Understanding CocoaPods, a dependency manager for Swift and Objective-C projects, is a critical skill every iOS developer should have. If you have no experience with CocoaPods, this short post is written for you. We’re going to take a look at what CocoaPods is, why you should start using it, and how to setup a project with cocoa pods installed!
While most of our tutorials are very detailed, this tutorial is much shorter than a traditional article and only intended to get you off the ground with Cocoapods.
What is CocoaPods?
CocoaPods is a dependency manager for Swift and Objective-C projects. If you’ve ever used Node.js, Ruby on Rails, Python, etc., you’re probably familiar with the concept of a dependency manager. If not, that’s okay! A dependency manger is a tool that manages a set of frameworks and packages for developers. So instead of having to manually import files via drop and drop, a dependency manager like CocoaPods takes care of all that for you.
Consider this sample scenario: You’re working on an app and need to make use of a third party framework like Firebase.
Firebase relies on several other frameworks to work. In order to use it, you have to import all the frameworks Firebase requires, plus Firebase itself. This is a tedious process if you have to do it manually.
Let’s take this example even further. If Firebase ships an update to their SDK, you’ll have to redownload the entire SDK and replace it manually.
This is why CocoaPods has its place. It simplifies the whole process by automatically finding and installing the frameworks, or dependencies require. You will understand the power of CocoaPods in a minute.
Setting Up CocoaPods on Your Mac
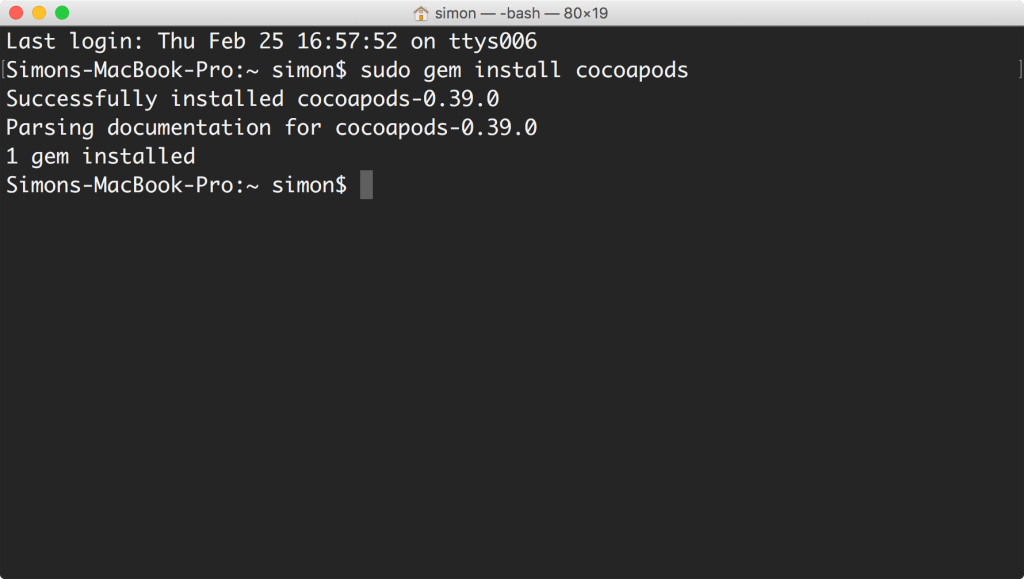
Setting up Cocoapods is simple and straightforward, and a very rewarding process. To install Cocoapods, navigate to the terminal and type the following commands:
|
1 |
sudo gem install cocoapods |
This line of command installs the CocoaPods gem on your system. CocoaPods was built with Ruby, so it relies on the default Ruby available on OS X for installation. If you’re familiar with Ruby, gems in Ruby are similar to pods in CocoaPods.
You may be prompted to enter your root password and then hit enter. Note that the password will not appear on screen as terminal does not display passwords.
It’ll take several minutes to finish the installation. Just be patient, grab a cup of coffee, and wait the whole process to complete.
Using CocoaPods for Xcode Projects
Once you have CocoaPods installed on your Mac, let’s see how to use it. We will create a sample project and demonstrate how you can install the Firebase framework in the project using CocoaPods.
First, create a new Xcode project and name it CocoapodsTest. Close the project and back in terminal. Use the cd (change directory) command to navigate to your new Xcode project. Assuming you save the project under Desktop, here is the command:
|
1 |
cd ~/Desktop/CocoapodsTest |
Next, we need to create what’s called a Podfile. A Podfile is a file that lives in the root of your project and is responsible for keeping track of all the pods you want to install. When you ask CocoaPods to install any pods or updates to your existing pods, CocoaPods will look to the Podfile for instructions.
To create a Podfile, simply type the following command:
|
1 |
pod init |
CocoaPod then generates the Podfile like this:
|
1 2 3 4 5 6 7 8 9 10 |
# Uncomment this line to define a global platform for your project # platform :ios, '9.0' target 'CocoapodsTest' do # Comment this line if you're not using Swift and don't want to use dynamic frameworks use_frameworks! # Pods for CocoapodsTest end |
That’s the basic structure of a Podfile. All you need to do is edit the file and specify your required pods. We are going to use a text editor called Vim to edit the file. Vim is a program built into every Mac that allows developers to edit content within terminal. That said, you’re free to use other text editors like Atom.
Type the following command to open the file with vim:
|
1 |
vim Podfile |
Suppose you’re going to use Firebase in your Xcode project. To do so, edit the file content like this to configure the Firebase pod.
|
1 2 3 4 5 6 7 8 9 10 |
# Uncomment this line to define a global platform for your project # platform :ios, '9.0' target 'CocoapodsTest' do # Comment this line if you're not using Swift and don't want to use dynamic frameworks use_frameworks! # Pods for CocoapodsTest pod 'Firebase' end |
That’s it. To exit vim, hit the escape key and then type:
|
1 |
:wq |
This means write and quit, which will close vim with your changes saved.
Before we move to the last step, let us go through the above configuration:
- The Podfile describes the dependencies of the targets of your Xcode project. Therefore, we have to specify the target, which is CocoapodsTest for this demo.
- The
use_frameworksoption tells CocoaPods to use frameworks instead of static libraries. This is required for Swift projects. - The line that we have just inserted (
pod 'Firebase') lets CocoaPods know that we need to use theFirebasepod. You may wonder how do you know the pod name. Normally you can look it up in the documentation of the pod or simply search it on cocoapods.org.
Now that you should have a better understanding of the pod file, type the following command in the terminal to complete the last step:
|
1 |
pod install |
Cocoapods will now install the Firebase pod! After downloading the Firebase pods, it creates a workspace file named CocoapodsTest.xcworkspace. This workspace file bundles your original Xcode project, the Firebase library, and its dependencies.
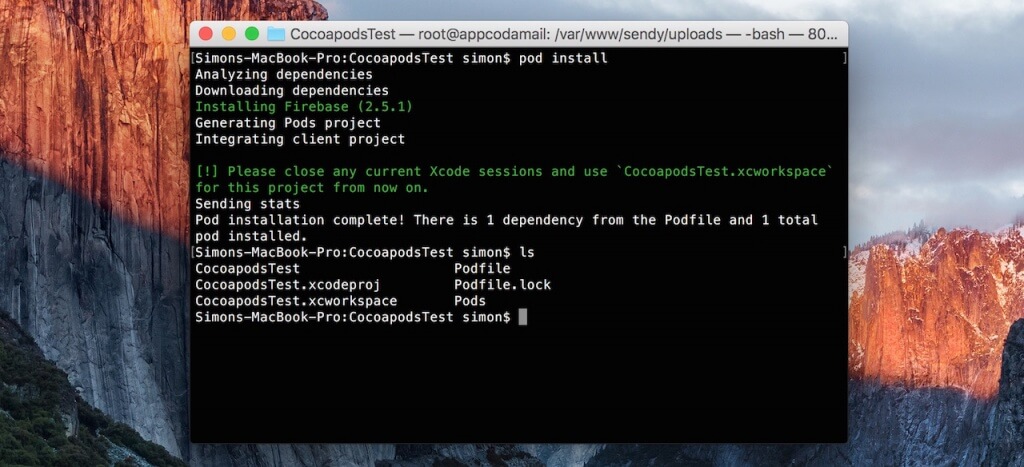
So from now on, you have to use CocoapodsTest.xcworkspace instead of CocoapodsTest.xcodeproj.
Opening the Xcode Workspace
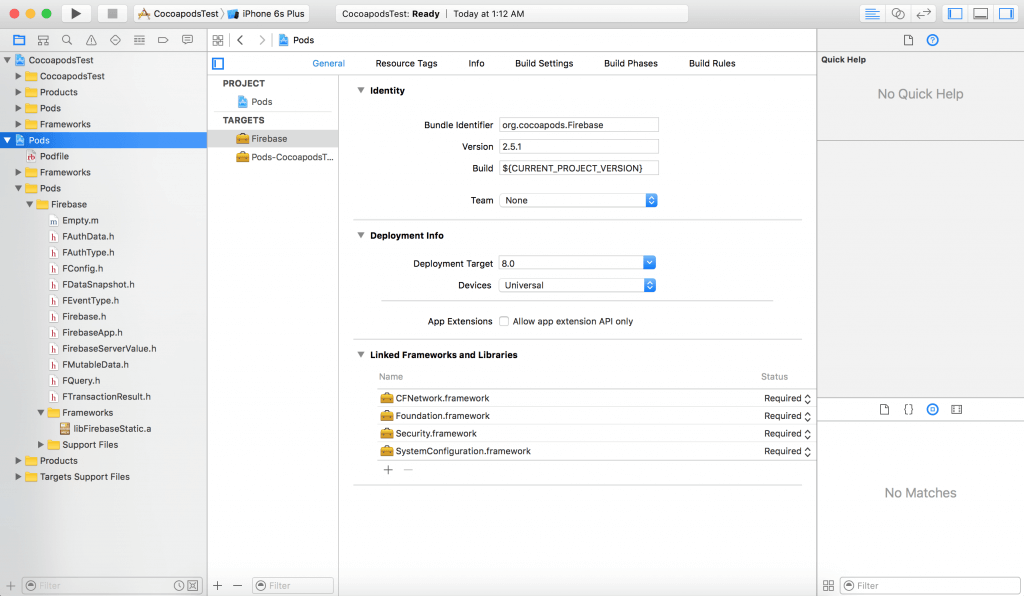
If you open CocoapodsTest.xcworkspace with Xcode, you should find both the CocoapodsTest project and the Pod project, which contains the Firebase library.
Now all there’s left to do is use the Firebase pod. Let’s navigate back to Xcode and inside the IDE, go to ViewController.swift. At the top, type:
|
1 |
import Firebase |
And look at that! You are up and running with CocoaPods!
Wrapping Up
CocoaPods is an incredibly simple tool that every iOS developer should have in his/her backpocket. I hope this tutorial is clear cut and easy to follow. If you have any thoughts or questions, please leave them in the comment.

Gregg Mojica is a software engineer & CEO at Clovis, a startup focusing on voice technology. When not hard at work building frontend, backend, and everything-else-end code, he enjoys writing, sharing his knowledge, and photography. Gregg has published several apps on the app store and worked at various startups. You can follow him on Twitter or connect with him on LinkedIn.