One of the greatest improvements in the technology of Central Processing Units (CPUs) since their existence is the capability to contain multiple cores and therefore to run multiple threads, which means to serve more than one task at any given moment.
Serial execution of tasks or fake multitasking belongs to the history since many years now, and if you are not that young and remember old computers, or if you ever had the opportunity to get your hands on an old computer with an old operating system, then it’s easy to understand what I’m talking about. But, no matter how many cores a CPU contains or how much powerful it might be, it can become totally useless if developers don’t take advantage of these possibilities. And this is where multitasking and multithreaded programming gets into play. Developers not only can, but actually have to take advantage of the multitasking capabilities of the CPU on any device, and this can be done by breaking a program’s parts into chunks that will be executed in parallel on more than one threads.
The advantages are many, and the most important ones include the execution of demanding tasks in less time, best user experience, no frozen user interfaces, and so on. Think for example how awful apps would be if they had to download a bunch of images on the main thread and the UI would become totally unresponsive until that task would be over; users would never use such kind of apps.
In iOS, Apple provides two ways to do multitasking: The Grand Central Dispatch (GCD) and NSOperationQueue frameworks. Both of them work perfectly when it’s time to assign tasks to different threads, or different queues other than the main one. Which one should be use is a subjective matter, but in this tutorial we’ll focus on the first one, the GCD. No matter what, there’s one rule that should be always respected: The main thread must be always remain free so it serves the user interface and user interactions. Any time-consuming or CPU demanding tasks should run on concurrent or background queues. Maybe this is difficult for new developers to digest and apply, however it’s the way things should be.
The Grand Central Dispatch was first introduced in iOS 4, and it offers great flexibility and options when trying to achieve concurrency, performance, and parallel tasks. It had a great disadvantage though until Swift 3: It was difficult to memorise its commands or easily write code regarding it, as its coding style was quite close to low level C, and it was obviously different than any other coding style in Swift, even in Objective-C. That was also the main reason that many developers were avoiding GCD on purpose, and they were choosing the NSOperationQueue. A simple web search about GCD in Swift versions other than the last one will give you a good taste of how GCD syntax had been.
In Swift 3 things have dramatically changed. The way GCD is used is brand new, totally Swift-like, and the new syntax makes it a lot easier for developers to get familiarised with it. These changes gave me the motivation to write a post about the most basic and important things one can do with GCD in Swift 3. If you were using GCD with its old coding style (even a little), then this whole new syntax will seem like a piece of cake; if not, then you’re just about to learn about a new programming chapter.
But before we go through all the specific topics of this post, let’s talk a bit about some specific concepts. First off, the dominating phrase in GCD is the dispatch queue. A queue is actually a block of code that can be executed synchronously or asynchronously, either on the main or on a background thread. Once a queue is created, the operating system is the one that manages it and gives it time to be processed on any core of the CPU. Multiple queues are managed accordingly, and that management is something that developers don’t have to deal with. Queues are following the FIFO pattern (First In, First Out), meaning that the queue that comes first for execution will also finish first (think of it like a queue of humans waiting in front of the counter, the first one is served first, the last one is served last). We will make that clear in one of our first examples later.
Next, another important concept is the work item. A work item is literally a block of code that is either written along with the queue creation, or it gets assigned to a queue and it can be used more than once (reused). The work item is what you think of exactly: It’s the code that a dispatch queue will run. The execution of work items in a queue also follows the FIFO pattern. This execution can be synchronous or asynchronous. In the synchronous case, the running app does not exit the code block of the item until the execution finishes. On the other hand, when queues are scheduled to run asynchronously, then the running app calls the work item block and it returns at once. Once again, we’ll see all those differences later in action.
Having mentioned the above meanings (dispatch queues and work items), it’s time to also say that a queue can be either serial or concurrent. In the first case, a work item starts to be executed once the previous one has finished (unless of course it’s the first item assigned in the queue), while in the second case the work items are executed in parallel.
You should be always cautious when assigning tasks to the main queue of an app. This one should remain always available to serve the user’s interactions and the UI requirements. Speaking of that, and that’s another rule, any changes you want to apply to the UI must be always done on the main thread. If you ever try to make UI updates on a background thread, then it’s not guaranteed if and when the updates will take place, and most possibly you’ll have unpleasant surprises on the user’s experience. However, any prior work needed to be done so you can create or update the UI, can absolutely take place on the background. For example, you can download the data for an image on a secondary, background dispatch queue, but you’ll update the respective image view on the main thread.
Keep in mind that it’s not always necessary to create your own queues. The system creates global dispatch queues that can be used for any kind of tasks you want to run. Regarding the thread that a queue will run to, iOS maintains what Apple calls a pool of threads, meaning a collection of threads other than the main one, and the system chooses one or more of them to use (depending always on how many queues you create, and how you create them). Which threads will be used are undefined to the developer, as the operating system “decides” depending on the number of other concurrent tasks, the load on the processor, etc, but seriously, who would like to deal with all these?
Our Testing Environment
In this post we are going to use small, specific examples for the GCD concepts that we’ll meet next. Normally, and given the fact that we’re not going to make a demo app, we could just use an Xcode Playground to work on, however this cannot be done with GCD. Calling functions from different threads does not work in Playgrounds. Some of our examples would run there of course, but not all. So, we’ll overcome any potential problems by using a normal project, and for your ease just grab this one and open it.
That project is almost empty, except for those two additions:
- In the
ViewController.swiftfile you’ll find a list of methods defined but not implemented. In each one of them we’ll meet a new feature of GCD, and all you need to do is to comment out the proper one in theviewDidLoad(_:)method so they get invoked. - In the
Main.storyboard,ViewControllerscene you’ll find an image view added, and the respective IBOutlet property connected to the ViewController class. We’ll need that image view for a real world example later.
Let’s get started now.
Getting Started With Dispatch Queues
In Swift 3, the simplest way to create a new dispatch queue is the following:
|
1 |
let queue = DispatchQueue(label: "com.appcoda.myqueue") |
The only thing you need to provide is a unique label for the queue, and that’s all. The reverse DNS notation (“com.appcoda.myqueue”) works just fine as it’s easy to create unique labels, and it’s recommended even by Apple. However, it’s not mandatory, and you can use any string you’d like as long as the labels remain unique. But other than that, the above is not the only initialiser for a queue; you can provide more arguments upon initialisation that we’ll talk about in a while.
Once the queue is created, then we can execute code with it, either synchronously using a method called sync, or asynchronously using a method called async. As we’re just getting started, we’ll provide the code as a block (a closure). Later we’ll initialise and use dispatch work items (DispatchWorkItem) objects instead of a block (note that the block is also considered as a work item for a queue). We’ll begin with the synchronous execution, and we’ll do nothing more than just displaying numbers from 0 to 9:
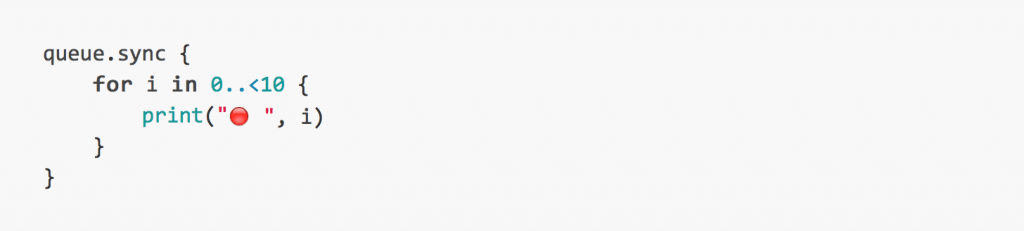
The red dot is to make the results easily distinguishable in the console, especially when we’ll add more queues or tasks to execute.
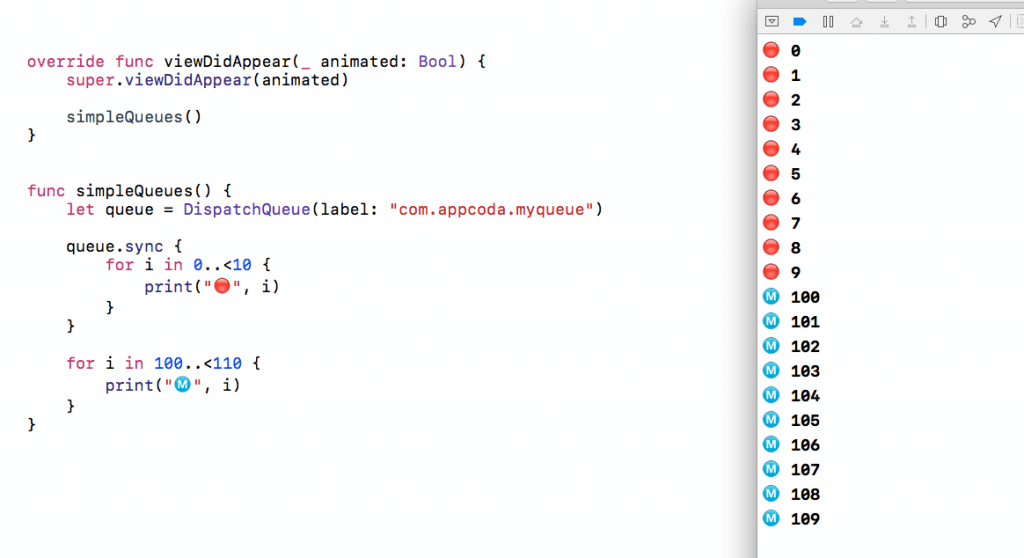
Grab and paste the above snippets in the simpleQueues() method in the ViewController.swift file of your starter project. Make sure that this method is not commented out in the viewDidAppear(_:) method, and then run it. Watching the Xcode console, you’ll see that nothing fancy happens; you’ll just see some numbers appearing, and that doesn’t help us to make any conclusions about how GCD works. So, update your code in the simpleQueues() method by adding another block of code right after the queue’s closure. Its purpose is to display numbers from 100 to 109 (just to make the difference):
|
1 2 3 4 5 |
for i in 100..<110 { print("Ⓜ️", i) } |
The above for loop will be executed on the main queue, while the first one will be run on the background. The program execution will stop though in the queue’s block; It won’t continue to the main thread’s loop and it won’t display the numbers from 100 to 109 until the queue’s task has finished. And that happens because we make a synchronous execution. You can see that in the console as well:
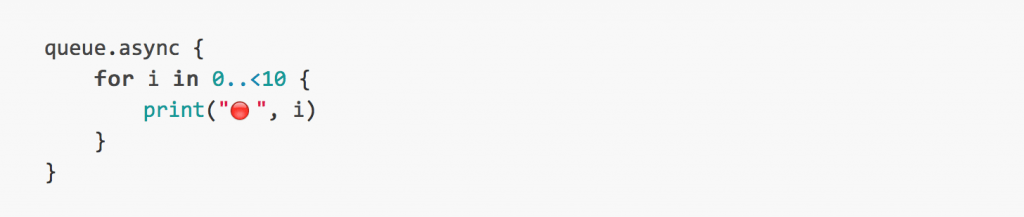
But what will happen if we use the async method and let the queue’s code block be executed asynchronously? Well in that case the program execution won’t stop waiting for the task of the queue to finish; it will immediately return to the main thread and the second for loop will be executed at the same time with the queue’s loop. Before we see that happening, update your queue’s execution by using the async method:
Now, run and watch the Xcode’s console:
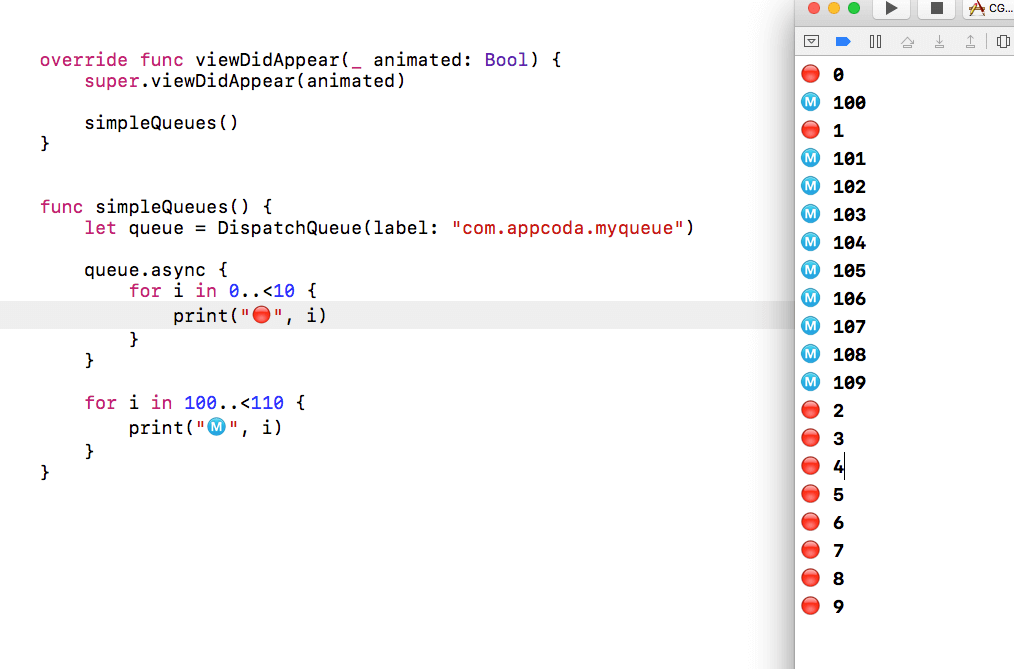
Comparing to the synchronous execution, this case is quite more interesting; you see that the code on the main queue (the second for loop) and the code of our dispatch queue run in parallel. Our custom queue could have actually get more running time at the beginning, but that’s just a matter of priorities (and we’ll see it next). The important here is to make clear that our main queue is free to “work” while we have another task running on the background, and this didn’t happen on the synchronous execution of the queue.
Even though the above examples are quite simple, it shows perfectly clear how a program behaves with queues running synchronously and asynchronously. We’ll keep the colourful results in the upcoming parts as well, just keep in mind that a specific color represents the results of code running on a specific queue, so different colors mean different queues.
Quality Of Service (QoS) and Priorities
It’s quite often necessary to tell the system which tasks of your app are more important than others and which need priority in execution when working with the GCD and dispatch queues. Of course, tasks running on the main thread have always the highest priority, as the main queue also deals with the UI and keeps the app responsive. In any case, by providing that information to the system, iOS prioritises the queues properly and gives the needed resources (like execution time on CPU) according to what you’ll specify. Needless to say that all the tasks will eventually finish. However, the difference lies to which tasks will finish sooner, and which later.
That information regarding the importance and priority of the tasks is called in GCD Quality of Service (QoS). In truth, QoS is an enum with specific cases, and by providing the proper QoS value upon the queue initialisation you specify the desired priority. If no QoS is defined, then a default priority is given by to the queue. The available options along with some documentation can be found here, and make sure that you’ll see that webpage. The following list summarises the available QoS cases, also called QoS classes. The first class means the highest priority, the last one the lowest priority:
- userInteractive
- userInitiated
- default
- utility
- background
- unspecified
Back to our project now, we’re going to work on the queuesWithQoS(). Let’s declare and initialise the following two new dispatch queues:
|
1 2 |
let queue1 = DispatchQueue(label: "com.appcoda.queue1", qos: DispatchQoS.userInitiated) let queue2 = DispatchQueue(label: "com.appcoda.queue2", qos: DispatchQoS.userInitiated) |
Notice that we assign the same QoS class in both of them, so they have the same priority during execution. Like we did previously, the first queue will contain a for loop that displays values from 0 to 9 (plus the red dot). In the second queue we’ll execute another for loop and we’ll display values from 100 to 109 (with a blue dot).
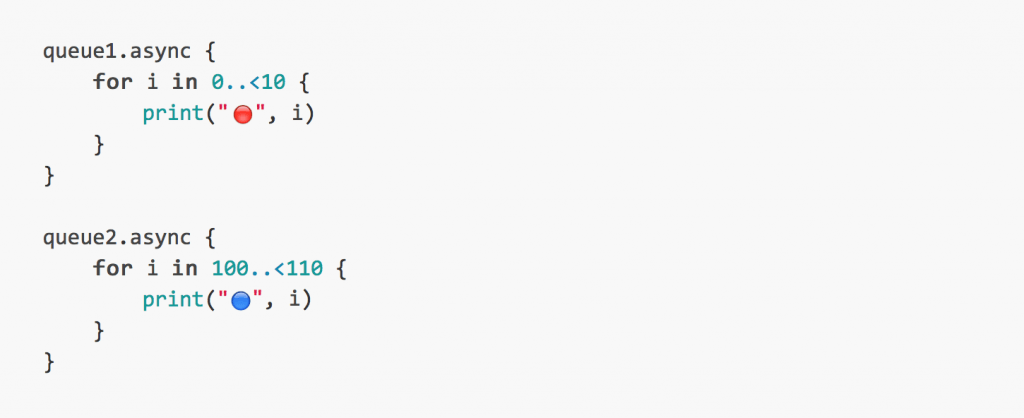
Let’s see now the results of execution knowing that both queues have the same priority (same QoS class) – don’t forget to uncomment the queuesWithQos() method in the viewDidAppear(_:):

It’s easy to say by looking at the above screenshot that both tasks are “evenly” executed, and actually this is what we expect to happen. Now, let’s change the QoS class of the queue2 to utility (lower priority) as shown next:
|
1 |
let queue2 = DispatchQueue(label: "com.appcoda.queue2", qos: DispatchQoS.utility) |
Let’s see what happens now:

Undoubtedly, the first dispatch queue (queue1) is executed faster than the second one, as it’s given a higher priority. Even though the queue2 gets an opportunity of execution while the first one is running, the system provides its resources mostly to the first queue as it was marked as a more important one. Once it gets finished, then the system takes care of the second queue.
Let’s do another experiment, and this time let’s change the QoS class of the first queue to background:
|
1 |
let queue1 = DispatchQueue(label: "com.appcoda.queue1", qos: DispatchQoS.background) |
This priority value is almost the lowest, so let’s see what happens when we run the code:

This time the second queue finishes faster, as the utility QoS class gives a higher priority against the background QoS class.
Ok, all the above makes clear how QoS classes work, but what happens if we perform a task on the main queue as well? Let’s add the following code at the end of our method:
|
1 2 3 4 5 |
for i in 1000..<1010 { print("Ⓜ️", i) } |
Also, let’s change once again the QoS class of the first queue by setting a higher priority:
|
1 |
let queue1 = DispatchQueue(label: "com.appcoda.queue1", qos: DispatchQoS.userInitiated) |
Here are the results:

Once again, we see that the main queue has a high priority by default, and the queue1 dispatch queue is executed in parallel to the main one. The queue2 finishes last and doesn’t get many opportunities in execution while the tasks of the other two queues are being executed, as it has the lowest priority.
Concurrent Queues
So far we’ve seen how dispatch queues work synchronously and asynchronously, and how the Quality of Service class affects the priority that the system gives to them. The common thing to all the previous examples is the fact that our queues are serial. That means that if we would assign more than one tasks to any queue, then those tasks would have been executed one after another, and not all together. In this part we’ll see how we can make multiple tasks (work items) run at the same time, or in other words we’ll see how to make a concurrent queue.
In our project, we’ll go to the concurrentQueues() method (and we’ll uncomment the respective line in the viewDidAppear(_:)). In this new method let’s create the following new queue:
|
1 |
let anotherQueue = DispatchQueue(label: "com.appcoda.anotherQueue", qos: .utility) |
Now, let’s assign the following tasks (or alternatively named work items) to the queue:

When this code is run, the tasks will be executed in a serial mode. This is clear in the following screenshot:

Next, let’s modify the initialisation of the anotherQueue queue:
|
1 |
let anotherQueue = DispatchQueue(label: "com.appcoda.anotherQueue", qos: .utility, attributes: .concurrent) |
There’s a new argument in the above initialisation: The attributes parameter. When this parameter is present with the concurrent value, then all tasks of the specific queue will be executed simultaneously. If you don’t use this parameter, then the queue is a serial one. Also, the QoS parameter is not required, and we could have omitted it in this initialisation without any problem.
By running the app again, we notice that the tasks are executed pretty much in parallel:

Note that by changing the QoS class the execution of the tasks is affected as well. However, as long as you initialise the queue as a concurrent one, then the parallel execution of the tasks will be respected, and all of them they’ll get their time to run.
The attributes parameter can also accept another value named initiallyInactive. By using that, the execution of the tasks doesn’t start automatically, instead the developer has to trigger the execution. We’ll see that, but a few modifications are required. First of all, declare a class property called inactiveQueue as shown below:
|
1 |
var inactiveQueue: DispatchQueue! |
Now let’s the queue initialisation, and let’s assign it to the inactiveQueue:
|
1 2 |
let anotherQueue = DispatchQueue(label: "com.appcoda.anotherQueue", qos: .utility, attributes: .initiallyInactive) inactiveQueue = anotherQueue |
The use of a class property in that case is necessary, because the anotherQueue is defined in the concurrentQueues() method and it’s visible only there. The app won’t know about it when it’ll exit the method, we won’t be able to activate the queue, but most importantly we’ll get a crash on runtime.
At this point run the app again, and you’ll see that there’s no output at all. That was expected. We can fire the dispatch queue by adding the following lines in the viewDidAppear(_:) method:
|
1 2 3 |
if let queue = inactiveQueue { queue.activate() } |
The activate() method of the DispatchQueue class will make the tasks run. Note that as the queue has not been marked as a concurrent one, they’ll run in a serial order:

The question now is, how can we have a concurrent queue while it’s initially inactive? Simply, we provide an array with both values, instead of providing a single value as the argument for the attributes parameter:
|
1 |
let anotherQueue = DispatchQueue(label: "com.appcoda.anotherQueue", qos: .userInitiated, attributes: [.concurrent, .initiallyInactive]) |

Delaying the Execution
Sometimes it’s required by the workflow of the app to delay the execution of a work item in a block. CGD allows you to do that by calling a special method and setting the amount of time after of which the defined task will be executed.
This time we’ll write code in the queueWithDelay() method that already exists in the starter project. We’ll begin by adding the following lines:
|
1 2 3 4 5 |
let delayQueue = DispatchQueue(label: "com.appcoda.delayqueue", qos: .userInitiated) print(Date()) let additionalTime: DispatchTimeInterval = .seconds(2) |
Initially, we create a new DispatchQueue as usually; we’ll make use of it right next. Then, we print the current date for future verification of the waiting time of the task, and lastly we specify that waiting time. The delay time is usually a DispatchTimeInterval enum value (internally that’s interpreted as an integer value) that is added to a DispatchTime value to specify the delay (this addition comes next). In our specific example above we set two seconds as the waiting time for the task’s execution. We use the seconds method, but besides that the following ones are also provided:
- microseconds
- milliseconds
- nanoseconds
Let’s use the queue now:
|
1 2 3 |
delayQueue.asyncAfter(deadline: .now() + additionalTime) { print(Date()) } |
The now() method returns the current time, and in that value we add the additional time we want for the delay. If we run the app now, here’s what we see on the console:

Indeed, the task of the dispatch queue was executed two seconds later. Note that there’s an alternative to specify the waiting time. If you don’t want to use any of the predefined methods mentioned above, you can directly add a Double value to the current time:
|
1 2 3 |
delayQueue.asyncAfter(deadline: .now() + 0.75) { print(Date()) } |
In this case, the task will be executed 0.75 seconds after the current time. Also, you can avoid using the now() method, but you have to provide a DispatchTime value as an argument on your own. What I showed above is the simplest way for delaying the execution of a work item in a queue, and actually you don’t need anything else further than that.
Accessing the Main and Global Queues
In all the previous examples we manually created the dispatch queues we used. However, it’s not always necessary to do that, especially if you don’t desire to change the properties of the dispatch queue. As I have already said in the beginning of this post, the system creates a collection of background dispatch queues, also named global queues. You can freely use them like you would do with custom queues, just keep in mind not to abuse the system by trying to use as many global queues as you can.
Accessing a global queue is as simple as that:
|
1 |
let globalQueue = DispatchQueue.global() |
You can use it as any other queue we’ve seen so far:

There are not many properties that you can change when using global queues. However, you can specify the Quality of Service class that you want to be used:
|
1 |
let globalQueue = DispatchQueue.global(qos: .userInitiated) |
If you don’t specify a QoS class (like we did in the first case), then the default case is used by default.
Using or not global queues, it’s almost out of the question the fact that you’ll need to access the main queue quite often; most probably to update the UI. Accessing the main queue from any other queue is simple as shown in the next snippet, and upon call you specify if it’s a synchronous or an asynchronous execution:
|
1 2 3 |
DispatchQueue.main.async { // Do something } |
Actually, you’ll see all the available options you have for the main queue just by typing the DispatchQueue.main. part; Xcode will autosuggest you all the methods that can be called in the main queue, but the above is what you need most of the times (in truth, that’s something that generally applies, and the available methods for any queue are auto-suggested by Xcode after typing the queue’s name and pressing the dot “.” symbol). You can also add a delay to the block execution accordingly to what we saw in the previous part.
Let’s have a real world example now on how we can use the main queue to update our UI. In the starter project that you’re working on, the ViewController scene in the Main.storyboard file contains an image view, and the respective IBOutlet property has been connected to the ViewController class. Here, we’ll go to the fetchImage() (still empty) method, and we’ll the required code to download the Appcoda logo and show it on the image view. The following code does that think exactly (I won’t discuss anything at this point about the URLSession class and how it’s used):
|
1 2 3 4 5 6 7 8 9 10 11 |
func fetchImage() { let imageURL: URL = URL(string: "http://www.appcoda.com/wp-content/uploads/2015/12/blog-logo-dark-400.png")! (URLSession(configuration: URLSessionConfiguration.default)).dataTask(with: imageURL, completionHandler: { (imageData, response, error) in if let data = imageData { print("Did download image data") self.imageView.image = UIImage(data: data) } }).resume() } |
Notice that we are not actually updating the UI on the main queue, instead we’re trying to do so on the background thread that the completion handler block of the dataTask(...) method runs to. Compile and run the app now and see what happens (don’t forget to make a call to the fetchImage() method):

Even though we get the information that the image has been downloaded, we’re unable to see it in the image view because the UI has not been updated. Most probably, the image will be displayed several moments later after the initial message (something that is not guaranteed that will happen if other tasks are being executed in the app as well), but problems don’t stop there; you’ll also get a really long error log complaining about the UI updates made on a background thread.
Now, let’s change that problematic behaviour and let’s use the main queue to modify our user interface. While editing the above method, change the part shown below only, and notice how we make use of the main queue:
|
1 2 3 4 5 6 7 |
if let data = imageData { print("Did download image data") DispatchQueue.main.async { self.imageView.image = UIImage(data: data) } } |
Run the app again, and see that the image view gets its image this time right after it gets downloaded. The main queue was really invoked and updated our UI.
Using DispatchWorkItem Objects
A DispatchWorkItem is a block of code that can be dispatched on any queue and therefore the contained code to be executed on a background, or the main thread. Think of it really simply; as a bunch of code that you just invoke, instead of writing the code blocks in the way we’ve seen in the previous parts.
The simplest way to use such a work item is illustrated right below:
|
1 2 3 |
let workItem = DispatchWorkItem { // Do something } |
Let’s see a small example to understand how DispatchWorkItem objects are used. Go to the useWorkItem() method, and for starters add the following code:
|
1 2 3 4 5 6 7 |
func useWorkItem() { var value = 10 let workItem = DispatchWorkItem { value += 5 } } |
The purpose of our work item is to increase the value of the value variable by 5. We use the workItem object by calling the perform() method as shown:
|
1 |
workItem.perform() |
That line will dispatch the work item on the main thread, but you can always use other queues as well. Let’s see the following example:
|
1 2 3 4 |
let queue = DispatchQueue.global() queue.async { workItem.perform() } |
This will also perfectly work. However, there’s a faster way to dispatch a work item like that one; The DispatchQueue class provides a convenient method for that purpose:
|
1 |
queue.async(execute: workItem) |
When a work item is dispatched, you can notify your main queue (or any other queue if you want) about that as shown next:
|
1 2 3 |
workItem.notify(queue: DispatchQueue.main) { print("value = ", value) } |
The above will print the value of the value variable on the console, and it’s invoked when the work item is dispatched. Putting everything together, the following is the useWorkItem() method in one piece:
|
1 2 3 4 5 6 7 8 9 10 11 12 13 14 15 16 17 |
func useWorkItem() { var value = 10 let workItem = DispatchWorkItem { value += 5 } workItem.perform() let queue = DispatchQueue.global(qos: .utility) queue.async(execute: workItem) workItem.notify(queue: DispatchQueue.main) { print("value = ", value) } } |
Here’s what you’ll get by running the app (and have called already the above method in the viewDidAppear(_:)):

Summary
Most of the times, what you’ve seen in this post is quite enough all you need for doing multitasking and concurrent programming. However, keep in mind that there are GCD concepts not touched in this tutorial, or some others already discussed, but not seen up to the last detail. The purpose for that is that I wanted to keep it simple, so the content is understandable and comprehensive by developers of all levels and skills. If you generally don’t use CGD, consider seriously to give it a try and unload your main queue from heavy operations; if there are tasks that can be executed on the background, then send them on the background. In any case, it’s not that difficult to use GCD, and only positive results one can have by making apps more responsive and faster. Have fun with GCD!
For the demo project, you can check it out on GitHub.

Gabriel has been a software developer for almost about two decades and he’s got long experience in programming using various languages. iOS development is what he’s being doing since 2010. On top of that, he’s added macOS programming to his repertoire over the last few years. Using Swift of course! Follow Gabriel at Google+ and Twitter.