

Parse, the mobile app platform, has one particularly interesting product: Parse Core. One of its features allows app developers to store data in the cloud, without worrying about setting up servers and designing a REST API. Parse Core is also locally backed, like Core Data, which makes it a very good solution for online-offline back-ends.
This tutorial explains how to create an app that’s backed by Parse. We’ll create an Instagram-like app with these features:
- Load data from Parse, store it locally.
- Save data to Parse, write it back to the cloud.
- Upvote, or like, pictures of cats.
The app will be entirely created with Swift, Apple’s new programming language for making iOS apps. Parse isn’t yet rewritten in Swift, so we’ll have to create a Bridging Header to work with it.
This is what you’ll learn:
- Working with Parse, retrieving and saving data in the cloud.
- Integrating a Swift project with Objective-C frameworks, with Cocoapods.
- Setting up views and a custom table view cell with Interface Builder.
- Coding an entire app with Swift, from scratch.
- Working with Auto Layout and constraints.
- Using gesture recognizers, optionals, conditions, closures, properties, outlets and actions.
Let’s Get Started
First, make sure you have a Parse account. You can sign up at Parse.com with your Facebook, Google+ or GitHub account, or by entering your email address.
Then, log in to Parse and go to your apps Dashboard over at https://www.parse.com/apps.
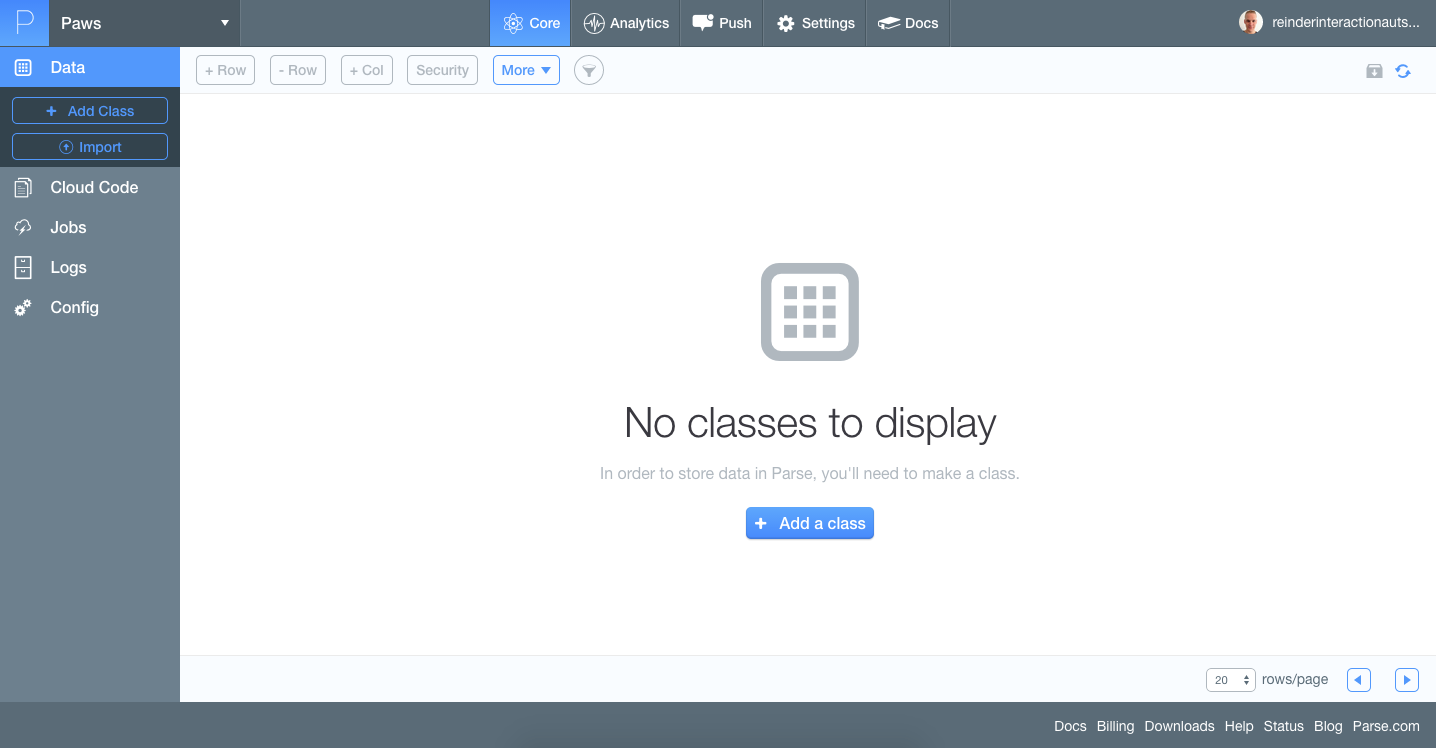
Create a new app by clicking the Create a new App button up top. Enter “Paws” as the name for our app. Then, open the new app and make sure you’re seeing the Core tab. It’ll look like the image below.
Creating The Datastore
Parse is technically just an online database. Data is stored as objects that have a name and a number of fields, like a spreadsheet. Such an object is called a class, and it functions as the blueprint of a data structure. The class we’ll be working with is called Cat.
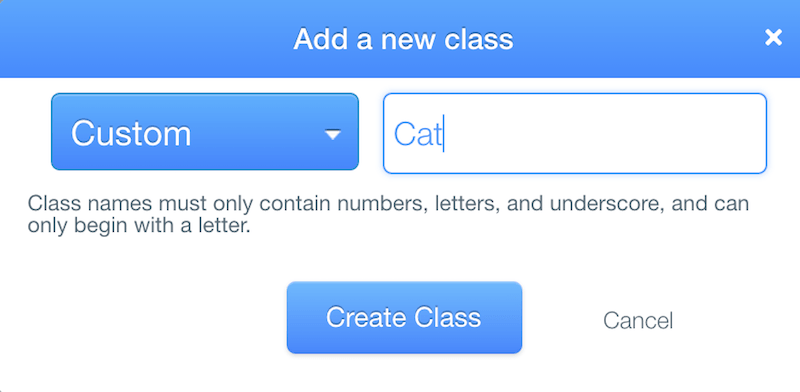
In the Core tab, click the button Add a class. Make sure the dropdown box says Custom, and type the name of the class: Cat. Then, click Create class.
Parse creates the new class for us and adds a bunch of standard fields, such as objectId, createdAt, updatedAt and ACL. Let’s add some more fields!
With the + Col button up top, add the following fields, with name and type:
- Name: name, type: String.
- votes, type Number.
- url, type String.
- cc_by, type String.
These fields will hold the basic information for our cat database.
Importing The Data
Now that we’ve got the structure set up, we can import the data! Save this file to your computer: Cat.json.
Then, back at the Core tab and our database, click the Import button up left. Select the file you just saved and upload it. Make sure the Collection Type “Custom” is selected, and rename the collection to Cat (not rs1_Cat). Then click Finish Import. Parse will notify when your import is complete, which is usually instant, so click Got it! and reload the page.
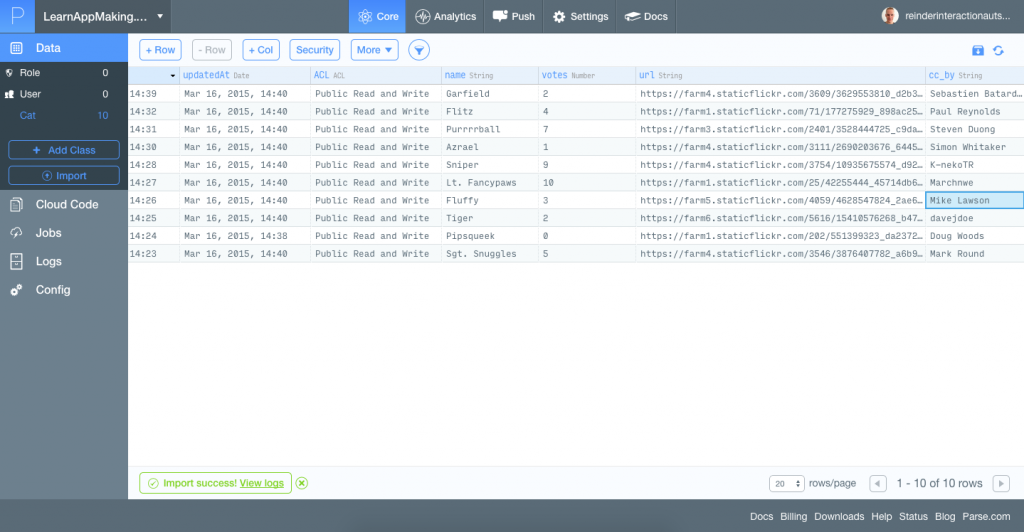
If all went well, you should now see that the database is filled with 10 cats. They all have a name, a URL, some votes and a field for the original author of the picture.
That’s all we need to do in Parse, for now. Let’s set up the Swift Xcode project.
Setting Up The Xcode Project
Open Xcode and create a new project, right from the start screen or by using menu File -> New -> Project.
Pick from category iOS -> Application the template Single View Application. In the next screen, input the following fields:
- Product Name: Paws
- Organization Name: Anything
- Organization Identifier: Anything, like com.appcoda
- Language: Swift
- Devices: Universal
- Use Core Data must be unchecked
Click Next and pick a folder for your project, then click Create.
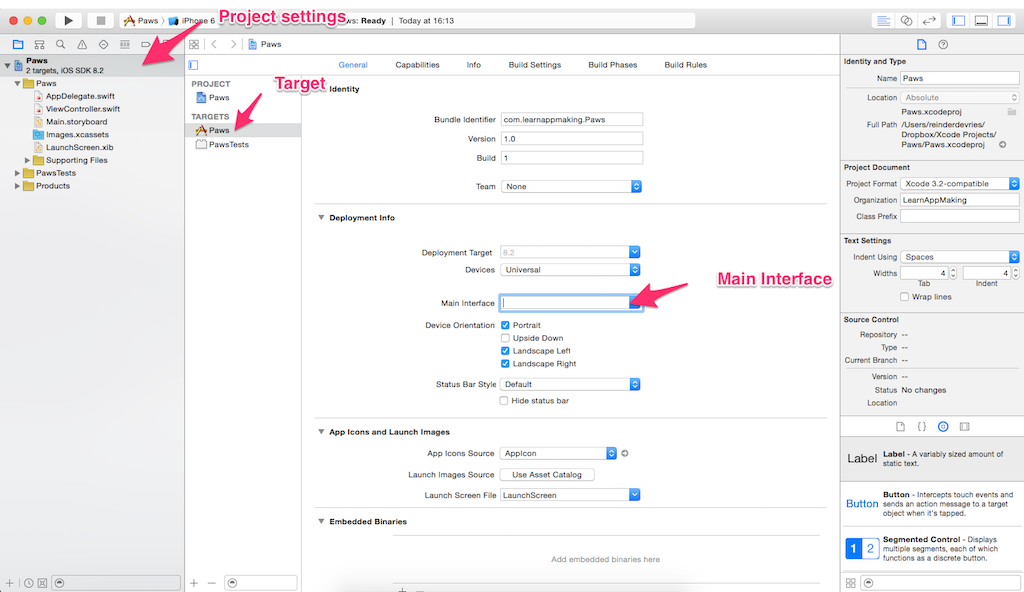
We’re not going to use Storyboards, so open the Project settings by clicking the thick bar up left that says Paws, 2 targets, iOS SDK. In the list on the left, click Paws under Target and then locate the Main Interface setting in the main area of the screen. Remove the text Main from the box.
Adding The Parse Library To Xcode With Cocoapods
Before we can use Parse in the code of the app, we have to include it as a dependency. For that we use Cocoapods, which is a package manager. Many app projects rely on third-party libraries, such as Parse, and Cocoapods is a tool that allows easy inclusion of libraries and ensures they’re up to date.
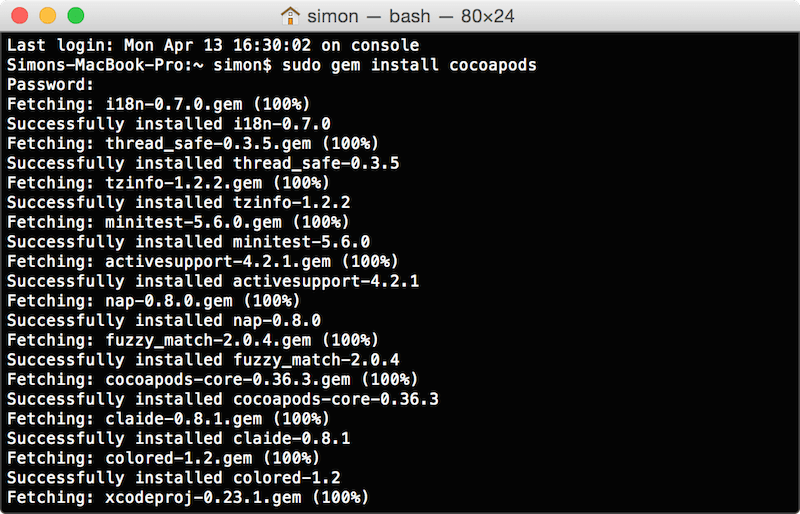
Install Cocoapods by executing the following command in Terminal. It’ll ask you to enter your Mac user password. Don’t include the $ sign. The sign simply indicates a shell command!
$ sudo gem install cocoapods
Don’t worry if there appears to be no progress for a couple of minutes, Cocoapods is just installing. When it’s finished, you should see a bunch of lines and ultimately … gems installed.
Next, create an empty file in the root of the Xcode app project directory and call the file Podfile. Open it with your favorite text editor and paste the following line in it:
pod ‘Parse’, ‘~> 1.7.1’
pod ‘ParseUI’, ‘~> 1.1.3’
The Podfile tells Cocoapods which libraries we want to use, and in this case it’s Parse version 1.7.1 and ParseUI version 1.1.3.
Now, close Xcode and use Terminal to go to the root directory of the app project. Write in Terminal cd, then look up the Paws directory in Finder and drag it to Terminal.
Next, type this on the command-line:
$ pod install
CocoaPods will look for the Podfile and attempt to install the dependencies we set. It can take a couple of minutes. The result should something like this:
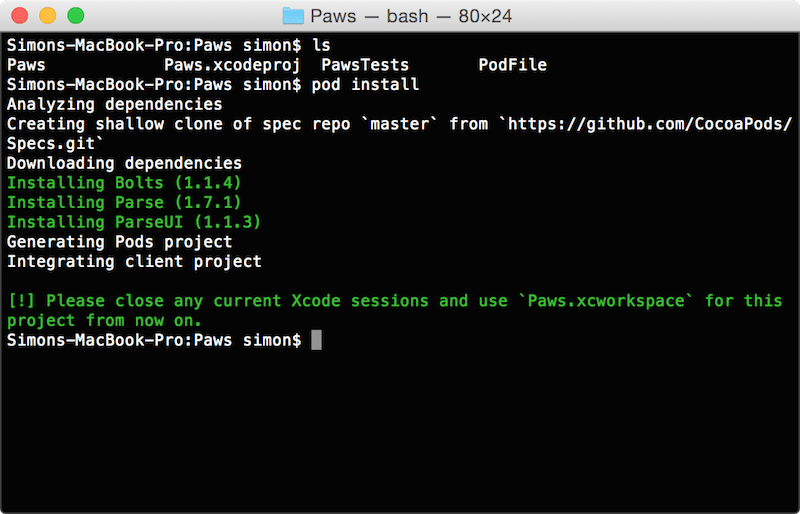
CocoaPods has downloaded and compiled Parse, and it’s dependencies, and added it to a new Workspace. From now on, we won’t be using the original app project, but we’ll be using the Workspace that CocoaPods created. It contains our original project and the CocoaPods project.
Before we can get to coding the app, we need to create a connection between Parse and our project. Parse is written in Objective-C, and our project is written in Swift, and those two don’t mix and match without proper setting up.
Using Objective-C in Swift Project
Any Objective-C library, project or class can be used with Swift by setting up a Bridging Header. Technically, such a bridge will translate header files from Objective-C to Swift.
Create a bridging header by doing the following:
- Add a new file to the Paws directory by right-clicking on the Paws directory in the Paws project, then click New File….
- From the iOS -> Source category, pick the Objective-C File template and click Next.
- Name the class “Paws” (or whatever you like), then press continue to proceed and save the file. When prompted, click “Yes” to configure an Objective-C bridging header.

Xcode creates two new files: Paws.m and Paws-Bridging-Header.h. We do not need the Paws.m file, so you can simply delete it. In the Paws-Bridging-Header.h file and write the following code:
#import
#import
#import
Whole lot of work for just setting up a coding project, right? Don’t worry, we’ll get to the fun stuff any minute now. Remember this: Parse’s saving us days of work by offering a ready to use online back-end!
Verifying That Parse Works
Go back to the Parse Dashboard, over at https://parse.com/apps. Hover over your account name top-right, then click Account, then click the App keys tab up top. You can also go to https://parse.com/account/keys directly.
The page will show you your App Keys, needed to identify the app with the Parse webservice later on. Such keys consist of a bunch of alpha-numeric characters, and should be kept private. They’re basically passwords for apps.
Next, open file AppDelegate.swift in Xcode. Locate the application didFinishLaunchingWithOptions method.
Add the following line of code to the method, make sure it’s the first line of the method. The entire method should look something like this:
func application(application: UIApplication, didFinishLaunchingWithOptions launchOptions: [NSObject: AnyObject]?) -> Bool
{
    Parse.setApplicationId("...", clientKey: "...")

    return true
}
Replace the … with the App Keys from Parse, respectively:
- First, the Application ID.
- Second, the Client Key.
Then, attempt to run the application:
- Make sure the right device is selected, by checking that up top right of the Play button a device is selected, such as your iPhone or iPhone 6.
- Then, hit the Play button or press Command-R.
The project should build and run without errors. Upon runtime, so when you can see the iPhone, it should have a black screen and then complain that the window is nil – that’s because we removed the MainInterface storyboard and haven’t yet replaced it.
The good news is: you’ve successfully set up your project with Parse and CocoaPods!
Creating The Table View Controller
To show the cats of the Paws app, we’ll use a table view controller. It’s a very common iOS interface element, showing individual rows of data in a vertical list. A great example is the Contacts app on iPhone: a vertical list of persons and phone numbers. In Objective-C and Swift, a table view controller manifests itself as the UITableViewController class.
Parse has a terrific counterpart called ParseUI, a collection of UI elements that are tightly integrated with Parse’s products. We’ll be using the PFQueryTableViewController class. It extends the functionality of UITableViewController with the data from Parse; a perfect fit.
Let’s start by creating a new Swift class called CatsTableViewController. In the Project navigator, right-click on the Paws directory and choose New file. Pick the Cocoa Touch Class template from iOS -> Source. Enter the following settings:
- Class: CatsTableViewController
- Subclass of: PFQueryTableViewController
- Language: Swift
- Make sure Also create XIB file is unchecked
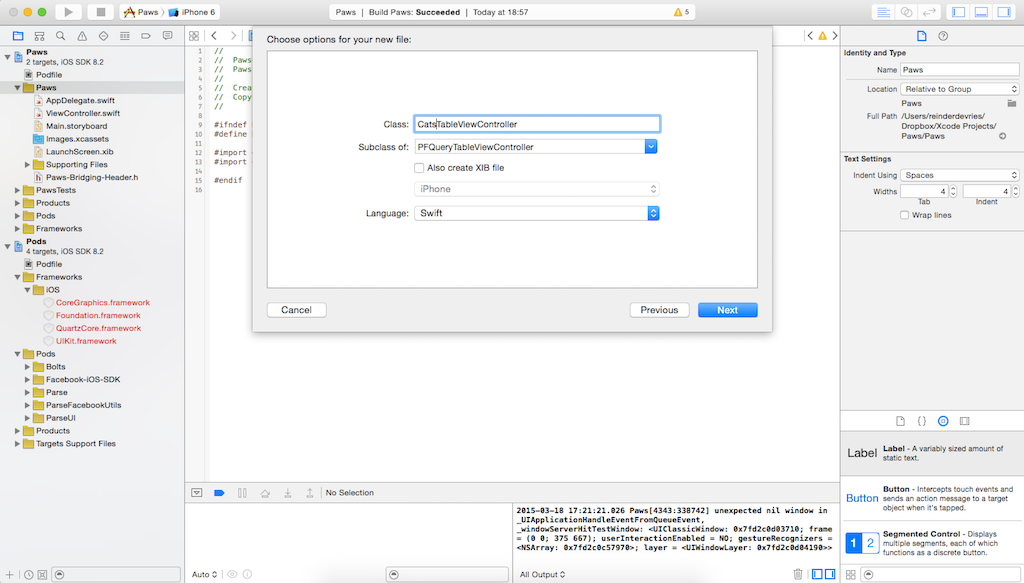
Save the file in the Paws directory. When selecting the directory, make sure Paws is checked as a Target (down below).
The new class file opens, and you can see the basic structure: a method called viewDidLoad, a method called didReceiveMemoryWarning. Note that CatsTableViewController extends PFQueryTableViewController, it’s a subclass. The class PFQueryTableViewController in turn extends UITableViewController, so our cats table view controller will inherit all table view functionality while adding code and functionality from ParseUI.
Coding The Table View Controller
Let’s code the table view controller. First, we have to override the constructor method of our class to set a few base settings.
Add the following two methods to the top of the class, just after the first squiggly bracket { of the file.
override init(style: UITableViewStyle, className: String!)
{
    super.init(style: style, className: className)

    self.pullToRefreshEnabled = true
    self.paginationEnabled = false
    self.objectsPerPage = 25

    self.parseClassName = className
}

required init(coder aDecoder:NSCoder)
{
    fatalError("NSCoding not supported")
}
You’ve just added 2 methods:
- Designated initializer init, which takes two parameters: the style of the table view, and the className from Parse we want to use (that’s Cat).
- A required initializer init, which takes one parameter: an instance of NSCoder. It’s contents is irrelevant for now, let’s just stick that it is required to implement it but unimportant to use the method constructively.
Within the first init, a couple of things happen:
- With the super.init() call, initialization is propagated to the superclass PFQueryTableViewController, which in turn initializes itself.
- Then, pullToRefreshEnabled is set to true. It’s an inherited property of PFQueryTableViewController. The special variable self refers to the current scope, thus the instance of the class.
- Then, we disable pagination and set the maximum number of objects in our table to 25.
- Finally, we store parameter className in the instance property parseClassName.
When, later on, we create an instance of the class CatsTableViewController, this constructor (or designated initializer) will get called and set up the basis of the table view controller.
Coding The Data Retrieval With queryForTable
The core of implementing a table view with Parse, by making use of PFQueryTableViewController is the method queryForTable. We’ve inherited that method when we subclassed PFQueryTableViewController and we need to override it: PFQueryTableViewController will call it when it wants to connect the table view controller to the Parse datastore. It literally queries data for the table, hence the method name queryForTable. Within the method, we can customize the retrieval.
Add this method to the CatsTableViewController class, just under the method viewDidLoad. Mind the squiggly brackets!
override func queryForTable() -> PFQuery {
    var query:PFQuery = PFQuery(className:self.parseClassName!)

    if(objects?.count == 0)
    {
        query.cachePolicy = PFCachePolicy.CacheThenNetwork
    }

    query.orderByAscending("name")

    return query
}
Let’s look at the signature of this new method:
override func queryForTable() -> PFQuery
What does it contain? It sets up the new method queryForTable, telling the compiler a couple of things:
- Override the superclass method with the same name (and signature), with the statement override.
- Declare the method with func and it’s name, queryForTable.
- Declare the parameters of the method between ( and ). In our case there’s no parameters.
- Finally write -> PFQuery, the return type of the method.
Within the method, this is what happens:
- Declare a new variable called query and instantiate it with a constructor method that takes a named parameter className, which gets assigned the value of self.parseClassName. In other words, when our table’s class name is Cat, a query that works with instances of Cat gets created at this point.
- Then, in case the query is empty, we set the cachePolicy property on the query. It’s value is constant PFCachePolicy.CacheThenNetwork, which means the query will first look in the offline cache for objects and if it doesn’t find any, it will download the objects from the online Parse datastore. When the table view is first put on screen, in our app, this if-statement is most likely to get executed once.
- Then, we order the queried objects by the “name” column.
- Finally, we return query.
Putting The Data On Screen
Almost there! Let’s write the final method of this class. It’ll put the data in the table view itself:
override func tableView(tableView: UITableView, cellForRowAtIndexPath indexPath: NSIndexPath, object: PFObject?) -> PFTableViewCell? {

    let cellIdentifier:String = "Cell"

    var cell:PFTableViewCell? = tableView.dequeueReusableCellWithIdentifier(cellIdentifier) as? PFTableViewCell

    if(cell == nil) {
        cell = PFTableViewCell(style: UITableViewCellStyle.Default, reuseIdentifier: cellIdentifier)
    }

    if let pfObject = object {
        cell?.textLabel?.text = pfObject["name"] as? String
    }

    return cell;
}
The signature of this method is this: override method tableView cellForRowAtIndexPath with parameters tableView, indexPath and object, returning a explicitly unwrapped PFTableViewCell instance. In other words: here’s a table view, here’s an object, here’s it’s index (row number) and now please return a usable cell view.
Then, first we declare a textual identifier for our cell. Each cell type has a different identifier. We’ll only be using one cell type, so we assign the String type value to it of “Cell”. The statement let declares a constant, as opposed to a variable.
Then, we declare an optional variable cell of type PFTableViewCell? and we attempt to dequeue it from the tableView parameter. Dequeueing is a mechanism that re-uses old table view cells to speed up the table view itself. The instance method dequeueReusableCellWithIdentifier takes one parameter, namely the identifier we set for this type of cell. The return type of the method is optional, and we cast it to type PFTableViewCell with the statement as?. Casting is basically the conversion of one type to another compatible type, in this case we cast from UITableViewCell to PFTableViewCell. Why is it optional? When there’s no cell to dequeue, this method will return nil.
Then, when cell is actually nil, we create a new cell from class PFTableViewCell. We indicate it’s cell type with an identifier, and give it a style of UITableViewCellStyle.Default.
Then, in the next if-statement we do something cool. Normally, when you work with an optional, you need to unwrap it. Before you can do it, you must check whether the optional is nil. You can’t unwrap an optional that has the possibility of being nil. In our case, we use optional binding (if-let) to verify if the optional is non-nil. If it contains a value, we make that value available as a temporary constant (pfObject).
Then, we assign object[“name”] to the text property of the textLabel. The textLabel is in fact, or obviously, the text label that’s shown in a row inside the table view. The variable object with type PFObject subclasses (inherits from) NSObject, so we can use the subscript [“…”] notation that retrieves the property of object with name “name”. Then it casts it to optional String?, because the object may or may not have a property called name and it could be nil.
Finally, we return cell.
Quick Recap of CatsTableViewController
Alright, inside the class CatsTableViewController we do 3 things:
- Initialize the class instance by setting a couple of basic settings.
- Integrating to the Parse back-end by overriding queryForTable: here’s the class we want to use, and this is our cache policy.
- Put the data on screen, in a row, by creating or re-using a cell and filling it.
Putting The Table View On Screen
Now, when you would run our app it wouldn’t do anything yet. We haven’t connected the CatsTableViewController with our app yet! Let’s do that.
Go back to the AppDelegate class and adjust the application didFinishLaunchingWithOptions method to reflect the following:
func application(application: UIApplication, didFinishLaunchingWithOptions launchOptions: [NSObject: AnyObject]?) -> Bool
{
    Parse.setApplicationId("...", clientKey: "...")

    var tableVC:CatsTableViewController = CatsTableViewController(className: "Cat")
    tableVC.title = "Paws"

    UINavigationBar.appearance().tintColor = UIColor(red: 0.05, green: 0.47, blue: 0.91, alpha: 1.0)
    UINavigationBar.appearance().barTintColor = UIColor(red: 0.05, green: 0.47, blue: 0.91, alpha: 1.0)
    UINavigationBar.appearance().titleTextAttributes = [NSForegroundColorAttributeName: UIColor.whiteColor()]
    UIApplication.sharedApplication().statusBarStyle = UIStatusBarStyle.LightContent


    var navigationVC:UINavigationController = UINavigationController(rootViewController: tableVC)

    let frame = UIScreen.mainScreen().bounds
    window = UIWindow(frame: frame)

    window!.rootViewController = navigationVC
    window!.makeKeyAndVisible()

    return true
}
First, make sure you still have the right Parse Application ID and Client Key.
Then, we create a new instance of CatsTableViewController and assign it to variable tableVC. We use a initializer that only takes a parameter className (with value “Cat”), internally the initializer we wrote earlier gets called. We also give the tableVC a title, “Paws”, a property that’s available in any UIViewController (our table view inherits that class) and is used by the navigation controller later on.
Then, we change the appearance of the UINavigationBar. That class is used by the navigation controller, it’s the thick bar on top of many many apps. Setting the appearance makes sure any instance of that class adheres to some style rules, in this case the tintColor and barTintColor. They’re both set to a blueish color and are directly assigned an instance of UIColor. The navigation bar text color gets set to white, and then we set the iPhone status bar to a light theme (white, too).
Note: It’s not required, but to make the status bar color change take effect, you have to add a new row to the Info.plist file. You’ll find that in directory Supporting Files. Open the file, insert a new row (right-click menu) and either paste View controller-based status bar appearance or UIViewControllerBasedStatusBarAppearance in it. Make sure the row value is NO or false.
Then, we finally create the UINavigationController instance itself, assigning it to variable navigationVC. We initialize it with a rootViewController, the first view controller it shows: tableVC. Then, this is our view hierarchy:
UIWindow -> UINavigationController -> CatsTableViewController
So, we show a table view controller inside a navigation controller and put that into the top-level root view controller of the UIWindow of our app.
Finally, some boiler-plate code: we create a new UIWindow instance, assign it a full frame, assign the root view controller, and make it the key window of our app.
Run The App
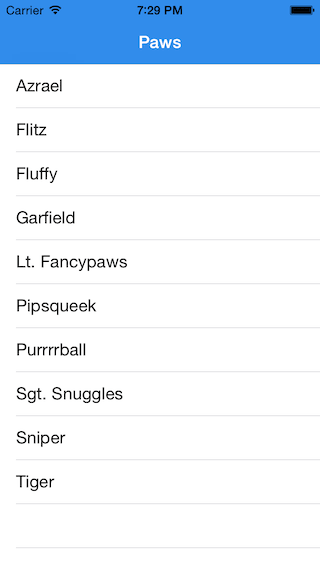
Oh yeah! Let’s run that app by hitting Command-R or clicking the Play button top left. If all went well, your app should fire up with a basic blue table view that shows 10 cat names.
You can pull down the table view to refresh it, it’ll then download new data from Parse and reload the table view.
The foundation for the app we made allows us to enrich the app, which we’ll do in a second. Take some time to enjoy your work so far! You’ve successfully implemented Parse into a working app prototype. Awesome!
Creating A Custom UITableViewCell In Interface Builder
Alright, let’s spice up the app with a custom table view cell. We won’t be using the text-only cells any more, but replace them with image-name-votes cells. It’ll look exactly like the image at the top of this guide.
Let’s start by creating a new class, called CatsTableViewCell. Right-click on Paws in the File navigator of Xcode and choose New File…. Add a template of Cocoa Touch Class from iOS -> Source. Make sure it’s called CatsTableViewCell and subclass UITableViewCell. Then, tick the Also create XIB file so it’s checked. The language is Swift, of course. Create the file in the Paws directory.
Then, open the CatsTableViewCell.swift file and change the class definition to this:
class CatsTableViewCell: PFTableViewCell
See what we did there? The class now extends (inherits from) PFTableViewCell instead of UITableViewCell. Remember the tableView cellForRowAtIndexPath method? It returns a cell instance of type PFTableViewCell, that’s why we needed to change that.
Add the following outlets to the new CatsTableViewCell, at the first line of the class itself, right after the first squiggly bracket {.
@IBOutlet weak var catImageView:UIImageView?
@IBOutlet weak var catNameLabel:UILabel?
@IBOutlet weak var catVotesLabel:UILabel?
@IBOutlet weak var catCreditLabel:UILabel?
We’ll need these 4 outlets to show 4 data points from Parse: the cat’s picture, the name of the cat, how many votes it got, and who the original author of the picture is.
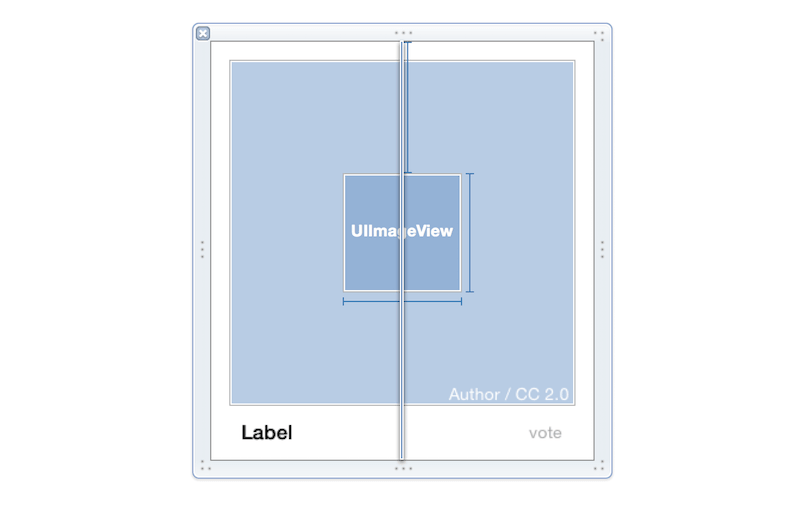
Next, open CatsTableViewCell.xib from the Project navigator. It’ll open in Interface Builder, a tool inside Xcode that’s super helpful for setting up app user interfaces. It’s a scaffolding tool, it won’t create a functional app UI, but will just define it. Compared with a car radio, Interface Builder creates the radio console, and with Swift you code the wiring.
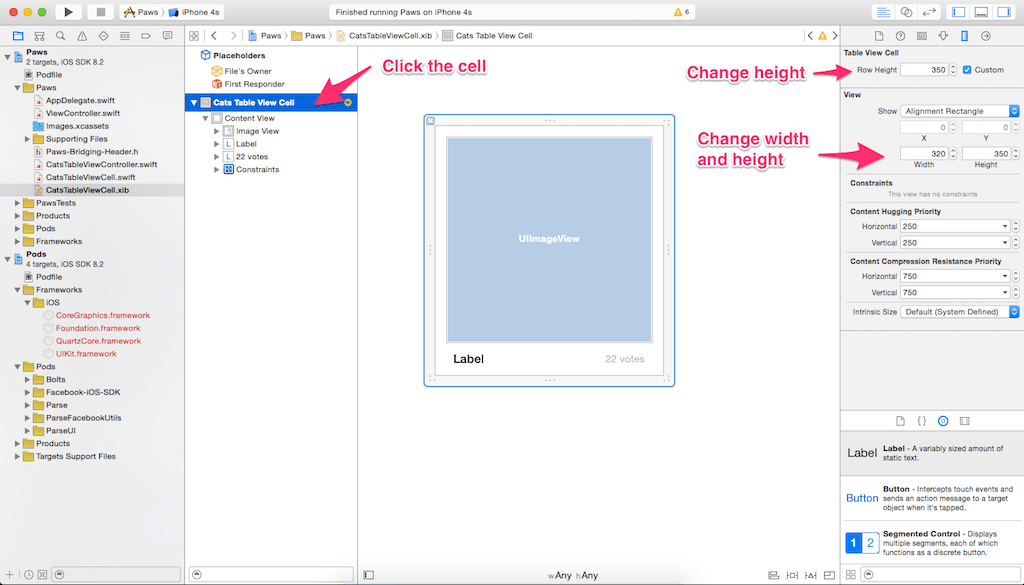
First, do the following:
- Click the main cell element in the Document Outline (left).
- Choose the Size Inspector tab (right).
- Change the Row Height to 350, and the Width to 320, and again the Height to 350.
The main view should now resize.
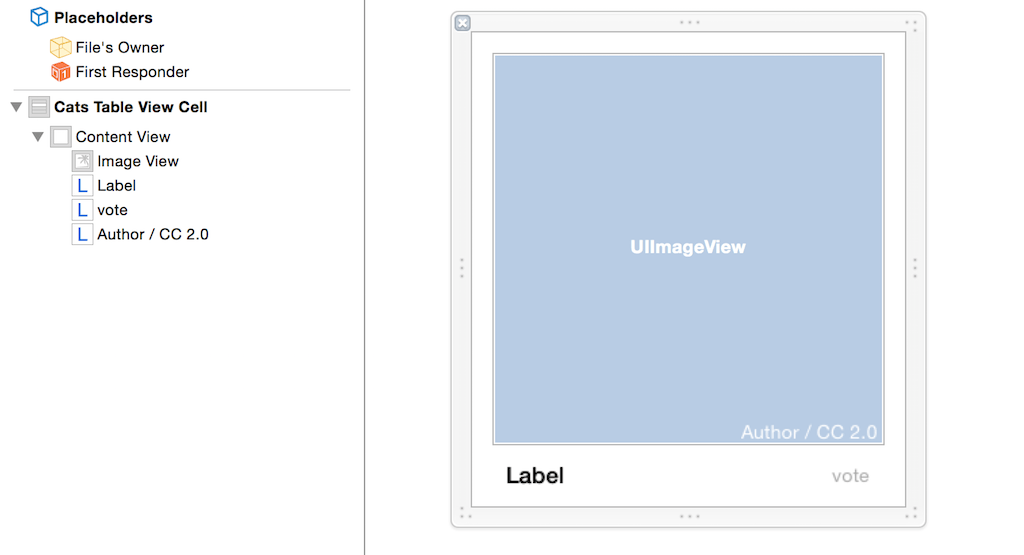
Now, we’ll add the 4 views:
- In the Object library, down-right, find the UIImageView class.
- Drag-and-drop the image view from the library to the cell view.
- Resize the image view, center it horizontally and separate it 15 points from the top, left and right edges. You can do this with the Size Inspector too, when selecting the image view. Its X and Y positions are both 15, its width and height are both 290.
Repeat the above steps with 3 new views, instances of UILabel. Align one on the left, and one on the right. Use the screenshot above as a reference. The left label is positioned (25, 317, 209, 21) as in X, Y, width and height. The right label is positioned (225, 317, 69, 21). The credit label is positioned (199, 285, 106, 21).
Next, configure all 4 views. Bring up the Attributes Inspector on the right, for each of the views, and set up the following:
- Image view: Mode to Aspect Fill, check Clip Subviews.
- Left label: Font to System Bold 17.0 and Color to Black.
- Right label: Font to System 14.0 and Color to Light Gray Color.
- Credit label: Font to System 14.0 and Color to White.
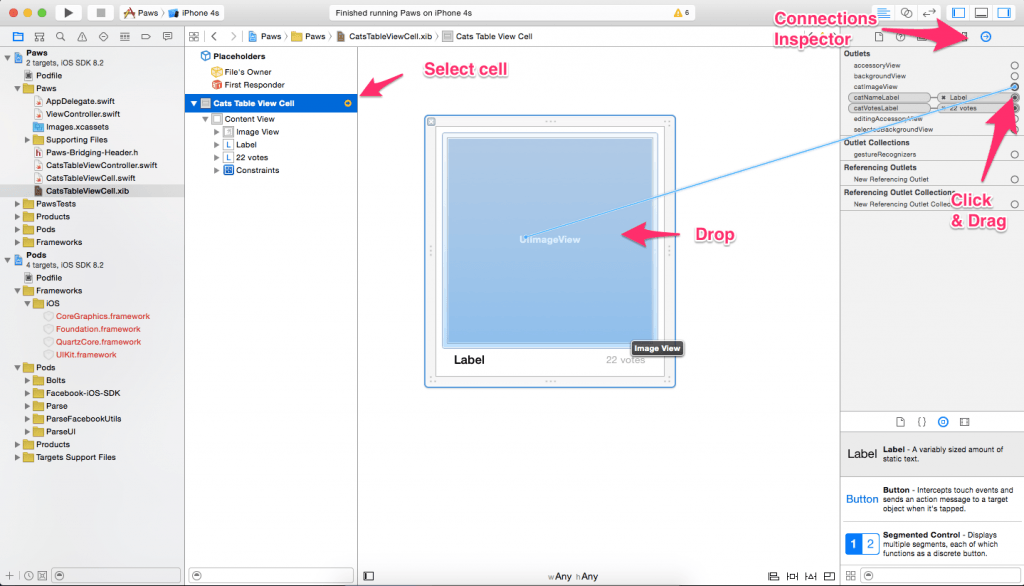
Now, let’s connect the views to the outlets. First, select the Cats Table View Cell again in the Document Outline on the left. Then, switch to the Connections Inspector tab on the right.
Now, locate the 4 outlets under Outlets in the inspector. See the empty circles? Drag from the circle right of catImageView to the image view in the cell. A blue line appears, and in the inspector the outlet gets a selection gizmo. Repeat these steps for the other 3 labels.
Setting Up Auto Layout Constraints For The Custom Cell
In order to make our app look great on iPhone 4, 4S, 5, 5S, 6 and 6 Plus we have to add a few rules to the UI elements in Interface Builder. Interface Builder comes with a handy feature called Auto Layout, and uses Constraints to manage view position, alignment and resizing. Auto Layout can be a bit quirky to work with, because it’s both intuitive and extremely logical. Ultimately, the tool is very effective at managing complex resizing tasks and will save you from writing custom layout code.
Technically, constraints are just rules for views. These are the rules we want our views to adhere to:
- Image view: center horizontally, height fixed to 290 points, width flexible, but stay on a 15 point margin from the top, right and left edges of the cell.
- Left label: flexible width, fixed height to 21 points, stay on a 25 point margin from the left of the cell (called Leading Space) and 11 points from the bottom of the cell.
- Right label: flexible width, fixed height to 21 points, stay 25 points from the right and 11 points from the bottom of the cell.
- Credit label: flexible width, fixed height to 21 points, stay 15 points from the right and 285 from the top (effectively fixing it to the bottom-right of the image view).
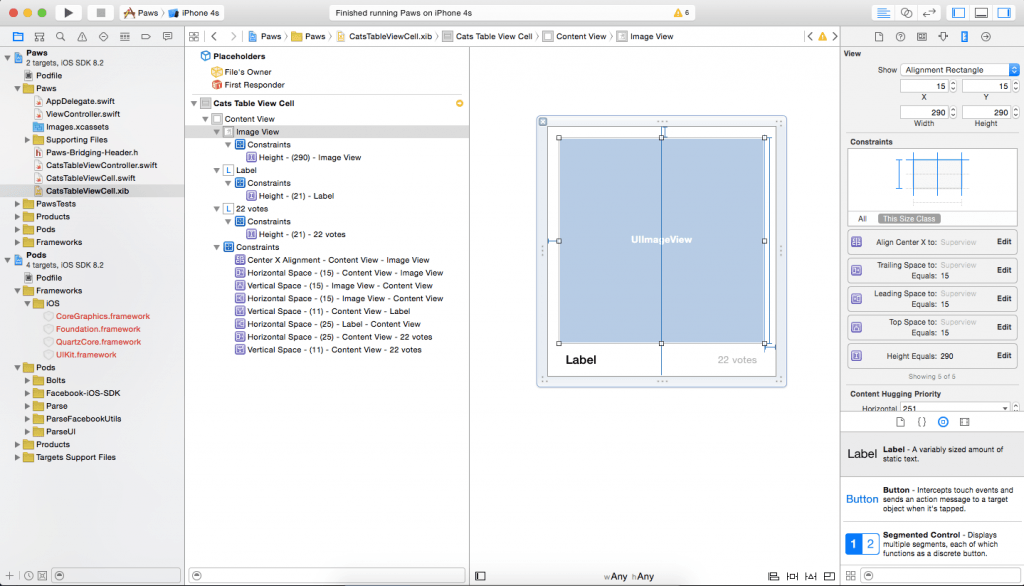
There are at least 4 ways to set up Constraints, we’ll be using the easiest: with the Editor menu up top.
To configure the image view, select it and then choose the following menu options:
- Editor -> Align -> Horizontal Center In Container
- Editor -> Pin -> Height
- Editor -> Pin -> Leading Space To Superview
- Editor -> Pin -> Trailing Space To Superview
- Editor -> Pin -> Top Space To SuperView
Then, set up the left label:
- Editor -> Pin -> Height
- Editor -> Pin -> Leading Space To Superview
- Editor -> Pin -> Bottom Space To Superview
Then, set up the right label:
- Editor -> Pin -> Height
- Editor -> Pin -> Trailing Space To Superview
- Editor -> Pin -> Bottom Space To Superview
Then, set up the credit label:
- Editor -> Pin -> Height
- Editor -> Pin -> Trailing Space To Superview
- Editor -> Pin -> Bottom Space To Superview
Do you see that we just stick the views to the edges, and fix them to a few positions? Your screen now should resemble the screenshot below.
Using The Custom Table View Cell With Swift
Alright, let’s get back to the code again – enough interface building! Open CatsTableViewController.swift and locate the designated initializer init(style: classname:).
In that method, add the following 2 lines below self.parseClassName = className;:
self.tableView.rowHeight = 350
self.tableView.allowsSelection = false
The first line sets the rows to the appropriate height, and the second one disallows selection on the cells.
Then, add the following line to method viewDidLoad just above super.viewDidLoad():
tableView.registerNib(UINib(nibName: "CatsTableViewCell", bundle: nil), forCellReuseIdentifier: cellIdentifier)
That line will most likely throw an error. To alleviate it, move the following line from method tableView cellForRowAtIndexPath to the top of the class and rename the value to “CatCell”.
let cellIdentifier:String = "Cell"
The class definition now looks like this snippet:
class CatsTableViewController: PFQueryTableViewController
{
    let cellIdentifier:String = "CatCell"

    override init!(style: UITableViewStyle, className: String!)
We’ve just moved the cellIdentifier constant from the local method scope to the class scope, making it available in the entire class: both in tableView cellForRowAtIndexPath and viewDidLoad.
Next, replace the contents of tableView cellForRowAtIndexPath with this code:
var cell:CatsTableViewCell? = tableView.dequeueReusableCellWithIdentifier(cellIdentifier) as? CatsTableViewCell

if(cell == nil) {
    cell = NSBundle.mainBundle().loadNibNamed("CatsTableViewCell", owner: self, options: nil)[0] as? CatsTableViewCell
}

if let pfObject = object {
    cell?.catNameLabel?.text = pfObject["name"] as? String

    var votes:Int? = pfObject["votes"] as? Int
    if votes == nil {
        votes = 0
    }
    cell?.catVotesLabel?.text = "\(votes!) votes"

    var credit:String? = pfObject["cc_by"] as? String
    if credit != nil {
        cell?.catCreditLabel?.text = "\(credit!) / CC 2.0"
    }
}

return cell
Compare it with the old code we used earlier. What’s the difference? It’s this:
- The cell type changed from PFTableViewCell to CatsTableViewCell.
- When the cell is nil (when it couldn’t be dequeued), a new cell gets created from the XIB we just created. We retrieve it from a collection and give ownership to the current class, then cast it to CatsTableViewCell.
- Then, we check if the object exists and attempt to assign it’s label text the value of column name of the Parse object, like earlier.
- Then, the same happens for catVotesLabel and it’s text. The column votes in Parse is not of type String but is Int, hence the cast to Int?. When votes happens to be empty, we set it to be zero. Then, with a nifty technique called string interpolation we set the label text to be … votes. Roughly the same happens for the credit label.
Finally, we return the cell. Note that it is the correct type!
Let’s run the app again. Did everything go well? No bugs, errors, crashes, smoke and/or flames? Good! But… where’s the image?
Asynchronously Downloading The Image From Parse
The image’s missing! Let’s add it. Include the code fragment below in tableView cellForRowAtIndexPath, just after the last if-statement (for the credit label) but before the return statement.
cell?.catImageView?.image = nil
if var urlString:String? = pfObject["url"] as? String {
    var url:NSURL? = NSURL(string: urlString!)

    if var url:NSURL? = NSURL(string: urlString!) {
        var error:NSError?
        var request:NSURLRequest = NSURLRequest(URL: url!, cachePolicy: NSURLRequestCachePolicy.ReturnCacheDataElseLoad, timeoutInterval: 5.0)

        NSOperationQueue.mainQueue().cancelAllOperations()

        NSURLConnection.sendAsynchronousRequest(request, queue: NSOperationQueue.mainQueue(), completionHandler: {
            (response:NSURLResponse!, imageData:NSData!, error:NSError!) -> Void in

            cell?.catImageView?.image = UIImage(data: imageData)

        })
    }
}
Whoah! What happens here? Well, technically we rework the Parse url column into an instance of type NSURL.
We use that to start an asynchronous NSURLConnection on the main operation queue, which downloads the image as an NSData object. When the downloading has finished, a closure gets executed. It assigns the data from the download to a UIImage, which gets assigned to the image property of catImageView.
Let’s not dive too deep here, because the intricacies of the above code is irrelevant for our app. However, note these points:
- Using NSURLConnection is quick, but a bit hacky. When doing more complex things with internet data sources, use the excellent AFNetworking (Objective-C) or Alamofire (Swift) libraries.
- Parse allows you to store images in the cloud, and work directly with them. It’s an integral part of ParseUI, but it doesn’t allow working with external URLs (the cat pictures are from Flickr).
- Before starting another async connection, we first clear all the operations from the main queue. This is a bit hacky: it removes pending-and-unfinished downloads from the queue. Try removing that line and run the app, you’ll see that all the images get mixed up. The dequeue-ing mechanism doesn’t reset any pending connections when it re-uses a cell, hence the wildly image loading.
Ready? Run the app again, and see if it works.
Upping The Ante: Instagram Like Function
You got this far. Awesome! Still have some air left for the final function of our app? It isn’t finished until we add the final function: the “Instagram” Like feature: when you double-tap on a picture, a vote + 1 gets added to that cat, with a neat little cat paw animation.
First, let’s add the outlet for the paw image to the table view cell. Add the following line to the CatsTableViewCell class, right below the 4 other outlets:
@IBOutlet weak var catPawIcon:UIImageView?
Then, add a UIImageView to CatsTableViewCell.xib in Interface Builder. Remember how?
- Look up the UIImageView class in the Object library.
- Drag it from the Object library to the table view cell.
Make sure to drag it right to the center of the other image view. Adjust the new image view to be 100 points wide and 100 points high. It’s X and Y are both approximately 110 points. Then, add the following constraints, when the image view has been selected.
- Editor -> Pin -> Width
- Editor -> Pin -> Height
- Editor -> Pin -> Top Space To Superview
- Editor -> Align -> Horizontal Center In Container
As you can see, this centers the image view horizontally, fixes both width and height to 100 points and keeps it at a fixed margin from the top, effectively centering it right in the middle of the cat picture image view.
Now, create the outlet connection by selecting the Cats Table View Cell top element from the Document Outline, then selecting the Connections Inspector tab, and drawing a blue line from the catPawIcon to the image view in the cell.
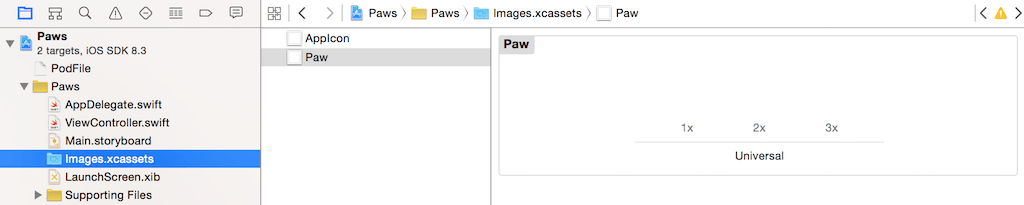
Next, download paw.zip. The file contains 3 graphic files, one image for 3 resolutions. We need to import it before we can use it.
First, unzip the file. Then, open the Images.xcassets file in Xcode. Then, right-click in the list on the left (the one that says AppIcon, LaunchImage) and click New Image Set, or use the “plus” button down-left. Rename the asset that was just created to Paw and open it.
Now, drag the just unzipped files one by one from Finder to the opened asset. Make sure the files match:
- paw.png to 1x.
- [email protected] to 2x.
- [email protected] to 3x.
Don’t worry if you don’t see the files, they’re white after all.
Then, go back to CatsTableViewCell.xib and select the small image view. Locate the Attributes Inspector and select the right image Paw from the dropdown list at Image. The white paw image should now show in the cell view.

Finally remember to connect the small image view with the catPawIcon outlet.
Now, let’s get back to coding. Open the CatsTableViewCell in Xcode. Add the following code to method awakeFromNib, right before super.awakeFromNib().
let gesture = UITapGestureRecognizer(target: self, action:Selector("onDoubleTap:"))
gesture.numberOfTapsRequired = 2
contentView.addGestureRecognizer(gesture)

catPawIcon?.hidden = true
Two things happen here:
- First, we set up a UITapGestureRecognizer, which allows us to interact with any view. In this case, we add it to the contentView, the view that holds both labels and both image views of the cell. It’s initialized with a target, self, and an action, a selector for the method onDoubleTap:. So, when a double-tap is detected, the method onDoubleTap: of self (the current class) is executed. Additionally, we set the number of taps required to 2, making it a double-tap.
- Second, we hide the catPawIcon outlet.
Next, add the onDoubleTap method to the class, right below awakeFromNib():
func onDoubleTap(sender:AnyObject) {
    catPawIcon?.hidden = false
    catPawIcon?.alpha = 1.0

    UIView.animateWithDuration(1.0, delay: 1.0, options:nil, animations: {

        self.catPawIcon?.alpha = 0

        }, completion: {
            (value:Bool) in

            self.catPawIcon?.hidden = true
    })
}
Such a method is called an action, and always requires one parameter: sender with type AnyObject. In the method, the following animation code happens:
- First, catPawIcon is made visible by setting hidden to false.
- Second, its alpha (transparency) is set to 1.0, which is fully visible. This is needed for a full reset of the image state, namely, its alpha channel is zero when the animation finishes.
- Then, the setup of the animation is coded. A class method of UIView is used, which takes 5 parameters: the animation duration, the delay before the animation, some options, then a closure of the animatable properties, and then a closure that’s executed when the animation finishes.
Visually, this happens:
- Reset the view by making it visible, and setting it’s alpha channel to visible.
- Wait one second, a delay.
- Within one second, the animation duration, animate the alpha channel from 1 to 0.
- When that’s finished, hide the image.
The great thing about this solution is it’s ease-of-use: the code will completely manage the animation. We only have to set it’s starting state and it’s ending state, and the duration, and the animation framework will interpolate states and animation steps on its own. Technically, we use two properties: a continuous value alpha, and a boolean value hidden to manage the visibility of the paw image.
Finally, run the app and see if the new feature works. You should be able to double-tap on a cell, which briefly shows the paw icon and then fades it out.
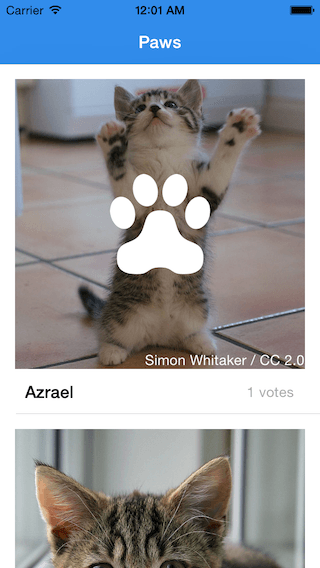
Did it work? Great!
Integrating The Vote Action With Parse
The only thing left to do is to take increase the votes column on the Parse Cat object by one, when a vote is cast from the double-tap action.
But how do we do that?
The object we want to change is called object of type PFObject, inside the tableView cellForRowAtIndexPath method of CatsTableViewController. We can’t access that from within the table view cell, where the double-tap action is.
We can’t move the onDoubleTap method, so we have to create a reference between the table view object and the table view cell.
In order to do that, take the following steps:
- In CatsTableViewCell, create a new property by writing this code just below the outlets, at the top of the class:
- Then, write the following code inside tableView cellForRowAtIndexPath, just below the closing squiggly bracket } of the cell == nil statement:
var parseObject:PFObject?
cell?.parseObject = object
We’ve now created a mechanism that copies the object from cellForRowAtIndexPath into our table view cell, making the object instance available in the CatsTableViewCell class.
Then, adjust the onDoubleTap method of CatsTableViewCell. Include the code below, at the beginning of the method:
if(parseObject != nil) {
    if var votes:Int? = parseObject!.objectForKey("votes") as? Int {
        votes!++

        parseObject!.setObject(votes!, forKey: "votes");
        parseObject!.saveInBackground();

        catVotesLabel?.text = "\(votes!) votes";
    }
}
This code does the following:
- Check if parseObject is not nil.
- Attempt to get the votes from parseObject, casting it to optional Int.
- When votes is not nil, increase the votes variable by one with the ++ operator. It’s the same as votes = votes! + 1;.
- Then, assign the votes variable back to the parseObject collection with method setObject.
- Then, call method saveInBackground() on parseObject!. This will save the current object in the background, writing it to the Parse cloud when possible.
- Finally, update it’s text to reflect the new vote count.
And… that’s all there is to it! Run the app with Command-R or the Play button to verify that the new feature is working.
Is it working? Great!
Quick Recap
Here’s what you learned today:
- Working with Parse, retrieving and saving data in the cloud.
- Integrating a Swift project with Objective-C frameworks, with Cocoapods.
- Setting up views and a custom table view cell with Interface Building.
- Coding an entire app with Swift, from scratch.
- Working with Auto Layout and constraints.
- Using gesture recognizers, optionals, conditions, closures, properties, outlets and actions.
For your reference, you can download the entire Paws project file here. Please use Xcode 6.3 (or up) to run the project. Note that you have to change both the application key and client key in the AppDelegate.swift file. Also, keep in mind that you learn better and have greater retention when you code yourself, so don’t just copy.
What do you think about this tutorial? Please leave me comment and share your thought.


