

Concurrency is always considered a monster of a subject in iOS development. It can be considered a dangerous area that many developers try their best to avoid. Rumor has it that multithreaded code should be avoided as much as you can. I agree with you that concurrency can be dangerous so if you don’t understand it very well. It is only dangerous because of the unknown. Think of how many dangerous actions or activities that people do in their life, many right? But once they master it, it becomes a piece of cake. Concurrency is a two sided-weapon that you should master and learn how to use it. It helps you to write efficient, fast execution, and responsive apps, but at the same time, misusing it will ruin your app with no mercy. That’s why before starting writing any concurrency code, think first why do you need concurrency and which API do you need to use to solve this problem? In iOS we have different APIs that can be used. In this tutorial we will talk about two of the most commonly used APIs – NSOperation and Dispatch Queues.

Why do We Need Concurrency?
I know you’re a good developer with experience in iOS. No matter what kinds of apps you’re going to build, however, you will need to know concurrency to make your app more responsive and fast. Here I summarize in points the advantages of learning or using concurrency:
- Utilize iOS devices’ hardware: Now all iOS devices have a multi-core processor that allows developers to execute multiple tasks in parallel. You should utilize this feature and get benefits out of the hardware.
- Better user experience: You probably have written code to call web services, handle some IO, or perform any heavy tasks. As you know, doing these kind of operations in the UI thread will freeze the app, making it non responsive. Once user faces this situation, the first step that he/she will take is to kill/close your app without a second thought. With concurrency, all these tasks can be done in background without hanging the main thread or disturbing your users. They can still tap on buttons, scroll and navigate through your app, while it handles the heavy loading task in background.
- The APIs like NSOperation and dispatch queues make it easy to use concurrency: Creating and managing threads are not easy tasks. This is why most of developers get scared when they hears the term concurrency and multi-threaded code. In iOS we have great and easy to use concurrency APIs that will make your life easier. You don’t have to care about creating threads or manage any low level stuff. The APIs will do all these tasks for you. Another important advantage about these APIs is that it helps you achieve synchronization easily to avoid race condition. Race condition happens when multiple threads try to access shared resource and that leads to unexpected results. By using synchronization, you protect resources from being shared between threads.
What do You Need to Know about Concurrency?
In this tutorial, we will explain everything you need to understand concurrency and relieve all fear you have about it. First we recommend to have a look at blocks (closures in Swift) as they are used heavily in concurrency APIs. Then we will talk about dispatch queues and NSOperationQueues. We will walk you through each of the concurrency concepts, their differences, and how to implement them.
Part 1: GCD (Grand Central Dispatch)
GCD is the most commonly used API to manage concurrent code and execute operations asynchronously at the Unix level of the system. GCD provides and manages queues of tasks. First, let’s see what queues are.
What are queues?
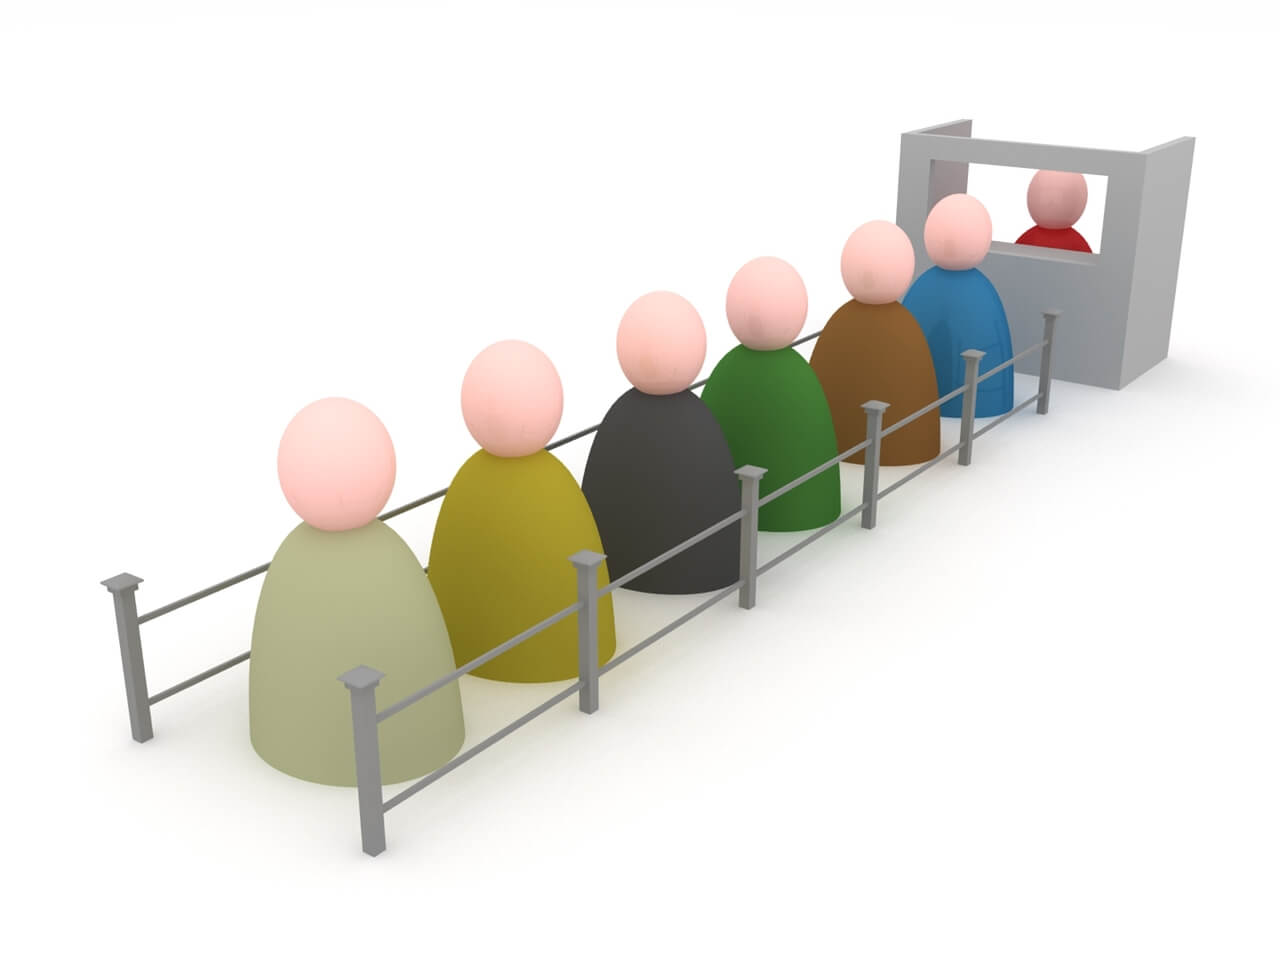
Queues are data structures that manage objects in the order of First-in, First-out (FIFO). Queues are similar to the lines at the ticket window of the movie theatre. The tickets are sold as first-come, first-serve. The people in the front of the line get to buy their tickets before the others in the line who arrived later. Queues in computer science are similar because the first object added to the queue is the first object to be removed from the queue.
Dispatch Queues
Dispatch queues are an easy way to perform tasks asynchronously and concurrently in your application. They are queues where tasks are being submitted by your app in form of blocks (Blocks of codes). There are two varieties of dispatch queues: (1) serial queues, & (2) concurrent queues. Before talking about the differences, you need to know that tasks assigned to both queues are being executed in separate threads than the thread they were created on. In other words, you create blocks of code and submit it to dispatch queues in the main thread. But all these tasks (Blocks of codes) will run in separate threads instead of the main thread.
Serial Queues
When you choose to create a queue as serial queue, the queue can only execute one task at a time. All tasks in the same serial queue will respect each other and execute serially. However, they don’t care about tasks in separate queues which means that you can still execute tasks concurrently by using multiple serial queues. For example, you can create two serial queues, each queue executes only one task at a time but up to two tasks could still execute concurrently.
Serial queues are awesome for managing a shared resource. It provides guaranteed serialized access to the shared resource and prevents race conditions. Imagine that there is a single ticket booth but there are a bunch of people who want to buy cinema tickets, here the staff at the booth is a shared resource. It’ll be chaotic if the staff has to serve these people all at the same time. To handle this situation, people are required to queue up (serial queue), so that the staff can serve the customers one at a time.
Again, it doesn’t mean the cinema can only handle one customer at a time. If it sets up two more booths, it can serve three customers at one time. This is why I said you can still perform multiple tasks in parallel by using several serial queues.
The advantages of using serial queues are:
- Guaranteed serialized access to a shared resource that avoids race condition.
- Tasks are executed in a predictable order. When you submit tasks in a serial dispatch queue, they will be executed in the same order as they are inserted.
- You can create any number of serial queues.
Concurrent Queues
As the name suggests, concurrent queues allows you to execute multiple tasks in parallel. The tasks (blocks of codes) starts in the order in which they are added in the queue. But their execution all occur concurrently and they don’t have to wait for each other to start. Concurrent queues guarantee that tasks start in same order but you will not know the order of execution, execution time or the number of tasks being executed at a given point.
For example, you submit three tasks (task #1, #2 and #3) to a concurrent queue. The tasks are executed concurrently and are started in the order in which they were added to the queue. However, the execution time and finish time vary. Even it may take some time for task #2 and task #3 to start, they both can complete before task #1. It’s up to the system to decide the execution of the tasks.
Using Queues
Now that we have explained both serial and concurrent queues, it’s time to see how we can use them. By default, the system provides each application with a single serial queue and four concurrent queues. The main dispatch queue is the globally available serial queue that executes tasks on the application’s main thread. It is used to update the app UI and perform all tasks related to the update of UIViews. There is only one task to be executed at a time and this is why the UI is blocked when you run a heavy task in the main queue.
Besides the main queue, the system provides four concurrent queues. We call them Global Dispatch queues. These queues are global to the application and are differentiated only by their priority level. To use one of the global concurrent queues, you have to get a reference of your preferred queue using the function dispatch_get_global_queue which takes in the first parameter one of these values:
- DISPATCH_QUEUE_PRIORITY_HIGH
- DISPATCH_QUEUE_PRIORITY_DEFAULT
- DISPATCH_QUEUE_PRIORITY_LOW
- DISPATCH_QUEUE_PRIORITY_BACKGROUND
These queue types represent the priority of execution. The queue with HIGH has the highest priority and BACKGROUND has the lowest priority. So you can decide the queue you use based on the priority of the task. Please also note that these queues are being used by Apple’s APIs so your tasks are not the only tasks in these queues.
Lastly, you can create any number of serial or concurrent queues. In case of concurrent queues, I highly recommend to use one of the four global queues, though you can also create your own.
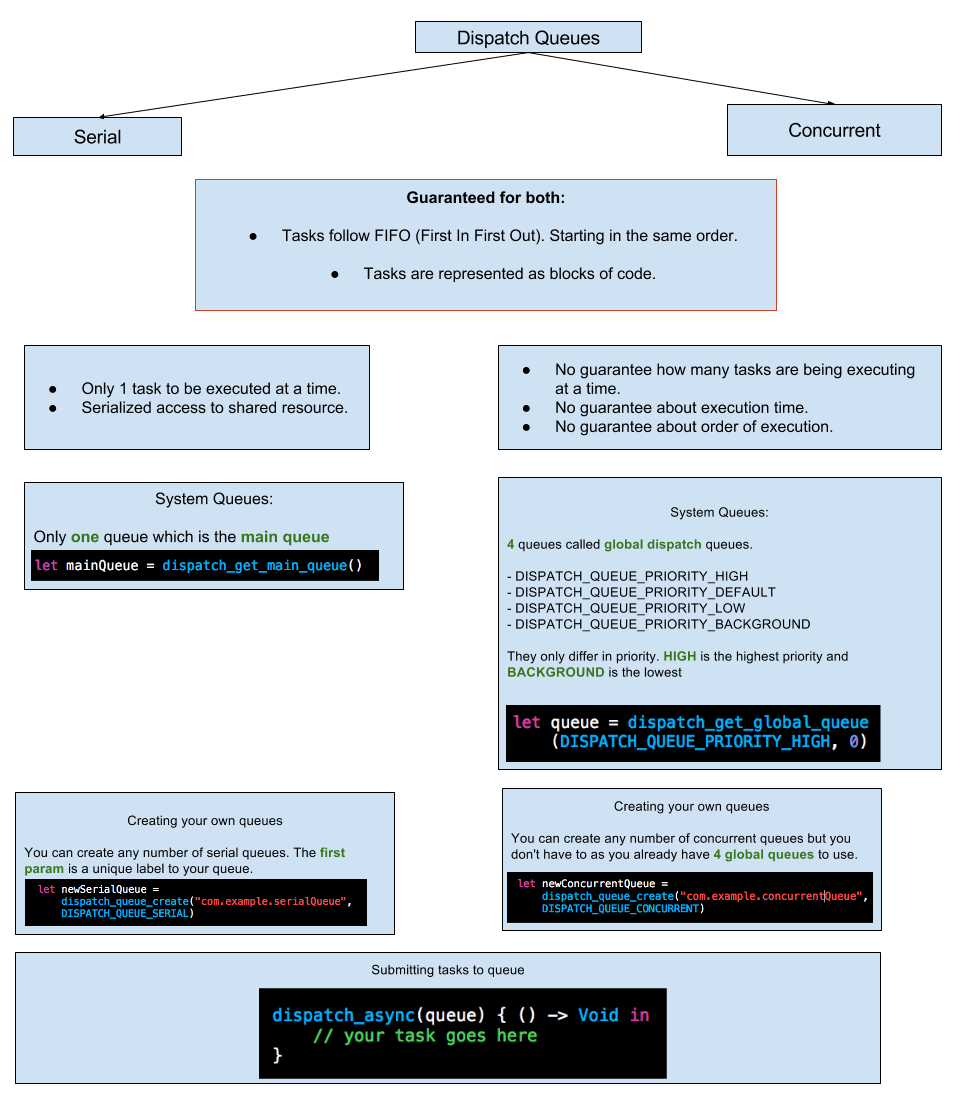
GCD Cheatsheet
Now that you should have a basic understanding about dispatch queues. I’m going to give you a simple cheatsheet for your reference. The sheet is very simple and contains all information you need to know about GCD.
Cool, right? Now let’s work on a simple demo to see how to use dispatch queues. I will show you how you can make use of dispatch queues to optimize an app’s performance and make it more responsive.
Demo Project
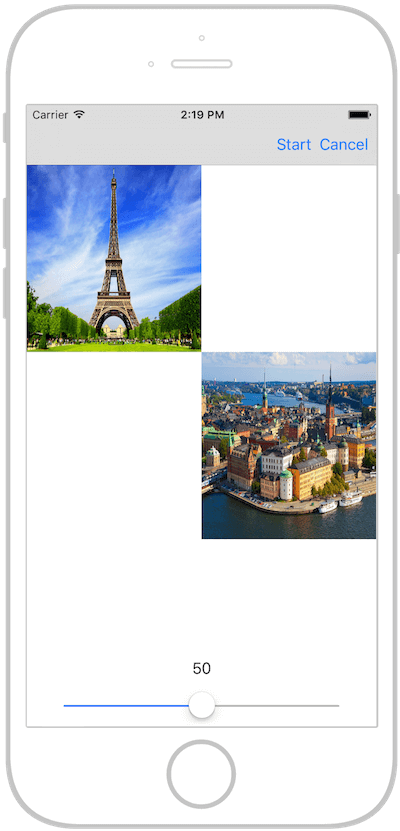
Our starter project is pretty simple, we display four image views, each one requests a specific image from a remote site. The image requests are done in main thread. To show you how this affects the responsiveness of the UI, I have added a simple slider below the images. Now download and run the starter project. Click the Start button to start the image download and drag the slider while the image download is in progress. You will find that you can’t even drag it a bit.

Once you click the Start button, the image starts to download in the main thread. Obviously, this approach is terribly bad and makes the UI non-responsive. Unfortunately till today there some apps that still perform heavy loading tasks like this in the main thread. Now we are going to fix that using dispatch queues.
First we will implement the solution using concurrent queues and then with a serial queue.
Using Concurrent Dispatch Queues
Now head back to the ViewController.swift file in the Xcode project. If you look into the code, you should see the action method didClickOnStart. This method handles the image download. We now perform the task like this:
@IBAction func didClickOnStart(sender: AnyObject) {
    let img1 = Downloader.downloadImageWithURL(imageURLs[0])
    self.imageView1.image = img1

    let img2 = Downloader.downloadImageWithURL(imageURLs[1])
    self.imageView2.image = img2

    let img3 = Downloader.downloadImageWithURL(imageURLs[2])
    self.imageView3.image = img3

    let img4 = Downloader.downloadImageWithURL(imageURLs[3])
    self.imageView4.image = img4

}
Each downloader is considered as a task and all tasks now are being performed in the main queue. Let’s now get a reference for one of the global concurrent queue which is the Default priority queue.
let queue = dispatch_get_global_queue(DISPATCH_QUEUE_PRIORITY_DEFAULT, 0)
        dispatch_async(queue) { () -> Void in

            let img1 = Downloader.downloadImageWithURL(imageURLs[0])
            dispatch_async(dispatch_get_main_queue(), {

                self.imageView1.image = img1
            })

        }
We first get a reference to the default concurrent queue using dispatch_get_global_queue, then inside the block we submit a task which is to download the first image. Once the image download completes, we submit another task to the main queue to update the image view with the downloaded image. In other words, we put the image download task in a background thread, but execute the UI related tasks in the main queue.
If you do the same for the rest of the images, your code should look like this:
@IBAction func didClickOnStart(sender: AnyObject) {

    let queue = dispatch_get_global_queue(DISPATCH_QUEUE_PRIORITY_DEFAULT, 0)
    dispatch_async(queue) { () -> Void in

        let img1 = Downloader.downloadImageWithURL(imageURLs[0])
        dispatch_async(dispatch_get_main_queue(), {

            self.imageView1.image = img1
        })

    }
    dispatch_async(queue) { () -> Void in

        let img2 = Downloader.downloadImageWithURL(imageURLs[1])

        dispatch_async(dispatch_get_main_queue(), {

            self.imageView2.image = img2
        })

    }
    dispatch_async(queue) { () -> Void in

        let img3 = Downloader.downloadImageWithURL(imageURLs[2])

        dispatch_async(dispatch_get_main_queue(), {

            self.imageView3.image = img3
        })

    }
    dispatch_async(queue) { () -> Void in

        let img4 = Downloader.downloadImageWithURL(imageURLs[3])

        dispatch_async(dispatch_get_main_queue(), {

            self.imageView4.image = img4
        })
    }

}
You just submitted the four image downloads as concurrent tasks to the default queue. Now build and run the app, it should work much faster (if you are receiving any errors, review that your code matches the code above). Notice that while downloading the images you should be able to drag the slider without any lag.
Using Serial Dispatch Queues
The alternate approach to resolve the lagging issue is using serial queues. Now, return to the same didClickOnStart() method in the ViewController.swift file. This time around we will use a serial queue for downloading the images. When using serial queues, you need to pay close attention to which serial queue you are referencing. Each app has one default serial queue, which is actually the main queue for the UI. So remember that when using serial queues, you must create a new queue, otherwise you will be executing your tasks while the app is attempting to execute the tasks for updating the UI. This will cause errors and delays that destroy the user experience. You can use the function dispatch_queue_create to create a new queue and then submit all tasks in the same way as we did earlier. After the change, the code will look like this:
@IBAction func didClickOnStart(sender: AnyObject) {

    let serialQueue = dispatch_queue_create("com.appcoda.imagesQueue", DISPATCH_QUEUE_SERIAL)


    dispatch_async(serialQueue) { () -> Void in

        let img1 = Downloader .downloadImageWithURL(imageURLs[0])
        dispatch_async(dispatch_get_main_queue(), {

            self.imageView1.image = img1
        })

    }
    dispatch_async(serialQueue) { () -> Void in

        let img2 = Downloader.downloadImageWithURL(imageURLs[1])

        dispatch_async(dispatch_get_main_queue(), {

            self.imageView2.image = img2
        })

    }
    dispatch_async(serialQueue) { () -> Void in

        let img3 = Downloader.downloadImageWithURL(imageURLs[2])

        dispatch_async(dispatch_get_main_queue(), {

            self.imageView3.image = img3
        })

    }
    dispatch_async(serialQueue) { () -> Void in

        let img4 = Downloader.downloadImageWithURL(imageURLs[3])

        dispatch_async(dispatch_get_main_queue(), {

            self.imageView4.image = img4
        })
    }

}
As we see the only thing different from the case of concurrent queues is the serial queue creation. When you build and run the app again, you will see that the images are again downloaded in the background so you can continue to interact with the UI.
But you will notice two things:
- It take a bit long to download the images, as compared to the case of concurrent queue. The reason is that we only load one image at a time. Each task waits for the previous task to finish before being executed.
- Images are loaded in order image1, image2, image3, and image4. That’s because the queue is a serial queue that executes one task a time.
Part 2: Operation Queues
GCD is a low-level C API that enables developers to execute tasks concurrently. Operation queues, on the other hand, are high level abstraction of the queue model, and is built on top of GCD. That means you can execute tasks concurrently just like GCD, but in an object-oriented fashion. In short, operation queues just make developers’ life even simpler.
Unlike GCD, they don’t conform to the First-In-First-Out order. Here are how operation queues are different from dispatch queues:
- Don’t follow FIFO: in operation queues, you can set an execution priority for operations and you can add dependencies between operations which means you can define that some operations will only be executed after the completion of other operations. This is why they don’t follow First-In-First-Out.
- By default, they operate concurrently: while you can’t change its type to serial queues, there is still a workaround to execute tasks in operation queues in sequence by using dependencies between operations.
- Operation queues are instances of class NSOperationQueue and its tasks are encapsulated in instances of NSOperation.
NSOperation
Tasks submitted to operation queues are in the form of NSOperation instances. We discussed in GCD that tasks are submitted in block. The same can be done here but should be bundled inside NSOperation instance. You can simply think of NSOperation as a single unit of work.
NSOperation is an abstract class which can’t be used directly so you have to use NSOperation subclasses. In the iOS SDK, we are provided with two concrete subclasses of NSOperation. These classes can be used directly, but you can also subclass NSOperation and create your own class to perform the operations. The two classes that we can use directly are:
- NSBlockOperation – Use this class to initiate operation with one or more blocks. The operation itself can contain more than one block and the operation will be considered as finish when all blocks are executed.
- NSInvocationOperation – Use this class to initiate an operation that consists of invoking a selector on a specified object.
So what’s the advantages of NSOperation?
- First, they support dependencies through the method addDependency(op: NSOperation) in the NSOperation class. When you need to start an operation that depends on the execution of the other, you will want to use NSOperation.
- Secondly, you can change the execution priority by setting the property queuePriority with one of these values:
public enum NSOperationQueuePriority : Int {
    case VeryLow
    case Low
    case Normal
    case High
    case VeryHigh
}
The operations with high priority will be executed first.
- You can cancel a particular operation or all operations for any given queue. The operation can be cancelled after being added to the queue. Cancellation is done by calling method cancel() in the NSOperation class. When you cancel any operation, we have three scenarios that one of them will happen:
- Your operation is already finished. In that case, the cancel method has no effect.
- Your operation is already being executing. In that case, system will NOT force your operation code to stop but instead, cancelled property will be set to true.
- Your operation is still in the queue waiting to be executed. In that case, your operation will not be executed.
- NSOperation has 3 helpful boolean properties which are finished, cancelled, and ready. finished will be set to true once operation execution is done. cancelled is set to true once the operation has been cancelled. ready is set to true once the operation is about to be executed now.
- Any NSOperation has an option to set completion block to be called once the task being finished. The block will be called once the property finished is set to true in NSOperation.
Now let’s rewrite our project demo but this time we’ll use NSOperationQueues. First declare the variable below in the ViewController class:
var queue = NSOperationQueue()
Next, replace the didClickOnStart method with the code below and see how we perform operations in NSOperationQueue:
@IBAction func didClickOnStart(sender: AnyObject) {
    queue = NSOperationQueue()

    queue.addOperationWithBlock { () -> Void in

        let img1 = Downloader.downloadImageWithURL(imageURLs[0])

        NSOperationQueue.mainQueue().addOperationWithBlock({
            self.imageView1.image = img1
        })
    }

    queue.addOperationWithBlock { () -> Void in
        let img2 = Downloader.downloadImageWithURL(imageURLs[1])

        NSOperationQueue.mainQueue().addOperationWithBlock({
            self.imageView2.image = img2
        })

    }

    queue.addOperationWithBlock { () -> Void in
        let img3 = Downloader.downloadImageWithURL(imageURLs[2])

        NSOperationQueue.mainQueue().addOperationWithBlock({
            self.imageView3.image = img3
        })

    }

    queue.addOperationWithBlock { () -> Void in
        let img4 = Downloader.downloadImageWithURL(imageURLs[3])

        NSOperationQueue.mainQueue().addOperationWithBlock({
            self.imageView4.image = img4
        })

    }
}
As you see in the above code, you use the method addOperationWithBlock to create a new operation with the given block (or as we call it in Swift, a closure). It’s very simple, isn’t it? To perform a task in the main queue, instead of calling dispatch_async() as when using GCD, we can do the same from NSOperationQueue (NSOperationQueue.mainQueue()) and submit the operation you want to execute in the main queue.
You can run the app to have a quick test. If the code was entered correctly, the app should be able to download the images in background without blocking the UI.
In the previous example, we used the method addOperationWithBlock to add operation in the queue. Let’s see how we can use NSBlockOperation to do the same, but at the same time, giving us more functionalities and options such as setting completion handler. The didClickOnStart method is rewritten like this:
@IBAction func didClickOnStart(sender: AnyObject) {

    queue = NSOperationQueue()
    let operation1 = NSBlockOperation(block: {
        let img1 = Downloader.downloadImageWithURL(imageURLs[0])
        NSOperationQueue.mainQueue().addOperationWithBlock({
            self.imageView1.image = img1
        })
    })

    operation1.completionBlock = {
        print("Operation 1 completed")
    }
    queue.addOperation(operation1)

    let operation2 = NSBlockOperation(block: {
        let img2 = Downloader.downloadImageWithURL(imageURLs[1])
        NSOperationQueue.mainQueue().addOperationWithBlock({
            self.imageView2.image = img2
        })
    })

    operation2.completionBlock = {
        print("Operation 2 completed")
    }
    queue.addOperation(operation2)


    let operation3 = NSBlockOperation(block: {
        let img3 = Downloader.downloadImageWithURL(imageURLs[2])
        NSOperationQueue.mainQueue().addOperationWithBlock({
            self.imageView3.image = img3
        })
    })

    operation3.completionBlock = {
        print("Operation 3 completed")
    }
    queue.addOperation(operation3)

    let operation4 = NSBlockOperation(block: {
        let img4 = Downloader.downloadImageWithURL(imageURLs[3])
        NSOperationQueue.mainQueue().addOperationWithBlock({
            self.imageView4.image = img4
        })
    })

    operation4.completionBlock = {
        print("Operation 4 completed")
    }
    queue.addOperation(operation4)
}
For each operation, we create a new instance of NSBlockOperation to encapsulate the task into a block. By using NSBlockOperation, you’re allowed to set the completion handler. Now when the operation is done, the completion handler will be called. For simplicity, we just log a simple message to indicate the operation is done. If you run the demo, you would see something like this in console:
Operation 1 completed
Operation 3 completed
Operation 2 completed
Operation 4 completed
Canceling Operations
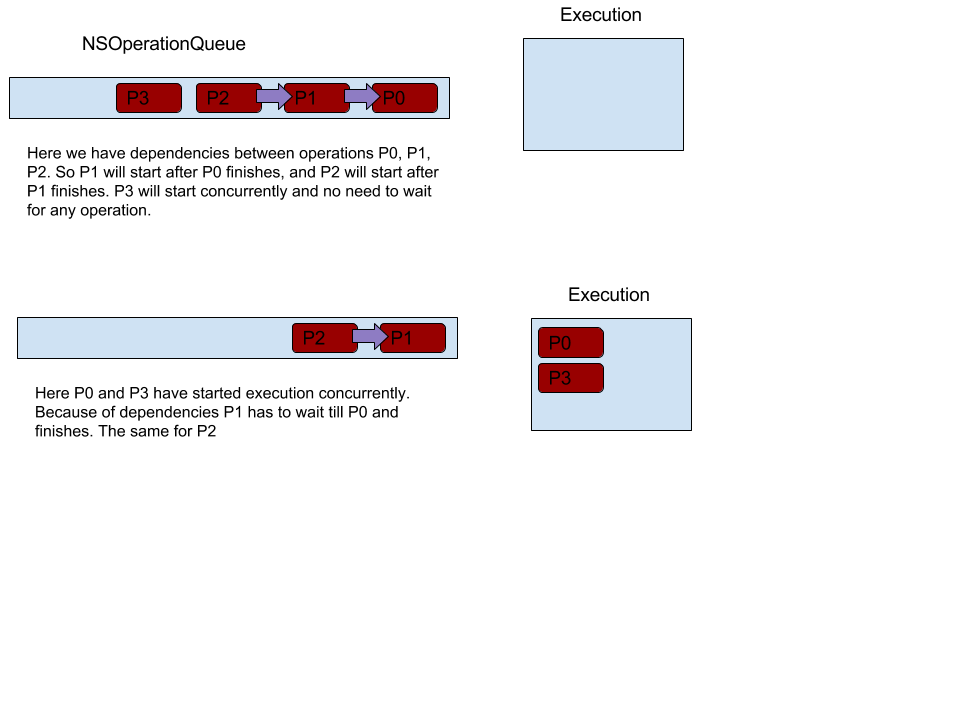
As mentioned before, NSBlockOperation allows you to manage the operations. Now let’s see how to cancel an operation. To do that, first add a bar button item to the navigation bar and name it Cancel. In order to demonstrate the cancel operation, we will add a dependency between Operation #2 and Operation #1, and another dependency between Operation #3 and Operation #2. This means Operation #2 will start after finishing of Operation #1, and Operation #3 will start after Operation #2 completes. Operation #4 has no dependency and will work concurrently. To cancel the operations all you need to do is call cancelAllOperations() of NSOperationQueue. Insert the following method in the ViewController class:
   @IBAction func didClickOnCancel(sender: AnyObject) {

        self.queue.cancelAllOperations()
    }
Remember you need to associate the Cancel button you added to the navigation bar with the didClickOnCancel method. You can do this by returning to the Main.storyboard file and opening the Connections Inspector. There you will see the unlink didSelectCancel() in the Received Actions section. Click + drag from the empty circle to the Cancel bar button. Then create the dependencies in the didClickOnStart method like this:
operation2.addDependency(operation1)
operation3.addDependency(operation2)
Next change the completion block of operation #1 to log the cancelled state like this:
operation1.completionBlock = {
            print("Operation 1 completed, cancelled:\(operation1.cancelled) ")
        }
You may change the log statement for operation #2, #3 and #4, so you will have a better idea of the process. Now let’s build and run. After you hit the Start button, press the Cancel button. This will cancel all operations after operation #1 completes. Here is what happens:
- As operation #1 already executed, cancelling will do nothing. This is why the cancelled value is logged false, and the app still shows image #1.
- If you hit the Cancel button quick enough, operation #2 is cancelled. The cancelAllOperations() call will stop its execution, so image #2 is not downloaded.
- Operation #3 was already in the queue, waiting for operation #2 to complete. As it depends on the completion of operation #2 and operation #2 was cancelled, operation #3 will not be executed and kicked out immediately from the queue.
- There is no dependency configured for operation #4. It just runs concurrently to download image #4.
Where to go from here?
In this tutorial, I have walked you through the concept of iOS concurrency and how you can implement it in iOS. I have given you a good introduction about concurrency, explained GCD, and showed you how to create series and concurrent queues. Furthermore, we have checked out NSOperationQueues. You should now be comfortable with the difference between Grand Central Dispatch and NSOperationQueue.
To dive further into iOS concurrency, I advise you to check out Apple’s Concurrency Guide.
For reference, you can find the complete source codes mentioned here in iOS Concurrency repository on Github.
Please feel free to ask any questions. I love to read your comment.


