

Previously, we covered how to use the built-in APIs to read a RSS feed and build a simple RSS Reader app. In this tutorial, we are going to learn how to use the built-in camera of the iPhone (or the iPod or iPad, if they have one) to take a photo. Also, we’ll see how to access the internal photo library and allow user to pick a photo. The iOS library provides the class UIImagePickerController which is the user interface for managing the user interaction with the camera or with the photo library. As usual, the UIImagePickerController requires the use of a delegate to respond to interactions.
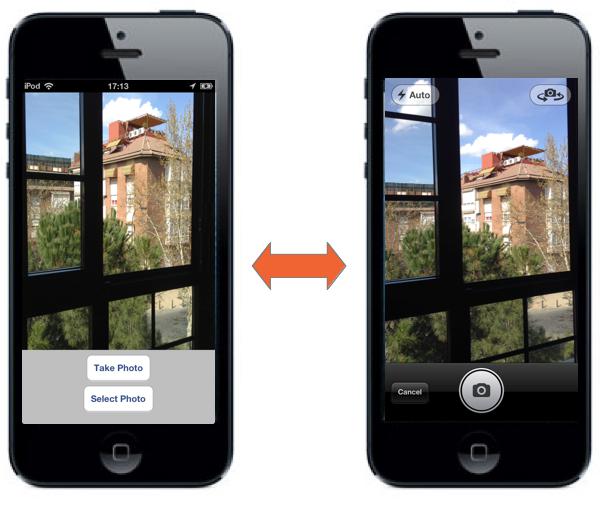
To help you understand the usage of UIImagePickerController, we’ll build a simple camera app. The example application is very simple: we will have a main window with a big UIImageView to show the selected photo, and two buttons: one to take a new photo, and the other one to select a photo from the photo library.
A simple camera app tutorial
Creating a Single View Application
Open Xcode and create a new Project, choose the template Single View Application as show below:

Single View Template
In the next screen enter CameraApp as the product name and set com.appcoda in the company identifier field. Select the “Use Authomatic Reference Counting” option, but unselect the “Use Storyboard” since we are not going to use storyboards for this project. Press next and crate.

Project Properties
Designing the User Interface
Select the AppViewController.xib file from Xcode’s Navigator to display the View Controller on the Editor Pane. Select an UIImageView from the library and drag and drop on the top of the UIView. Resize the UIImageView to take the full screen width and more than half of the height. Next, drag and drop an UIButton below the UIImageView, centered, and change its title to “Take Photo”. Finally, drag and drop another UIButton below the previous one, again centered, and change its title to “Select Photo”. The resulting View Controller should look something like:

UIViewController Design
Select again the UIImageView. In the Inspector select the File tab, and unselect the Use AutoLayout option, because we do not want the UIImageView to be resized to the size of the image created with the camera, since that would leave almost no free space for the buttons.

Disable Auto Layout
The next step is to create the connections. In order to do that, change the Editor to the Assistant mode meanwhile the AppViewController.xib file is selected. The AppViewController.h file should be opened. Control and drag from the UIImageView to the AppViewController.h and crate an IBOutlet.

Application Outlets
In the connection field we have to choose Outlet, as Name use imageView, as Type select UIImageView, and finally, as Storage select Strong. That should create the following IBOutlet code:
@property (strong, nonatomic) IBOutlet UIImageView *imageView;
In the same way, control and drag from the “Take Photo” button. In this case in the Connection field choose Action, as Name write takePhoto, the type is UIButton, the Event that fires the actions is “Touch Up Inside”, and the argument passed to the method is Sender. Do it again for the “Select Photo” button, but in this case name the action selectPhoto.
If you did everything correctly, the APPViewController.h should be something like:
#import

@interface APPViewController : UIViewController

@property (strong, nonatomic) IBOutlet UIImageView *imageView;

- (IBAction)takePhoto:  (UIButton *)sender;
- (IBAction)selectPhoto:(UIButton *)sender;

@end
Implementing the View Controller
As we said before, we need a delegate to deal with the user interaction with the camera or the photo library. In order to do that we have to conform to the UIImagePickerControllerDelegate protocol. Also, since we are going to present the camera (or the photo library) modally, we have to implement the UINavigationControllerDelegate protocol as well. Add both protocols to the AppViewController.h file:
@interface APPViewController : UIViewController
When the user clicks (touch up inside) the “Take Photo” button, we have to create an UIImagePickerController and set its delegate to our AppViewController class. Also, we have to specify which kind of image picker we want to show, the camera with UIImagePickerControllerSourceTypeCamera, or a photo library with UIImagePickerControllerSourceTypePhotoLibrary; in this case we select the Camera. Once the picker has been crated, we have to present it modally with the method presentViewController.
Write the following takePhoto acton method:
- (IBAction)takePhoto:(UIButton *)sender {

    UIImagePickerController *picker = [[UIImagePickerController alloc] init];
    picker.delegate = self;
    picker.allowsEditing = YES;
    picker.sourceType = UIImagePickerControllerSourceTypeCamera;

    [self presentViewController:picker animated:YES completion:NULL];

}
Finally, we do the same for the selectPhoto action method, but changing the sourceType to UIImagePickerControllerSourceTypePhotoLibrary.
- (IBAction)selectPhoto:(UIButton *)sender {

    UIImagePickerController *picker = [[UIImagePickerController alloc] init];
    picker.delegate = self;
    picker.allowsEditing = YES;
    picker.sourceType = UIImagePickerControllerSourceTypePhotoLibrary;

    [self presentViewController:picker animated:YES completion:NULL];


}
Implementing the Delegate Methods of UIImagePickerController
When the user takes a photo with the camera and resizes the image (photo resizing is allowed since we said allowsEditing = YES when we created the image picker) the didFinishPickingMediaWithInfo method is called. As the first argument we have the picker who called the method, something very useful if we have more than one image picker in our application, but that is not our case, and so, we ignore this parameter. The second argument is more interesting. It is a NSDictionary which contains, among other things, the original image and the edited image (accessible through the tag UIImagePickerControllerEditedImage).
- (void)imagePickerController:(UIImagePickerController *)picker didFinishPickingMediaWithInfo:(NSDictionary *)info {

    UIImage *chosenImage = info[UIImagePickerControllerEditedImage];
    self.imageView.image = chosenImage;

    [picker dismissViewControllerAnimated:YES completion:NULL];

}
It might happen that the user cancel the operation by touching the “Cancel” button of the image picker view. In that case the picker will call the imagePickerControllerDidCancel method. The implementation of this method is very simple, since what we have to do is just remove (dismiss) the picker controller.
- (void)imagePickerControllerDidCancel:(UIImagePickerController *)picker {

    [picker dismissViewControllerAnimated:YES completion:NULL];

}
Oops… the App Crashes
OK, our application is ready and it can be tested on a physical device. However, if we run the application on the simulator, it will crash. What has gone wrong? Well, the problem is that the simulator has no camera. If we want, we can control explicitly that case and show to the user an error message (that it is much better solution than a crash). And doing so it is a good idea, since it could happen that somebody will run our app in an old iPodTouch or iPad without a camera. The UIImagePickerController has a class method called isSourceTypeAvailable that allows us to check if the device has a built in camera (constant UIImagePickerControllerSourceTypeCamera).
For example, add the following code to the controller’s viewDidLoad method:
    if (![UIImagePickerController isSourceTypeAvailable:UIImagePickerControllerSourceTypeCamera]) {

        UIAlertView *myAlertView = [[UIAlertView alloc] initWithTitle:@"Error"
                                                        message:@"Device has no camera"
                                                        delegate:nil
                                                        cancelButtonTitle:@"OK"
                                                        otherButtonTitles: nil];

        [myAlertView show];

    }
Test the App Using a Physical Device
After changing the code, run the app again in iPhone Simulator. You should see the error message as the simulator doesn’t support camera. In order to test the app, you must load the app and test it on a physical iPhone (or other iOS devices). If everything is smooth, you should end up with a simple camera app that lets you take photo and access the internal photo library.

Download the Full Source Code
The UIImagePickerController class offers a great way to access iPhone’s camera and photo library. The sample camera app is not perfect but it gives you an idea how the UIImagePickerController works. The iOS SDK makes it so simple for developer to access the built-in camera and photo library.
For your complete reference, you can download the Xcode project for the sample app here.
As always, leave us comment and share your thought about the tutorial.


