

One of the most well-known and most used feature of iPhone devices to all users, developers or not, is the Address Book. For those who use a lot the device as a phone (rather than a mobile mini computer), all important and vital information they need exist in their contacts. Till today, many applications have been developed, and even more can be built that make use the device’s address book data.
Apple makes developers’ life easy, as it provides frameworks that allow to access the address book and deal with its records. Knowing how to work with address book and how to perform some basic tasks (at least), is a knowledge necessary to all developers, as either sooner or later they’ll come in need of integrating address book info into their applications.
Before we proceed to take a tour on the most important aspects of the address book framework through a demo application, it would be a nice idea to make an introductory discussion first that will make easier to everyone to comprehend what comes next in this tutorial. So, keep reading and surely you’ll find some pretty interesting stuff as food for thinking and study.
Address Book Overview
Initially, it will might seem a bit weird the way the address book and its records are managed. Even though at a first glance it doesn’t look the most straightforward programming topic to work with, once someone gets familiarized with it, it becomes really easy to handle contact information. Let’s begin digging into the address book concepts, trying to keep things as simple as possible. We won’t see every aspect of it, neither will we analyze all of its provided features. However, we will focus on the most common type of usage, how we can get a person’s contact information.
First of all, it’s necessary to make clear that there is not just one address book. Many address books can be created and be handled, even by the same application. Our goal however is to access the address book that the device uses, so we won’t care about how to create or manage numerous address books.
An address book record, represented programmatically by a ABRecordRef object, contains all data that someone may desire to import into an app. A record can contain data either for a person, or for a group of persons. In this tutorial, we’ll focus on a single person’s data only. The structure that represents a person is the ABPerson class, and all of its related data is a collection of properties. As we are going to work with properties in details, it’s important to stay a little longer on it. A property can be either single-value, or multi-value. The set of properties regarding a person consist of both these kinds. Examples of single-value properties are the first and last name of a person. On the other hand, the e-mail addresses of a person, or the phone numbers are pretty nice examples of multi-value properties, as one may have more than one e-mail addresses and more than one phone numbers respectively.
A multi-value property consists of a list of single values. Each single value is associated with a label and an identifier, which uniquely identifies a single value inside a multi-value property. For example, as I previously said, a person’s e-mail is a multi-value property, which can be composed by a work e-mail address and a label describing it, a personal (home) e-mail address and a label describing it, etc.
It worths denoting that when it’s needed to keep track of a single value of a multi-value property, the identifier value should be used instead of its index in the value list, as it doesn’t get changed for any reason in a device. The index of a single value inside a multi-value property is not a reliable point of reference, as it can be changed while new values are added or existing ones get deleted (think of a mutable array where new values are added or deleted). This is useful information for all those who would like to explore the address book framework beyond the scope of this tutorial.
Even though that all information mentioned above looks somehow complicated, it will become pretty clear how everything works upon usage. Keep in mind that in bottom line, you always deal with properties and functions related to them. Before ending this introduction, I should also make one more step and say a few more words, programmatically speaking this time. So, first of all, address book framework requires to do some C-level working. The framework provides functions that allows to copy values from C structures in Objective-C properties and then work with familiar stuff. Actually, copying values is almost mandatory, otherwise access in address book data is not allowed. Further than that, each property in the address book framework is in the form of kABPersonPROPERTYNAMEProperty, a fact that makes it easy to everyone to see all available properties in Xcode, simply by starting to type kABPerson…. For example, the kABPersonFirstNameProperty indicates the first name property of a person. For multi-value properties, it’s allowed to get all values in a NSArray array, and then using specific functions to copy values and/or the respective labels and identifiers in appropriate Objective-C variables.
Enough with theory though. Let’s move forward to see some action!
Demo App Overview
For the purposes of this tutorial, we are going to create a sample application that will demonstrate how we can import contact info from the device’s address book into it. It will consist of two view controllers:
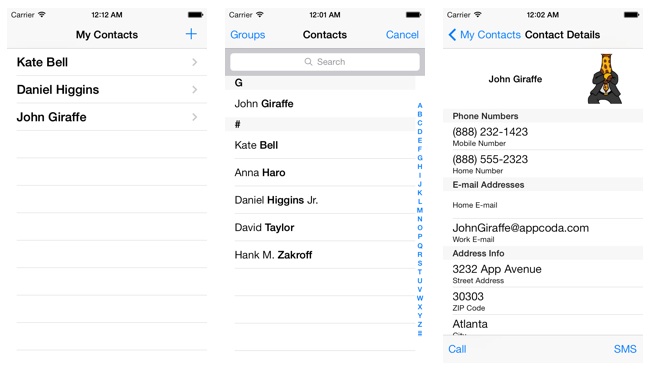
- A master view controller that will contain a table view, where all imported contacts will appear only with the first and last name.
- A secondary view controller, where details of a selected contact will show on-screen.
The workflow will be as follows: In the first, primary view controller, an Add button will exist, which when is tapped the address book controller will appear to let us pick a contact. Once a selection has been made, the first and last name of the selected contact will be displayed on the table view. When tapping on a name on the table view, the secondary view controller will come in front, where the next contact details will be made available:
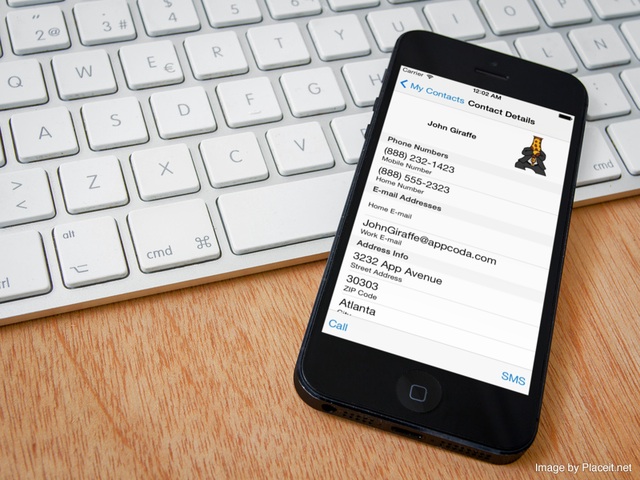
- Full name (first and last name).
- Contact image (if exists).
- Both work and home e-mail addresses.
- Both mobile and home phone numbers.
- Street address info.
The last three pieces of information will be populated on a table view.
Previously I mentioned that when the add button is tapped, then the address book controller will be displayed. This address book controller is actually a navigation controller, provided by iOS directly when importing the appropriate framework. So, there is nothing regarding design that we have to implement in order to list all address book contacts. It’s provided for free by the system.
Beyond importing contacts from the address book, listing them and viewing their details, there is also a bonus in this application. We will implement two extra features: How to make a call and how to send SMS messages using phone numbers existing on our app!
As a final note I must say that the root view controller of our demo application is going to be a navigation controller, so we can navigate from the list of the imported contacts into a contact’s details and backwards by taking advantage of the system built-in transitions. In other words, we are going to develop a master-detail view application.
Creating the Xcode Project
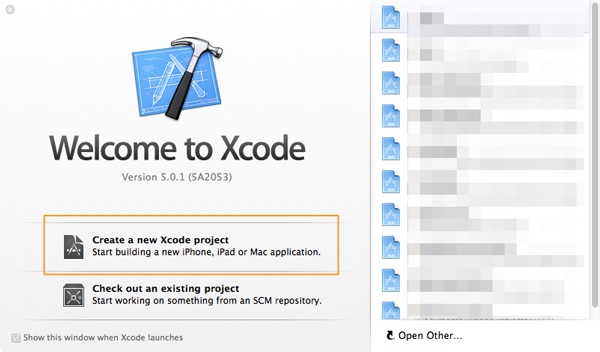
Time to make our hands dirty. Launch Xcode and in the welcome screen select to create a new project.
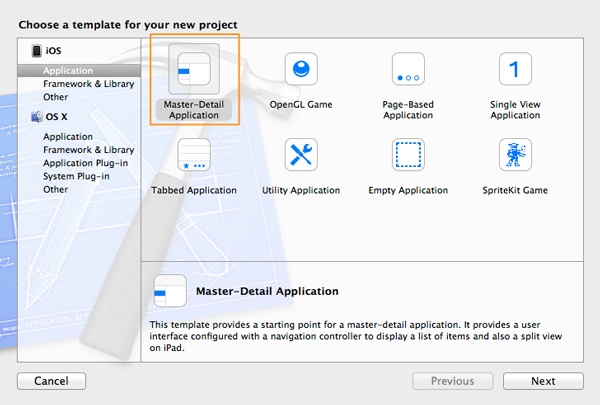
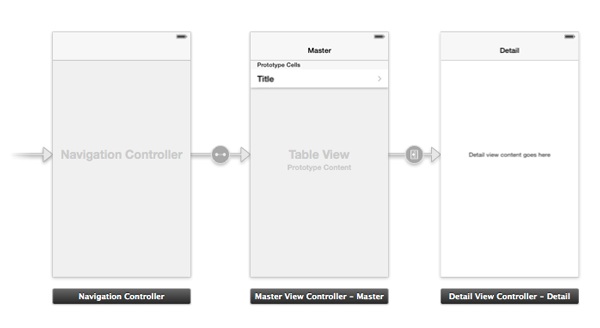
As the template for the new project, select the Master-Detail Application option. This one will setup a nice base for us, even though we’ll have got rid of some unnecessary code. Click on the Next button.
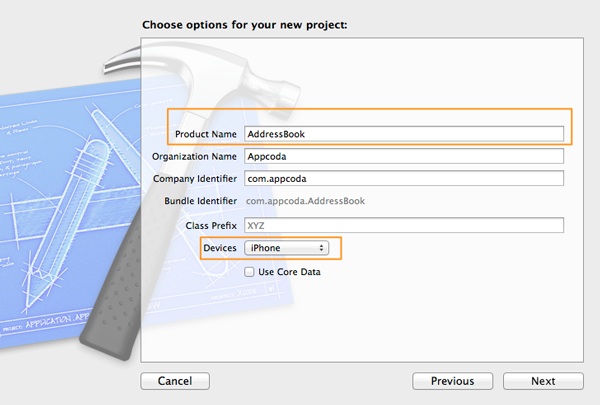
In the second step, add the AddressBook value in the Product Name field. Leave everything else as it is, but make sure that in the Devices drop down menu the iPhone value is selected. Click on the Next button.
In the last step of the guide, select a place to save your project and click on the Create button.
The project is ready!
Clear Unnecessary Code
The Master-Detail template we chose for our project sets up a navigation controller as the root view controller for our application. Along with that, it adds some default code, but we don’t want all of it in our project. Therefore, in this sample app instead of starting our work by adding code as it is traditionally done, we are going to begin by deleting targeted code snippets.
Let’s begin from the MasterViewController.m. At first, go at the private interface section and delete the next line:
NSMutableArray *_objects;
Next, head down to the viewDidLoad method and remove the following:
self.navigationItem.leftBarButtonItem = self.editButtonItem;
Fine. After that, delete the entire next method:
- (void)insertNewObject:(id)sender
{
    if (!_objects) {
        _objects = [[NSMutableArray alloc] init];
    }
    [_objects insertObject:[NSDate date] atIndex:0];
    NSIndexPath *indexPath = [NSIndexPath indexPathForRow:0 inSection:0];
    [self.tableView insertRowsAtIndexPaths:@[indexPath] withRowAnimation:UITableViewRowAnimationAutomatic];
}
Don’t worry if on the way Xcode shows warnings or errors. Everything will be resolved during development. Go to the tableView:numberOfRowsInSection: table view delegate method and remove this:
return _objects.count;
Next, in the tableView:cellForRowAtIndexPath: table view method delete these two lines:
NSDate *object = _objects[indexPath.row];
cell.textLabel.text = [object description];
Also, delete entirely the implementation of the next table view methods:
- tableView:canEditRowAtIndexPath:
- tableView:commitEditingStyle:forRowAtIndexPath:
- tableView:moveRowAtIndexPath:toIndexPath:
- tableView:canMoveRowAtIndexPath:
Finally, go to the prepareForSegue:sender: method and delete the contents of the condition body:
NSIndexPath *indexPath = [self.tableView indexPathForSelectedRow];
NSDate *object = _objects[indexPath.row];
[[segue destinationViewController] setDetailItem:object];
A couple more points to clear code: Open the DetailViewController.h file and delete the detailItem property:
@property (strong, nonatomic) id detailItem;
Navigate your self in the DetailViewController.m file. In the private interface section, delete the configureView method declaration…
- (void)configureView;
… and completely delete the implementation of both the setDetailItem: and the configureView methods:
- (void)setDetailItem:(id)newDetailItem
{
    if (_detailItem != newDetailItem) {
        _detailItem = newDetailItem;

        // Update the view.
        [self configureView];
    }
}

- (void)configureView
{
    // Update the user interface for the detail item.

    if (self.detailItem) {
        self.detailDescriptionLabel.text = [self.detailItem description];
    }
}
Lastly, in the viewDidLoad method just remove the call to the configureView method (which no longer exists):
[self configureView];
Designing the interface
At this point we get rid of any unwanted code and it’s time to setup the interface of our application. On the Project Navigator, click on the Main.storyboard file to let it open on Interface Builder. Initially, this is what you should see on your screen:
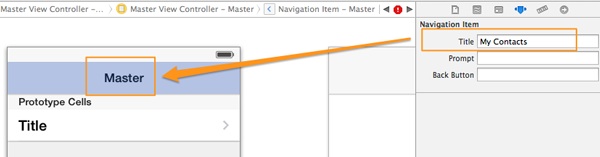
Begin by changing the title in the navigation bar of the MasterViewController scene. Click on the navigation bar area, on the title, and then by going to the Utilities pane > Attributes Inspector > Title field modify the title by setting the My Contacts value.
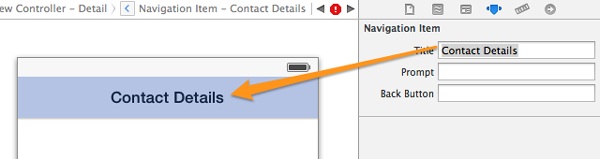
Follow the same process and change the title of the DetailViewController scene. Set the Contact Details value instead of the default one.
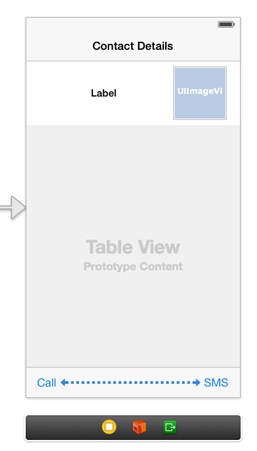
The MasterViewController scene seems suitable for our sample application in the way it currently is. Therefore, we will focus on configuring the DetailViewController scene. Start off by deleting the pre-made UILabel with title Detail view content goes here in the center of the scene. Continue by adding the next subviews:
- UIImageView. X:220 Y:73 Width:80 Heigh:80
- UILabel. X:20 Y:73 Width:192 Height:80, Font: System Bold 15.0, Text Alignment: Centered
- UITableView. X:0 Y:161 Width:320 Height:363
- UIToolBar. X:0 Y:524 Width:320 Height:44
On the toolbar, add the next bar button items, right next to the default one:
- Flexible Space Bar Button Item
- UIBarButtonItem
Double-Click on the left bar button item of the toolbar to change its name. Give the Call value on it. Do the same for the right bar button item and set the SMS value.
Our interface is ready. All needed subviews for the purpose of the sample application have been added through the Interface Builder. Here is how the DetailViewConrtoller scene should look like:
However, we are not still ready to move on, because one more major task needs to be performed. We must declare IBOutlet properties and connect them to the subviews we just added in order to access them later through our code.
Open the DetailViewController.h file and declare the next three IBOutlet properties:
@interface DetailViewController : UIViewController

@property (nonatomic, weak) IBOutlet UILabel *lblContactName;
@property (nonatomic, weak) IBOutlet UIImageView *imgContactImage;
@property (nonatomic, weak) IBOutlet UITableView *tblContactDetails;

@end
Next, go back to the Main.storyboard file to make any necessary connections. Inside the Document Outline pane, Control-Click or Right-Click on the DetailViewController object. A (black) popup window appears, where all declared IBOutlets properties list there, under the Outlets section. For each IBOutlet property, click on the circle on the right side and drag and drop to the appropriate control, just as it’s shown at the next figure:
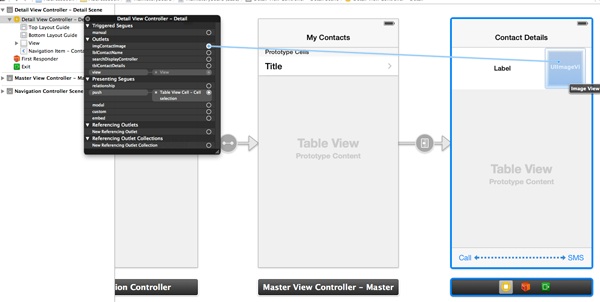
Make sure to connect the imgContactImage to the image view, the lblContactName to the label object and the tblContactDetails property to the table view of the DetailViewController scene.
Now we are completely ready regarding the interface! Let’s move full ahead to enable the add button and display all device’s contacts existing into the address book.
Display Address Book Contacts
Summarizing what we’ve done so far, we could say that we have setup the base for building the essential part of the application on it. Once the project got prepared, we deleted any redundant code from it, we configured the interface using the Interface Builder and declared and connected all necessary IBOutlet properties. From this point on, we are able to start making some real work!
Our first concern is to enable the Add button, which when is tapped must display the address book controller, so as we pick a contact. Before doing so, we must link two necessary frameworks to the application. Fortunately, thanks to new Xcode 5 Auto Linking compiler feature which will work on our behalf, we don’t need to manually add the required frameworks on the project. Simply we’ll import them, and the compiler is responsible for linking them. So, open the MasterViewController.h file, and at the top of it import the next two:
#import
#import
The first framework will provide us with all the necessary libraries and classes we need to work with address book contacts. The second one, is required in order to display the address book navigation controller and list all existing contacts.
Further than that, it’s also necessary to adopt the ABPeoplePickerNavigationControllerDelegate protocol, so as to give our app the right to handle any selections been made on the address book controller and interact with it, simply by being its delegate. Therefore, while still being on the MasterViewController.h file, modify the interface header so as to be similar to this one:
@interface MasterViewController : UITableViewController

@end
Our progress up to this point is perfect! Let’s head now to the MasterViewController.m file, directly into the private section of the interface. In here, we will declare a private method, the one that will be called every time the Add button gets tapped and the address book controller should show up. Add the following:
@interface MasterViewController ()

-(void)showAddressBook;

@end
Besides that, at the same place we will declare a ABPeoplePickerNavigationController in order to handle the address book controller. So, here is the snippet above, a bit enriched:
@interface MasterViewController ()

@property (nonatomic, strong) ABPeoplePickerNavigationController *addressBookController;

-(void)showAddressBook;

@end
The addressBookController object is the key for accessing the device’s address book and getting its contacts.
Now, let’s do a small fix. Go straight ahead to the viewDidLoad and locate the following commands:
UIBarButtonItem *addButton = [[UIBarButtonItem alloc] initWithBarButtonSystemItem:UIBarButtonSystemItemAdd target:self action:@selector(insertNewObject:)];

self.navigationItem.rightBarButtonItem = addButton;
This first line of code creates a bar button item, the Add button, which is then (second line) positioned on the right side of the navigation bar. Everything here is perfect, except for one thing: The selector method of the bar button item. As you see, there is still set the insertNewObject: method, which had been created by default by Xcode and we deleted earlier. We must replace it with the one we previously declared, so every time the Add button gets tapped our method is called. To fix this, simply replace the selector method, just as follows:
UIBarButtonItem *addButton = [[UIBarButtonItem alloc] initWithBarButtonSystemItem:UIBarButtonSystemItemAdd target:self action:@selector(showAddressBook)];

self.navigationItem.rightBarButtonItem = addButton;
What’s left? Just to implement the showAddressBook method. Inside the MasterViewController.m file, add the next code fragment:
-(void)showAddressBook{
    _addressBookController = [[ABPeoplePickerNavigationController alloc] init];
    [_addressBookController setPeoplePickerDelegate:self];
    [self presentViewController:_addressBookController animated:YES completion:nil];
}
At first we are initializing the addressBookController object, then we are setting self (the MasterViewController class) as its delegate, and we are finally presenting modally the address book controller on the screen. Quite simple.
If you temporarily silent any errors and you run the application for the first time either on the Simulator or on a real device, you’ll find out that when tapping on the Add bar button item the address book controller (the well-known address book window) appears. Amazing! However, nothing else seems to be working yet. A contact cannot be selected, nor the Cancel button of the controller works so we can simply dismiss it. Don’t worry though; all these consist of the heart of this tutorial and are coming next.
Select and Handle Contact Info
In order to keep things simple and at the same time to make a comprehensive demonstration on how to handle various kind of address book properties, here is what we are going to import to our application from the address book:
- First and Last name
- Contact image
- Mobile and Home Phone numbers
- Work and Home E-mail addresses
- Street address info
All this data is a combination of both single-value and multi-value properties. Once a contact gets selected, it will be added to a mutable array. Actually, the imported data for each contact will be stored to a mutable dictionary object, and this object will be stored then to a position of the mutable array.
So, as a first step go and declare a mutable array object in the private section of the interface:
@interface MasterViewController ()

@property (nonatomic, strong) NSMutableArray *arrContactsData;

...

@end
Good, now that the storing structure exists, we are able to proceed. Let’s continue by doing some easy stuff and let’s enable the Cancel button of the address book controller, so when it’s tapped the controller goes away. Add the next delegate method in the MasterViewController.m file:
-(void)peoplePickerNavigationControllerDidCancel:(ABPeoplePickerNavigationController *)peoplePicker{
    [_addressBookController dismissViewControllerAnimated:YES completion:nil];
}
The method’s name is self-explanatory. The only thing we do is to dismiss the address book controller using the addressBookController object. If you want, go and give it another try. You’ll find out that the Cancel button works great.
Selecting a contact can be done in two ways. The first one is to simply tap on a contact’s record in order to select it and let the address book controller be dismissed. The second one goes one step further, where when tapping on a contact’s record a new view appears containing all the contact’s detailed info. From this view (which is part of the address book controller also) a specific property can be selected and then the address book controller gets dismissed. We are going to use the first way, as we don’t care about selecting single properties, but we’d rather get the whole record.
The behavior I just described can be achieved using the following delegate method:
-(BOOL)peoplePickerNavigationController:(ABPeoplePickerNavigationController *)peoplePicker shouldContinueAfterSelectingPerson:(ABRecordRef)person{
    return NO;
}
Inside this delegate method we’ll do our most important job, and that is to handle the address book data. Let’s begin doing so by making one step at the time.
Previously I mentioned that the imported data of each contact is going to be stored into a mutable dictionary object, and then this object is going to be added into the mutable array. Now it’s time to create this dictionary by initializing a NSMutableDictionary object. In the following code, note that we are setting the empty string value as the default one for all keys upon initialization.
-(BOOL)peoplePickerNavigationController:(ABPeoplePickerNavigationController *)peoplePicker shouldContinueAfterSelectingPerson:(ABRecordRef)person{
    NSMutableDictionary *contactInfoDict = [[NSMutableDictionary alloc]
                                            initWithObjects:@[@"", @"", @"", @"", @"", @"", @"", @"", @""]
                                            forKeys:@[@"firstName", @"lastName", @"mobileNumber", @"homeNumber", @"homeEmail", @"workEmail", @"address", @"zipCode", @"city"]];

    return NO;
}
I think that it’s now quite clear from the key values the contact info we are interested in this application. Now, let’s see how we can get the first name of the selected person. The address book framework provides a function named ABRecordCopyValue, and it accepts two parameters. The first one is an address book record, and in our case it’s the last parameter of the delegate method, the person object. The ABRecordRef type represents a record in the address book. The second parameter of the ABRecordCopyValue function is the name of the property that we are looking for.
The ABRecordCopyValue function returns a Core Foundation object. Therefore, we will declare a Core Foundation object for general use inside this delegate method and we will assign the results of every function that returns such a type into it. Here is what I mean exactly:
CFTypeRef generalCFObject;
generalCFObject = ABRecordCopyValue(person, kABPersonFirstNameProperty);
The CFTypeRef type is a general type that represents any Core Foundation object.
Before getting the first name from the generalCFObject, we need to check at first if it contains a value indeed or not (if it’s nil or not). If it contains a value, then we will store it in the dictionary. Note that the previous code allocates memory, and after we have finished working with it is necessary to release it using the CFRelease function. Here is how we check for an existing value and how to store it to the dictionary:
if (generalCFObject) {
    [contactInfoDict setObject:(__bridge NSString *)generalCFObject forKey:@"firstName"];
    CFRelease(generalCFObject);
}
Note the (__bridge NSString *)generalCFObject point. This is the so-called bridged cast and is used to resolve any ARC compatibility issues between pointers in C and Objective-C objects. In the dictionary we cannot add a Core Foundation object, as it’s not one of the supported types that can be stored in it. So, we must convert it to a NSString object. If we want to do that without make Xcode complain and show errors, this casting is more than necessary. If you feel so, please go and do some research about all this on the web to get more info. Going in more details will lead us out of the scope of this tutorial.
So, putting everything together up to now, here is how the delegate method is formed:
-(BOOL)peoplePickerNavigationController:(ABPeoplePickerNavigationController *)peoplePicker shouldContinueAfterSelectingPerson:(ABRecordRef)person{
    NSMutableDictionary *contactInfoDict = [[NSMutableDictionary alloc]
                                            initWithObjects:@[@"", @"", @"", @"", @"", @"", @"", @"", @""]
                                            forKeys:@[@"firstName", @"lastName", @"mobileNumber", @"homeNumber", @"homeEmail", @"workEmail", @"address", @"zipCode", @"city"]];


    CFTypeRef generalCFObject;
    generalCFObject = ABRecordCopyValue(person, kABPersonFirstNameProperty);
    if (generalCFObject) {
        [contactInfoDict setObject:(__bridge NSString *)generalCFObject forKey:@"firstName"];
        CFRelease(generalCFObject);
    }

    return NO;
}
It’s not too hard, right? As I said in the introduction, it might not be the most straightforward thing to work with, but on the other hand it’s not difficult to get used to it. So, let’s do the same for the next one single-value property we want, the last name of the contact.
-(BOOL)peoplePickerNavigationController:(ABPeoplePickerNavigationController *)peoplePicker shouldContinueAfterSelectingPerson:(ABRecordRef)person{
    ...

    generalCFObject = ABRecordCopyValue(person, kABPersonLastNameProperty);
    if (generalCFObject) {
        [contactInfoDict setObject:(__bridge NSString *)generalCFObject forKey:@"lastName"];
        CFRelease(generalCFObject);
    }

    return NO;
}
Next, let’s try to get the phone numbers we want, and let’s work for first time with a multi-value property. The general idea is more or less the same as before, as once again we’ll make use of the ABRecordCopyValue function. This time however, we won’t assign the returned value into a single object, but instead we will use a ABMultiValueRef object. The ABMultiValueRef type represents a multi-value property, and the normal way to assign a value to it is the next one:
ABMultiValueRef phonesRef = ABRecordCopyValue(person, kABPersonPhoneProperty);
Here is how we are going to proceed next:
We will make a loop, and for every single value of the multi-value property, we will get its label and its value. If the label is equal to the pre-defined mobile or home phone number label constants, then we will set the respective value to the dictionary. If no match is found, then there is no entry regarding the specific phone value for the selected contact. Let’s see the code to make everything more clear:
for (int i=0; i < ABMultiValueGetCount(phonesRef); i++) {
        CFStringRef currentPhoneLabel = ABMultiValueCopyLabelAtIndex(phonesRef, i);
        CFStringRef currentPhoneValue = ABMultiValueCopyValueAtIndex(phonesRef, i);

        if (CFStringCompare(currentPhoneLabel, kABPersonPhoneMobileLabel, 0) == kCFCompareEqualTo) {
            [contactInfoDict setObject:(__bridge NSString *)currentPhoneValue forKey:@"mobileNumber"];
        }

        if (CFStringCompare(currentPhoneLabel, kABHomeLabel, 0) == kCFCompareEqualTo) {
            [contactInfoDict setObject:(__bridge NSString *)currentPhoneValue forKey:@"homeNumber"];
        }

        CFRelease(currentPhoneLabel);
        CFRelease(currentPhoneValue);
    }
    CFRelease(phonesRef);
Using the ABMultiValueGetCount function we get the total number of items the multi-value property contains. Note that the label and value for each loop is defined using the ABMultiValueCopyLabelAtIndex function, which accepts two parameters. The multi-value property (the phonesRef in our case) and the index of the current single value. Next, by making a simple comparison between the current label and a pre-defined label constant (kABPersonPhoneMobileLabel, kABHomeLabel) we make sure that the value we're looking for exists or not. If found, then we set the respective value to the dictionary. Note that the casting is necessary once again. Also, don't forget to release the memory allocated by the Core Foundation objects.
When the loop above ends, the dictionary will contain the desired phone numbers (if exist). Using the exact same logic, we can get the e-mail addresses of the selected contact:
ABMultiValueRef emailsRef = ABRecordCopyValue(person, kABPersonEmailProperty);
for (int i=0; i
So far, so good. Let's get the street address data now. We are going to change our approach, as the street address is a little bit peculiar case. At first, we'll get the address multi-value property just like we did in all the previous cases, and then we will get the data of the first address value (if any exist) as a NSDictionary object. We'll do that because when talking about an address, we talk for a set of values, including street address, zip code, city, etc. Once we get the first address in the collection of addresses as a dictionary, then we will directly add all individual values into the mutable dictionary where we store all data.
ABMultiValueRef addressRef = ABRecordCopyValue(person, kABPersonAddressProperty);
if (ABMultiValueGetCount(addressRef) > 0) {
NSDictionary *addressDict = (__bridge NSDictionary *)ABMultiValueCopyValueAtIndex(addressRef, 0);
[contactInfoDict setObject:[addressDict objectForKey:(NSString *)kABPersonAddressStreetKey] forKey:@"address"];
[contactInfoDict setObject:[addressDict objectForKey:(NSString *)kABPersonAddressZIPKey] forKey:@"zipCode"];
[contactInfoDict setObject:[addressDict objectForKey:(NSString *)kABPersonAddressCityKey] forKey:@"city"];
}
CFRelease(addressRef);
Finally, let's get the contact image as a NSData object, if exists of course. Without commenting anything further, I present the code which is pretty clear:
if (ABPersonHasImageData(person)) {
NSData *contactImageData = (__bridge NSData *)ABPersonCopyImageDataWithFormat(person, kABPersonImageFormatThumbnail);
[contactInfoDict setObject:contactImageData forKey:@"image"];
}
All desired values now exist in the contactInfoDict dictionary, which needs to be added to the arrContactsData array:
if (_arrContactsData == nil) {
_arrContactsData = [[NSMutableArray alloc] init];
}
[_arrContactsData addObject:contactInfoDict];
Two easy final steps have been left and we are ready. The first one is to reload the table view data, and the second one is to dismiss the address book controller. Here it is:
[self.tableView reloadData];
[_addressBookController dismissViewControllerAnimated:YES completion:nil];
The heart of our application has been implemented. Go ahead and test the application. You'll see that when you select a contact from the address book, it will appear on the table view of our app after the address book controller has gone away. Right below, you see the delegate method with its code all-together:
-(BOOL)peoplePickerNavigationController:(ABPeoplePickerNavigationController *)peoplePicker shouldContinueAfterSelectingPerson:(ABRecordRef)person{
NSMutableDictionary *contactInfoDict = [[NSMutableDictionary alloc]
initWithObjects:@[@"", @"", @"", @"", @"", @"", @"", @"", @""]
forKeys:@[@"firstName", @"lastName", @"mobileNumber", @"homeNumber", @"homeEmail", @"workEmail", @"address", @"zipCode", @"city"]];
CFTypeRef generalCFObject = ABRecordCopyValue(person, kABPersonFirstNameProperty);
if (generalCFObject) {
[contactInfoDict setObject:(__bridge NSString *)generalCFObject forKey:@"firstName"];
CFRelease(generalCFObject);
}
generalCFObject = ABRecordCopyValue(person, kABPersonLastNameProperty);
if (generalCFObject) {
[contactInfoDict setObject:(__bridge NSString *)generalCFObject forKey:@"lastName"];
CFRelease(generalCFObject);
}
ABMultiValueRef phonesRef = ABRecordCopyValue(person, kABPersonPhoneProperty);
for (int i=0; i
Before closing this chapter and move forward, go and add the next delegate method implementation to silence a warning that Xcode will show:
-(BOOL)peoplePickerNavigationController:(ABPeoplePickerNavigationController *)peoplePicker shouldContinueAfterSelectingPerson:(ABRecordRef)person property:(ABPropertyID)property identifier:(ABMultiValueIdentifier)identifier{
return NO;
}
Display Contact Details
It's time now to concentrate on setting up the view controller that a contact's details will be displayed to. So, open the DetailViewController.h and do the following:
- Adopt the UITableViewDelegate and UITableViewDataSource protocols.
- Declare a public NSDictionary object that will contain the data passed from the master view controller.
Remember that earlier we had declared some IBOutlet properties as well in this file, so having all those in mind edit your file and make it look like this:
@interface DetailViewController : UIViewController
@property (nonatomic, strong) NSDictionary *dictContactDetails;
@property (nonatomic, weak) IBOutlet UILabel *lblContactName;
@property (nonatomic, weak) IBOutlet UIImageView *imgContactImage;
@property (nonatomic, weak) IBOutlet UITableView *tblContactDetails;
@end
Move now to the DetailViewController.m file and in the private section of the interface directly. In there declare just one private method that we will use to populate our data to the appropriate subviews.
@interface DetailViewController ()
-(void)populateContactData;
@end
After that, go to the viewDidLoad method to perform two tasks: Firstly, to make self (the DetailViewController class) the delegate and datasource of the table view. Next, to call the private method we just declared.
- (void)viewDidLoad
{
[super viewDidLoad];
[_tblContactDetails setDelegate:self];
[_tblContactDetails setDataSource:self];
[self populateContactData];
}
Our next goal is to implement the populateContactData private method. This one is going to be a really small method, as only three tasks will take place in it: The full name of the contact, composed by the first and last name will be displayed on the label, the contact image if exists it will be shown on the image view and finally the table view data will be reloaded, so as to show all values existing in the dictContactDetails dictionary.
-(void)populateContactData{
NSString *contactFullName = [NSString stringWithFormat:@"%@ %@", [_dictContactDetails objectForKey:@"firstName"], [_dictContactDetails objectForKey:@"lastName"]];
[_lblContactName setText:contactFullName];
// Set the contact image.
if ([_dictContactDetails objectForKey:@"image"] != nil) {
[_imgContactImage setImage:[UIImage imageWithData:[_dictContactDetails objectForKey:@"image"]]];
}
[_tblContactDetails reloadData];
}
Let's discuss a little bit about the table view now. The tblContactDetails table view will be used to display all the imported contact values except for the first and last name, as well as the contact image, whose value will be assigned directly to the image view and the label we created for them. In the table view we will create three sections; in the first one they will be displayed the two phone numbers, in the second one they will be displayed the two e-mail addresses and in the last section the street address info will appear. Each section is going to have its title. So, having said that, let's add the next table view delegate methods:
- (NSInteger)numberOfSectionsInTableView:(UITableView *)tableView
{
return 3;
}
- (NSInteger)tableView:(UITableView *)tableView numberOfRowsInSection:(NSInteger)section
{
if (section == 0 || section == 1) {
return 2;
}
else{
return 3;
}
}
-(NSString *)tableView:(UITableView *)tableView titleForHeaderInSection:(NSInteger)section{
switch (section) {
case 0:
return @"Phone Numbers";
break;
case 1:
return @"E-mail Addresses";
break;
case 2:
return @"Address Info";
break;
default:
return @"";
break;
}
}
The data display will take place in the tableView:cellForRowAtIndexPath: datasource method. In this one, depending on the index path section and row, the appropriate data will be assigned to both the cell's text label and detail text label (subtitle text). The method doesn't have any difficult part in it, so I'm pretty sure that just by looking at the code you'll understand everything:
- (UITableViewCell *)tableView:(UITableView *)tableView cellForRowAtIndexPath:(NSIndexPath *)indexPath
{
UITableViewCell *cell = [tableView dequeueReusableCellWithIdentifier:@"Cell"];
if (cell == nil) {
cell = [[UITableViewCell alloc] initWithStyle:UITableViewCellStyleSubtitle reuseIdentifier:@"Cell"];
}
NSString *cellText = @"";
NSString *detailText = @"";
switch (indexPath.section) {
case 0:
switch (indexPath.row) {
case 0:
cellText = [_dictContactDetails objectForKey:@"mobileNumber"];
detailText = @"Mobile Number";
break;
case 1:
cellText = [_dictContactDetails objectForKey:@"homeNumber"];
detailText = @"Home Number";
break;
}
break;
case 1:
switch (indexPath.row) {
case 0:
cellText = [_dictContactDetails objectForKey:@"homeEmail"];
detailText = @"Home E-mail";
break;
case 1:
cellText = [_dictContactDetails objectForKey:@"workEmail"];
detailText = @"Work E-mail";
break;
}
break;
case 2:
switch (indexPath.row) {
case 0:
cellText = [_dictContactDetails objectForKey:@"address"];
detailText = @"Street Address";
break;
case 1:
cellText = [_dictContactDetails objectForKey:@"zipCode"];
detailText = @"ZIP Code";
break;
case 2:
cellText = [_dictContactDetails objectForKey:@"city"];
detailText = @"City";
break;
}
break;
default:
break;
}
cell.textLabel.text = cellText;
cell.detailTextLabel.text = detailText;
return cell;
}
Ready to test it? Well, don't rush! The detail view controller might be ready, but one important thing has not yet been done; and that is to pass data from one view controller to another.
Pass Contact Details
Thankfully, this task is really easy and just a matter of a few lines. Head back to the MasterViewController.m file, and locate the prepareForSegue:sender: method. If you remember, at the beginning of this tutorial while deleting any unnecessary code we visited this one too, and we removed all code existed inside the condition block. Now it's turn to add some code at the same place, therefore edit the method and make it exactly like the next code fragment:
- (void)prepareForSegue:(UIStoryboardSegue *)segue sender:(id)sender
{
if ([[segue identifier] isEqualToString:@"showDetail"]) {
NSDictionary *contactDetailsDictionary = [_arrContactsData objectAtIndex:self.tableView.indexPathForSelectedRow.row];
[[segue destinationViewController] setDictContactDetails:contactDetailsDictionary];
}
}
What we are doing here is clear enough. We are getting the dictionary object existing in the position of the arrContactsData array that's equal to the selected row index, and then we are assigning it to the dictContactDetails dictionary object of the detail view controller, using the setter method shown above.
Our sample application is now almost ready, and almost fully functional. Go and give it a try if you want. Admire how contact details appear when selecting one listed on the master view controller.
The Bonus Features!
At the beginning of this tutorial I mentioned that we are going to add two bonus features on the sample application; how to make a call and how to send a SMS message through the app. Also, if you recall, when we designed the interface, we added a toolbar with two respective bar button items. Now that the app's functionality has been completed, it's time to work with these.
First of all, we need to create two IBAction methods that will trigger each action when those buttons get tapped. To implement the call feature, as you will later see, things are easy. The SMS message sending however is more complex, as it's required to use one more framework, but it's not too hard though. Let's start creating all these, and everything will be explained on the way.
Start off by opening the DetailViewController.h file and add the next two IBAction method declaration:
-(IBAction)makeCall:(id)sender;
-(IBAction)sendSMS:(id)sender;
It's pretty clear what they are for. Before proceeding and while still being in this file, let's add the following framework which we'll need to implement the SMS sending functionality:
#import
Also, it's necessary to modify the @interface header, so to enable our class to adopt the message protocol. Besides that, let's make our class conform to the UIActionSheetDelegate protocol, because we'll use an action sheet to let users select a phone number.
@interface DetailViewController : UIViewController
Now we can go to the next step. Open the Main.storyboard file to connect the two action methods to the bar button items, applying the same logic just like you did when you connected the IBOutlet properties to the subviews. The next figure will also help you:

Now head to the DetailViewController.m file, at the private section of the interface and declare the following three private methods:
-(void)performPhoneAction:(BOOL)shouldMakeCall;
-(void)makeCallToNumber:(NSString *)numberToCall;
-(void)sendSMSToNumber:(NSString *)numberToSend;
In the first method we will add code common for both making a call and sending a SMS message. Its parameter will define if its code will work for the first or the second case. This method will be called by our IBAction methods, where each one of them will set a different parameter value.
The next two methods are used to either make the actual call (the first one), or to send the SMS message (the second one). Which one will be called depends on the outcome of the previous method. You'll find out upon implementation how everything will work.
Let's create now the performPhoneAction: method. Let me present its logic first, and then I'll provide the respective code. It's known that when importing a contact from the address book, up to two phone numbers will be stored to our application (mobile and home numbers). If both phone numbers exist, it's required to let user select what number wants to use in order to make a call or send a SMS message. Therefore, after checking if both of the numbers exist indeed, we will display an action sheet and allow user to make a choice. Depending on this choice and the parameter value, we will call then either the makeCallToNumber: or sendSMSToNumber: method through the action sheet delegate method (that's why we adopted earlier its protocol). However, if not both phone numbers exist, then we need to check if any of them exists, and if that's the case, then make the appropriate method call depending once again on the parameter value. Below it's presented the code mathing to all these, and as you'll see, there is nothing especially hard there:
-(void)performPhoneAction:(BOOL)shouldMakeCall{
if (![[_dictContactDetails objectForKey:@"mobileNumber"] isEqualToString:@""] &&
![[_dictContactDetails objectForKey:@"homeNumber"] isEqualToString:@""]) {
UIActionSheet *phoneOptions = [[UIActionSheet alloc] initWithTitle:@"Pick a number"
delegate:self
cancelButtonTitle:@"Cancel"
destructiveButtonTitle:@""
otherButtonTitles:[_dictContactDetails objectForKey:@"mobileNumber"], [_dictContactDetails objectForKey:@"homeNumber"], nil];
[phoneOptions showInView:self.view];
if (shouldMakeCall) {
[phoneOptions setTag:101];
}
else{
[phoneOptions setTag:102];
}
}
else{
NSString *selectedPhoneNumber = nil;
if (![[_dictContactDetails objectForKey:@"mobileNumber"] isEqualToString:@""]) {
selectedPhoneNumber = [_dictContactDetails objectForKey:@"mobileNumber"];
}
if (![[_dictContactDetails objectForKey:@"homeNumber"] isEqualToString:@""]) {
selectedPhoneNumber = [_dictContactDetails objectForKey:@"homeNumber"];
}
if (selectedPhoneNumber != nil) {
if (shouldMakeCall) {
[self makeCallToNumber:selectedPhoneNumber];
}
else{
[self sendSMSToNumber:selectedPhoneNumber];
}
}
}
}
If you're curious why I'm setting a tag value depending on the parameter value, I just need to say that based on this value later inside the action sheet delegate method we will specify whether a call should be made or a SMS message should be sent. The 101 and 102 values I set are random, so you may use any value you wish. Beyond that, notice that when they don't exist both of the phone numbers, we only proceed if the selectedPhoneNumber value is not nil. Don't worry about the makeCallToNumber: and the sendSMSToNumber: methods. We'll implement them in a while.
Now that this method has been created, let's call it. At first, implement the makeCall: IBAction method:
-(IBAction)makeCall:(id)sender{
[self performPhoneAction:YES];
}
The YES value means that we call the performPhoneAction to perform a phone call. Similarly, implement the next IBaction method:
-(IBAction)sendSMS:(id)sender{
[self performPhoneAction:NO];
}
Inside the performPhoneAction: method we used an action sheet to provide a way of picking a phone number. Now, we need to handle the user selection, so any choice been made to trigger the appropriate action. At first, get the code and then we'll discuss it:
-(void)actionSheet:(UIActionSheet *)actionSheet clickedButtonAtIndex:(NSInteger)buttonIndex{
if (buttonIndex != 3) {
NSString *selectedPhoneNumber = [actionSheet buttonTitleAtIndex:buttonIndex];
if ([actionSheet tag] == 101) {
[self makeCallToNumber:selectedPhoneNumber];
}
else{
[self sendSMSToNumber:selectedPhoneNumber];
}
}
}
All of our logic in this delegate method is based on the value of the index of the tapped button. When the Cancel button is tapped, there is no need to take any action, so using the condition shown above we exclude it from everything else. For any of the rest two buttons, we get the title of the tapped one. Having done so, it's time to use the tag value of the action sheet. So, depending on the tag value, we make a call to the appropriate method so as to perform a proper action.
Right now we are a step away from getting finished with the call feature. Let's implement the private method that does exactly that:
-(void)makeCallToNumber:(NSString *)numberToCall{
NSURL *phoneURL = [NSURL URLWithString:[NSString stringWithFormat:@"tel:%@", numberToCall]];
if ([[UIApplication sharedApplication] canOpenURL:phoneURL]) {
[[UIApplication sharedApplication] openURL:phoneURL];
}
}
Using a URL scheme it's possible through the sharedApplication instance to make a phone call. Keep in mind that it's very important to check if a call can be made using the way presented above, before continuing to the actual action. In fact, this mechanism makes use of the Phone App of the device and provides it with the number we want to call in the form of a NSURL object.
We are now ready with that! Let's go to see how we can send a SMS message. The most important thing is to know whether the device can send a SMS (text) message or not. In this example, if the test device cannot do so, we will simply log a message regarding it. On the other hand, if the device is capable to send SMS messages, then it's needed to initialize and use a MFMessageComposeViewController object. That's the reason we imported the MessageUI framework. Managing this object is easy, as we just have to provide it with the target phone number (or a list of numbers, not in our case though), the text to be sent and present the message view controller. Let's see how all this can be done:
-(void)sendSMSToNumber:(NSString *)numberToSend{
if (![MFMessageComposeViewController canSendText]) {
NSLog(@"Unable to send SMS message.");
}
else {
MFMessageComposeViewController *sms = [[MFMessageComposeViewController alloc] init];
[sms setMessageComposeDelegate:self];
[sms setRecipients:[NSArray arrayWithObjects:numberToSend, nil]];
[sms setBody:@"This is a SMS message from Appcoda.com"];
[self presentViewController:sms animated:YES completion:nil];
}
}
As you notice, there is the canSendText class method which returns YES or NO, depending on whether the device can send text messages or not.
Lastly, just before reaching the end, one last thing is remaining. To implement a required delegate method (and silence a Xcode warning):
-(void)messageComposeViewController:(MFMessageComposeViewController *)controller didFinishWithResult:(MessageComposeResult)result{
[controller dismissViewControllerAnimated:YES completion:nil];
}
When this method it's called, the text message view controller will get dismissed.
Everything is ready now! Note before trying to test the application that phone call and SMS sending features work only on real devices with a SIM card on them.
Compile and Run the App
If you haven't done so in previous steps, then go ahead and run the application. Import contacts and view their details. Use real devices to test all features. Right next there are some screenshots of the app running.

Summary
Importing contact info from the address book into an application is a quite common task, and it's almost certain that most of the developers will have to deal with it some time. The way the address book and its records are managed might seem a little bit peculiar at the beginning, but it's not hard to work with it once you get to know it. Undoubtably, the most important part of this tutorial was the contact data importing process, and how the address book framework works. However, many more useful programming techniques were also presented and used, in order to become tools for making this sample project real. Working with address book doesn't stop here, and of course it's required a lot of reading to succeed to do more than just importing data. Nevertheless, I'm confident that this tutorial will become a guide for many readers who want to get involved with all these stuff. Happy reading!
For your complete reference, you can download the address book project from here. Make sure you use Xcode 5.0 (or up) to build the project.
As always, leave me comment and share your thought about the tutorial.


