Appendix - Swift Basics
Swift is a new programming language for developing iOS, macOS, watchOS and tvOS apps. As compared to Objective-C, Swift is a neat language and will definitely make developing iOS apps easier. In this appendix, I will give you a brief introduction of Swift. This doesn't serve as a complete guide for the programming language but gives you all the essentials to kick start Swift programming. For the full reference, please refer to the official documentation (https://swift.org/documentation/).
Variables, Constants, and Type Inference
In Swift, you declare variables with the var keyword and constants using the let keyword. Here is an example:
var numberOfRows = 30
let maxNumberOfRows = 100
These are the two keywords you need to know for variable and constant declaration. You use the letkeyword for storing a value that is unchanged. Otherwise, use var keyword for storing values that can be changed.
Isn't it easier than Objective-C?
What's interesting is that Swift allows you to use nearly any character for both variable and constant names. You can even use an emoji character for the naming.
You may notice a huge difference in variable declaration between Objective-C and Swift. In Objective-C, developers have to specify explicitly the type information when declaring a variable. Be it an int or double or NSString, etc.
const int count = 10;
double price = 23.55;
NSString *myMessage = @"Objective-C is not dead yet!";
It's your responsibility to specify the type. In Swift, you no longer need to annotate variables with type information. It provides a huge feature known as Type inference. This feature enables the compiler to deduce the type automatically by examining the values you provide in the variable.
let count = 10
// count is inferred to be of type Int
var price = 23.55
// price is inferred to be of type Double
var myMessage = "Swift is the future!"
// myMessage is inferred to be of type String
It makes variable and constant declaration much simpler, as compared to Objective-C. Swift provides an option to explicitly specify the type information if you wish. The below example shows how to specify type information when declaring a variable in Swift:
var myMessage: String = "Swift is the future!"
No Semicolons
In Objective-C, you need to end each statement in your code with a semicolon. If you forget to do so, you will end up with a compilation error. As you can see from the above examples, Swift doesn't require you to write a semicolon (;) after each statement, though you can still do so if you like.
var myMessage = "No semicolon is needed"
Basic String Manipulation
In Swift, strings are represented by the String type, which is fully Unicode-compliant. You can declare strings as variables or constants:
let dontModifyMe = "You cannot modify this string"
var modifyMe = "You can modify this string"
In Objective-C, you have to choose between NSString and NSMutableString classes to indicate whether the string can be modified. You do not need to make a choice in Swift. Whenever you assign a string to a variable (i.e. var), the string can be modified in your code.
Swift simplifies string manipulating and allows you to create a new string from a mix of constants, variables, literals, as well as, expressions. Concatenating strings is super easy. Simply add two strings together using the + operator:
let firstMessage = "Swift is awesome."
let secondMessage = "What do you think?"
var message = firstMessage + secondMessage
print(message)
Swift automatically combines both messages and you should see the following message in console. Note that print is a global function in Swift to print the message in console.
Swift is awesome. What do you think? You can do that in Objective-C by using the stringWithFormat:method. But isn't the Swift version more readable?
NSString *firstMessage = @"Swift is awesome. ";
NSString *secondMessage = @"What do you think?";
NSString *message = [NSString stringWithFormat:@"%@%@", firstMessage, secondMessage];
NSLog(@"%@", message);
String comparison is more straightforward. You can use the == operator to compare two strings like this:
var string1 = "Hello"
var string2 = "Hello"
if string1 == string2 {
    print("Both are the same")
}
Arrays
The syntax of declaring an array in Swift is similar to that in Objective-C. Here is an example:
Objective-C:
NSArray *recipes = @[@"Egg Benedict", @"Mushroom Risotto", @"Full Breakfast", @"Hamburger", @"Ham and Egg Sandwich"];
Swift:
var recipes = ["Egg Benedict", "Mushroom Risotto", "Full Breakfast", "Hamburger", "Ham and Egg Sandwich"]
While you can put any objects in NSArray or NSMutableArray in Objective-C, arrays in Swift can only store items of the same type. In the above example, you can only store strings in the string array. With type inference, Swift automatically detects the array type. But if you like, you can also specify the type in the following form:
var recipes : String[] = ["Egg Benedict", "Mushroom Risotto", "Full Breakfast", "Hamburger", "Ham and Egg Sandwich"]
Swift provides various methods for you to query and manipulate an array. Simply use the count method to find the number of items in the array:
var numberOfItems = recipes.count
// recipes.count will return 5
Swift makes operations on array much simpler. You can add an item by using the += operator:
recipes += ["Thai Shrimp Cake"]
This also applies when you need to add multiple items:
recipes += ["Creme Brelee", "White Chocolate Donut", "Ham and Cheese Panini"]
To access or change a particular item in an array, pass the index of the item by using subscript syntax just like that in Objective-C and other programming languages:
var recipeItem = recipes[0]
recipes[1] = "Cupcake"
One interesting feature of Swift is that you can use … to change a range of values. Here is an example:
recipes[1...3] = ["Cheese Cake", "Greek Salad", "Braised Beef Cheeks"]
This changes the item 2 to 4 of the recipes array to "Cheese Cake", "Greek Salad" and "Braised Beef Cheeks". (Remember the first item in an array starts with the index 0. This is why index 1 refers to item 2.)
If you print the array to console, here is the result:
- Egg Benedict
- Cheese Cake
- Greek Salad
- Braised Beef Cheeks
- Ham and Egg Sandwich
Dictionaries
Swift provides three primary collection types: arrays, dictionaries, and sets. Now let's talk about dictionaries. Each value in a dictionary is associated with a unique key. To declare a dictionary in Swift, you write the code like this:
var companies = ["AAPL" : "Apple Inc", "GOOG" : "Google Inc", "AMZN" : "Amazon.com, Inc", "FB" : "Facebook Inc"]
The key and value in the key-value pairs are separated by a colon. The key-value pairs are surrounded by a pair of square brackets, each of which is separated by commas.
Like array and other variables, Swift automatically detects the type of the key and value. But, if you like, you can specify the type information by using the following syntax:
var companies: [String: String] = ["AAPL" : "Apple Inc", "GOOG" : "Google Inc", "AMZN" : "Amazon.com, Inc", "FB" : "Facebook Inc"]
To iterate through a dictionary, use the for-in loop.
for (stockCode, name) in companies {
    print("\(stockCode) = \(name)")
}

// You can also use the keys and values properties to
// retrieve the keys and values of the dictionary.
for stockCode in companies.keys {
    print("Stock code = \(stockCode)")
}
for name in companies.values {
    print("Company name = \(name)")
}
To access the value of a particular key, specify the key using the subscript syntax. If you want to add a new key-value pair to the dictionary, simply use the key as the subscript and assign it with a value like below:
companies["TWTR"] = "Twitter Inc"
Now the companies dictionary contains a total of 5 items. The "TWTR":"Twitter Inc" pair is automatically added to the companies dictionary.
Set
A set is very similar to an array. While an array is an ordered collection, a set is an unordered collection. Items in an array can be duplicated. A set stores no repeated values.
To declare a set, you can write like this:
var favoriteCuisines: Set = ["Greek", "Italian", "Thai", "Japanese"]
The syntax is very similar to creating an array, but you have to explicitly specify the type Set.
As mentioned, a set is an unordered collection of distinct items. If you declare a set of duplicated values, the set will not store the duplicates. Here is an example:

Operations on sets are quite similar to an array. You can use for-in loop to iterate over a set. But to add a new item to a set, you can't use the += operator. You have to call the insert method:
favoriteCuisines.insert("Indian")
With sets, you can easily determine the values two sets have in common, or vice versa. For example, you use two sets to represent the favorite cuisines of two persons:
var tomsFavoriteCuisines: Set = ["Greek", "Italian", "Thai", "Japanese"]
var petersFavoriteCuisines: Set = ["Greek", "Indian", "French", "Japanese"]
You want to find out the common cuisines which they both love. You can call the intersection method like this:
tomsFavoriteCuisines.intersection(petersFavoriteCuisines)
This will return you the result: {"Greek", "Japanese"}.
Or if you want to determine which cuisines they don't have in common, you can use the symmetricDifference method:
tomsFavoriteCuisines.symmetricDifference(petersFavoriteCuisines)
// Result: {"French", "Italian", "Thai", "Indian"}
Classes
In Objective-C, you create separate interface (.h) and implementation (.m) files for classes. Swift no longer requires developers to do that. You can define classes in a single file (.swift) without separating the external interface and implementation.
To define a class, you use the class keyword. Here is a sample class in Swift:
class Recipe {
    var name: String = ""
    var duration: Int = 10
    var ingredients: [String] = ["egg"]
}
In the above example, we define a Recipe class with three properties including name duration and ingredients. Swift requires you to provide the default values of the properties. You'll end up with a compilation error if the initial values are missing.
What if you don't want to assign a default value? Swift allows you to write a question mark (?) after the type of a value that indicates the value is optional.
class Recipe {
    var name: String?
    var duration: Int = 10
    var ingredients: [String]?
}
In the above code, the name and ingredients properties are automatically assigned with a default value of nil. We will discuss optionals in details in later section. To create an instance of a class, just use the below syntax:
var recipeItem = Recipe()
// You use the dot notation to access or change the property of an instance.
recipeItem.name = "Mushroom Risotto"
recipeItem.duration = 30
recipeItem.ingredients = ["1 tbsp dried porcini mushrooms", "2 tbsp olive oil", "1 onion, chopped", "2 garlic cloves", "350g/12oz arborio rice", "1.2 litres/2 pints hot vegetable stock", "salt and pepper", "25g/1oz butter"]
Swift allows you to subclass classes and adopt protocols. For example, if you have a SimpleTableViewController class that extends from UIViewController and adopts both UITableViewDelegate and UITableViewDataSource protocols, you can write the class declaration like this:
class SimpleTableViewController : UIViewController, UITableViewDelegate, UITableViewDataSource
Methods
Similar to other object-oriented languages, Swift allows you to define functions in a class known as methods. You can use the func keyword to declare a method. Here is a sample method without return values and parameters:
class TodoManager {
    func printWelcomeMessage() {
        print("Welcome to My ToDo List")
    }
}
In Swift, you call a method by using dot syntax:
todoManager.printWelcomeMessage()
If you need to declare a method with parameters and return values, the method will look this:
class TodoManager {
    func printWelcomeMessage(name:String) -> Int {
        print("Welcome to \(name)'s ToDo List")

        return 10
    }
}
The syntax looks a bit awkward especially for the -> operator. The above method takes a name parameter in String type as the input. The -> operator is used as an indicator for methods with a return value. In the above code, you specify a return type of Int that returns the total number of todo items. Below demonstrates how you call the method:
var todoManager = TodoManager()
let numberOfTodoItem = todoManager.printWelcomeMessage(name: "Simon")
print(numberOfTodoItem)
Control Flow
Control flow and loops employ a very C-like syntax. As you can see in the previous section, Swift provides for-in loop to iterate through arrays and dictionaries.
for loops
In case you just want to iterate over a range of values, you can use the ... or ..< operators. These are the new operators introduced in Swift for expressing a range of values. Here is an example:
for i in 0..<5 {
    print("index = \(i)")
}
This would print out the following result in console:
index = 0
index = 1
index = 2
index = 3
index = 4
So what's the difference between ..< and ...? If we replace the ..< operator with ... in the above example, this defines a range that runs from 0 to 5 and 5 is included in the range. Here is the console result:
index = 0
index = 1
index = 2
index = 3
index = 4
index = 5
if-else statement
Just like Objective-C, you can use if statement to execute code based on a certain condition. The syntax of the if-else statement is pretty similar to that in Objective-C. Swift just makes the syntax even simpler in that you no longer need to enclose the condition within a pair of round brackets.
var bookPrice = 1000;
if bookPrice >= 999 {
    print("Hey, the book is expensive")
} else {
    print("Okay, I can affort it")
}
switch statement
I'd just like to highlight the switch statement in Swift that is a dramatic improvement compared to its Objective-C counterpart. Take a look at the following sample switch statement. Do you notice anything special?
switch recipeName {
    case "Egg Benedict":
        print("Let's cook!")
    case "Mushroom Risotto":
        print("Hmm... let me think about it")
    case "Hamburger":
        print("Love it!")
    default:
        print("Anything else")
}
First up, the switch statement can now handle strings. You can't do switching on NSString in Objective-C. You had to use several if statements to implement the above code. At last, Swift brings us this most sought after utilization of switch statement.
Another interesting feature that you may notice is that there is no break. Recalled that in Objective-C, you need to add a break in every switch case. Otherwise, it will fall through to the next case. In Swift, you do not need to add the break statement explicitly. Switch statements in Swift do not fall through the bottom of each case and into the next one. Instead, as soon as the first matching case completes, the entire switch statement completes its execution.
On top of that, the switch statement now supports range matching. Take a look at the below code:
var speed = 50
switch speed {
case 0:
    print("stop")
case 0...40:
    print("slow")
case 41...70:
    print("normal")
case 71..<101:
    print("fast")
default:
    print("not classified yet")
}

// as the speed falls within the range of 41 and 70, it'll print normal to console
The switch case lets you check values within a certain range by using two new operators: ... and ..<. Both operators serve as a shortcut for expressing a range of values.
Consider the sample range of "41...70", the ... operator defines a range that runs from 41 to 70, including both 41 and 70. If we use the ..< operator instead of ... in the example, this defines a range that runs from 41 to 69. In other words, 70 is excluded from the range.
Tuples
Swift introduces an advanced type that is not available in Objective-C known as tuples. Tuples allow developers to create a group of values and pass it around. Consider that you're developing a method call to return multiple values, you can now use tuples as a return value instead of returning a custom object.
Tuples treat multiple values as a single compound value. Here is an example:
let company = ("AAPL", "Apple Inc", 93.5)
The above code creates a tuple that includes stock code, company name and stock price. As you may be aware, you're allowed to put any value of any type within a tuple. You can decompose the values of tuples and use it like this:
let (stockCode, companyName, stockPrice) = company
print("stock code = \(stockCode)")
print("company name = \(companyName)")
print("stock price = \(stockPrice)")
A better way to use tuple is to give each element in tuple a name and you can access the element value by using dot notation. Here is another example:
let product = (id: "AP234", name: "iPhone X", price: 599)
print("id = \(product.id)")
print("name = \(product.name)")
print("price = USD\(product.price)")
A common use of tuples is to serve as a return value. In some cases, you want to return multiple values in a method without using a custom class. You can use tuples as the return value like the following example:
class Store {
    func getProduct(number: Int) -> (id: String, name: String, price: Int) {
        var id = "IP435", name = "iMac", price = 1399
        switch number {
        case 1:
            id = "AP234"
            name = "iPhone X"
            price = 999
        case 2:
            id = "PE645"
            name = "iPad Pro"
            price = 599
        default:
            break
        }

        return (id, name, price)
    }
}
In the above code, we create a method call named getProduct that takes in a number and returns a product as tuple. You can call the method and store the return value like below:
let store = Store()
let product = store.getProduct(number: 2)
print("id = \(product.id)")
print("name = \(product.name)")
print("price = USD\(product.price)")
Optionals Overview
What is optional? When declaring variables in Swift, they are designated as non-optional by default. In other words, you have to assign a non-nil value to the variable. If you try to set a nil value to a non-optional, the compiler will say, "Nil cannot be assigned to type String!"
var message: String = "Swift is awesome!" // OK
message = nil // compile-time error
The same applies when declaring properties in a class. The properties are designated as non-optional by default.
class Messenger {
    var message1: String = "Swift is awesome!" // OK
    var message2: String // compile-time error
}
You will get a compile-time error for message2 because it's not assigned with an initial value. If you have written in Objective-C before, you may be a bit surprised. In Objective-C or another programming language (e.g. Javascript), you won't get any compile-time error when assigning nil to a variable or declaring a property without initial value.
However, it doesn't mean you can't declare a property without assigning an initial value in Swift. Swift introduces optional type to indicate the absence of a value. It is defined by adding a question mark ?operator after the type declaration. Here is an example:
class Messenger {
    var message1: String = "Swift is awesome!" // OK
    var message2: String? // OK
}
You can still assign a value when the variable is defined as optional. However if the variable is not assigned with any value like the below code, its value automatically defaults to nil.
Why Optionals?
Swift is designed for safety. As Apple mentioned, optionals are an example of the fact that Swift is a type safe language. As you can see from the above examples, Swift's optionals provide compile-time checks that would prevent some common programming errors happening at run-time. Let's go through the below example and you will have a better understanding of the power of optionals.
func findStockCode(company: String) -> String? {
    if (company == "Apple") {
        return "AAPL"
    } else if (company == "Google") {
        return "GOOG"
    }

    return nil
}

var stockCode: String? = findStockCode(company: "Facebook")
let text = "Stock Code - "
let message = text + stockCode  // compile-time error
print(message)
This function accepts a company name and returns the corresponding stock code. As you can see from the code, it can only supports two companies including Apple and Google. The return value can be AAPL, GOOG, or nil.
Consider that if Swift doesn't have the optional feature, what will happen when we execute the code above? As the method returns nil for Facebook, a runtime exception will be thrown when running the app. In the worst case, the app may crash.
With Swift's optionals, instead of discovering the error at runtime, it reveals the error at compile time. Since stockCode is defined as an optional, Xcode immediately detects a potential error ("value of optional type String? is not unwrapped) and tells you to correct it.
As you can see from the example, Swift's optionals reinforce the nil-check and offer compile-time cues to developers. Thus, the use of optionals contributes to better code quality.
Unwrapping Optionals
So how can we make the code work? Apparently, we need to test if stockCode contains a nil value or not. We modify the code as follows:
var stockCode: String? = findStockCode(company: "Facebook")
let text = "Stock Code - "
if stockCode != nil {
    let message = text + stockCode!
    print(message)
}
We used if to perform the nil-check. Once we know the optional must contain a value, we unwrap it by placing an exclamation mark (!) to the end of the optional's name. In Swift, this is known as forced unwrapping. You use the ! operator to unwrap an optional and reveal the underlying value.
Referring to the above example, we only unwrap the stockCode optional after the nil-check. We know the optional must contain a non-nil value before unwrapping it using the ! operator. It is always recommended to ensure that an optional contains a value before unwrapping it.
But what if we forget the verification like below?
var stockCode:String? = findStockCode(company: "Facebook")
let text = "Stock Code - "
let message = text + stockCode!  // runtime error
There will be no compile-time error. The compiler assumes that the optional contains a value as forced unwrapping is used. When you run the app, a runtime error is shown in the console.
Optional Binding
Other than forced unwrapping, optional binding is a simpler and recommended way to unwrap an optional. You use optional binding to check if the optional contains a value or not. If it does contain a value, unwrap it and put it into a temporary constant or variable.
There is no better way to explain optional binding than using an example. We convert the sample code in the previous example into optional binding:
var stockCode: String? = findStockCode(company: "Facebook")
let text = "Stock Code - "
if let tempStockCode = stockCode {
    let message = text + tempStockCode
    print(message)
}
The if let (or if var) are the two keywords of optional binding. In plain English, the code says, "If stockCode contains a value, unwrap it, set its value to tempStockCode and execute the conditional block. Otherwise, just skip the block." As tempStockCode is a new constant, you no longer need to use the ! suffix to access its value.
You can further simplify the code by evaluating the function in the if statement:
let text = "Stock Code - "
if var stockCode = findStockCode(company: "Apple") {
    let message = text + stockCode
    print(message)
}
Here stockCode is not an optional. There is no need to use the ! suffix to access its value in the conditional block. If a nil value is returned from the function, the block will not be executed.
Optional Chaining
Before explaining optional chaining, let's tweak the original example. We create a new class named Stock with the code and price properties, which are optionals. The findStockCode function is modified to return a Stock object instead of String.
class Stock {
    var code: String?
    var price: Double?
}

func findStockCode(company: String) -> Stock? {
    if (company == "Apple") {
        let aapl: Stock = Stock()
        aapl.code = "AAPL"
        aapl.price = 90.32

        return aapl

    } else if (company == "Google") {
        let goog: Stock = Stock()
        goog.code = "GOOG"
        goog.price = 556.36

        return goog
    }

    return nil
}
We rewrite the original example as below. We first find the stock code/symbol by calling the findStockCode function. And then we calculate the total cost needed when buying 100 shares of the stock.
if let stock = findStockCode(company: "Apple") {
    if let sharePrice = stock.price {
        let totalCost = sharePrice * 100
        print(totalCost)
    }
}
As the return value of findStockCode() is an optional, we use optional binding to check if it contains an actual value. Apparently, the price property of the Stock class is an optional. Again we use the if let statement to test if stock.price contains a non-nil value.
The above code works without any error. Instead of writing nested if let, you can simplify the code by using Optional Chaining. The feature allows us to chain multiple optionals together with the ?. operator. Here is the simplified version of the code:
if let sharePrice = findStockCode(company: "Apple")?.price {
    let totalCost = sharePrice * 100
    print(totalCost)
}
Optional chaining provides an alternative way to access the value of price. The code now looks a lot cleaner and simpler. Here I just cover the basics of optional chaining. You can find further information about optional chaining in Apple's Swift guide.
Failable Initializers
Swift has a feature called Failable Initializers. Initialization is the process of providing initial values to each of the stored properties of a class. In some cases, the initialization of an instance may fail. Now such failure can be reported using a failable initializer. The resulting value of a failable initializer either contains the object or nil. You will need to use if let to check if the initialization is successful or not. Let me give you an example:
let myFont = UIFont(name : "AvenirNextCondensed-DemiBold", size: 22.0)
The initialization of the UIFont object will fail if the font file doesn't exist or is unreadable. This initialization failure will report using a failable initializer. The returned object is an optional that can either be the object itself or nil. Thus, we need to use if let to handle the optional:
if let myFont = UIFont(name : "AvenirNextCondensed-DemiBold", size: 22.0) {

   // Further processing

}
Generics
The concept of Generics is not new and has been around for a long time in other programming languages like Java. For iOS developers, however, you may be new to Generics.
Generic Functions
Generics are one of the most powerful features of Swift and allow you to write flexible functions. So what are Generics exactly? Well, let's take a look at an example. Suppose you're developing a process function:
func process(a: Int, b: Int) {
     // do something
}
The function accepts two integer values for further processing. What if you need to take in other types of values like Double? You probably write another function like this:
func process(a: Double, b: Double) {
     // do something
}
Both functions look very similar. Assuming the bodies of the functions are identical, the main difference is the types of inputs they take in. With Generics, you can simplify them into one generic function that handles multiple input types:
func process<T>(a: T, b: T) {
     // do something
}
Now it defines a placeholder type instead of an actual type name. The <T> after the function name indicates that this is a generic function. For the function arguments, the actual type name is replaced with a generic type T.
You can call the process function in the same way. The actual type to use in place of T will be determined each time the function is called.
process(a: 689, b: 167)
Generic Functions with Type Constraints
Let's take a look at another example. Suppose you're writing another function to compare if two integer values are equal.
func isEqual(a: Int, b: Int) -> Bool {
    return a == b
}
If you need to compare other types of value such as String, you'll write another function like this:
func isEqual(a: String, b: String) -> Bool {
    return a == b
}
With Generics, you'll combine the two functions into one:
func isEqual<T>(a: T, b: T) -> Bool {
    return a == b
}
Again, we use T as a placeholder of the value types. But if you test out the above code in Xcode, the function will not compile. The problem lies with the a==b equality check. Though the function accepts values with any types, not every type can support the equal to operator (==). This is why Xcode indicates an error. In this case, you need to apply a type constraint for the generic function.
func isEqual<T: Equatable>(a: T, b: T) -> Bool {
    return a == b
}
You write type constraint by placing a protocol constraint after a type parameter's name, separated by a colon. Here the Equatable is the protocol constraint. In other words, the function will only accept values that support the Equatable protocol.
In Swift, it comes with a standard protocol called Equatable. For any types conforming to the Equatable protocol, they support the equal to (==) operator. All standard types like String, Int, Double support the Equatable protocol.
So you can use the isEqual function like this:
isEqual(a: 3, b: 3)             // true
isEqual(a: "test", b: "test")   // true
isEqual(a: 20.3, b: 20.5)       // false
Generic Types
You are not limited to use Generics in functions. Swift allows you to define your own generic types. This can be custom classes or structure. The built-in Array and Dictionary are examples of generic types.
Let's take a look at the below example:
class IntStore {
    var items = [Int]()

    func addItem(item: Int) {
        items.append(item)
    }

    func findItemAtIndex(index: Int) -> Int {
        return items[index]
    }
}
The IntStore class is a simple class to store an array of Int items. It provides two methods for:
- Adding a new item to the store
- Returning a specific item from the store
Apparently, the IntStore class supports items in Int type. Wouldn't it be great if you can define a generic ValueStore class that manages any types of values? Here is the generic version of the class:
class ValueStore<T> {
    var items = [T]()

    func addItem(item: T) {
        items.append(item)
    }

    func findItemAtIndex(index: Int) -> T {
        return items[index]
    }
}
Like what you have learned in the Generic functions section, you use a placeholder type parameter (T) to indicate a generic type. The type parameter after the class name indicates the class is a generic type.
To instantiate the class, you write the type to be stored in the ValueStore within angle brackets.
var store = ValueStore<String>()
store.addItem(item: "This")
store.addItem(item: "is")
store.addItem(item: "generic")
store.addItem(item: "type")
let value = store.findItemAtIndex(index: 1)
You can call the method the same way as before.
Computed Properties
A computed property does not actually store a value. Instead, it provides its own getter and setter to compute the value. Here is an example:
class Hotel {
    var roomCount: Int
    var roomPrice: Int
    var totalPrice: Int {
        get {
            return roomCount * roomPrice
        }
    }

    init(roomCount: Int = 10, roomPrice: Int = 100) {
        self.roomCount = roomCount
        self.roomPrice = roomPrice
    }
}
The Hotel class has two stored properties: roomPrice and roomCount. To calculate the total price of a hotel, we can simply multiply roomPrice by roomCount. In the past, you might create a method that performs the calculation and returns the total price. With Swift, you can use computed properties instead. In the example, totalPrice is a computed property. Rather than storing a fixed value, it defines a custom getter that actually performs the calculation and returns the total price of the rooms. Just like stored properties, you can access the computed property through dotted syntax:
let hotel = Hotel(roomCount: 30, roomPrice: 100)
print("Total price: \(hotel.totalPrice)")
// Total price: 3000
Optionally, you can define a custom setter for the computed property. Consider the same example again:
class Hotel {
    var roomCount: Int
    var roomPrice: Int
    var totalPrice: Int {
        get {
            return roomCount * roomPrice
        }

        set {
            let newRoomPrice = Int(newValue / roomCount)
            roomPrice = newRoomPrice
        }
    }

    init(roomCount: Int = 10, roomPrice: Int = 100) {
        self.roomCount = roomCount
        self.roomPrice = roomPrice
    }
}
Here we define a custom setter to calculate the new room price when the value of total price is updated. When a new value of totalPrice is set, a default name of newValue can be used in the setter. Base on newValue, you can then perform the calculation and update the roomPrice accordingly.
Could you use methods instead of computed properties? Sure. To me, it is a matter of coding style. Computed properties are especially useful for performing simple conversions and calculations. As you can see from the above example, the implementation is much cleaner.
Property Observers
Property observers are one of my favorite features of Swift. Property observers observe and respond to changes in a property's value. The observers are called every time a property's value is set. You have the option to define two kinds of observers on a property:
willSetis called just before the value is stored.didSetis called immediately after the new value is stored.
Consider the Hotel class again. For instance, we want to limit the room price to a thousand dollars. Whenever a caller sets the room price to a value larger than 1000, we will set it to 1000. You can then use a property observer to monitor the value change like this:
class Hotel {
    var roomCount: Int
    var roomPrice: Int {
        didSet {
            if roomPrice > 1000 {
                roomPrice = 1000
            }
        }
    }

    var totalPrice: Int {
        get {
            return roomCount * roomPrice
        }

        set {
            let newRoomPrice = Int(newValue / roomCount)
            roomPrice = newRoomPrice
        }
    }

    init(roomCount: Int = 10, roomPrice: Int = 100) {
        self.roomCount = roomCount
        self.roomPrice = roomPrice
    }
}
Say, you set the roomPrice property to 2000. The didSet observer will be called and perform the validation. Because the value is larger than 1000, the room price is then set it to 1000. As you can see, property observers are particularly useful for value change notifications.
Failable Casts
as! (or as?) is known as a failable cast operator. You have to either use as! or as? to downcast an object to a subclass type. If you're quite sure that the downcasting will succeed, you can use as! to force the casting. Here is an example:
let cell = tableView.dequeueReusableCell(withIdentifier: cellIdentifier, for: indexPath) as! RestaurantTableViewCell
If you're not sure whether the casting will succeed, just use the as? operator. By using as?, it returns an optional value, but in case the downcasting fails, the value will be nil.
repeat-while
Apple introduces a new control flow operator called repeat-while, which is to replace the classic do-while loop. Here is an example:
var i = 0
repeat {
    i += 1
    print(i)
} while i < 10
repeat-while evaluates its condition at the end of each pass through the loop. If the condition is true, it repeats the block of code again. It exits the loop when the condition evaluates to false.
for-in where Clauses
Not only can you iterate over all items in an array using a for-in loop, you can define a condition to filter the items using the where clause. When you loop through an array, for example, only those items that meet the criteria will be processed.
let numbers = [20, 18, 39, 49, 68, 230, 499, 238, 239, 723, 332]
for number in numbers where number > 100 {
    print(number)
}
In the above example, it only prints out those numbers that are greater than 100.
Guard
The guard keyword was first introduced in Swift version 2. According to Apple's documentation, a guard is described like this:
A guard statement, like an if statement, executes statements depending on the Boolean value of an expression. You use a guard statement to require that a condition must be true in order for the code after the guard statement to be executed.
Before I further explain the guard statement, let's go straight to the following example:
struct Article {
     var title: String?
     var description: String?
     var author: String?
     var totalWords: Int?
}

func printInfo(article: Article) {
    if let totalWords = article.totalWords, totalWords > 1000 {
        if let title = article.title {
            print("Title: \(title)")
        } else {
            print("Error: Couldn't print the title of the article!")
        }
    } else {
        print("Error: It only works for article with more than 1000 words.")
    }
}

let sampleArticle = Article(title: "Swift Guide", description: "A beginner's guide to Swift 2", author: "Simon Ng", totalWords: 1500)
printInfo(article: sampleArticle)
In the code above, we create a printInfo function to display the title of an article. However, we will only print the information for an article with more than a thousand words. As the variables are optionals, we use if let to verify if the optional contains a value or not. If the optional is nil, we display an error message. If you execute the code in Playgrounds, it should display the title of the article.
In general, the if-else statements follow this pattern:
if some conditions are met {
       // do something
       if some conditions are met {
               // do something
       } else {
               // show errors or performs other operations
       }
} else {
      // show errors or performs other operations
}
As you may notice, if you have to test more conditions, it will be nested with more conditions. There is nothing wrong with that programmatically. But in terms of readability, your code will get messy if there are a lot of nested conditions.
This is where the guard statement comes in. The syntax of guard looks like this:
guard else {
        // what to do if the condition is not met
}
// continue to perform normal actions
If the condition, defined in the guard statement is not met, the code inside the else branch is executed. On the other hand, if the condition is met, it skips the else clause and continues the code execution.
If you rewrite the sample code using guard, it is a lot cleaner:
func printInfo(article: Article) {
    guard let totalWords = article.totalWords, totalWords > 1000 else {
        print("Error: It only works for article with more than 1000 words.")
        return
    }

    guard let title = article.title else {
        print("Error: Couldn't print the title of the article!")
        return
    }

    print("Title: \(title)")
}
With guard, you focus on handling the condition you don't want. Furthermore, it forces you to handle one case at a time, avoiding nested conditions. Thus, the code is cleaner and easier to read.
Error Handling
When developing an app or any programs, you'll need to handle every possible scenario, whether it's good or bad. Obviously, things may go wrong. Say, if you're developing an app that connects to a cloud server, your app has to deal with situations where the Internet connection is unavailable or the cloud server is failed to connect.
In the older version of Swift, it lacks a proper error handling model. As an example, you handle error conditions like this:
let request = NSURLRequest(URL: NSURL(string: "http://www.apple.com")!)
var response: NSURLResponse?
var error: NSError?
let data = NSURLConnection.sendSynchronousRequest(request, returningResponse: &response, error: &error)

if error == nil {
        print(response)
        // Parse the data
} else {
       // Handle error
}
When calling a method that may cause a failure, you normally pass it with an NSError object (as a pointer). If there is an error, the object will be assigned with the corresponding error. You then check if the error object is nil or not and respond to the error accordingly.
That's how you handle errors in the early version of Swift.
Note: NSURLConnection.sendSynchronousRequest() has been deprecated in iOS 9. As most readers are familiar with the usage, it is used in the example.
try / throw / catch
Beginning from Swift 2, it comes with an exception-like model using try-throw-catch keywords. The same code snippet will become this:
let request = URLRequest(url: URL(string: "https://www.apple.com")!)
var response:URLResponse?
do {
    let data = try NSURLConnection.sendSynchronousRequest(request, returning: &response)
    print(response)

    // Parse the data
} catch {
    // handle error
    print(error)
}
Now you use a do-catch statement to catch errors and handle them accordingly. As you may notice, we put a try keyword in front of the method call. With the introduction of the error handling model, some methods can throw errors to indicate failures. When we invoke a throwing method, you will need to put a try keyword in front of it.
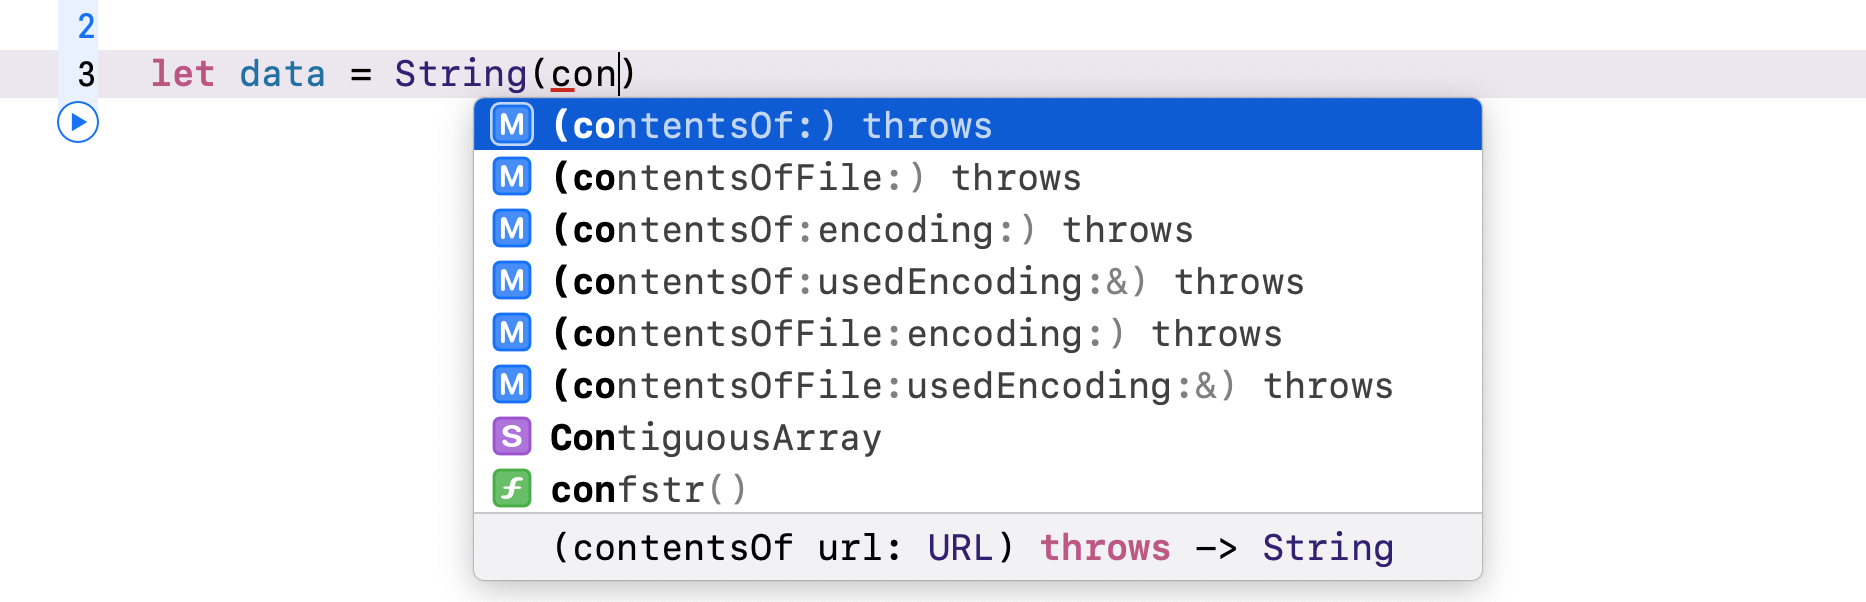
How do you know if a method throws an error? As you type the method in the built-in editor, the throwing methods are indicated by the throws keyword.
Now that you should understand how to call a throwing method and catch the errors, how do you indicate a method or function that can throw an error?
Imagine you're modelling a lite shopping cart. Customers can use the cart to temporarily store and check out their items, but this cart will throw an error for the following conditions:
- The shopping cart can only store a maximum of 5 items. Otherwise, it throws a
cartIsFullerror. - There must be at least one item in the shopping cart during checkout. Otherwise, it throws a
cartIsEmptyerror.
In Swift, errors are represented by values of types conforming to the Error protocol.
Usually, you use an enumeration to model the error conditions. In this case, you can create an enumeration that adopts Error like this for the shopping cart errors:
enum ShoppingCartError: Error {
    case cartIsFull
    case emptyCart
}
For the shopping cart, we create a LiteShoppingCart class to model its functions. Here is a sample code snippet:
struct Item {
    var price:Double
    var name:String
}

class LiteShoppingCart {
    var items:[Item] = []

    func addItem(item: Item) throws {
        guard items.count < 5 else {
            throw ShoppingCartError.cartIsFull
        }

        items.append(item)
    }

    func checkout() throws {
        guard items.count > 0 else {
            throw ShoppingCartError.emptyCart
        }
        // Continue with the checkout
    }
}
If you take a closer look at the addItem method, you probably notice the throws keyword. We append the throws keyword in the method declaration to indicate that the method can throw an error. In the implementation, we use guard to ensure the total number of items is less than 5. Otherwise, we throw the ShoppingCartError.cartIsFull error.
To throw an error, you just write the throw keyword, followed by the actual error. For the checkout method, we have a similar implementation. If the cart does not contain any items, we throw the ShoppingCartError.emptyCart error.
Now, let's see what happens when performing a checkout on an empty cart. I recommend you to fire up Xcode and use Playgrounds to test out the code.
let shoppingCart = LiteShoppingCart()
do {
    try shoppingCart.checkout()
    print("Successfully checked out the items!")
} catch ShoppingCartError.cartIsFull {
    print("Couldn't add new items because the cart is full")
} catch ShoppingCartError.emptyCart {
    print("The shopping cart is empty!")
} catch {
    print(error)
}
As the checkout method can throw an error, we use the do-catch statement to catch the errors. If you execute the above code in Playgrounds, it will catch the ShoppingCartError.emptyCart error and print the error message accordingly, because we haven't added any items.
Now insert the following code in the do clause, right before calling the checkout method:
try shoppingCart.addItem(item: Item(price: 100.0, name: "Product #1"))
try shoppingCart.addItem(item: Item(price: 100.0, name: "Product #2"))
try shoppingCart.addItem(item: Item(price: 100.0, name: "Product #3"))
try shoppingCart.addItem(item: Item(price: 100.0, name: "Product #4"))
try shoppingCart.addItem(item: Item(price: 100.0, name: "Product #5"))
try shoppingCart.addItem(item: Item(price: 100.0, name: "Product #6"))
Here we try to add a total of 6 items to the shoppingCart object. Again, it will throw an error because the shopping cart cannot hold more than 5 items.
When catching errors, you can identify the exact error (e.g. ShoppingCartError.cartIsFull) to match, so you can provide very specific error handling.
If you do not specify a pattern in the catch clause, Swift will match any errors and automatically bind the error to the error constant. As a best practice, you should try to catch the specific errors that are thrown by the throwing method. At the same time, you should write a catch clause that matches any errors. This ensures all possible errors are handled.
Availability Checking
If all users are forced to upgrade to the latest version of iOS, this would make our developers’ life much easier. Apple has tried hard to promote users to upgrade their iOS devices. However, there are still some users who are reluctant to upgrade their devices. Thus, in order to reach more users, our apps have to cater for different versions of iOS (e.g. iOS 13, iOS 14 ,and iOS 15).
If you just use the latest version of APIs in your app, this may cause errors when the app runs on older versions of iOS. When using an API that is only available on the latest version of iOS, you will need to do some kinds of verification before using the class or calling the method.
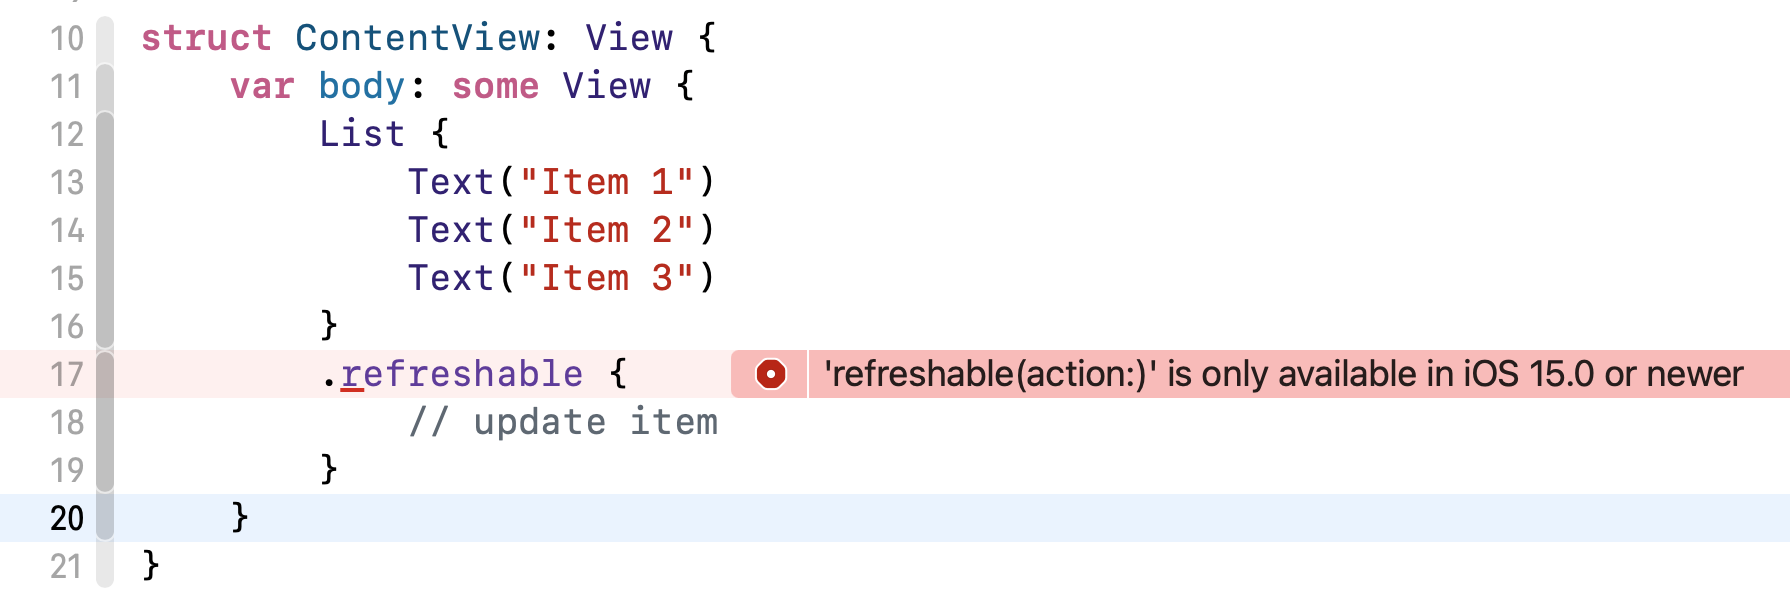
Say, the refreshable modifier for List is only available on iOS 15 (or later). If you use the modifier on older versions of iOS, you’ll end up with an error.
Swift has built-in support for checking API availability. You can easily define an availability condition so that the block of code will only be executed on certain iOS versions. Here is an example:
if #available(iOS 15.0, *) {
    List {
        Text("Item 1")
        Text("Item 2")
        Text("Item 3")
    }
    .refreshable {
        // update item
    }
} else {
    // Fallback on earlier versions
    List {
        Text("Item 1")
        Text("Item 2")
        Text("Item 3")
    }
}
You use the #available keyword in the if statement. In the availability condition, you specify the OS versions (e.g. iOS 15) you want to verify. The * is required and indicates that the if clause is executed on the minimum deployment target and any other versions of OS. For the example, the body of the if will be executed on iOS 15 or up, and other platforms such as watchOS.
What if you want to develop a class or method, which is available to certain versions of OS? Swift lets you apply the @available attribute on classes/methods/functions to specify the platform and OS version you want to target. Say, for example, you’re developing a class named SuperFancy and it is only available for iOS 15 or later. You can apply @available like this:
@available(iOS 15.0, *)
class SuperFancy {
    // implementation
}
If you try to use the class on an Xcode project that supports multiple versions of iOS, Xcode will show you the errors.
Note: You cannot test availability check in Playgrounds. If you want to give it a try, create a new Xcode project to test out the feature.