

Social networks are part of our everyday life since a long time ago. Social networks are also part of our programming life, as the majority of the apps must interact somehow with them and send or receive data regarding users. In most cases, users are required to get connected somehow to each social network, and authorize the app so it makes requests on their behalf. There are many such networks out there, with Facebook and Twitter being the most used, and additionally there is built-in support for them in iOS. However, for all the other social networks, developers have to do more work so as they successfully manage to authorize their apps to each network, and perform authorized requests from there on. Such a social network is LinkedIn, and in this tutorial we are going to see how to authorize the app so it’s possible to exchange protected data with the server.
Authorizing an iOS app to LinkedIn and performing certain operations based on the provided APIs can be achieved in two different ways. The first one is to use the OAuth 2.0 protocol that is supported by LinkedIn. The second available option is to use the iOS SDK that LinkedIn provides, which, as every other third-party SDK, must be integrated into your project and setup up properly before making any use of it.
In this tutorial, we are going to focus on the first way only, meaning that we’ll go through the necessary process that LinkedIn and OAuth 2.0 guidelines specify in order to let users sign in through an app (any app, not only iOS) and eventually authorize it for further requests. The LinkedIn iOS SDK is also a good preference, but I prefer to stick to OAuth way for three reasons:
- I’m honestly much more attracted to such kind of tasks, where a direct “communication” with the server using REST API calls must take place until the authorization process is successful.
- There are explicit steps described in LinkedIn website regarding the LinkedIn iOS SDK, so I’m not really sure if a tutorial on the same topic would make any good.
- In my opinion, there’s a drawback when using the LinkedIn iOS SDK: The official LinkedIn app must be installed to the device, otherwise the signing in and authorization process isn’t going to work. That could be a problem in cases where an app requires information from the user’s LinkedIn profile, but the user doesn’t really wants to install the official app in order to sign in through the first one.
Regarding the OAuth 2.0 protocol there are no much to say, as the best move here would be to prompt you to read about it in the official website. In short, here are the steps that we’ll follow in this tutorial for a successful sign in and authorization process:
- Necessarily, we are going to create a new app in the LinkedIn Developers website. That will let us get two important keys (Client ID and Client Secret) required for the rest of the process.
- Using a web view, we’ll let user sign in to his LinkedIn account.
- Using the above, plus some more pieces of required data, we’ll ask the LinkedIn server for an authorization code.
- We’ll exchange the authorization code with an access token.
The access token is what we really need when working with OAuth. Using such a valid token, we’ll be able to make authorized requests to the LinkedIn server, and depending on the app’s nature to either get or post data through the user’s profile.
Before we proceed, please make sure that you have the basic understanding on how OAuth 2.0 works, and what its flow is. If necessary, pay a visit to a couple of other resources to get more information (like here, here, and here).
With all the above being said, let’s proceed to the demo application of this tutorial, and then straight to the actual implementation. I really believe that what we’ll do next is going to be proved quite interesting to all of you.
For your reference, here are a couple of links in the official LinkedIn documentation:
Demo App Overview
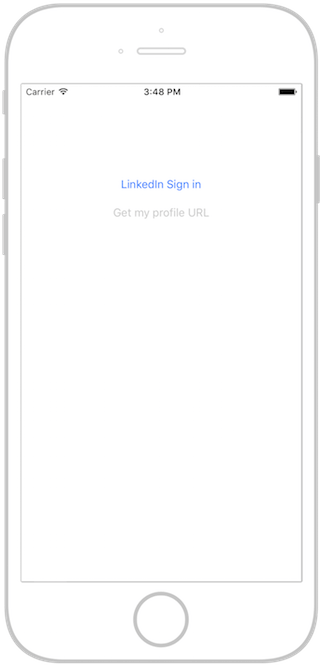
The demo app that we’re going to implement for the purposes of this tutorial is parted by two view controllers: In the first one (the default ViewController class) we’ll have three buttons only:
- A button named LinkedIn Sign In for initiating the sign in and authorization process.
- A button named Get my profile URL, which will be used to get the profile URL by performing an authorized request using the access token.
- A button that will display the profile URL, and when it’s tapped it will open the profile on Safari.
By default, only the first button will be enabled. Actually, it will remain enabled as long as there’s not an access token acquired. In any other case, the first button gets disabled, and the second becomes enabled. The third button is hidden, but it becomes visible only when the profile URL has been fetched (using the second button).
The second view controller will contain a web view. Using it, you’ll be able to sign in to your LinkedIn account, so the authentication and authorization process comes to its end successfully. This view controller will be dismissed when we’ll fetch the access token needed for making authorized requests to LinkedIn.
As usually, we won’t start making the project from scratch; instead, you have to download a starter project, and continue building on it.
Our efforts will be mainly focused on getting the access token. We’ll go step by step through all the required process as it’s specified by the OAuth 2.0 protocol and the LinkedIn guidelines. Once we fetch it, we’ll see how an authorized request is made simply by asking LinkedIn for the public profile URL of the authorized user. By getting it with success, we’ll use it to display the profile on Safari through the third button I talked about above.
Before you continue, make sure to download the starter project, open it, and walk yourself around so you get acquainted with it. When you’re ready, please keep reading.
LinkedIn Developers Website – Create a New App
The first step towards the implementation of the OAuth 2.0 sign in process in our demo app is to create a new app record in the LinkedIn Developers website. To reach it, all you have to do is to visit this link. If you’re not already logged in to your LinkedIn profile, you’ll be prompted to do so first.
Note: In case you encounter any problems in the following steps using Safari, then pick another browser instead. I used the Chrome browser.
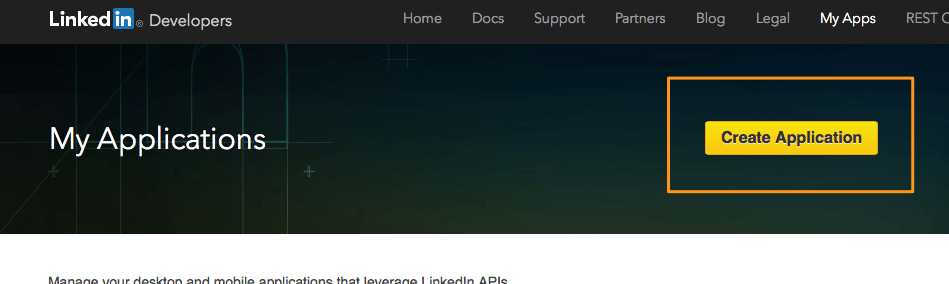
By landing to the My Applications area of the website, you’ll find a yellow button titled Create Application. Click it to proceed in the creation of a new application that we’ll connect a bit later to our iOS app.
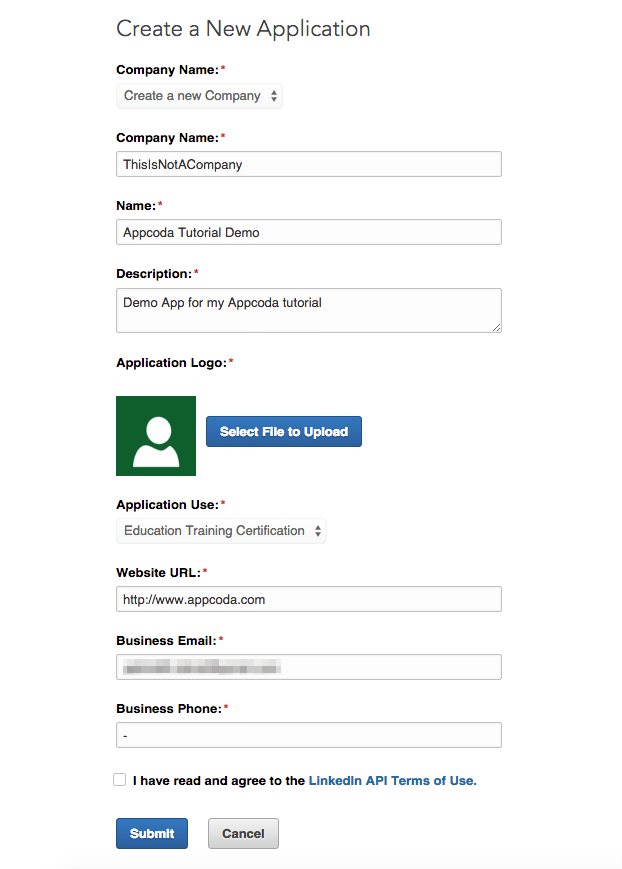
In the next form that appears, make sure to fill all fields in. Don’t worry if it asks you for a company name or an application logo. Just provide it with some “dummy” data, accept the Terms of Use, and click to the Submit button. Don’t forget to enter a value to all fields having a red asterisk, otherwise you won’t be able to continue. Here’s a sample of the form filled:
Our goal here is to reach the next page:
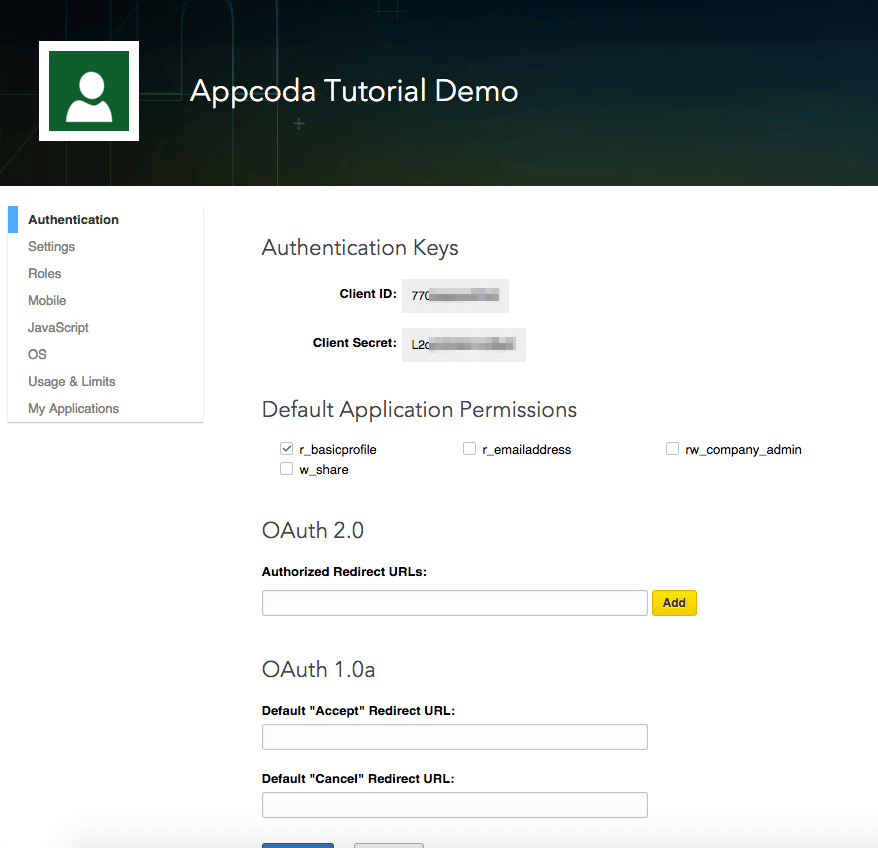
As you can see in the above screenshot, this is the place where you can find the Client ID and Client Secret values. Please don’t close that window, as we’re going to start making use of them in the next part. Feel free to explore the app settings using the menu options to the left side of the window.
One important task we have to do here (besides than simply having access to the client keys), is to add a value to the Authorized Redirect URLs field. An authorized redirect URL is mostly needed when the client app tries to refresh an existing access token, and the user isn’t required to explicitly sign in again through a web browser. The OAuth flow will automatically redirect the app using that URL. For normal a normal sign in process, that URL is exchanged between the client (our app) and the server while fetching both authorization code and the access token. Anyway, this value must exist and exchanged with the server later, so we have to define it.
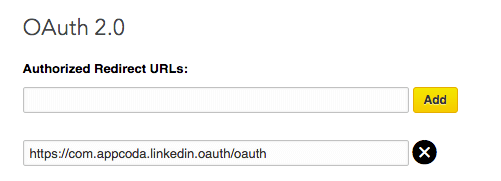
The redirection URL does’t have to be a real, existing URL. It can be any value you wish starting with the “https://” prefix. For our purposes, I’ve set the following value, but you’re are can set any other URL you wish:
https://com.appcoda.linkedin.oauth/oauth
In case you’re using a different URL, don’t forget to set your URL in the proper variables in the upcoming code snippets.
Once the authorized redirect URL is written under the OAuth 2.0 section, the Add button must be clicked so it’s actually added to the app.
Also, don’t forget to click to the Update button to the bottom of the screen.
Regarding the permissions, leaving the basic profile option as the only one selected suits perfectly for our purposes in this tutorial. However, you can select more permissions, or visit these settings later once our demo app gets ready. Note that if the initial permissions requested by the app get changed, users have to sign in again so they approve them.
Initiating the Authorization Process
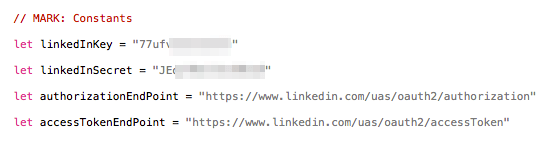
Going to the starter project on Xcode for first time now, we are about to start implementing and eventually to put in action the OAuth 2.0 flow. Before we get started though, please select the WebViewController.swift file in the Project Navigator to open it. At the top of the class, you’ll find two variables named linkedInKey and linkedInSecret. You have to assign the Client ID and Client Secret values to those two respectively by getting them from the LinkedIn Developers website (simply copy and paste them).
Our main goal in this step is to prepare the request for getting the authorization code, and to load it through a web view. The WebViewController scene in the Interface Builder already contains a web view, therefore we’re going to work on the WebViewController class. The request for getting the authorization code must contain mandatorily the following parameters:
- response_type: It’s a standard value that must always be: code.
- client_id: It’s the Client ID value taken from the LinkedIn Developers website and been assigned to the linkedInKey property of our project.
- redirect_uri: The authorized redirection URL value that you specified in the previous part. Make sure to copy and paste it properly in the following code snippets.
- state: A unique string required to prevent a cross-site request forgery (CSRF).
- scope: A URL-encoded list of the permissions that our app requests.
Speaking in terms of code now, let’s create a new function in the WebViewController class where we’ll prepare our request. We’ll name it startAuthorization(). The first task in it is to specify the most of the request parameters described right before, exactly as shown in the following snippet:
func startAuthorization() {
    // Specify the response type which should always be "code".
    let responseType = "code"

    // Set the redirect URL. Adding the percent escape characthers is necessary.
    let redirectURL = "https://com.appcoda.linkedin.oauth/oauth".stringByAddingPercentEncodingWithAllowedCharacters(NSCharacterSet.alphanumericCharacterSet())!

    // Create a random string based on the time interval (it will be in the form linkedin12345679).
    let state = "linkedin\(Int(NSDate().timeIntervalSince1970))"

    // Set preferred scope.
    let scope = "r_basicprofile"


}
Note that further than simply assigning the authorized redirect URL to the redirectURL variable, we also replace all the special symbols of the URL with percent encoding characters by URL-encoding the string. That means that this:
https://com.appcoda.linkedin.oauth/oauth
will be converted to this:
https%3A%2F%2Fcom.appcoda.linkedin.oauth%2oauth
(See more about URL-encoding here).
Next, the state variable must contain a unique, hard to guess string. In the code above we concatenate the “linkedin” string and the integer part of the current timestamp (time interval since 1970), and we ensure that way that our string will be unique. An alternate way would be to create random characters and append them to the state string, but that’s something I let you do if you feel so.
Finally, the scope gets the “r_basicprofile” value, matching to the permission that I set to the app in the LinkedIn Developers website. When you set permissions, make sure to take a look at this text from the official documentation.
Our next step is to compose the authorization URL. Note that the https://www.linkedin.com/uas/oauth2/authorization URL must be used for the request, which is already assigned to the authorizationEndPoint property.
Back in our code again:
func startAuthorization() {
    ...

    // Create the authorization URL string.
    var authorizationURL = "\(authorizationEndPoint)?"
    authorizationURL += "response_type=\(responseType)&"
    authorizationURL += "client_id=\(linkedInKey)&"
    authorizationURL += "redirect_uri=\(redirectURL)&"
    authorizationURL += "state=\(state)&"
    authorizationURL += "scope=\(scope)"

    print(authorizationURL)
}
I added the print line above just to let you see with your own eyes in the console how the request is finally formed.
Finally, the last action we have to do here is to load the request in our web view. Keep in mind that user will be able to sign in through the web view if only the above request is properly formed. In any other case, LinkedIn will return error messages and you won’t be able to proceed any further. Therefore, make sure that you copy the Client Key and Secret values properly, as well as the authorized redirect URL.
Loading the request in the web view takes just a couple of lines:
func startAuthorization() {
    ...

    // Create a URL request and load it in the web view.
    let request = NSURLRequest(URL: NSURL(string: authorizationURL)!)
    webView.loadRequest(request)
}
Before we get to the end of this part, we have to call the above function. This is going to take place in the viewDidLoad(_: ) function:
override func viewDidLoad() {
    ...

    startAuthorization()
}
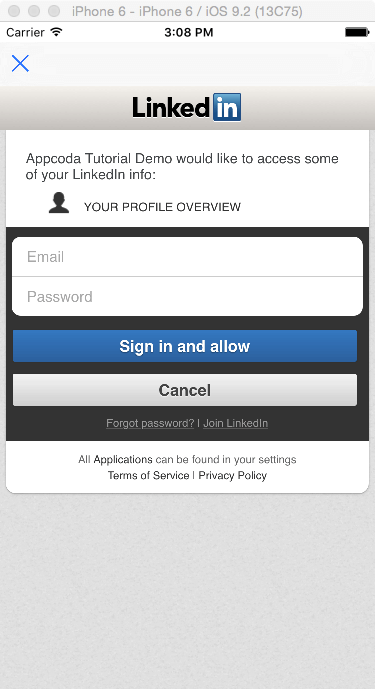
At this point, you’re free to run the app and test it for first time. If you’ve set the correct values as said right before, you’ll manage to land to the following page:
Don’t sign in to your LinkedIn account yet, as there are still things remaining to be done on our part. Nevertheless, if you see the sign in form, then you’ve successfully requested for an authorization code, and after signing in, LinkedIn will send one back to the browser (in this case, our web view).
Besides that, here’s the authorizationURL string printed in the console:

Getting an Authorization Code
By having the authorization code request ready and loaded in the web view, we can proceed by implementing the webView(:shouldStartLoadWithRequest:navigationType) delegate method. In this one we’ll “catch” the LinkedIn response, and we’ll extract the desired authentication code from it.
Actually, a response containing the authorization code looks like this:
http://com.appcoda.linkedin.oauth/oauth?code=AQSetQ252oOM237XeXvUreC1tgnjR-VC1djehRxEUbyZ-sS11vYe0r0JyRbe9PGois7Xf42g91cnUOE5mAEKU1jpjogEUNynRswyjg2I3JG_pffOClk&state=linkedin1450703646
That means that all we have to do is to break that string into its parts, and manage to isolate the “code” value. Two precautions though: First, we must be sure that the URL in the delegate method is the one we’re interested in, and second we must ensure that the authorization code really exists to the LinkedIn response. Here’s in code:
func webView(webView: UIWebView, shouldStartLoadWithRequest request: NSURLRequest, navigationType: UIWebViewNavigationType) -> Bool {
    let url = request.URL!
    print(url)

    if url.host == "com.appcoda.linkedin.oauth" {
        if url.absoluteString.rangeOfString("code") != nil {

        }
    }

    return true
}
At first, we get access to the URL through the request parameter. Then we first check if it’s the one we care about (that is the redirection URL set in the LinkedIn Developers website) by examining the value of the host property of the URL. In case it is, we make sure that the URL string really contains the “code” word by asking for the range of that word in the string, which if it’s other than nil verifies that the authorization code is contained indeed.
Breaking the URL string into its components isn’t difficult. To make it simpler, I’ve separated this task in two steps:
func webView(webView: UIWebView, shouldStartLoadWithRequest request: NSURLRequest, navigationType: UIWebViewNavigationType) -> Bool {
    let url = request.URL!
    print(url)

    if url.host == "com.appcoda.linkedin.oauth" {
        if url.absoluteString.rangeOfString("code") != nil {
            // Extract the authorization code.
            let urlParts = url.absoluteString.componentsSeparatedByString("?")
            let code = urlParts[1].componentsSeparatedByString("=")[1]

            requestForAccessToken(code)
        }
    }

    return true
}
Besides the two new lines above, you can also notice a call to another function named requestForAccessToken(_: ). This is a new custom function that we’re about to implement in the next part. In it, we’ll ask for the access token using the authorization code taken in this step.
As you realize, we’re just a step away at this point from acquiring the access token using the OAuth 2.0 flow. Recapping our steps so far, we’ve managed to create the request for asking for the authorization code, to allow users to get connected to their accounts as part of the authentication process, and finally to fetch and extract the authorization code.
If you want to run the app at this stage, just comment out the call to the requestForAccessToken(_: ) and you’re good to go. Don’t hesitate to add print commands whenever you desire, so it’s easier for you to digest what’s happening in each step.
Requesting for the Access Token
All the communication we’ve had so far with the LinkedIn server was through the web view. From now on, we’re going to “talk” to the server only through easy RESTful requests (simple POST and GET requests). More precisely, we’re going to make one POST request for getting the access token, and one GET request for asking for the user profile URL later.
Having said that, it’s time to move and create the new custom function that I mentioned about in the last part, the requestForAccessToken(). In its body, we’re going to perform three distinct tasks:
- We’ll prepare the POST request parameters.
- We’ll initialize and configure a mutable URL request object (
NSMutableURLRequest). - We’ll instantiate a
NSURLSessionobject and perform a data task request. In case we get a proper response, we’ll store the access token to the user defaults dictionary.
Preparing the POST parameters
Similarly to the request preparation for getting the authorization code, we need to post specific parameters and their values along with the request for the access token too. These parameters are:
- grant_type: It’s a standard value that should always be:
authorization_code. - code: The authorization code acquired in the previous part.
- redirect_uri: It’s the authorized redirection URL we’ve talked about many times earlier.
- client_id: The Client Key value.
- client_secret: The Client Secret Value.
The authorization code that we fetched in the previous part is going to be given as a parameter in our new function. Let’s get started by specifying the “grant_type” and “redirect_uri” parameters first:
func requestForAccessToken(authorizationCode: String) {
    let grantType = "authorization_code"

    let redirectURL = "https://com.appcoda.linkedin.oauth/oauth".stringByAddingPercentEncodingWithAllowedCharacters(NSCharacterSet.alphanumericCharacterSet())!
}
The values for all the other parameters are already “known” to the app, so let’s compose them as a single string:
func requestForAccessToken(authorizationCode: String) {
    ...

    // Set the POST parameters.
    var postParams = "grant_type=\(grantType)&"
    postParams += "code=\(authorizationCode)&"
    postParams += "redirect_uri=\(redirectURL)&"
    postParams += "client_id=\(linkedInKey)&"
    postParams += "client_secret=\(linkedInSecret)"
}
If you’ve ever worked with the NSMutableURLRequest class to make POST requests, then you definitely know that the POST parameters cannot be sent as a string value; instead they must be converted to a NSData object and assigned to the HTTPBody of the request (we’ll see that in a while). So, let’s convert the postParams as required:
func requestForAccessToken(authorizationCode: String) {
    ...

    // Convert the POST parameters into a NSData object.
    let postData = postParams.dataUsingEncoding(NSUTF8StringEncoding)
}
Preparing the request object
By having the POST parameters ready, we can proceed to the initialization and configuration of a NSMutableURLRequest object. The initialization will take place using the URL for getting the access token (https://www.linkedin.com/uas/oauth2/accessToken), which is already assigned to the accessTokenEndPoint property.
func requestForAccessToken(authorizationCode: String) {
    ...

    // Initialize a mutable URL request object using the access token endpoint URL string.
    let request = NSMutableURLRequest(URL: NSURL(string: accessTokenEndPoint)!)
}
Next, it’s time to “say” to the request object what kind of request we want to make, as well as to pass it the POST parameters:
func requestForAccessToken(authorizationCode: String) {
    ...

    // Indicate that we're about to make a POST request.
    request.HTTPMethod = "POST"

    // Set the HTTP body using the postData object created above.
    request.HTTPBody = postData
}
According to the LinkedIn documentation, the Content-Type of the request should be also set using the application/x-www-form-urlencoded value:
func requestForAccessToken(authorizationCode: String) {
    ...

    // Add the required HTTP header field.
    request.addValue("application/x-www-form-urlencoded;", forHTTPHeaderField: "Content-Type")
}
And… that’s it! That’s the required configuration for the request object, so now we are ready to use it.
Performing the request
We’ll perform the request for the access token using an instance of the NSURLSession class. Through it, we’ll make a data task request, and in the completion handler body we’ll deal with the LinkedIn server response:
func requestForAccessToken(authorizationCode: String) {
    ...

    // Initialize a NSURLSession object.
    let session = NSURLSession(configuration: NSURLSessionConfiguration.defaultSessionConfiguration())

    // Make the request.
    let task: NSURLSessionDataTask = session.dataTaskWithRequest(request) { (data, response, error) -> Void in

    }

    task.resume()
}
If the request is successful, the LinkedIn server will return JSON data that contains the access token. So, our task is to get this JSON data, convert it into a dictionary object, and then extract the access token. Of course, all that will happen if only the returned HTTP status code is 200, meaning a successful request.
func requestForAccessToken(authorizationCode: String) {
    ...

    // Make the request.
    let task: NSURLSessionDataTask = session.dataTaskWithRequest(request) { (data, response, error) -> Void in
        // Get the HTTP status code of the request.
        let statusCode = (response as! NSHTTPURLResponse).statusCode

        if statusCode == 200 {
            // Convert the received JSON data into a dictionary.
            do {
                let dataDictionary = try NSJSONSerialization.JSONObjectWithData(data!, options: NSJSONReadingOptions.MutableContainers)

                let accessToken = dataDictionary["access_token"] as! String
            }
            catch {
                print("Could not convert JSON data into a dictionary.")
            }
        }
    }

    task.resume()
}
Note that the conversion takes place inside a do-catch statement, as since Swift 2.0 this operation can throw an exception (there’s no error parameter). In our demo app, we don’t need to give special care to the case of the exception, therefore we just display a message to the console saying that the conversion could not be done. In case that everything runs smoothly, then we convert the JSON data (the data parameter in the closure) into a dictionary (dataDictionary object), and then we access the access token directly.
What’s next? Simply to save it in the user defaults dictionary, and dismiss that view controller:
func requestForAccessToken(authorizationCode: String) {
    ...

    // Make the request.
    let task: NSURLSessionDataTask = session.dataTaskWithRequest(request) { (data, response, error) -> Void in
        // Get the HTTP status code of the request.
        let statusCode = (response as! NSHTTPURLResponse).statusCode

        if statusCode == 200 {
            // Convert the received JSON data into a dictionary.
            do {
                ...

                NSUserDefaults.standardUserDefaults().setObject(accessToken, forKey: "LIAccessToken")
                NSUserDefaults.standardUserDefaults().synchronize()

                dispatch_async(dispatch_get_main_queue(), { () -> Void in
                    self.dismissViewControllerAnimated(true, completion: nil)
                })
            }
            catch {
                print("Could not convert JSON data into a dictionary.")
            }
        }
    }

    task.resume()
}
Pay attention to the fact that the view controller is dismissed in the main thread. Always keep in mind that any UI related changes must happen to the main thread of the app, and not in the background. Completion handlers (closures) like the above always being executed on the background.
Our ultimate goal has been finally achieved! We managed to acquire the access token that will “unlock” several API features.
Fetching the User Profile URL
We are going to demonstrate how the access token is used simply by asking for the user profile URL, which we’ll open in turn in Safari. However, before we do that, let’s discuss about something else first. When you launch the app, you have two buttons at your disposal as shown next:
By default, the LinkedIn Sign In button is enabled, and the Get my profile URL is disabled. Now that we’ve acquired the access token, we need the second button to become enabled, and disable the first one. How are we supposed to do that?
An approach to that could be the use of the delegation pattern, where through a delegate method we could inform the ViewController class that the access token has been fetched, so the second button to become enabled. Another approach would be to post a custom notification (NSNotification) from the WebViewController class, and observe for it in the ViewController. Both of those approaches would perfectly work, however there’s a third, way simpler solution to that: We’ll just check if the access token exists in the user defaults dictionary upon the ViewController appearance, and if so we’ll disable the sign in button and we’ll enable the second one. Otherwise, we’ll leave everything as shown in the above screenshot.
We’ll perform that check by implementing a new, small function in the ViewController class. Note that there’s a third button also (the btnOpenProfile IBOutlet property), that is hidden by default. It will become visible once we get the user profile URL, as we’re going to set that URL string as its title (we’ll see that later).
Now, let’s define this new function:
func checkForExistingAccessToken() {
    if NSUserDefaults.standardUserDefaults().objectForKey("LIAccessToken") != nil {
        btnSignIn.enabled = false
        btnGetProfileInfo.enabled = true
    }
}
We’ll call that function in the viewWillAppear(_: ):
override func viewWillAppear(animated: Bool) {
    super.viewWillAppear(animated)

    checkForExistingAccessToken()
}
From now on, the app will properly enable and disable the two buttons in the ViewController scene.
Let’s focus now on the getProfileInfo(_: ) IBAction method. This one is called when the Get my profile URL button is tapped. When that happens, we want to make a GET request to the LinkedIn server using the access token asking for the user’s profile URL. The steps we’ll follow here are quite similar to those in the previous part where we prepared and made the request for getting the access token.
So, let’s get started by specifying the request URL string. Note that you should always seek for guidelines in the official documentation if you don’t really know what the URL you need is, or what parameters you should possibly specify.
@IBAction func getProfileInfo(sender: AnyObject) {
    if let accessToken = NSUserDefaults.standardUserDefaults().objectForKey("LIAccessToken") {
        // Specify the URL string that we'll get the profile info from.
        let targetURLString = "https://api.linkedin.com/v1/people/~:(public-profile-url)?format=json"
    }
}
Notice that as an extra measure we check once again if the access token really exists. By using the if-let statement we assign it to the accessToken constant. Furthermore, the above URL is the one that will give us the user’s profile URL. Don’t forget that you should have asked for the proper permissions prior to making any request like the one we’re about to do here. In our case we’re just fine, as we asked for the basic profile information.
Let’s continue by creating a new NSMutableURLRequest object, where this time we’ll set the “GET” value as the desired HTTP method. In addition to that, we’ll specify one HTTP header field, and this is going to be the access token.
@IBAction func getProfileInfo(sender: AnyObject) {
    if let accessToken = NSUserDefaults.standardUserDefaults().objectForKey("LIAccessToken") {
        ...

        // Initialize a mutable URL request object.
        let request = NSMutableURLRequest(URL: NSURL(string: targetURLString)!)

        // Indicate that this is a GET request.
        request.HTTPMethod = "GET"

        // Add the access token as an HTTP header field.
        request.addValue("Bearer \(accessToken)", forHTTPHeaderField: "Authorization")
    }
}
Lastly, let’s make the request by using once again the NSURLSession and the NSURLSessionDataTask classes:
@IBAction func getProfileInfo(sender: AnyObject) {
    if let accessToken = NSUserDefaults.standardUserDefaults().objectForKey("LIAccessToken") {
        ...

        // Initialize a NSURLSession object.
        let session = NSURLSession(configuration: NSURLSessionConfiguration.defaultSessionConfiguration())

        // Make the request.
        let task: NSURLSessionDataTask = session.dataTaskWithRequest(request) { (data, response, error) -> Void in

        }

        task.resume()
    }
}
If the request is successful (HTTP status code = 200), then the data parameter in the closure will contain the JSON data returned by the server. Exactly as we did before, we must covert the JSON data into a dictionary, and eventually fetch the user’s profile URL string.
@IBAction func getProfileInfo(sender: AnyObject) {
    if let accessToken = NSUserDefaults.standardUserDefaults().objectForKey("LIAccessToken") {
        ...

        // Make the request.
        let task: NSURLSessionDataTask = session.dataTaskWithRequest(request) { (data, response, error) -> Void in
            // Get the HTTP status code of the request.
            let statusCode = (response as! NSHTTPURLResponse).statusCode

            if statusCode == 200 {
                // Convert the received JSON data into a dictionary.
                do {
                    let dataDictionary = try NSJSONSerialization.JSONObjectWithData(data!, options: NSJSONReadingOptions.MutableContainers)

                    let profileURLString = dataDictionary["publicProfileUrl"] as! String
                }
                catch {
                    print("Could not convert JSON data into a dictionary.")
                }
            }
        }

        task.resume()
    }
}
And now we come to what I said a bit earlier: The profileURLString value will be set as a title to the btnOpenProfile button, and that button will become visible also. Remember that right now we’re working on a background thread, therefore we’ll do that addition to the main thread:
@IBAction func getProfileInfo(sender: AnyObject) {
    if let accessToken = NSUserDefaults.standardUserDefaults().objectForKey("LIAccessToken") {
        ...

        // Make the request.
        let task: NSURLSessionDataTask = session.dataTaskWithRequest(request) { (data, response, error) -> Void in
            // Get the HTTP status code of the request.
            let statusCode = (response as! NSHTTPURLResponse).statusCode

            if statusCode == 200 {
                // Convert the received JSON data into a dictionary.
                do {
                    ...

                    dispatch_async(dispatch_get_main_queue(), { () -> Void in
                        self.btnOpenProfile.setTitle(profileURLString, forState: UIControlState.Normal)
                        self.btnOpenProfile.hidden = false

                    })
                }
                catch {
                    print("Could not convert JSON data into a dictionary.")
                }
            }
        }

        task.resume()
    }
}
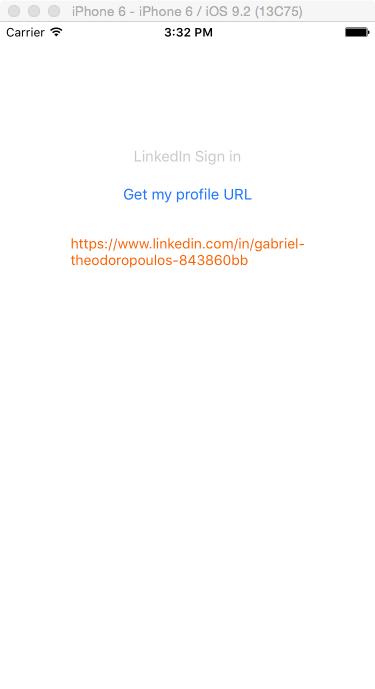
By running the app now, and considering that you’ve acquired an access token successfully, you’ll see your profile URL to be appearing in the third button just a little after you tap on the Get my profile URL button.
Viewing the Profile on Safari
Now that we have fetched the user’s profile URL by making use of the access token and the LinkedIn API, it’s time to verify that it’s the correct one. Since we’ve set it as a title to a button, the fastest approach would be to make that button open a URL using its title as the source. The implementation that follows is quite simple, so I provide it without any further discussion:
@IBAction func openProfileInSafari(sender: AnyObject) {
    let profileURL = NSURL(string: btnOpenProfile.titleForState(UIControlState.Normal)!)
    UIApplication.sharedApplication().openURL(profileURL!)
}
The last line above will trigger the appearance of Safari, which will load and display the profile webpage.
Summary
You may have noticed that we’ve come to the end of this tutorial, but still, I haven’t said anything about revoking the access token, or refreshing it. Well, there are reasons for that: As far as revoking is concerned, LinkedIn doesn’t offer any API to do so. Therefore, your best hit would be to simply delete the access token from your storage mechanism (database, user defaults, etc) in case you need to stop your app from making authorized requests. Besides that, an access token is valid for about 60 days (according to the official documentation by the time of writing this). LinkedIn advices to refresh it before that time frame expires, and that can happen easily, as all you have to do is to start over the whole authentication and authorization process. If the access token is valid, users won’t need to explicitly sign in again, as everything will take place in the background, and the access token will be refreshed automatically for another 60 days. However, that’s a general case that apply mostly to web apps and not in iOS. A basic prerequisite for the background refresh is users to be already connected to their LinkedIn account, and obviously that’s not the case when using internal web views in apps. Therefore, you probably need to ask users to go through the sign in process if the access token is about to expire. For more information, take a look at this (in the “Refresh your Access Tokens” section). With that, it’s time to leave you once again. I hope you find some sort of assistance through the lines of this tutorial, and eventually you manage to make authorized requests to LinkedIn.
For reference, you can download the complete Xcode project from GitHub.


