

Notifications are the way of an application to communicate with users, especially when it’s not running in the foreground. A notification, as its name implies, is used to *notify* a user either about an event, or just to remind something important. In fact, notifications are extremely useful in reminding applications, but they’re also quite handy in a number of other cases. For example, a notification can be shown when a user enters a predefined region (that’s new in iOS 8), when a download is complete, or when a friend has sent a message to a chat application. No matter what, the purpose of notifications is to pull the users’ attention, so they act on the message they see.
From the programming point of view, notifications consist of a quite standard aspect that can be easily implemented into an application. As there’s no much room for improvisation, developers almost always follow a predefined path to add notification features in their applications. That is to specify the details of the notification that will be delivered by the system, to handle the app launching due to a notification, and finally, starting from iOS 8, to handle any actions that have been set regarding them. The per application logic is the only thing that gets changed.

Up to iOS 8 there were essentially two kinds of notifications:
- Local notifications: These are notifications specified by the developer and are triggered by the app itself. The exact time that they’ll appear is always scheduled.
- Remote notifications: In this case, the notifications can be split in two subcategories: (a) The push notifications, which are initiated into a web server, then go through the Apple Push Notification servers and finally they’re shown to users at the moment they arrive to the device. (b) The silent notifications, which are actually push notifications, but they’re not shown to the user straight away. Instead, they’re handled internally by the application in order to perform a task, and when everything is ready, a local notification is scheduled to inform the user.
Apart from the above, iOS 8 introduces the location notifications. These are actually local notifications, but they’re fired only when a user enters or exits a specific geographical or iBeacon region. Even though we won’t see much details, they’re easy to be implemented.
The great news exist in just one important fact: New capabilities have been added to notifications in iOS 8. Simply put, from now on developers are able to specify certain actions that can be taken by the user when a notification is shown, and the application can handle them even without gets launched in the foreground.
That’s something really remarkable, as notifications become more interactive that way. Users are given with a certain list of options that can be used to order an application to perform specific tasks instantly. No need for users to lose time by running the app and then handle the notification. Actions can now make notifications and applications more powerful, and they can maximise the user experience as well.
Actions can be grouped together in categories. That’s pretty handy, especially if an application schedules more than few notifications to appear. With categories, all the related actions to a notification can be tied and specified at once. On the other hand, handling actions is easy also, as the implementation of a specific delegate method is the only requirement in order to receive and manage them. Each action has a special property named identifier, and this one is used by an application to determine each received action and act appropriately.
As you understand, our goal in this tutorial is to see all the above in details. Even though actions and categories are something new indeed, you’ll eventually find out that is extremely easy to implement and configure them. However, before we move to the next part, it’s important to say that we are going to focus on local notifications only. I guess that it would be pointless to try to cover all the aspects regarding all kinds of notifications in one tutorial, and besides that, we just aim to the new capabilities of notifications introduced in iOS 8.
As always, I strongly encourage you to definitely pay a visit to the official documentation. Not only to the Apple’s Developer Library (which is a must), but also watch the WWDC 2014 #713 session video. Combining them with what you’ll be presented here with will give you all the knowledge you need regarding the new notification capabilities. Also, as we’re not going to discuss here about remote and location based notifications, the official documentation is your source if you’re about to work with them.
About Local Notifications
Local notifications are scheduled to be fired in predefined date and time by the application itself. Always keep in mind that even though notifications are good for communicating with the user, you should be cautious, as the excessive use of them would lead to a bad user experience.
There are several ways to inform a user about a local notification. Right next they are presented all the supported types which you can use to do that. As you may already know, you can either specify some or all of them when configuring a notification in code:
- Alert or Banner: Depending on the preferences the user sets in the Settings, a notification can be shown using either an alert view or a banner. Both of them should contain the message of the notification (which can be localized).
- Sound: You can “tell” iOS to playback either a predefined or a custom sound when the notification is fired. That’s quite useful, as in most cases users won’t look at the device all the time, so any presented notifications can be easily overlooked. However, in less critical notifications, sounds could be just omitted.
- Badge: A badge number can also be shown in the app’s icon when a new notification is fired. The badge number must be increased by one with a new notification, and then decreased when the notification is handled. iOS automatically shows and hides the badge, depending on whether there’s a value other than zero to display.
Up to iOS 7, a user could only tap on the notification (or slide in the lock screen) so as the respective app to be launched, and then perform any actions that might were required. Now, developers can give users the ability to perform certain, predefined actions. The respective application may stay on the background for non-critical or not important tasks, but yet able to execute the code regarding the user’s choice. We’ll see how all this is implemented thoroughly in this tutorial.
Besides all the above, a local notification can include additional data that may be needed by the app when it’s about to handle it (or when it’s about to handle an action). This data is encapsulated in a user info dictionary, which is accessed by the application when it’s launched due to the notification either in the foreground, or in background.
The scheduled local notifications cannot be unlimited. On the contrary, iOS allows up to 64 local notifications to be scheduled and fired. If more than this number is set, then all the notifications after the 64th are simply discarded. However, no matter in what order notifications are scheduled, only the soonest ones will be eventually fired.
So, with all that in mind, let’s get to know the app that we are going to work with today.
Demo App Overview
We are going to see all the new exciting features of notifications by developing a simple demo application. Actually, we are going to build a shopping list application, in which the user will get a reminding notification about the shopping he has to do. In this, two things will be possible to be done:
- To add and delete items.
- To pick a date and time that the notification should be fired.
As you guess, we will implement one local notification only. It’s more than enough to demonstrate all the new capabilities of iOS 8.
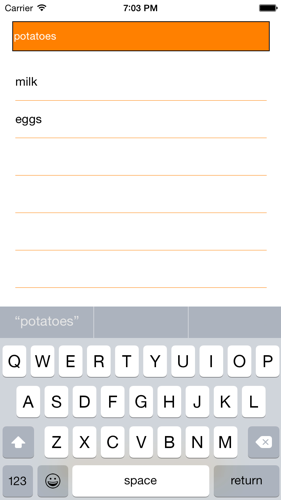
For adding a new item in the list, we’ll use a textfield. The added items will be displayed in a tableview, through which an existing item will be possible to be deleted by swiping the respective cell to the left. Furthermore, a date picker view will become available to pick a date and time for the notification. This date picker will be shown when a button is tapped, and after a date has been selected the same button will be used to schedule the notification and display the tableview again. We’ll make the date picker view to be appeared and disappeared in an animated way, so our app becomes a bit more attractive, but also to see how a simple animation can be performed using the UIView class in Swift.
For the local notification that we’ll schedule, we’ll define three distinct actions (apart from the default one that all local notifications support and make the app simply to be launched). These actions will give the following options to the user (I write the action title and what should happen with each one):
- “OK, got it”: This action will do nothing actually, except for making the notification go away. In the app, no tasks will be performed at all.
- “Edit list”: With this action, the application will come in the foreground and the textfield will get the focus, so the user can start writing a new item straight away.
- “Delete list”: This action will make the app run in the background. The existing shopping list will be removed, but the app won’t come in the foreground. The next time that the user will launch the app the list will simply not be there.
The next figures illustrate the demo application. As I said, it’s simple, but good enough for the purposes of this tutorial:


As a last word, I’d like to say that I’m going to talk in details about actions when we’re about to implement them. So, for the time being just have in mind that notification actions are actually… actions that a user can take and respond to the notification, and all the stuff about them will become known shortly.
The Starter Project
As our goal is to learn all the new stuff about notifications and not to see how to build an application from scratch, you can get a starter project for the demo app here. Once you download it, unzip it and get ready to work, as this project is going to be the base that we’ll start implementing to.
What you’ll find already existing in the starter project is mostly the interface. Before you keep reading to the next parts, please take a few minutes and look around for a while. Open the Main.storyboard file in the Interface Builder, and notice the subviews being there, as well as all the IBOutlet properties and the IBAction method that have already been created and connected as needed.
Besides that, you’ll see that all the necessary protocols that the ViewController class should conform to have already been declared. In addition to that, the minimum necessary tableview delegate and datasource methods have already been defined to the code, but without any logic implemented to them. They’re there just to avoid any Xcode errors that would be thrown if they were missing. Finally, in the viewDidLoad method you can find the objects for which the ViewController class becomes the delegate.
It’s easy to understand that the starter project is a quite easy one, so you don’t need to waste a lot of time by exploring it. However, it worths to take a quick look and familiarize yourself with it.
Managing the Shopping List
Let’s get started by implementing the shopping list first. Our goal in this part is to add a new item using the textfield, and to display all added items to the tableview. Also, we will make the application capable of deleting existing items. Obviously, we need a structure to both keep our data, and to use it as the datasource for the tableview. So, let’s begin by adding a NSMutableArray property to the ViewController class. Make sure that you’ve selected the ViewController.swift file in the Project Navigator. In that file, navigate yourself right below the IBOutlet property declarations add add the next instance variable:
var shoppingList: NSMutableArray!
Okay, we just did the first step. Note that we won’t initialize it in the viewDidLoad method as you may expected, instead we’ll do that to the point where we’ll add new objects to it. This will take place right next.
Now that the structure that will be used to store the shopping list items has been declared, let’s get going by allowing the user to add a new item using the textfield. Actually, we want the newly entered item to be added to the array and displayed eventually to the tableview right after the Return button on the keyboard has been tapped. To do that, we must implement the textFieldShouldReturn(textField:) delegate method. As you can see in the starter project, the UITextFieldDelegate protocol has already been adopted, and the ViewController class has been set as the delegate of the txtAddItem textfield.
So, as it seems we are ready to implement the aforementioned delegate method. In it, we want the next things to happen:
- To initialize the shoppingList array if it’s nil.
- To add the textfield’s text as a new object to the array.
- To make the tableview display the new item (we’ll implement the tableview behavior in just a while).
- To clear the textfield from any content so it’s ready to accept new text again.
- To remove the focus from the textfield, so the keyboard will hide.
Do all the above look too many? Well, they’re not, and you can see that in the above code segment:
func textFieldShouldReturn(textField: UITextField) -> Bool {
    if shoppingList == nil{
        shoppingList = NSMutableArray()
    }
    shoppingList.addObject(textField.text)

    tblShoppingList.reloadData()

    txtAddItem.text = ""
    txtAddItem.resignFirstResponder()

    return true
}
The above code is pretty clear on what it does, and I don’t think that you need further discussion about it.
The next step is to display the items of the shopping list to the tableview. In the ViewController class, the delegate and datasource tableview methods that we’ll need already exist, but now we must add the proper code to make it work. Let’s begin by the easy stuff, the number of sections and rows of the tableview, and the height of each row. You may replace the entire methods in the class with those given below, or simply replace their content. It’s up to you:
func numberOfSectionsInTableView(tableView: UITableView) -> Int {
    return 1
}


func tableView(tableView: UITableView, numberOfRowsInSection section: Int) -> Int {
    var rows = 0

    if let list = shoppingList{
        rows = list.count
    }

    return rows
}


func tableView(tableView: UITableView, heightForRowAtIndexPath indexPath: NSIndexPath) -> CGFloat {
    return 50.0
}
Note that we make sure that the shoppingList array isn’t nil before we get the number of the total objects it contains and return it.
Next, let’s assign each object of the array to the cell’s label, so it can be displayed to the tableview. Before doing so, let me underline that in the Interface Builder there’s a prototype cell with the idCellItem identifier value. Our first step is to dequeue that cell, and then set each object to its text label as a string value. Here it is:
func tableView(tableView: UITableView, cellForRowAtIndexPath indexPath: NSIndexPath) -> UITableViewCell {
    var cell = tableView.dequeueReusableCellWithIdentifier("idCellItem") as UITableViewCell

    cell.textLabel?.text = shoppingList.objectAtIndex(indexPath.row) as NSString

    return cell
}
The downcast in the line:
cell.textLabel?.text = shoppingList.objectAtIndex(indexPath.row) as NSString
is necessary (the as NSString part), because we want to make clear to the compiler that we want to assign a string value to the label.
So, now we are ready. We can add a new item and display all existing items to the tableview. But the truth is that we are almost ready, as there’s a last basic functionality missing here: The deletion of an existing item.
That’s easy to do, and we’ll start by defining a new, super-simple function:
func removeItemAtIndex(index: Int) {
    shoppingList.removeObjectAtIndex(index)

    tblShoppingList.reloadData()
}
This function accepts just one parameter, the index of the object that should be removed. Using this index value, we remove the respective object from the shoppingList array first, and then we reload the tableview data.
The above function is completely useless unless we call it when the user swipes the finger to the left so it reveals and use the well-known red Delete button. To enable this button, we must implement the tableView(tableView:commitEditingStyle:forRowAtIndexPath:) delegate method of the tableview. In it, we’ll call the above function. Right next you’re given its implementation:
func tableView(tableView: UITableView, commitEditingStyle editingStyle: UITableViewCellEditingStyle, forRowAtIndexPath indexPath: NSIndexPath) {
    if editingStyle == UITableViewCellEditingStyle.Delete {
        removeItemAtIndex(indexPath.row)
    }
}
Two things to notice: At first, the if statement is necessary so the above function gets called when the user deletes rows only, and of course to prevent any row insertion functionality. At second, the argument to the function is the row of the selected cell, which matches to the object we want to remove.
I guess that you may wonder why we created the removeItemAtIndex(index:) function, while we could have written the two lines of code it contains in the above tableview method. Well, I won’t really answer that; instead I let you discover it if you’re curious enough. Are you?
As a last word, I’d like to mention that there’s no need to add editing capability for the existing items to such a simple application. After all, there would be nothing really interesting to see, so we just skip it. What we did is good enough.
Saving and Loading List Items
Even though in the previous part we built the basic functionality of the demo app, we still must add two more important features so it works as expected. This means that we must make it capable of saving the shopping list permanently to the disk, and also load the list from the disk (if exists) when the application gets launched.
As the structure of our data is a mutable array, we can easily write and read to and from the disk, using the methods that the NSMutableArray class provides. Obviously, for doing both of the above, we are going to create two separate functions. So, let’s get started with the next one, which is responsible for saving the contents of the array to a file. The file is named shopping_list:
func saveShoppingList() {
    let pathsArray = NSSearchPathForDirectoriesInDomains(NSSearchPathDirectory.DocumentDirectory, NSSearchPathDomainMask.UserDomainMask, true)
    let documentsDirectory = pathsArray[0] as String
    let savePath = documentsDirectory.stringByAppendingPathComponent("shopping_list")
    shoppingList.writeToFile(savePath, atomically: true)
}
The first two lines consist of a standard piece of code that returns the path to the documents directory of the app. Once we know that, we form the path to the file, specifying the file name at the same time. Lastly, the key to the above function is the writeToFile(_:atomically:) method of the NSMutableArray class. This is the one that actually saves the array contents to the disk.
By having the above method implemented, we can go ahead and call it where it’s needed. If you think of what we did in the previous part, you can assume that we are going to call it in two places: When a new item is added to the list, and when an existing item is removed from the list.
At first, go to the textFieldShouldReturn(textField:) delegate method of the textfield. Just right before the return command, make a call to the above method:
func textFieldShouldReturn(textField: UITextField) -> Bool {
    ...

    saveShoppingList()

    return true
}
Nice, each new item now will be saved to the disk too. Also, let’s pay a visit to the removeItemAtIndex(index:) function too, where we actually delete an item. As we just did, let’s make a call to the save function and let’s add it as the last command as well:
func removeItemAtIndex(index: Int) {
    ...

    saveShoppingList()
}
With all the above we can be sure that any changes that might take place in our data, they will become permanent too.
Now, we can proceed by implementing the exact opposite functionality, the data loading. At first, let’s see the definition of the respective function:
func loadShoppingList() {
    let pathsArray = NSSearchPathForDirectoriesInDomains(NSSearchPathDirectory.DocumentDirectory, NSSearchPathDomainMask.UserDomainMask, true)
    let documentsDirectory = pathsArray[0] as String
    let shoppingListPath = documentsDirectory.stringByAppendingPathComponent("shopping_list")

    if NSFileManager.defaultManager().fileExistsAtPath(shoppingListPath){
        shoppingList = NSMutableArray(contentsOfFile: shoppingListPath)
        tblShoppingList.reloadData()
    }
}
It’s important to highlight the fact that we must always check if a file exists before we load its contents. In iOS, we do that by using the NSFileManager class exactly as shown above. If the file doesn’t exists and the condition returns false, nothing will happen at all. On the other hand, if the file exists, we initialise the shoppingList array with the contents of the file, and then we reload the tableview so it displays the loaded data.
As a last step, we must call this function. As we want the data to be loaded right after the app has been launched, we’ll do that in the viewDidLoad method:
override func viewDidLoad() {
    ...

    loadShoppingList()
}
The two functionalities we added to the application in this part, will become really helpful later, when we’ll handle the notification actions without running the app on the foreground.
Picking a Reminding Date
The textfield and the tableview are working perfectly, especially after our last additions, and the management of a shopping list can be now flawlessly done. That means that we can move forward and focus on the date picker. In this part what we’ll do is simple but interesting. We’ll show the date picker in an animated fashion, so we can pick a date and time for the notification.
If you take a look in the viewDidLoad method of the ViewController class, you’ll find a line which makes the date picker initially hidden:
datePicker.hidden = true
Through the steps we’ll follow here, we’ll make the Schedule Reminder button work like a switch: When it’s tapped once, the date picker will become visible and the tableview hidden, and when it’s tapped again it will be performed the exact opposing action.
As I said, the transition from the tableview to date picker and back will be animated, and we’ll do that by implementing a new function dedicated to that. In it, we’ll use the animateWithDuration(duration:animations:completionHandler:) method of the UIView class. This method allows to create animations fast and easily, and if you’ve ever worked with it (in Swift or in Objective-C) then you definitely know that.
We’ll define a new function named animateMyViews(viewToHide:viewToShow:). From this signature it’s clear that it accepts two parameters, the view we want to hide animated, and the view we want to show animated. Remember that with this function we need to show and hide both the tableview and the date picker, therefore we’ll set the proper views as arguments to that function each time upon calling.
Going to code now, for starters let’s see this method implemented, and then we’ll discuss about it more:
func animateMyViews(viewToHide: UIView, viewToShow: UIView) {
    let animationDuration = 0.35

    UIView.animateWithDuration(animationDuration, animations: { () -> Void in
        viewToHide.transform = CGAffineTransformScale(viewToHide.transform, 0.001, 0.001)
        }) { (completion) -> Void in

            viewToHide.hidden = true
            viewToShow.hidden = false

            viewToShow.transform = CGAffineTransformScale(viewToShow.transform, 0.001, 0.001)

            UIView.animateWithDuration(animationDuration, animations: { () -> Void in
                viewToShow.transform = CGAffineTransformIdentity
            })
    }
}
Let’s see what this function does: Initially, we specify the duration of each animation in seconds. Note that two subsequent animations are going to take place here. At first there’s the animation of the view that’s about to hide, and then follows the animation of the view that’s about to show.
Anyway, we begin the first animation, and we change the transform property of the viewToHide view by scaling down both its width and height. The actual frame of the view won’t be changed, but the result will be a nice zoom out effect. Once this animation is over, in the completion handler’s closure we first modify the visibility state of the two views. The first view gets hidden, the second view becomes visible. Then, we scale down the view that’s about to appear by using again the transform property, but we do that instantly. Lastly, we initiate the second animation where we bring the transform value of the appearing view back to normal. This will result to a beautiful zoom in effect.
Notice that if you want to change the duration of each animation, simply change the value of the animationDuration variable. In the current implementation, the whole transition lasts 0.7 seconds (0.35 + 0.35).
You now may be curious about this animation and how it works. You’ll be able to see it in a while, because we’re not finished yet. We must also implement the one and only IBAction method and initiate it.
What we’re going to do in this method is simple: We’ll check the current state of the date picker, and if it’s hidden then we’ll call the above function setting the tableview as the first argument (the view to hide), and the date picker as the second argument (the view to show). If it’s not hidden, we’ll call the function again but we’ll put the arguments in the reverse order. Let’s see it:
@IBAction func scheduleReminder(sender: AnyObject) {
    if datePicker.hidden {
        animateMyViews(tblShoppingList, viewToShow: datePicker)
    }
    else{
        animateMyViews(datePicker, viewToShow: tblShoppingList)
    }

    txtAddItem.enabled = !txtAddItem.enabled
}
The if-else statement is pretty clear I believe. At the end of the function, we enable or disable the textfield based on its current state, so it’s editable when the tableview is shown, and not-editable when the date picker is on.
Now, the Schedule Reminder button can be used to transit from the tableview to the date picker, and back. Note that in the IBAction method above, we’ll add a couple of more lines later, so we schedule the local notification that will be shown.
For the time being, you can play a bit with the app if you want. So, go ahead and run it either in the Simulator, on in a real device. Further than playing around with the shopping list by adding and removing items, use the button to see how the animation works. If you don’t want to run the application at this point though, the following graphic will give you an idea of the app up to now:
Specifying Notification Types
So far we have seen some interesting and cool things, and we made our application to work as expected. Starting from this part, we will focus on the local notification that we’ll display to the user, and we’ll examine in detail all the new stuff regarding it.
Before we begin, it’s necessary to say that what we’ll do in this one and the next few parts, it will take place in a new function that we’ll create. However, we’ll add its contents step by step, so we can discuss each important new feature properly.
In the beginning of the tutorial I said a few words about local notifications. Among them, I mentioned the types that a notification can have: A message appearing in an alert or banner (I’ll tell you later how to switch between them), a sound, and a badge. In this part, we will specify the types for the notification that we’ll schedule. In fact, from all the supported types, we’ll allow it to support only the text message in an alert or banner, and the sound playback. We won’t care about adding a badge number, but feel free to do it by yourself if you want so at the end of the tutorial.
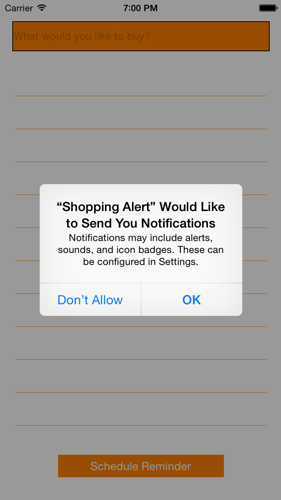
What it’s also important to mention before we write the next part of code, is that all the configuration made regarding the notifications of an application is added as part of the settings in the Settings app. This is useful, as the first time that an application that supports notifications is run, a message asking for permissions to show notifications is shown to the user. No matter whether the user decides to allow or not the appearance of local notifications for the specific app, he might change his mind later, and eventually change the app’s notification settings through the Settings app. So, be prepared to see a confirmation alert the first time we’ll run the app next. Of course, accept notifications, otherwise you’ll see nothing at all.
The new function that we are about to create is called setupNotificationSettings(). Apart from defining it here, we’ll add just a single line of code there. You might think it’s so little work, but on the other hand a very important one. With this line, we’ll tell the app the types for the notification we want to support. This configuration will be stored to a variable, which will be written to the settings a bit later.
So, having said all the above, let’s see the method:
func setupNotificationSettings() {
    // Specify the notification types.
    var notificationTypes: UIUserNotificationType = UIUserNotificationType.Alert | UIUserNotificationType.Sound

}
The UIUserNotificationType is actually an enum structure, and it contains all the possible type values. As you can see, the bitwise OR operator (the “|” symbol) is used to logically include both types in the final result. You can find all the available values for the notification types in this link. Also, if you feel that you need to refresh your memory about bitwise operators, take a look at the Swift manual here.
Anyway, as I said before we will write the value of the notificationTypes variable to the settings later. Before doing so though, we have still more to see.
Creating Notification Actions
Several times up to this point I talked about notification actions, but always generally speaking. Now, it’s time to see what they really are.
An action is an object of the UIMutableUserNotificationAction class. This class is new in iOS 8, and provides various useful properties so an action can be properly configured. These are:
- identifier: This is a string value, that uniquely identifies an action among all in an application. Obviously, you should never define two or more actions with the same identifier. Also, using this property we’ll be able to determine the chosen action by the user upon the notification appearance. We’ll see that later.
- title: The title is the text that is shown on the action button to the user. This can be either a simple, or a localized string. Be cautious and always set proper titles to your actions, so the user can instantly understand by reading the 1-2 title words what is going to happen by selecting it.
- destructive: This is a bool value. When it is set to true the respective button in the notification has red background colour. Note that this happens in the banner mode only. Usually, actions regarding deletion, removal and anything else critical are marked as destructive, so they increase the user’s attention.
- authenticationRequired: This property is a bool value also. When it becomes true, the user must necessarily authenticate himself to the device before the action is performed. It’s extremely useful in cases where the action is critical enough, and any unauthorised access can damage the application’s data.
- activationMode: This is an enum property, and defines whether the app should run in the foreground or in the background when the action is performed. The possible values specifying each mode are two: (a) UIUserNotificationActivationModeForeground, and (b) UIUserNotificationActivationModeBackground. In background, the app is given just a few seconds to perform the action.
While I was describing this demo application, I said that we’re going to create three distinct actions:
- An action to just make the notification go away, without anything else to be performed.
- An action to edit the list (actually to add a new item).
- An action to delete the entire list.
Let’s see how each one is written in code. For every action, we will set the values to all the aforementioned properties. The first one:
var justInformAction = UIMutableUserNotificationAction()
justInformAction.identifier = "justInform"
justInformAction.title = "OK, got it"
justInformAction.activationMode = UIUserNotificationActivationMode.Background
justInformAction.destructive = false
justInformAction.authenticationRequired = false
The identifier of this action is “justInform”. As you see, this action will be performed in the background, and as there’s nothing dangerous with it we set to false the destructive and the authenticationRequired properties.
The next one:
var modifyListAction = UIMutableUserNotificationAction()
modifyListAction.identifier = "editList"
modifyListAction.title = "Edit list"
modifyListAction.activationMode = UIUserNotificationActivationMode.Foreground
modifyListAction.destructive = false
modifyListAction.authenticationRequired = true
Apparently, this action requires the app to run in the foreground so we can edit the shopping list. Also, we don’t want nobody else to mess with our list, so we set the authenticationRequired to true.
And the third and last one:
var trashAction = UIMutableUserNotificationAction()
trashAction.identifier = "trashAction"
trashAction.title = "Delete list"
trashAction.activationMode = UIUserNotificationActivationMode.Background
trashAction.destructive = true
trashAction.authenticationRequired = true
With this action we’ll allow the user to delete the entire shopping list without launching the application in the foreground. However, this is a dangerous action for the data, therefore we tell the app that it’s destructive and that authentication is required to proceed.
By looking at the above actions setup, you understand that configuring them is an easy task.
Now that we have done all the above, let’s add them to the setupNotificationSettings function we started to implement in the previous part:
func setupNotificationSettings() {
    ...

    // Specify the notification actions.
    var justInformAction = UIMutableUserNotificationAction()
    justInformAction.identifier = "justInform"
    justInformAction.title = "OK, got it"
    justInformAction.activationMode = UIUserNotificationActivationMode.Background
    justInformAction.destructive = false
    justInformAction.authenticationRequired = false

    var modifyListAction = UIMutableUserNotificationAction()
    modifyListAction.identifier = "editList"
    modifyListAction.title = "Edit list"
    modifyListAction.activationMode = UIUserNotificationActivationMode.Foreground
    modifyListAction.destructive = false
    modifyListAction.authenticationRequired = true

    var trashAction = UIMutableUserNotificationAction()
    trashAction.identifier = "trashAction"
    trashAction.title = "Delete list"
    trashAction.activationMode = UIUserNotificationActivationMode.Background
    trashAction.destructive = true
    trashAction.authenticationRequired = true

}
Action Categories
When the actions of a notification have been defined, they can then be grouped together in categories. Actually, categories are what is written in the settings, and not the actions themselves, so you should always create them, unless of course you present a notification without actions. Usually, a category matches to a notification, so supposing that all notifications in an application support actions, there should be as many categories as the notifications.
In this demo application, we are going to create just one notification, so we are going to have one category only. Programmatically speaking now, a category is an object of the UIMutableUserNotificationCategory class, which is also new in iOS 8. This class has just one property and one method. The property is a string identifier that uniquely identifies a category (similarly to actions), and the method is used to group the actions together.
Let’s see a few more things about that method, and let’s start by its signature (taken by the Apple documentation directly):
func setActions(_ actions: [AnyObject]!, forContext context: UIUserNotificationActionContext)
The first parameter regards the actions that should be grouped for the category. It’s an array containing all the actions, and the order of the of the action objects in the array specifies the order they will appear in the notification.
The second parameter is quite important. The context is an enum type, and describes the context of the alert that the notification will appear into. There are two possible values:
- UIUserNotificationActionContextDefault: It matches to a full alert that is appeared to the centre of the screen (when the device is unlocked).
- UIUserNotificationActionContextMinimal: It matches to a banner alert.
In the default context, the category can accept up to four actions, which will be displayed in the predefined order in the notification alert (at the screen centre). In the minimal context, up to two actions can be set to appear in the banner alert. Notice that in the second case, you must choose what the most important actions are among all so they appear in the banner notification. In our implementation we’ll specify the actions for both contexts.
As I said, the first parameter in the above method must be an array. For this reason, our initial step is to create two arrays with the actions for each context. Let’s go back to our function:
func setupNotificationSettings() {
    ...

    let actionsArray = NSArray(objects: justInformAction, modifyListAction, trashAction)
    let actionsArrayMinimal = NSArray(objects: trashAction, modifyListAction)

}
Next, let’s create a new category for which we will set an identifier, and then we will provide the above arrays for the two contexts:
func setupNotificationSettings() {
    ...

    // Specify the category related to the above actions.
    var shoppingListReminderCategory = UIMutableUserNotificationCategory()
    shoppingListReminderCategory.identifier = "shoppingListReminderCategory"
    shoppingListReminderCategory.setActions(actionsArray, forContext: UIUserNotificationActionContext.Default)
    shoppingListReminderCategory.setActions(actionsArrayMinimal, forContext: UIUserNotificationActionContext.Minimal)

}
And… that’s all it takes to create a category regarding the actions of a notification.
Registering Notification Settings
In the last three parts we configured all the new features of the local notification, and now we have only left to write everything to settings. For this purpose, we will use the UIUserNotificationSettings class (new in iOS 8), and through the following init method we’ll provide the types and the category of the notification:
convenience init(forTypes allowedUserNotificationTypes: UIUserNotificationType, categories actionSettings: NSSet?)
The first parameter is the types we defined for the notification. The second parameter is a NSSet object, in which all the categories for all the existing notifications in an application must be set. In this example, we have just one category, however we’ll create a NSSet object no matter what.
Let’s continue the function implementation with that:
func setupNotificationSettings() {
    ...

    let categoriesForSettings = NSSet(objects: shoppingListReminderCategory)

}
Now, we can create a new object of the UIUserNotificationSettings class and pass the required arguments:
func setupNotificationSettings() {
    ...

    let newNotificationSettings = UIUserNotificationSettings(forTypes: notificationTypes, categories: categoriesForSettings)

}
Lastly, let’s write (register) the settings in the Settings app using the next line:
func setupNotificationSettings() {
    ...
UIApplication.sharedApplication().registerUserNotificationSettings(newNotificationSettings)
}
The first time the above code will work, it will create a new record for our application in the Settings app.
Now, before I present you the whole setupNotificationSettings() after all the previous additions, let me say something more. This function will be called in the viewDidLoad method, and that means that its content will be executed every time the app runs. However, as the notification settings are not going to change and therefore it’s pointless to set them again and again, it would be wise to contain all the above code in an if statement. In the condition of this statement, we will check if the notification types have been specified or not, where in the second case the if body will be executed. This is translated to code as shown next:
func setupNotificationSettings() {
    let notificationSettings: UIUserNotificationSettings! = UIApplication.sharedApplication().currentUserNotificationSettings()

    if (notificationSettings.types == UIUserNotificationType.None){
        ...
    }
}
At first, we get the existing notification settings using the currentUserNotificationSettings() method of the UIApplication class. This method returns a settings object, through which we can check the current value of the types property. Remember that this property is an enum type. If its value equals to None, meaning that no notification types have been set, then we’ll allow it to register the notification settings by doing all the above in the previous parts, otherwise will do nothing.
With the above condition we avoid unneeded settings registration. Note though that if you want to modify any settings or add more actions, categories, etc for new notifications, you should comment out the if opening and closing lines and run the app once, so the new additions to be applied and so you can test it with the new settings. Then, remove the comments to revert your code to its previous state.
With that, all the work in the notification details is over. Right next you can see the setupNotificationSettings() function fully implemented and in one part:
func setupNotificationSettings() {
    let notificationSettings: UIUserNotificationSettings! = UIApplication.sharedApplication().currentUserNotificationSettings()

    if (notificationSettings.types == UIUserNotificationType.None){
        // Specify the notification types.
        var notificationTypes: UIUserNotificationType = UIUserNotificationType.Alert | UIUserNotificationType.Sound


        // Specify the notification actions.
        var justInformAction = UIMutableUserNotificationAction()
        justInformAction.identifier = "justInform"
        justInformAction.title = "OK, got it"
        justInformAction.activationMode = UIUserNotificationActivationMode.Background
        justInformAction.destructive = false
        justInformAction.authenticationRequired = false

        var modifyListAction = UIMutableUserNotificationAction()
        modifyListAction.identifier = "editList"
        modifyListAction.title = "Edit list"
        modifyListAction.activationMode = UIUserNotificationActivationMode.Foreground
        modifyListAction.destructive = false
        modifyListAction.authenticationRequired = true

        var trashAction = UIMutableUserNotificationAction()
        trashAction.identifier = "trashAction"
        trashAction.title = "Delete list"
        trashAction.activationMode = UIUserNotificationActivationMode.Background
        trashAction.destructive = true
        trashAction.authenticationRequired = true

        let actionsArray = NSArray(objects: justInformAction, modifyListAction, trashAction)
        let actionsArrayMinimal = NSArray(objects: trashAction, modifyListAction)

        // Specify the category related to the above actions.
        var shoppingListReminderCategory = UIMutableUserNotificationCategory()
        shoppingListReminderCategory.identifier = "shoppingListReminderCategory"
        shoppingListReminderCategory.setActions(actionsArray, forContext: UIUserNotificationActionContext.Default)
        shoppingListReminderCategory.setActions(actionsArrayMinimal, forContext: UIUserNotificationActionContext.Minimal)


        let categoriesForSettings = NSSet(objects: shoppingListReminderCategory)


        // Register the notification settings.
        let newNotificationSettings = UIUserNotificationSettings(forTypes: notificationTypes, categories: categoriesForSettings)
        UIApplication.sharedApplication().registerUserNotificationSettings(newNotificationSettings)
    }
}
Don’t forget to call this function in the viewDidLoad body:
override func viewDidLoad() {
        ...

        setupNotificationSettings()
    }
Scheduling a Local Notification
If you ever worked with local notifications in previous versions of iOS, then you are definitely aware of how simple it is to schedule one. In iOS 8, scheduling notifications doesn’t differ from previous versions; in truth, all the basic setup it’s exactly the same. The only new here is that a category must be set to the notification, so it knows the correct actions that should be provided to user when it will be displayed.
As you may suspect, we are going to create a new function for configuring and scheduling the local notification. Before we move to the implementation, let me remind you shortly what the most important properties of a local notification are:
- fireDate: The fire date is the exact date and time that a local notification should appear. It is a NSDate object.
- alertBody: The message of the notification is set to this property. When specifying it, be sure to be comprehensive and clear as much as possible, so the user be able to understand the message right away.
alertAction: By default, tapping on the notification when it’s displayed as a banner leads to the application running. If it’s displayed in an alert view, then a button matching to that action is automatically created. In this property, you must specify the text of that action button. For example, in this demo application we are going to set the View List* as the title or the alert’s action.
With all that in mind, let’s create a new function and let’s do the basic setup of the notification. Needless to say that first we must create an object of the UILocalNotification class:
func scheduleLocalNotification() {
var localNotification = UILocalNotification()
localNotification.fireDate = datePicker.date
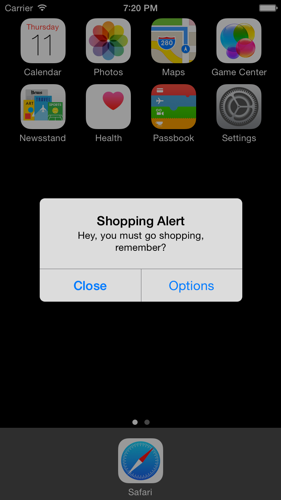
localNotification.alertBody = "Hey, you must go shopping, remember?"
localNotification.alertAction = "View List"
}
The addition to the above is that we must specify the category of actions that should be available to the user when the notification will be fired. If you recall, we specified an identifier value for the category previously, and that value exactly we are going to use here for specifying the category:
func scheduleLocalNotification() {
    ...

    localNotification.category = "shoppingListReminderCategory"
}
That simple. Lastly, the notification will never appear unless we perform the actual scheduling using the scheduleLocalNotification(_:) method of the UIApplication class:
func scheduleLocalNotification() {
    ...

    UIApplication.sharedApplication().scheduleLocalNotification(localNotification)
}
Now, let’s call the above method. To do that, we’ll update the scheduleReminder(sender:) IBAction method, and when the tableview is about to be shown again, we’ll make the call. However, there’s a big catch here that we must avoid: When scheduling a new local notification right after we’ve scheduled already one, the previous notification still remains active. If we overlook that, we can schedule many unneeded notifications without even to understand it. So, to prevent this from happening, we will simply remove all scheduled notifications when the date picker is appeared, and we’ll be just fine. Here’s the IBAction method once again, containing what I just said:
@IBAction func scheduleReminder(sender: AnyObject) {
    if datePicker.hidden {
        animateMyViews(tblShoppingList, viewToShow: datePicker)

        UIApplication.sharedApplication().cancelAllLocalNotifications()
    }
    else{
        animateMyViews(datePicker, viewToShow: tblShoppingList)

        scheduleLocalNotification()
    }

    txtAddItem.enabled = !txtAddItem.enabled
}
That’s all. After having configured all the type, action and rest details of the local notification, scheduling it consists of a really fast process. Furthermore, with the above additions everything is expected to work with no problems.
Fixing the Scheduled Notification Time
Our implementation so far is great, and everything is going to perfectly work. However, when you run the app you’ll notice a behaviour regarding the firing notification time which even might be normal, I find it to be problematic. So, here I come to talk about it in advance, before we even test the notification for first time. Let me say that what I’ll describe next maybe it’s not perceived at once when you run the app, however in a real application where the exact time of the notification is crucial this would possibly cause troubles.
What’s the problem? Well, I’ll make it clear with this simple example: If you schedule a notification to fire at 14:00 (never mind about the date, suppose it’s the same day) and now it’s 10:23:14, the notification won’t be fired at 14:00:00 as you might suppose. Instead, it will be fired at 14:00:14, and in my opinion, this is a problem in cases that a notification is a critical one. Why does this happen? Because in the date picker we can set the time, but without specifying the seconds value. So, the system supposes that should use the seconds value of the current time to set the firing timestamp, instead of using the 0 value.
So, what can we do? Simply, we’ll fix the time manually. It’s an easy and interesting task, and no need to worry if you’ve never worked with date and time parts in the past.
A date object (NSDate object) can be broken in parts, named date components. These components, which are properties of a class named NSDateComponents have both read and write access, therefore once we get them from the date picker’s selected date we can modify the seconds property. Obviously, from the components we can form again a NSDate object, and that’s so convenient for us because the date that we’ll compose will be set as the firing date for the notification.
As you will see in the implementation that follows, the conversion between date and date components is based on the use of the NSCalendar class. This is the one that provides the desired methods to do our job. Here’s the fix wrapped in a new function:
func fixNotificationDate(dateToFix: NSDate) -> NSDate {
    var dateComponets: NSDateComponents = NSCalendar.currentCalendar().components(NSCalendarUnit.DayCalendarUnit | NSCalendarUnit.MonthCalendarUnit | NSCalendarUnit.YearCalendarUnit | NSCalendarUnit.HourCalendarUnit | NSCalendarUnit.MinuteCalendarUnit, fromDate: dateToFix)

    dateComponets.second = 0

    var fixedDate: NSDate! = NSCalendar.currentCalendar().dateFromComponents(dateComponets)

    return fixedDate
}
Talking extensively about the NSCalendar class is out of my goals. However, it’s a quite interesting topic, so I give you this link to read more about it if you want.
This function now must be called to the proper place, and that is when setting the notification’s firing date. So, go back to the scheduleLocalNotification() function, and instead of accessing the date picker’s date, make a call to this function, providing the date picker’s date as an argument. Right next you’re given the scheduleLocalNotification() function once again with the replacement in it:
func scheduleLocalNotification() {
    var localNotification = UILocalNotification()
    localNotification.fireDate = fixNotificationDate(datePicker.date)
    localNotification.alertBody = "Hey, you must go shopping, remember?"
    localNotification.alertAction = "View List"
    localNotification.category = "shoppingListReminderCategory"

    UIApplication.sharedApplication().scheduleLocalNotification(localNotification)
}
Now the notification will be fired as expected.
Handling Notification Actions
There is one last aspect of the local notification that we haven’t worked with yet, and that is to handle the actions that get received by the application when the user taps on the respective buttons. As usual, there are certain delegate methods that should be implemented.
Before we see what actions we’ll handle and how, let me introduce you a couple of other delegate methods that can become handy when developing your own applications. Note that in this demo we won’t really use them; we’ll just print a message to the console. Also, make sure to open the AppDelegate.swift file now.
So, the first one regards the notification settings. This delegate method is called when the app is launched (either normally or due to a local notification’s action) and contains all the settings configured for the notifications of your app. Right next you can see its definition. What we only do, is to print the current notification types:
func application(application: UIApplication, didRegisterUserNotificationSettings notificationSettings: UIUserNotificationSettings) {

    println(notificationSettings.types.rawValue)
}
Regardless of the above simple implementation, you can use it to access all kind of settings supported by the UIUserNotificationSettings class. This method can become useful in cases you need to check the existing settings and act depending on the values that will come up. Don’t forget that users can change these settings through the Settings app, so do never be confident that the initial configuration made in code is always valid.
When scheduling a local notification, this will be fired no matter whether your application is currently running or not. Usually, developers imagine how the notifications are going to appear when the app is in the background or suspended, and all the implementation is focused on that. However, it’s your duty to handle a notification in case it will be fired when the app is running. Thankfully, iOS SKD makes things pretty straightforward, as there’s another delegate method that is called when the app is in the foreground:
func application(application: UIApplication, didReceiveLocalNotification notification: UILocalNotification) {
    // Do something serious in a real app.
    println("Received Local Notification:")
    println(notification.alertBody)
}
There will be cases where you won’t need to handle the notification if your app is running. However, in the opposite scenario, the above method is the place to deal with it and perform the proper actions.
Now let’s focus on the delegate method that is called when an action button is tapped by the user. Based on the identifier values we set to the actions, we’ll determine which one has been performed, and then we will make the app execute the proper part of code. We configured three actions in total:
- One to make the notification simply go away (identifier: justInform).
- One to add a new item to the list (identifier: editList).
- One to delete entire the list (identifier: trashAction).
From all the above, we don’t need to do anything when the first action is performed. However, we’ll handle the other two. Depending on the identifier value, we will post a notification (NSNotification) for each one, and then in the ViewController class we’ll observe for those notifications, and of course, we’ll handle them.
Let’s get started with the new delegate method:
func application(application: UIApplication, handleActionWithIdentifier identifier: String?, forLocalNotification notification: UILocalNotification, completionHandler: () -> Void) {

    if identifier == "editList" {
        NSNotificationCenter.defaultCenter().postNotificationName("modifyListNotification", object: nil)
    }
    else if identifier == "trashAction" {
        NSNotificationCenter.defaultCenter().postNotificationName("deleteListNotification", object: nil)
    }

    completionHandler()
}
In both cases we post a notification (a NSNotification), specifying a different name each time. Notice that at the end we call the completion handler, and that’s mandatory to do, so the system knows we handled the received action. This is the most important delegate method when working with local notifications, as this is the place where you’ll route your code depending on the action the user performed.
Now, let’s go back to the ViewController.swift file. There, let’s make that class observe for the notifications we set before. In the viewDidLoad method add the next lines:
override func viewDidLoad() {
    ...

    NSNotificationCenter.defaultCenter().addObserver(self, selector: "handleModifyListNotification", name: "modifyListNotification", object: nil)
    NSNotificationCenter.defaultCenter().addObserver(self, selector: "handleDeleteListNotification", name: "deleteListNotification", object: nil)
}
The modifyListNotification() and deleteListNotification() are both custom functions that we’ll implement right next.
Let’s begin with the first one. What we want is to make the textfield the first responder when the app is launched due to the edit list action, so we’re just talking about one line of code only:
func handleModifyListNotification() {
    txtAddItem.becomeFirstResponder()
}
With this, the keyboard will automatically be shown and the user will be able to type a new item immediately.
For the delete list action, we want to remove all existing objects from the array that contains them. So, we’ll do exactly that, and then we’ll save the (empty) array back to file. Lastly, we’ll reload the tableview data, so when the user launches the app will find no items at all:
func handleDeleteListNotification() {
    shoppingList.removeAllObjects()
    saveShoppingList()
    tblShoppingList.reloadData()
}
With the above implemented, our demo application is finally ready!
Running the Demo App
Time to test our work. Go and run the application either in Simulator or in a real device. Add a few items, and then schedule the local notification. To avoid waiting for it, schedule it 1-2 minutes later after the current time and then quit the app. The following images illustrate both the use of app, and the notification appearing in various contexts:
Adding a new item in the list:
Scheduling the notification:
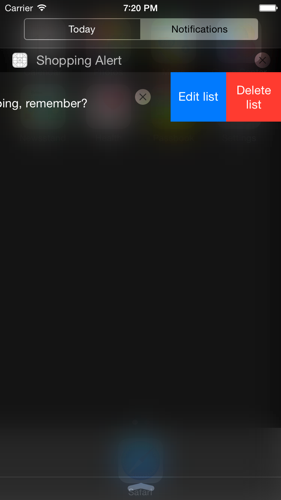
Notification as banner, viewing the actions (minimal context):
Notification as alert, all actions (default context):
Notification in the notification center (minimal context):
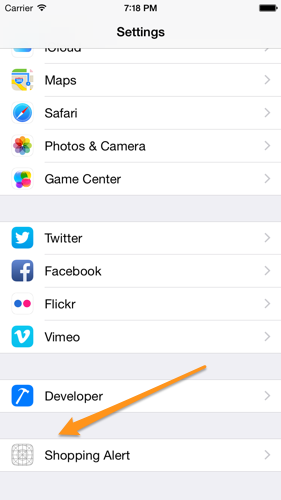
To switch between the banner and the alert view, open the Settings app of your device. Then, locate the Shopping Alert entry, and tap on it to see its details:
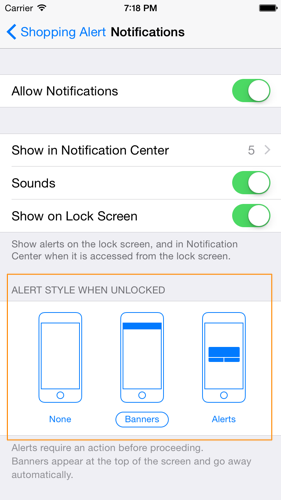
In there, select either the banner or the alert option, depending on how you want the notification to appear:
Then quit Settings, and schedule a new notification so you see the results of your selection.
Summary
As it seems, notifications in iOS 8 have become a lot better, as now users can perform actions directly through them and without even launching the app. In this tutorial we met various concepts, both existing and new ones. The bottom line is that setting types, actions and categories for notifications is a quite easy and fast process, and it really worths it to use them in your applications if they are actually needed. As I said in the introduction, there are more kinds of notifications as well, such as remote and location based. Even though we didn’t work with any of them, knowing how to work with local notifications, you already know the path you should follow for the other kinds too. You only need to search for the details of each one. So, with that I salute you, and waiting as always for your thoughts. Have fun!
For your reference, you can download the complete Xcode project from here.


