Following up on my previous post on migrating a parse database to a self-hosted MongoDB instance, in this spring-themed tutorial, we will take a look at how to host the parse server on Heroku and Amazon Web Services.
For those who are not familiar with the demise of Parse, that means the server (which manipulates data, interacts with the database, sends and recieves requests, etc.) will need to be hosted somewhere else. Parse, a Backend-as-a-Service (BaaS), handled both the server and database for developers. However, with the Parse shutdown looming next January, you’re advised to migrate all your Parse apps before service is suspended on January 28, 2017. Parse suggests you to perform the migration in steps with the database migration first and the server migration second. This tutorial assumes you have already migrated the database as we did in part one of this tutorial.
Fortunately, parse-server (a Github project opensourced by Facebook, Parse’s corporate overlord) can be deployed to any major cloud services. In this tutorial, we will take a look at deploying parse-server to Heroku, a popular cloud provider owned by Salesforce. In the latter half of this article, we will then use the same thinking to deploy parse-server to Amazon Web Services (AWS), which powers some of the most popular apps in the world.
Getting Started
To begin, head over to Heroku.com and sign up for an account. For the purpose of this demo, I will be using the free tier. However, depending on your own needs, you may wish to upgrade to a paid plan. You can view all paid Heroku plans here.
There are two options to deploy parse-server on heroku’s servers. The first is to click the deploy to Heroku button below which will prompt a step by step walkthrough of the process. Because Parse has already configured parse-server on Heroku’s servers, this may be the easiest approach for non-Javascript developers. If you are comfortable with git and the terminal, however, feel free to clone the app and push it using the terminal commands below. That being said, you won’t be able to avoid the command line forever. We will reference the terminal no matter what option you device to take.
Option 1: Using the Heroku Button
Clicking the button above to create a new heroku app. You should see a screen similar to the one below.
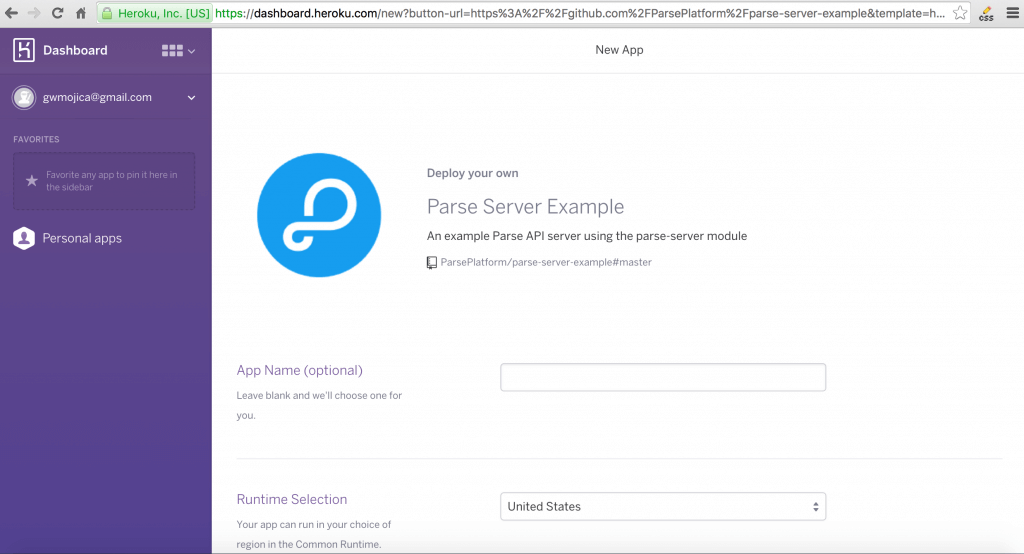
The setup “wizard” will prompt you to enter an app name (which must be all lower case and without spaces).
Next, you must select the runtime selection. If you live in the United States, choose United States. Otherwise, select Europe. The runtime selection selects the location of the servers you would like your parse app to be hosted on. For performance and speed, it is usualy a good idea to host your app on servers closest to your location.
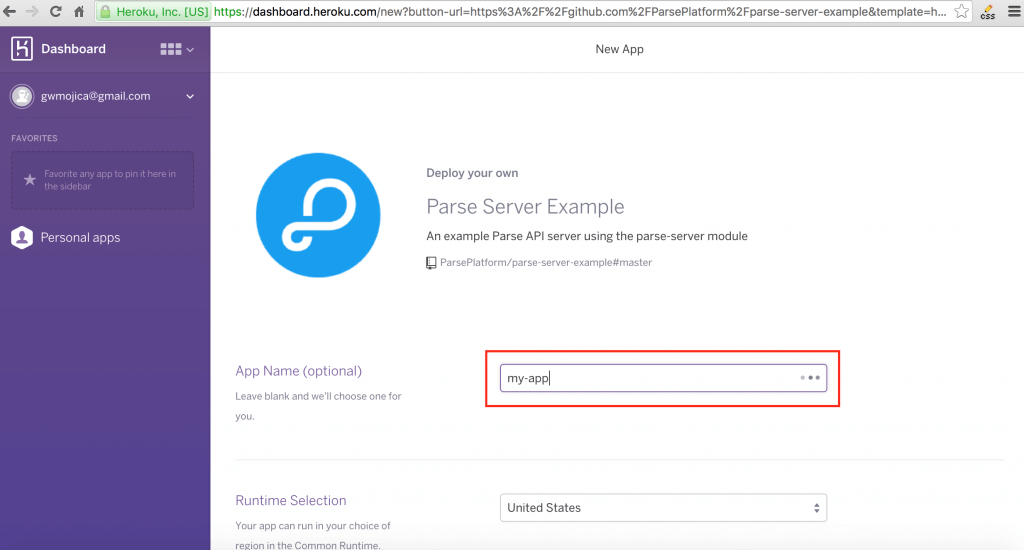
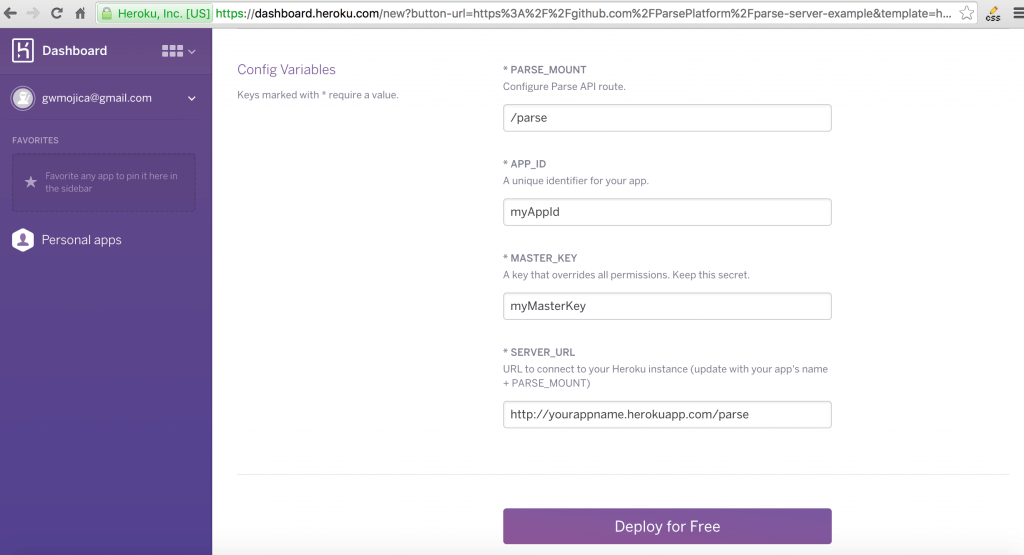
Next, update the config variables with the appropriate keys from your Parse account (or create new ones if you are not migrating an existing app — more on this later). Keep the Parse mount to /parse.
When you have filled out the remaining fields, hit the deploy button. We will leave the MongoLab (now known as mLab) deployment alone for now.
You may be prompted to enter your credit card.
Option 2: Cloning the Heroku App
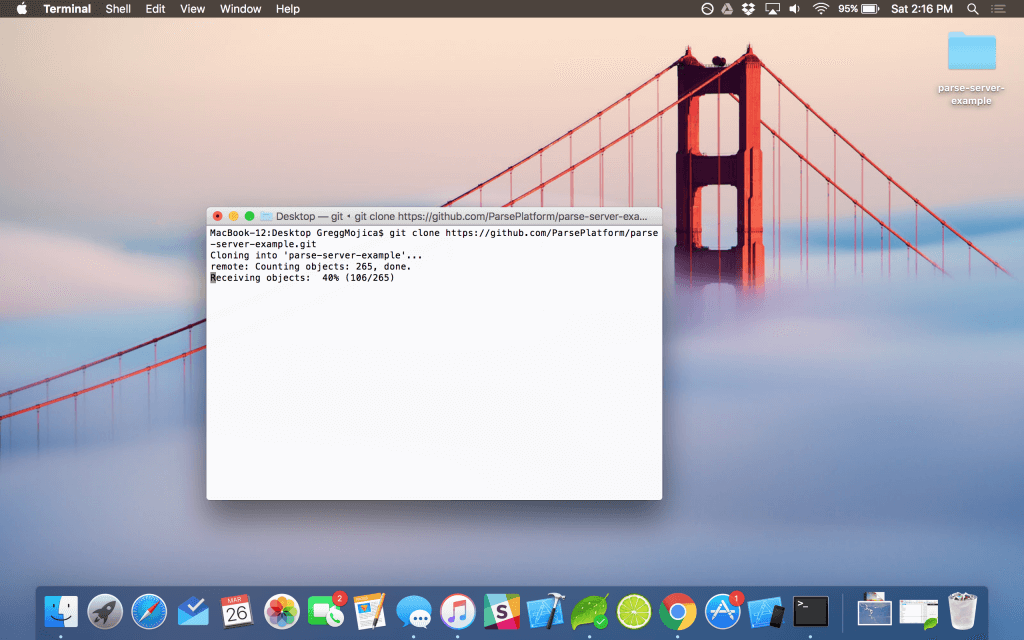
Parse-Server is open source and available on GitHub. If you have selected to use the terminal instead of the heroku button, proceed below. To start, fire up Terminal and clone the app using the following commands:
|
1 2 3 4 5 6 7 |
cd ~ cd Desktop git clone https://github.com/ParsePlatform/parse-server-example.git git add . git init git commit -m "Initial Commit" |
You have now successfully cloned parse-server to your desktop!
Modifying the Database URI
No matter what option you chose above, your app should be somewhat configured at this point. If you selected to use option 1, you’ll need to have a local copy of the code on your computer. To do so, use the following terminal commands (this will clone the app to my desktop).
|
1 2 3 4 5 6 7 8 9 |
$ heroku login $ cd ~/Desktop $ heroku git:clone -a your-app-name $ cd your-app-name $ git add . $ git commit -am "make it better" $ git push heroku master |
Upon logging in, you will be prompted to enter your credentials (more on this later, too, but for now just enter the email and password you used for Heroku. The password will not appear on screen).
Now, fire up your favorite text editor (I prefer Sublime Text) and open the newly cloned repository (for starters, you can drag the entire folder onto the sublime text icon and it will open the folder or use File > Open).
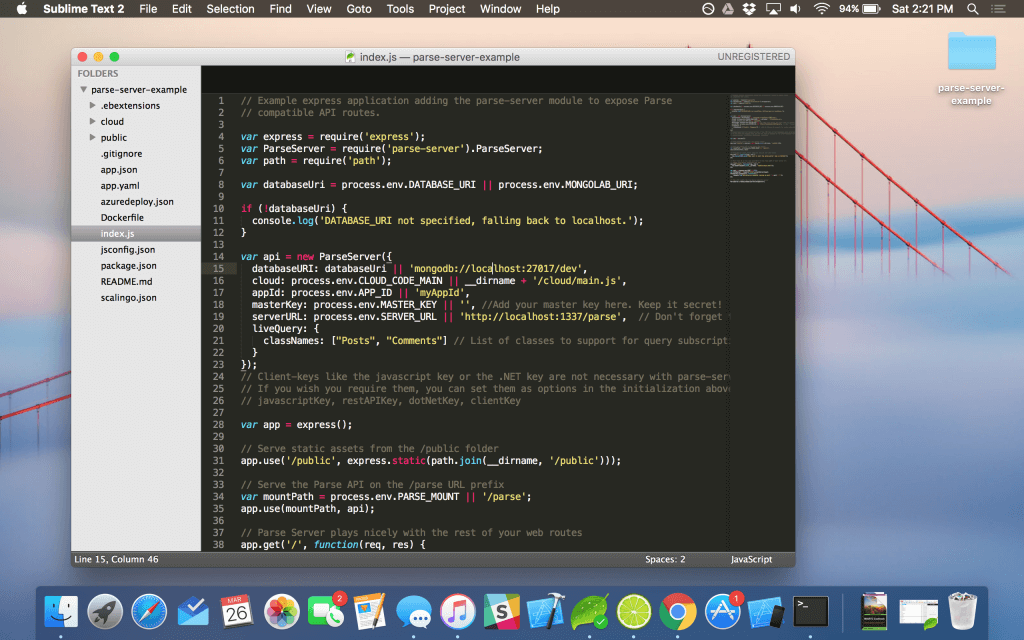
Now, we need to open the index.js file and modify the API variable. Let’s focus on line 14-23.
Starting with line 14, we need to modify the databaseURI parameter. Replace it with the path you generated in the first part of this tutorial series. As an example, I wil use the below url, but you must replace it with one that is your own.
|
1 |
Next, we need to fill out the appId and masterKey parameters. If you are migrating an existing app, head over to parse.com to find this data. If this is your first time using parse-server for a new project, you can create random, alpha numeric keys for these fields.
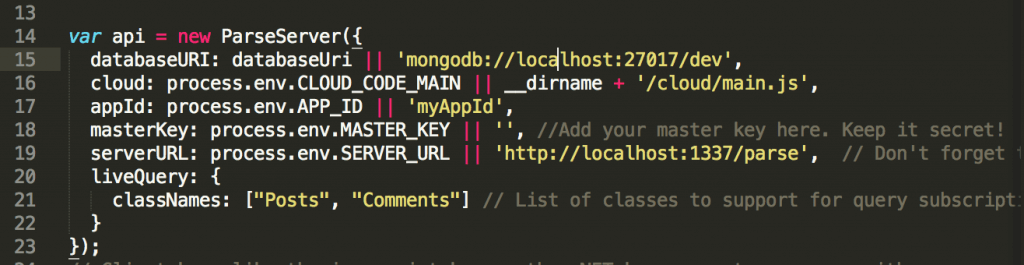
Login to your parse account at parse.com and head over to settings. From there, select Security & Keys. Copy and paste your Application ID (this is the appId) and Master Key. See the below image for reference (my keys have been redacted for security purposes).
Replace the keys in the index.js file with the new keys you retrieved from Parse. You can also add clientKey as a parameter by retrieving that from Parse.
Lastly, remember to save your work by hitting Command + S (on a Mac).
If you’re not migrating from the Parse hosted service, use a random generator (i.e. random.org or something similar) to generate strong, alpha-numeric keys.
Next, let’s deploy to Heroku.
Deploying Parse Server to Heroku
To deploy to parse server, first install the Heroku Toolbelt on your local machine by following the directions listed in the official Heroku support article linked above. Once installed, enter the following commands into terminal.
|
1 |
heroku login |
You will be prompted to enter your Heroku login. Note that when entering the password, it will not appear onscreen.
If you chose option 1, then there is no need to create a Heroku app using the following command. However, if you used option 2, make sure to run the following command to create a new Heroku app.
|
1 |
heroku create |
Heroku will then create an app for you. Now commit the changes to your server code with the following terminal commands:
|
1 2 3 4 |
git add . git init git commit -m "Updated api config" git push heroku master |
Now, your app should be successfully deployed to Heroku! If you encounter any errors, please list them in the comments below for discussion. I will try my best to help.
Setting the Environment Variables in Heroku
Next, we need to configure the server environment variables in Heroku. To do so, go back to terminal and enter the following command (with the proper URI of your MongoDB instance as we discussede earlier).
|
1 |
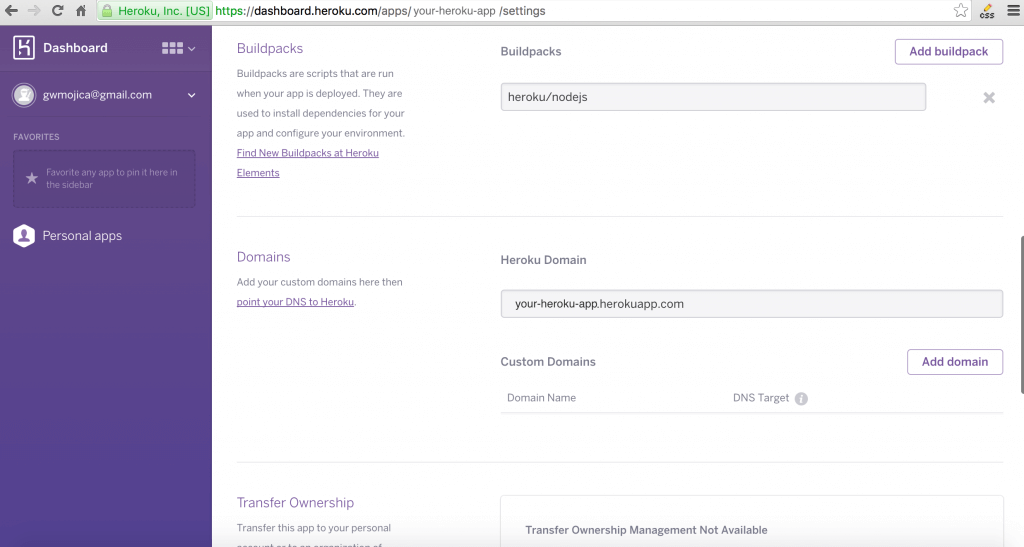
Head over to your Heroku dashboard, select your app, and under the Settings tab, click reveal config variables.
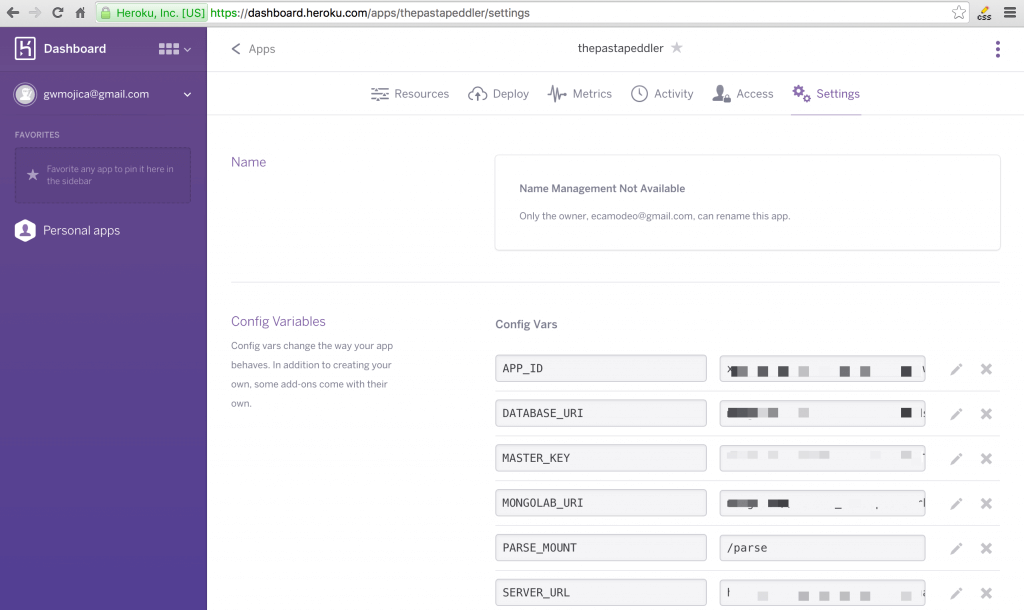
You should now see your configuration variables in Heroku including the database URI.
Congratulations! Your parse-server has been successfully deployed to Heroku. The only problem: your iOS apps aren’t wired up, yet.
Locating the Parse Server URL
To connect your app to your new parse server, locate its hosting url from the Heroku app’s settings.
Switching back to index.js in the parse server app and refer to line 27. You should notice that the mountPath variable is set to /parse.

This variable specifies where parse is located on the Heroku server. Currently it is set as /parse. So parse-server can be accessed on yourapp.herokuapp.com/parse (modify this to your appropriate domain).
Configuring the iOS application
Now that we have the server provisioned and deployed correctly, it is time to configure your iOS app’s settings and point them to the Parse server.
In Xcode, open your Parse iOS app and choose the appdelegate.swift file. Remove where you set the app key and client key with the following (add your own keys and custom server url of course).
Replace the following line of code:
|
1 |
Parse.setApplicationId(“xxxxxxxxxxxxxxxxxxxxxxxx”, clientKey: “xxxxxxxxxxxxxxxxxxxxxxxx”) |
with this:
|
1 2 3 4 5 6 7 8 |
let config = ParseClientConfiguration(block: { (ParseMutableClientConfiguration) -> Void in ParseMutableClientConfiguration.applicationId = "xxxxxxxxxxxxxxxxxxxxxxxx"; ParseMutableClientConfiguration.clientKey = "xxxxxxxxxxxxxxxxxxxxxxxx"; ParseMutableClientConfiguration.server = "xxxxxxxxxxxxxxxxxxxxxxxx.com/parse"; }); Parse.initializeWithConfiguration(config); |
Once you made the change, hit the Run button to test your app. The app should now work perfectly as it did before the migration but on a custom server. If you use cloud code, you may need to modify it to work in the new parse server environment. We will tackle this topic in a follow up tutorial as it is beyond the scope of this tutorial. Additionally, we will also discuss hosting the Parse dashboard on your own server in another tutorial, but for now you can continue to use the Parse hosted dashboard on parse.com until the official shutdown, which will take place in January of 2017.
Congratulations! You have successfully deployed your parse-server to Heroku!
Deploying Parse Server to AWS
Amazon Web Services (AWS) is one of the most popular cloud providers and powers some of the biggest names in the tech world. In fact, AWS is so widely used that tech giants like Apple rely on it for iCloud. Hulu, AirBnb, Lyft, Adobe, Slack, etc are just a few of the many companies that rely on AWS for their cloud storage.
So why’d I detail how to use Heroku first off? Heroku, unlike AWS, is much easier to setup. For the most part, you can get away without entering billing information. AWS on the other hand, is more complex. To demonstrate how to deploy the Parse server on AWS, we are going to use another deploy button and walkthrough wizard to make everything simple and seamless.
Once again, if you have deployed your app on Heroku and are completely satisfied with it, you can just skip this section. However, if you’re interested in learning how to deploy their parse app on the most widely used cloud provider available, let’s get moving!
First things first, go up to AWS and sign up for an AWS account. You’ll need to provide your billing information, in order to start a free trial.
Once done, click the below button to create a new AWS app. AWS provides a collection of cloud tools, each serves a unique and different function. For the tutorial, we will be using Elastic Beanstalk (which works hand in hand with the Elastic Cloud Compute Engine or EC2 for short).
What is Elastic Beanstalk?
According to Amazon, Elastic Beanstalk is an easy-to-use service for deploying and scaling web applications and services developed with Java, .NET, PHP, Node.js, Python, Ruby, Go, and Docker on familiar servers such as Apache, Nginx, Passenger, and IIS.
Fancy language? Perhaps. In short, it’s the service we’re going to use to setup and run the Parse server. If you want to learn more about Elastic Beanstalk, visit the official website.
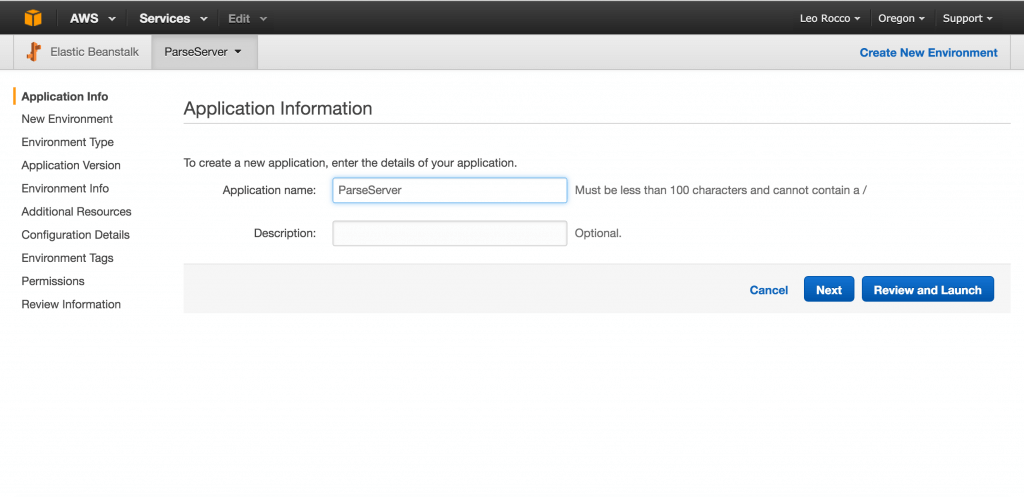
After clicking the button, you’ll be prompted to add an app name similarly to the screenshot below.
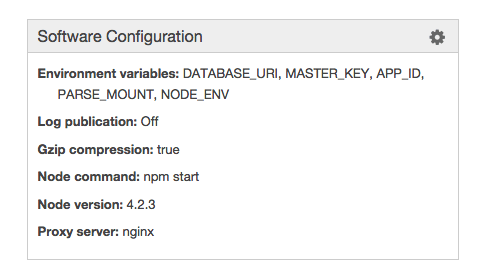
Next, make sure your configuration is as follows and proceed.
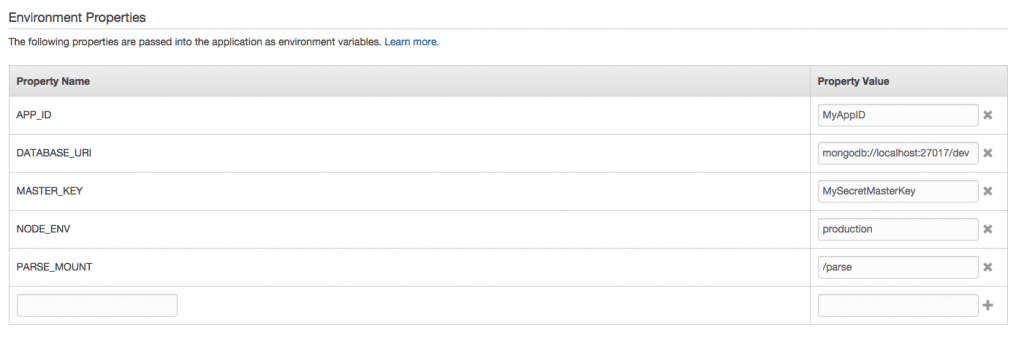
Update your parse settings accordingly in the next screen with appropriate keys and leave the parse mount to /parse.
Now, click the upload and deploy button to finish everything up. Your parse app should be configured properly on AWS!
When you configure the iOS app, ensure you locate the AWS URL which can be found under the app in the elastic beanstalk (see below).

Congratulations! You’ve successfully deployed parse server app to AWS! All you need to do now is configure your iOS app with the appropriate keys and new server url (suffixed with /parse).
Finishing up
In this tutorial, we took an in-depth look at deploying a parse server to Heroku and AWS. By now, you should have a solid grasp on this process.
However, we have left some loose strings attached. If you used cloud code, you may have to modify it appropriately to ensure it functions as before on the new Parse server. Additionally, you may want a replacement for the Parse dashboard. Fortunately, the Parse team has made the dashboard open source and provided step by step guides for updating cloud code. In the upcoming tutorials, we will discuss more on the topics. But for now, you should have a working parse app deployed to either AWS or Heroku!
What do you think about this tutorial? Leave me comment and share your thoughts.

Gregg Mojica is a software engineer & CEO at Clovis, a startup focusing on voice technology. When not hard at work building frontend, backend, and everything-else-end code, he enjoys writing, sharing his knowledge, and photography. Gregg has published several apps on the app store and worked at various startups. You can follow him on Twitter or connect with him on LinkedIn.