Making apps is hard, but making games is even harder, especially if you are not the gamer type. I always used to say this to myself whenever I started learning game programming. And I eventually quit each and every single time. This year I finally realised what I was doing wrong: I was focusing on building something big and got scared of the tremendous task right from the very beginning instead of starting with something small and having fun along the way. I want to make games which are fun to play, so if I don’t have fun creating them, what’s the whole point of even doing it? And then it hit me: you don’t have to create a full game from scratch to begin with – you just have to think of something easy enough to get you started and the rest will come naturally along the way.
Your challenge for this tutorial series is a simple one: make a label move, scale and rotate all at the same time when you tap the screen using SpriteKit, Apple’s 2D gaming framework. You will learn all you need to know about the following concepts along the way:
- Scenes
- Nodes
- Labels
- Points
- Gesture recognisers
- Actions
That’s quite a lot actually, so let’s get started! 🙂
The Tutorial Series
In the first part of the series you will learn all about scenes, nodes, labels and points by centering the label on the screen. The second part teaches you everything about gesture recognisers and actions by moving, scaling and rotating the label.
You may think why I will just teach you how to center a label in the first part of the tutorial series. Isn’t it too easy?
Learning to display and centre a label is the simplest and easiest way to start learning about scenes and nodes and connecting the dots in Sprite Kit. It’s important to understand how to centre a label first and play with nodes and scenes before moving to advanced stuff like gesture recognisers and actions.
If you do not understand and grasp the basics properly there is no use in explaining more advanced stuff like collision detection and physics. So let’s start with the basics!
Your First SpriteKit Project
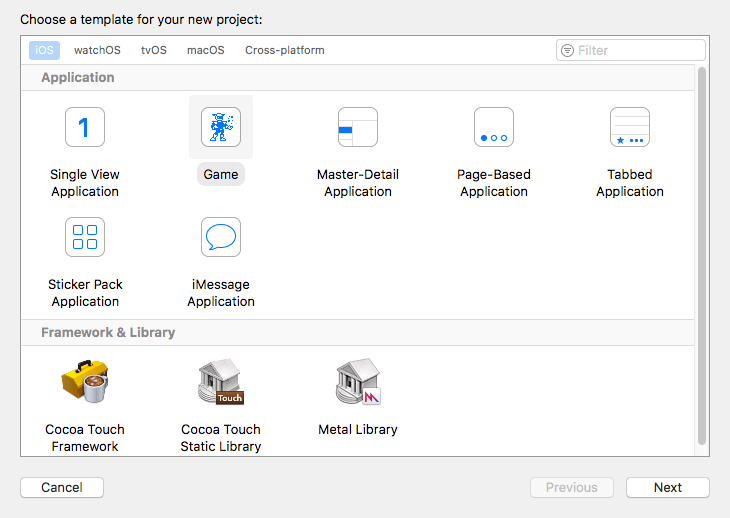
There is no better way to learn a framework by using it. So, let’s kick things off by creating our first SpriteKit project. Fire up Xcode and choose the Game template from the iOS project menu like this:
Next enter the project’s settings:
The most important thing to get right here is the Game Technology option – make sure you select SpriteKit from the corresponding menu:

Now save your project and you are done – time to clean it up a bit!
Cleaning Up the Project
The game template provides boilerplate code to get started. You are going to write everything from scratch, so go ahead and delete everything inside the GameScene.swift and GameViewController.swift files.
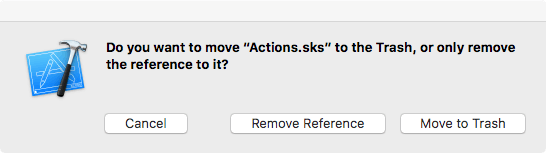
The GameScene.sks and Actions.sks files help you design scenes and actions visually. However, it’s easier to understand how to create them programatically first, so just delete both of them for now – you will learn how to use the SpriteKit editor in another tutorial. Make sure you permanently move the files to the trash when prompted to do so instead of just removing their references from the project:

That’s it for project cleanup – time for some code!
Creating the View Controller
Since we have emptied GameViewController.swift, we will now create the view controller from scratch. Add the following block of code to the GameViewController.swift file to get started:
|
1 2 3 4 5 |
import SpriteKit class GameViewController: UIViewController { } |
Here we import the SpriteKit framework and declare the class, which is a standard view controller. Its main role is to present the game scene right after the controller’s view is loaded, so add the viewDidLoad() method to the class:
|
1 2 3 4 5 |
override func viewDidLoad() { let scene = GameScene(size: view.frame.size) let skView = view as! SKView skView.presentScene(scene) } |
Let’s go over all this step by step:
Line #1 – You override the view controller’s viewDidLoad() method – it runs immediately after the view controller is loaded into memory.
Line #2 – You create the scene with the GameScene class designated initialiser: it fills up the entire screen, so it has the same size as the controller’s view’s frame one.
Line #3 – You force downcast the controller’s view to a SpriteKit view – this is the only type of view that renders SpriteKit content. The cast always succeeds in this case because you are using the game template, so the class of the controller’s view is set by default to SKView, instead of UIView in the storyboard.

Line #4 – You display the scene on the screen. In a complete game, you will use transitions to go through multiple scenes, but for now we will keep things simple and stick to one only.
That’s it for the view controller setup. Now, let’s move on to create a scene.
Creating a Scene
Again, we emptied GameScene.swift in the earlier section. Here I will show you how to create it from scratch. Add the following code to the GameScene.swift file to kick things off:
|
1 2 3 4 5 |
import SpriteKit class GameScene: SKScene { } |
You import the SpriteKit framework and define the class, which is a subsclass of a standard SpriteKit scene (i.e. SKScene). The previous error is fixed, so build and run the project to see your scene in action:

The scene is empty because it has no nodes attached to it, except for the root one which is the scene itself. Okay, now stop the app, and head back to the editor to add your first node to the scene!
Adding a Node to the Scene
The first node is just a simple label. In the GameScene class, declare a the label property named label:
|
1 |
let label = SKLabelNode(text: "Hello SpriteKit!") |
Every game needs to display text at some point. The SpriteKit provides a class called SKLabelNode to display a text label. The code above simply instantiates a SKLabelNode object and set its initial string to Hello SpriteKit!. It doesn’t do anything on its own unless you add it to the scene’s node tree as soon as the view controller presents the scene. In other words, you have to provide additional implementation to present the label on screen.
Now add a new method called didMove(to:) to the class:
|
1 2 3 |
override func didMove(to view: SKView) { addChild(label) } |
We override the scene’s didMove(to:) method. It is the method that runs immediately after the scene is presented by its corresponding view. In the method implementation, we call the addChild method to add the label as a child node to the scene’s node tree.
Now let’s run the app again. You should see the label on the screen:
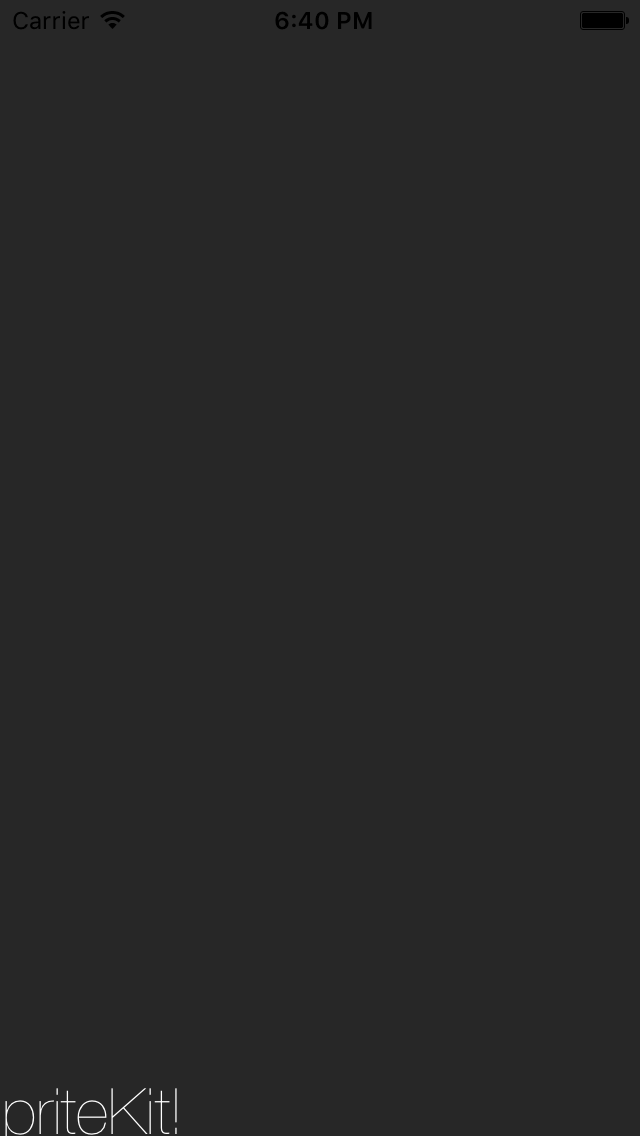
But there is a problem: the label is cut off. It is because its position is set to (0, 0) by default.
Okay, now let’s move on to the last part of the tutorial and make some changes to center the label.
Centering the Label
Add this line of code to the didMove(to:) method right before adding the label to the scene:
|
1 |
label.position = CGPoint(x: view.frame.width / 2, y: view.frame.height / 2) |
You use the view’s width and height to determine the label’s coordinates and position it at the center of the screen. The screen’s dimensions are not hardcoded, so the label is correctly positioned on all iPhone simulators.
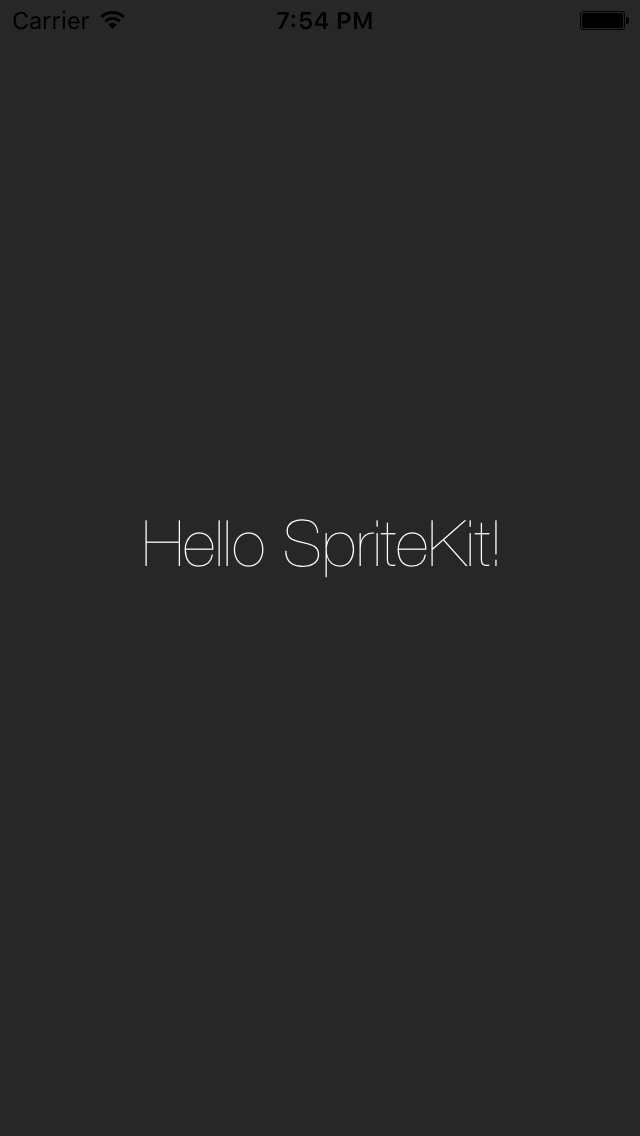
Build and run and voilà! The label should be rendered perfectly on screen.
Other than the position property of the label, there are a number of properties that you can tweak to change the label style. For example, you can change its font size, type and colour like this:
|
1 2 3 |
label.fontSize = 45 label.fontColor = SKColor.yellow label.fontName = "Avenir" |
Conclusion
This is the end of the tutorial’s first part – you have used scenes, nodes, labels and points to center a label on the screen with SpriteKit. In the next part, you will move, scale and rotate the label with gesture recognizers and actions. Stay tuned. In the meantime if you have any questions or issues, please let me know.
For reference, you can download the complete Xcode project on GitHub.
Update: Part 2 of the SpriteKit series is now ready. You can check it out here.

Cosmin Pupăză blogs about Swift and iOS development at cosminpupaza.wordpress.com and on the Swift tutorial teams at raywenderlich.com and appcoda.com. When not coding, he plays the guitar or studies WW2 history. You can contact him at [email protected], on Facebook, Twitter and Google+.