How To Create UIPageViewController Using Storyboard
We’ve covered UIPageViewController before. The original tutorial demonstrates how to create UIPageViewController using Interface Builder. To make it compatible with iOS 7 and Xcode 5, we completely rewrite the whole tutorial. In addition, we’ll use Storyboard to create UIPageViewController.
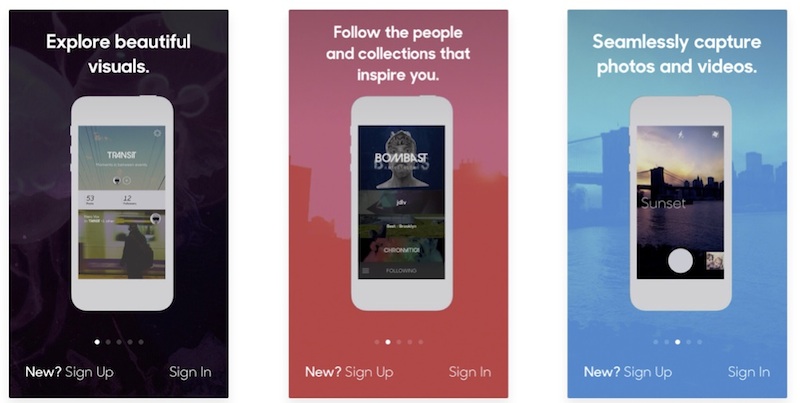
For the very first time you launch an app, you’ll probably find a series of walkthrough (or tutorial) screens to give you a brief introduction of the features. It’s a common practice to explain how the app works. In this tutorial, we’ll show you how to build a similar type of walk through screens by using UIPageViewController.
The UIPageViewController class was first introduced in iOS 5 SDK that lets developers build pages of content, where each page is managed by its own view controller. The class was further improved in iOS 6 to support the scrolling transition. With page view, users can easily navigate between multiple pages through simple gesture. The page view controller is not limited to create walkthrough screens. You can find examples of page view implementation in games like Angry Birds to show the available levels or book apps to display pages of content.

The UIPageViewController is a highly configurable class. You’re allowed to define:
- the orientation of the page views – vertical or horizontal
- the transition style – page curl transition style or scrolling transition style
- the location of the spine – only applicable to page curl transition style
- the space between pages – only applicable to scrolling transition style to define the inter-page spacing
We’ll create a simple app together in order to demonstrate how UIPageViewController works. However, we’ll not demonstrate every option of UIPageViewController. We’ll just use the scrolling transition style to display a series of walkthrough screens. Don’t worry. With the basic understanding of the UIPageViewController, I believe you should be able to explore other features in the page view controller.
Let’s get started.
A Glance at the Demo App
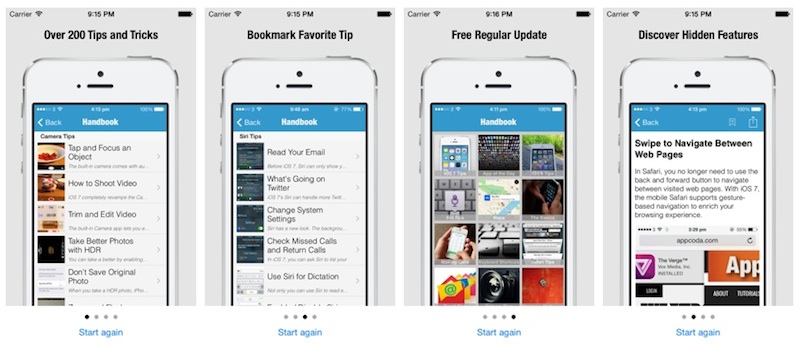
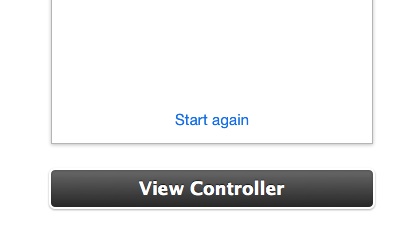
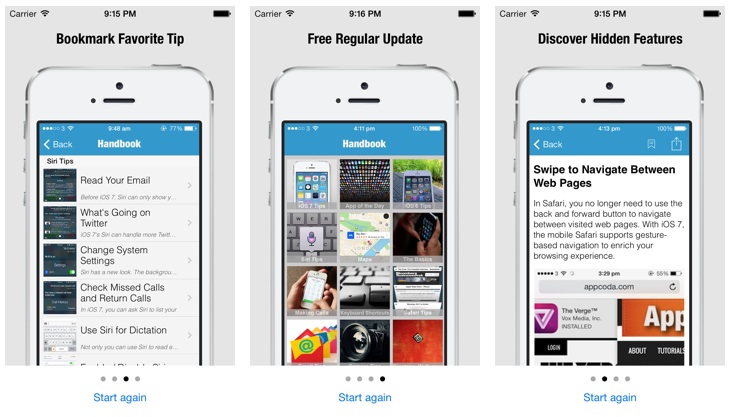
The demo app we are going to create is very simple. It displays 4 pages of screens to give users a brief introduction to the user interface. User can navigate between pages by swiping through the screen. Whenever user taps the “Start again” button to go back to the first page of tutorial. This type of walkthrough/tutorial screens shouldn’t be new to you as they are commonly found in apps such as Snapguide and Airbnb.

Creating the Project
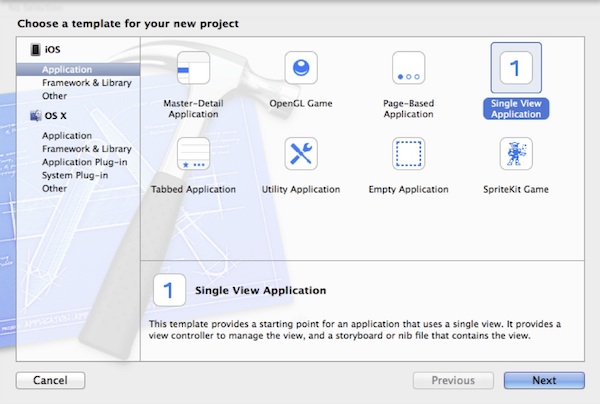
Launch Xcode and create a new Project by using the Single View Application template. It might seem a little bit strange to select the Single View Application template as Xcode already comes with a Page-Based Application template, which contains a fully functional app based on the UIPageViewController. However, this template is a little bit complex and it will take us more time to clean-up the code of the template than to start from scratch. Needless to say, we can better grasp the concept behind the UIPageViewController when we start from scratch.

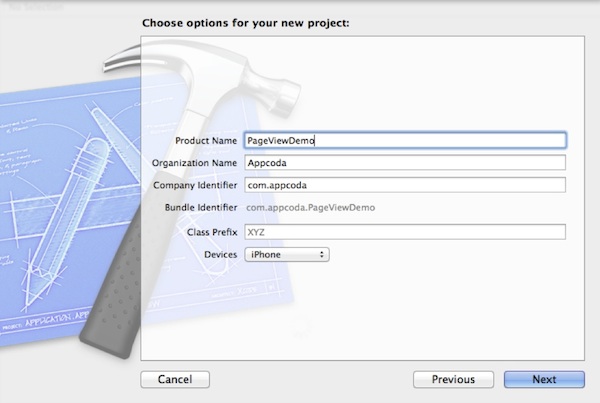
Okay, let’s move on. In the next screen enter PageViewDemo as the product name and set com.appcoda in the company identifier field. Select iPhone for the Devices option. Press next and create the project.

Creating Page View Controller in Storyboard
Next, select the Main.storyboard. As usual, you should find a default view controller generated by Xcode. Leave it as it is. Drag a Page View Controller from the Object Library into the storyboard. Then add another View Controller and put it in the same storyboard.

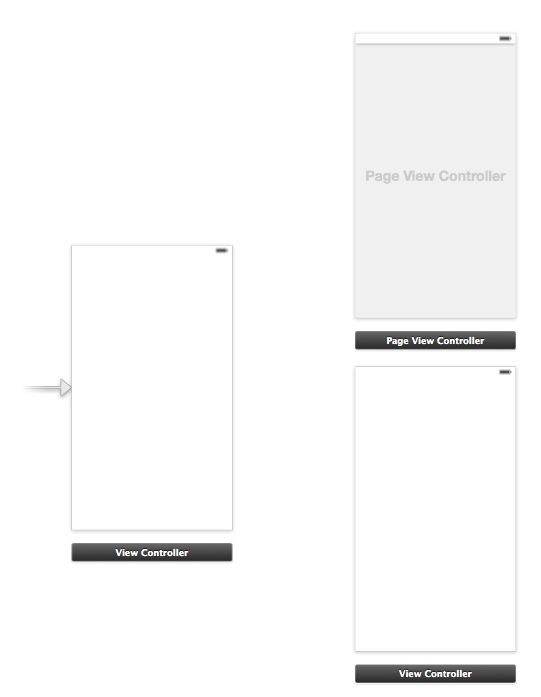
For this project, the original view controller is used as the root view controller for holding the page view controller. The view controller you’ve just added will be used for displaying the page content. Throughout the article, we refer the original view controller as the root view controller and the other view controller as page content controller.
You may wonder why we just add a single view controller for 4 pages of content. Shouldn’t we use four view controllers instead of one? As you can see from the final deliverable, the walkthrough screens are very similar. It’s better to share the same view controller for different screens.
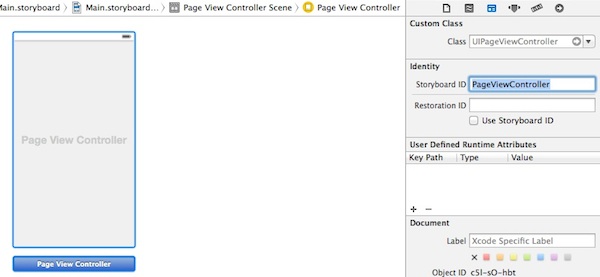
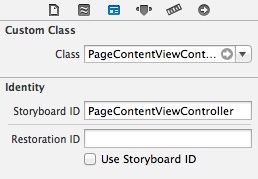
Next, assign a Storyboard ID for the page view controller and the page content controller. You can simply select the controller and set the ID under Identity Inspector. Set the Storyboard ID of the page view controller as “PageViewController” and name the ID of the page content controller as “PageContentController”. Later we’ll refer to these IDs in our code.

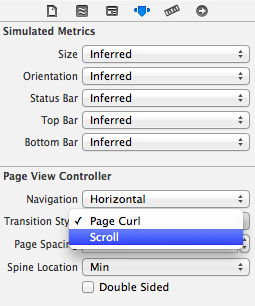
By default, the transition style of the page view controller is set as Page Curl. The page curl style is perfect for book apps. For walkthrough screens, we prefer to use scrolling style. So change the transition style to Scroll under Attribute Inspector.
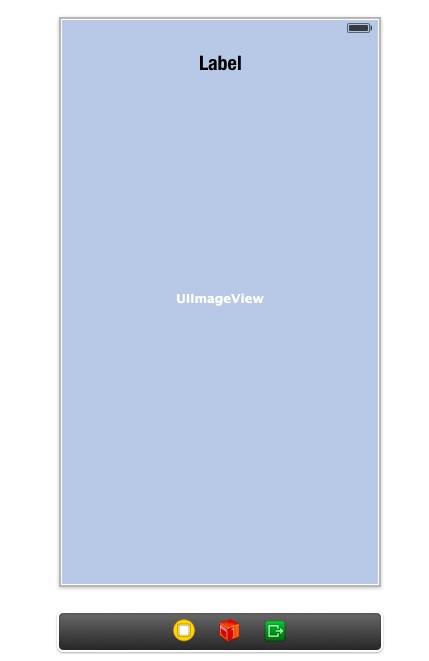
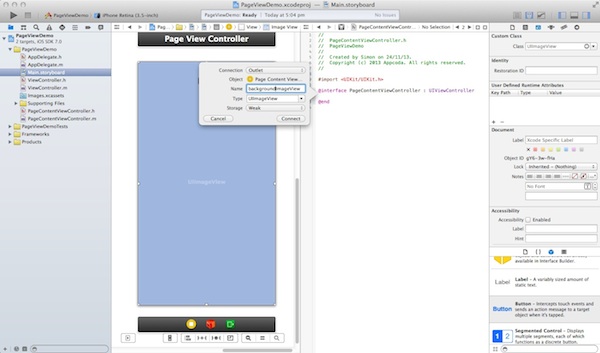
We’ll design the user interface of page content view controller. Drag an image view and a label into the controller. You’re free to change the font type and size. But your view controller should be similar to the below screenshot.

For the default view controller, add a “Start again” button and put it at the below of the screen.

Creating View Controller Class
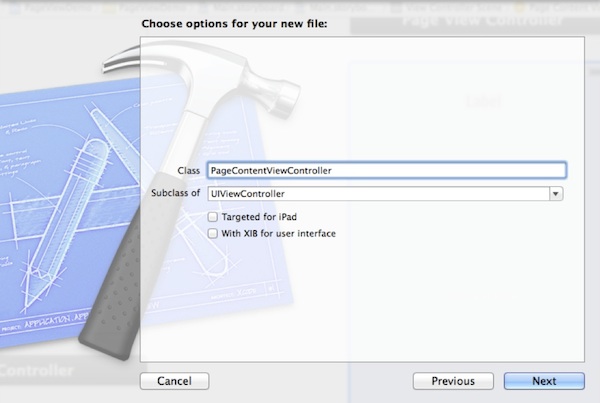
The next step is to create view controller class and associate it with the corresponding view controller. From the menu, select File -> New -> File … and choose the “Objective-C class” template. Name the class as PageContentViewController and make it a subclass of UIViewController.

Go back to Storyboard. Select the page content view controller and set the custom class to PageContentViewController under Identify Inspector.

Next, we’ll create outlets for the image view and label. Switch to the Assistant Editor and make sure the PageContentViewController.h is opened. Control and drag from the image view to the PageContentViewController.h and create an IBOutlet. Set the name as backgroundImageView for the image view. For the label, set the name of the outlet as titleLabel.

After the change, the PageContentViewController.h should look like this:
|
1 2 3 4 5 6 7 |
#import <UIKit/UIKit.h> @interface PageContentViewController : UIViewController @property (weak, nonatomic) IBOutlet UIImageView *backgroundImageView; @property (weak, nonatomic) IBOutlet UILabel *titleLabel; @end |
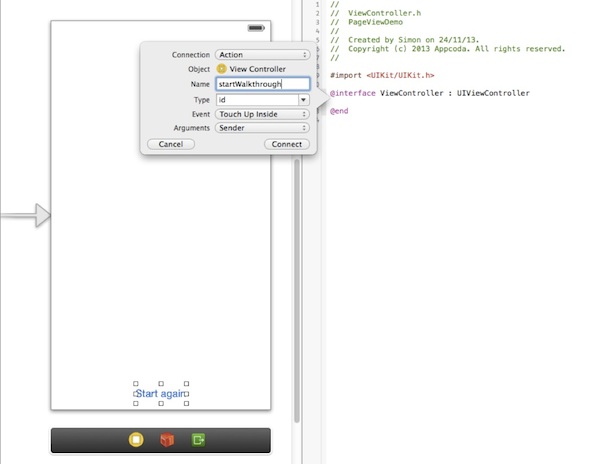
Next, select the root view controller and make sure the ViewController.h is opened. Create an action for the “Start again” button and name the action as “startWalkthrough”.

Okay, we’ve completed the design of user interface and created all the outlets. Let’s move onto the implementation of the view controller classes.
Implementing the Page Content View Controller
It’s very straightforward to implement the page content view controller. First, add the following properties in PageContentViewController.h:
|
1 2 3 |
@property NSUInteger pageIndex; @property NSString *titleText; @property NSString *imageFile; |
The pageIndex stores the current page index (or page number). The view controller is designed to display an image and a title. So we create two parameters for passing the title text and image file. Next, open PageContentViewController.m and change the viewDidLoad: method:
|
1 2 3 4 5 6 7 |
- (void)viewDidLoad { [super viewDidLoad]; self.backgroundImageView.image = [UIImage imageNamed:self.imageFile]; self.titleLabel.text = self.titleText; } |
Implementing the Page View Controller
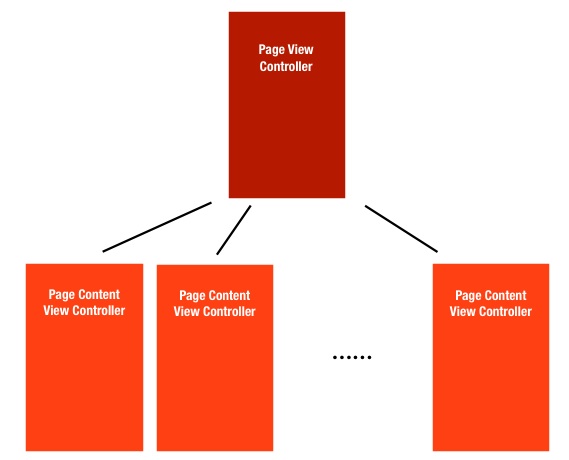
The UIPageViewController class is classified as a container controller. The container controller is used to contain and manage multiple view controllers shown in the app, as well as, controlling the way one view controller switches to another. Here the UIPageViewController is the container controller that lets the user navigate from page to page, where each page is managed by its own view controller object. The following illustration depicts the relationship between the page view controller and the page content view controller.
In order to make UIPageViewController work, we must adopt the UIPageViewControllerDataSource protocol. The data source for a page view controller is responsible for providing the content view controllers on demand. By implementing the data source protocol, we tell the page view controller what to display for each page.
In this case, we use the ViewController class as the data source for the UIPageViewController instance. Therefore it is necessary to declare the ViewController class as implementing the UIPageViewControllerDataSource protocol.
The ViewController class is also responsible to provide the data of the page content (i.e. images and titles). Open the ViewController.h. Modify the @interface declaration, add a new property to hold the UIPageViewController, as well as, properties for both images and titles:
|
1 2 3 4 5 6 7 8 9 10 11 |
#import <UIKit/UIKit.h> #import "PageContentViewController.h" @interface ViewController : UIViewController <UIPageViewControllerDataSource> - (IBAction)startWalkthrough:(id)sender; @property (strong, nonatomic) UIPageViewController *pageViewController; @property (strong, nonatomic) NSArray *pageTitles; @property (strong, nonatomic) NSArray *pageImages; @end |
In the ViewController.m, initialize the pageTitles and pageImages in the viewDidLoad method:
|
1 2 3 4 5 6 7 |
- (void)viewDidLoad { [super viewDidLoad]; _pageTitles = @[@"Over 200 Tips and Tricks", @"Discover Hidden Features", @"Bookmark Favorite Tip", @"Free Regular Update"]; _pageImages = @[@"page1.png", @"page2.png", @"page3.png", @"page4.png"]; } |
We have created the data model for the page content. Next, we have to implement at least two methods of the UIPageViewControllerDataSource protocol:
- viewControllerAfterViewController – provides the view controller after the current view controller. In other words, we tell the app what to display for the next screen.
- viewControllerBeforeViewController – provides the view controller before the current view controller. In other words, we tell the app what to display when user switches back to the previous screen.
Add the following lines of code before the end of the ViewController.m file:
|
1 2 3 4 5 6 7 8 9 10 11 12 13 14 15 16 17 18 19 20 21 22 23 24 25 26 27 28 |
#pragma mark - Page View Controller Data Source - (UIViewController *)pageViewController:(UIPageViewController *)pageViewController viewControllerBeforeViewController:(UIViewController *)viewController { NSUInteger index = ((PageContentViewController*) viewController).pageIndex; if ((index == 0) || (index == NSNotFound)) { return nil; } index--; return [self viewControllerAtIndex:index]; } - (UIViewController *)pageViewController:(UIPageViewController *)pageViewController viewControllerAfterViewController:(UIViewController *)viewController { NSUInteger index = ((PageContentViewController*) viewController).pageIndex; if (index == NSNotFound) { return nil; } index++; if (index == [self.pageTitles count]) { return nil; } return [self viewControllerAtIndex:index]; } |
The above methods are very straightforward. First, we get the current page index. Depending the method, we simply increase/decrease the index number and return the view controller to display. Of course, we have to verify if we have reached the boundaries of the pages and return nil in that case.
As you may notice, we haven’t created the viewControllerAtIndex: method. It is a helper method that is designed to create the page content view controller on demand. It takes in the index parameter and creates the corresponding page content controller.
In the ViewController.m, add the helper method:
|
1 2 3 4 5 6 7 8 9 10 11 12 13 14 |
- (PageContentViewController *)viewControllerAtIndex:(NSUInteger)index { if (([self.pageTitles count] == 0) || (index >= [self.pageTitles count])) { return nil; } // Create a new view controller and pass suitable data. PageContentViewController *pageContentViewController = [self.storyboard instantiateViewControllerWithIdentifier:@"PageContentViewController"]; pageContentViewController.imageFile = self.pageImages[index]; pageContentViewController.titleText = self.pageTitles[index]; pageContentViewController.pageIndex = index; return pageContentViewController; } |
Recalled that we have set a storyboard ID for the view controllers when designing the user interface. The ID is used as reference for creating the view controller instance. To instantiate a view controller in storyboard, you can use the instantiateViewControllerWithIdentifier: method with a specific storyboard ID.
|
1 |
PageContentViewController *pageContentViewController = [self.storyboard instantiateViewControllerWithIdentifier:@"PageContentViewController"]; |
To display a page indicator, you have to tell iOS the number of pages (i.e. dots) to display in the page view controller and which page must be selected at the beginning. Add the following two methods at the end of the ViewController.m file:
|
1 2 3 4 5 6 7 8 9 |
- (NSInteger)presentationCountForPageViewController:(UIPageViewController *)pageViewController { return [self.pageTitles count]; } - (NSInteger)presentationIndexForPageViewController:(UIPageViewController *)pageViewController { return 0; } |
Again the above code is very straightforward. We simply tell iOS that we have the total number of pages to display in the page view controller and the first page should be selected by default.
Initializing the UIPageViewController
The final step is to create and initialize the UIPageViewController. The best place to do that is in the viewDidLoad method. Open the ViewController.m file and change the method to:
|
1 2 3 4 5 6 7 8 9 10 11 12 13 14 15 16 17 18 19 20 21 22 23 |
- (void)viewDidLoad { [super viewDidLoad]; // Create the data model _pageTitles = @[@"Over 200 Tips and Tricks", @"Discover Hidden Features", @"Bookmark Favorite Tip", @"Free Regular Update"]; _pageImages = @[@"page1.png", @"page2.png", @"page3.png", @"page4.png"]; // Create page view controller self.pageViewController = [self.storyboard instantiateViewControllerWithIdentifier:@"PageViewController"]; self.pageViewController.dataSource = self; PageContentViewController *startingViewController = [self viewControllerAtIndex:0]; NSArray *viewControllers = @[startingViewController]; [self.pageViewController setViewControllers:viewControllers direction:UIPageViewControllerNavigationDirectionForward animated:NO completion:nil]; // Change the size of page view controller self.pageViewController.view.frame = CGRectMake(0, 0, self.view.frame.size.width, self.view.frame.size.height - 30); [self addChildViewController:_pageViewController]; [self.view addSubview:_pageViewController.view]; [self.pageViewController didMoveToParentViewController:self]; } |
Let’s see what the method does. We first create the PageViewController instance. Next we specify the data source, in this case it is the class itself. We then create the first page content controller, add it to an array of controllers and assign it to the page view controller for display.
Lastly, we change the size of the page view controller and add the page controller view to the current view.
Customize the Page Indicator
If you compile and run the app now, your app should run properly but you may find the page indicator missing. Actually the page indicator is there but the color of the dots is the same as the color of the view. So let’s change its color.
In the AppDelegate.m, add the following lines of code in the didFinishLaunchingWithOptions: method:
|
1 2 3 4 |
UIPageControl *pageControl = [UIPageControl appearance]; pageControl.pageIndicatorTintColor = [UIColor lightGrayColor]; pageControl.currentPageIndicatorTintColor = [UIColor blackColor]; pageControl.backgroundColor = [UIColor whiteColor]; |
Compile and Run the App
And there we go, start the application and see how the UIPageViewController works. You should be able to load the page view controller by using the iPhone Simulator. Try to swipe through the screen to navigate between pages.

Back to the First Page
There is still one thing left. The “Start again” is not yet implemented. When tapped, we expect the page view controller will scroll back to the first page. You can use the setViewControllers: method of the UIPageViewController to switch page. To go back to the first page of the page view controller, change the startWalkthrough: method of ViewController.m:
|
1 2 3 4 5 |
- (IBAction)startWalkthrough:(id)sender { PageContentViewController *startingViewController = [self viewControllerAtIndex:0]; NSArray *viewControllers = @[startingViewController]; [self.pageViewController setViewControllers:viewControllers direction:UIPageViewControllerNavigationDirectionReverse animated:NO completion:nil]; } |
Run the app again. The app will bring you back to the first page when tapping the “Start again” button.
Summary
In this tutorial, we cover the basics of UIPageViewController and demonstrate how to implement the controller by using Storyboard. The UIPageViewController is a very handy class for implementing walkthrough screens in your app. That said, the usage of UIPageViewController is unlimited. You can use it to display whatever information as you like such as pages of web view. The UIPageViewController is highly configurable. This tutorial only covers the scroll transition style. But don’t you know that you can easily use the class to build a simple book app? Simply change the transition style from scroll to page curl and see what you’ll get. So don’t stop here. Try to change the available options and learn about UIPageViewController.
For your complete reference, you can download the Xcode project from here. As always, please leave us comment and share your thought.

Founder of AppCoda. Author of multiple iOS programming books including Beginning iOS Programming with Swift and Mastering SwiftUI. iOS App Developer and Blogger. Follow me at Facebook, Twitter and Google+.
Comments
 Jeremy Beker
AuthorThanks for the updated tutorial, but I have one question. How does one modify the demo so that the page control dots show up over the underlying views and the underlying views are full screen? (Like shown in the screenshots at the top of the article.)
 Simon Ng
AuthorIn this case, you’ll need to use the Page Control. Check out the details here: https://developer.apple.com/library/ios/documentation/userexperience/conceptual/UIKitUICatalog/UIPageControl.html
 Jeremy Beker
AuthorUnderstood. It would be great if you guys could do a more advanced tutorial on this topic. I have tried to implement the more advanced scenario, but you can’t put the page control on the underlying views as they scroll off screen. It needs to be placed in the parent controller, but I have never had success. (Or it needs to implemented in a completely different manner.)
 Thomas Calmon
AuthorHi Jeremy, follow the steps:
1) Open your PageContentViewController.h and declare an IBOutlet for UIPageControl;
2) Open your PageContentViewController.m and add in viewDidLoad;
[self.pageControl setCurrentPage:self.pageIndex];
3) Open your Mais.storyboard;
4) Add a UIPageControl in PageContentViewController and link the IBOutlet properly;
5) Configure “Pages” and “Current Page” in UIPageControl;
6) If you want, configure Background Color, Tint Color (not selected dots) and Current Page Color (selected dot);
7) Remove the code of PageContentViewController.h:
– (NSInteger)presentationCountForPageViewController:(UIPageViewController *)pageViewController
{
return [_nomeImagens count];
}
– (NSInteger)presentationIndexForPageViewController:(UIPageViewController *)pageViewController
{
return 0;
}
These presentation’s things configure a UIPageControl automatically in UIPageViewController, overlaying the childview’s image.
Cheers.
 Sunly Ear
AuthorStill Can’t make it! I don’t understand point number 7 and what is “_nomeImagens” in presentationCountForpageViewController:?
 Thomas Calmon
AuthorSorry, Sunly. I did some changes in properties name. Forget about _nomeImagens, I ‘m using it in place of self.pageTitles.
I made a mistake in my steps in the point 7. You need to remove presentationCountForPage and presentationIndexForPage from ViewController.h (not PageContentViewController.h like I wrote).
Anyway, You NEED to remove those methods because they are responsible for creating UIPageControl through UIPageViewController.
 Sunly Ear
AuthorThanks, a lot Thomas! I can do it now. 🙂
 Lorenzo Fanchi
AuthorThanks Thomas, I was also able to implement a transparent PageControl using your guide.
I have an additional question: I would like the PageControl to ‘stick’ and not slide away with each page. How would one go about doing that?
Thanks in advance!
 Daniel García Alvarado
AuthorHi, I’ve tried to do a transparent PageControl without can. Could you share with me your code?
 Lorenzo Fanchi
AuthorI’ve put my code here, good luck!
http://pastebin.com/WbHST6Ms
 berleo
AuthorI tried, but I fail to make right connections in the IB. I have added also an IBOutlet for the UIPageControl. Is that right?
Thanks
 AnthonyMarchenko
AuthorHey Berleo,
Try to compere with the implementation (with transparency fix, but without a button)
https://github.com/AnthonyBY/WalkthroughScreens
P.S. Thomas Calmon and IrwinN thank you so much for your support!
 IrwinN
AuthorHere’s how I made the PageControl ‘stick’. Similar to Thomas solution with some changes.
1) Open ViewController.h (instead of PageContentViewController) and declare an IBOutlet for UIPageControl;@property (nonatomic, weak) IBOutlet UIPageControl *pageControl;
2) Open ViewController.m and in viewDidLoad add self.pageControl.numberOfPages = self.pageTitles.count;
3) Also in viewDidLoad after the line [self.view addSubview:_pageViewController.view]; add [self.view addSubview:_pageControl.viewForBaselineLayout];
4) In the method – (UIViewController *)pageViewController:(UIPageViewController *)pageViewController viewControllerBeforeViewController:(UIViewController *)viewController
after NSUInteger index = ((PageContentViewController *) viewController).pageIndex; add
self.pageControl.currentPage = index;
5) In the method – (UIViewController *)pageViewController:(UIPageViewController *)pageViewController viewControllerAfterViewController:(UIViewController *)viewController
after NSUInteger index = ((PageContentViewController*) viewController).pageIndex; add
self.pageControl.currentPage = index;
6) REMOVE the methods below ViewController .m:
– (NSInteger)presentationCountForPageViewController:(UIPageViewController *)pageViewController and
– (NSInteger)presentationIndexForPageViewController:(UIPageViewController *)pageViewController
7) You can configure the visual part of the pageControl using the attributes inspector
Hope this helps.
 WilliamX
AuthorI have this proven to fail, since a quick swipe will miss to update the page control and I havent found the fix for that 🙁
 Thomas Calmon
AuthorTo be more especific and clear (and without mistakes) 😉
1) Open your PageContent .h and declare an IBOutlet for UIPageControl;
@property (nonatomic, weak) IBOutlet UIPageControl *pageControl;
2) Open your PageContent .m and add in viewDidLoad;
[self.pageControl setCurrentPage:self.pageIndex];
3) Open your Storyboard, add a UIPageControl in PageContent and link IBOutlet properly; (images attached)
4) Configure “Pages” and “Current Page” in UIPageControl;
5) If you want, configure Background Color, Tint Color (not selected dots) and Current Page Color (selected dot);
6) REMOVE the methods below ViewController .m:
– (NSInteger)presentationCountForPageViewController:(UIPageViewController *)pageViewController and
– (NSInteger)presentationIndexForPageViewController:(UIPageViewController *)pageViewController
Cheers
 Antonio Junior
Authorgreat, but in the section: Implementing the Page Content View Controller , it isn’t to change the method viewDidLoad inside ViewController.m, the correct is to make this change inside PageContentViewController.m ; )
 ramesh
Authorthis is great tutorial
 vanylapep
AuthorI followed exactly the tutorial and the page dots don’t appear.. which VC display them, and what it its frame?
 H.S.H
H.S.H
Authorgood tutorial!
but can I develop it in a way that enable the user to create new page using a button?
 Brian Hild
AuthorGreat tutorial! Huge supporter of your work and you have helped me out so much! I also have one question for everyone reading this: How do I incorporate different view controllers and pages? For example, pageOneViewController and pageTwoViewController both having their own xib files of course. Any ideas?
Thanks!
 Henning Andersen
AuthorVery nice! I would like to have a button that can skip to a specific page. I have tried to implement that with no luck. Any ideas?
 Sunly Ear
AuthorReplace the content of startWalkthrough as following:
– (IBAction)startWalkthrough:(id)sender {
UIViewController *yourSpecificViewController = [self.storyboard instantiateViewControllerWithIdentifier:@”YourSpecificViewController”];
[self presentViewController:yourSpecificViewController animated:YES completion:nil];
}
Hope this will help! 🙂
 Sunly Ear
AuthorIt is a great tutorial for UIPageViewController!!!
 tusharghate
AuthorAwesome tutorial, thanks!
 Mạnh Hiền Lành
Authorgood job! thanks very very much
 Ander Suárez Martínez
AuthorIs possible to change the animation between images to fade style instead of push style?
 蘇健豪
蘇健豪
AuthorI don’t think there is any other transition style. If you read the tutorial carefully, you’ll see there just two kinds of transition style – page curl transition style or scrolling transition style.
I think Apple only provide these two kinds of transition style must have their reason.
Why you want to do that by the way?
 HeMac
HeMac
AuthorVery easy to read, to follow, clear explanation, great tutorial, thanks.
 hengchengfei
AuthorWhy not “Start again” show in my ipod4(ios6.1) device?
 John
John
AuthorSeriously, can someone answer this? How can you set the frame for each view in the pageview so it fits for iphone4?
 Joe Anderson
AuthorLet me know if the answer I gave helps
 Sarfaraz Hussain
Authoryes it helped thanks
 Joe Anderson
AuthorIt really depends on what device you run in the simulator (or compile to your phone). Just make sure the label is near the bottom, if it isnt it will appear hidden underneath the page indicators.
So drag it in the story board to the bottom edge, then go from there
 vanylapep
AuthorDo we need tree levels of view controllers? (RootViewController -> PageViewController -> PageContentViewController). Can we just have a two level with PageViewController as the root view? I do not need a “start again” button, I just want the PageContentViewControllers to take over the whole screen.
 蘇健豪
蘇健豪
AuthorFor your second question, you just need to change
self.pageViewController.view.frame = CGRectMake(0, 0, self.view.frame.size.width, self.view.frame.size.height – 30);
to this
self.pageViewController.view.frame = CGRectMake(0, 0, self.view.frame.size.width, self.view.frame.size.height);
 Neegbeah Reeves
AuthorIt works with a separate storyboard file and it is tested, but I have a main storyboard to link into the tutorial storyboard. How do it implement or link the two storyboard, but show the tutorial storyboard once.
 toolman
AuthorGreat tutorial. I need the ability to have 4 pages of content, how can this be done? Each of my pages is very different.
You may wonder why we just add a single view controller for 4 pages of content. Shouldn’t we use four view controllers instead of one? As you can see from the final deliverable, the walkthrough screens are very similar. It’s better to share the same view controller for different screens.
 蘇健豪
蘇健豪
AuthorYou just need to initialize with a different storyboard ID like I post below.
PageContentViewController *pageContentViewController;
if (index == 2) {
pageContentViewController = [self.storyboard instantiateViewControllerWithIdentifier:@”2″];
}else {
pageContentViewController = [self.storyboard instantiateViewControllerWithIdentifier:@”PageContentViewController”];
pageContentViewController.imageFile = self.pageImages[index];
pageContentViewController.titleText = self.pageTitles[index];
}
pageContentViewController.pageIndex = index;
 jq
jq
AuthorThanks for this fix – when I add that to the View controller my index setting isn’t working correctly anymore and i keep throwing NSInValidArgument exceptions. Any idea why?
 mikeconik
Authorthanks for the tutorial! but how do you add this project to another project? I already have the main app in one xcode file and under the help of this tutorial, I have created another project with only the UIPageViewController, how do I combine these two projects so that I have 1 complete app?
 佳捷 计
佳捷 计
AuthorMy one images can not show. Does anyone have any ideas?
 Mark Thien
AuthorHi Simon,
Thanks a lot for this awesome tutorial. However, everytime user done scrolling thru the walk through they need to exit the page view controller and return to the main/root view controller.
Please kindly add guide us how to accomplish this like once user is at the last index of the page view controller and they swipe to left again, page view controller will be dismissed.
Cheers,
Mark Thien
 cwoloszynski
AuthorDid you ever figure this bit out? I am working on a new app and I need to have a ‘walk-thru’ like this shows but then I want to transition to the main app and NOT have the ‘walk-thru’ in the stack of controllers.
 imapoornerd
AuthorIsit possible to make a login screen before initiating the pageviewcontroller?
 VSemenchenko
AuthorNice tutorial! But one question: how I can disable scrolling when user at first or at last page? For now when I scroll on first page from left to right I see superview’s white colour. Also the same effect on latest page. How fix this?
 Peter
Peter
AuthorThanks for this awesome tutorial.
Could you create a tutorial where instead of scrolling through images, you scroll through individual views (each with a set of images and animations and buttons)? I want to animate each page when the user lands on each one.
 Kennedy
AuthorNice tutorial and exactly what I have been looking for. How can I make the pagecontrol show at the top and not at the bottom and also make them see through.. Just white and lack dots with see through background.
 Tushar Garg
AuthorSimple and effective tutorial ! Thank you.
 Eftixia Happines
AuthorHi, It didn’t work for me – 15 errors and 2 hours gone by! please make a video of this Tutorial – For all us visual creatures! thanks
 Eftixia Happines
AuthorPlease fix your mistakes!!! The application fails after
Implementing the Page View Controller
 Simon Ng
AuthorYes, it’s fixed. Sorry for any inconvenience caused.
 Eftixia Happines
AuthorFix this: – (void)viewDidLoad
{
[super viewDidLoad];
self.backgroundImageView.image = [UIImage imageNamed:self.imageFile];
self.titleLabel.text = self.titleText;
}
it goes in PageContentViewController – Im still not able to get this thing running though!
 Eftixia Happines
AuthorBut thanks for the source code!!!
It took me 1 1/2 days and I still cant do it on my own!
 Sim Sinak
Authorwhy in customize the page indicator we put the code in AppDelegate?
and what is the meaning of this code?
[self addChildViewController:_pageViewController];
[self.pageViewController didMoveToParentViewController:self];
thank you:)
 Nicolas
AuthorGood tutorial. I have a question anyway. I tried to reproduce it with a PageContentViewController that contains a UITableView, but, in iOS7.0, my first cell is hidden by the navigation bar (the UITableView content inset is not correctly set). Do you know a way to make it work?
 Nicolas
AuthorFinally found a way to fix my layout issue. I added the code attached in my PageContentViewController.
 Ryan
Ryan
AuthorI tried your code but I keep getting the error: “user of undeclared variable ‘didlayoutDone'”
Any way I can fix this?
Thanks
 Do Huu Tien
AuthorThanks, cool tutorial
 Jemythehigh
AuthorThanks.. .. its a good tutorial
 Tom S
Tom S
AuthorHey I really like your tutorial, great job. But there are two points I like to mention. First one mistype in the text, second a little code improvement.
#1 – There is a little typo in your tutorial description
“Set the Storyboard ID of the page view controller as “PageViewController” and name the ID of the page content controller as “PageContentController”.” ➜ Later in code you refer to PageContentViewController, so the Storyboard ID should be “PageContentViewController”.
#2 – I rewrite the code for the two data source methods:
– pageViewController:viewControllerBeforeViewController:
– pageViewController:viewControllerAfterViewController:
Using casting can be very dangerous, so I checked the class before.
 Tom S
Tom S
Author– (UIViewController *)pageViewController:(UIPageViewController *)
pageViewController viewControllerBeforeViewController:(UIViewController *)
viewController
{
if ([viewController isMemberOfClass:[PageContentViewController class]]) {
PageContentViewController *pageContentViewController = (PageContentViewController*)viewController;
NSUInteger index = pageContentViewController.pageIndex;
// if index is “something” decrement index
if (index) {
index–;
return [self viewControllerAtIndex:index];
}
// else index is 0 or nil just do nothing
return nil;
}
// there should be a warning about this return
NSLog(@”Warning: %@ “”viewController”” is NOT member of class PageContentViewController”, NSStringFromSelector(_cmd));
return nil;
}
 Tom S
Tom S
Author– (UIViewController *)pageViewController:(UIPageViewController *)pageViewController viewControllerAfterViewController:(UIViewController *)viewController
{
if ([viewController isMemberOfClass:[PageContentViewController class]]) {
PageContentViewController *pageContentViewController = (PageContentViewController*)viewController;
NSUInteger index = pageContentViewController.pageIndex;
//increment index
index++;
if (index == [self.pageTitles count]) {
return nil;
}
return [self viewControllerAtIndex:index];
}
// there should be a warning about this return
NSLog(@”Warning: %@ “”viewController”” is NOT member of class PageContentViewController”, NSStringFromSelector(_cmd));
return nil;
}
 Asad
Asad
AuthorNice 1…. I have been trying to implement this with a PageContentViewController having a UIScrollView which can scroll vertically but it is not scrolling… Is there a reason for that?
 Sarfaraz Hussain
Authorthanks for this nice tutorial, I just changed the transition style from scroll to page curl but due to this, the “Start again” button got hidden. can you please explain, why is this happening ? and how can it be fixed for page transition property set to curl.
 凯峰 费
凯峰 费
AuthorAbout UIPageViewController Memory,I use it for a picture book about 100pictures.I found the memoy grows very fast.It didont release..Can anyone help me to solve the problem?
The code:
– (PageContentViewController *)viewControllerAtIndex:(NSUInteger)index
{
if (([self.pageImages count] == 0) || (index >= [self.pageImages count])) {
return nil;
}
PageContentViewController *pageContentViewController = [self.storyboard instantiateViewControllerWithIdentifier:@”PageContentViewController”];
pageContentViewController.imageFile = self.pageImages[index];
pageContentViewController.pageIndex = index;
pageContentViewController.titleName = _titleName;
return pageContentViewController;
}
This method “instantiateViewControllerWithIdentifier” creates a new instance of the specified view controller each time you call it.Is this problem?
 Jim Clermonts
AuthorI want to show the dots in the picture, not below the picture. I tried this:
pageControl.contentVerticalAlignment =UIControlContentVerticalAlignmentTop;
doesn’t seem to work. Any thoughts?
 Waste of time
AuthorIf you are going to publish information including tutorials you should AT LEAST MAKE THEM CORRECT!
 FreddyF
AuthorHi !
Very useful tutorial.
I have a question, though : I wanted to animate the PageViewController going back to the first PageContentViewcontroller, so in (IBAction)startWalkthrough:, I used
[self.pageViewController setViewControllers:viewControllers
direction:UIPageViewControllerNavigationDirectionReverse
animated:YES
completion:nil];
Passing the “animated” parameter to YES completely disturbs the navigation when clicking on “start again”. Now the PageViewController passes from page 1 to page 3, skipping page 2.
You can check that by simply changing the page title to “1”, “2”, “3”, and “4”.
Do you have an idea about that bug ?
Thanks
Fred
 Behinder
AuthorNice but dragging image view to page view controller do not add it to the view..:(
 Alex owens
AuthorDo you mind telling me how you managed to drag the image view to the page view controller?
 Behinder
AuthorWell you cannot drag it for pagecontent viewcontroler you have to drag it to one of the child views :/ very confusing and incorrect written in tutorial. That’s why i canot code this in my own app 🙁
 Greg
Greg
AuthorGreat tutorial Thanks!
 Martin
AuthorWhy the “viewControllerAtIndex” method doesn’t work on Xcode 5 please ?
 Alex owens
AuthorI’m using Xcode 5, and it won’t let me add an image or label to the UIPageViewController, so I can’t follow the tutorial. Some one let me know where I’m doing it wrong.
 Behinder
AuthorTutorial is wrong, i can’t follow it either
 Jeff Flynn
AuthorI’m using Xcode 5.1.1 – if it’s not already open, open up the “Show Document Outline” by clicking the little “right arrow” in a box button. Then, you can drag your controls to the hierarchy and not to the image controllers in the storyboard view. (Expand everything so you can see all the nodes in the hierarchy – if you’ve been following the example verbatim, drag the “ImageView” and “Label” controls onto the dropdown that says, “View” on the “Page Content View Controller” scene.
 Konstantinos Mavroudakis
AuthorThank you for your article. It is excellent and clear! I think that it assumes some basic knowledge of Xcode and iOS development.
 taylornrolyat
AuthorHow would I detect which image i clicked on to take me to a specific view controller (I have a transparent button over the image)? For instance if I have two pages, one that takes me to a standard vc and another that takes me to a navigation controller, would it be similar to this? I am just not sure how to detect which page was clicked on.
 taylornrolyat
AuthorThanks for the tutorial.
Instead of just having one page content view controller, how would I make it so that it uses four different page content view controllers. Each of my pages are different.
 gfunk2k
AuthorFirst off, thank you so much for this tutorial. I have managed to get it working but for some reason when launching the test app, it will not display in landscape.
I know it is something obvious but for the life of me it will not work, help please! 😉
 gfunk2k
Authoron and this is for the iPad too
 suma
suma
AuthorCan I use different Content View controller for each page
 Marcos Curvello
AuthorI don’t know why I am getting this error [__NSArrayM insertObject:atIndex:]: object cannot be nil’
 Shailesh Prajapati
AuthorI am also getting same error in iOS6. You found any solution for this?
 Ben MacKinnon
AuthorI’ve followed this tutorial, but when I try to run it I get an exception:
PageViewDemo[14006:60b] -[ViewController setDataSource:]: unrecognized selector sent to instance 0xaa16780
Any ideas why?
 Ben MacKinnon
AuthorFor anyone else who has this issue, I had named the wrong view controller “PageViewController” in the StoryboardID.
 Leisa ReFalo
AuthorThank you! Saved me
 smv
smv
AuthorThanks for the tutorial!
I’m trying to move the dots up (on the image). Any tips on how it can be done?
 hi
hi
AuthorJust change the frame to instead of -30 to -80 or wahtever
 LittlePeculiar
AuthorSimon, I always find what I’m looking for on this site. Thanks so much. I have a quick questions. How would I show a portion or slice rather, of the next and previous view using a UIPageViewController? Or is that something else?
 Alex
Alex
AuthorHow do I go about moving the page indicators lower?
 AnujAroshA
AuthorHi,
I have followed your tutorial. It’s working perfectly. I tried to enhance these features and stuck. My problem is mentioned in StackOverflow (http://stackoverflow.com/questions/24136379/uipageviewcontroller-as-sub-view-will-disable-main-view-events-in-ios). Highly appreciate if you can give a solution.
Thanks
 Shailesh Prajapati
AuthorHi Simon,
Nice tutorial. Thank you very much for sharing. I’ve implemented successfully in my app which is working fine in iOS7 but i am getting below error in iOS6.
Terminating app due to uncaught exception ‘NSInvalidArgumentException’, reason: ‘*** -[__NSPlaceholderArray initWithObjects:count:]: attempt to insert nil object from objects[0]’
I appreciate if you help me to solve this issue.
Thank You,
Shailesh
 Bas de Vries
AuthorGood tut. I However, I’d like to hide the button until the last view. [index 4]. How do I initialize a IBOutlet UIButton in the .m file like the NSArrays? Hopefully someone can help.
 Ryan E
AuthorHello, I have a button on the top of the controller and when I click the button and then return to the same controller, the screen is completely white and this error message shows up:
2014-06-22 22:59:10.947 PageViewDemo[6847:60b] CUICatalog: Invalid asset name supplied: (null), or invalid scale factor: 2.000000
I was wondering what I could do to fix the problem or what exactly the error is trying to explain to me?
Thanks for your help in advance!
 DD
DD
AuthorThis is really useful, but there was a bug. The UICollectionViewCell shouldn’t need a tag, the tag of 100 should be on the UILabel. I also did this tutorial in Swift in case anyone’s interested:
import UIKit
class ViewController: UIViewController, UICollectionViewDelegate, UICollectionViewDataSource {
var imagesArray:String[] = []
let cellIdentifier = “CollectionCell”
override func viewDidLoad() {
super.viewDidLoad()
// Do any additional setup after loading the view, typically from a nib.
imagesArray += “Swift”
imagesArray += “is”
imagesArray += “the”
imagesArray += “next”
imagesArray += “hotness”
}
override func didReceiveMemoryWarning() {
super.didReceiveMemoryWarning()
// Dispose of any resources that can be recreated.
}
func numberOfSectionsInCollectionView(collectionView: UICollectionView!) -> Int {
return 1
}
func collectionView(collectionView: UICollectionView!, numberOfItemsInSection section: Int) -> Int {
return imagesArray.count
}
func collectionView(collectionView: UICollectionView!, cellForItemAtIndexPath indexPath: NSIndexPath!) -> UICollectionViewCell! {
let cell = collectionView.dequeueReusableCellWithReuseIdentifier(cellIdentifier, forIndexPath: indexPath) as UICollectionViewCell
var label = cell.viewWithTag(100) as UILabel
label.text = imagesArray[indexPath.row]
cell.layer.borderWidth = 2.0
cell.layer.borderColor = UIColor.whiteColor().CGColor
cell.layer.cornerRadius = 50.0
return cell
}
}
 Marcelly Luise
AuthorHi, Simon! First of all, thanks a lot for the tutorial. Now, can you, please, help me set up the Navigation Bar Title? I’ve tried programmatically and by storyboard and got nothing. It simply doesn’t display. I even found another tutorial of yours and still, nothing. I know I can use label for this, but I do not feel comfortable this way. 🙂
 koteswar
Authorcan We add more than two Pages on View Controller
As show in the Below figure
 nobody
Authoryou confused the shit out of us. change Class for PageViewController – > parentPageViewController Class for Page Content View Controller -> childPageContentViewController would have helped a lot.
 suma
suma
Authorcan I shift the UIpagecontrol to the centre of the view?
 Chris Fellows
AuthorGreat tutorial. Thanks for the help!
 Peter
Peter
AuthorGreat Tutorial! Thanks a lot!
 Victor González
AuthorHi Joe and company 🙂
I want to change the position of the Control Page and put the Control Page in another position on the screen, how I can do ?. I have tried to do so:
UIPageControl *pageControl = [[UIPageControl alloc] initWithFrame:CGRectMake(160, 25, 71, 37)];
But it does not work, any ideas please???. Thank you very much.
 Pedro Borges
AuthorVery nice topic, however if the RootViewController is a UINavigationController something is missing for proper storyboard inference of titles and barbuttons when scrolling through pages.
 Behinder
AuthorInconsistent tutorial – too much thinking about which file is which. It would be easier to provide complete content of each *.h file. For example this:
#import “PageContentViewController.h”
@interface ViewController : UIViewController
is very confusing. import declaration suggests we are in main page view controller but interface declaration means we are in childview…WTF. Searching for other tutorial
 Ted W. Bendixson
AuthorThis seems to have a problem with auto layout. Why do my views keep resizing as I flip through the pages? I’ll start to see the next view coming, and then when it’s done transitioning to the next view, the image and the text label resize. Why, and how can I trigger the layout update before the transition?
 Rafael Saqueli
AuthorI have the same problem, do you fixed it?
 Nathan Furman
AuthorI managed this issue with canceling auto layout for walkthrough controller and disabled it’s auto rotation.
 Rod
Rod
AuthorI can NOT get the page control to appear in a project I created based upon this one. I don’t mean it isn’t visible, I mean it is not there at all. Clicking in the region where it should be does nothing. I downloaded this project and it successfully shows a page control (the dots) above the “Start again” button. Based upon this project, I created a new project that pages multiple VC. This works great but I can only swipe; the page control does not appear. I think it may be because my views are being shrunk – there are black bars appearing above and below the main view. I cannot figure this out.
 Rod
Rod
AuthorOk, never mind. Figured it out. Don’t ya hate it when you figure it out after you post? I had neglected to include the presentationCountForPageViewController and presentationIndexForPageViewController methods.
 Taylor Smith
Authorawesome tutorial! any chance of making one for swift and Xcode 6?? 🙂 i’d love you forever!
 amy
amy
AuthorI’m having trouble getting this to work with Swift, so I would love this too!
 vinzo
vinzo
AuthorYou can find the updated code on my github: http://bit.ly/1fPMqv7
 orit
orit
AuthorHow can I add a button that when i click on it- it will go on to the next page? (of course i will have 2 button one for left and one for right). Thanks!
 Prado
Prado
AuthorGreat Tutorial. Thanks a lot.
 sasha zanjani
AuthorI have implemented this code but I cannot make it only show on first opening of the app. It shows every time I open the app. Any pointers please?
 sst
sst
Authorsave in preferences a boolean “true” when it appeared first time and check if(boo = true) don;t make it show
 John
John
AuthorDid the tutorial and everything works, but when I add something like a constraint, there is a lag before the value of the constraint is loaded. For example, if there is spacing on the label, the label’s position does not move until after the page appears. How would I fix this?
 Юрий Антонов
AuthorTutorial isn’t working! I’ve lost my time reading this!!!
 Wade Sellers
AuthorGreat Tut! Thanks so much!
 Uchihacarlos92
AuthorHow can you jump to a specific page programatically?
 vinzo
vinzo
AuthorIf you need the updated tutorial written in Swift:
http://bit.ly/1fPMqv7
Hope it can help
 macuser79
AuthorThank you…..I find this component for my app…..Great…. 🙂
 Göktuğ Yılmaz
AuthorHere is a great repo for this:
https://github.com/goktugyil/EZSwipeController
 Gokulraj Rajan
Authorhow to add multiple uiviewcontrollers like in this pic
 yogendra bagoriya
AuthorIts working fine. But I am facing memory issue. It increases App memory by 10*number of screen.
Please give me solution, how can I reduce..??
 Middle
AuthorHey, thanks for posting this article. It helped me a lot. Thought I’d contribute something back incase anyone else is having a similar problem.
For those people trying to imbed this page controller in a navigation controller you may have a weird experience where the view jumps down when the view is loaded and then jumps back up when you interact with it. To prevent this from happening uncheck “Under Top Bar” for “Extended Edges” in the container view controller that holds the UIPageViewController as a child. Hopefully this helps some people. Here is a links to where I originally found the solution as well as a link that further explains “Extended Edges”.
Solution: http://stackoverflow.com/questions/18202475/content-pushed-down-in-a-uipageviewcontroller-with-uinavigationcontroller
Extended Edge Explanation: http://stackoverflow.com/questions/18798792/explaining-difference-between-automaticallyadjustsscrollviewinsets-extendedlayo