In this tutorial, I will go through the entire process of importing a 3D photogrammetry model into ARKit, and make it look as realistic as possible, using the tools that ARKit and SceneKit provide.
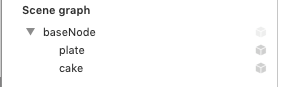
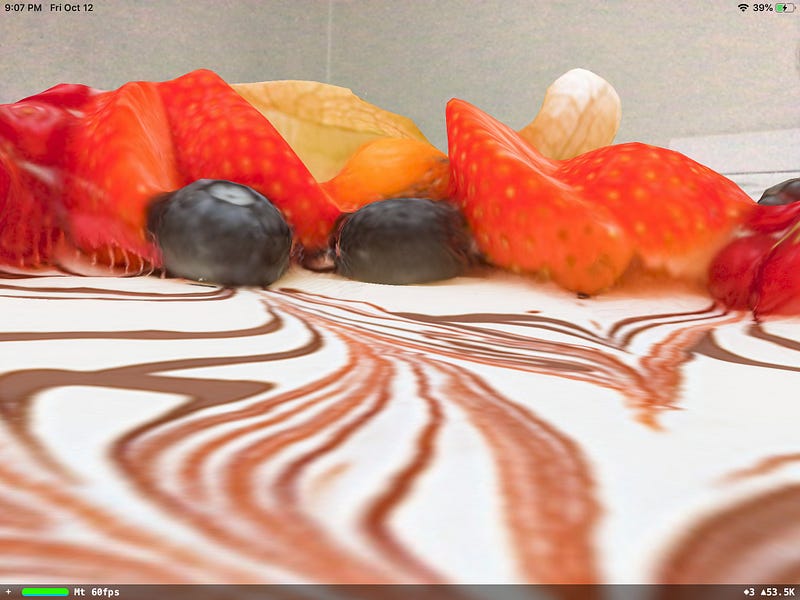
The finished product:

Prerequisites
This is an intermediate level tutorial and requires you to have a good understanding of Swift as well as some previous experience with ARKit and SceneKit. To follow along, Xcode 10 (or later) and an ARKit supported device running iOS 12 (or later) are required.
Make sure you have downloaded the starter project from this link.
This tutorial is written in two parts. Part one is about how to prepare a model compatible with Xcode while part two is the main part of the tutorial about using the model in Xcode. Although it is not necessary to follow part one as the prepared model is included in the starter project, I still recommend you read through it to understand the process.
Now let’s get started!
Downloading and preparing the model
The most realistic 3D models are usually the ones created through a process called photogrammetry. The process involves taking pictures of the object from all angles and using software to convert it into a high-resolution 3D mesh. Many great photogrammetry models can be found online for free. We will be using this model by Francesco Coldesina for the project.
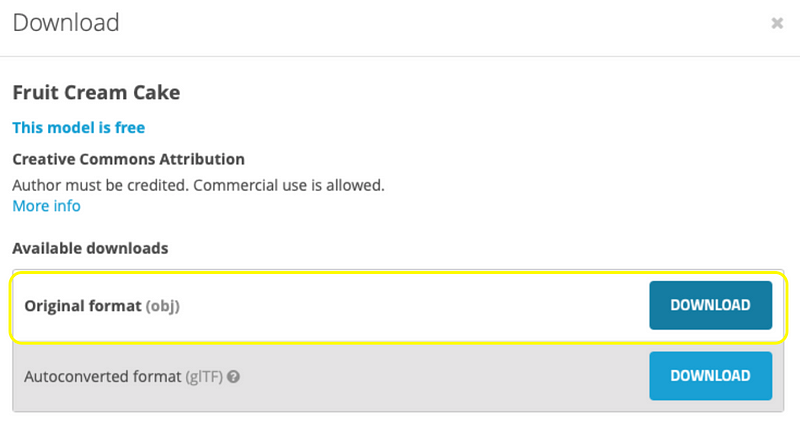
When downloading the model, make sure you have selected the Original format (obj).
Most photogrammetry models use the .obj file format. Even though .obj is supported by Xcode, it just doesn’t work well. The preferred format for importing 3D models into SceneKit is .dae. Lucky for us, converting file from .obj to .dae is a very simple process. Many 3D modeling applications are able to do this. I will be using Blender to show you the steps.
Blender is a free 3D modeling application that can be downloaded from here.
Converting the model to .dae
After we have extracted the .zip file, there should be two folders called “source” and “textures”. In the source folder, there will be another .zip file that needs to be extracted. Once extracted, there will be a couple of .jpg files (the textures) and a .obj file (the model).
When Blender is first opened, a scene with a camera, a light, and a box is created. We don’t want any of that, we just want an empty scene so we would delete them all. You can press the “a” on your keyboard twice to select all the items and press “x” to delete them. This will leave us with an empty scene.
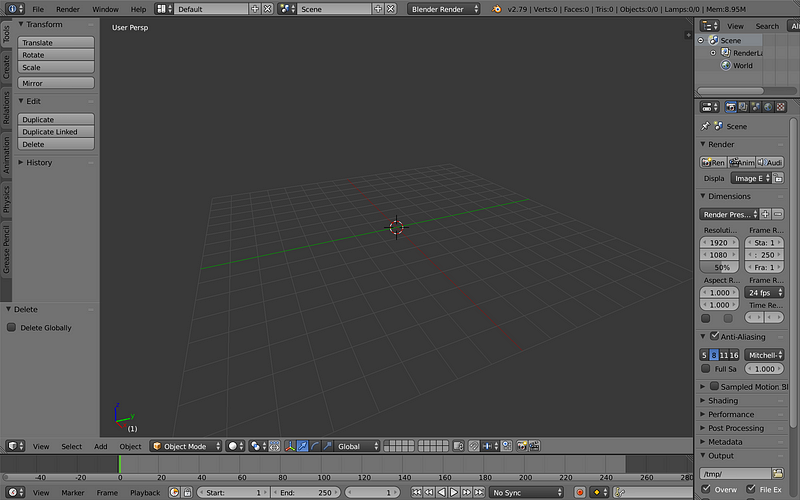
Now we can import the file by selecting File > Import > Wavefront (.obj). You can zoom out to see the model more clearly. (Reverse pinch gesture using if you’re using a trackpad or Ctrl + swipe middle mouse button if you’re using a mouse)
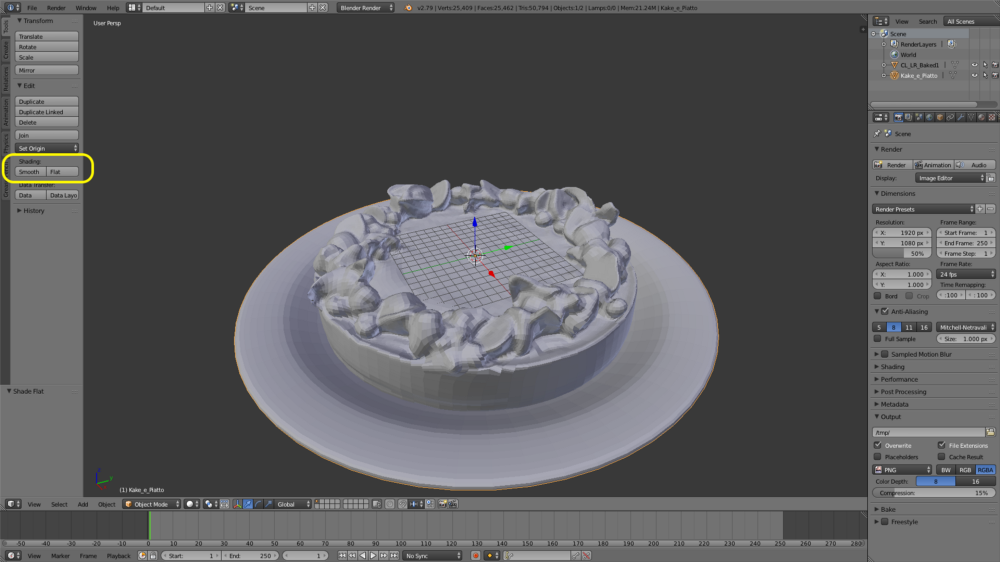
Before we export our model as a .dae file, we need to make one small change. Some models have their shading set to flat but Flat shading makes the model look very blocky and unrealistic. We want a smooth shading.
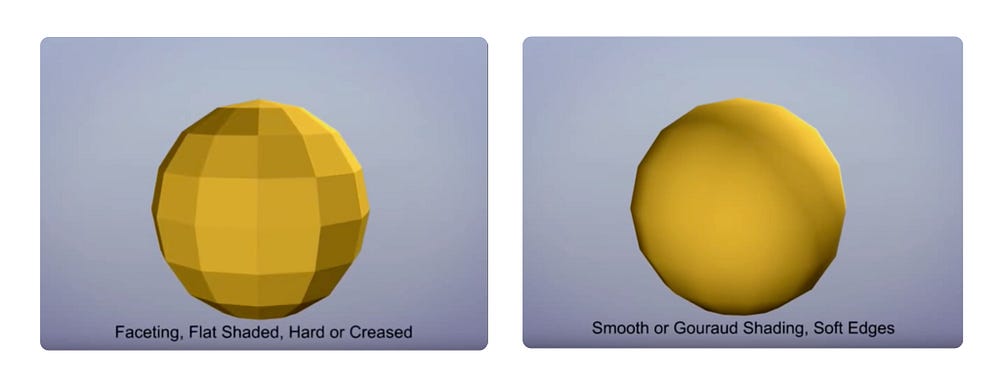
Smooth shading allows less division to give the illusion a smooth surface, resulting in lighter meshes and faster rendering. Here is a great video explaining the difference.
To change the shading mode to smooth in the scene, we tap on the cake and then click the smooth button on the left side of the screen. Repeat the same process for the plate. Now our model is nice and smooth and ready to be exported.
We can export the model by selecting File > Export > Collada (Default) (.dae).
The model is now ready to be used in Xcode.
Using the model in Xcode
Open the starter project (Here’s the link if you haven’t downloaded it yet). In the project navigator, click on art.scnassets and you will see a folder named FruitCake. This contains the converted model and the textures. If you take a look at ViewController.swift, you will also see some template codes already added. Plane detection is set to .horizontal and a tap gesture that performs hit-test on the detected surface is added.
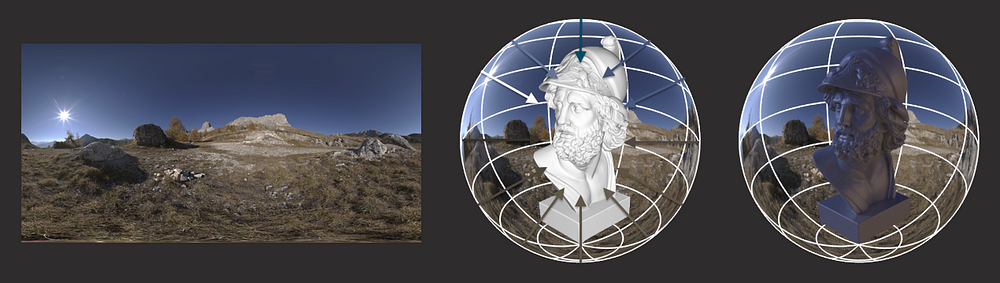
Inside art.scnassets > FruitCake, click on FruitCake.dae :
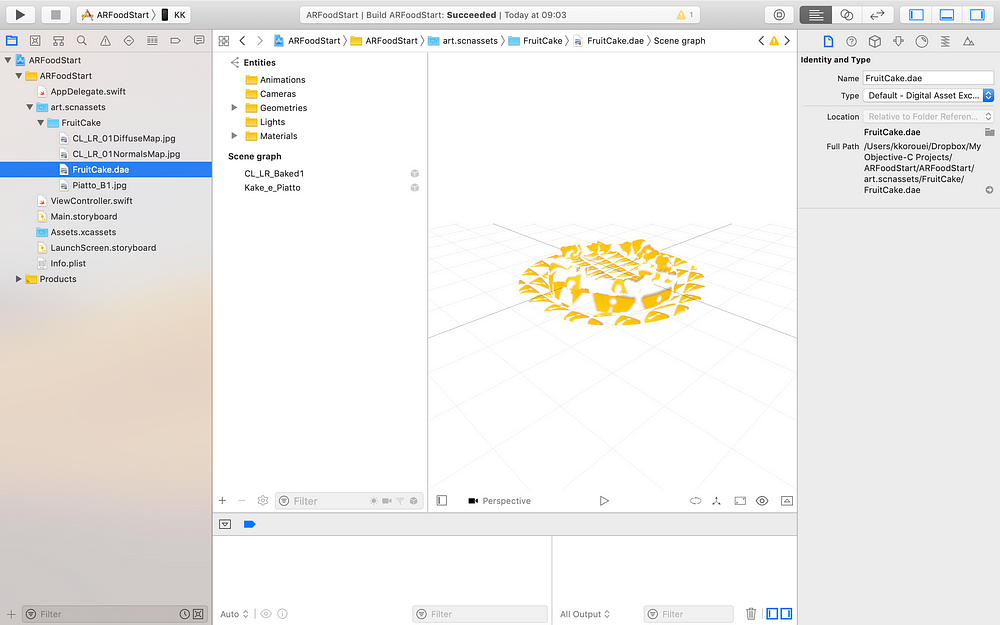
In the scene graph, you can see we have two nodes. One is the plate (Kake_e_Piatto) and the other is the cake (CL_LR_Baked1). The first thing we will do is rename them to make everything easier to understand. Rename the node Kake_e_Piatto to plate and the node CL_LR_Baked1 to cake.
Now, what are those yellow warning signs on our model?!
This is SceneKit’s way of telling us that the models have a texture associated with them but the file cannot be found. Select the cake node and on all the way on the top right of the screen, select the material inspector.
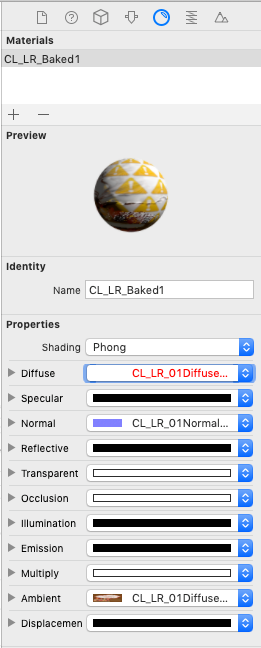
Here is where we can see the material for the cake. The Diffuse property is the base color (or the main texture) of the material. It is shown in red, indicating that SceneKit was not able to locate the texture image. Click on the red text and choose CL_LR_01DiffuseMap from the dropDown menu.
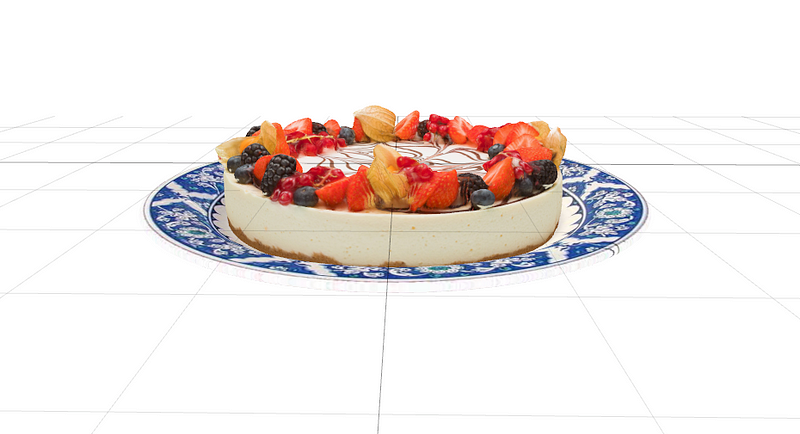
Now our cake has a lovely texture. Repeat the same process for the plate but choose Piatto_B1 as the diffuse image.
This is how the model should look when you’re done.
In the scene graph, click the “+” button on the bottom left. This creates an empty node and adds it to the center of our scene. Rename it to baseNode and drag the cake and plate nodes underneath it.
This will make retrieving, positioning and scaling the nodes easier because we don’t have to repeat the same process twice for both the cake and the plate. Instead, we will be doing everything to their parent node.
Our model is now ready to be used in ARKit.
Open ViewController.swift and look at the method handleTap:. This method gets the 2D point on the screen where the user has touched and uses that to perform a hit-Test. If a horizontal surface is detected, it will give us the position of that point. That position is exactly where we want to place our 3D model (since we want it to be placed on a flat surface instead of floating in the air).
Add the following method to the class:
|
1 2 3 4 5 6 7 8 9 10 11 12 13 |
func addFoodModelTo(position: SCNVector3) { // 1 guard let fruitCakeScene = SCNScene(named: "art.scnassets/FruitCake/FruitCake.dae") else { fatalError("Unable to find FruitCake.dae") } // 2 guard let baseNode = fruitCakeScene.rootNode.childNode(withName: "baseNode", recursively: true) else { fatalError("Unable to find baseNode") } // 3 baseNode.position = position sceneView.scene.rootNode.addChildNode(baseNode) } |
- First, we have to fetch our imported .dae file so we can get access to the 3D model.
- We fetch the baseNode (the parent node we created) from the .dae file.
- We set the position of the node and add it to our scene.
Now add the following line to the end of handleTap::
|
1 |
addFoodModelTo(position: position) |
This will add the model to the location we tapped on the screen (if a surface is detected).
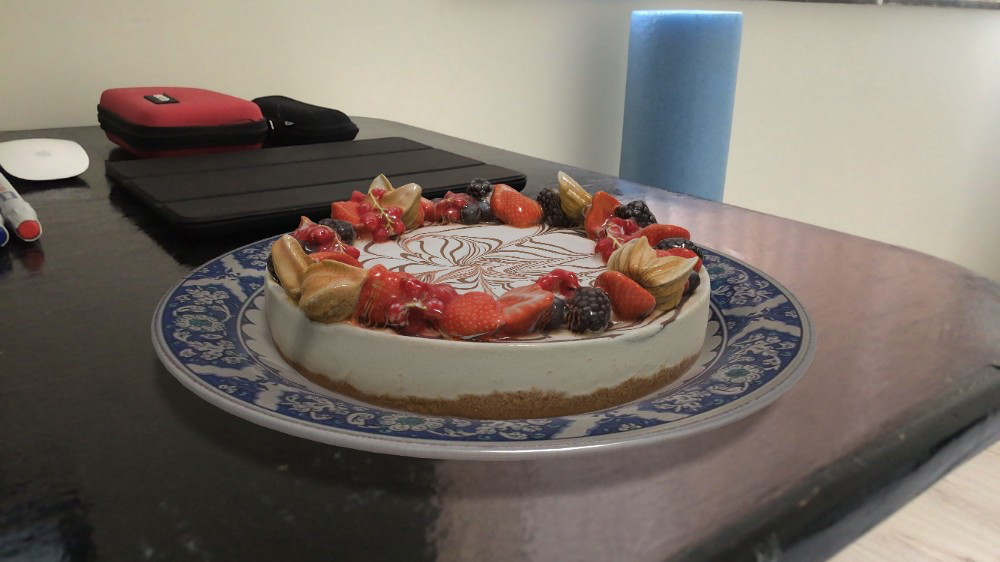
Run the app and move your phone around so that ARKit has time to detect a surface. Then tap the screen:
WOW, the cake is HUGE! So first things first, we have to fix the scale.
Different 3D modeling applications use different units of measurement. This causes the models to have different sizes when imported/exported to other software. Resizing the model is pretty easy. Add the following line of code in addFoodModelTo: right after the line baseNode.position = position and run the app again.
|
1 |
baseNode.scale = SCNVector3Make(0.005, 0.005, 0.005) |
Now we have the correct scale for our model. Then we have to consider the position and orientation. Well, the orientation is correct, the model is facing the right direction. What about the position?
The model is placed correctly on a flat surface. However, if you pan the camera down a bit and look closely, you will notice that the model is not exactly on the detected surface. It looks like it’s placed a little bit underneath it. It just doesn’t look right. Why?
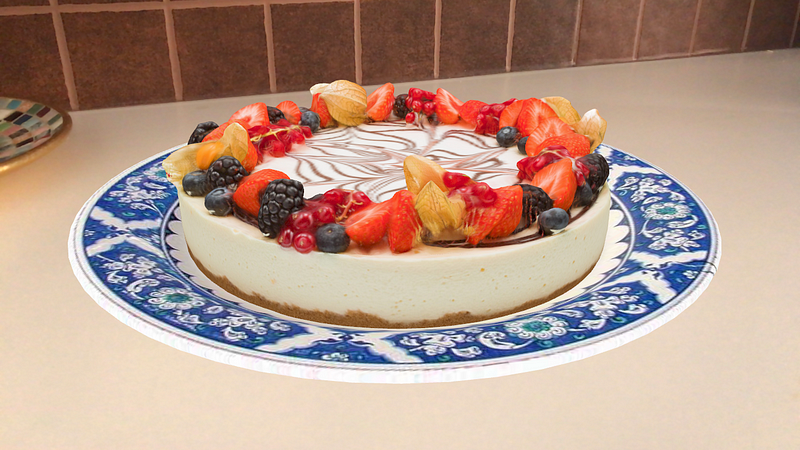
This is where the importance of the pivot point comes into play.
Pivot point
In simple terms, the pivot point is the origin point of the model. The point against which the model is rotated or positioned.
When we add our model to the scene, SceneKit places it at the position we’ve specified and centers it relatively to its pivot point.
In the project navigator, click on FruitCake.dae in art.scnassets and select baseNode in the scene graph. See the green/blue/red arrows in the middle of the cake model? It represents where the pivot point of our node is placed.
As we want the bottom of the plate to be positioned exactly on top of the detected surface, we have to move the pivot point to the bottom of the plate.
Unfortunately, SceneKit does not provide us any way to manually move the pivot point of the model (in the SceneKit Editor at least). But there is another way to do it.
Select both the cake and the plate node (not the baseNode) by holding down the command (⌘) button. Then in the scene editor, drag them upwards until the bottom of the plate is touching the grid.
Now select the baseNode. The pivot point should now be at the bottom of the plate (like how it looks on the right of the above image).
The position of our model is now correct. Time to move on to the materials.
Materials
Right now we have only set the diffuse maps for the cake and the plate.
We want our plate to be nice and shiny and to reflect the environment. Realistic lighting and reflections can be achieved through a technique called Physically Based Rendering (PBR). PBR uses the environment as a source for the lighting and reflections.
Before the introduction of ARKit 2.0, a preloaded image would be used as the source for the lighting environment. Although this technique works in creating realistic lighting conditions, the result is not an accurate representation of the current environment.
With the release of ARKit 2.0, Apple introduced a new technology called Environment Texturing. This technique takes the video feed from the camera and uses computer vision to create an environment texture in real time. The texture is created and updated as the user moves their device around, this means that the lighting and reflections generated from this map are pretty accurate.
Adding Environment Texturing to our scene is really simple too. In viewWillAppear:, add the following line of code under the line configuration.planeDetection = .horizontal:
|
1 |
configuration.environmentTexturing = .automatic |
Now when the app starts, an environment texture will be automatically created and updated as you move your phone around.
If you run the app, you will see that nothing has changed. This is because we need physically based materials to make use of the environment texture.
Add the following piece of code in the addFoodModelTo: method before the line sceneView.scene.rootNode.addChildNode(baseNode):
|
1 2 3 4 5 6 7 8 9 |
// 1 let cakeNode = baseNode.childNode(withName: "cake", recursively: true) // 2 let cakeMaterial = SCNMaterial() cakeMaterial.lightingModel = .physicallyBased // 3 cakeMaterial.diffuse.contents = UIImage(named: "art.scnassets/FruitCake/CL_LR_01DiffuseMap.jpg") // 4 cakeNode?.geometry?.firstMaterial = cakeMaterial |
- First, we must get a reference to the cake node.
- We create a new material and set the
.lightingModelto.physicallyBased. This means the material can now make use of the environment texture for realistic lighting and reflections. - Why are we giving the cake the
diffusetexture again? Remember, we are assigning a totally new material to the cake. This will override the previous material, so we have to give it thediffusetexture again. - Assign the new material to the cake model.
Repeat the same process for the plate. Add the following lines of code right below the code you just added:
|
1 2 3 4 5 |
let plateNode = baseNode.childNode(withName: "plate", recursively: true) let plateMaterial = SCNMaterial() plateMaterial.lightingModel = .physicallyBased plateMaterial.diffuse.contents = UIImage(named: "art.scnassets/FruitCake/Piatto_B1.jpg") plateNode?.geometry?.firstMaterial = plateMaterial |
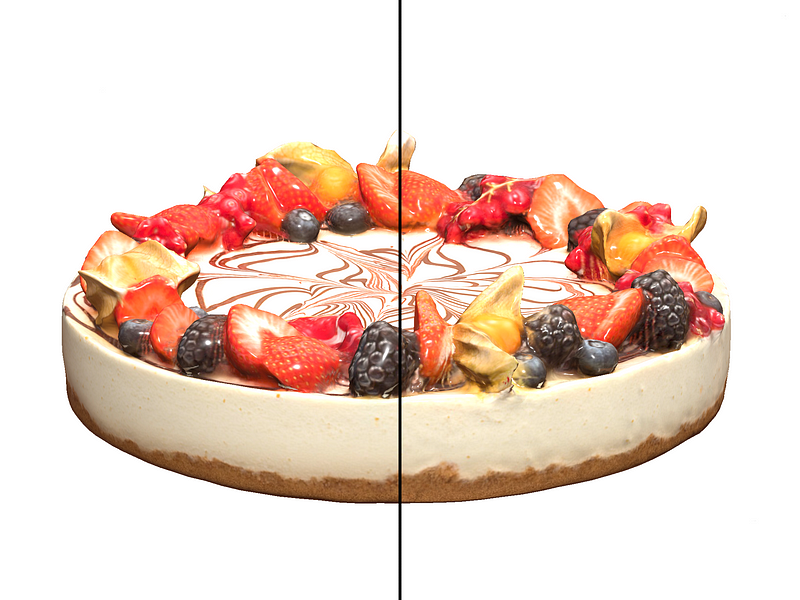
Now run the app. See the difference of default lighting on the left and automatic environment lighting on the right:
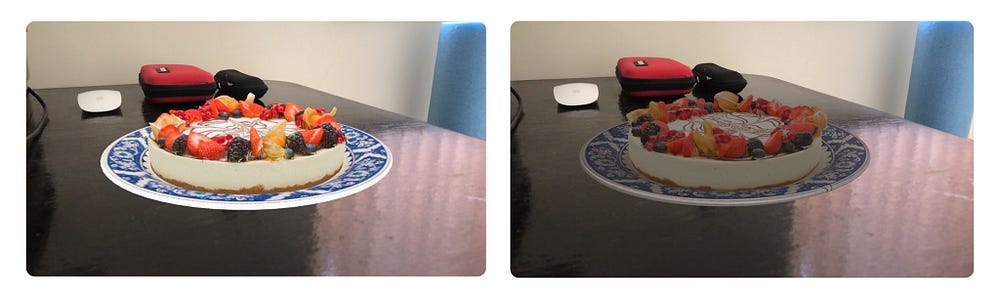
You can already see how much of a difference the physically based lighting makes. Our cake is starting to look like it belongs in the scene.
Physically based materials rely primarily on three properties:
- The
diffuseproperty provides the “base” color of a material. - The
roughnessandmetalnessproperties determine how rough or shiny a surface is.
Now that we know about the roughness and metalness properties, let’s add a bit of shine to our plate.
Add the following line of code in addFoodModelTo: before the line plateNode?.geometry?.firstMaterial = plateMaterial:
|
1 2 |
plateMaterial.metalness.contents = 0.8 plateMaterial.roughness.contents = 0.2 |
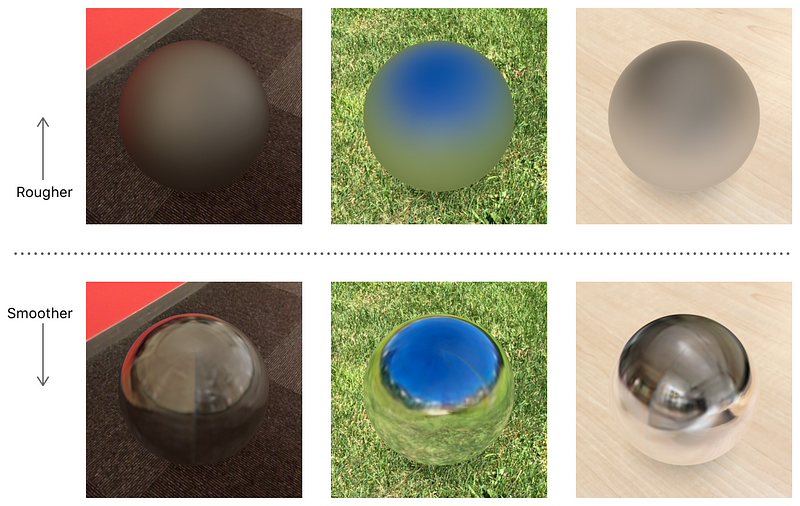
In the code above, in addition to setting the metalness of the plate, we have also given it a bit of roughness to smoothen the reflections. Otherwise setting metalness alone would make it look like a mirror. Don’t worry about what the right values are, you can mess around with adjusting the metalness and roughness values to see what looks best.
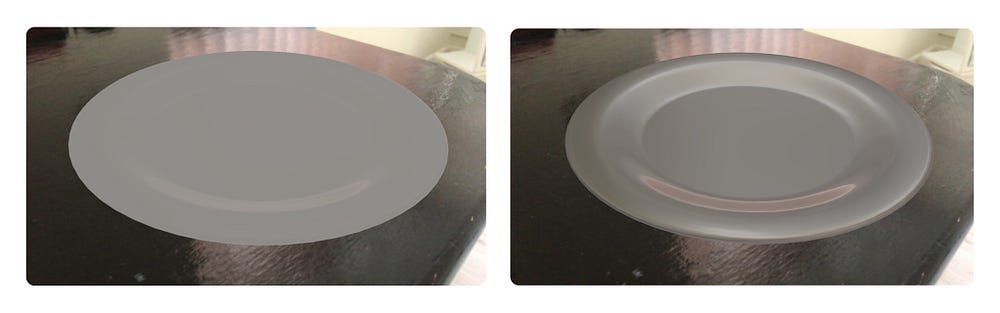
In the following image, I have removed the diffuse texture for the plate to show you how much of a difference adjusting the metallic property makes. The metallic intensity has been increased for the image on the right:
In addition to the diffuse, metallic and roughness properties, the physically based material also supports normal maps. This can be used to add more details to the model.
Normal Maps
Normal maps create the illusion of detail by changing the way light is reflected from the surface.
A normal map has already been included with the model we downloaded.
Add the following piece of code in addFoodModelTo: before the line cakeNode?.geometry?.firstMaterial = cakeMaterial:
|
1 2 |
cakeMaterial.normal.contents = UIImage(named: "art.scnassets/FruitCake/CL_LR_01NormalsMap.jpg") cakeMaterial.normal.intensity = 0.5 |
No Normal Map VS Normal Map:
The model on the left looks smooth and a bit too perfect. With the normal map added, we can now see more details in our texture. The difference is subtle. Check the sides of the cake and the detail on the raspberries. They now a bit of a bump to them whereas before they were flat and smooth.
Shadows
Without shadows, our model looks like it’s floating in the air. We need to have shadows to add more realism to the scene. By adding light to the scene, shadows will be cast on the plate and the cake itself. However, no shadows will be cast on the surface below as no geometry existed for the shadows to be cast on.
The first thing we must do is to add a plane node right below our model.
Add the following method to the class:
|
1 2 3 4 5 6 7 8 9 10 |
func addPlaneTo(node:SCNNode) { // 1 let plane = SCNPlane(width: 200, height: 200) // 2 plane.firstMaterial?.colorBufferWriteMask = .init(rawValue: 0) // 3 let planeNode = SCNNode(geometry: plane) planeNode.rotation = SCNVector4Make(1, 0, 0, -Float.pi / 2) node.addChildNode(planeNode) } |
- Create a small plane to represent the floor.
- How can we add shadows while keeping the floor itself invisible? Since iOS 11, SceneKit has added a new strategy to achieve this. By setting the
colorBufferWriteMaskof the geometry to empty, SceneKit will not render any colors for that geometry but allow it to receive shadows. This means only the shadows will be rendered and not the geometry. - Add the plane to a node, rotate it 90 degrees (planes are vertical when first initialized) and add it as a child node.
Now, all we have to do is add the following line to the end of the addFoodModelTo: method so that the plane gets added to the baseNode:
|
1 |
addPlaneTo(node: baseNode) |
Unfortunately, environment textures cannot cast shadows, therefore, we have to manually add a light to the scene.
Add the following method:
|
1 2 3 4 5 6 7 8 9 10 11 12 13 14 15 16 17 18 19 |
func addLight() { // 1 let directionalLight = SCNLight() directionalLight.type = .directional // 2 directionalLight.intensity = 0 // 3 directionalLight.castsShadow = true directionalLight.shadowMode = .deferred // 4 directionalLight.shadowColor = UIColor(red: 0, green: 0, blue: 0, alpha: 0.5) // 5 directionalLight.shadowSampleCount = 10 // 6 let directionalLightNode = SCNNode() directionalLightNode.light = directionalLight directionalLightNode.rotation = SCNVector4Make(1, 0, 0, -Float.pi / 3) sceneView.scene.rootNode.addChildNode(directionalLightNode) } |
- Create a light and set the type to
.directional(Only directional and spot lights can cast shadows). - We only want the light to cast shadows and we don’t want to have any effect on the lighting. This can be achieved by setting the
intensityto zero. - We set
castsShadowto true andshadowModeto.deferredso that shadows are not applied when rendering the objects. Instead, it would be applied as a final post-process (This is required for casting shadows on the invisible plane). - We create a black color with 50% opacity and set it as our
shadowColor. This will make our shadows look more grey and realistic as opposed to the default dark black color. - We increase its
shadowSampleCountto create smoother and higher resolution shadows. - Finally, we create a node, attach our light to it, and rotate it so that it’s facing the floor at a slightly downward angle. Then, add it to the root node of the scene.
Finally, add this line to the end of viewDidLoad:
|
1 |
addLight() |
Run the app. Remember, the more you rotate your phone around, the higher the accuracy of the environment lighting will be.
Conclusion
Congrats on making it all the way through. I hope this tutorial could help you understand how to use photogrammetry models in ARKit.
If you have any questions or suggestions, please leave a comment below.
You can download the complete Xcode project here.
This is a guest post by Koushan Korouei, iOS Developer with a strong focus on ARKit. The article was first published on Medium.

This post was written by a guest contributor. Please refer to the author bio and details in the post above.