As iOS developers, we’re very aware that humans love connectivity. Obviously, we love to communicate with each other using wireless devices. More recently, we’ve come expect that we can communicate with what once were considered standalone, ordinary devices. We’ve come to love, even expect, that some of those wireless devices can gather and analyze data about ourselves (usually “wearables”). So many devices have become intrinsic parts of our lives that we’ve coined a now commonly-used phrase, the “Internet of Things” or “IoT.” There are now billions of wireless, communicable devices on the planet. In this tutorial, we’re going to focus on just one segment of the IoT: Bluetooth®.
I’ll explain the essential concepts behind Bluetooth® technology, plus:
- Show you how getting proficient in Bluetooth® software development presents you with a tremendous career opportunity
- Remind you that you can’t distribute an app that uses Bluetooth® without determining if you need to go through “qualification”
- Provide you with an overview of Apple’s Core Bluetooth framework (see also here)
- Finally, walk you through the development of an iOS app in Swift 4 that monitors a person’s heart rate via Core Bluetooth via a Bluetooth® device.
Bluetooth – A Booming Technology
A discussion of developing software for the whole IoT would be impossible in one article, but running the numbers regarding all these wireless devices is illuminating — actually, quite mind boggling. Connected stuff is everywhere and the predicted growth of these little buggers is phenomenal. If you take the thingies we’re talking about today, in the “short-range segment,” using technologies like Bluetooth® and WiFi, and add in the “wide-area category,” using technologies like cellular (e.g., CDMA), you’ll see ~12.5 billion devices in 2014 rapidly growing to a projected ~30 billion in 2022.
Bluetooth® is a standardized specification for a short distance wireless communications technology. The Bluetooth Special Interest Group (Bluetooth SIG) manages and protects the development, evolution, and intellectual property behind this short range wireless technology. The SIG ensures that manufacturers, developers, and sellers of Bluetooth®-based hardware and software meet the standardized specification.
According to the Bluetooth SIG, “Nearly 4 billion devices will ship this year using Bluetooth to connect. To phones, to tablets, to PCs, or to each other.”. Ellisys, a company deeply invested in short-range communications technology agrees, estimating that “nearly 4 billion new Bluetooth devices [are] forecasted to ship in 2018.”. Remember, that’s 4 billion new Bluetooth® devices shipping in this year alone.
In terms of trends, Statista, an aggregator of “market and consumer data,” claims that the worldwide installed base of Bluetooth® devices has gone from 3.5 billion in 2012 to an estimated 10 billion in 2018.
What Bluetooth® means to your career
Dogtown Media, LLC, an “IoT Bluetooth Apps” boutique specializing in iOS development, asserts that “According to experts at the McKinsey Global Institute, the Internet of Things will have an economic impact of over $6 trillion globally within the next nine years.” So what does this mean to iOS developers like you and I? Dogtown says that “The coming years promise to be exciting, productive, and potentially very profitable for forward-thinking startups and entrepreneurs.” Translation: Get forward-thinking and entrepreneurial, learn about app development using Bluetooth® because your next job or contract has a good chance of requiring skills in this rapidly-expanding market.
Disclaimer:
- I have no affiliation with Dogtown Media, LLC. During research for this article, I found the company’s website, saw that they specialize in iOS Bluetooth® development.
- I am an “Adopter”-level member of the Bluetooth SIG.
Before Submitting Your Core Bluetooth App for Review
Since Bluetooth’s® debut, I’ve often seen developers find some references, plunge right into app development involving wireless devices, and submit Bluetooth® apps to the Apple App Store. Not so fast, there, partner.
From the Bluetooth SIG, “All products that use Bluetooth must complete the Bluetooth Qualification Process.” I’ve heard people say, “There are so many Bluetooth®-based apps out there; no one will notice mine.” Ah… no. Bluetooth® technology is copyrighted, patented, and licensed to app developers. If you want your app to stand out and showcase the fact that you’ve incorporated Bluetooth® technology, remember that:
The Bluetooth® trademarks–including the BLUETOOTH word mark, the figure mark (the runic “B” and oval design), and the combination mark (Bluetooth word mark and design)–are owned by the Bluetooth SIG. Only members of the Bluetooth SIG with properly qualified and declared products may display, feature or use any of the trademarks. In order to protect the trademarks, the Bluetooth SIG administers an enforcement program that monitors the market and performs audits to ensure members using the trademarks are doing so in accordance with the Bluetooth brand guide and in relation to goods and services that have successfully completed the qualification process.
See the Bluetooth SIG’s qualification FAQ:
What happens if I don’t qualify my product?
If you do not qualify your product, you become subject to enforcement action. Read the updated policy here where we outline the escalation schedule. If no corrective actions are taken, your Bluetooth SIG membership could be suspended or revoked.
Don’t be stupid and tempt fate. The main point is that all of us should strive for the highest level of integrity and honesty, and to give credit where credit is due, and to promote adherence to standards so interoperability is the norm, not the exception. Thousands of people have contributed thousands of hours of work and millions of dollars in expenses in developing the Bluetooth® Standard and several patents to create an obviously useful set of intellectual assets.
Don’t let me scare you
People often get put off by stern sounding words like “trademark,” “patent,” “copyright,” “qualification,” “membership,” and especially “enforcement.” Don’t start worrying about development using Bluetooth®. Join the Bluetooth SIG! IT’S FREE! Just click here and:
Start by becoming an Adopter member. Membership is required to build products that use Bluetooth technology, and Adopter membership includes the following benefits:
• A license to build products using Bluetooth technology under and in compliance with the Bluetooth Patent/Copyright License Agreement
• A license to use the Bluetooth trademarks on qualified products under and in compliance with the Bluetooth Trademark License Agreement
• The ability to network and collaborate with tens of thousands of Bluetooth SIG members in a wide variety of industries–from chip manufacturers to application developers, device makers and service providers
• The ability to participate in SIG expert groups, study groups, and sub groups within working groups
• Access to tools such as the Profile Tuning Suite (PTS), providing protocol and interoperability testing…
Becoming a Bluetooth SIG Member
Membership in the SIG includes serious benefits. You get free access to educational kits, training videos, webinars, developer forums, developer support services, white papers, tools for product testing, and help ensuring that your app meets international regulatory requirements (mainly regarding radio frequency emissions).
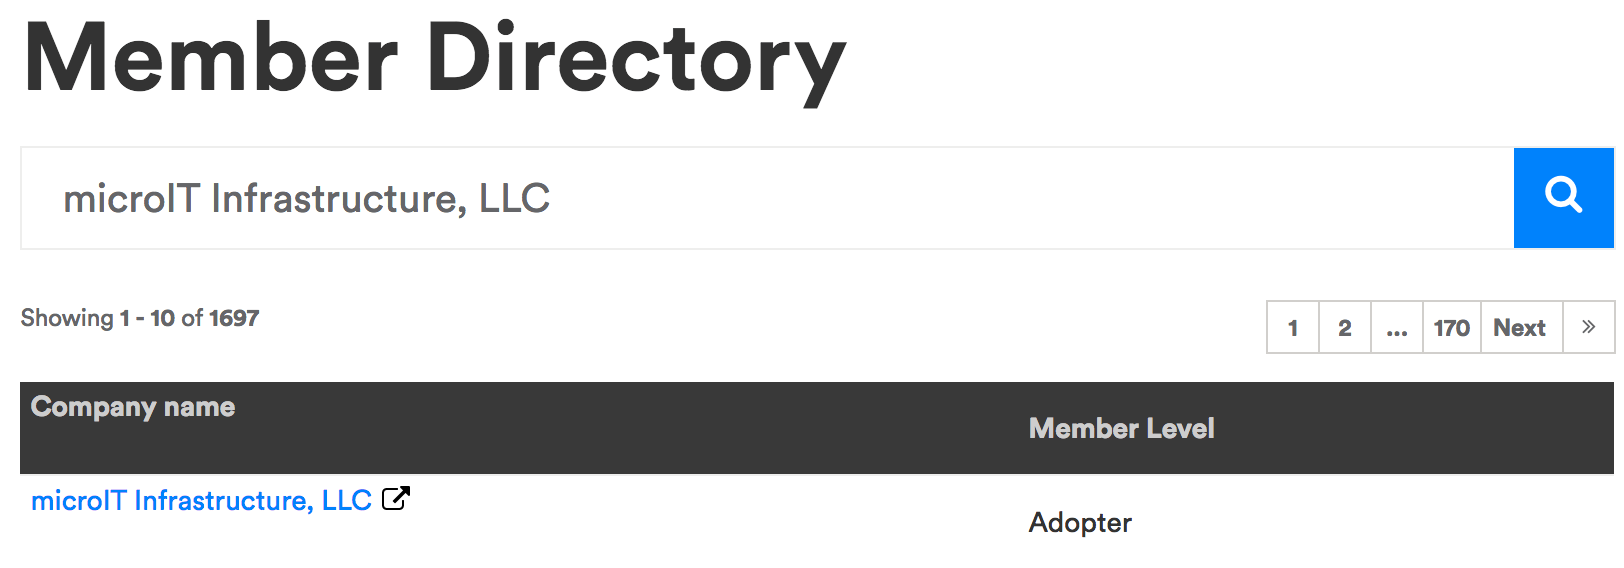
You get some exposure just by being a member. My company is a member and as such it appears in the Bluetooth SIG’s Member Directory:
Once you develop an app, qualify it with the SIG, and get it approved for inclusion in the Apple App Store, your product also gets listed publicly by the SIG, and you get even more exposure.
Qualifying your app is easy and cheap
When you’re satisfied that your Core Bluetooth-based app is ready for submission to the Apple App Store for review, stop, and go to the Bluetooth SIG’s website to “Qualify Your Product”. The SIG provides you with the slick “Launch Studio,” which “is the online tool you use to complete the Bluetooth Qualification Process.”
For most apps like the one I’m going to walk you through in this tutorial, a “GATT-based Profile Client (app),” the qualification and listing fee is $100. It’s well worth the effort and cost to make sure your code meets the Bluetooth® specification and to do some more testing. Finally, you can use the Bluetooth® logo to brand your app. That logo “is globally recognizable with up to 92% consumer awareness.”
And please don’t worry about the $100 bucks thing. You’re probably more likely to make a good salary or hourly rate working for a company that’s handling all those Bluetooth® compliance details.
Understanding Core Bluetooth
Most of the time, using Bluetooth® devices is so, so, so easy. Developing software that communicates with Bluetooth® can be very complicated. That’s why Apple created the Core Bluetooth framework:
The Core Bluetooth framework lets your iOS and Mac apps communicate with Bluetooth low energy devices. For example, your app can discover, explore, and interact with low energy peripheral devices, such as heart rate monitors, digital thermostats, and even other iOS devices.
The framework is an abstraction of the Bluetooth 4.0 specification for use with low energy devices. That said, it hides many of the low-level details of the specification from you, the developer, making it much easier for you to develop apps that interact with Bluetooth low energy devices. Because the framework is based on the specification, some concepts and terminology from the specification have been adopted. …
Notice the mention of “low energy devices.” We’re not dealing with classic Bluetooth® devices, i.e., wireless speakers, when using Core Bluetooth. Communication with such devices can drain battery power pretty quickly. Core Bluetooth is an API for “Bluetooth Low Energy” (BLE), also known as “Bluetooth 4.0.” BLE uses much less power because it’s designed to communicate small amounts of data. A great example of a BLE device is a heart rate monitor (HRM). It sends just a few bytes of data approximately every second. That’s why people can go for a one-hour run wearing an HRM and carrying their iPhone, record their heart rate for the duration of the run, and not see a huge drain in battery power. Notice that the number of acronyms like BLE is increasing as this article proceeds.
You’ll have to learn a new vocabulary so we can discuss Core Bluetooth together and coherently.
Think about the BLE protocol in terms of the client/server and consumer/producer model.
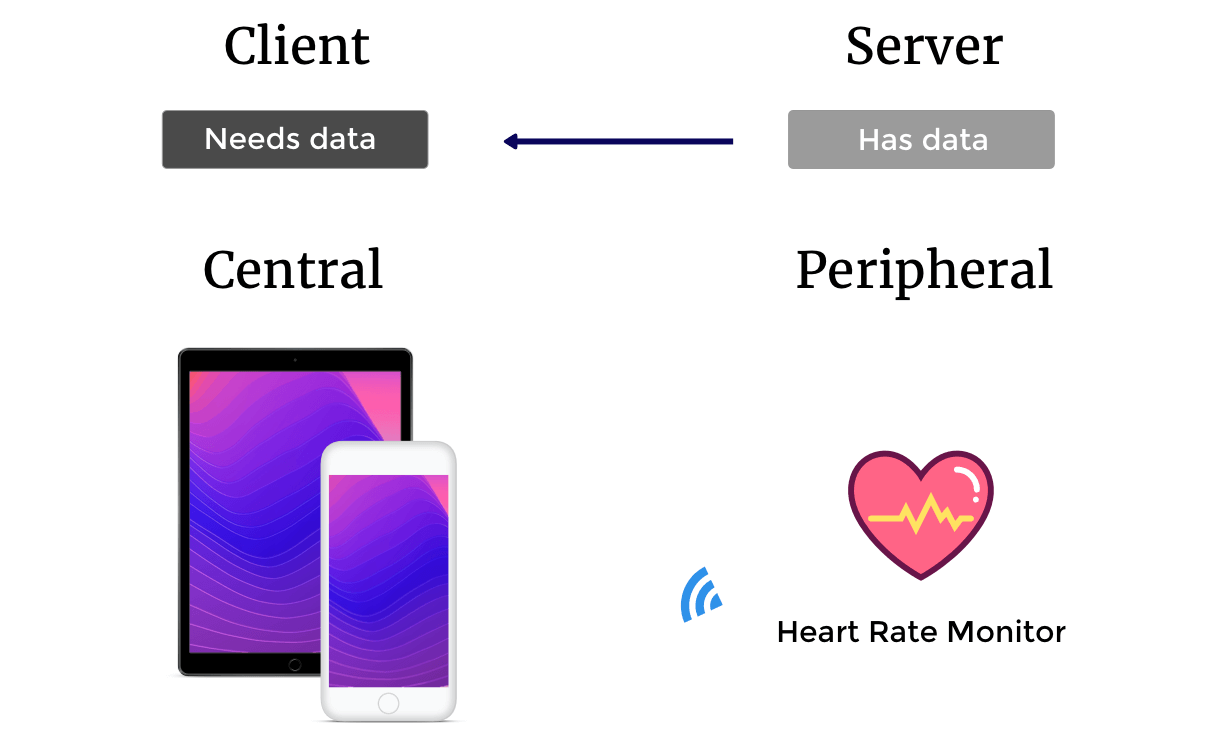
The Peripheral
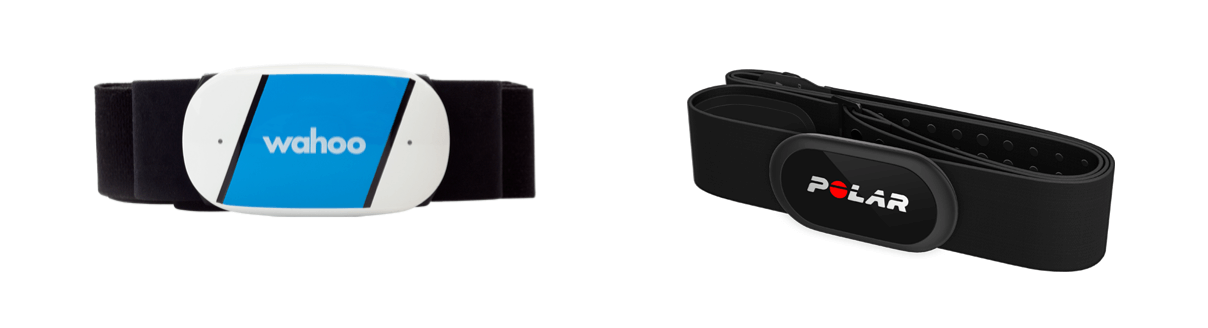
The peripheral is a piece of hardware/software like an HRM. Most HRM devices collect and/or calculate data like heart beats per minute, the HRM’s battery power level, and something called the “RR-Interval.” The device transmits this data to another entity or entities that want(s) this information. A peripheral is a server and producer. Some of the more popular HRMs on the market are the Wahoo TICKR, Polar H7, and Scosche Rhythm+.
I’ll show how important standards like BLE are by writing Swift 4 code that connects to all three of these devices.
Core Bluetooth perspective
From Apple’s documentation:
CBPeripheralDelegate
The delegate of a
CBPeripheralobject must adopt theCBPeripheralDelegateprotocol. The delegate uses this protocol’s methods to monitor the discovery, exploration, and interaction of a remote peripheral’s services and properties. There are no required methods in this protocol.
The Central
The central is a piece of hardware/software like an iPhone, iPad, MacBook, iMac, etc. These devices can host apps that scan for Bluetooth® peripherals like HRMs. A central is a client and consumer. They connect to the HRM so they can consume the data being pumped out by the peripheral, like heart beats per minute, battery power level, and the “RR-Interval.” The central device receives this data, possibly manipulates that data, i.e., performing value-added calculations on the the data, or just presents the data via a user interface, and/or stores the data for future analysis, presentation, and/or aggregation and data analysis (like statistical analysis that requires enough data to determine significant and meaningful trends).
Core Bluetooth perspective
From Apple’s documentation:
The
CBCentralManagerDelegateprotocol defines the methods that a delegate of aCBCentralManagerobject must adopt. The optional methods of the protocol allow the delegate to monitor the discovery, connectivity, and retrieval of peripheral devices. The only required method of the protocol indicates the availability of the central manager, and is called when the central manager’s state is updated.
Finding Peripherals via Advertising
Peripherals like an HRM wouldn’t be much good if your iPhone or iPad couldn’t find them and connect to them. So they continuously and wirelessly broadcast little snippets (packets) of data saying something like, “Hey, I’m a Scosche Rhythm+ heart rate monitor; I offer features like my wearer’s heart rate in beats per minute; I offer information like my battery’s charge level.” When a central interested in heart rate scans for and finds this peripheral, it connects to it and the peripheral stops advertising.
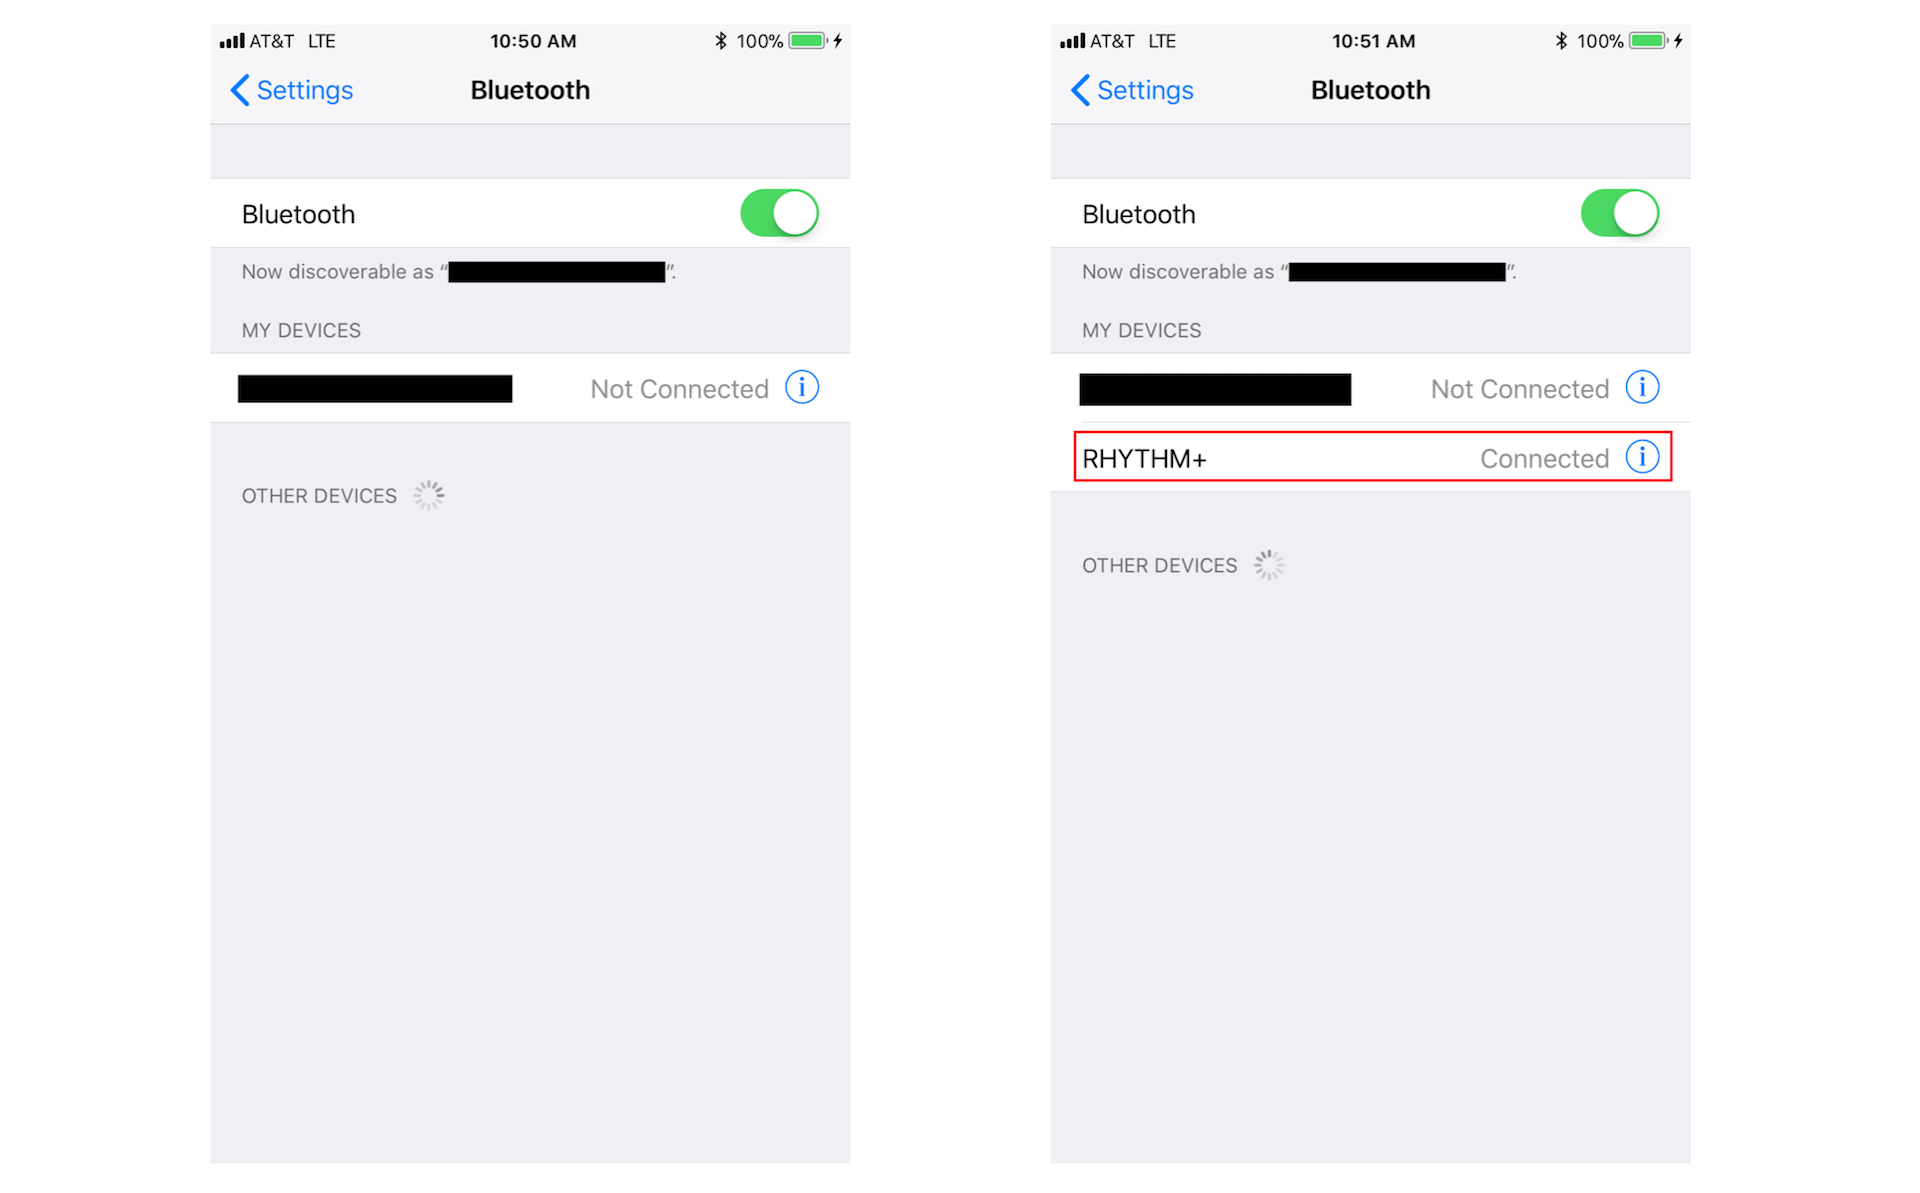
You’ve probably already used iPhone -> Settings -> Bluetooth to turn Bluetooth® (both classic and BLE) off and on. When switched to on, you can watch your iPhone scan for devices and then connect to them, as shown in the following two images where I scanned for, found, and connected my iPhone to a Scosche Rhythm+ HRM:
According to Apple:
Peripherals broadcast some of the data they have in the form of advertising packets. An advertising packet is a relatively small bundle of data that may contain useful information about what a peripheral has to offer, such as the peripheral’s name and primary functionality. For instance, a digital thermostat may advertise that it provides the current temperature of a room. In Bluetooth low energy, advertising is the primary way that peripherals make their presence known.
A central, on the other hand, can scan and listen for any peripheral device that is advertising information that it’s interested in…
I’ll show you how to scan for peripherals and connect to them in the Swift 4 code later in this tutorial.
A Peripheral’s Services
A service may not be what you’d probably expect it to be. A service describes some primary feature or function provided by the peripheral. But instead of being a concrete measurement like heart beats per minute, it is a category that describes what heart-related measurements are available from the peripheral.
According to Apple:
A service is a collection of data and associated behaviors for accomplishing a function or feature of a device (or portions of that device). For example, one service of a heart rate monitor may be to expose heart rate data from the monitor’s heart rate sensor.
To concretely define a Bluetooth® “service,” we should look at the Bluetooth SIG’s list of “GATT Services”, where GATT stands for “Generic Attributes”.
Scroll down through the list of services until you find “Heart Rate” in the Name column. Note that the corresponding Uniform Type Identifier is “org.bluetooth.service.heart_rate” and the Assigned Number is 0x180D. Note that we’ll use the value 0x180D in the code below.
Click on “Heart Rate”. You’ll land on a page that says Name: Heart Rate in big bold letters. Notice that the Summary states, “The HEART RATE Service exposes heart rate and other data related to a heart rate sensor intended for fitness applications.” Scroll down through the page and notice that the Heart Rate service itself doesn’t provide the actual heart rate in beats per minute. The service is a collection of other pieces of data called characteristics. Finally, you’ll get to a characteristic that provides the meat: heart beats per minute.
Core Bluetooth perspective
From Apple’s documentation:
CBServiceand its subclassCBMutableServicerepresent a peripheral’s service–a collection of data and associated behaviors for accomplishing a function or feature of a device (or portions of that device).CBServiceobjects in particular represent services of a remote peripheral device (represented by aCBPeripheralobject). Services are either primary or secondary and may contain a number of characteristics or included services (references to other services).
A Peripheral Service’s Characteristics
A peripheral’s services are often broken down into more fine-grained but related pieces of information. Characteristics are generally where we find the good stuff, the actual data. Again, from Apple:
Services themselves are made up of either characteristics or included services (that is, references to other services). A characteristic provides further details about a peripheral’s service. For example, the heart rate service just described may contain one characteristic that describes the intended body location of the device’s heart rate sensor and another characteristic that transmits heart rate measurement data.
Let’s continue using the HRM example. Please return to the page that says Name: Heart Rate in big bold letters. Scroll down until you see Service Characteristics. That’s a big table with a lot of meta data (information about data). Please look for Heart Rate Measurement and then click on org.bluetooth.characteristic.heart_rate_measurement and review. I’ll explain this page soon.
Core Bluetooth perspective
From Apple’s documentation:
CBCharacteristicand its subclassCBMutableCharacteristicrepresent further information about a peripheral’s service.CBCharacteristicobjects in particular represent the characteristics of a remote peripheral’s service (remote peripheral devices are represented byCBPeripheralobjects). A characteristic contains a single value and any number of descriptors describing that value. The properties of a characteristic determine how the value of the characteristic can be used and how the descriptors can be accessed.
The GATT Specification
When it’s time for you to work on an app that requires communication with a Bluetooth® peripheral using Core Bluetooth, you should first turn to the Bluetooth SIG’s website.
Let’s go through the process I once went through when building an app that did all sorts of funky-town jammin’ with HRMs. Review the section on GATT Specifications and then find your peripheral’s services under GATT Services.
In the HRM example covered herein, first find the term “Heart Rate” (also a hyperlink) in the Name column on the GATT Services page. Click on the “Heart Rate” link and review the whole page. Note the Assigned Number (0x180D) and then scroll down to the Service Characteristics table. Review the table carefully and find the characteristics of interest.
In this example, read the Heart Rate Measurement and Body Sensor Location sections and then click on their respective detail links, org.bluetooth.characteristic.heart_rate_measurement and org.bluetooth.characteristic.body_sensor_location.
On the Heart Rate Measurement page, make a note of the Assigned Number (0x2A37), and then review all the gory details on how to decipher the Bluetooth®-encoded data structure that will be sent to the proposed HRM app. Code will have to be written to turn the Bluetooth®-encoded data into human-readable format.
Jump back to the Body Sensor Location page, make a note of the Assigned Number (0x2A38), and then review the protocol for how to decipher the Bluetooth®-encoded data structure that will be sent to the proposed HRM app. Code will have to be written to turn the Bluetooth®-encoded data into human-readable format.
I’ll give you more details as we move forward in this tutorial and especially when I show you my working app code for communicating with a BLE HRM.
You can get much more detailed information about programming with services and characteristics if you join the Bluetooth SIG.
Writing Core Bluetooth Code
In this discussion, I’m making the assumption that you understand the basics of iOS app development, including the Swift programming language and an Xcode Single View App template. The user interface (UI), including Auto Layout, for the test app, whose code is shown below, is trivial.
I’m going to describe the code in series of steps — steps that are also comments in my code shown below. So as you read the steps in this section, please refer to those same steps in the code below. The entire process is basically linear. Just remember that some of the steps represent callbacks — delegate methods being called.
In a production app, I would have split the Core Bluetooth components out into protocols or classes — i.e., separated core functionality from the UI. But the purpose of this code is to show you how Core Bluetooth works with the least amount of distractions. My rubric is simple and face value. You’ll see only the essentials on one page.
What the Demo App Looks like
The UI for the demo app I developed for this article is also bare-bones simple. When the app is started, it begins scanning for an HRM. This scanning is indicated by the UIActivityIndicatorView appearing on screen and spinning. A square UIView is colored red to indicate that no HRM has been connected. Once an HRM is found and initially connected, the UIActivityIndicatorView stops spinning and is hidden, and the red UIView turns green. Once the HRM is fully connected and interrogated, I display the HRM’s retail device name and the intended location on the body on which the wearer has it placed. I then start reading and displaying the wearer’s heart beats per minute approximately every second. Most HRMs send a beats per minute value once per second. I’ve artificially contrived a pulsing animation of the heart rate number to make the app look more engaging, but that’s my real heart rate your seeing. When the HRM disconnects, I blank out all the informational text, turn the square UIView red, display the UIActivityIndicatorView and start it spinning, and start scanning for an HRM again.
Here’s what my app looks like in action with three different brands of HRMs — the Scosche Rhythm+, Wahoo TICKR, and Polar H7:
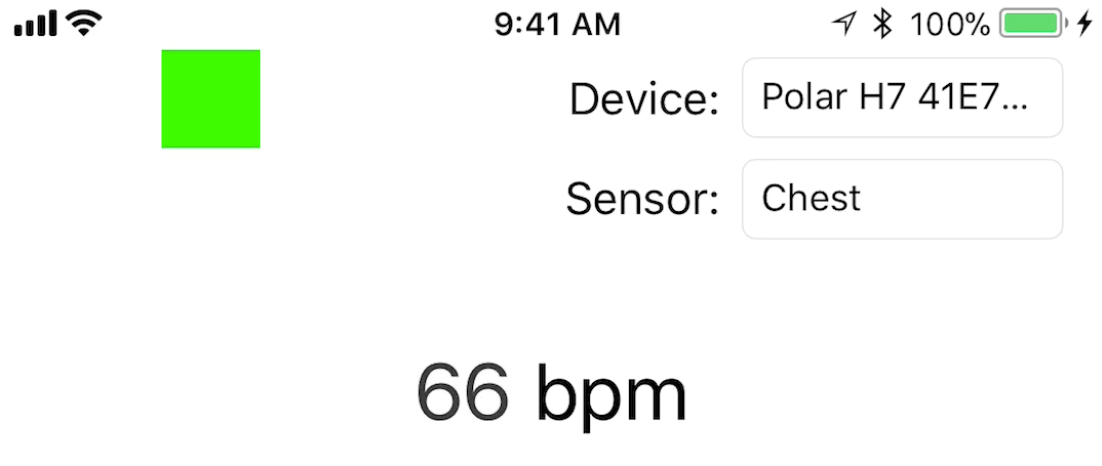
The Rhythm+ uses infrared light to “look” at my veins to determine heart rate. The TICKR and H7 use electrodes to detect the electrical impulses telling my heart to beat.
Stepping through my code
You can find the full source code in the next section. Here I walk you through the implementation.
Step 0.00: I must include the CoreBluetooth framework.
Step 0.0: Specify GATT Assigned Numbers as constants. I do so to make the Bluetooth® specification’s identifiers more readable and maintainable, for the “Heart Rate” service, its “Heart Rate Measurement” characteristic, and its “Body Sensor Location” characteristic.
Step 0.1: Make the HeartRateMonitorViewController a subclass of UIViewController. Make HeartRateMonitorViewController conform to the CBCentralManagerDelegate and CBPeripheralDelegate protocols. I’m using protocols and the delegation design pattern, as described in my AppCoda articles here and here, respectively. We’ll implement methods from both protocols. We’ll call some Core Bluetooth methods and some methods will be called by Core Bluetooth for us in response to our own invocations.
Step 0.2: We define instance variables in the HeartRateMonitorViewController class representing the CBCentralManager and CBPeripheral classes so they persist for the duration of the app’s life.
Step 1: We create a concurrent background queue for the central. I want Core Bluetooth activities to occur in the background. I want the UI to remain responsive. In a more sophisticated app — hypothetically speaking — an HRM might be running for hours, collecting heart rate data for the user. The user may want to employ other app features, for example, to configure app settings or, for example, if the user were taking a run and wanted to use Core Location to track the route of their run. So a user could be collecting and/or viewing their geographic location while heart rate data is being collected and displayed.
Step 2: Create central to scan for, connect to, manage, and collect data from peripherals. This is an essential step. Core Bluetooth will not function without a central. Also essential: Since HeartRateMonitorViewController adopts the CBCentralManagerDelegate, we set the centralManager delegate property to HeartRateMonitorViewController (self). We also specify the DispatchQueue for the central.
Step 3.1: This centralManagerDidUpdateState method is called based on the device’s Bluetooth® state. Ideally, we should be prepared for a scenario in which the user inadvertently (or purposefully) turns off Bluetooth® in the Settings app. We can only scan for peripherals if Bluetooth® is in the .poweredOn state.
Step 3.2: The central must scan for peripherals of interest, but only if the device, like an iPhone, has Bluetooth® turned on. Remember the section up above entitled “Finding peripherals via advertising?” That’s what we do with this call. We listen only for HRMs with the Heart Rate service that are advertising (0x180D). We could listen for and connect to more peripherals with specific services by adding their CBUUIDs to the serviceUUIDs array parameter (labelled withServices). For example, in some health-related app, we could listen for and connect to an HRM and a blood pressure monitor or BPM (though we’d need another class instance variable of CBPeripheral for the BPM). Note that if we made this call:
|
1 |
centralManager?.scanForPeripherals(withServices: nil) |
… we could listen for all Bluetooth® devices advertising and within range. This could be useful in some type of Bluetooth® utility app.
Step 4.1: Discover what peripheral devices of interest (HRMs) that are available for which this app can connect. This didDiscover method tells us is that, while scanning, the central has found HRMs that are advertising.
Step 4.2: We must store a reference to the just-discovered peripheral in a class instance variable that will persist. If we were to use solely a local variable, we’d be out of luck.
Step 4.3: Since HeartRateMonitorViewController adopts the CBPeripheralDelegate protocol, the peripheralHeartRateMonitor object must set its delegate property to HeartRateMonitorViewController (self).
Step 5: We tell the central to stop scanning in didDiscover to preserve battery life. We can re-scan if a connected HRM/peripheral gets disconnected.
Step 6: While still in didDiscover, we connect to the discovered peripheral of interest, an HRM.
Step 7: This didConnect method is only “Invoked when a connection is successfully created with a peripheral.” Make note of that word “successfully.” If you discover a peripheral but can’t connect, you’ve got some debugging to do. Note that I update the UI to show what peripheral I’ve connected to and to indicate I’ve stopped scanning, among other things.
Step 8: While still in method didConnect, we look for services of interest on the peripheral. Specifically, we want to find the Heart Rate service (0x180D).
Step 9: Since the didDiscoverServices method got called, that means that the “Heart Rate” service was found on the peripheral to which we connected. Remember that we have to look for characteristics of interest. Here, I cycle through all of the Heart Rate service’s characteristics and pick the ones I want a bit later. If you go to the “Heart Rate” service page on the Bluetooth SIG’s website, scroll down to the section labelled Service Characteristics. Review the three available characteristics.
Step 10: This didDiscoverCharacteristicsFor service method confirms we’ve discovered all characteristics within the service of interest.
Step 11: First, I subscribe to the single notification — a “read” — for the Body Sensor Location characteristic of interest. Go to the “Heart Rate” service’s page and notice that this characteristic is marked “Read Mandatory.” Calling peripheral.readValue will cause peripheral:didUpdateValueForCharacteristic:error: to get called a bit later so I can decipher this characteristic for human consumption. Second, I subscribe to regular notifications — a “notify” — for the Heart Rate Measurement characteristic of interest. Go to the “Heart Rate” service’s page and notice that this characteristic is marked “Notify Mandatory.” Calling peripheral.setNotifyValue will cause peripheral:didUpdateValueForCharacteristic:error: to get called a bit later, and about every second so I can decipher this characteristic for human consumption.
Step 12: Since I subscribed to read the characteristic value for Body Sensor Location (0x2A38) and subscribed to regular notifications for the Heart Rate Measurement (0x2A37) characteristic, then I’ll get those two binary values if they post once or update regularly, respectively.
Step 13: Decode the BLE Heart Rate Measurement data into human readable format. Go to the GATT specification page for this characteristic. The first byte is meta data (Flags) about the rest of the data. The specs tell me to look at the first byte’s least significant bit, the Heart Rate Value Format bit. If it’s 0 (zero), heart beats per minute is UINT8 in the second byte. I’ve never met an HRM that used anything other than the second byte, and all three HRMs I demo here are no exception. That’s why I ignored the use case where the Heart Rate Value Format bit is 1 (one). I’ve seen all sort of implementations proposed, but have never been able to test those implementations. I don’t publish anything I can’t reproduce myself.
Step 14: Decode the BLE Body Sensor Location data into human readable format. Go to the GATT specification page for this characteristic. This one’s easy. A value of 1, 2, 3, 4, 5, 6, or 7 is stored in 8 bits. The text string equivalent of each of these values is shown for decoding purposes.
Step 15: When a peripheral gets disconnected from the central, take appropriate action. I update my UI and…
Step 16: Start scanning for a peripheral advertising the Heart Rate service (0x180D).
My source code
Here is the full source code that implements what we have just discussed:
|
1 2 3 4 5 6 7 8 9 10 11 12 13 14 15 16 17 18 19 20 21 22 23 24 25 26 27 28 29 30 31 32 33 34 35 36 37 38 39 40 41 42 43 44 45 46 47 48 49 50 51 52 53 54 55 56 57 58 59 60 61 62 63 64 65 66 67 68 69 70 71 72 73 74 75 76 77 78 79 80 81 82 83 84 85 86 87 88 89 90 91 92 93 94 95 96 97 98 99 100 101 102 103 104 105 106 107 108 109 110 111 112 113 114 115 116 117 118 119 120 121 122 123 124 125 126 127 128 129 130 131 132 133 134 135 136 137 138 139 140 141 142 143 144 145 146 147 148 149 150 151 152 153 154 155 156 157 158 159 160 161 162 163 164 165 166 167 168 169 170 171 172 173 174 175 176 177 178 179 180 181 182 183 184 185 186 187 188 189 190 191 192 193 194 195 196 197 198 199 200 201 202 203 204 205 206 207 208 209 210 211 212 213 214 215 216 217 218 219 220 221 222 223 224 225 226 227 228 229 230 231 232 233 234 235 236 237 238 239 240 241 242 243 244 245 246 247 248 249 250 251 252 253 254 255 256 257 258 259 260 261 262 263 264 265 266 267 268 269 270 271 272 273 274 275 276 277 278 279 280 281 282 283 284 285 286 287 288 289 290 291 292 293 294 295 296 297 298 299 300 301 302 303 304 305 306 307 308 309 310 311 312 313 314 315 316 317 318 319 320 321 322 323 324 325 326 327 328 329 330 331 332 333 334 335 336 337 338 339 340 341 342 343 344 345 346 347 |
import UIKit // STEP 0.00: MUST include the CoreBluetooth framework import CoreBluetooth // STEP 0.0: specify GATT "Assigned Numbers" as // constants so they're readable and updatable // MARK: - Core Bluetooth service IDs let BLE_Heart_Rate_Service_CBUUID = CBUUID(string: "0x180D") // MARK: - Core Bluetooth characteristic IDs let BLE_Heart_Rate_Measurement_Characteristic_CBUUID = CBUUID(string: "0x2A37") let BLE_Body_Sensor_Location_Characteristic_CBUUID = CBUUID(string: "0x2A38") // STEP 0.1: this class adopts both the central and peripheral delegates // and therefore must conform to these protocols' requirements class HeartRateMonitorViewController: UIViewController, CBCentralManagerDelegate, CBPeripheralDelegate { // MARK: - Core Bluetooth class member variables // STEP 0.2: create instance variables of the // CBCentralManager and CBPeripheral so they // persist for the duration of the app's life var centralManager: CBCentralManager? var peripheralHeartRateMonitor: CBPeripheral? // MARK: - UI outlets / member variables @IBOutlet weak var connectingActivityIndicator: UIActivityIndicatorView! @IBOutlet weak var connectionStatusView: UIView! @IBOutlet weak var brandNameTextField: UITextField! @IBOutlet weak var sensorLocationTextField: UITextField! @IBOutlet weak var beatsPerMinuteLabel: UILabel! @IBOutlet weak var bluetoothOffLabel: UILabel! // HealthKit setup let healthKitInterface = HealthKitInterface() // MARK: - UIViewController delegate override func viewDidLoad() { super.viewDidLoad() // Do any additional setup after loading the view, typically from a nib. // initially, we're scanning and not connected connectingActivityIndicator.backgroundColor = UIColor.white connectingActivityIndicator.startAnimating() connectionStatusView.backgroundColor = UIColor.red brandNameTextField.text = "----" sensorLocationTextField.text = "----" beatsPerMinuteLabel.text = "---" // just in case Bluetooth is turned off bluetoothOffLabel.alpha = 0.0 // STEP 1: create a concurrent background queue for the central let centralQueue: DispatchQueue = DispatchQueue(label: "com.iosbrain.centralQueueName", attributes: .concurrent) // STEP 2: create a central to scan for, connect to, // manage, and collect data from peripherals centralManager = CBCentralManager(delegate: self, queue: centralQueue) // read heart rate data from HKHealthStore // healthKitInterface.readHeartRateData() // read gender type from HKHealthStore // healthKitInterface.readGenderType() } override func didReceiveMemoryWarning() { super.didReceiveMemoryWarning() // Dispose of any resources that can be recreated. } // MARK: - CBCentralManagerDelegate methods // STEP 3.1: this method is called based on // the device's Bluetooth state; we can ONLY // scan for peripherals if Bluetooth is .poweredOn func centralManagerDidUpdateState(_ central: CBCentralManager) { switch central.state { case .unknown: print("Bluetooth status is UNKNOWN") bluetoothOffLabel.alpha = 1.0 case .resetting: print("Bluetooth status is RESETTING") bluetoothOffLabel.alpha = 1.0 case .unsupported: print("Bluetooth status is UNSUPPORTED") bluetoothOffLabel.alpha = 1.0 case .unauthorized: print("Bluetooth status is UNAUTHORIZED") bluetoothOffLabel.alpha = 1.0 case .poweredOff: print("Bluetooth status is POWERED OFF") bluetoothOffLabel.alpha = 1.0 case .poweredOn: print("Bluetooth status is POWERED ON") DispatchQueue.main.async { () -> Void in self.bluetoothOffLabel.alpha = 0.0 self.connectingActivityIndicator.startAnimating() } // STEP 3.2: scan for peripherals that we're interested in centralManager?.scanForPeripherals(withServices: [BLE_Heart_Rate_Service_CBUUID]) } // END switch } // END func centralManagerDidUpdateState // STEP 4.1: discover what peripheral devices OF INTEREST // are available for this app to connect to func centralManager(_ central: CBCentralManager, didDiscover peripheral: CBPeripheral, advertisementData: [String : Any], rssi RSSI: NSNumber) { print(peripheral.name!) decodePeripheralState(peripheralState: peripheral.state) // STEP 4.2: MUST store a reference to the peripheral in // class instance variable peripheralHeartRateMonitor = peripheral // STEP 4.3: since HeartRateMonitorViewController // adopts the CBPeripheralDelegate protocol, // the peripheralHeartRateMonitor must set its // delegate property to HeartRateMonitorViewController // (self) peripheralHeartRateMonitor?.delegate = self // STEP 5: stop scanning to preserve battery life; // re-scan if disconnected centralManager?.stopScan() // STEP 6: connect to the discovered peripheral of interest centralManager?.connect(peripheralHeartRateMonitor!) } // END func centralManager(... didDiscover peripheral // STEP 7: "Invoked when a connection is successfully created with a peripheral." // we can only move forwards when we know the connection // to the peripheral succeeded func centralManager(_ central: CBCentralManager, didConnect peripheral: CBPeripheral) { DispatchQueue.main.async { () -> Void in self.brandNameTextField.text = peripheral.name! self.connectionStatusView.backgroundColor = UIColor.green self.beatsPerMinuteLabel.text = "---" self.sensorLocationTextField.text = "----" self.connectingActivityIndicator.stopAnimating() } // STEP 8: look for services of interest on peripheral peripheralHeartRateMonitor?.discoverServices([BLE_Heart_Rate_Service_CBUUID]) } // END func centralManager(... didConnect peripheral // STEP 15: when a peripheral disconnects, take // use-case-appropriate action func centralManager(_ central: CBCentralManager, didDisconnectPeripheral peripheral: CBPeripheral, error: Error?) { // print("Disconnected!") DispatchQueue.main.async { () -> Void in self.brandNameTextField.text = "----" self.connectionStatusView.backgroundColor = UIColor.red self.beatsPerMinuteLabel.text = "---" self.sensorLocationTextField.text = "----" self.connectingActivityIndicator.startAnimating() } // STEP 16: in this use-case, start scanning // for the same peripheral or another, as long // as they're HRMs, to come back online centralManager?.scanForPeripherals(withServices: [BLE_Heart_Rate_Service_CBUUID]) } // END func centralManager(... didDisconnectPeripheral peripheral // MARK: - CBPeripheralDelegate methods func peripheral(_ peripheral: CBPeripheral, didDiscoverServices error: Error?) { for service in peripheral.services! { if service.uuid == BLE_Heart_Rate_Service_CBUUID { print("Service: \(service)") // STEP 9: look for characteristics of interest // within services of interest peripheral.discoverCharacteristics(nil, for: service) } } } // END func peripheral(... didDiscoverServices // STEP 10: confirm we've discovered characteristics // of interest within services of interest func peripheral(_ peripheral: CBPeripheral, didDiscoverCharacteristicsFor service: CBService, error: Error?) { for characteristic in service.characteristics! { print(characteristic) if characteristic.uuid == BLE_Body_Sensor_Location_Characteristic_CBUUID { // STEP 11: subscribe to a single notification // for characteristic of interest; // "When you call this method to read // the value of a characteristic, the peripheral // calls ... peripheral:didUpdateValueForCharacteristic:error: // // Read Mandatory // peripheral.readValue(for: characteristic) } if characteristic.uuid == BLE_Heart_Rate_Measurement_Characteristic_CBUUID { // STEP 11: subscribe to regular notifications // for characteristic of interest; // "When you enable notifications for the // characteristic’s value, the peripheral calls // ... peripheral(_:didUpdateValueFor:error:) // // Notify Mandatory // peripheral.setNotifyValue(true, for: characteristic) } } // END for } // END func peripheral(... didDiscoverCharacteristicsFor service // STEP 12: we're notified whenever a characteristic // value updates regularly or posts once; read and // decipher the characteristic value(s) that we've // subscribed to func peripheral(_ peripheral: CBPeripheral, didUpdateValueFor characteristic: CBCharacteristic, error: Error?) { if characteristic.uuid == BLE_Heart_Rate_Measurement_Characteristic_CBUUID { // STEP 13: we generally have to decode BLE // data into human readable format let heartRate = deriveBeatsPerMinute(using: characteristic) DispatchQueue.main.async { () -> Void in UIView.animate(withDuration: 1.0, animations: { self.beatsPerMinuteLabel.alpha = 1.0 self.beatsPerMinuteLabel.text = String(heartRate) }, completion: { (true) in self.beatsPerMinuteLabel.alpha = 0.0 }) } // END DispatchQueue.main.async... } // END if characteristic.uuid ==... if characteristic.uuid == BLE_Body_Sensor_Location_Characteristic_CBUUID { // STEP 14: we generally have to decode BLE // data into human readable format let sensorLocation = readSensorLocation(using: characteristic) DispatchQueue.main.async { () -> Void in self.sensorLocationTextField.text = sensorLocation } } // END if characteristic.uuid ==... } // END func peripheral(... didUpdateValueFor characteristic // MARK: - Utilities func deriveBeatsPerMinute(using heartRateMeasurementCharacteristic: CBCharacteristic) -> Int { let heartRateValue = heartRateMeasurementCharacteristic.value! // convert to an array of unsigned 8-bit integers let buffer = [UInt8](heartRateValue) // UInt8: "An 8-bit unsigned integer value type." // the first byte (8 bits) in the buffer is flags // (meta data governing the rest of the packet); // if the least significant bit (LSB) is 0, // the heart rate (bpm) is UInt8, if LSB is 1, BPM is UInt16 if ((buffer[0] & 0x01) == 0) { // second byte: "Heart Rate Value Format is set to UINT8." print("BPM is UInt8") // write heart rate to HKHealthStore // healthKitInterface.writeHeartRateData(heartRate: Int(buffer[1])) return Int(buffer[1]) } else { // I've never seen this use case, so I'll // leave it to theoroticians to argue // 2nd and 3rd bytes: "Heart Rate Value Format is set to UINT16." print("BPM is UInt16") return -1 } } // END func deriveBeatsPerMinute func readSensorLocation(using sensorLocationCharacteristic: CBCharacteristic) -> String { let sensorLocationValue = sensorLocationCharacteristic.value! // convert to an array of unsigned 8-bit integers let buffer = [UInt8](sensorLocationValue) var sensorLocation = "" // look at just 8 bits if buffer[0] == 1 { sensorLocation = "Chest" } else if buffer[0] == 2 { sensorLocation = "Wrist" } else { sensorLocation = "N/A" } return sensorLocation } // END func readSensorLocation func decodePeripheralState(peripheralState: CBPeripheralState) { switch peripheralState { case .disconnected: print("Peripheral state: disconnected") case .connected: print("Peripheral state: connected") case .connecting: print("Peripheral state: connecting") case .disconnecting: print("Peripheral state: disconnecting") } } // END func decodePeripheralState(peripheralState } // END class HeartRateMonitorViewController |
Conclusion
I hope you’ve enjoyed this tutorial. Buy or borrow a BLE device and use my code with it or write your own. Follow all the hyperlinks I’ve provided in the article and read them. You should definitely get an overview of Bluetooth® by reviewing the Bluetooth SIG’s website and Apple’s Core Bluetooth framework (see also here) documentation.
Thanks for tuning in. Remember to enjoy your work. Don’t forget that having Bluetooth® experience on your resume will be a big plus for your career.
For reference, you can check out the full source code on GitHub.

Avid and well-published author and software developer now specializing in iOS mobile app development in Objective-C and Swift. He has a strong background in C#, C++, .NET, JavaScript, HTML, CSS, jQuery, SQL Server, Agile, TDD, Git, and other technologies. He earned a B.Sc. and M.Sc. in Computer Science. Andrew has published several apps in the Apple App Store and has 30 years of experience in software development and professional writing. You can read his blog at http://iosbrain.com/.