In the past few years, the use of machine learning approaches to solve problems and perform complex tasks have been increasing. Machine learning enables us to use big data to perform complex tasks, such as image classification and speech recognition.
Furthermore, Apple recently announced a framework built to simplify the process of integrating machine learning models into macOS, iOS, tvOS and watchOS devices, called Core ML. Apple also provided sample Core ML models to test the framework.
When Core ML was first announced, it was quite a challenge for software developers to create their own custom Core ML models because it required previous experience in machine learning.
However, thanks to GraphLab and Apple, now we have Turi Create, a framework that enables us to easily create Core ML models. Turi Create provides us with essential machine learning algorithms, such as k-nearest neighbor, and advanced deep learning algorithms, such as Residual Networks (ResNet), in order to create our own machine learning models.
In this tutorial, we will demonstrate how to create a custom image classification Core ML model and integrate it into an iOS application. To do so, we will use Python 2.7, Turi Create, Swift 4.0 and Core ML.
Before getting started, we will need the following:
- A computer with a 64-bit processor (x86_64 architecture)
- Python, version 2.7: Download here
Let’s Get Started!
To begin, we will first install Turi Create using the Python package manager, pip. The package manager comes with Python when you install it on your machine.
To install Turi Create, go to Terminal.app and type the following command:
|
1 2 |
$ pip install turicreate |
After installing the Python package, we will create a new Python project, by doing the following steps:
- Create a folder named
MLClassifier - Open Xcode and create a new file
- Select an Empty file from any section
- Name the file:
classifier.py - Save it to the
MLClassifierfolder


Creating a Dataset
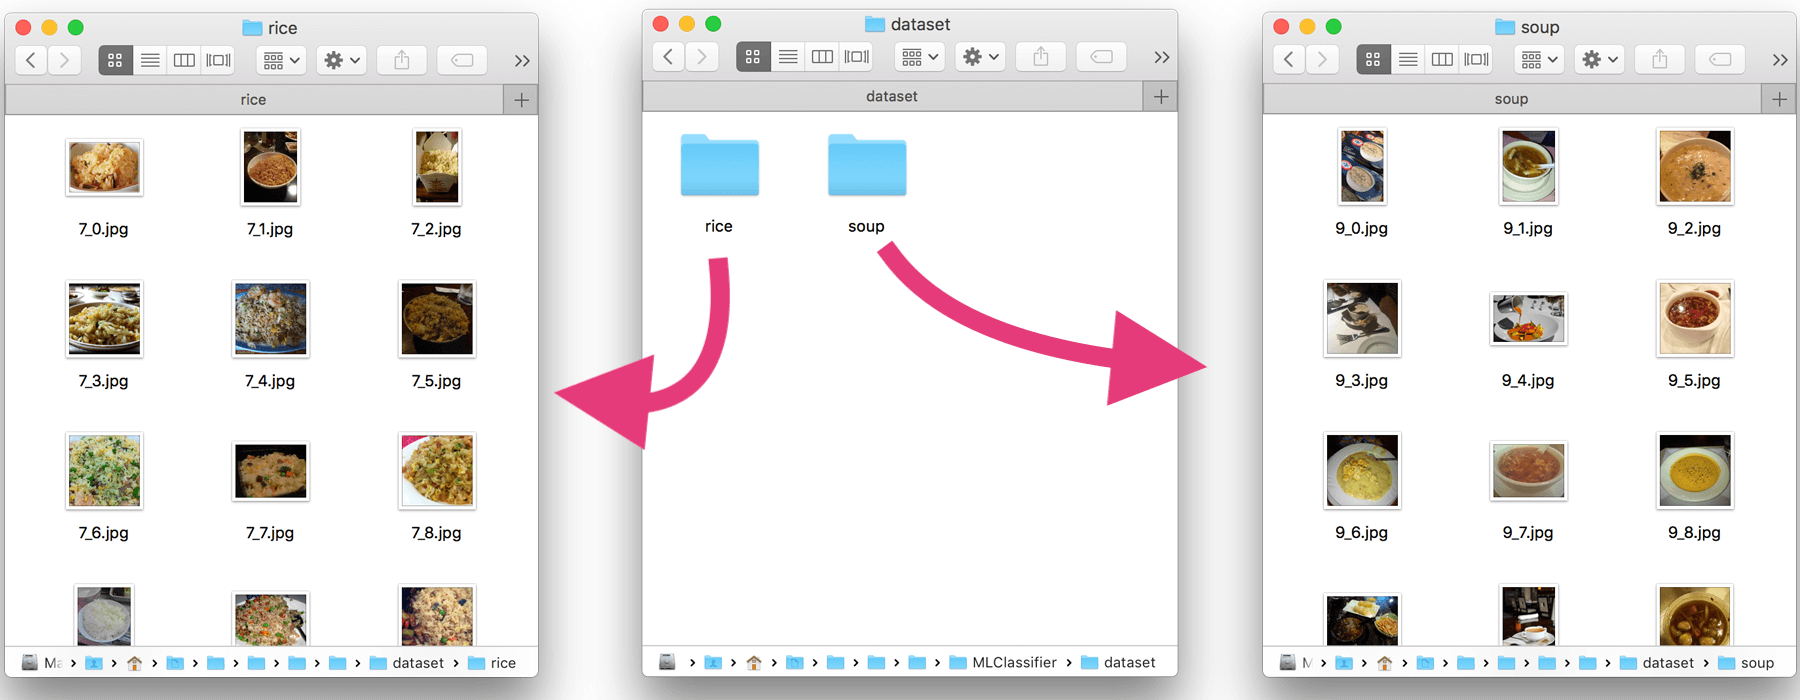
In this example, we will create a machine learning model that classifies whether an image contains rice or soup. To do so, we will have to create a dataset that contains images of both categories. This data set is used to train our own model. You can download the dataset I am using and save it to the MLClassifier folder. Or you can create a custom dataset by following the next steps:
- In the
MLClassifierfolder, create a new folder nameddataset. - Inside the
datasetfolder, create 2 empty folders namedriceandsoup. - Inside the
ricefolder, add at least 100 different images of rice. - Inside the
soupfolder, add at least 100 different images of soup.
The dataset folder contents should look like this:
Implementing Turi Create
Turi Create simplifies the development of custom machine learning models. You don’t have to be a machine learning expert to add recommendations, object detection, image classification, image similarity or activity classification to your app.
– the official documentation of Turi Create (https://github.com/apple/turicreate)
In this part, we will implement turicreate into our Python project and label each of the images from the dataset we created in the previous step. Let’s implement and configure the framework by doing the following:
- Open the
classifier.pyfile and importturicreateby adding this line: - Next, let’s define the dataset path:
- And then add the following line to find and load images from the dataset folder:
- Continue to add the following line of code. We define image categories based on its folder path:
- Lastly, save the new labeled dateset as
rice_or_soup.sframe. We will use it to train the model - Preview the new labeled dataset on Turi Create
|
1 |
import turicreate as turi |
|
1 |
url = "dataset/" |
|
1 |
data = turi.image_analysis.load_images(url) |
|
1 |
data["foodType"] = data["path"].apply(lambda path: "Rice" if "rice" in path else "Soup") |
> Given an image, the goal of an image classifier is to assign it to one of a pre-determined number of labels.
|
1 |
data.save("rice_or_soup.sframe") |
|
1 |
data.explore() |
Training & Exporting the Machine Learning model
It’s time to train and export the machine learning model for production use!
To do so, we will train our machine learning model using SqueezeNet architecture option provided by turicreate.
We will be using the SqueezeNet architecture because it takes less time to train; however, it’s recommeneded to use ResNet-50 for more accurate results. In the following steps, I will demonstrate examples of both architectures:
- In the
classifier.pyfile, we first load the previously savedrice_or_soup.sframefile. Insert the following line of code in the file: - Next, create training data using 90% of the
dataBufferobject we just created and test data using the remaining 10%. - Continue to insert the following code to create the image classifier using the training data and
SqueezeNetarchitecture: - Next, we will evaluate the test data to determine the model accuracy:
- Lastly, insert the following code to save the model and export the image classification model as a CoreML model:
|
1 |
dataBuffer = turi.SFrame("rice_or_soup.sframe") |
|
1 |
trainingBuffers, testingBuffers = dataBuffer.random_split(0.9) |
|
1 |
model = turi.image_classifier.create(trainingBuffers, target="foodType", model="squeezenet_v1.1") |
Alternatively, you can use ResNet-50 for more accurate results:
|
1 |
model = turi.image_classifier.create(trainingBuffers, target="foodType", model="resnet-50") |
|
1 2 |
evaluations = model.evaluate(testingBuffers) print evaluations["accuracy"] |
|
1 2 |
model.save("rice_or_soup.model") model.export_coreml("RiceSoupClassifier.mlmodel") |
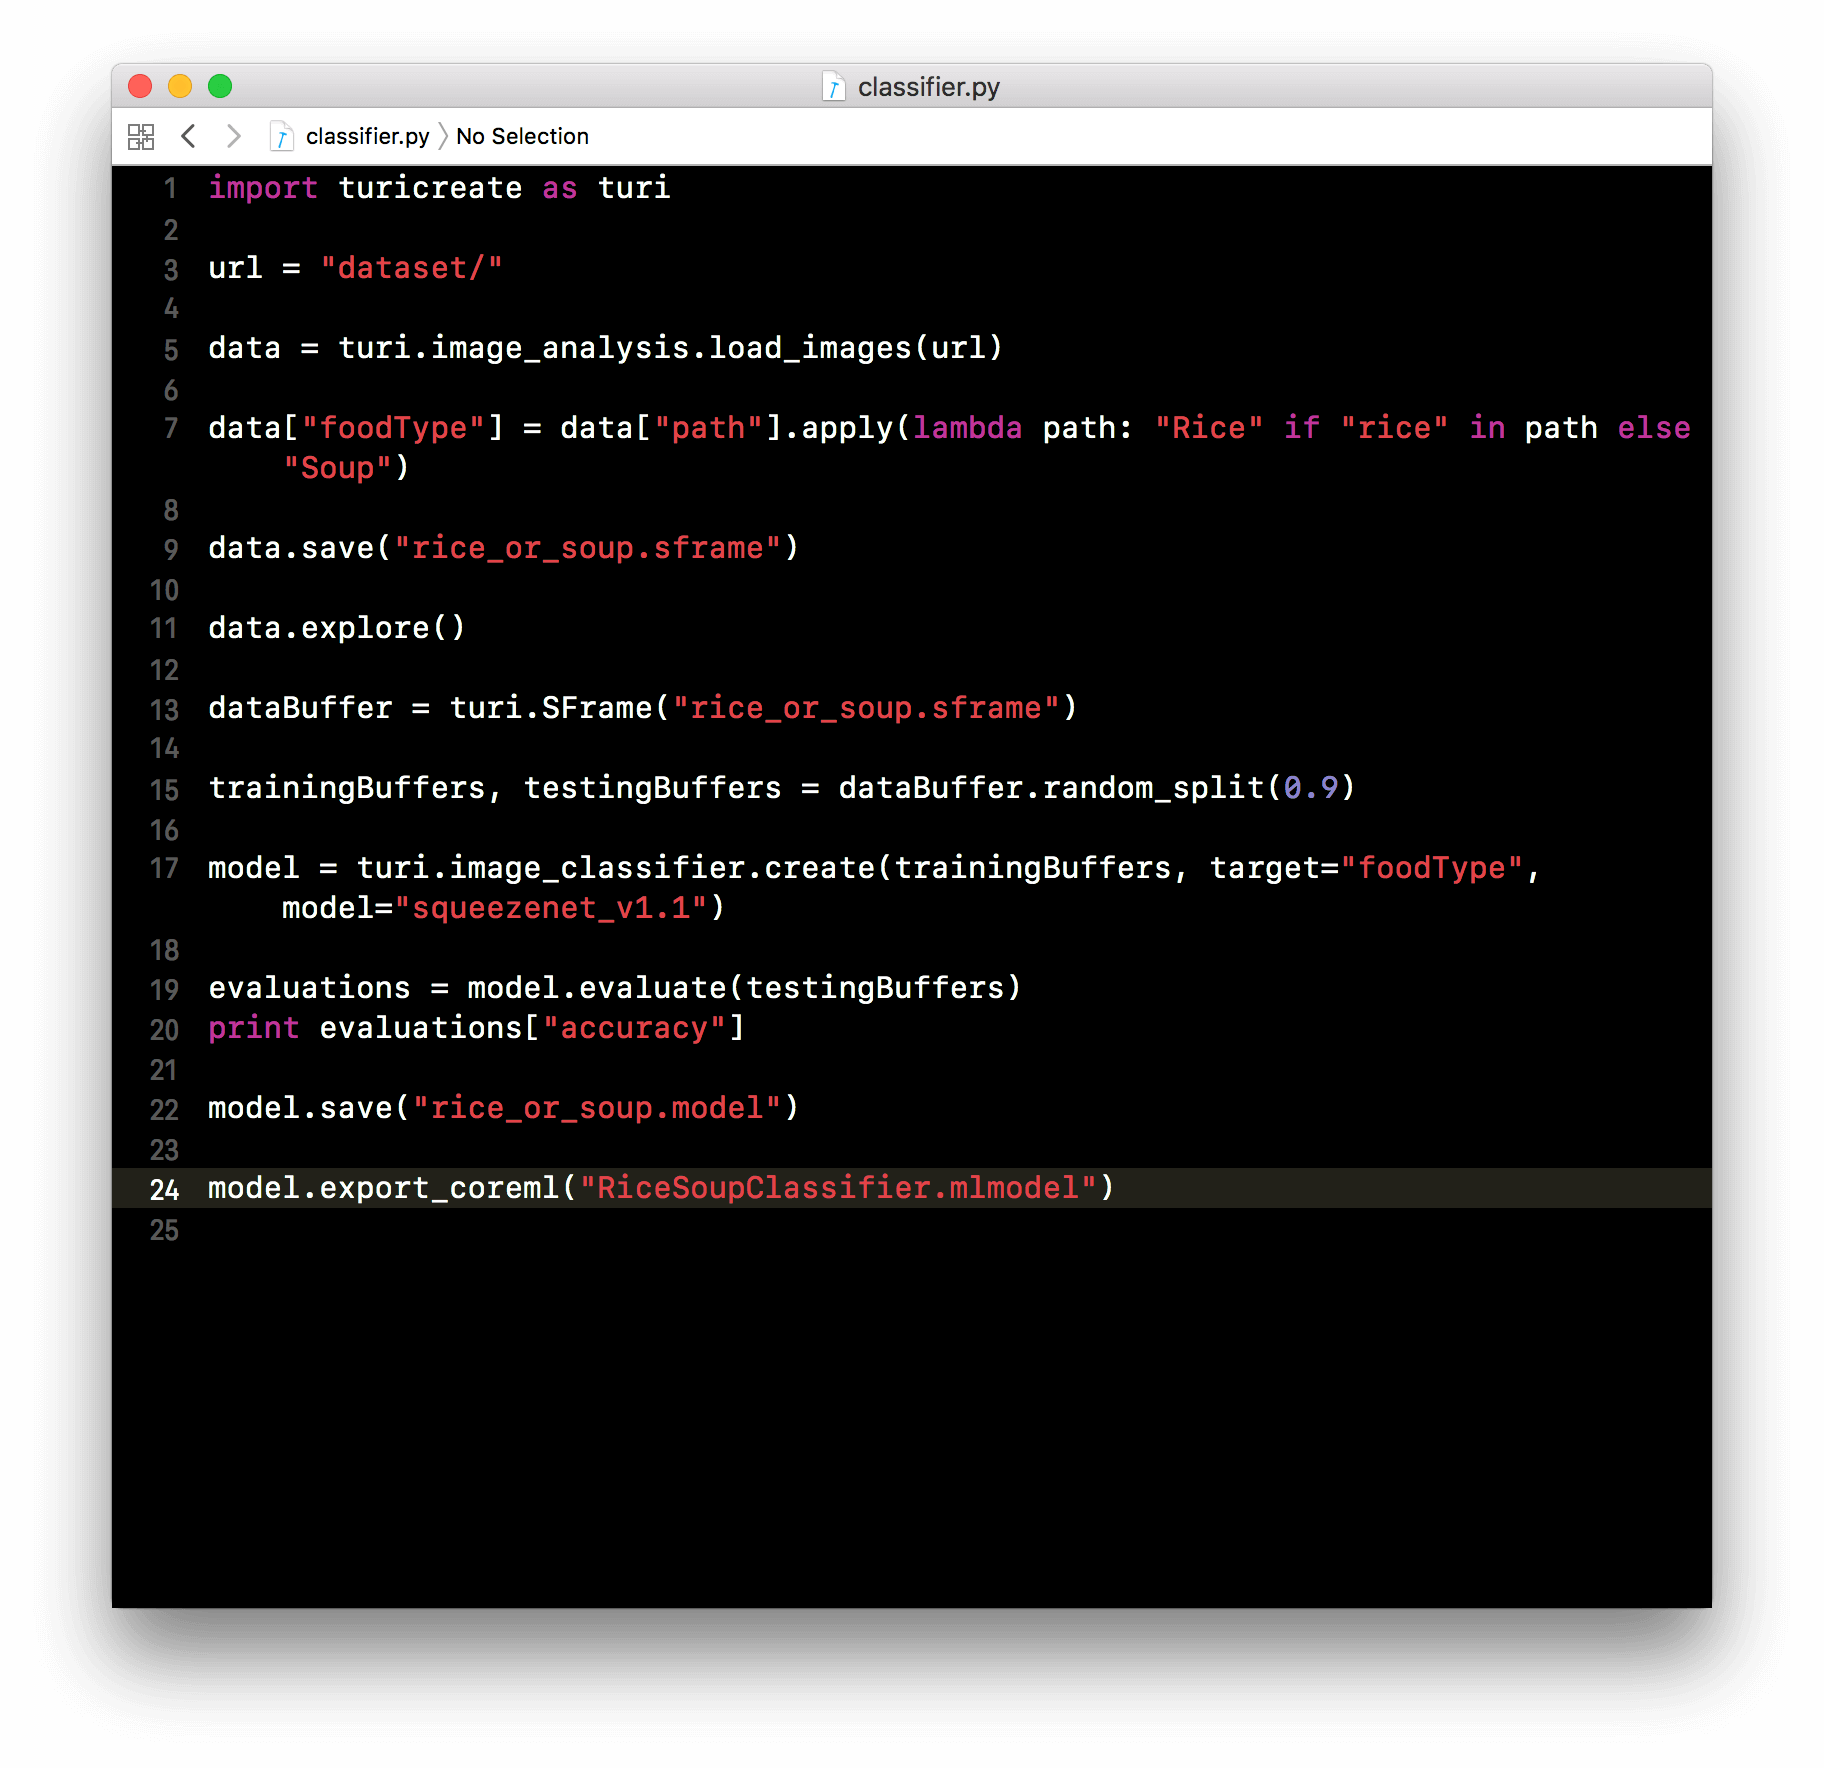
Your classifier.py file should look like this:
Now it’s time to run our code! To do so, go to Terminal.app and change to the MLClassifier folder. Then run the classifier.py file like this:
|
1 |
python classifier.py |
You should see the following message. Just be patient and wait.
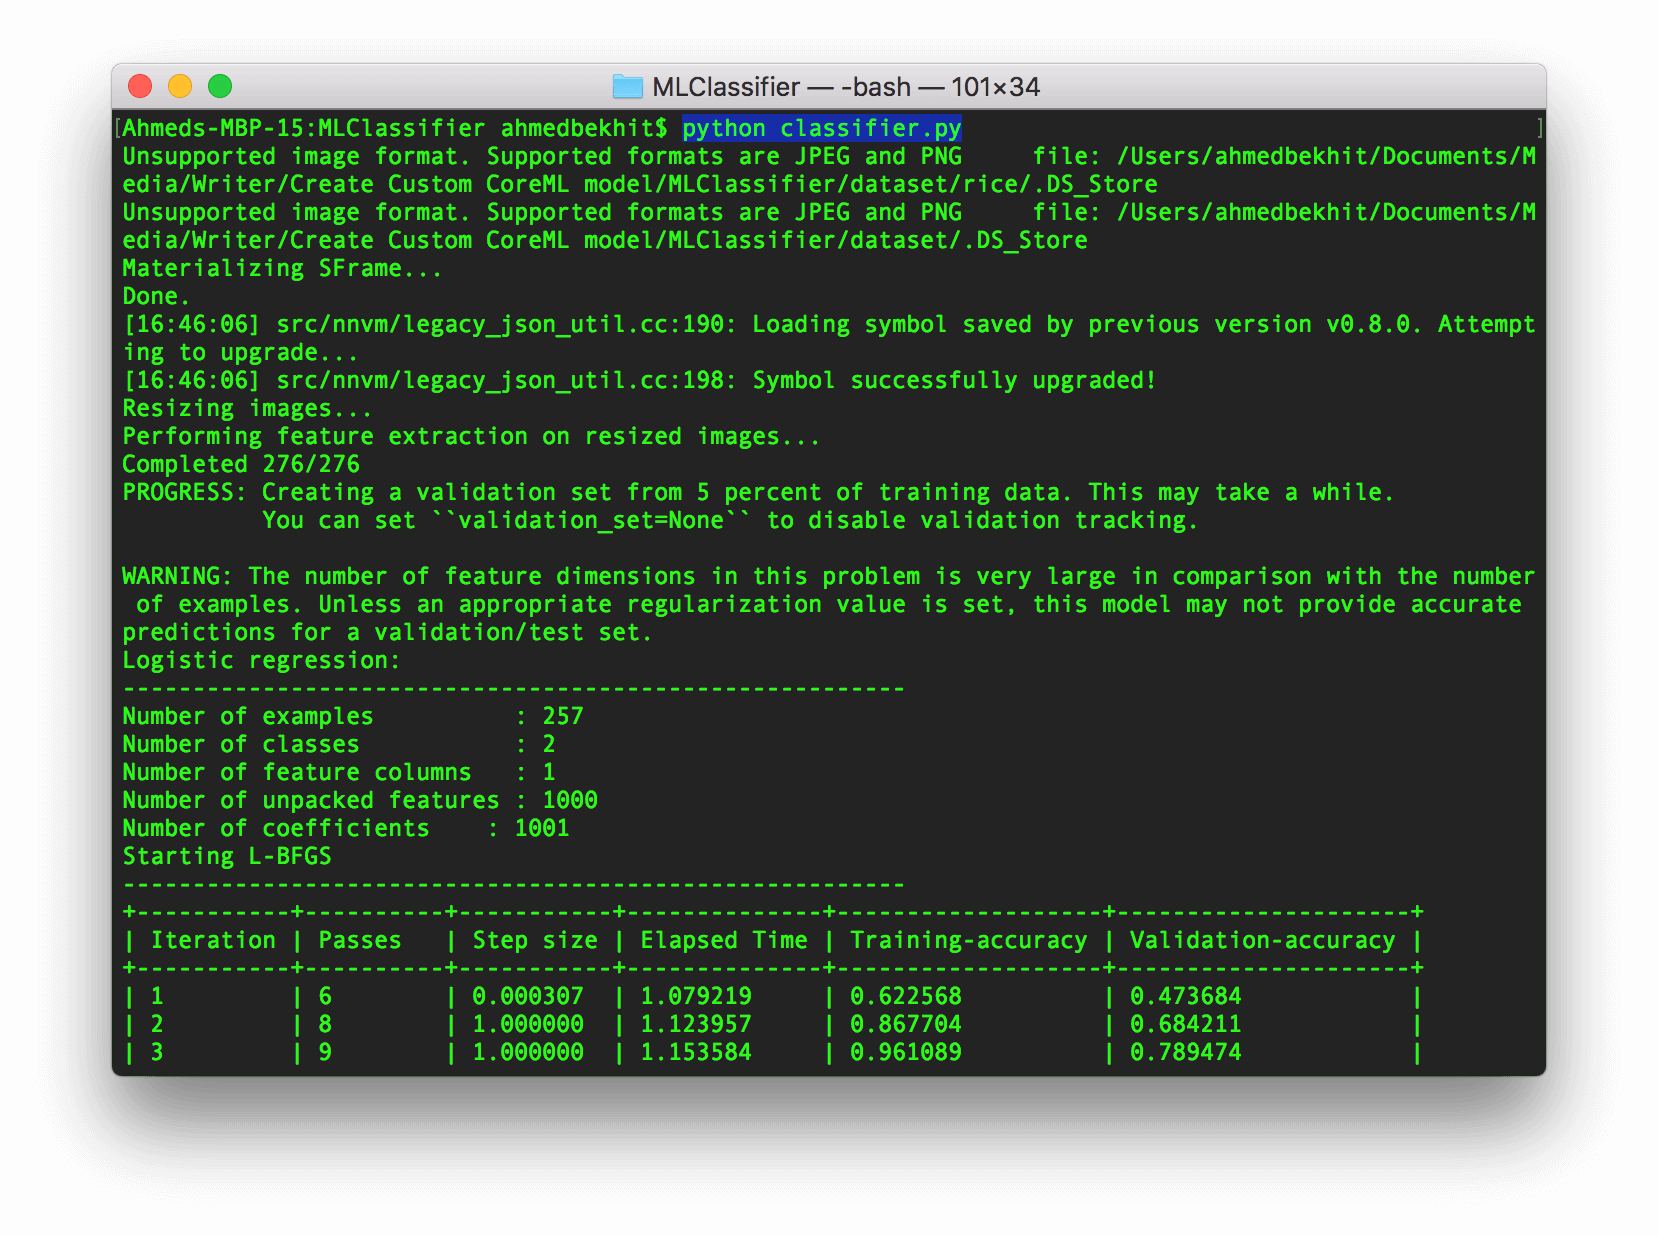
A few minutes later… You will have the CoreML model ready to implement into any iOS, macOS, tvOS, or watchOS application!
Integrating the Core ML model into an iOS app
Now we’re ready to integrate the custom CoreML model we have just created into an iOS app. If you’ve read our introductory tutorial of Core ML before, you should have some ideas about how to integrate the CoreML model into an iOS app. Therefore, I will keep this part short and sweet.
- First, create a new iOS project using the Single Application template. Name the project to whatever name you like but make sure you use Swift in this example.
- To use the model we just created, drag the trained CoreML model (
RiceSoupClassifier.mlmodelfile) into the project. - Import
CoreMLframework into our project then add the following line in theViewController.swiftfile: - Create the
CoreMLmodel object: - Create the user interface of the application:
- Add
UIImagePickerControllerprotocol calls to theViewControllerclass: - Create an
importFromCameraRollmethod: - In the
viewDidLoadmethod, connect the import button to the import method and add the button the subview: - Next, create a
UIImageextension and add the following function to convert aUIImageobject intoCVPixelBuffer: - Analyze the imported image and display the result in a
UILabelby adding the following method into theViewControllerclass:
|
1 |
import CoreML |
|
1 |
let mlModel = RiceSoupClassifier() |
|
1 2 3 4 5 6 7 8 9 10 11 12 13 14 15 16 17 18 19 20 21 22 23 24 25 26 27 28 29 |
var importButton:UIButton = { let btn = UIButton(type: .system) btn.setTitle("Import", for: .normal) btn.setTitleColor(.white, for: .normal) btn.backgroundColor = .black btn.frame = CGRect(x: 0, y: 0, width: 110, height: 60) btn.center = CGPoint(x: UIScreen.main.bounds.width/2, y: UIScreen.main.bounds.height*0.90) btn.layer.cornerRadius = btn.bounds.height/2 btn.tag = 0 return btn }() var previewImg:UIImageView = { let img = UIImageView() img.frame = CGRect(x: 0, y: 0, width: 350, height: 350) img.contentMode = .scaleAspectFit img.center = CGPoint(x: UIScreen.main.bounds.width/2, y: UIScreen.main.bounds.height/3) return img }() var descriptionLbl:UILabel = { let lbl = UILabel() lbl.text = "No Image Content" lbl.frame = CGRect(x: 0, y: 0, width: 350, height: 50) lbl.textColor = .black lbl.textAlignment = .center lbl.center = CGPoint(x: UIScreen.main.bounds.width/2, y: UIScreen.main.bounds.height/1.5) return lbl }() |
|
1 |
class ViewController: UIViewController, UIImagePickerControllerDelegate, UINavigationControllerDelegate |
|
1 2 3 4 5 6 7 8 9 |
@objc func importFromCameraRoll() { if UIImagePickerController.isSourceTypeAvailable(.photoLibrary) { let imagePicker = UIImagePickerController() imagePicker.delegate = self imagePicker.sourceType = .photoLibrary; imagePicker.allowsEditing = true self.present(imagePicker, animated: true, completion: nil) } } |
|
1 2 3 4 |
importButton.addTarget(self, action: #selector(importFromCameraRoll), for: .touchUpInside) self.view.addSubview(previewImg) self.view.addSubview(descriptionLbl) self.view.addSubview(importButton) |
|
1 2 3 4 5 6 7 8 9 10 11 12 13 14 15 16 17 18 19 20 21 22 23 |
extension UIImage { func buffer(with size:CGSize) -> CVPixelBuffer? { if let image = self.cgImage { let frameSize = size var pixelBuffer:CVPixelBuffer? = nil let status = CVPixelBufferCreate(kCFAllocatorDefault, Int(frameSize.width), Int(frameSize.height), kCVPixelFormatType_32BGRA , nil, &pixelBuffer) if status != kCVReturnSuccess { return nil } CVPixelBufferLockBaseAddress(pixelBuffer!, CVPixelBufferLockFlags.init(rawValue: 0)) let data = CVPixelBufferGetBaseAddress(pixelBuffer!) let rgbColorSpace = CGColorSpaceCreateDeviceRGB() let bitmapInfo = CGBitmapInfo(rawValue: CGBitmapInfo.byteOrder32Little.rawValue | CGImageAlphaInfo.premultipliedFirst.rawValue) let context = CGContext(data: data, width: Int(frameSize.width), height: Int(frameSize.height), bitsPerComponent: 8, bytesPerRow: CVPixelBufferGetBytesPerRow(pixelBuffer!), space: rgbColorSpace, bitmapInfo: bitmapInfo.rawValue) context?.draw(image, in: CGRect(x: 0, y: 0, width: image.width, height: image.height)) CVPixelBufferUnlockBaseAddress(pixelBuffer!, CVPixelBufferLockFlags(rawValue: 0)) return pixelBuffer }else{ return nil } } } |
|
1 2 3 4 5 6 7 8 9 10 11 12 13 |
func imagePickerController(_ picker: UIImagePickerController, didFinishPickingMediaWithInfo info: [String : Any]) { if let image = info[UIImagePickerControllerOriginalImage] as? UIImage { previewImg.image = image if let buffer = image.buffer(with: CGSize(width:224, height:224)) { guard let prediction = try? mlModel.prediction(image: buffer) else {fatalError("Unexpected runtime error")} descriptionLbl.text = prediction.foodType print(prediction.foodTypeProbability) }else{ print("failed buffer") } } dismiss(animated:true, completion: nil) } |
Ready to Test
That’s it! Have fun. Run the app and click the Import button to test it out. Now you should understand how to create custom machine learning models and implement them into your applications!
To download the full project, you can find it on GitHub. If you have any questions or thoughts on this tutorial, please leave me comment below and let me know.

A passionate software developer who enjoys creating software that solves problems and makes people's lives easier. Ahmed was previously awarded Apple's WWDC Scholarship 3 years in a row and currently he is working with his team at Magic.af (http://magic.af) to develop mobile software for video creators.
Comments
 Abhinandan Bedi
AuthorHi,
I have followed all the instructions accordingly but I am getting an error that says, “Fatal Python error: PyThreadState_Get: no current thread
Abort trap: 6”
Can anyone explain? https://uploads.disquscdn.com/images/7eed903886cf16634c223945305476b15b7fab018c4c34b005dae54048e91bac.png
 Ahmed Bekhit
AuthorHi Abhinandan Bedi,
If you’re still having this issue, please try using Anaconda to run the Python file.
Check out this repository: https://github.com/AFathi/turicreate-notebooks . It explains how to used Turi Create with Anaconda.
-Ahmed
 Abhinandan Bedi
AuthorYes, the issue got solved once I ran the file using Anaconda 🙂
 Steve Richardson
AuthorHi Ahmed,
This seems to be the simplest for beginners that ive found, thanks.
I have used the same code to trying and make it classify 3’s and 8’s using about 100 jpegs for each from the mnist collection.
It just seems to be showing a few errors:
https://uploads.disquscdn.com/images/e7e13e5727f3fef3280ff268be2512b7ccd251f8d0d39d7d8401b14065ae68c5.png
1. Why does it think they are unsupported images when they are all .jpg?
2. How do I increase the iteration limit?
3. How do I alter this line “data[“number”] = data[“path”].apply(lambda path: “3” if “3” in path else “8”)” to include multiple options such as other numbers?
4. Is there a more efficient way seeing as ill only be using simple elements such as numbers and arrows, not pictures?
Thanks!
 Meertje
AuthorWow, what an easy&going tutorial. Thanks, this is exactly what I was looking for. I tried tensor flow and stuff, but the leven was too high. Only thing I noticed is that the image size had to be 227 (maybe because of iPhone X ) and the ResNet worked better than squeeze net.
 Guru Teja Pulavarty
AuthorThanks for simple tutorial..
Is there any way to add multiple folders with images data set in the python script
data[“foodType”] = data[“path”].apply(lambda path: “Rice” if “rice” in path else “Soup”)
this is for only two categories. How to write the logic for multiple folders?
 Sachin
AuthorDid you got the solution to create multiple folder inside dataset?
 Marc
Marc
AuthorHello, can you share the solution pls? Thanks!
 rajasekhar tolapu
AuthorTry this…
data[“foodType”] = data[“path”].apply(lambda path: str(os.path.basename(os.path.dirname(path))))
 rajasekhar tolapu
AuthorTry this,
data[“foodType”] = data[“path”].apply(lambda path: str(os.path.basename(os.path.dirname(path))))
 rajasekhar tolapu
AuthorTry this, it will work.
data[“foodType”] = data[“path”].apply(lambda path: str(os.path.basename(os.path.dirname(path))))
 Guru Teja Pulavarty
AuthorSorry, but I cannot figure it out. Can you explain the logic.
Thanks.
 rajasekhar tolapu
Authorfor suppose if your datapath is : username/folder/folder/CAT/cat.png
find Dir name by using os.path.dirname(path) which results username/folder/folder/CAT
now find the last dir name(which is ur class) os.path.basename() results CAT.
 Ray
Ray
AuthorHello Ahmed,
Thanks for the informative tutorial! I have a question on how to go about identifying “texts” from an image. Would we need to obtain a hundred images of the letter “a”, “b”, “c”, etc? seems like a lot. Can you point us in the right direction regarding this?
 Retroplayer
AuthorYou are a fucking GOD of iOS A.I.
 Robert Holzapfel
AuthorHello Ahmed, thank you very much, I am deeply impressed although beeing a 56 years old man. 🙂
I have one question: I am very new to machine learning and wherever I read, I find ‘visual recognition’ as examples for machine learning and I really would like to know, whether TuriCreate is also helpful for creating a custom model for e.g. a card play? What do you think?
 vsplc test
Authori have tried the same datase.but for image different from rice & soup it also gives prediction as rice or soup.
 iOS Dev
AuthorHello, I am facing following error while running py script.
File “classifier.py”, line 19, in
evaluations = model.evaluate(testingBuffers)
File “/usr/local/lib/python2.7/site-packages/turicreate/toolkits/image_classifier/image_classifier.py”, line 553, in evaluate
return self.classifier.evaluate(extracted_features, metric = metric)
File “/usr/local/lib/python2.7/site-packages/turicreate/toolkits/classifier/logistic_classifier.py”, line 839, in evaluate
metric=metric)
File “/usr/local/lib/python2.7/site-packages/turicreate/toolkits/_supervised_learning.py”, line 158, in evaluate
dataset, missing_value_action, metric);
File “/usr/local/lib/python2.7/site-packages/turicreate/extensions.py”, line 292, in
ret = lambda *args, **kwargs: self.__run_class_function(name, args, kwargs)
File “/usr/local/lib/python2.7/site-packages/turicreate/extensions.py”, line 279, in __run_class_function
raise _ToolkitError(exc)
Please revert back on this. Thanks in advance.