Since the advent of OS X Mojave and especially Catalina and the requirement for app notarization, some of us old-time macOS developers are concerned that Apple will pull the plug on the apps that we distribute ourselves. Many of you have downloaded and installed macOS software directly from websites, i.e., not from the Mac App Store. Have you ever really considered it?
You can’t download an iOS app outside of the App Store. Yes, I know about the Apple Developer Enterprise Program, but it only “allows large organizations to develop and deploy proprietary, internal-use apps to their employees.” How many of you have obtained tools like Skype, Zoom, Atom, or Sourcetree? These are all “third-party” apps not distributed through the Mac App Store. You probably downloaded Xcode from Apple’s developer portal (because downloading it from the App Store usually doesn’t work).
I would like to share my experiences in developing and distributing macOS apps outside of the Mac App Store and show you how you can do it too. Today, I’ll help you understand how to navigate the rather convoluted process of signing and notarizing both an app and its installer. Apple’s signing and notarization process can be quite complex and the documentation is not that clear on the subject, especially for installers.
A series of tutorials
This is the first part in a three-part series of tutorials on sandboxing, signing, notarizing, and and distributing macOS apps outside of the Mac App Store. In this tutorial, we’ll build a non-sandboxed app, talk about certificates, sign the app, notarize it, briefly talk about building an installer, sign and notarize the installer, and finally cover distribution. In the second tutorial in this series, we’ll turn the sandboxing capability and entitlement on in my sample app and explore ways that users can still gain access to files and folders outside of the app’s container. We’ll also discuss the pros and cons of sandboxing and try to understand Apple’s reasoning behind providing loopholes for sandboxed apps. Finally, in Part III, I’ll guide you step-by-step through the process of using the excellent freeware app Packages to create an installer for distributing your app. We’ll build an installer that has a splash page, installation instructions, a licensing agreement, and provides installation options for users.
Advantages of staying out of the Mac App Store
There are several big advantages to distributing macOS apps outside of the Mac App Store. You have much more creative, design, development, distribution, financial, and feature-full options than you would by putting all your work at the risk of sometimes arbitrary rejection by Apple’s notoriously fickle and opaque app reviewers.
For example, you don’t have to sandbox your apps, giving you access to much of the macOS file system. Another good reason to avoid the App Store: you don’t have to follow Apple’s sometimes confusing and often draconian Human Interface Guidelines. Probably the best reason: you save lots of money!
Here’s a succinct list of the best reasons to distribute your macOS apps outside of the Mac App Store:
- you get to advertise, distribute, and sell your app any way and any place you like;
- you don’t have to pay Apple a 30%/15% fee for selling your apps or for subsequent “in app” purchases (you can call purchases from within your app anything you’d like to call them);
- you don’t have to follow Human Interface Guidelines; and,
- you avoid the coin toss of ending up with the disgruntled app reviewer who’s just having a bad day.
What is Gatekeeper and notarization?
Before we get started with the tactical discussion, let’s clarify the meaning and importance of what Apple calls “notarization.” There’s a quote from Apple describing Gatekeeper, positing a situation exactly as I’ll discuss herein, where:
… you download and install apps from the internet or directly from a developer, macOS continues to protect your Mac. When you install Mac apps, plug-ins, and installer packages from outside the App Store, macOS checks the Developer ID signature to verify that the software is from an identified developer and that it has not been altered. By default, macOS Catalina also requires software to be notarized, so you can be confident that the software you run on your Mac doesn’t contain known malware. Before opening downloaded software for the first time, macOS requests your approval to make sure you aren’t misled into running software you didn’t expect. …
My sample code
Let’s get started. If you want to build a project yourself and follow along, then open up Xcode (I’m using 11.2.1) and create a new application based on the macOS App template. You can look at my storyboard and code for guidance. Or if you just want to follow along using my existing code, then open my “AppNotaryAndDistrib” project and walk through it while reading this article. You can download my sample project, built against the OS X 10.15 (Catalina) SDK at this link. If you use my code, remember that you’ll have to use Xcode 11.x to configure the settings under TARGETS -> [TARGET_NAME] -> Signing & Capabilities -> Signing with your own Team, Bundle Identifier, Signing Certificate, and possibly Provisioning Profile.
I won’t be going into Swift coding specifics today as this tutorial is concentrated on distributing safe code outside the Mac App Store. We’ll concentrate on app configuration herein. If you stay with me, you’ll configure, build, sign, and notarize my app. Then you’ll configure, build, sign, and notarize an installer for my app. When you run the installer and then run my sample app, you’ll see this:
Let’s take just a few minutes to go over the code wired to the button in the center of my main window entitled “Select folder.” Remember that in Part II of this tutorial, we’ll be having a very in-depth discussion about how a user can grant a sandboxed app access to specific folders outside of its container. Keep that in mind. For now, let’s just say that, from my project’s NSViewController subclass, I’m using NSOpenPanel to enable the user to select individual folders:
|
1 2 3 4 5 6 7 8 9 10 11 12 13 14 15 16 17 18 19 20 21 |
... @IBAction func selectFolderBtnClicked(_ sender: Any) { let folderSelectionDialog = NSOpenPanel() folderSelectionDialog.prompt = "Select" folderSelectionDialog.message = "Please select a folder" ... if dialogButtonPressed == NSApplication.ModalResponse.OK { ... self.userSelectedFolderURL = url print("User selected folder: \(url)") ... } // end if dialogButtonPressed == NSApplication.ModalResponse.OK } // end func selectFolderBtnClicked ... |
App signing and notarization
Most of you are familiar with building apps and submitting them to the iOS App Store or, in the case of this tutorial, submitting them for review and distribution to the Mac App Store. You also should know why apps must be digitally signed. If not, please take the time to read up on certificates and signing.
Preparing for app signing
I can’t cover all the prerequisite components, protocols, and methodologies required to sign and notarize your apps, as this article would turn into a rather lengthy book. Let me point you at some documentation that Apple has provided so that, for example, you can reproduce what I’m showing you in this tutorial on your own Macs. Please read “Signing Your Apps for Gatekeeper”, “Create, export, and delete signing certificates”, and “Distribute outside the Mac App Store (macOS)”.
Because I regularly develop, sign, notarize, and distribute macOS apps outside the App Store, I have certificates with the following types of names in my Mac’s Keychain, shown below. If you want to distribute outside of the Mac App Store, you’ll need to create and export the same type of certificates from your account on Apple’s developer portal and install them into your own Keychain, where TEAM_NAME is your own name or your company’s “Team Name,” and TEAM_ID is your/your company’s “Team ID,” from your portal’s account. He are the some of the relevant certificates I can see in my Keychain:
|
1 2 3 4 |
Developer ID Installer: TEAM_NAME (TEAM_ID) Developer ID Application: TEAM_NAME (TEAM_ID) Apple Worldwide Developer Relations Certification Authority Developer ID Certification Authority |
This is not an exhaustive list of all certificates you need for day-to-day development. These are just the ones most important for signing and notarizing apps and installers. It behooves you to burn the phrase Developer ID into your brain’s neural net. From Apple’s docs:
For software and applications that are downloaded from places other than the Mac App Store, developers can get a Developer ID certificate and submit their software for notarization by Apple. Digitally signing software with a unique Developer ID and including a notarization ticket from Apple lets Gatekeeper verify that the software is not known malware and has not been tampered with.
To get you started, here is a screenshot from Apple’s developer portal showing how you would create the certificates you need for distribution outside the Mac App Store. It shows the Certificates, Identifiers & Profiles section when you Create a New Certificate:

Once you create these certificates, you download and install them into your Mac’s Keychain.
Add automatic signing, remove sandboxing, and keep hardening
We’re going to diverge from from the default macOS app template while simultaneously leaving other settings as-is, re: sandboxing and hardening, respectively. Most of you use the Automatically manage signing setting. Go to TARGETS -> [TARGET_NAME] -> Signing & Capabilities and make sure that setting is checked. Delete the App Sandbox capability (entitlement) and leave the default Hardened Runtime capability (build setting), like this, and notice my annotations in red:

Many apps benefit greatly from having the convenience of accessing files/folders anywhere on your Mac, excluding protected system areas, so my sample app is not sandboxed. As for hardening, according to Xcode 11 help:
Hardened Runtime defends your application by preventing modifications to its code and provides fine-grained controls over what can run in your process. Hardening the runtime also prevents access to sensitive resources unless your application pre-declares its intent to use them, which reduces the attack surface by eliminating unnecessary access. These properties help prevent exploitation of your application and this capability is required for your app to be notarized. [My emphasis added.]
Building, signing, and notarizing
You all are familiar with cleaning and building apps. I’m not sure how many of you are involved in the signing of your apps beyond using Xcode’s automated certification process when uploading to the App Store. We’ll do some manual digital signing herein. We’ll walk through the process step-by-step below. Here’s an image you know well — Xcode’s Product menu:
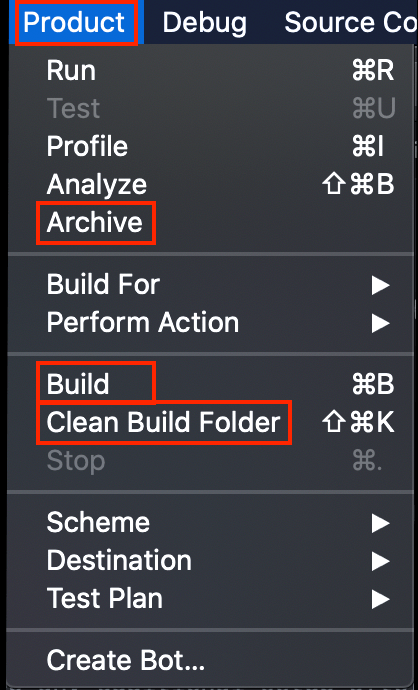
Let’s Clean Build Folder, Build, and then Archive. The Xcode Organizer window will appear showing the archive you just created:
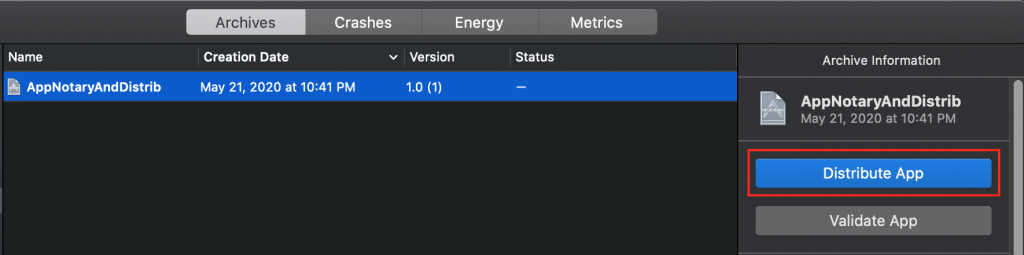
Click the Distribute App button as highlighted in red in the previous image. This will pop up the Select a method of distribution: dialog, where you’ll select Developer ID (with subtitle “Distribute directly to customers.”), like with the certificates I discussed above. Remember the significance of Developer ID. Click the Next button as shown in red in the next image:

The next step is the Select a destination: dialog, where you’ll select the Upload option (with subtitle “Send to Apple notary service.”), where you’ll click the Next button to, well, upload your app bundle to Apple for notarization, as shown in the following image:
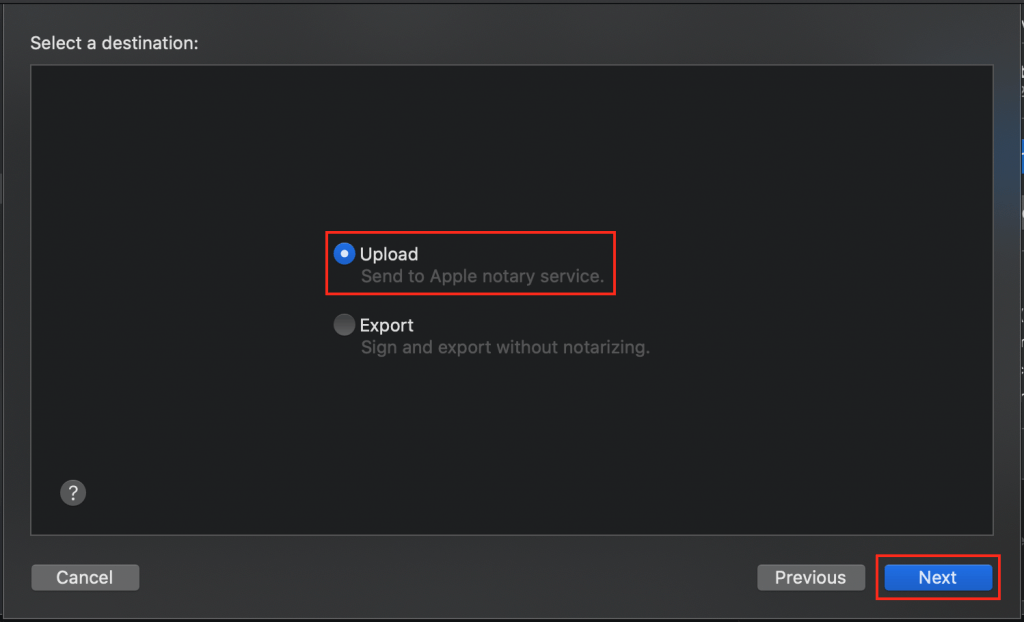
Remember the significance of notarization. You’re sending your app to Apple for a safety inspection. Apple “scans your software for malicious content [and] checks for code-signing issues.”
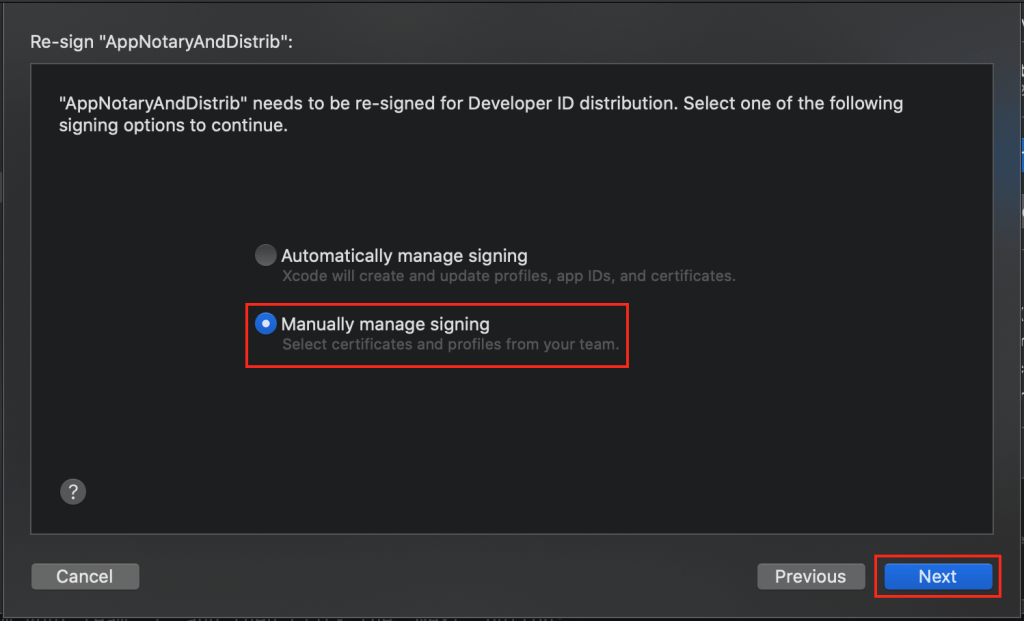
Now you’ll see the Re-sign “[APP_NAME]”: pop-up, where APP_NAME should obviously be the name of the app we want to notarize. Here, it’s my sample app, “AppNotaryAndDistrib.” You’ll select Manually manage signing (with caption “Select certificates and profiles from your team.”), and then click the Next button:
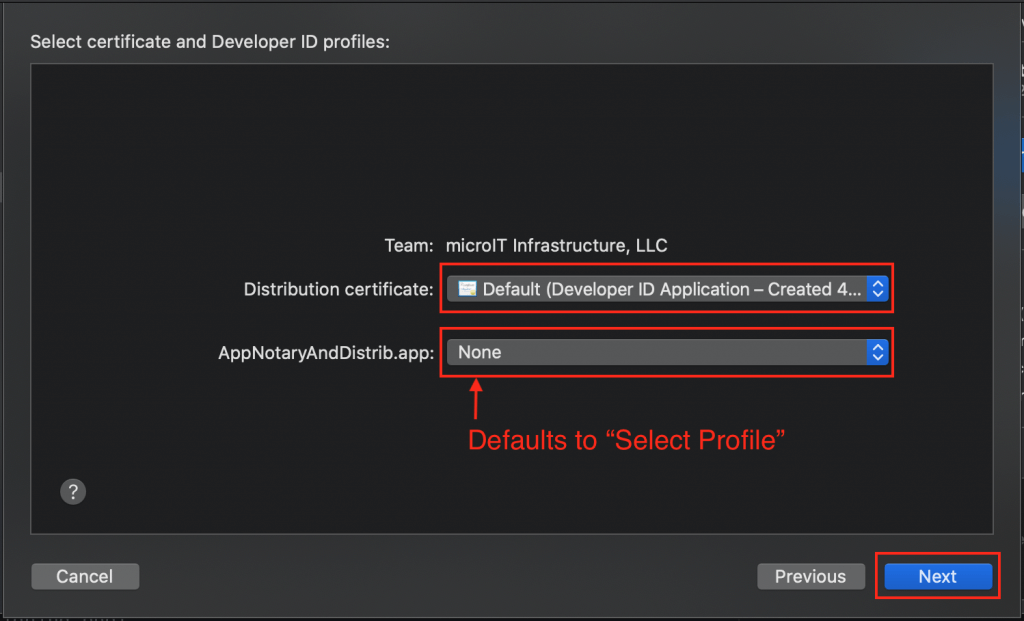
We next get the Select certificate and Developer ID profiles: dialog, where your Team is already known, you set Distribution certificate: to a valid Developer ID certificate that’s in your Keychain as I discussed above, and we set the dropdown adjacent to my app’s name, specifying provisioning profiles, to “None.” I can select “None” because I didn’t add any capabilities to this app. (I removed sandboxing and since hardening is required, is there by default, is really a build setting, then it’s not considered a capability). Click the Next button:
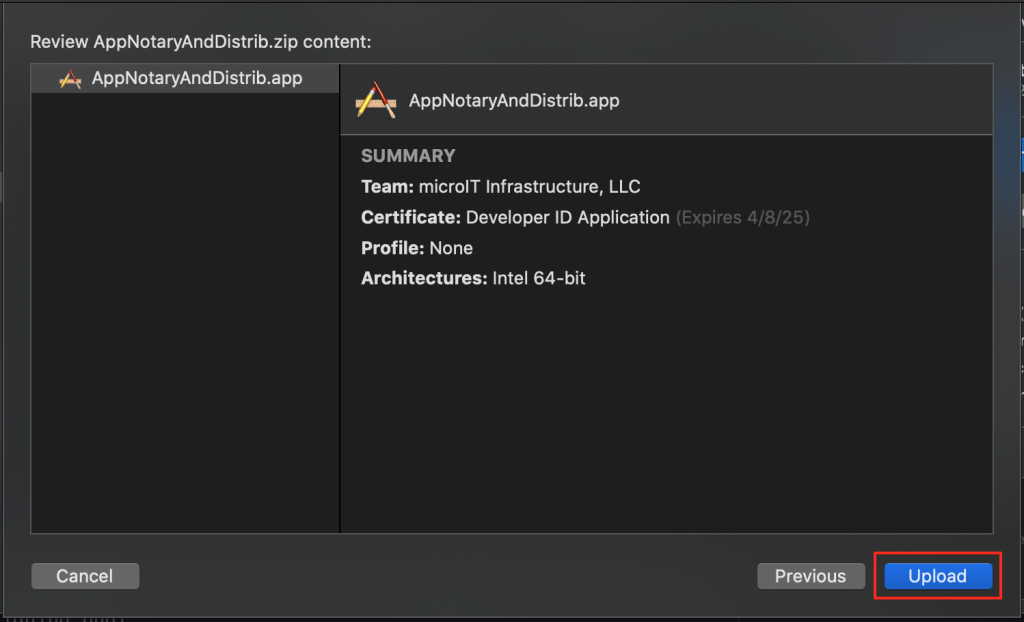
Now we land on a screen entitled Review [APP_NAME].zip content:, where APP_NAME is my sample app, “AppNotaryAndDistrib.” You may ask yourself, “Why the .zip extension?” An app bundle is often going to contain a plugin or extension, though in this case it doesn’t, and remember that a bundle is a directory structure that often contains components that can be compressed, so zipping adds to performance. Also, the notary service needs to be able to scan one single, definable file. This is your chance to review your app before wasting time because you forgot something. You get to see entitlements, plugins, extensions, core app, team, certificate, provisioning profile, etc. When done reviewing, click the Upload button.
On the next screen, you’ll see some messages about handshaking with the Apple server(s), preparing content for upload, and a progress bar showing uploading status. When your app bundle has successfully been sent to Apple’s server, you’ll see this:
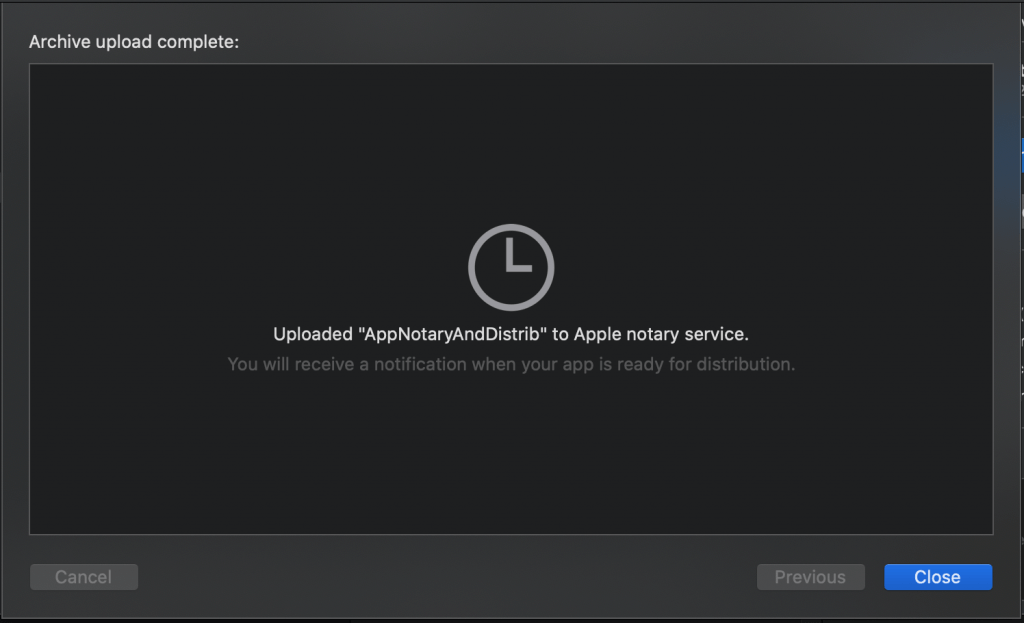
Now you wait… The length of time it takes for notarization depends on issues like how busy Apple’s servers are at the time and how large is your app bundle, but it generally only takes a few minutes. I don’t think I’ve ever waited longer than 5-7 minutes, and that was back when Apple first started requiring notarization on Catalina, and everyone was scurrying to get their 3rd-party apps inspected:
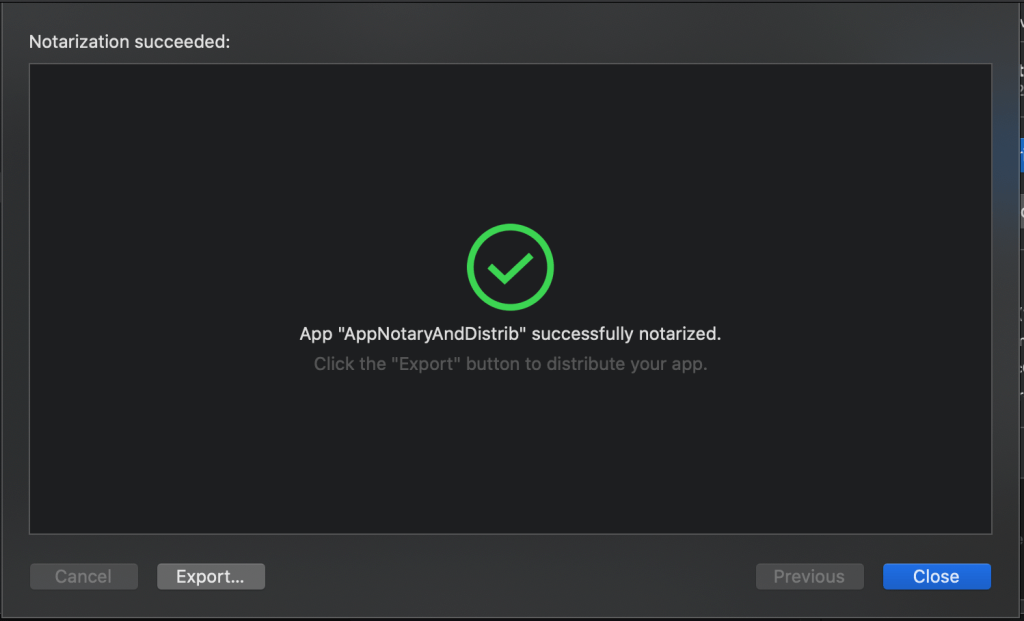
Click the Export… button and place the file in a folder of your choosing. I often save it straight to the /Applications folder, because I’m literally “installing” an app that’s ready for prime time. If I double-click on my newly-notarized app in /Applications, it runs immediately because it’s been notarized. Apple’s Gatekeeper looks at it and let’s it run. But that’s not how you should distribute your apps. We need to create an installer.
Creating an installer to distribute the app
It is beyond the scope of this tutorial to go into all the details involved in creating an installer. That being said, please come back in about three weeks and look at my posts here on AppCoda. I’ll provide a very detailed, step-by-step tutorial on using the freeware app Packages to make the installer used in this tutorial. I believe Packages is the best app for creating installation packages on Mac. Full disclosure: I have no personal or financial relationship or interest with Packages’ author, Stéphane Sudre. I urge you to use his app and, by doing so, support his efforts.
The best way for you to start learning about building installers using Packages is to download the app, read about it, poke around, start a new project, check out related resources, check out its technical specifications, and read some of the tutorials. Remember that in Part III of this series of tutorials I’m writing, I’ll be showing you exactly how to use Packages to build an installer for the app we’re discussing today.
Here’s a tip for my upcoming Packages tutorial: Your installer needs a “tag,” also knows as an “identifier,” just like your app has a Bundle Identifier. I used us.microit.pkg.AppNotaryAndDistrib. Notice how it starts with the reverse of my company website’s domain, again, just like your app bundle ID.
Here’s a brief look at how I add my sample app bundle, AppNotaryAndDistrib.app, to the Packages project I created to build a distributable .pkg installer:
After configuring and building my Packages project, I now have a fully functional installer which I named AppNotaryAndDistrib.pkg. Remember: I can’t distribute this installer because… it’s not signed OR notarized and Apple’s Gatekeeper will tell users that it may contain malicious content and that it’s from an unknown distributor. So what do we do? We sign the installer and then we notarize it. Believe it or not, this is not a simple process. So let me walk you through it.
Installer signing
You all should know that an installer needs to be signed with a valid certificate, right? It’s an application that installs another application on someone’s Mac and we don’t want anyone tampering with it. Let’s sign my installer using one of the Developer ID certificates I discussed earlier using the productsign command in Terminal, and check the output. This command has the form:
|
1 |
productsign --sign "Developer ID Installer: TEAM_NAME (TEAM_ID)" "ORIGINAL_INSTALLER_NAME" "SIGNED_INSTALLER_NAME" |
Let’s run it with real arguments, like my company name (TEAM_NAME) and file names, except my TEAM_ID, which I’ve redacted as “ABCABCABCD”:
|
1 |
productsign --sign "Developer ID Installer: microIT Infrastructure, LLC (ABCABCABCD)" "AppNotaryAndDistrib.pkg" "AppNotaryAndDistrib_1.0_Installer.pkg" |
Here’s the output from running the command:
|
1 2 3 4 5 |
productsign: using timestamp authority for signature productsign: signing product with identity "Developer ID Installer: microIT Infrastructure, LLC (ABCABCABCD)" from keychain /Users/andrewjaffee/Library/Keychains/login.keychain-db productsign: adding certificate "Developer ID Certification Authority" productsign: adding certificate "Apple Root CA" productsign: Wrote signed product archive to AppNotaryAndDistrib_1.0_Installer.pkg |
Notice the last line in the output: You’ll find a new file, the signed installer, AppNotaryAndDistrib_1.0_Installer.pkg in the folder where you ran productsign. We can’t use this installer yet because it hasn’t been notarized. Are you ready for some pain, er, ah, fun?
Installer notarization
Because of the previous discussion, you know why we need to notarize our installer, but you probably don’t know how. It’s a doozy. Apple certainly didn’t make this easy. It’s all command line-based and very verbose. IMPORTANT: You’ll need your Apple ID and your installer’s “bundle ID,” i.e., us.microit.pkg.AppNotaryAndDistrib as we discussed above. If you use two-factor authentication with your Apple ID, you’ll need to use app-specific passwords. If you don’t want to send your Apple ID and password as clear text, you can use Keychain placeholders.
Open a Terminal window and follow along as I enter commands and review output. I’ll use placeholders for many of the commands’ arguments so as to redact my private information. We’ll start with uploading my installer to Apple for notarization:
|
1 |
xcrun altool --notarize-app --primary-bundle-id "us.microit.pkg.AppNotaryAndDistrib" --username "[email protected]" --password "PASSWORD" --file AppNotaryAndDistrib_1.0_Installer.pkg |
Terminal will hang a little while while your installer is uploaded but will come back shortly with the following output:
|
1 2 |
No errors uploading 'AppNotaryAndDistrib_1.0_Installer.pkg'. RequestUUID = cadc5ae2-768a-4cee-8719-f977c422b1c6 |
Keep that RequestUUID because you’ll use it to check and track the notarization status of your installer. You can wait for an email that will go to your Apple ID, but let’s stick with the Terminal workflow. In a few minutes, you’ll run this command:
|
1 |
It will return immediately with a log of your notarization results — a list of all your submissions and their respective statuses. Look for the line item that has the RequestUUID I asked you to remember. It should be at the top of the list:
|
1 2 3 4 5 6 7 8 |
Notarization History - page 0 Date RequestUUID Status Status Code Status Message ------------------------- ------------------------------------ ------- ----------- ---------------- 2020-05-24 19:34:46 +0000 cadc5ae2-768a-4cee-8719-f977c422b1c6 success 0 Package Approved 2020-05-22 05:20:00 +0000 a7b855f8-986c-4df0-a938-24876c588b27 success 0 Package Approved Next page value: 1590124800000 |
Yes, the first line item matches my RequestUUID. There it is: “Package Approved.” The second line item is from my app’s notarization that we performed with Xcode earlier in this tutorial.
Your installer is… almost ready. Note that if Apple hasn’t finished notarizing your installer, it will tell you that your request is pending. You can keep submitting the last command to determine if notarization succeeded or failed. What if notarization fails? Can you find out why? Well, yes kinda sorta.
You can get a much more detailed JSON report on notarization status. Let’s get started. There are two steps. First, enter this command in Terminal using the installer’s RequestUUID:
|
1 |
xcrun altool --notarization-info cadc5ae2-768a-4cee-8719-f977c422b1c6 -u "[email protected]" -p "PASSWORD" |
You’ll receive quite a bit of information:
|
1 2 3 4 5 6 7 8 9 |
No errors getting notarization info. Date: 2020-05-24 19:34:46 +0000 Hash: 3a5ecc35c373ad872718c8c2c7a4efc21ac5ac3b2739c5e4bef995e910fcf851 LogFileURL: https://osxapps-ssl.itunes.apple.com/itunes-assets/Enigma123/v4/d2/94/27/d2942733-d44b-5533-fae9-8bbf78d840ba/developer_log.json?accessKey=1590622884_2683968192308681510_zBw4%2BSVyZ%2Fwcy1nlvnkT%2Bo7LVAefv5uDiMG6cz80lAdMrL4mIBCUnhX37utPeGclAZ66U90RdNvhggbBlRF3tuVDJN13uOU3rrSTkLngKRiMDDW3bYcaiSZ2tMqzYBMWykmp%2Fcrs435%2ByIIWmW9E798Ql3Bd1yLBo%2FFDwxeBn8c%3D RequestUUID: cadc5ae2-768a-4cee-8719-f977c422b1c6 Status: success Status Code: 0 Status Message: Package Approved |
Focus on the Status, Status Code, and Status Message fields for now. As we already know, my installer notarization succeeded (Package Approved). If those three fields contain anything other than success, 0, and Package Approved, respectively, you can try to find out why your notarization attempt failed by visiting the LogFileURL in your favorite browser. Don’t get your hopes up too high. Apple hasn’t done the greatest job with its reporting on the results of automated inspections of installers. Still, this is all you can get, and sometimes an obvious mistake it brought to light.
Next up is the second and most important step in getting detailed notarization information. In our case, going to that LogFileURL will be somewhat entertaining, but it’s instructive for us to look at the JSON contents that is returned so we can examine its structure. I visited LogFileURL in Safari and here’s what I got:
|
1 2 3 4 5 6 7 8 9 10 11 12 13 14 15 16 17 18 19 20 21 22 23 24 25 26 27 |
{ "logFormatVersion": 1, "jobId": "cadc5ae2-768a-4cee-8719-f977c422b1c6", "status": "Accepted", "statusSummary": "Ready for distribution", "statusCode": 0, "archiveFilename": "AppNotaryAndDistrib_1.0_Installer.pkg", "uploadDate": "2020-05-24T19:34:46Z", "sha256": "3a5ecc35c373ad872718c8c2c7a4efc21ac5ac3b2739c5e4bef995e910fcf851", "ticketContents": [ { "path": "AppNotaryAndDistrib_1.0_Installer.pkg", "digestAlgorithm": "SHA-1", "cdhash": "72e859f50fddcd045091a2bb4ccd8d0bba94633b" } ], "issues": [ { "severity": "warning", "code": null, "path": "AppNotaryAndDistrib_1.0_Installer.pkg", "message": "This archive is corrupt, and cannot be unpacked for analysis.", "docUrl": null, "architecture": null } ] } |
What you’re looking at is Apple’s attempt to inventory the contents of your submission and scan it for malicious content. I called it “entertaining” because, while status is “Accepted” and statusSummary is “Ready for distribution,” issues is “This archive is corrupt, and cannot be unpacked for analysis,” but notice it’s just a warning. The installer is not corrupt because I’ve tested it several times and it works great. I believe that Apple feels that it “cannot be unpacked for analysis” because my installer is signed with a valid certificate. I don’t want anyone tampering with my installer. DOH! Finally, note the ticketContents field. This has to do with “stapling” and we’ll discuss that in just a moment.
Installer stapling
Now that your installer is notarized, you distribute it to your millions of customers, right? When your customers download and run your installer, Apple knows via an Internet connection through Gatekeeper to allow your installer to proceed. But what if, for a variety of reasons, a customer’s Internet connection drops just as they’re running your installer? If Apple can’t be reached, Gatekeeper won’t allow installation. For just such occasions, Apple allows you to “staple” a “ticket” to your installer so that it runs, net connection or not:
|
1 |
xcrun stapler staple "AppNotaryAndDistrib_1.0_Installer.pkg" |
Here’s to what the stapler tells us:
|
1 2 3 |
Processing: /Users/andrewjaffee/Documents/AppNotaryAndDistrib_1.0_Installer.pkg Processing: /Users/andrewjaffee/Documents/AppNotaryAndDistrib_1.0_Installer.pkg The staple and validate action worked! |
We’ve got an installer — finally. Remember earlier that I test-dragged my sample app into /Applications to kinda install it? I’ll delete that now and then run my new installer. Looks what happens:
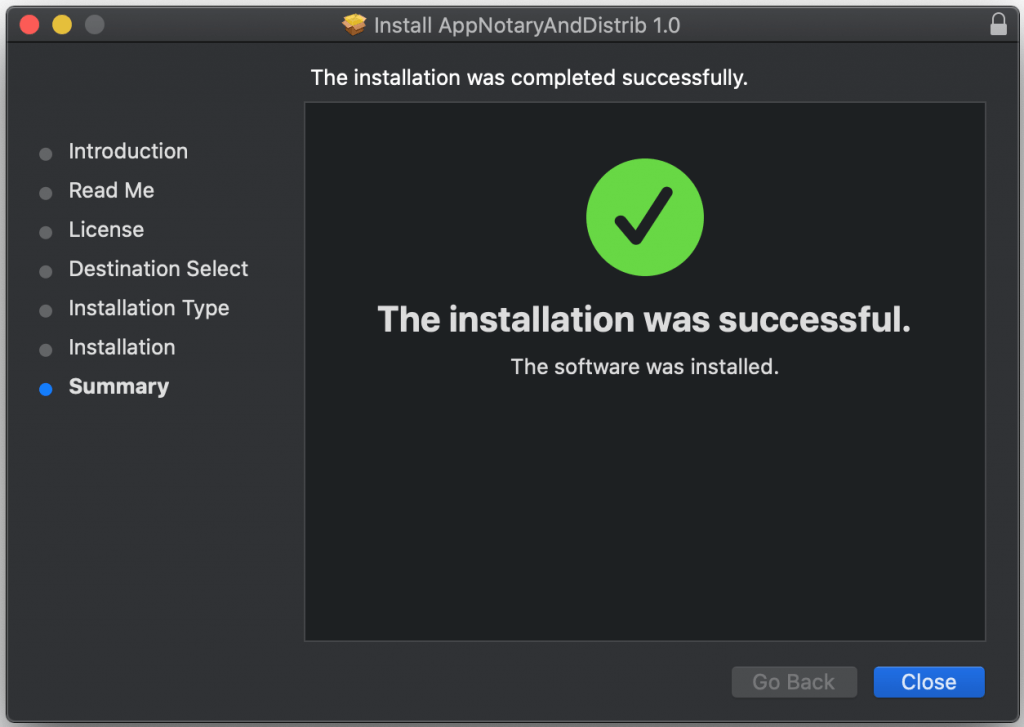
When I look in [/Applications], my AppNotaryAndDistrib.app has been installed. When I double-click on the app icon, it runs and works perfectly. I don’t get any warning prompts about “malicious” software.
You can post an installer like this one on your own website, advertise, and sell it, with the whole process being under your control. This option affords you the most control and the highest profits. You can also sell it through a third party, but that generally eats into your profits. The key takeaway here in that it’s your app under your control.
Mission accomplished.
Conclusion
Is notarization all about Apple protecting its customers from potentially malicious software, or is it really an attempt to force all OS X app development into the Mac App Store so the giant, trillion-dollar conglomerate can gouge you for enormous fees? My gut feeling is the truth is a mix of the two possibilities, probably 60/40 as Apple already has 100% control over the iOS ecosystem.
There’s no question that hacking, identity theft, purposeful and purposeless malicious software-based attacks are a huge and growing problem. Protecting people from such attacks is a noble cause and all developers should keep their users’ safety in mind when writing code. On the other hand, a free market and the open source phenomena have brought great wealth and knowhow to a world desperately in need of both.
I hope we can find a happy medium. I hope Apple keeps the macOS ecosystem open to third party apps. Be sure to come back for Part II and Part III of this series of tutorials!

Avid and well-published author and software developer now specializing in iOS mobile app development in Objective-C and Swift. He has a strong background in C#, C++, .NET, JavaScript, HTML, CSS, jQuery, SQL Server, Agile, TDD, Git, and other technologies. He earned a B.Sc. and M.Sc. in Computer Science. Andrew has published several apps in the Apple App Store and has 30 years of experience in software development and professional writing. You can read his blog at http://iosbrain.com/.