Welcome to a new and interesting enough programming tutorial! Swift is a rich-featured language and it couldn’t be missing a great feature such as the higher order functions. According to Wikipedia:
In mathematics and computer science, a higher-order function is a function that does at least one of the following:
– takes one or more functions as arguments (i.e. procedural parameters),
– returns a function as its result.
All other functions are first-order functions.
From the practical point of view in real world programming, higher order functions consist all together of a great tool that we can only have benefits from; we can avoid implementing functionalities that are already available in Swift, and we can achieve more with less, meaning that we can get to the same results with fewer lines of code. Higher order functions are applied usually in collections (arrays, dictionaries, sets) and as you will see in the upcoming parts, their purpose is to act on the contained elements in various ways. Even though they’re called “functions”, they’re accessed as methods using the dot syntax through the collection object that they’re going to be used with.
If there is one downside in higher order functions, then that is the bit unusual way to write them comparing to other more “Swifty” code. But being uncomfortable with them is not a reason for not making your life easier. It’s all just a matter of habit and training. If higher order functions are not included in your programming repertoire, then please try to start using them; they’ll become an everyday tool that will speed up your coding tasks.
Higher order functions are based on closures, but you don’t have to be a closures ninja in order to understand what comes next. However, just in case you need to refresh your memory or to just read a little bit about them, then you’d better take a look at Apple’s documentation before you get started here. What makes higher order functions great is that they can be written in really short ways, and as a result we can manage to write in just one line what we would normally have written in five or six lines. Shorthand arguments such as $0, $1 make that possible, and we’re going to meet them right next (they’re presented in the previous link as well); no need for further discussion about them now.
In this tutorial I’m going to present the most famous and most commonly used higher order functions in Swift:
- map
- compactMap
- flatMap
- filter
- reduce
- forEach
- contains
- removeAll
- sorted
- split
By the end of this post you’ll have learnt all the necessary stuff in order to start using higher order functions in your projects. So, don’t wait any longer, just dive in to get started!
Get Prepared to work with Higher Order Functions in Swift
Contrarily to the most of the tutorials presented here, this time there is not a starter project to download and work with. To try out what you’ll be learning while you’ll be proceeding you are invited to create one or more playgrounds in Xcode.
As a practical side note, if a playground seems frozen and does not execute the code you put in it, then:
- Show the Inspector pane,
- Select macOS as the platform in the Playground Settings section in the File inspector.
Also, you can replace the default boilerplate code in any new playground with the following before you start adding custom code:
|
1 |
import Foundation |
There’s no need to import the UIKit or Cocoa framework (depending on whether you’ll create an iOS or macOS playground) since we’re not going to have any UI here. To find out more about playgrounds, a quick search on the web will instantly bring you back a lot of helpful results. It’s out of scope here to discuss any details about playgrounds, so I’m assuming that you have at least the minimum knowledge needed to run code on them.
Map
Let’s get started with the first, and probably the most famous higher order function called map. This function performs an operation on all the elements of a collection and returns a new collection with the results of the operation on the original elements. It sounds great, but how exactly does it work?
Create a playground in Xcode, and add the following line:
|
1 |
let numbers = [2, 5, 3, 9, 15, 12, 8, 17, 20, 11] |
The array contains 10 integer numbers. Let’s try to create a new array which will contain the above numbers doubled. Without using any higher order function but just the traditional, well-known for-in loop we would write this:
|
1 2 3 4 5 6 7 8 |
var doubled = [Int]() for number in numbers { doubled.append(number * 2) } print(doubled) // Prints [4, 10, 6, 18, 30, 24, 16, 34, 40, 22] |
At first we initialize a new array specifying the data type of its elements, then we implement the loop where each number from the first array is being doubled and appended to the new one, and finally we print the array to the console so we can see the results.
Now, let’s try to use map for first time and see how to achieve the same results with less but smarter code. In the playground type the following:
|
1 |
doubled = numbers.map |
Xcode will auto-suggest the map function, so press Return once to get to this:

Then press Return once more to let Xcode expand the placeholder and provide a default implementation.
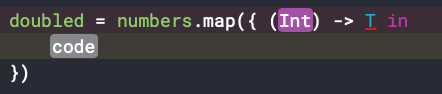
The first thing to look at here is the closure where we’ll add the implementation of the operations we want to perform to the original data. It takes an argument, which represents a single element in the original collection. In this example that argument represents a number in the numbers array. Higher order functions iterate on collections, so that argument will represent all items on them sequentially.
Then, there’s a generic return type T, which has to become specific. This is the type of data the closure will return; we will return Int values here.
So, let’s set an argument name to the placeholder, and let’s fix the return type of the closure:
|
1 2 3 |
doubled = numbers.map({ (number) -> Int in }) |
Do not forget that map function returns a new collection. In this specific example it returns an array of integer values which we assign to doubled variable.
Note that the array that will keep the results does not have to be initialized in advance as we did here. It’s perfectly fine to delete this:
|
1 |
var doubled = [Int]() |
and just use the let or var keyword in front of the variable that will keep the results of map:
|
1 2 3 |
let doubled = numbers.map({ (number) -> Int in }) |
Now, in the closure’s body we will add the custom logic we want to apply; that is to double the number parameter value:
|
1 2 3 |
let doubled = numbers.map({ (number) -> Int in return number * 2 }) |
Printing the doubled array again, we get once more the original numbers doubled. Great!
The above use of the map function is totally correct, however we can make it even shorter! How? By avoiding the full definition of the closure with an argument and return value, and by making use of the shorthand argument:
|
1 |
let doubled = numbers.map { $0 * 2 } |
$0 is called a shorthand argument, and it’s a general way to refer to any element in the source collection. In this case it represents any number in the numbers array, exactly like the number parameter in the previous example of map.
In addition, also notice that the opening and closing parentheses of the method have been omitted. For greater readability there’s just an optional space between the map keyword and the opening curly bracket.
By printing the doubled array we get once more the exact same results as the first two times in the debug area. But this time there’s a great difference; it only took us one line to double each value and assign them all to the doubled array. Higher order functions are cool, aren’t they?
Let’s see another example. Consider the following array which contains degree values:
|
1 |
let degrees = [20, 45, 160, 360, 84, 215, 178, 185] |
We want to convert them to radians. Using the map function we can do that in one line only:
|
1 |
let rads = degrees.map { Double($0) * Double.pi / 180.0 } |
See that the shorthand argument $0 is being treated like a normal argument would have been treated. The dollar sign might look weird, but this shouldn’t be bothering you; it’s just a matter of writing.
Without the map function, the above conversion would have to be done like this:
|
1 2 3 4 |
var rads = [Double]() for deg in degrees { rads.append(Double(deg) * Double.pi / 180.0) } |
It’s not wrong, but using the map we can move faster with fewer lines of code.
Map And Dictionaries
Arrays do not consist of the only collection type that map function can be used with. Dictionaries and Sets are collection types too, even though dictionaries need a slightly different approach depending on whether we want to get just keys, just values, or both.
Let’s declare and fill with values the following dictionary:
|
1 2 3 4 5 |
var info = [String: String]() info["name"] = "andrew" info["city"] = "berlin" info["job"] = "developer" info["hobby"] = "computer games" |
Printing the above dictionary on the console will give this:

map function returns an array of values, so getting only keys or values is easy:
|
1 2 |
let keys = info.map { $0.key } let values = info.map { $0.value } |
info is a dictionary, so using the key and value accessors in order to refer to keys and values respectively is required. Adding the following two statements:
|
1 2 |
print(keys) print(values) |
will print the next two lines; two different arrays of values as expected:

However, what is it going to happen if we just do this?
|
1 2 |
let result = info.map { $0 } print(result) |
Here is the result:

Each element of the result array is a tuple where the first value is the key, and the second is the actual value matching to the key.
An array like the above can be used to initialize a new dictionary as shown right below:
|
1 |
let newInfo = Dictionary(uniqueKeysWithValues: result) |
Of course, doing the above without modifying the source data at all is pointless and the newInfo dictionary is going to be exactly the same to info. For that reason, let’s act on both keys and values first. What we want to achieve is to convert keys to uppercased strings, and to capitalize the first letter of each value. Then, we’ll create a new dictionary with the tweaked keys and values.
The new dictionary will be created at the end as shown above. But before that, let’s define the map function where we’ll be returning a custom tuple value with the modified keys and values:
|
1 |
let updatedKeysAndValues = info.map { ($0.key.uppercased(), $0.value.capitalized) } |
The tuple is the parentheses with the two values between the curly brackets where the key comes first and the value next. Using the uppercased() method of the String class we make the key letters uppercased, and using the capitalized property (of the String class again) we get the value with the first letter only capitalized.
Here’s now a new thing about the shorthand argument used above. Instead of $0.key and $0.value we can write:
|
1 |
let updatedKeysAndValues = info.map { ($0.uppercased(), $1.capitalized) } |
$0 argument refers to the key, and $1 argument refers to the value. Both ways are correct, and you can use what you find the most suitable.
Let’s create the new dictionary now:
|
1 2 |
let capitalizedInfo = Dictionary(uniqueKeysWithValues: updatedKeysAndValues) print(capitalizedInfo) |
Here’s the result:

We can write the above in one line only like this:
|
1 |
let capitalizedInfo = Dictionary(uniqueKeysWithValues: info.map { ($0.uppercased(), $1.capitalized) } ) |
MapValues – A Variation Of Map
Now we’ve seen the above, there’s a quite simpler way to get a dictionary that keeps the original keys and modified values. That is to use a different higher order function which is a variation of map. It’s called mapValues:
|
1 2 |
let updatedInfo = info.mapValues { $0.capitalized } print(updatedInfo) |
Here is the result:
|
1 |
["job": "Developer", "city": "Berline", "name": "Andrew", "hobby": "Computer Games"] |
updatedInfo is a dictionary as you can see, so creating manually one is not necessary here. If you don’t want to modify the dictionary keys, then you’d better be using the mapValues higher order function. Use map if only you want to modify keys as well.
Map And Custom Types
map function (and generally the higher order functions) can be used in collections where their elements are instances of a custom type. Let’s see an example. Consider the following class that contains properties to store data about testers of a product:
|
1 2 3 4 5 6 7 8 9 |
class Tester { var name: String var age: Int init(name: String, age: Int) { self.name = name self.age = age } } |
Let’s create an array of testers:
|
1 |
let testers = [Tester(name: "John", age: 23), Tester(name: "Lucy", age: 25), Tester(name: "Tom", age: 32), Tester(name: "Mike", age: 29), Tester(name: "Hellen", age: 19), Tester(name: "Jim", age: 35)] |
Let’s suppose now that for statistical reasons we need to get an array with the ages of the testers only. We can easily do that by using the map function and accessing the age property through the shorthand argument:
|
1 2 |
let ages = testers.map { $0.age } print(ages) |
Here is the result:
|
1 |
[23, 25, 32, 29, 19, 35] |
In this example the $0 argument is a Tester object, so we treat it like that and we access the age property.
CompactMap
compactMap function is pretty much similar to map, with a great difference though; the resulting array does not contain any nil values. To make that clear, let’s see the following example where the array contains integer numbers with nil values existing among them:
|
1 |
let numbersWithNil = [5, 15, nil, 3, 9, 12, nil, nil, 17, nil] |
Obviously the type of the array is [Int?]. Let’s suppose now that we want to double the non-nil values and produce a new array using the map function. Doing the following:
|
1 |
let doubledNums = numbersWithNil.map { $0 * 2 } |
will make Xcode show the following error:

It’s absolutely natural to see this error, because the $0 argument can have an actual value so doubling it is possible, but it can also be nil so there’s nothing to double. To workaround this we need to unwrap the $0 argument, and double if only it’s not nil. The long version of map would be this:
|
1 2 3 4 5 6 7 |
let doubledNums = numbersWithNil.map { (number) -> Int? in if let number = number { return number * 2 } else { return nil } } |
See that the return type of the closure is Int?, meaning that the closure will return either an actual integer value, or nil if the number parameter is also nil. Based on the closure’s return type, the type of the doubledNums array is inferred to [Int?].
The shorter version of above code is this:
|
1 |
let doubledNums = numbersWithNil.map { $0 != nil ? $0! * 2 : nil } |
Here we are using the ternary operator in order to keep things shorter. Depending on whether $0 is nil or not we return either the original value doubled, or nil again. doubledNums type is inferred once again.
Adding the following print command:
|
1 |
print(doubledNums) |
will give us this:

However, it’s not always desirable to have an array with optional and nil values as shown in the above result. The solution in that case is to use the compactMap function. By using it in the numbersWithNil array, the resulting array will contain only non-nil values and the type of the array will be [Int].
Here’s what we did above, but using the compactMap this time:
|
1 |
let notNilDoubled = numbersWithNil.compactMap { $0 != nil ? $0! * 2 : nil } |
And here are the results:
|
1 |
[10, 30, 6, 18, 24, 34] |
Obviously the number of elements in the resulting array is different than the number of elements in the original array if there are nil values. Consider this fact in case the number of elements somehow matters in your code. In that case maybe you should stick to map and use a default value in case nil is found in the original array. Modifying a bit the above, the following map function doubles the non-nil values, but it returns -1 in case it finds nil:
|
1 |
let doubledNums = numbersWithNil.map { $0 != nil ? $0! * 2 : -1 } |
Here is the result:
|
1 |
[10, 30, -1, 6, 18, 24, -1, -1, 34, -1] |
-1 value in this example is a random choice. Take extremely care in case you do something similar in your apps, so the so-called default value has no negative or unexpected impact in the overall functionality you are implementing.
FlatMap
flatMap is useful when there are collections inside collections, and we want to merge them into one single collection. Check out the following array which contains other arrays as elements. Let’s suppose that each inner array contains the marks of a student in three different courses:
|
1 |
let marks = [[3, 4, 5], [2, 5, 3], [1, 2, 2], [5, 5, 4], [3, 5, 3]] |
Using a traditional for-in loop to gather all values in a single array would be done like this:
|
1 2 3 4 |
var allMarks = [Int]() for marksArray in marks { allMarks += marksArray } |
However, all this “manual” work and effort can be avoided with the flatMap higher order function:
|
1 2 3 |
let allMarks = marks.flatMap { (array) -> [Int] in return array } |
The closure’s argument represents an inner collection in the source collection that the higher order function is applied to. It’s necessary to specify the type of the resulting array, which in this case is [Int]. If there is no need to perform any operation to the elements of the array parameter value, then just returning that array is all we need to do.
We can also shorten the above using the shorthand argument:
|
1 |
let allMarks = marks.flatMap { $0 } |
In any case, if we print the above will show the following in the debug area:
|
1 2 |
print(allMarks) // Prints [3, 4, 5, 2, 5, 3, 1, 2, 2, 5, 5, 4, 3, 5, 3] |
By having all values in one single array we can now perform further operations or calculations.
In case inner collections contain nil values, then by using the flatMap function the nil values will be carried over to the resulting array. See the following example:
|
1 2 3 4 5 6 |
let valuesWithNil = [[2, nil, 5], [4, 3, nil], [nil, nil, 1]] let result = valuesWithNil.flatMap { $0 } print(result) // Prints [Optional(2), nil, Optional(5), Optional(4), Optional(3), nil, nil, nil, Optional(1)] |
Filter
filter higher order function is one of the most useful among all and it can be proved a great tool when used. As its name suggests, its purpose is to filter the elements of a collection based on a condition and produce a new one containing only those elements that satisfy the condition.
To demonstrate filter let’s use once again the numbers array we first-saw in the map function:
|
1 |
let numbers = [2, 5, 3, 9, 15, 12, 8, 17, 20, 11] |
Let’s suppose that we want to filter the above array and keep only those values that are greater than 10. Without using the filter method we would have to do something like that:
|
1 2 3 4 5 6 7 |
var over10 = [Int]() for number in numbers { if number > 10 { over10.append(number) } } |
Here’s how we can do the exact same thing using the filter function now:
|
1 2 3 4 5 6 7 |
let over10 = numbers.filter { (number) -> Bool in if number > 10 { return true } else { return false } } |
Or even shorter:
|
1 2 3 |
let over10 = numbers.filter { (number) -> Bool in return number > 10 } |
Note that there is no need to specify the return type of the function; it’s always Bool, and the code we write in the closure’s body has to be a condition that will result in a true/false value.
The above can become even shorter using the known shorthand argument:
|
1 |
let over10 = numbers.filter { $0 > 10 } |
Any of the above will return the same results:
|
1 |
[15, 12, 17, 20, 11] |
Conditions in filter can be as simple or as as complicated needed. Also, just like map, objects of custom types can be contained in the original collections and access their properties using the dot syntax. Remember the small Tester class we met in the map part, and the testers we initialized:
|
1 2 3 4 5 6 7 8 9 10 11 |
class Tester { var name: String var age: Int init(name: String, age: Int) { self.name = name self.age = age } } let testers = [Tester(name: "John", age: 23), Tester(name: "Lucy", age: 25), Tester(name: "Tom", age: 32), Tester(name: "Mike", age: 29), Tester(name: "Hellen", age: 19), Tester(name: "Jim", age: 35)] |
With just one filter function we can find those testers whose name starts with “J” and they’re at least 30 years old:
|
1 |
let results = testers.filter { $0.name.prefix(1) == "J" && $0.age >= 30 } |
In this specific example we know that there’s one such tester, so it’s safe to print the results:
|
1 |
print(results[0].name, results[0].age) |
Here is the result:
|
1 |
Jim 35 |
However, in real conditions always check if there are results like so:
|
1 2 3 |
if results.count > 0 { // Do something... } |
Quite often it’s necessary to get only the first item of a collection, after the collection’s values have been filtered. For example, let’s get the first tester with a name starting with “J”. A common, yet not so short way to do it would be this:
|
1 2 3 4 5 6 |
let filtered = testers.filter { $0.name.prefix(1) == "J" } if filtered.count > 0 { let firstTester = filtered[0] // Do something with firstTester... } |
Alternatively, instead of accessing the first element of the filtered array using the subscript, we could use the first property; watch out though, it returns an optional value so unwrapping it is necessary.
|
1 2 3 4 5 6 7 |
let filtered = testers.filter { $0.name.prefix(1) == "J" } if filtered.count > 0 { if let firstTester = filtered.first { // Do something with firstTester... } } |
Even though the above code is correct, we can shorten it using a single guard statement:
|
1 2 |
guard let firstTester = (testers.filter { $0.name.prefix(1) == "J" }).first else { return } // Do something with firstTester... |
In a similar way we can also count the filtered items of a collection. In the initial numbers array for example, we can count how many numbers are greater than 10:
|
1 2 3 |
let totalOver10 = numbers.filter { $0 > 10 }.count print("Total items greater than 10: ", totalOver10) |
Here is the result:
|
1 |
Total items greater than 10: 5 |
One thing to remember about filter is that it doesn’t modify the elements of the collection (like map does for example). Use filter only to get a subset of the original data that satisfy certain conditions. If you want further operations to be performed on the filtered data, you can use the output of filter as the input collection to any other higher order function that actually acts on that data.
Reduce
The purpose of the reduce higher order function is to produce one value from the values of all elements in a collection. To understand what this means exactly, suppose that we want to calculate the product of the numbers in the following array:
|
1 |
let numbers = [5, 3, 8, 4, 2] |
Without using reduce but only a for-in loop, multiplying the numbers and finding the result would take this:
|
1 2 3 4 |
var product = 1 for number in numbers { product *= number } |
However, instead of the above, we can use the reduce higher order function and achieve the same results. As you’re going to see right next, it accepts two arguments; the first one is an initial value (like the product variable above), and the second is the closure that implements the logic that should apply to the collection’s elements.
|
1 2 3 |
let product = numbers.reduce(1) { (partialResult, number) -> Int in return partialResult * number } |
The closure’s arguments are also interesting, because the first argument does not represent an element in the collection, like the second argument does. Instead, the first argument is the result of the previous calculation which is going to be multiplied by the number value. To make it even clearer:
|
1 2 3 4 5 |
// 1st iteration: partialResult = 1, number = 5, Returns 5 // 2nd iteration: partialResult = 5, number = 3, Returns 15 // 3rd iteration: partialResult = 15, number = 8, Returns 120 // 4th iteration: partialResult = 120, number = 4, Returns 480 // 5th iteration: partialResult = 480, number = 2, Returns 960 |
reduce can be shortened by using shorthand arguments:
|
1 |
let product = numbers.reduce(1, { $0 * $1 }) |
Do not forget that the first argument always represents the partial result and not an element in the collection. $0 is the partial result here, while $1 is an element in the array.
For simple cases like our example here, reduce can become even shorter and we can get rid of the shorthand arguments as well. All we need is the symbol of the operation that should be performed:
|
1 |
let product = numbers.reduce(1, *) |
Be careful when using this syntax and make sure that the initial value is correct.
reduce works with dictionaries too. Consider the following dictionary which contains five friends and the allowance money each one has:
|
1 |
let friendsAndMoney = ["Alex": 150.00, "Tim": 62.50, "Alice": 79.80, "Jane": 102.00, "Bob": 94.20] |
They need to know if the summary of their money is enough so they can buy all together the new game console that they badly want. Using reduce this takes just one line of code:
|
1 |
let allMoney = friendsAndMoney.reduce(0, { $0 + $1.value }) |
Watch something interesting in the above line: In order to access each amount in the closure, it’s necessary to use the value property because $1 is not a single value; it’s a (String, Double) key-value pair (a tuple). On the other hand, $0 is a single value as it represents the partial result of the calculation.
ForEach
What developers know well is how to write for-in loops in order to iterate through the elements of a collection. For example, the following shows how to go through the elements of the numbers array and prints whether each number is even or odd:
|
1 2 3 4 5 |
let numbers = [2, 5, 3, 9, 15, 12, 8, 17, 20, 11] for number in numbers { number.isMultiple(of: 2) ? print("\(number) is even") : print("\(number) is odd") } |
Here is the result:
|
1 2 3 4 5 6 7 8 9 10 |
2 is even 5 is odd 3 is odd 9 is odd 15 is odd 12 is even 8 is even 17 is odd 20 is even 11 is odd |
The above loop can be replaced by the forEach function. Like all the other higher order functions, it provides a closure that implements the custom logic. Let’s do again now what we did right above, but this time we’ll use the forEach function instead:
|
1 2 3 |
numbers.forEach { (number) in number.isMultiple(of: 2) ? print("\(number) is even") : print("\(number) is odd") } |
We can do it in one line too using the shorthand argument:
|
1 |
numbers.forEach { $0.isMultiple(of: 2) ? print("\($0) is even") : print("\($0) is odd") } |
It often happens to have conditions or to unwrap optionals conditionally inside loops, and we come to the need to break or continue the loop using the break and continue statements respectively as a result of these conditions. Consider the following example:
|
1 2 3 4 5 6 7 8 9 |
let numbersWithNil = [5, 15, nil, 3, 9, 12, nil, nil, 17, nil] for number in numbersWithNil { guard let number = number else { print("Found nil") continue } print("The double of \(number) is \(number * 2)") } |
The continue statement shown in the previous code tells the program to move on to the next iteration in case unwrapping number fails in the guard (and after all other operations specified in the else case are finished). Doing the same though in the forEach function is not possible; continue and break statements cannot be used there. Instead, return statement is the only one allowed. Using it, the program will exit from the current closure, however subsequent calls to forEach will be made normally in case there are more elements in the collection. Here’s the equivalent of the above:
|
1 2 3 4 5 6 7 |
numbersWithNil.forEach { (number) in guard let number = number else { print("Found nil") return } print("The double of \(number) is \(number * 2)") } |
So, in short, remember that continue and break are not allowed when using the forEach method; they’re meant to be used in loops only, and forEach is not a loop.
Contains
contains function is used in collections in order to check if there are elements that satisfy a certain condition and it returns a boolean value. Let’s suppose that our goal is to find whether the numbers array contains values less than 5. A solution would be to search using a loop:
|
1 2 3 4 5 6 7 |
var containsLessThan5 = false for number in numbers { if number < 5 { containsLessThan5 = true break } } |
However, repeating the above over and over again using different conditions and on different collections is totally counterproductive and definitely not a good programming practice.
The solution comes with the contains higher order function. Let’s check again if there are numbers less than 5 in the numbers array using the contains function:
|
1 2 3 4 5 6 |
let hasNumbersLessThan5 = numbers.contains { (number) -> Bool in return number < 5 } print("Has small numbers? :", hasNumbersLessThan5) // Prints true |
This function does not return a new collection, but a single Boolean value which is true when the given condition is satisfied, and false when not. If the condition is simple as shown in the above example, then it’s easy to write it in one line only using the shorthand argument:
|
1 |
let hasNumbersLessThan5 = numbers.contains { $0 < 5 } |
Like the other higher order functions, this one too can be used with objects of custom types and to form conditions based on custom properties. See the following class that has a few properties regarding the staff of a company and some instances contained into an array:
|
1 2 3 4 5 6 7 8 9 10 11 12 13 14 15 16 17 |
class Staff { enum Gender { case male, female } var name: String var gender: Gender var age: Int init(name: String, gender: Gender, age: Int) { self.name = name self.gender = gender self.age = age } } let staff = [Staff(name: "Nick", gender: .male, age: 37), Staff(name: "Julia", gender: .female, age: 29), Staff(name: "Tom", gender: .male, age: 41), Staff(name: "Tony", gender: .male, age: 45), Staff(name: "Emily", gender: .female, age: 42), Staff(name: "Irene", gender: .female, age: 30)] |
With contains(where:) it’s easy to perform searches like the following:
|
1 2 3 4 5 6 7 8 9 10 11 |
let hasStaffOver40 = staff.contains { $0.age > 40 } print("hasStaffOver40", hasStaffOver40) // Prints true let hasMalesOver40 = staff.contains { $0.gender == .male && $0.age > 40 } print("hasMalesOver40", hasMalesOver40) // Prints true let hasMalesUnder30 = staff.contains { $0.gender == .male && $0.age < 30 } print("hasMalesUnder30", hasMalesUnder30) // Prints false |
contains can be used in dictionaries too for searching if there are elements that match to specific criteria. Consider the following dictionary which contains random temperatures (in Celsius) of a few cities around the world:
|
1 |
let temperatures = ["London": 7, "Athens": 14, "New York": 15, "Cairo": 19, "Sydney": 28] |
The following answers to the question whether there are any cities with high temperatures (assuming high temperature is > 25 degrees):
|
1 2 3 4 |
let hasHighTemperatures = temperatures.contains { $0.value > 25 } print(hasHighTemperatures) // Prints true |
RemoveAll
Similar to contains is the removeAll method which is pretty handy when it’s necessary to remove collection elements based on conditions that regard the actual element values. In cases like that, using the remove(at:) method which gets the index of an element to the collection isn’t useful, nor any of the other remove methods provided.
Once again we’ll use the numbers array as an example, however this time it’s declared using the var keyword since it’s about to be modified:
|
1 |
var numbers = [2, 5, 3, 9, 15, 12, 8, 17, 20, 11] |
Our purpose here is to remove all values less than 10:
|
1 2 3 |
numbers.removeAll { (number) -> Bool in return number < 10 } |
As you see, nothing is returned by the function but the original array is being modified:
|
1 |
print(numbers) |
Here is the result:
|
1 |
[15, 12, 17, 20, 11] |
The above as a single line:
|
1 |
numbers.removeAll { $0 < 10 } |
Note that removeAll function is available in arrays only, not in dictionaries or sets.
Sorted
Sorting a collection’s data in ascending order is easy in Swift using the sorted() method as shown next:
|
1 2 3 4 5 6 |
let toSort = [5, 3, 8, 2, 10] let sorted = toSort.sorted() print(sorted) // Prints [2, 3, 5, 8, 10] |
However, when sorting order must be specified (ascending or descending), or sorting should be based on a specific condition, then this is where sorted higher order function gets into play. It can be written in three different ways, with the longer one being this:
|
1 2 3 |
let sorted = toSort.sorted { (num1, num2) -> Bool in return num1 > num2 } |
The two arguments represent any two elements in the array that are compared to each other while sorting is in progress. The closure returns a boolean value which is the result of the condition defined in it. At the end, a new collection comes up with the elements of the original collection sorted in one or the other way. The previous code will sort the toSort array in a descending order.
A shorter way to achieve the above is the next one:
|
1 |
let sorted = toSort.sorted { $0 > $1 } |
Once again the resulting array has the numbers sorted in a descending order. $0 and $1 arguments represent two numbers that are being compared together while sorting is in progress.
An even more simpler way to sort is this:
|
1 |
let sorted = toSort.sorted(by: >) |
Simply writing the greater than or lower than symbol is enough to specify the sorting order. Notice that the by parameter name cannot be omitted in this case.
Sorting is possible in dictionaries too. However the resulting collection is not a dictionary; it’s an array of tuples, where the first value on each tuple is the key and the second is the value.
Remember the temperatures dictionary we met in the previous part. The following sorts the cities and their temperatures starting from the highest temperature and going to the lowest:
|
1 |
let sortedTemperatures = temperatures.sorted { $0.value > $1.value } |
Here’s what is printed in the debug area if we print the above:

Accessing any key or value is possible by accessing the respective tuple value in any valid index of the array. For example, we can get the temperature of the third city (New York) as follows:
|
1 2 |
print(sortedTemperatures[2].value) // Prints 15 |
An actual dictionary can be initialized using the sortedTemperatures array. However, keys and values will be in a random, unsorted order again:
|
1 2 3 4 5 |
let sortedTemperaturesDict = Dictionary(uniqueKeysWithValues: sortedTemperatures) print(sortedTemperaturesDict) // Prints ["Cairo": 19, "London": 7, "New York": 15, "Athens": 14, "Sydney": 28] // By running again it prints ["Cairo": 19, "Athens": 14, "London": 7, "Sydney": 28, "New York": 15] |
It’s also possible to sort the dictionary based on the key values. The following orders cities in an alphabetical order:
|
1 |
let sortedCities = temperatures.sorted { $0.key < $1.key } |
Here is the result:

The above is possible because keys are String values, and strings conform to Comparable protocol.
Split
split function is used with String values and its purpose is to split a string into pieces based on a given condition. The result is an array of substrings. It works pretty similar to components(separatedBy:) that breaks a string based on a given separator. Note though that in split only characters can be provided as separators. You might wonder why this function applies on String values given that strings are not collections. The truth is that split is used in the sequence of characters in the string, which conforms to the Collection protocol.
For starters, let’s see the declaration of split:
|
1 |
func split(maxSplits: Int = Int.max, omittingEmptySubsequences: Bool = true, whereSeparator isSeparator: (Character) throws -> Bool) rethrows -> [Substring] |
As you see, it takes three arguments, with the first two of them being optional as they have initial values. We’ll talk about them in a while. The last argument is the closure where we specify the condition based on which the original string will split. Let’s start with a simple example and let’s break the following string value based on the space character:
|
1 2 3 4 5 6 7 8 |
let message = "Hello World!" let result = message.split { (char) -> Bool in return char == " " } print(result) // Prints ["Hello", "World!"] |
Like any other higher order function, we can use the shorthand argument and write split in one line only:
|
1 |
let result = message.split { $0 == " " } |
Now, if we include the maxSplits parameter in the call of split, we can specify how many times the string will break based on the given separator. In other words, how many subsequences of the original sequence of characters will be created. The following example makes all that clear:
|
1 2 3 4 5 6 |
let anotherMessage = "This message is going to be broken in pieces!" let splitOnce = anotherMessage.split(maxSplits: 1, whereSeparator: { $0 == " " }) print(splitOnce) // Prints ["This", "message is going to be broken in pieces!"] |
Notice that even though there are more than one spaces in the original string, splitting took place only for the first space found because we specified just one split to happen in the maxSplits parameter.
Regarding the omittingEmptySubsequences parameter, when it’s false then all empty subsequences that come up by splitting using the separation condition will appear in the resulting array as empty substrings. Let’s modify a bit the above string:
|
1 |
let anotherMessage = "This message is going to be broken in pieces!" |
Now let’s split it by setting false as the omittingEmptySubsequences parameter value:
|
1 2 3 4 |
let emptySequences = anotherMessage.split(omittingEmptySubsequences: false, whereSeparator: { $0 == " " }) print(emptySequences) // Prints ["This", "message", "is", "going", "to", "", "", "", "be", "broken", "in", "pieces!"] |
Lastly, two more things to note. First, the type of the elements in the array that split creates is String.SubSequence, not String. If you want to use them as strings, you must create string objects with them first. The following example creates a new array where all substrings are being converted to strings using the map function:
|
1 2 3 4 5 6 7 8 9 10 11 12 13 14 |
let message = "Hello World!" let result = message.split { $0 == " " } print(result) // Prints ["Hello", "World!"] // result type is [String.SubSequence] // Create String values from substrings. let allStrings = result.map { String($0) } print(allStrings) // Prints ["Hello", "World!"] // allStrings type is [String] |
The second thing to note is that the condition you specify for the split can be more complicated than what we used in the previous examples. The following example breaks the paragraph into sentences based on the period and exclamation mark characters. See the condition in the split function:
|
1 2 3 4 5 6 |
let paragraph = "This paragraph will be separated in parts. Based on the periods and the exclamation mark! There will be three strings!" let sentences = paragraph.split { $0 == "." || $0 == "!" } print(sentences) // Prints ["This paragraph will be separated in parts", " Based on the periods and the exclamation mark", " There will be three strings"] |
Summary
The simple examples presented in all the previous parts demonstrated how to use the most common higher order functions in Swift. I believe it became clear that by using them the required amount of code is decreased, and at the same time the code itself gets clearer and more efficient. In case you were not making use of higher order functions in your code then maybe you should consider start doing so as they’re quite helpful. In any case, we have come to the end of the tutorial, so I leave you with the hope that you have learnt something new today that will be proved useful in your everyday coding tasks!

Gabriel has been a software developer for almost about two decades and he’s got long experience in programming using various languages. iOS development is what he’s being doing since 2010. On top of that, he’s added macOS programming to his repertoire over the last few years. Using Swift of course! Follow Gabriel at Google+ and Twitter.