Did you know that a macOS app can read and write outside of its container when sandboxed? Did you know that a non-sandboxed macOS app has no container? Were you aware that you can sell and distribute non-sandboxed macOS apps without using the Mac App Store? Since the focus of most Apple development seems concentrated on iOS, many developers probably take the sandbox for granted. Some might not even be fully aware of the sandbox’s existence, especially in the case of iOS where all apps must be sandboxed. By ignoring the sandbox — and possibly macOS development entirely — developers run the risk of neglecting to understand a fundamental piece of Apple’s security infrastructure, and fail to take advantage of earning income from developing macOS apps.
Today, we’ll take an in-depth look at the sandbox’s benefits (and drawbacks) to both users and developers. We’ll discover, when merited, how to read/write outside the sandbox, and when and how to develop apps that are not sandboxed at all.
Editor’s note: If you are new to macOS development, you can check out our macOS tutorial series.
A series of tutorials
This is the second part in a three-part series of tutorials on sandboxing, signing, notarizing, and distributing macOS apps outside of the Mac App Store. In this tutorial I’ll give you in-depth insight into the sandbox and then build an app that, whether sandboxed or not sandboxed, can read and write outside of its container — and can be either sold and distributed outside the Mac App Store (MAS) or through the MAS, both with Apple’s blessings. I’ll demonstrate how you can build apps safe from malicious code and/or malicious exploitation even if you make exceptions to the sandboxing rules — or even if you turn off the sandbox entitlement completely.
You should definitely read my first tutorial in this series where I built a non-sandboxed app, discussed certificates, signed the app, notarized it, briefly talked about building an installer, signed and notarized the installer, and lastly covered distribution of the app installer.
Finally, in Part III, I’ll guide you step-by-step through the process of using the excellent freeware app Packages to create an installer for distributing your macOS apps outside the MAS. We’ll build an installer that has a splash page, installation instructions, a licensing agreement, and provides installation options for users.
What is an app sandbox?
Apple’s “App Sandbox Design Guide” is a bit outdated, stating:
An app that is not sandboxed has access to all user-accessible system resources–including the built-in camera and microphone, network sockets, printing, and most of the file system. If successfully attacked by malicious code, such an app can behave as a hostile agent with wide-ranging potential to inflict harm.
I say “outdated” because, since the advent of Mojave and especially Catalina, I’ve seen non-sandboxed macOS apps that, when trying to access system resources, get a system prompt asking if it’s OK, for example, to read/write data in the user’s ~/Documents folder. So we’ve defined non-sandboxed apps with my provisos; now let’s talk about sandboxed apps.
The app sandbox is meant to keep users safe from apps that contain malicious code or contain vulnerabilities that an attacker can exploit for malicious purposes. The sandbox protects users’ assets from damage or theft. Apple mandates app sandboxing in iOS app development and strongly recommends it, though doesn’t require it, for macOS apps. Apple describes their notion of sandboxing thusly:
Fine-grained restriction over access to system resources is the heart of how App Sandbox provides protection should an app become compromised by malicious code. Resolving such violations involves adding specific entitlements in Xcode corresponding to the capabilities your app needs.
Think of the sandbox as a very constrictive fence surrounding your app. Of course, an app would be useless if this fence was impenetrable. Apps are only useful if they can act on some type of input and produce meaningful output. A sandboxed app comes with its own file system and can solicit input from the user via a user interface. As iOS developers well know, a lot can be done within the sandbox, but notice that, especially soon after installing a new app, iOS intercepts and asks the user for permission for your app to interact with, for example, the microphone, the camera, Bluetooth, location services, etc. macOS apps used to be pretty much free of such constant micromanagement — until Mojave and Catalina debuted. Let’s briefly talk about a tangible attribute of a sandboxed app to help you fully appreciate the sandboxing concept.
Take a little time to review the file system created by macOS for each sandboxed app. After you run the sandboxed version of my sample app for the first time, look in ~Library/Containers for a folder named after the app’s Bundle Identifier, with the form com.yourDomain.AppNotaryAndDistrib. Compare that folder’s contents to those in your own user-level file system at /Users/YOUR_USERNAME, where my own is /Users/andrewjaffee. Notice anything similar? Different? What about the symbolically linked folders in my app’s container? Don’t just look at those folders, try double-clicking on some and see where you end up.
Remember the quote I posted above from Apple? They want us to start with very little access to system resources and then only request more resources on an as-needed basis. Let’s use a real project to explore our options for writing apps with varying degrees of access to system resources. Because of scope, time, and space constraints, I’ll confine the discussion of resources to the file system, but keep in mind that your vulnerable surface area includes Mac components like network connections, microphones, the camera, Bluetooth, etc.
The sample code
If you want to build a project yourself and follow along, then open up Xcode 11.x and create a new application based on the macOS App template. You can look at my storyboard and code for guidance. Or if you just want to follow along using my existing code, then open my “AppNotaryAndDistrib” project and walk through it while reading this article. You can download my sample project, built against the OS X 10.15 (Catalina) SDK at this link.
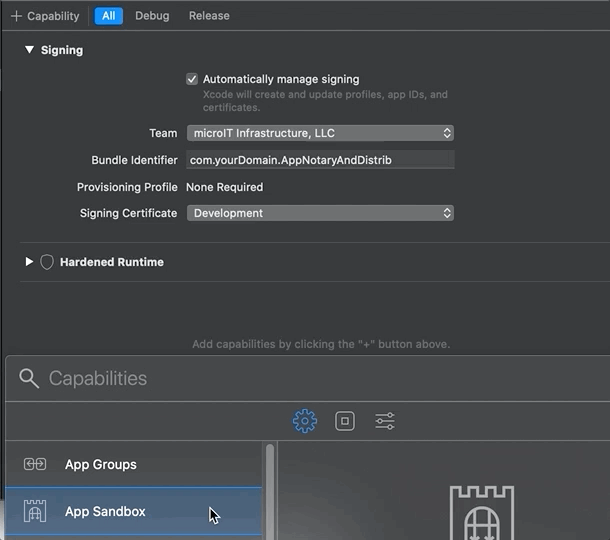
If you use my code, remember that you’ll have to use Xcode 11.x to configure the settings under TARGETS -> [TARGET_NAME] -> Signing & Capabilities -> Signing with your own Team, Bundle Identifier, Signing Certificate, and possibly Provisioning Profile.
Add automatic signing, remove sandboxing, and keep hardening
Since we’re exploring the app sandbox, let’s first configure my code not to use that security entitlement, i.e., we’ll remove the com.apple.security.app-sandbox entitlement via the Xcode UI. Most of you use the Automatically manage signing setting. Go to TARGETS -> [TARGET_NAME] -> Signing & Capabilities and make sure that setting is checked. Delete the App Sandbox capability (entitlement) and leave the default Hardened Runtime capability (build setting), like this, and notice my annotations in red:

Please read Part I of this series if you need a refresher on hardening.
Testing the code
When it comes to non-sandboxed apps, working inside Xcode lets you get away with things you couldn’t do outside of it. To make sure my code is actually functional to this tutorial’s specifications, you should have the requisite certificates and then clean, build, archive, sign (with Developer ID), upload, notarize the app, and drag it into /Applications in each section below where we play outside the sandbox. Sandboxed apps can be tested within Xcode or just run from the build folder.
Getting outside the app sandbox
There’s no doubt that malicious software is out of control. I worked with a government agency that was subject to 10,000 attacks on its IT infrastructure every day. It’s no surprise that Apple has increasingly emphasized macOS security, most notably with the advent of Mojave and especially Catalina. While sandboxing is not the only security mechanism available to you as a developer, it’s a starting point. Let’s look at your options for both sandboxed and non-sandboxed apps.
Going without sandboxing
Remember that we removed the sandbox entitlement when we started working with my sample project. You’ll have an AppNotaryAndDistrib.entitlements file in the Xcode Project Navigator, but it will be empty. I’m going to try to write a new text file to the user’s ~/Documents folder from an app without an entitlement for sandboxing. Here’s my code in ViewController.swift:
|
1 2 3 4 5 6 7 8 9 10 11 12 13 14 15 16 17 18 19 20 21 |
... @IBAction func writeToFileBtnClicked(_ sender: Any) { // create the FULLY-QUALIFIED path to the file so // we're SURE we write OUTSIDE any container let url = URL(fileURLWithPath: "/Users/andrewjaffee/Documents/test.txt"); // prepare text to write to the file let fileText = "This is text in the file"; // try writing file to the non-sandboxed ~/Documents folder... do { try fileText.write(to: url, atomically: false, encoding: String.Encoding.utf8) } catch let error { // ... or find out why write fails print(error.localizedDescription) // write some code to recover from error } } // end func writeToFileBtnClicked ... |
So while this app didn’t come from the MAS and isn’t sandboxed, it is notarized, and therefore I can write a file to to the user’s ~/Documents folder, not a folder in the app sandbox. I get no special prompts asking for permission to write to the ~/Documents folder, though I swear it happens sometimes, maybe when an app is downloaded from the web and/or is installed using an installer? Here, it just works:
Using Full Disk Access
You may have installed apps from websites that, when run for the first time, ask you to go, on your Mac, to System Preferences -> Security & Privacy -> Privacy, unlock settings, and grant Full Disk Access to the app that prompted you. These are almost always un-sandboxed apps that need access to as much of your file system as is possible, like malware scanners, disk cleanup utilities, or file backup services. If you didn’t grant Full Disk Access, macOS would prompt you for access permission to folders a billion times, thus rendering such software almost useless. As the preference panel for Full Disk Access says, we’re talking about permission for:
…data like Mail, Messages, Safari, Home, Time Machine backups, and certain administrative settings for all users of this Mac.
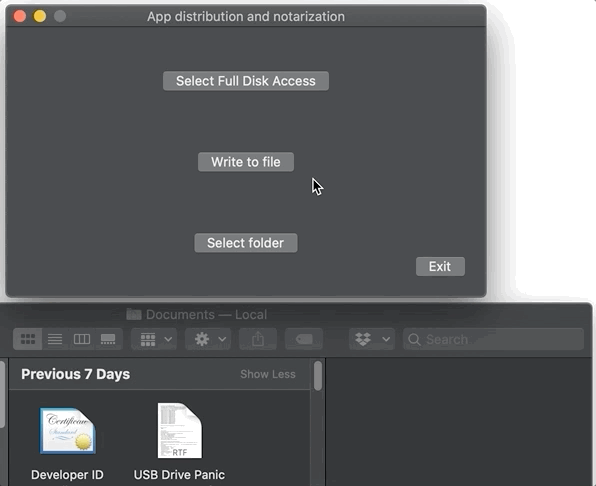
You can make it easier on users by wiring up a button like in my sample app entitled “Select Full Disk Access.” It is wired to this @IBAction:
|
1 2 3 4 5 6 7 8 9 10 |
... @IBAction func selectFullDiskAccessBtnClicked(_ sender: Any) { // we use an Apple-specific URL to open System Preferences let url = URL.init(string: "x-apple.systempreferences:com.apple.preference.security?Privacy_AllFiles") // we present System Preferences for "Full Disk Access" to the user NSWorkspace.shared.open(url!) } ... |
As you see from the image below, my button and code does what it says:

Do not conflate or confuse Full Disk Access with sandboxing. If you grant Full Disk Access to a sandboxed app and it reads outside of its container, it will crash immediately, killed by the macOS sandboxd daemon. I’ll provide an example in the next section.
Going with sandboxing
By now, you understand the simplicity and convenience of using macOS apps that are not sandboxed. But suppose you are required to use sandboxing, for example, because you want to submit your app to the Mac App Store (MAS). Add the sandbox capability (and thus entitlement) to your app:
If you add the App Sandbox capability, a corresponding entitlement is added to the project’s configuration. Here’s the project’s .entitlements file after adding sandboxing:
|
1 2 3 4 5 6 7 8 |
<?xml version="1.0" encoding="UTF-8"?> <!DOCTYPE plist PUBLIC "-//Apple//DTD PLIST 1.0//EN" "http://www.apple.com/DTDs/PropertyList-1.0.dtd"> <plist version="1.0"> <dict> <key>com.apple.security.app-sandbox</key> <true/> </dict> </plist> |
What happens if we press my sample app’s “Write to file” button after adding the sandbox entitlement? Give it a try. The app crashes, right? Let’s look in Console.app for (redacted) crash logging reported by the system process/daemon sandboxd as an ERROR of category Violation:
|
1 2 3 4 5 6 7 8 9 10 11 12 |
Sandbox: AppNotaryAndDist(7030) deny(1) file-write-create /Users/andrewjaffee/Documents/test.txt Violation: deny(1) file-write-create /Users/andrewjaffee/Documents/test.txt Process: AppNotaryAndDist [7030] Path: /path/to/folder/Build/Products/Debug/AppNotaryAndDistrib.app/Contents/MacOS/AppNotaryAndDistrib Load Address: 0x100000000 Identifier: com.yourDomain.AppNotaryAndDistrib Version: 1 (1.0) Code Type: x86_64 (Native) Parent Process: debugserver [7032] Responsible: /path/to/folder/Build/Products/Debug/AppNotaryAndDistrib.app/Contents/MacOS/AppNotaryAndDistrib User ID: 501 ... |
At its simplest, when an app is sandboxed, you can only write to and read from the folders in the app’s container. If you want to get down into the really nitty-gritty, you can also read from a list of “world readable [files], in certain directories, including /bin /sbin …,” and a few others, but those generally apply to special use cases.
Getting user intent for folders outside the sandbox
What if I determine the user’s “intent” by running my app, clicking my “Select folder” button, recording the folder the user picked (~/Documents), and then writing a file to that location? What I’m doing is saying, “Pick a folder (outside the container) where it’s OK for the app to read and write.” This is one of Apple’s methods for limiting the vulnerable surface area of the app to attack by malware. This requires some preparation via Xcode.
Go to TARGETS -> [TARGET_NAME] -> Signing & Capabilities -> App Sandbox -> File Access -> Type -> User Selected File and change Permission & Access from “None” to “Read/Write,” as show here:
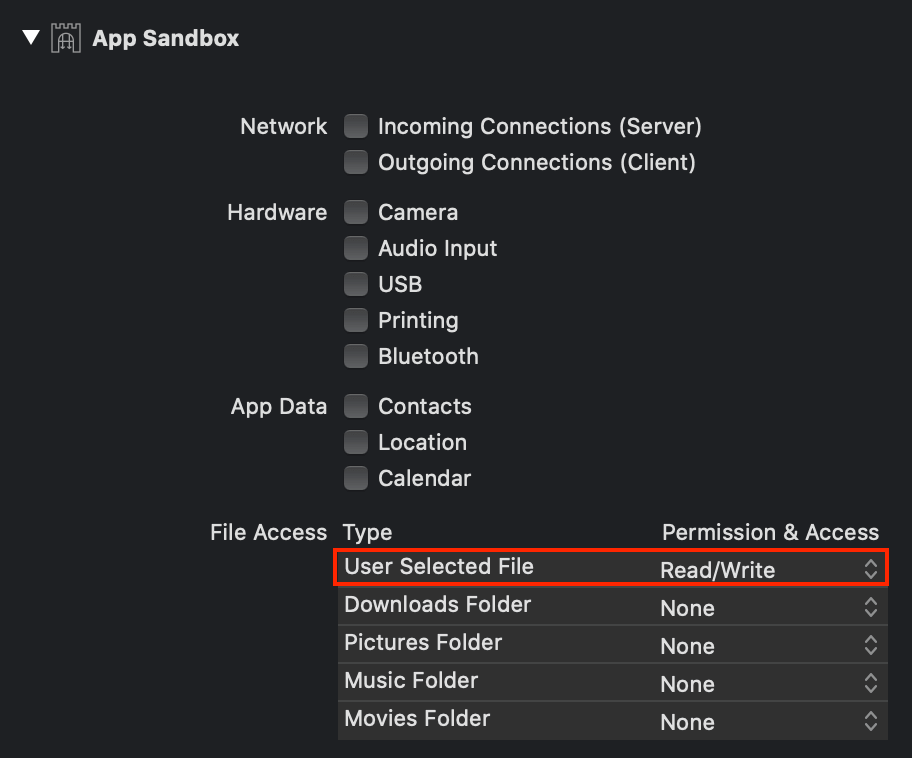
This will add the com.apple.security.files.user-selected.read-write entitlement to your project. Then follow all the usual steps we’ve discussed to get a notarized app and run it. Now let’s click my Select folder button, choose the ~/Documents folder by browsing to it using the NSOpenPanel, highlighting the folder, and pressing the Select button. If we do all this before we click my Write file button, then macOS will let us write the test.txt file to the user-selected location, like so:
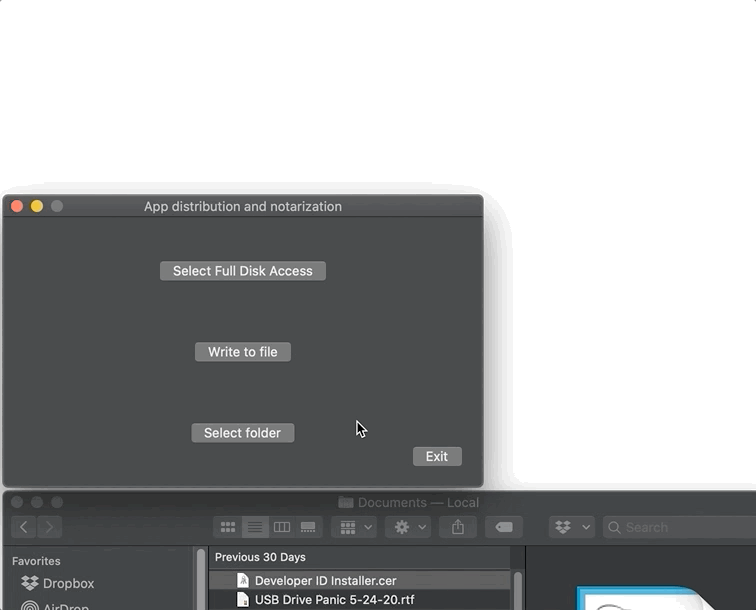
The app didn’t crash because the user told us that writing to ~/Documents was OK. Here’s the code behind my app’s Select folder button. It’s semantically clear and well-commented, so you shouldn’t have any problem reading it:
|
1 2 3 4 5 6 7 8 9 10 11 12 13 14 15 16 17 18 19 20 21 22 23 24 25 26 27 28 29 30 31 32 33 34 35 36 37 38 39 40 41 42 43 44 45 46 47 48 49 50 51 52 53 54 55 56 57 58 59 60 61 62 |
... /** We encourage the user to select a folder, like ~/Documents, showing their "intent" to grant our app access to that folder. That directory is OUTSIDE of this app's sandbox. We do this in preparation for allowing us to reach out of our container. */ @IBAction func selectFolderBtnClicked(_ sender: Any) { let folderSelectionDialog = NSOpenPanel() // a modal dialog folderSelectionDialog.prompt = "Select" folderSelectionDialog.message = "Please select a folder" folderSelectionDialog.canChooseFiles = false folderSelectionDialog.allowedFileTypes = ["N/A"] folderSelectionDialog.allowsOtherFileTypes = false folderSelectionDialog.allowsMultipleSelection = false folderSelectionDialog.canChooseDirectories = true // open the MODAL folder selection panel/dialog let dialogButtonPressed = folderSelectionDialog.runModal() // if the user pressed the "Select" (affirmative or "OK") // button, then they've probably chosen a folder if dialogButtonPressed == NSApplication.ModalResponse.OK { if folderSelectionDialog.urls.count == 1 { if let url = folderSelectionDialog.urls.first { // if the user doesn't select anything, then // the URL "file:///" is returned, which we ignore if url.absoluteString != "file:///" { // save the user's selection so that we can // access the folder they specified (in Part II) self.userSelectedFolderURL = url print("User selected folder: \(url)") } else { print("User did not select a folder: file:///") } } // end if let url = folderSelectionDialog.urls.first { } else { print("User did not select a folder") } // end if folderSelectionDialog.urls.count } else { // user clicked on "Cancel" print("User cancelled folder selection panel") } // end if dialogButtonPressed == NSApplication.ModalResponse.OK } // end func selectFolderBtnClicked ... |
I find this all very fascinating. Apple is making sure the user carefully considers what folders their already-sandboxed apps will be able to access. This is another tool in the fight to reduce or control the attackable surface area to which apps are exposed.
Persistent access outside of the sandbox
There’s a catch to the user showing their intent as in the previous section. The folder selected by the user is only added to your sandbox until the app is closed. If you were to write to that folder after reopening the app, the app would crash. There is a solution, but it’s really going beyond the scope of this tutorial. There’s not enough space and time to cover everything, so I leave you with Apple’s very detailed documentation on remembering user intent across app launches. In a nutshell, these docs show you how “you can retain access to file-system resources by employing a security mechanism, known as security-scoped bookmarks, that preserves user intent.”
Specify entitlements to specific Apple-defined folders
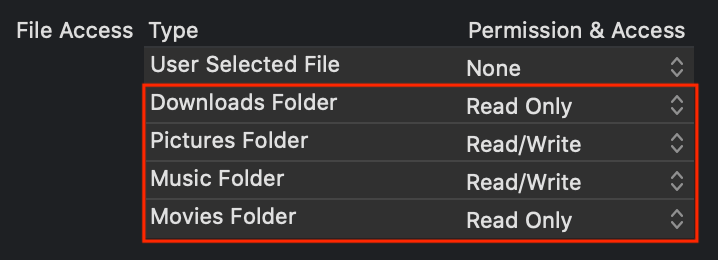
Remember how we obtained access to a folder of the user’s choosing outside of the app container in the section above entitled “Getting user intent for folders outside the sandbox?” Apple provides a simple mechanism for you to declaratively specify permanent access to user-level folders that everyone knows and loves. Go to TARGETS -> [TARGET_NAME] -> Signing & Capabilities -> App Sandbox -> File Access -> Type and change Permission & Access from None to Read/Write or Read Only for Downloads Folder, Pictures Folder, Music Folder, and/or Movies Folder. Of course, these correspond to the paths ~/Downloads, ~/Pictures, ~/Music, and/or ~/Movies, respectively. Here’s a sample configuration:
Using app groups for interprocess communication between your apps
It’s important to have options when creating software solutions to complex problems. Remember that two tutorials back, I wrote about how apps from the same vendor can share a common container, even if some of the apps are sandboxed, some of the apps are not sandboxed, all are sandboxed, or all are not sandboxed. It would be advantageous for you to read that tutorial.
Conclusion
The sandbox can be a powerful tool in the arsenal used to protect users from malicious code. In an ideal world, hopefully in the not-so-distant future, I would hope that the operating system and possibly smart hardware will be improved to reduce the vulnerable surface area of the app runtime environment. Then developers will be able to spend more time on solving problems for users rather than spending hours and hours trying to learn about sandboxing, app groups, security-scoped bookmarks, etc., ad nauseum. Users should be considered, too.
What type of experience is it for users to be constantly bombarded (interrupted) with prompts asking them to make decisions about things they might not even understand, like whether some app needs to access some directory or whether the app can install some “helper?”
I know I’m being hard on OS and hardware designers — being a bit of an armchair quarterback — but I already put a lot of time into considering how to make my code less vulnerable to malicious exploitation. My hope is for a division of labor, where the OS and hardware folks can strengthen IT security, developers can concentrate on creativity and problem sovling, all so we can all achieve our common goal: useful, creative, and safe apps.
That being said, I hope I’ve helped you understand the sandbox, or how not to use the sandbox, and I hope I’ve encouraged at least a few developers to give macOS development a chance, especially outside of the MAS, so that they can learn something new and make some extra money.

Avid and well-published author and software developer now specializing in iOS mobile app development in Objective-C and Swift. He has a strong background in C#, C++, .NET, JavaScript, HTML, CSS, jQuery, SQL Server, Agile, TDD, Git, and other technologies. He earned a B.Sc. and M.Sc. in Computer Science. Andrew has published several apps in the Apple App Store and has 30 years of experience in software development and professional writing. You can read his blog at http://iosbrain.com/.