



With iOS 27, Vision adds OCRTool, a system tool you attach to a Foundation Models session. Before this, reading a cover meant calling RecognizeTextRequest and picking the title out of the string yourself, or sending the photo to a cloud model. OCRTool stays on the phone. You label the image, the on-device model calls the tool when it needs the printed words, and you never upload the photo. In this tutorial, we'll photograph a book cover and turn it into a small card: the title, the author, a blurb from the cover, one line on why it's worth reading, and a short list of similar books.
This follows the Foundation Models series: Getting Started, @Generable, and Tool Calling. You can follow along without having built those sample apps.
OCRTool isn't a framework of its own. It's a Vision tool you pass into a LanguageModelSession. To follow along, make sure you have Xcode 27 installed, with the iOS 27 SDK.
Ready to get started? Let's dive in.
The Demo App: Shelf Spine
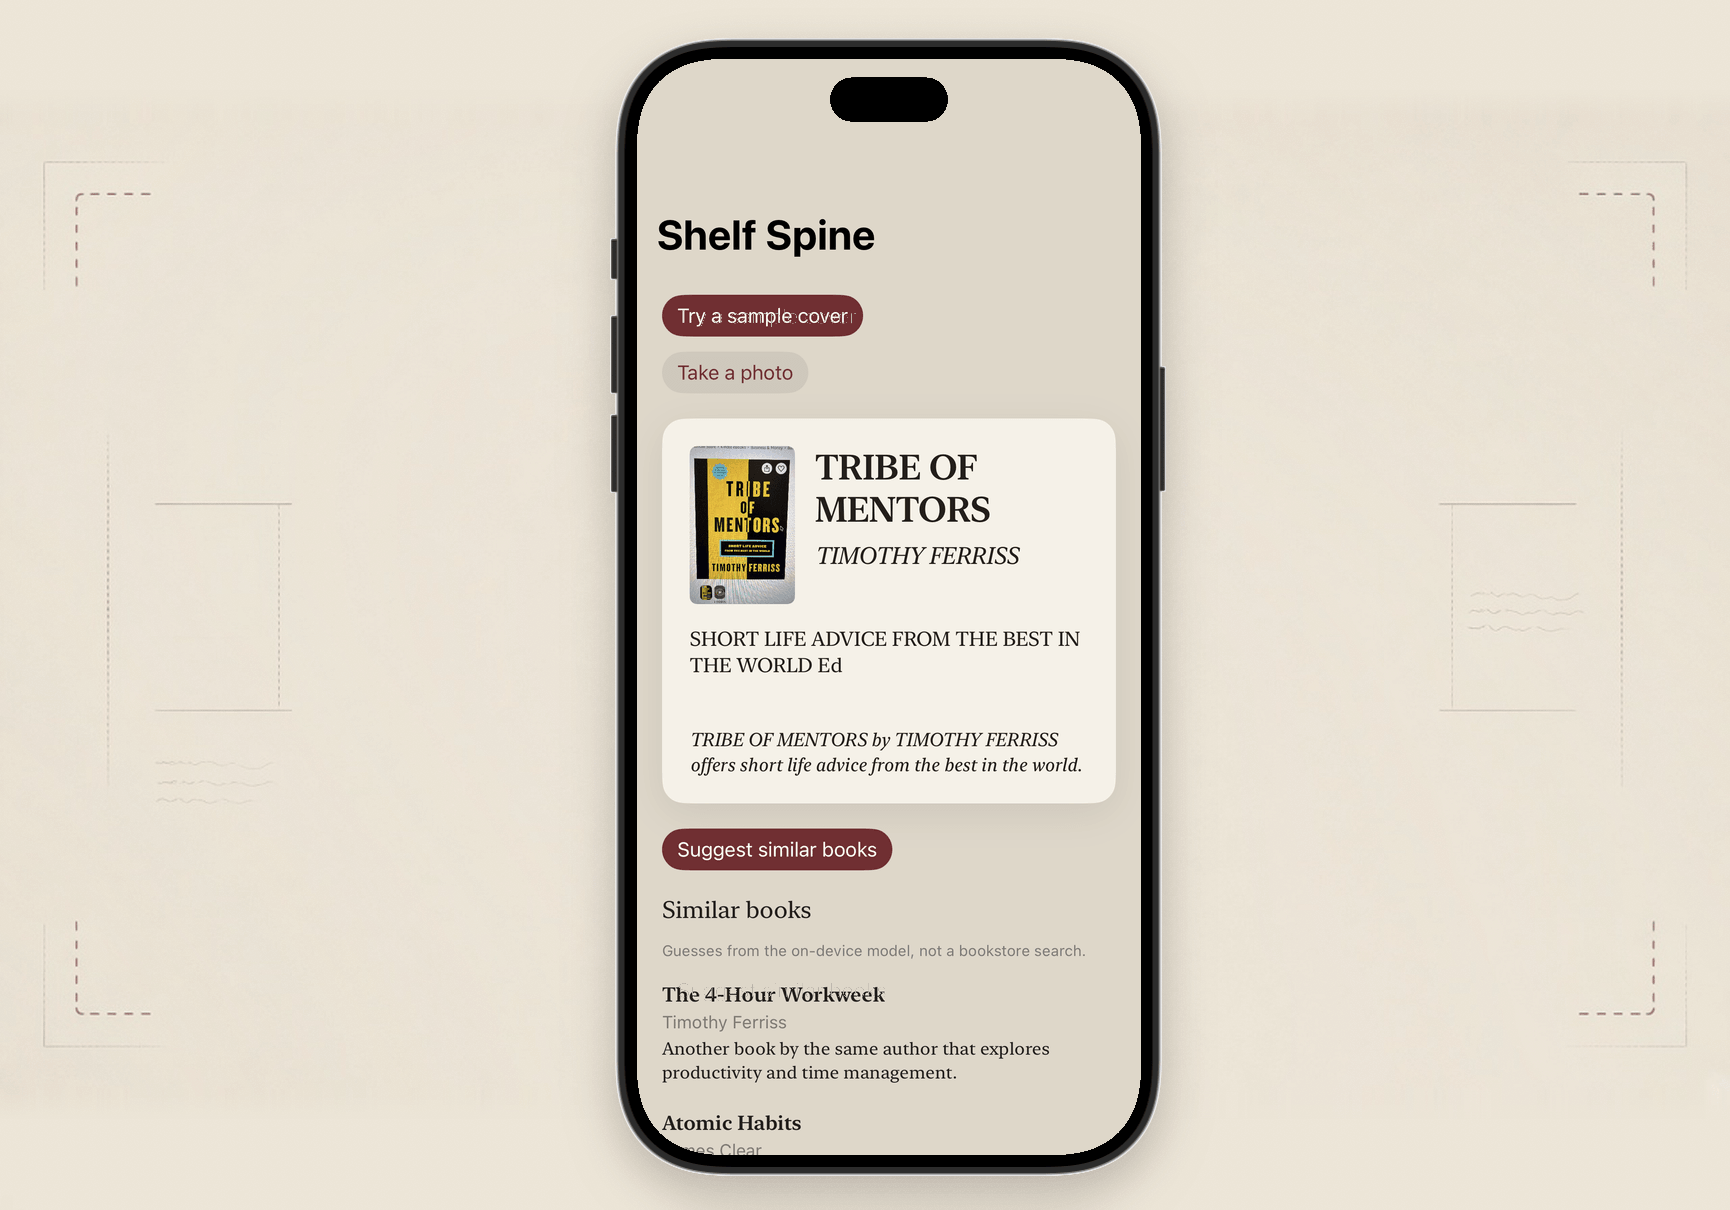
Shelf Spine takes a cover and automatically extracts text from the image like title, subtitles, and author. You can download the demo on GitHub and try it out.
Open it in Xcode 27 and run it on an iOS 27 simulator or on an iPhone. If you test it on a simulator, use the sample cover to test it out. For physical iPhone, you can take a photo of any book covers and let the app recognize the book information. The read uses SystemLanguageModel, the on-device model, so the app works offline.
The Basic Usage of OCRTool
To read the printed words on a cover, you give a language model session a Vision tool called OCRTool. It recognizes text in an image and returns a string containing all the text it found. You don't call the tool yourself. You attach it to a LanguageModelSession, and the on-device model uses it when the prompt needs those words.
You import Vision alongside FoundationModels and create a session with an OCRTool. Here's the basic setup from Apple's documentation:
let ocrTool = OCRTool()
let session = LanguageModelSession(tools: [ocrTool])
That's enough to get started. OCRTool() uses a default name and description. If you want to steer when the model reaches for the tool, you can override both. Here's how you customize them:
let customTool = OCRTool(
    name: "extractText",
    description: "Extract text from documents"
)
The name is how the tool is exposed to the model. The description is what the model uses to decide when to call it.
You also pass the photo as an Attachment and give it a label. That label is how the model identifies which image to hand to OCRTool. We'll use that when we read the cover.
One more thing: OCRTool isn't available in Simulator. You'll see how the sample deals with that later.
Checking the Availability of the System Language Model
The first thing the sample does is check whether the on-device language model is available. That's SystemLanguageModel.default.availability. If the model is ready, you show the shelf. If it isn't, you show the reason and stop. Here's the check from the sample:
private var model = SystemLanguageModel.default
var body: some View {
switch model.availability {
case .available:
mainView
case .unavailable(let reason):
Text(unavailableMessage(reason))
.multilineTextAlignment(.center)
.padding(24)
}
}mainView is the rest of the screen: the sample button, the card, and, later, the similar-books list. The unavailable branch is a sentence, not a spinner. The model can be missing because the device isn't eligible, because Apple Intelligence is off, or because the model is still downloading. Here's the helper that turns that reason into a sentence:
private func unavailableMessage(_ reason: SystemLanguageModel.Availability.UnavailableReason) -> String {
    switch reason {
    case .deviceNotEligible:
        return "The device is not eligible for Apple Intelligence."
    case .appleIntelligenceNotEnabled:
        return "Apple Intelligence is not enabled on this device."
    case .modelNotReady:
        return "The model isn't ready. It may still be downloading."
    @unknown default:
        return "The model is unavailable."
    }
}
If you stop here, the app already runs. It either shows the shelf or it tells you why it can't.
Reading a Book Cover with OCRTool
Now that you should have a basic understanding of OCRTool, let's see how we use it to recognize a book cover.
Here's how the sample creates the session:
private func makeSession() -> LanguageModelSession {
    #if targetEnvironment(simulator)
    LanguageModelSession(model: model, instructions: instructions)
    #else
    LanguageModelSession(
        model: model,
        tools: [
            OCRTool(
                name: "readBookCover",
                description: "Read the printed title, author, and blurb on a book cover or spine."
            )
        ],
        instructions: instructions
    )
    #endif
}
OCRTool() with no arguments is enough if you're happy with the default name. The sample names it readBookCover so the prompt can ask for that tool by name. The instructions stay short: use the printed title, author, and blurb, and don't invent a different book.
The #if is there because OCRTool isn't in the Simulator SDK. On a Mac that can run the on-device model, Simulator can still fill the card. It just can't call OCRTool.
The next step is to ask that session to read the cover and fill the card. You do that in one call: a short prompt, plus the photo. The photo goes in as an Attachment, and you give it a label, book cover. That label is how the model knows which image to hand to OCRTool. Here's the call:
card = try await session.respond(generating: BookCard.self) {
    "Read this book cover. Use readBookCover on the image labeled book cover. Fill the title, author, and blurb from the printed words only."
    Attachment(image).label("book cover")
}.content
respond(generating:) is the guided-generation call from the @Generable article. The prompt builder takes a string and the labeled attachment together. The sample imports UIKit, so Attachment can take the UIImage from the camera or from the study cover. You can leave the photo at the size the camera gave you.
Generating a Structured Book Card
A cover isn't a paragraph you want to split with components(separatedBy:). You describe the card as a Swift type, and the model fills it. BookCard lives in its own file. Here's the type:
@Generable
struct BookCard {
    @Guide(description: "The book title printed on the cover.")
    let title: String

    @Guide(description: "The author name printed on the cover.")
    let author: String

    @Guide(description: "A short blurb copied from the cover. Leave it empty if the cover has no blurb.")
    let blurb: String
}
@Generable builds the schema the model has to follow. Each @Guide description is a hint about that field, and those strings go into the prompt, so you keep them to a sentence. The blurb guide tells the model to copy the cover and to leave the field empty when the cover has no blurb. That's how you avoid a made-up plot summary sitting where the printed sentence should be.
readCover() writes response.content into the title, author, and blurb fields on the card. Those fields are text fields, so you can correct a word the tool misread.
If the call throws, or the title and author both come back empty, a photo leaves the fields blank so you can type. Try a sample cover doesn't stop there. The card uses the words printed on the study cover, and the recommendation still runs. Here's that branch:
} catch {
    if isSample {
        let session = makeSession()
        self.session = session
        showPrintedSample(liveToolUnavailable: usingSampleText)
        await writeRecommendation()
    } else {
        status = "Couldn't read that cover. Type the title and author."
    }
}
On a device, Try a sample cover still asks OCRTool first. showPrintedSample(liveToolUnavailable:) runs only when that read throws or comes back without a title. In Simulator, usingSampleText is true, so the note says this isn't a live read. A photo that fails doesn't get the printed-text fallback. You type the title and author, and you move on.
Writing a Recommendation
The card isn't finished when the fields are filled. We ask the same session for one sentence on why the book is worth reading, and we show that sentence under the blurb. Because the session already has the cover in its transcript, we don't attach the image again. Here's the follow-up:
private func writeRecommendation() async {
    guard !trimmed(title).isEmpty else { return }
    let session = session ?? makeSession()
    self.session = session

    do {
        let response = try await session.respond(
            to: "Write one short line on why \(title) by \(author) is worth reading. Keep it to a single sentence."
        )
        recommendation = trimmed(response.content)
    } catch {
        recommendation = ""
    }
}
Suggesting Similar Books
The last step is a separate tap, not another automatic call. Suggest similar books asks the same session for two or three other books. These are guesses from what the on-device model knows. They are not a search of a bookstore catalog, and the screen says that under the list. The study cover is a public-domain novel on purpose, so the guesses tend to be other books you'd recognize, rather than a random scrape of a catalog.
You describe one suggestion, then a small list with a count. Here's the result type:
@Generable
struct SimilarBook {
    @Guide(description: "The title of a similar book.")
    let title: String

    @Guide(description: "The author of that book.")
    let author: String

    @Guide(description: "One sentence on why it is similar to the cover we just read.")
    let reason: String
}

@Generable
struct SimilarBooks {
    @Guide(description: "Two or three similar books. These are guesses, not a catalog search.", .count(2...3))
    let books: [SimilarBook]
}
@Guide(.count(2...3)) constrains the array to a closed range, two or three items, instead of one fixed count. The model has to return two or three SimilarBook values, each with a title, an author, and one line. The button calls this:
let response = try await session.respond(generating: SimilarBooks.self) {
    """
    Suggest two or three books similar to \(title) by \(author).
    \(blurb)
    These are guesses from what you know, not a search of a bookstore catalog. For each book, give the title, the author, and one line on why it is similar.
    """
}
similarBooks = response.content.books
The code is very straightforward. We simply specify the instructions in plain text and ask the on-device to give us two or three books similar to the current one.
Summary
In this tutorial, we show you how to use OCRTool, a new tool in iOS 27, to perform text recognition in an image. Rather than being a standalone framework, OCRTool is a Vision system tool that you pass directly into a LanguageModelSession, letting the local Foundation Model read printed words whenever needed without manual string parsing like RecognizeTextRequest or uploading photos to the cloud.
By building a practical book scanner in Xcode 27, you have seen how effortlessly OCRTool turns a cover photo into a structured card complete with the title, author, blurb, and reading recommendations. If you want to bring fast, private text extraction to your next iOS app without relying on cloud servers or writing complex parsing code, give OCRTool a try in your upcoming projects.If you've got a photo of something with type on it, a receipt, a spine, or a label, try the labeled attachment first. The session you already use for @Generable can call OCRTool without a second framework and without a server.


