WWDC20 finished almost two months ago, but still we are all talking about the new frameworks, APIs, and improvements announced this year. Among all those there’s something that is going to have a strong impact to the way we work when implementing in-app purchases in our apps. That is the brand new capability of testing StoreKit locally in Xcode 12.
Up until now one had to stop the development workflow and visit the App Store Connect in order to create the necessary in-app purchase records and at least one sandbox user so testing is possible. After having gone through all required steps that we had described in a previous tutorial, developer could continue writing the in-app purchases related code. Obviously a disturbing yet unavoidable change of mindset like that is always enough to slow the development process down. In addition to that, subsequent visits to the App Store Connect would also be necessary most of the times in order to create additional test users.
Thankfully, that slow situation might belong to the past starting from Xcode 12 with the StoreKit local testing! Not only it’s not necessary to stop the development workflow in order to visit the App Store Connect, but implementing and debugging IAPs can now be done at a blazing speed locally, simply using the Xcode and the Simulator. Developers can focus more on code implementation and make in-app purchases work perfectly, without any concern about in-app purchases records or test users until all implementation is finished. An additional benefit of StoreKit local testing is that it works offline, so in-app purchases can be implemented and tested even when there’s no Internet access available.
During the next parts of this post you’ll probably find various reasons why testing StoreKit locally is great. However, what makes it really awesome is the fact that it will eventually make in-app purchases integration a less painful task, and testing implemented logic and any related user interface a much, much faster process.
Before we move on to the next part, there’s one more noteworthy fact; there’s a brand new framework called StoreKitTest which allows to write unit and UI tests, and therefore automate in-app purchases testing. Isn’t that really amazing?
About The Demo App
Like it happens in the most of our tutorials, there’s a project for you to download and start with. However, and contrarily to other times, here we’ll write almost no code at all; just a few bits at the end of the post when we’ll talk about unit testing. What we’ll focus on is the necessary configuration files that allow to test StoreKit locally, and the available options Xcode provides in order to test various states and conditions of in-app purchases.
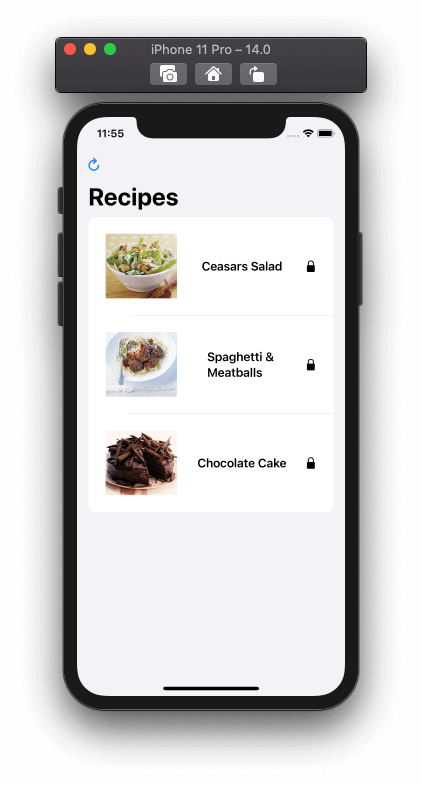
The demo project we’ll be working on in the upcoming parts of the tutorial is a SwiftUI based application. It’s really simple, as it shows a list with three recipes only which are meant to be purchased and therefore to be unlocked. Nothing will happen after they’re purchased, but we don’t really care about that; what we care about is the behaviour of the app when purchasing under various conditions.
The three recipes (in-app purchase products) are described in a JSON file called Recipes.json and you can find it in the project navigator along with the rest of the project files. Programmatically, a recipe is represented by an instance of the RecipeInfo class which is implemented in the RecipeInfo.swift file. Recipes are handled by the RecipesModel class, which among others contains the recipes array (a collection of RecipeInfo objects), and it is also responsible for reading the JSON file and decoding the recipe data.
RecipesModel class is also the one that triggers the in-app purchase actions, such as loading the in-app purchase products and initiating purchases. It’s important to highlight here that all the in-app purchases related code is implemented in the IAPManager class that you can find in the IAPManager.swift file. This class had been presented and implemented step-by-step in this older tutorial where we had talked about in-app purchases thoroughly, and you might want to take a look there too.
A requirement of the IAPManager class is that all product identifiers available for in-app purchases should exist in a property list (.plist) file, called IAP_ProductIDs.plist. You will find it in the project navigator too, and you can open it to see the identifiers matching to the three products we’ll be testing today.
Before we get to the end of this part, there’s one more important statement I’d like to make:
In order to test StoreKit properly in Xcode and get the maximum out of it, it’s recommended to perform local receipt validation. However, we won’t do that here; local receipt validation is a long discussion, probably the topic of one or more new tutorials, so we’ll just skip it. We’ll do the best we can without validating the fake receipt that Xcode will create for us, but in certain topics, such as subscriptions, we won’t go into much depth. We’ll see all necessary steps to configure a local test, but we won’t actually test anything. In case you have implemented your own local receipt validation mechanism, feel free to move further by following the guides from a link I give you later. To help the UI being in accordance to the purchased state of our recipes in this project, the User Defaults dictionary is used to mark whether recipes have been purchased or not.
Other than that, and after that long description, take your time to explore the demo project, and even visit the previous tutorial and read about the IAPManager class that is used in this project too. Once you’re ready, keep reading to unveil the most important aspects of StoreKit testing locally in Xcode.
Preparing To Test In-App Purchases Locally
There are some standard actions that must be taken in order to test in-app purchases locally in Xcode. The first one is to create a configuration file that simulates App Store by containing in-app purchase records. Depending on the kind of the in-app purchases an app offers, multiple configuration files can be created into the same app; for example, there can be one for testing non-consumable in-app purchases and one for testing subscriptions. However, note that only one can be active and used at any given time.
To create a configuration file, open the File > New > File… menu in Xcode, or just press Cmd+N in your keyboard. In the window that appears with all the available file templates, scroll to bottom under the Other section where you’ll find the StoreKit Configuration File. To spot it easier, you can also type “storekit” in the search bar.

Click next in order to give a name to the file that’s going to be created and added to the project. We are going to work with non-consumable products here, so give the name NonConsumables to it and then click Create. In fact, you can give any name you want, however that cleary indicates what that configuration file is all about.
Once the file appears in the project navigator, click to open it in case it won’t open automatically. Currently it’s empty, and it’s waiting for us to add either in-app purchases or subscriptions. We’ll go for the first, and the way to do that is by clicking on the Plus (+) button to the bottom left side of the window.

There’s a context menu appearing here containing options to add:
- A consumable in-app purchase.
- A non-consumable in-app purchase.
- An auto-renewable subscription.
We want to try out non-consumable in-app purchases here, so click on the second menu item. Here’s what you’ll see:
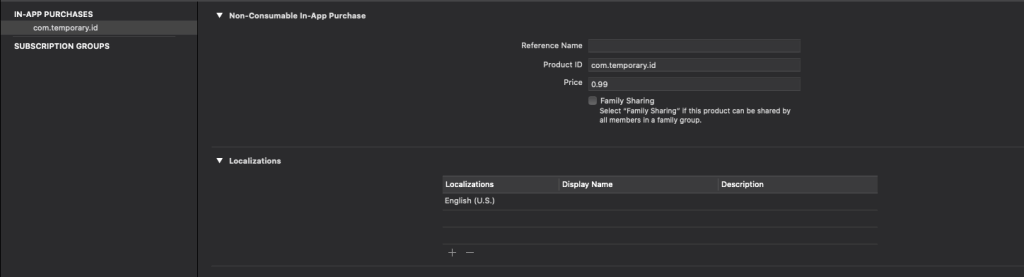
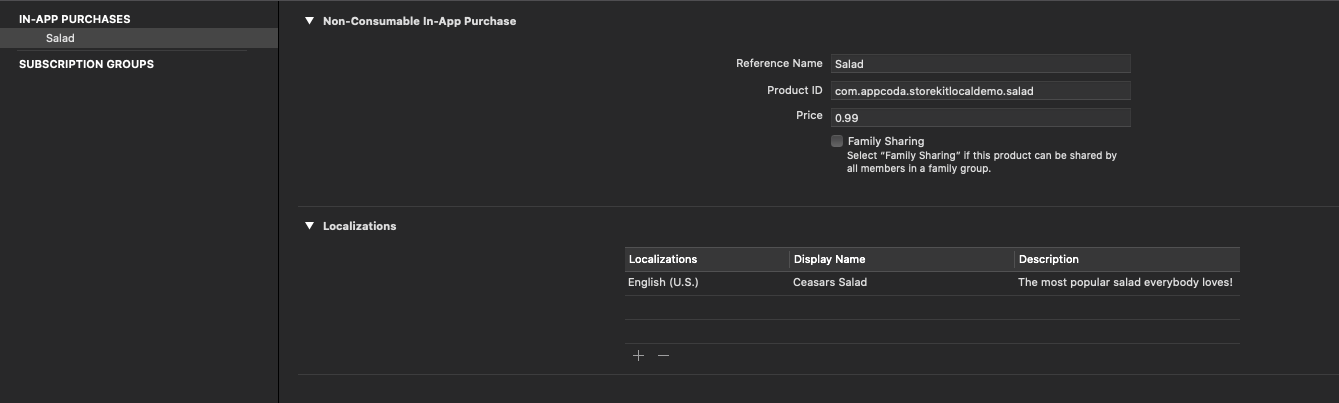
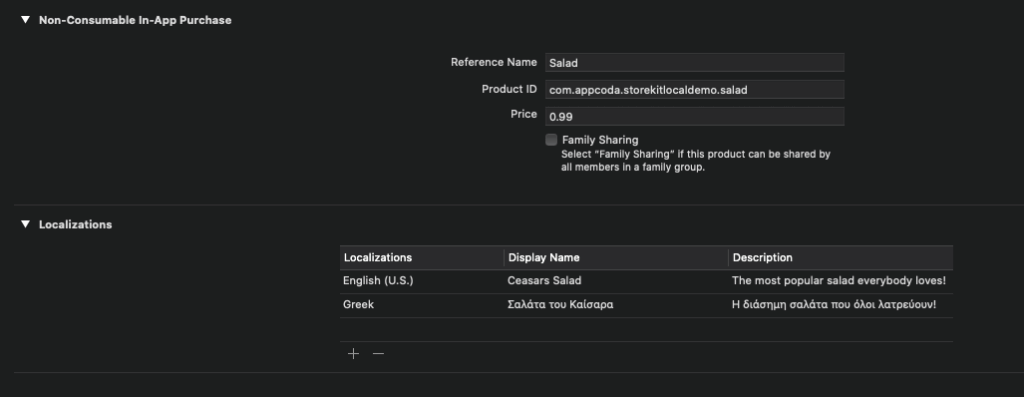
The Reference field should contain a short descriptive name for the in-app purchase. In our demo project we’re going to have sample recipes for a salad, a spaghetti and a cake, so let’s suppose that this record is about the first one; type Salad as the reference name.
The Product ID is the product identifier as we would also provide it in the App Store Connect. As I mentioned earlier, you can find all product identifiers that will be used in the app in the IAP_ProductIDs.plist file. The one that we’ll use here is the com.appcoda.storekitlocaldemo.salad. This will replace the default value “com.temporary.id”.
The next field is the Price of the in-app purchase. Even though there are price tiers in App Store Connect, here we can provide any value we want as a free text. The price is just for testing reasons, it won’t apply to the real in-app purchases and of course, there will be no charging. So feel free to set any price you’d like. For this specific in-app purchase that we’re configuring here, 0.99 value is just fine. The currency of the price will be the currency matching to the Simulator’s locale, or any locale that has been manually selected (we’ll talk about that later). So, 0.99 can be dollars, euros, yen, and so on.
Right below the three fields described we just met, there’s a checkbox which you can turn on to test the family sharing feature. We won’t do that here, so simply leave it unchecked.
Lastly, there’s the Localizations section. Here is the place where we must provide a display name and a description for our in-app purchase, as we would normally do in the App Store Connect too. Click on the default localization row and a window will be presented as a sheet. Fill the following values in:
- Display name: Ceasars Salad
- Description: The most popular salad everybody loves!
Here’s how the in-app purchase should look now configured:
The steps described above concern one in-app purchase only. However, in our demo application there are three recipes that we’ll offer as in-app purchases, so we have to add and configure the other two in a similar way.
Following the steps as described previously, add two more non-consumable in-app purchase entries and configure them as follows:
- For the spaghetti recipe in-app purchase:
- Reference name: Spaghetti
- Product ID: com.appcoda.storekitlocaldemo.spaghetti
- Price: 1.19
- Localizations > Display Name: Spaghetti & Meatballs
- Localizations > Description: A tasty meal that makes you happy!
- For the cake recipe in-app purchase:
- Reference name: Cake
- Product ID: com.appcoda.storekitlocaldemo.cake
- Price: 1.49
- Localizations > Display Name: Chocolate Cake
- Localizations > Description: The most delicious dessert ever!
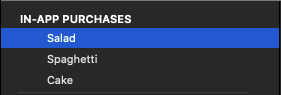
At the end, you should be able to see the next three in-app purchases in the configuration file:
In case you add in-app purchase records that you don’t want to use, select them by clicking on them (keep Ctrl key pressed for more than one record), and then click on the Minus (-) button at the bottom left side of the window.
Finally, when you finish configuring the in-app purchases press Cmd+S to save your changes.
Using The StoreKit Configuration File
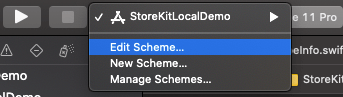
With the NonConsumables.storekit file created and configured, the next step is to tell our app that we want to use that instead of the App Store. To do that start by clicking on the StoreKitLocalDemo scheme in Xcode toolbar, and select the Edit Scheme option.
Make sure that the Run action is selected on the left column, and then choose the Options tab on the main window. You’ll find an option there called StoreKit Configuration, with its current value being to None. Click to open the popup button, and you will find the NonConsumables.storekit file we created right there. Select it and close the scheme editor.
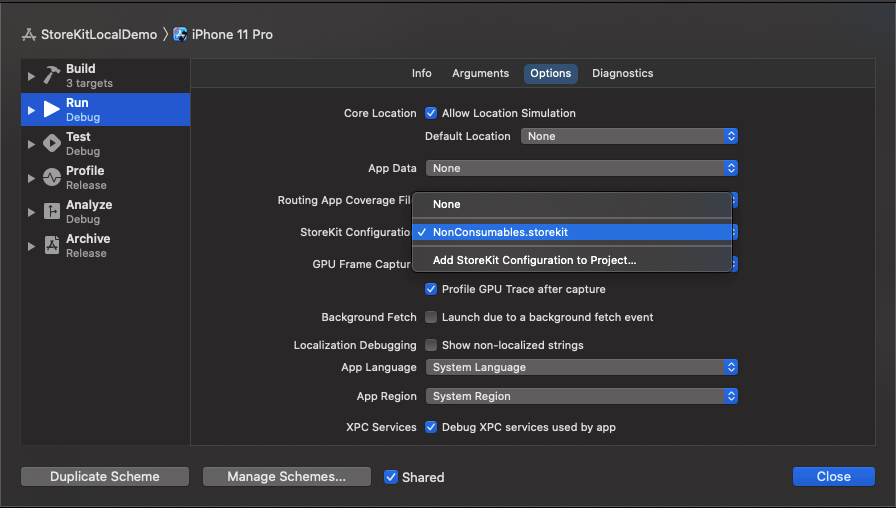
Note that additional .storekit files can be listed along with the NonConsumables.storekit file, but as I have already mentioned and as you just saw, only one can be active at a time.
Testing In-App Purchases
At this point we are able to test for first time in-app purchases locally. Make sure that you have followed all steps as described in the previous two parts, and then run the app in the Simulator. You’ll see the three demo recipes listed, where a lock icon exists next to each one to indicate that they have not been purchased yet.
Click on the first (or any other) recipe in the list, and you’ll see an alert showing app suggesting to buy it. The interesting thing here is that the alert contains the product display name, description and price as they were defined in the NonConsumables.storekit file. If you make any change on any of those three values in the storekit file, you’ll see it being reflected on this alert.
In the presented alert, select to buy the recipe by clicking on the Get recipe for XXX button. The system UI that would appear in a normal purchase from the App Store appears here too in order to simulate the purchase experience, and all you have to do to continue with the transaction is to click on the Confirm button. Of course, no charge will happen, and that’s something that is also clarified in the details section of the presented UI.
After confirming the purchase you’ll see a system alert notifying that the transaction was successful. The lock icon next to the selected recipe will disappear right after you dismiss that alert, which is the indication in our demo project that the recipe has been purchased.
The Transactions Manager
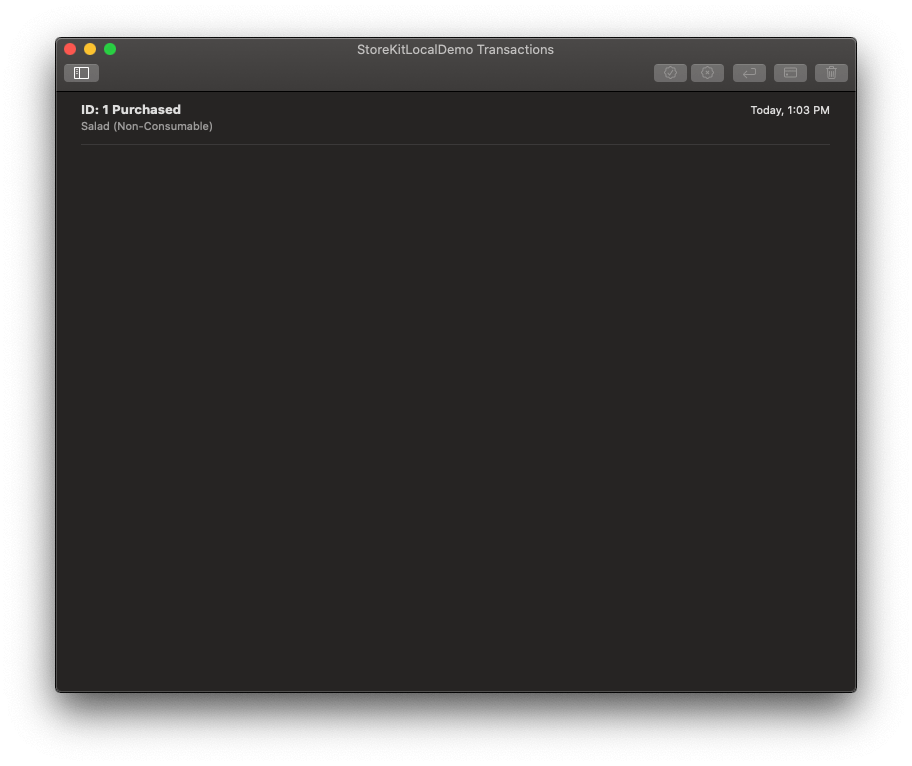
All transactions that take place locally using a storekit file like the one we created previously are visible in a special window in Xcode. This is the transactions manager, and you can present it either by going to the Debug > StoreKit > Manage Transactions… menu, or by clicking on the Manage StoreKit Transactions button in Xcode’s status bar while the app is running:
When transactions manager window is presented, you’ll find the transaction that you made in the previous part listed in it.
What is really great with local testing is that we can delete any transaction that was made so far and test our in-app purchases from start immediately. Using the App Store in order to do the exact same thing we would need to create new test users every time we would like to start testing fresh.
To see that in action, select the transaction you see in the manager window, and either click on the Trash button, or right click on it and select Delete Transaction.
Run the app again, but before you click to buy the same recipe again, please make sure to click on the Refresh button so the recipe is marked as non-purchased in the User Defaults dictionary and its visual state to be initialized. After you do so and you see the lock icon again, click to purchase the exact same recipe that you purchased before. You’ll see that you’ll go through the exact same steps you met previously. With a couple of clicks we managed to revert the app to its original state and to test in-app purchases from scratch, like nothing had already happened before.
Back to the transactions manager again, you’ll see that the new transaction is present, this time with a different identifier. Besides just deleting the purchase, you can also refund it through the manager window by selecting the respective option either in the toolbar or by right clicking on it. You can do so if you want now, however there will be no visual update in the UI of our demo app; as declared at the beginning, we won’t do any receipt validation here, and refund is something that can be checked only in the receipt. However, if you have your own local receipt validation mechanism, you can pretty easily check if the the transaction is marked as cancelled in the receipt, and update the UI of this demo or any other app accordingly.
Testing Interrupted Purchases
The scenario we tested above is the one everybody wishes for their apps. However, things are not going always as smoothly as we would want, so handling cases out of the ordinary is something that we must take care of as well. Such a case is an interrupted purchase; a purchase that cannot be completed because an action out of the app must be taken by the user. For example, the user might need to update the payment information to the App Store in order to be able to make purchases.
To test interrupted purchases, first select the NonConsumables.storekit file in the project navigator. Then go to menu Editor > Enable Interrupted Purchases. By doing so, any purchase you’ll be making from now on will be handled as interrupted, so don’t forget to go to the Editor > Disable Interrupted Purchases menu to switch back to normal later.
The IAPManager class provided in the starter project that contains the in-app purchases related implementation will return an error in case of an interrupted purchase. That error is a SKErrorDomain with value 0, meaning an unknown error. Most of the times you’ll want just to inform users that the transaction cannot be completed, and this is what happens in this demo project too. Of course, you can follow a different approach in your own apps and treat that error in a way that you find more proper and suitable.
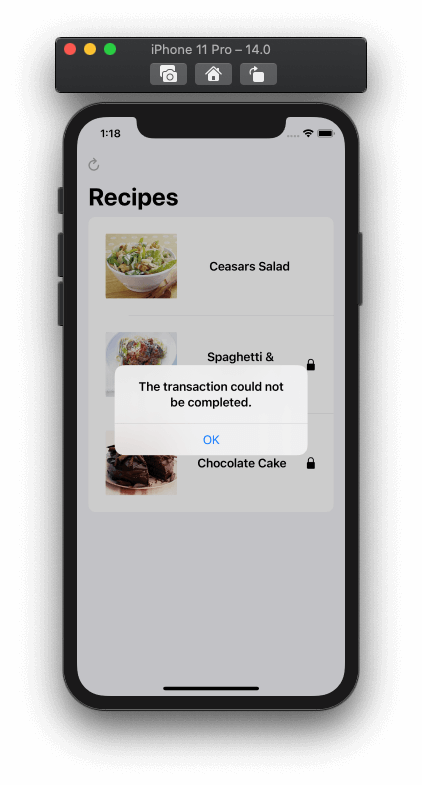
After having turned interrupted transactions on, run the app and try to purchase a recipe that you haven’t purchased already. If you have purchased all of them, then use the transactions manager window to delete them, and don’t forget to use the Refresh button in the app to initialize the UI too. Then, start the process of purchasing a recipe, and see what happens right after you confirm it through the system UI; an alert informing that the transaction could not be completed is presented, and you can see the error printed in the console at the same time too.
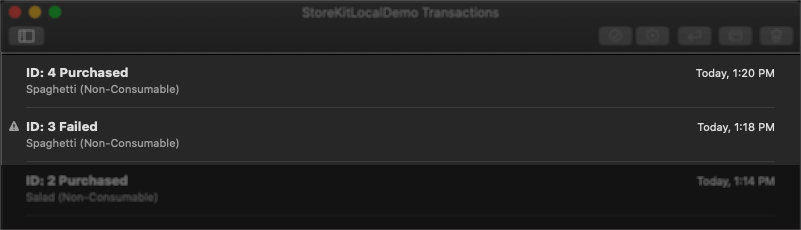
In the testing environment that we’re working on we can resolve the issue that caused the interrupted transaction and see how our app will behave. Go back to Xcode and open the transactions manager window. You’ll find the transaction that was made right there, marked as failed. To proceed, select it and use either the Resolve Issues button in the toolbar, or right click on it and choose the Resolve Issue option from the context menu.

The fake issue will be resolved and the transaction will continue normally. If you go back to the app, you’ll see that the purchase is now complete. At the same time, a new entry will show up in the transactions manager where the selected recipe is marked as purchased.
Testing Ask To Buy
Another option that can be found in the Editor menu when the NonConsumables.storekit file is selected in Xcode is the Enable Ask to Buy. By enabling it you can test what will happen if an underaged user initiates the purchase process through your app and the Ask to Buy feature is turned on on their device.
To see it in action make sure to open NonConsumables.storekit by selecting it in the project navigator, and then go to menu Editor > Enable Ask to Buy.
Note: Make sure that you’ve disabled interrupted purchases first.
Run the app again and start the purchase process of a recipe. After confirming the purchase you’ll get the following system alert:
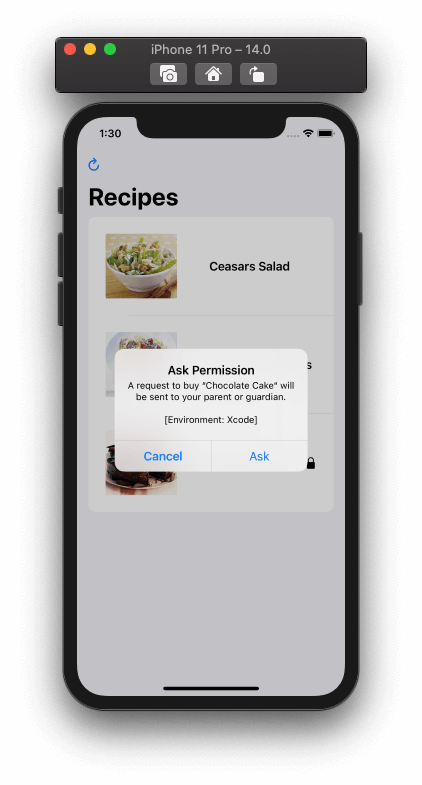
By selecting the Ask option you’ll see a detailed error logged in the console saying that the payment was complete but with errors. Until the parent or guardian of the underaged user who initiated the purchase will approve or reject it, there’s no need to change our UI. However, we must make sure that the recipe will become available in case of approval.
Once again, testing can continue through the transactions manager in Xcode. Open it, and you’ll find the transaction we just made being listed there, marked as Pending Approval.
Select the transaction and use the toolbar or right click on it and select the Approve Transaction to approve it. Switch back to the running application in the Simulator, and you’ll see that the recipe has being unlocked.
Read more about the Ask to Buy feature here.
Changing The Storefront
While testing in-app purchases locally in Xcode 12, it’s possible to change the default storefront and make sure that your app presents the price of the selected product properly formatted using the correct currency. Responsible for formatting properly the price in our demo app is the getPriceFormatted(for:) method of the IAPManager class. It’s already used as needed in the RecipesView, so all we have to do is to test if it’s working as expected. Before we continue, remember that during the configuration of the in-app purchases in the storekit file we set just a numerical value as the price; we did not set any currency. The displayed currency depends on the selected storefront.
Back in Xcode, open the NonConsumables.storekit file, and then go to Editor > Default Storefront > Greece menu. This will simulate the use of the Greek App store, and the euro sign will be displayed instead of the dollar sign next to the price when we’ll purchase a recipe.
After you make the above change, run the app and initiate a new purchase. You’ll see that this time the Euro currency sign is displayed next to the price value.

Changing The Default Localization
In conjunction to the default storefront, you can also change the default localization that will affect the displayed product metadata. To do so, make sure that the NonConsumables.storekit file is open, and then go to Editor > Default Localization > Greek menu (or choose any other localization you want).
However, simply changing the default localization is not enough. We must provide the respective display name and description that will be used for that localization in the configuration file. Let’s do that for the Salad in-app purchase.
Note: If you run the app without providing localized display name and description for a product, then no title and description will appear in the alert that prompts to buy the recipe.
In the NonConsumables.storekit file select the Salad in app purchase. Then, click on the Plus (+) button in the Localizations section. In the localization configuration window, first select the Greek locale (or any other locale you prefer). Then provide a localized display name and description in the language you prefer, or use the example given here. For the Greek locale, that would be:
- Display name: Σαλάτα του Καίσαρα
- Description: Η διάσημη σαλάτα που όλοι λατρεύουν!
Click on the Done button, and the new localization will appear in the Localizations list.
Run the app now, and initiate a purchase process. You’ll see that the message appearing in the alert is now translated to the selected localization, and the currency of the price is in accordance with that localization.
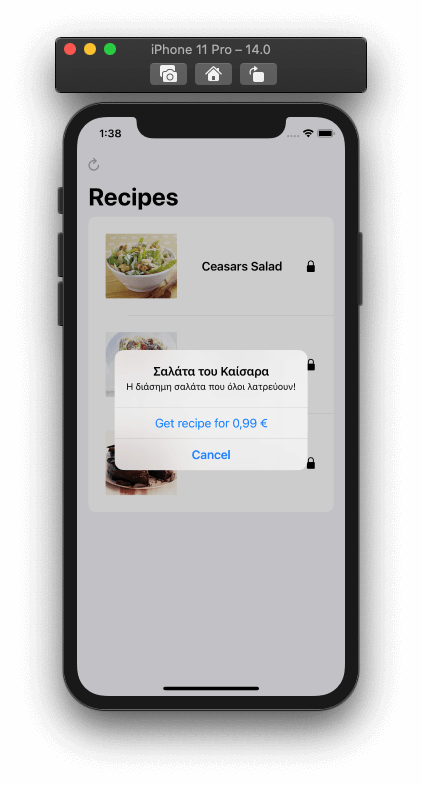
Of course, in a real app the UI should be translated too, however what we focus on now is the in-app purchases only; so just don’t mind about the rest of the UI that is still in English.
Creating A Configuration File To Test Subscriptions
Even though we won’t test subscriptions as they require receipt validation in order to properly work, we’ll go briefly through the steps of creating a storekit configuration file which includes subscription records.
Note: Don’t forget to edit the app scheme and select any new storekit configuration file in the StoreKit Configuration popup (Run action, Options tab) that you’d like to use for testing.
To start, go to File > New > File… menu, and then search for the “storekit” file template. Select it and proceed by naming it as Subscriptions. Once you see the Subscriptions.storekit file in the project navigator, click to open it.
The first move here is to add a new auto-renewable subscription record to the configuration file. Go to the Plus (+) button to the bottom left side of the configuration window, click on it and select the Add Auto-Renewable Subscription option from the context menu.
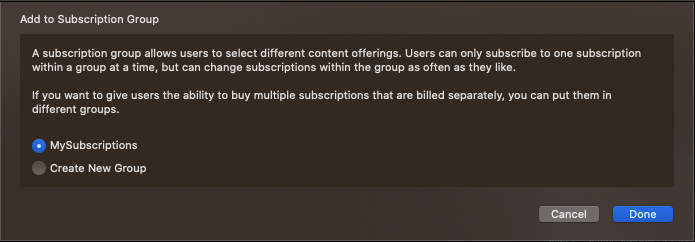
Since this is the first subscription added, you’ll see a window asking to create a subscription group. Such a group can contain multiple subscriptions, but users can subscribe to one of them only at a time, having however the ability to switch subscriptions that belong to the same group whenever they want.
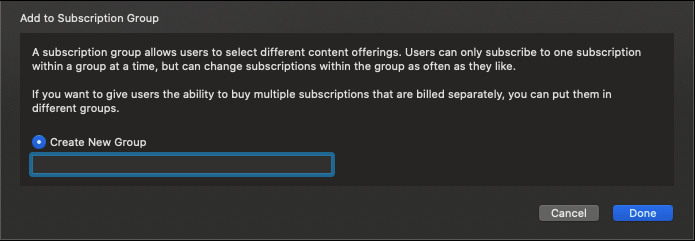
Even if you are going to have one subscription only a group is necessary to be created here, so just type a name in, such as MySubscriptions or anything else you want. Click on the Done button to proceed.
As you can see in the subscription configuration, there are several fields that we can provide values for, depending always on what we’d like to test.
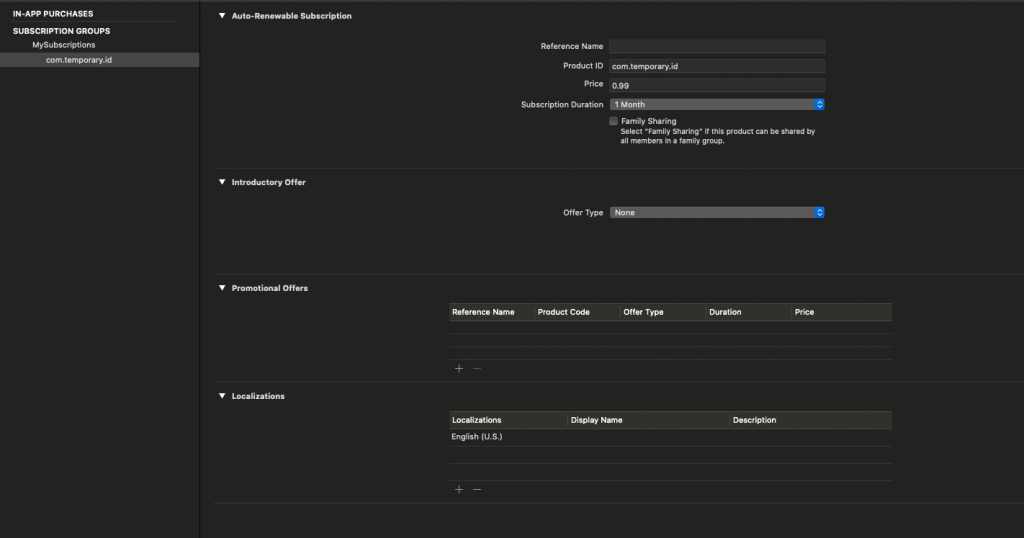
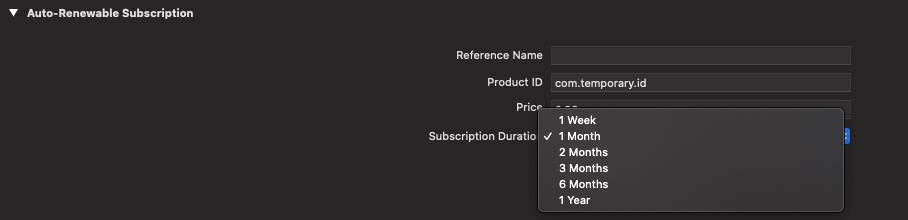
The first section under the Auto-Renewable Subscription section is pretty similar to the set of fields we filled in for each in-app purchase in the NonConsumables.storekit file. Each subscription should have a reference name, a product identifier, and a price that users should pay when the subscription is renewed. Additionally, here we have the Subscription Duration field for specifying how long the subscription we’re about to test will last.
Right below there’s the Introductory Offer section. Use it if you’re planning to provide a one-time introductory offer to the users and you want to test whether your app works as expected or not. To configure the introductory offer start by clicking on the Offer Type popup button. Select one of the three options (besides None) depending on the subscription kind:
- Pay as you go
- Pay up front
- Free
For any selected option you have to specify the offer duration in a new field that appears, and for the first two options there’s a price field to fill in as well that contains the offer’s lower price.

Upon testing the introductory offer, the offer price (or free) specified right above should be displayed in the system sheet presented to confirm the payment. Remember that any transaction is listed in the transactions manager window, so make sure to delete them from there if you want to start fresh.

To test if your subscription will be renewed properly after the period of the introductory offer, you can speed things up by going back to Xcode and the Subscriptions.storekit file. Then go to Editor > Time Rate menu, and choose a time rate that you find fast enough. Usually, “1 second is 1 day” is the option to go if you want to test quickly. Once the time period has expired, switch back to a slower time rate, and test if your app renews the subscription properly by reading the proper fields in the receipt.
Besides the introductory offer that you can test, there’s also the Promotional Offers section. Here you can define offers that you’d like to test for each subscription, which you can display either when the subscription expires or when you decide it’s the best time depending on certain conditions.
To create a promotional offer click on the Plus button in that section and fill the required values in. Type in custom value for the reference name and the product code, and then select the offer type, its duration, and a price if it’s not a free offer. Once again, use the Editor > Time Rate menu to speed up or slow down the time rate while testing.

Lastly, don’t forget to set a display name and a description for the default localization that will be displayed to users upon purchasing the subscription. This is similar to the localization values we also met previously in the in-app purchases storekit configuration file.

Note that for any new subscription record you’ll add to this configuration file, you’ll be given the option either to append it to the current subscriptions group, or create a new group to contain it.
You are recommended to take a look at the guides you’ll find here about testing subscriptions.
Writing Unit Tests
Besides all the manual work that can be done to test in-app purchases locally as shown in the previous parts, it’s also possible to create unit and UI tests thanks to a new framework called StoreKitTest. This framework provides the SKTestSession class, which in turn offers several methods and properties in order to configure test conditions and perform fake transactions.
We’re going to write a couple of unit tests here and get a small, first taste of the StoreKitTest framework. Begin by opening the StoreKitLocalDemoTests.swift file; the place to write unit tests in our project. Then, go to the top of the file, and right after the import XCTest line, import the StoreKitTest framework:
|
1 |
import StoreKitTest |
In our first test we’re going to do something really simple; we’ll make a purchase and we’ll ensure that it’s completed successfully. Since it’s a test environment things can’t go wrong, but it’s a good chance to meet a few bits of the new API and validate that our in-app purchases code works properly.
Let’s define the following new method:
|
1 2 3 |
func testSaladPurchase() throws { } |
Initially, we’ll create a SKTestSession instance through which we’ll test the in-app purchase:
|
1 2 3 |
func testSaladPurchase() throws { let session = try SKTestSession(configurationFileNamed: "NonConsumables") } |
See that upon initialization we provide the name of the storekit configuration file we want to use.
Then, in order to have everything run automatically from start to finish, let’s disable the appearance of any system dialogs and UI with the next line:
|
1 2 3 4 |
func testSaladPurchase() throws { ... session.disableDialogs = true } |
Lastly, we’ll make the purchase using the buyProduct(productIdentifier:) method of the SKTestSession class through the session object. This is a method that can throw an exception, and since this is the last line of our method, we’ll call it as the argument of a XCTAssertNoThrow(_:) method:
|
1 2 3 4 |
func testSaladPurchase() throws { ... XCTAssertNoThrow(try session.buyProduct(productIdentifier: "com.appcoda.storekitlocaldemo.salad")) } |
Notice that it’s necessary to specify the product identifier matching to the in-app purchase we want to test. Here’s the full method:
|
1 2 3 4 5 |
func testSaladPurchase() throws { let session = try SKTestSession(configurationFileNamed: "NonConsumables") session.disableDialogs = true XCTAssertNoThrow(try session.buyProduct(productIdentifier: "com.appcoda.storekitlocaldemo.salad")) } |
Let’s run the test now. Click on the small play icon on the left side of the method’s name, and wait until the test is finished. It should be successful, if it isn’t, please make sure that you followed all steps here as described.

To see the purchase that was just made, first run the app by pressing Cmd+R; then open the transactions manager; the transaction will be listed there.
It’s possible to delete all previous transactions each time a test is running. Right after the session initialization add the next line:
|
1 |
session.clearTransactions() |
Let’s pass to the second test now. This time we’ll test the Ask to Buy scenario in a new test method:
|
1 2 3 |
func testAskToBuy() throws { } |
As previously, we’ll start by initializing a test session object and by performing some basic configuration:
|
1 2 3 |
let session = try SKTestSession(configurationFileNamed: "NonConsumables") session.clearTransactions() session.disableDialogs = true |
To enable the Ask to Buy feature we just need to set true to the following flag:
|
1 |
session.askToBuyEnabled = true |
Now we can buy the same in-app purchase as before:
|
1 |
XCTAssertNoThrow(try session.buyProduct(productIdentifier: "com.appcoda.storekitlocaldemo.salad")) |
If the above assertion is successful, then a new transaction will be created with the purchase pending for approval. In this case, the transaction that was made remains in the deferred state and it’s completed only once it gets approved or rejected. To test that, let’s add the next two assertions:
|
1 2 |
XCTAssertTrue(session.allTransactions().count == 1) XCTAssertTrue(session.allTransactions()[0].state == .deferred) |
Here’s the entire method so far:
|
1 2 3 4 5 6 7 8 9 10 11 |
func testAskToBuy() throws { let session = try SKTestSession(configurationFileNamed: "NonConsumables") session.clearTransactions() session.disableDialogs = true session.askToBuyEnabled = true XCTAssertNoThrow(try session.buyProduct(productIdentifier: "com.appcoda.storekitlocaldemo.salad")) XCTAssertTrue(session.allTransactions().count == 1) XCTAssertTrue(session.allTransactions()[0].state == .deferred) } |
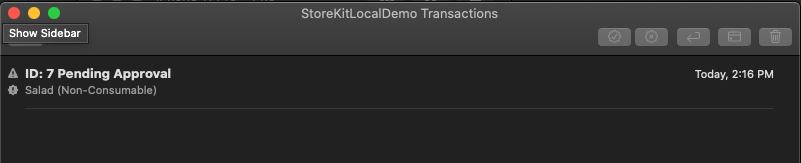
Run the test, and once it’s marked as successful, run the app and open the transactions manager. You will find the in-app purchase in the pending approval state:
Let’s add one last assertion in the above test method where we’ll be approving the purchase:
|
1 2 3 4 5 |
func testAskToBuy() throws { ... XCTAssertNoThrow(try session.approveAskToBuyTransaction(identifier: session.allTransactions()[0].identifier)) } |
The identifier that the approveAskToBuyTransaction(identifier:) method requires is the transaction identifier as shown in the transactions manager.
Run the test again, and then run the app and open the transactions manager; this time the transaction is marked as purchased because it was approved with the last line we just added.
In the above two tests we met a few methods and properties of the SKTestSession class. I prompt you to read more about this class and all the available API to use, so you can create tests that can cover all possible cases when dealing with in-app purchases.
Summary
Testing StoreKit locally is a game-changer when the implementation of an app comes to in-app purchases. It can really save a significant amount of time and allows to focus on the important things; how to make an app work properly when it offers in-app purchases. Of course, this doesn’t mean that testing with real in-app purchase records in the App Store Connect shouldn’t be done at all.
On the contrary, that’s the next step once we ensure that our app works properly after testing locally. In any case, I hope that you found some valuable and interesting stuff among the lines of this tutorial, and please make sure to watch the Introducing StoreKit Testing in Xcode session of WWDC20. Enjoy testing StoreKit!
For reference, you can download the complete project here.

Gabriel has been a software developer for almost about two decades and he’s got long experience in programming using various languages. iOS development is what he’s being doing since 2010. On top of that, he’s added macOS programming to his repertoire over the last few years. Using Swift of course! Follow Gabriel at Google+ and Twitter.