Earlier, I gave you an introduction on SwiftUI button, let’s dive a little bit deeper and see how to create a custom button style and animate a button. This is a follow-up tutorial on the beginner’s guide to SwiftUI button, so if you haven’t read that, please check it out first.
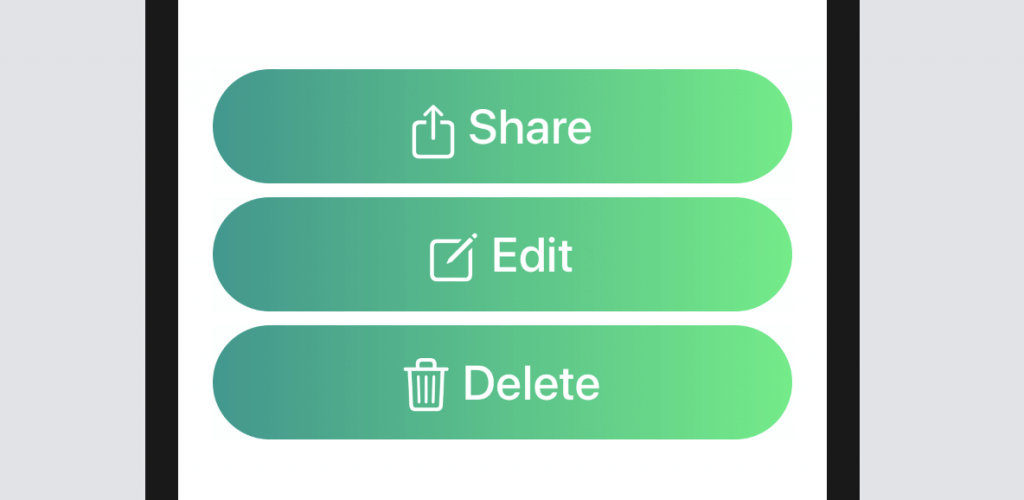
In a real world app, you may use and apply the same button design on multiple buttons. Let’s say, you’re creating three buttons: Delete, Edit, and Share that all have the same button style like this:
You’ll probably write the code like below:
|
1 2 3 4 5 6 7 8 9 10 11 12 13 14 15 16 17 18 19 20 21 22 23 24 25 26 27 28 29 30 31 32 33 34 35 36 37 38 39 40 41 42 43 44 45 46 47 48 49 50 51 52 53 54 55 56 57 58 59 60 61 62 63 |
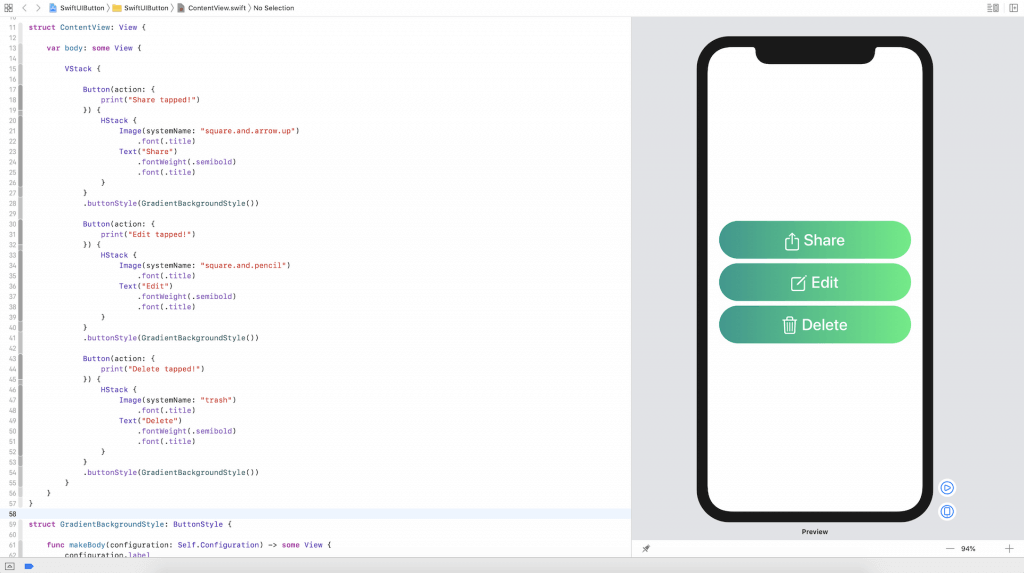
struct ContentView: View { var body: some View { VStack { Button(action: { print("Share tapped!") }) { HStack { Image(systemName: "square.and.arrow.up") .font(.title) Text("Share") .fontWeight(.semibold) .font(.title) } .frame(minWidth: 0, maxWidth: .infinity) .padding() .foregroundColor(.white) .background(LinearGradient(gradient: Gradient(colors: [Color("DarkGreen"), Color("LightGreen")]), startPoint: .leading, endPoint: .trailing)) .cornerRadius(40) .padding(.horizontal, 20) } Button(action: { print("Edit tapped!") }) { HStack { Image(systemName: "square.and.pencil") .font(.title) Text("Edit") .fontWeight(.semibold) .font(.title) } .frame(minWidth: 0, maxWidth: .infinity) .padding() .foregroundColor(.white) .background(LinearGradient(gradient: Gradient(colors: [Color("DarkGreen"), Color("LightGreen")]), startPoint: .leading, endPoint: .trailing)) .cornerRadius(40) .padding(.horizontal, 20) } Button(action: { print("Delete tapped!") }) { HStack { Image(systemName: "trash") .font(.title) Text("Delete") .fontWeight(.semibold) .font(.title) } .frame(minWidth: 0, maxWidth: .infinity) .padding() .foregroundColor(.white) .background(LinearGradient(gradient: Gradient(colors: [Color("DarkGreen"), Color("LightGreen")]), startPoint: .leading, endPoint: .trailing)) .cornerRadius(40) .padding(.horizontal, 20) } } } } |
As you can see from the code above, you need to replicate all modifiers for each of the buttons. What if you or your designer want to modify the button style? You’ll need to modify all the modifiers. That’s quite a tedious task and not a good coding practice. How can you generalize the style and make it reusable?
SwiftUI provides a protocol called ButtonStyle for you to create your own button style. To create a reusable style for our buttons, we create a new struct called GradientBackgroundStyle that conforms to the ButtonStyle protocol like this:
|
1 2 3 4 5 6 7 8 9 10 11 12 |
struct GradientBackgroundStyle: ButtonStyle { func makeBody(configuration: Self.Configuration) -> some View { configuration.label .frame(minWidth: 0, maxWidth: .infinity) .padding() .foregroundColor(.white) .background(LinearGradient(gradient: Gradient(colors: [Color("DarkGreen"), Color("LightGreen")]), startPoint: .leading, endPoint: .trailing)) .cornerRadius(40) .padding(.horizontal, 20) } } |
The protocol requires us to provide the implementation of the makeBody function that accepts a parameter configuration. The configuration parameter includes a label property that you can apply the modifiers to change the button’s style. In the code above, we just apply the same set of modifiers that we used before.
So, how can you apply the custom style to a button? SwiftUI provides a modifier called .buttonStyle for you to apply the button style like this:
|
1 2 3 4 5 6 7 8 9 10 11 12 |
Button(action: { print("Delete tapped!") }) { HStack { Image(systemName: "trash") .font(.title) Text("Delete") .fontWeight(.semibold) .font(.title) } } .buttonStyle(GradientBackgroundStyle()) |
Cool, right? The code is now simplified and you can easily apply the button style to any buttons with just one line of code.
SwiftUI Button Animation
You can also determine if the button is pressed by accessing the isPressed properties of the configuration. This allows you to alter the style of the button when the user taps on it. For example, let’s say we want to make the button a bit smaller when someone presses down the button. You can add a line of code like this:

The scaleEffect modifier lets you scale up or down a button (and any views). To scale up the button, you pass a value greater than 1.0. A value less than 1.0 can make the button smaller.
|
1 |
.scaleEffect(configuration.isPressed ? 0.9 : 1.0) |
So, what the line of code does is that it scales down the button (i.e. 0.9) when the button is pressed and scales back to its original size (i.e. 1.0) when the user lifts the finger. If you’ve run the app, you should see a nice animation when the button is scaled up and down. This is the power of SwiftUI. You do not need to write any extra line of code and it comes with a built-in animation.
What’s your thought on SwiftUI? Please leave me a comment below.

Founder of AppCoda. Author of multiple iOS programming books including Beginning iOS Programming with Swift and Mastering SwiftUI. iOS App Developer and Blogger. Follow me at Facebook, Twitter and Google+.