For experienced developers, you probably have used the Core Graphics APIs to draw shapes and objects. It’s a very powerful framework for you to create vector-based drawings. SwiftUI also provides several vector drawing APIs for developers to draw lines and shapes.
In this tutorial, you will learn how to draw lines, arcs, and pie charts using Path and the built-in Shape such as Circle and RoundedRectangle. Here are the topics we’ll cover:
- Understanding Path and how to draw a line
- How to draw curve
- How to draw a pie chart
Note: This is a excerpt of our Mastering SwiftUI book. If you want to dive deeper into SwiftUI, you can check out the full content here.
Understanding Path
In SwiftUI, you draw lines and shapes using Path. If you refer to Apple’s documentation (https://developer.apple.com/documentation/swiftui/path), Path is a struct containing the outline of a 2D shape. Basically, a path is the setting of a point of origin, then drawning lines from point to point. Let me give you an example. Take a look at the figure below. We will walk thorugh how this rectangle is drawn.
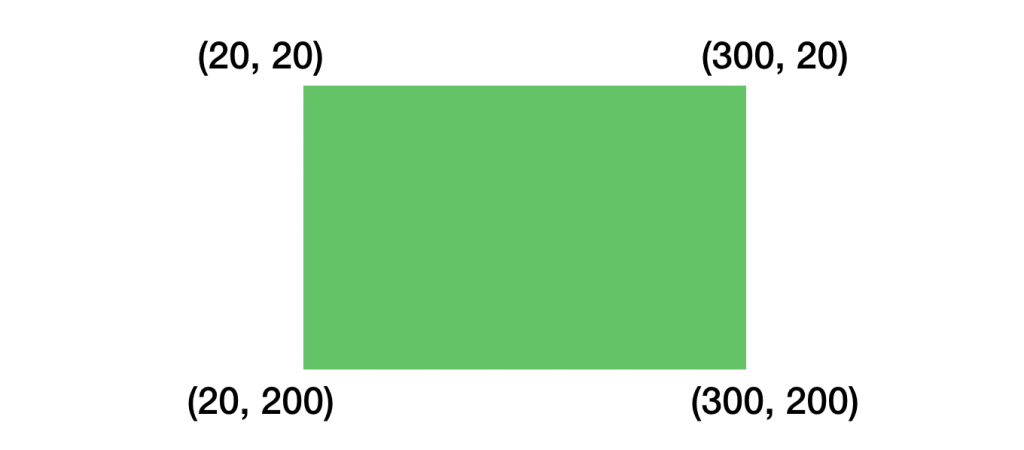
If you were to verbally tell me how you would draw the rectangle step by step, you would probably provide the following description:
- Move the point (20, 20)
- Draw a line from (20, 20) to (300, 20)
- Draw a line from (300, 20) to (300, 200)
- Draw a line from (300, 200) to (20, 200)
- Fill the whole area in green
That’s how Path is works! Let’s write your verbal description in code:
|
1 2 3 4 5 6 7 |
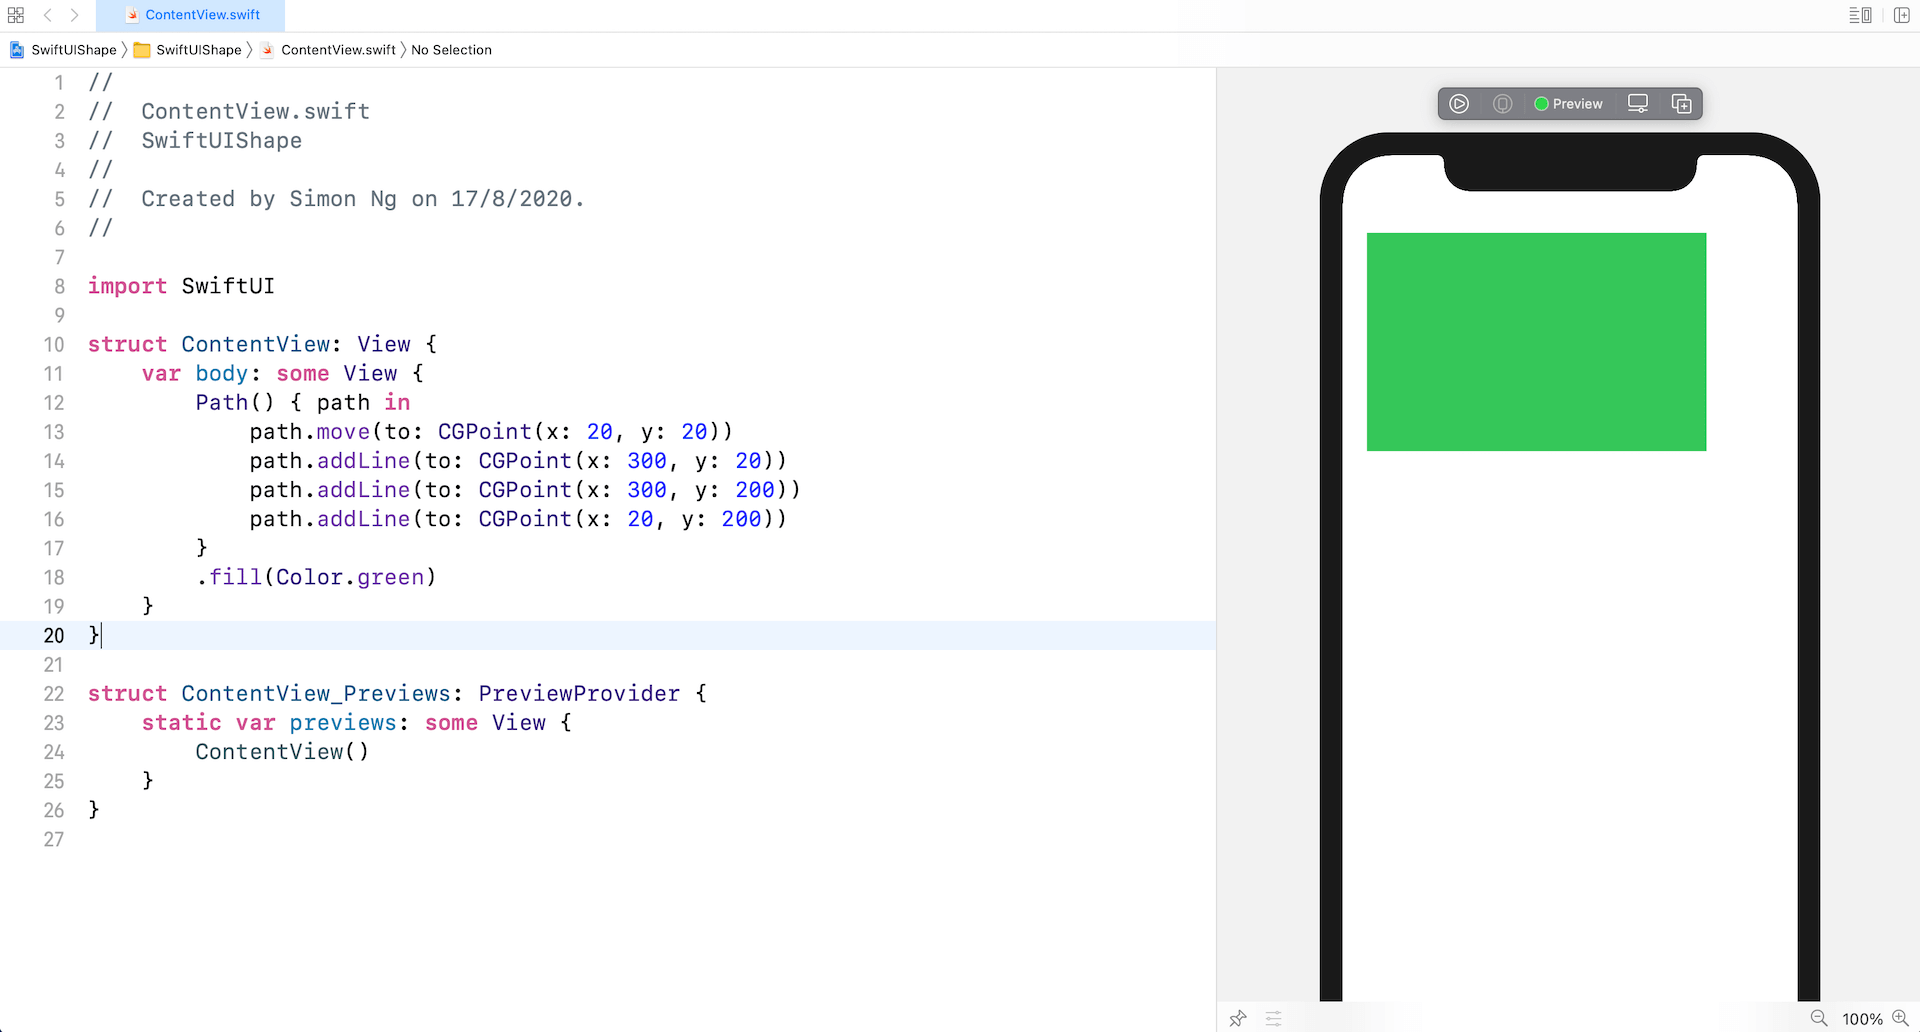
Path() { path in path.move(to: CGPoint(x: 20, y: 20)) path.addLine(to: CGPoint(x: 300, y: 20)) path.addLine(to: CGPoint(x: 300, y: 200)) path.addLine(to: CGPoint(x: 20, y: 200)) } .fill(Color.green) |
You initialize a Path and provide detailed instructions in the closure. You call the move(to:) method to move to a particular coordinate. To draw a line from the current point to a specific point, you call the addLine(to:) method. By default, iOS fills the path with the default foreground color, which is black. To fill it with a different color, you can use the .fill modifier and set a different color.
Test the code by creating a new project using the App template. Name the project SwiftUIShape (or whatever name you like) and then type the above code snippet in the body. The preview canvas should display a rectangle in green.
Using Stroke to Draw Borders
You’re not required to fill the whole area with color. If you just want to draw the lines, you can use the .stroke modifier and specify the line width and color. The figure below shows the result.
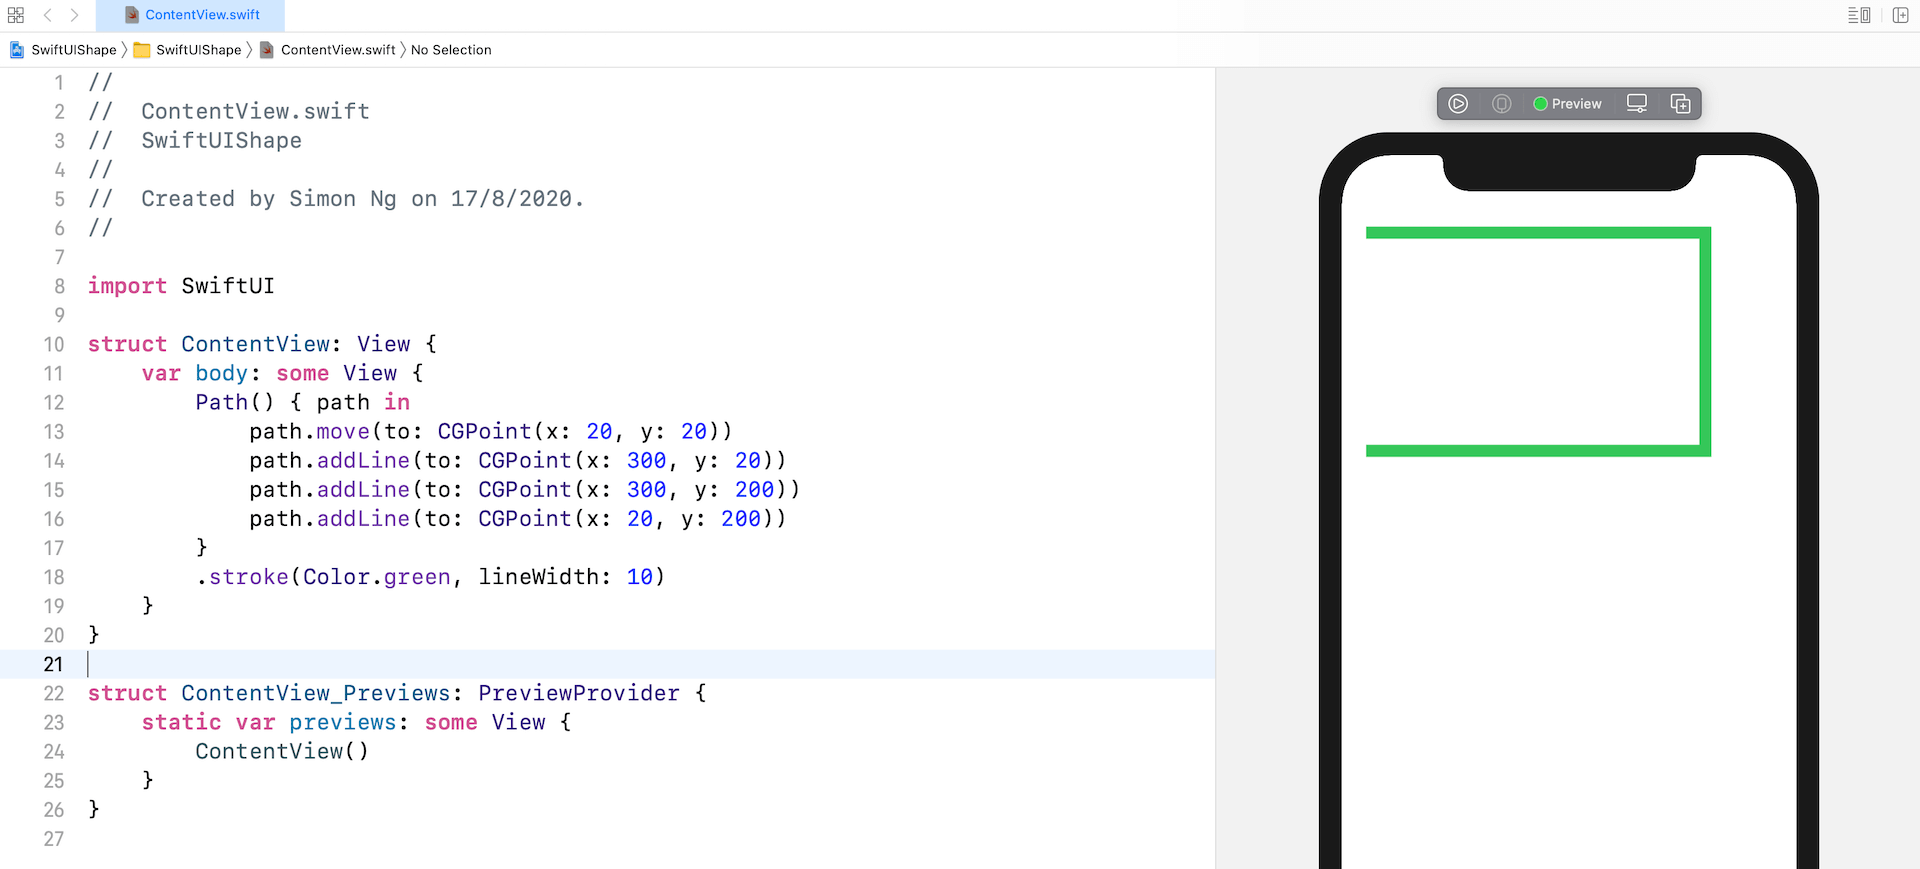
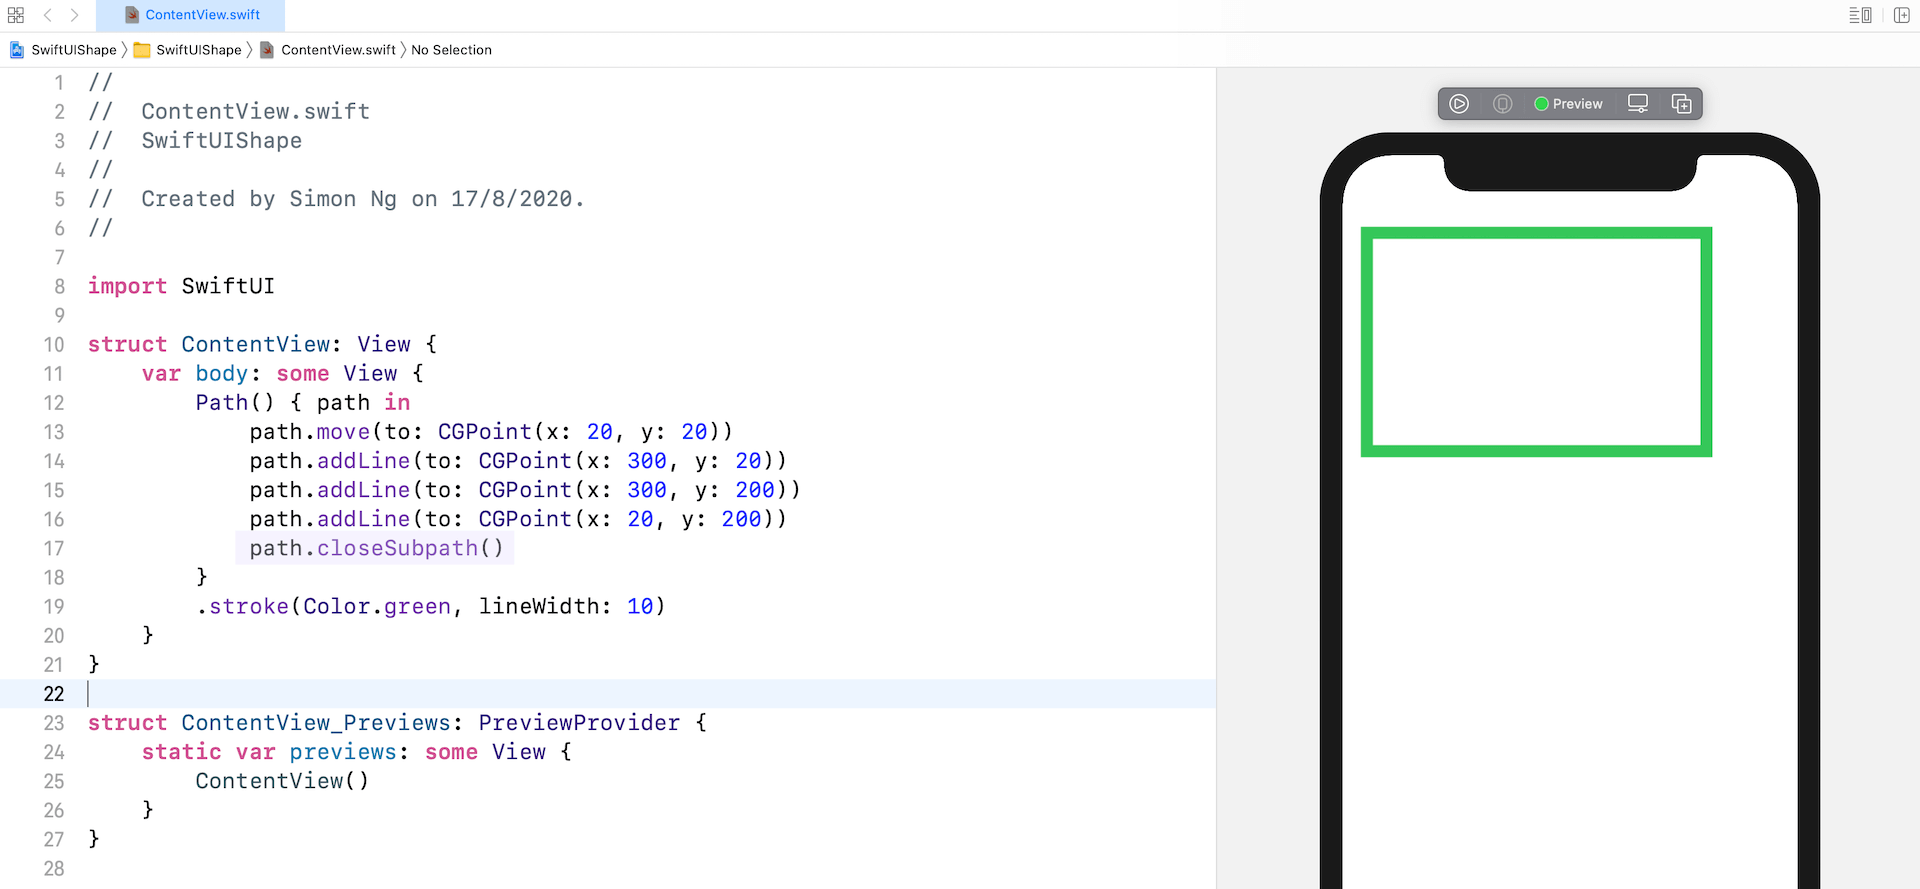
Because we didn’t specify a step to draw the line to the point of origin, it shows an open-ended path. To close the path, you can call the closeSubpath() method at the end of the Path closure, that will automatically connect the current point with the point of origin.
Drawing Curves
Path provides several built-in APIs to help you draw different shapes. You are not limited to drawing straight lines. The addQuadCurve, addCurve, and addArc allow you to create curves and arcs. Let’s say, you want to draw a dome on top of a rectangle like that shown below.
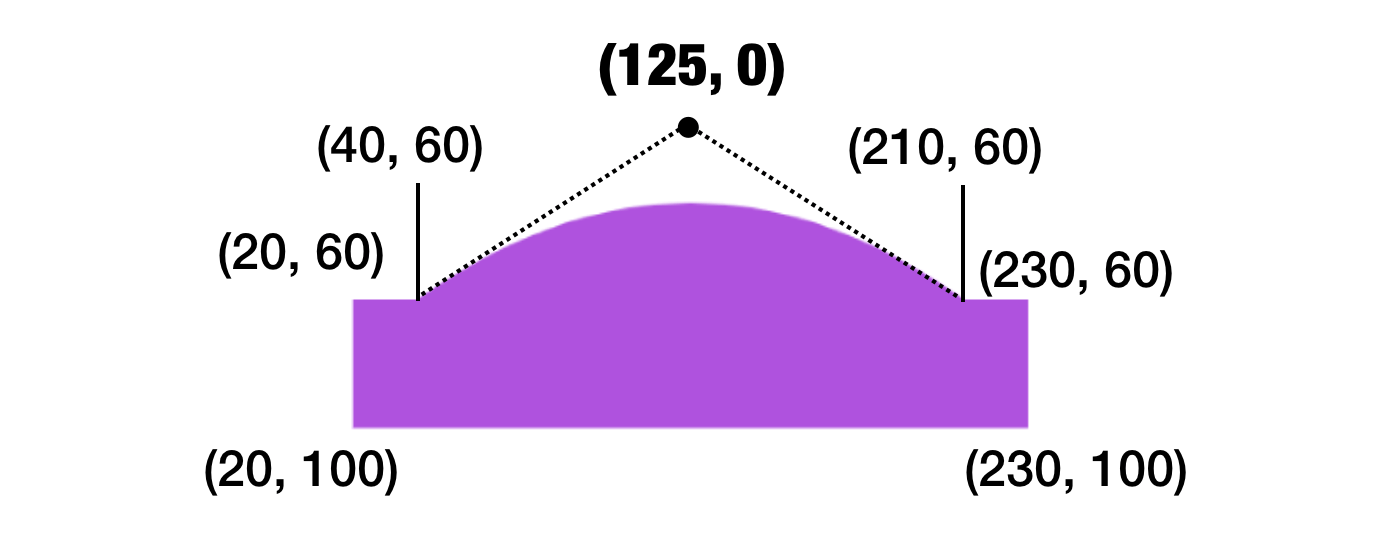
You write the code like this:
|
1 2 3 4 5 6 7 8 9 |
Path() { path in path.move(to: CGPoint(x: 20, y: 60)) path.addLine(to: CGPoint(x: 40, y: 60)) path.addQuadCurve(to: CGPoint(x: 210, y: 60), control: CGPoint(x: 125, y: 0)) path.addLine(to: CGPoint(x: 230, y: 60)) path.addLine(to: CGPoint(x: 230, y: 100)) path.addLine(to: CGPoint(x: 20, y: 100)) } .fill(Color.purple) |
The addQuadCurve method lets you draw a curve by defining a control point. Referring to figure 6, (40, 60) and (210, 60) are known as anchor points. (125, 0) is the control point, which is calculated to create the dome shape. I’m not going to discuss the mathematics involved in drawing the curve, however, try to change the value of the control point to see its effect. In brief, this control point controls how the curve is drawn. If it’s placed closer to the top of the rectangle (e.g. 125, 30), you will create a less rounded appearance.
Fill and Stroke
What if you want to draw the border of the shape and fill the shape with color at the same time? The fill and stroke modifiers cannot be used in parallel. You can make use of ZStack to achieve the same effect. Here is the code:
|
1 2 3 4 5 6 7 8 9 10 11 12 13 14 15 16 17 18 19 20 21 22 |
ZStack { Path() { path in path.move(to: CGPoint(x: 20, y: 60)) path.addLine(to: CGPoint(x: 40, y: 60)) path.addQuadCurve(to: CGPoint(x: 210, y: 60), control: CGPoint(x: 125, y: 0)) path.addLine(to: CGPoint(x: 230, y: 60)) path.addLine(to: CGPoint(x: 230, y: 100)) path.addLine(to: CGPoint(x: 20, y: 100)) } .fill(Color.purple) Path() { path in path.move(to: CGPoint(x: 20, y: 60)) path.addLine(to: CGPoint(x: 40, y: 60)) path.addQuadCurve(to: CGPoint(x: 210, y: 60), control: CGPoint(x: 125, y: 0)) path.addLine(to: CGPoint(x: 230, y: 60)) path.addLine(to: CGPoint(x: 230, y: 100)) path.addLine(to: CGPoint(x: 20, y: 100)) path.closeSubpath() } .stroke(Color.black, lineWidth: 5) } |
We create two Path objects with the same path and overlay one on top of the other using ZStack. The one underneath uses fill to fill the dome rectangle with purple color. The one overlayed on top only draws the borders with black color. Here shows the result:

Drawing Arcs and Pie Charts
SwiftUI provides a convenient API for developers to draw arcs. This API is incredibly useful to compose various shapes and objects including pie charts. To draw an arc, you write the code like this:
|
1 2 3 4 5 |
Path { path in path.move(to: CGPoint(x: 200, y: 200)) path.addArc(center: .init(x: 200, y: 200), radius: 150, startAngle: Angle(degrees: 0.0), endAngle: Angle(degrees: 90), clockwise: true) } .fill(Color.green) |
Enter this code in the body, you will see an arc that fills with green color in the preview canvas.
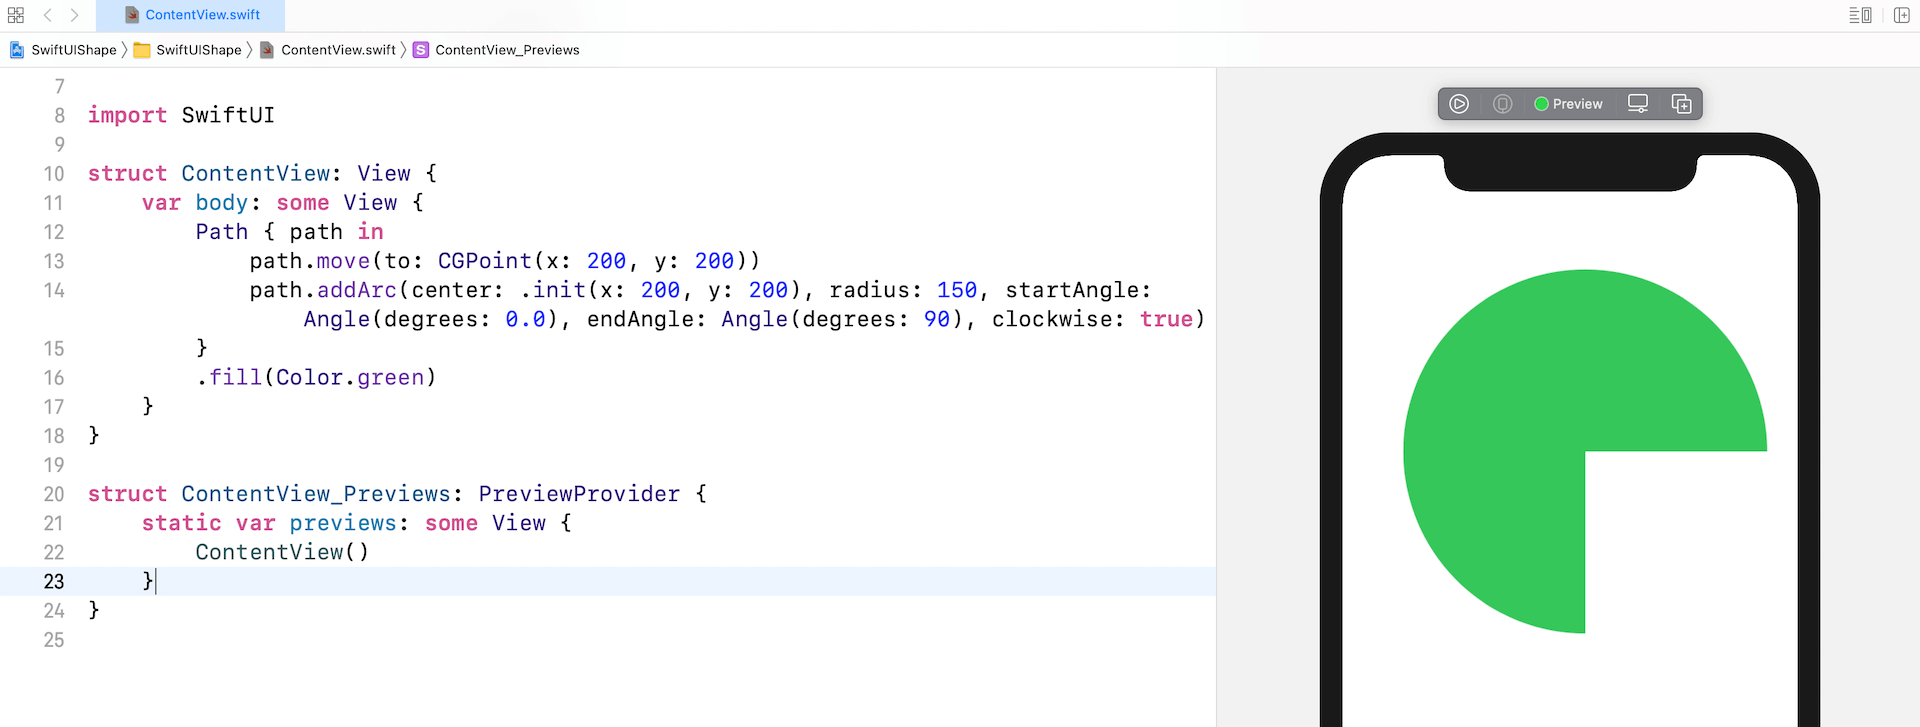
In the code, we first move to the starting point (200, 200). Then we call addArc to create the arc. The addArc method accepts several parameters:
- center – the center point of the circle
- radius – the radius of the circle for creating the arc
- startAngle – the starting angle of the arc
- endAngle – the ending angle of the arc
- clockwise – the direction to draw the arc
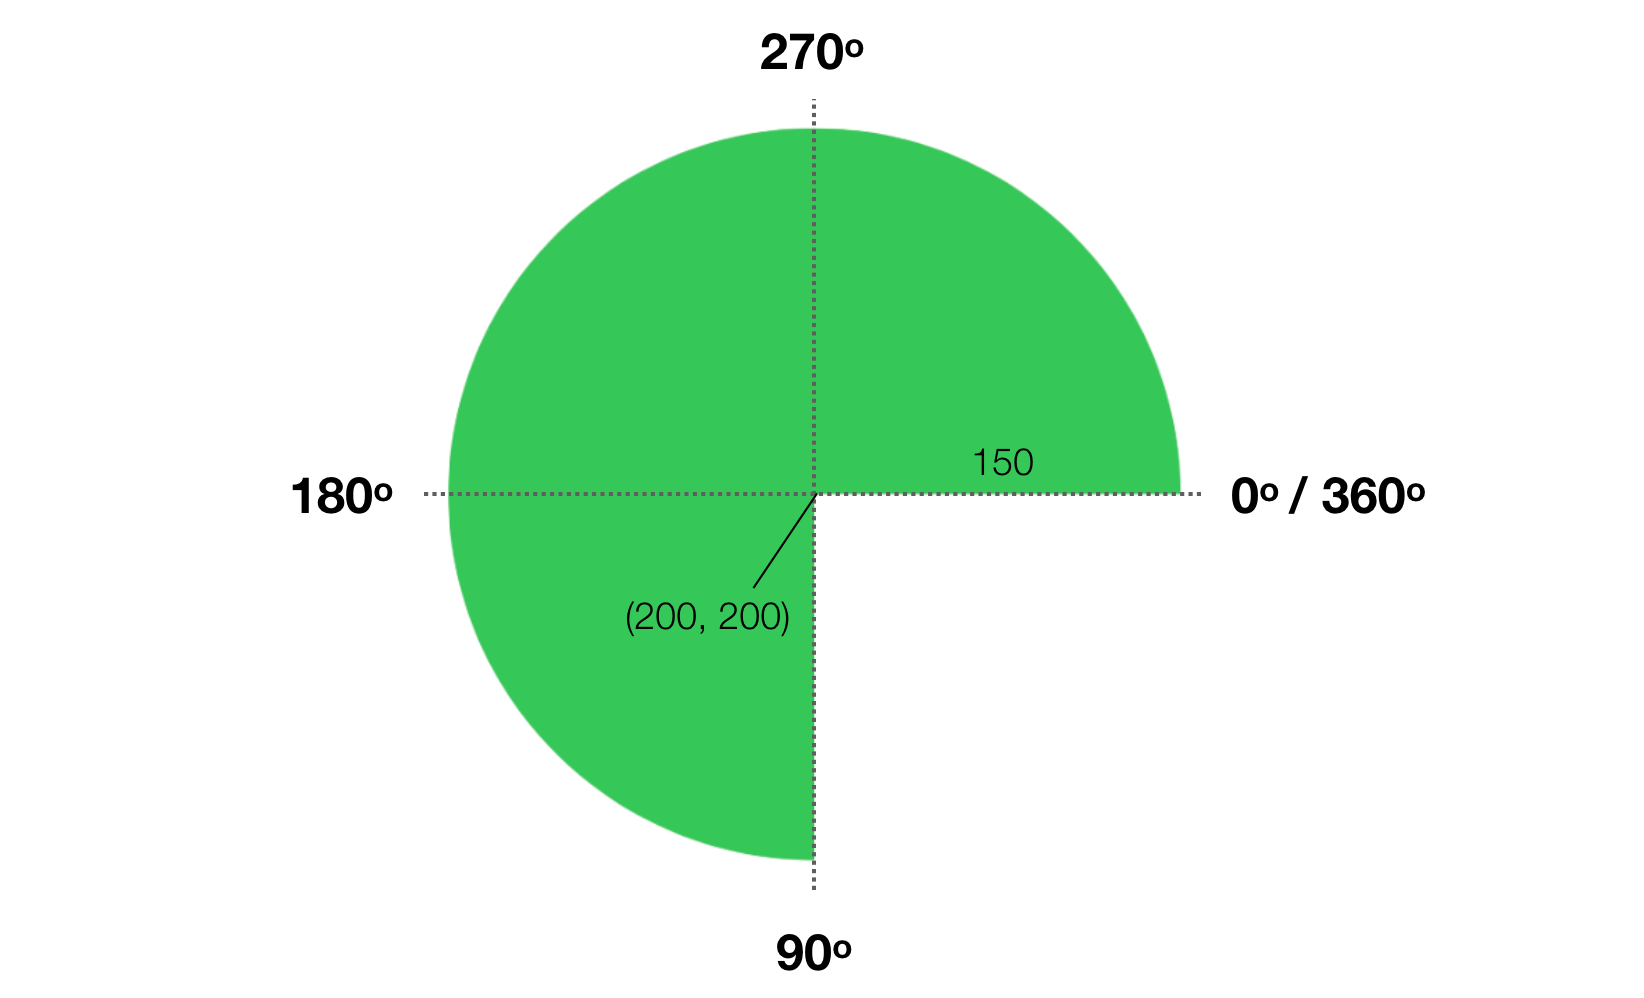
If you just look at the name of the startAngle and endAngle parameters, you might be a bit confused with their meaning. The figure below will give you a better idea of how these parameters work.
By using addArc, you can easily create a pie chart with different colored segments. All you need to do is overlay different pie segments with ZStack. Each segment has different values for startAngle and endAngle to compose the chart. Here is an example:
|
1 2 3 4 5 6 7 8 9 10 11 12 13 14 15 16 17 18 19 20 21 22 23 24 25 26 |
ZStack { Path { path in path.move(to: CGPoint(x: 187, y: 187)) path.addArc(center: .init(x: 187, y: 187), radius: 150, startAngle: Angle(degrees: 0.0), endAngle: Angle(degrees: 190), clockwise: true) } .fill(Color(.systemYellow)) Path { path in path.move(to: CGPoint(x: 187, y: 187)) path.addArc(center: .init(x: 187, y: 187), radius: 150, startAngle: Angle(degrees: 190), endAngle: Angle(degrees: 110), clockwise: true) } .fill(Color(.systemTeal)) Path { path in path.move(to: CGPoint(x: 187, y: 187)) path.addArc(center: .init(x: 187, y: 187), radius: 150, startAngle: Angle(degrees: 110), endAngle: Angle(degrees: 90), clockwise: true) } .fill(Color(.systemBlue)) Path { path in path.move(to: CGPoint(x: 187, y: 187)) path.addArc(center: .init(x: 187, y: 187), radius: 150, startAngle: Angle(degrees: 90.0), endAngle: Angle(degrees: 360), clockwise: true) } .fill(Color(.systemPurple)) } |
This will render a pie chart with 4 segments. If you want to have more segments, just create additional path objects with different angle values. As a side note, the color I used comes from the standard color objects provided in iOS 13 (or later). You can check out the full set of color objects at https://developer.apple.com/documentation/uikit/uicolor/standard_colors.
Sometimes, you may want to highlight a particular segment by splitting it from the pie chart. Say, to highlight the segment in purple, you can apply the offset modifier to re-position the segment:
|
1 2 3 4 5 6 |
Path { path in path.move(to: CGPoint(x: 187, y: 187)) path.addArc(center: .init(x: 187, y: 187), radius: 150, startAngle: Angle(degrees: 90.0), endAngle: Angle(degrees: 360), clockwise: true) } .fill(Color(.systemPurple)) .offset(x: 20, y: 20) |
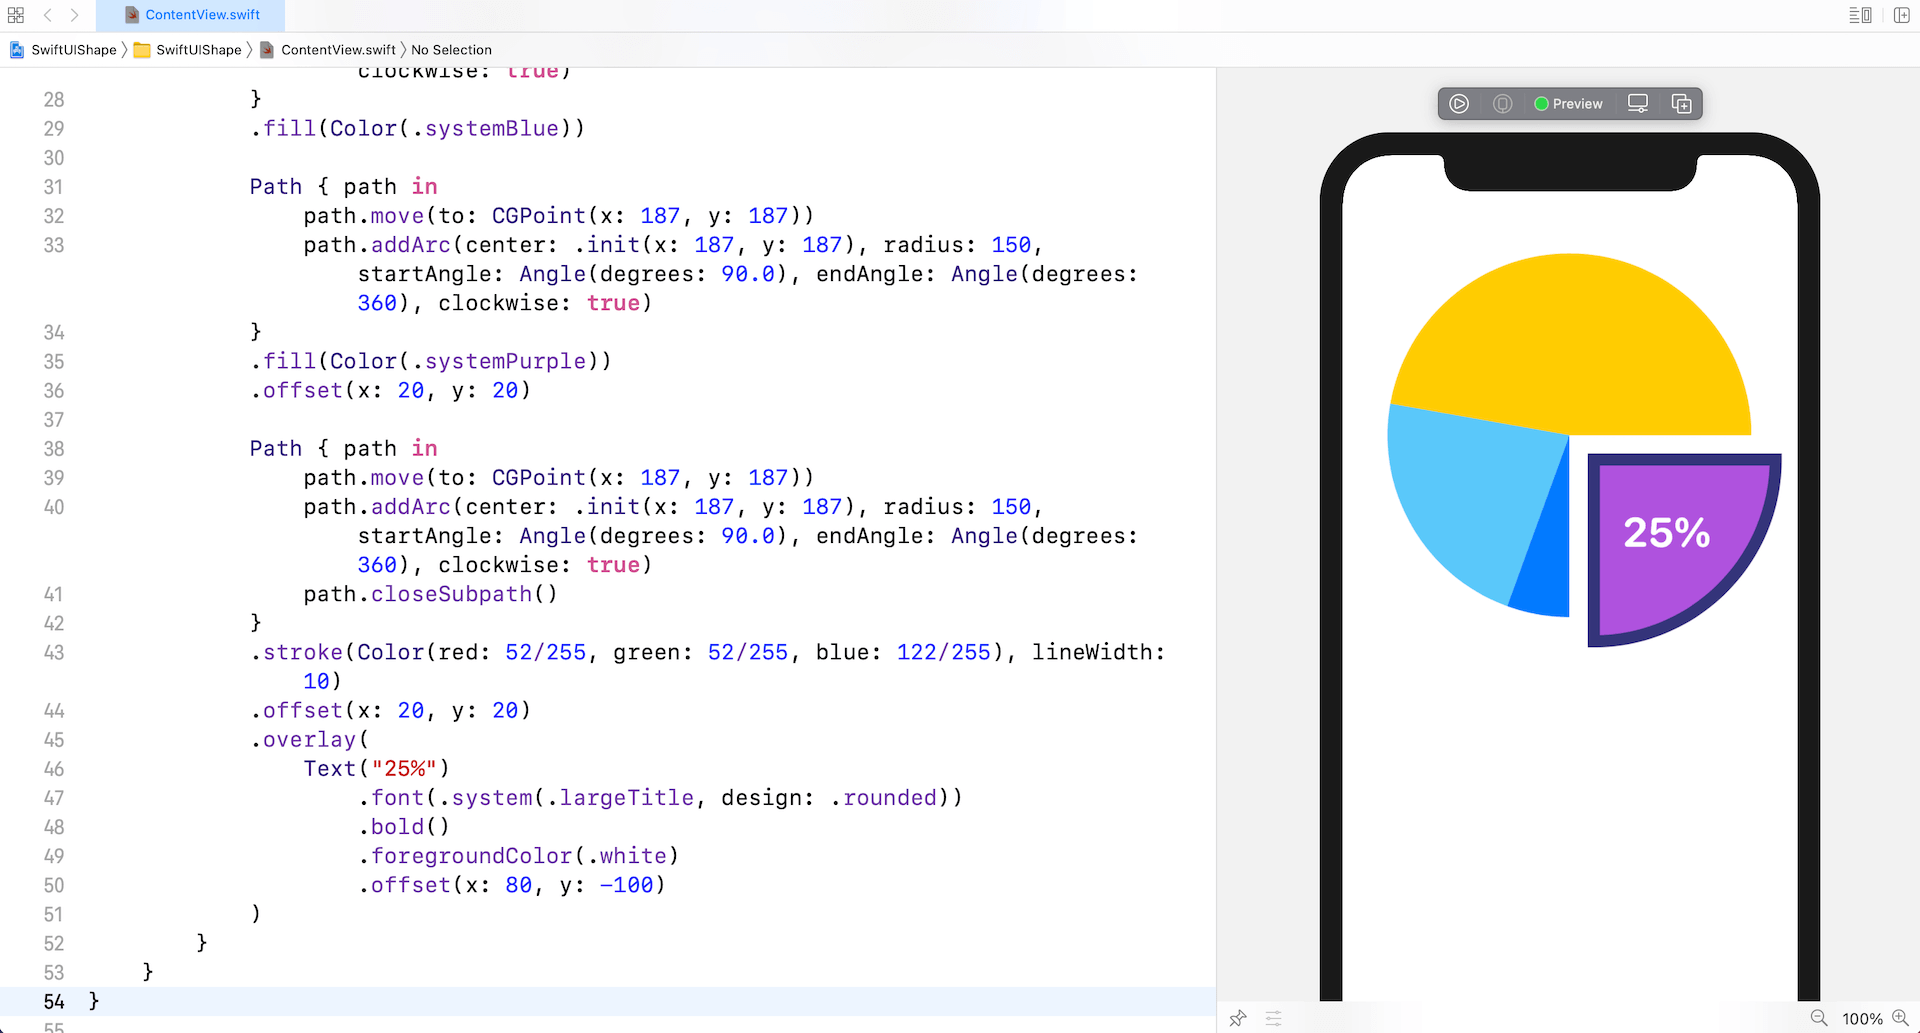
Optionally, you can overlay a border to further catch people’s attention. If you want to add a label to the highlighted segment, you can also overlay a Text view like this:
|
1 2 3 4 5 6 7 8 9 10 11 12 13 14 |
Path { path in path.move(to: CGPoint(x: 187, y: 187)) path.addArc(center: .init(x: 187, y: 187), radius: 150, startAngle: Angle(degrees: 90.0), endAngle: Angle(degrees: 360), clockwise: true) path.closeSubpath() } .stroke(Color(red: 52/255, green: 52/255, blue: 122/255), lineWidth: 10) .offset(x: 20, y: 20) .overlay( Text("25%") .font(.system(.largeTitle, design: .rounded)) .bold() .foregroundColor(.white) .offset(x: 80, y: -100) ) |
This path has the same starting and end angle as the purple segment, however; it only draws the border and adds a text view in order to make the segment stand out. Here is the end result:
Summary
I hope you enjoyed reading this tutorial and coding the demo projects. With these drawing APIs, provided by the framework, you can easily create custom shapes for your application. There is a lot you can do with Path. You can find more coding example in our Mastering SwiftUI book.

Founder of AppCoda. Author of multiple iOS programming books including Beginning iOS Programming with Swift and Mastering SwiftUI. iOS App Developer and Blogger. Follow me at Facebook, Twitter and Google+.
Comments