Welcome to a new tutorial, where we are going to discuss about two quite interesting, related and interconnected concepts; how to scan images and perform text recognition on them. It might sound like a complicated task, but soon you will find out that this is far from being true. Thanks to Vision framework, performing text scanning and recognition is nowadays a quite straightforward job.
Let’s see briefly a few details regarding both tasks. In order to scan images with a device, VisionKit framework provides a specific class called VNDocumentCameraViewController for that purpose. It’s a UIKit view controller that allows to scan one or more pages using a system provided user interface and the camera. What we get back are images (UIImage objects), which we can handle any way we desire.
With scanned pages, meaning images that contain text available on our hands, Vision framework can get into play. Using scanned images as input, it performs the actual recognition and returns back text. It’s possible to configure a few aspects of the recognition task, and affect that way the overall accuracy and the speed of the process. However, the details about all that is something that will be discussed extensively later.
We are going to meet all that through a small SwiftUI application. Obviously we are going to mix UIKit and SwiftUI given that VNDocumentCameraViewController is a UIKit view controller, but we will do that and everything else together and step by step.
Editor’s note: If you are new to SwiftUI, you can check out our Mastering SwiftUI book.
In the next part you will get an overview of the sample app we’ll be working on, and then we’ll implement everything described above; we’ll start with the document scanning, and then we’ll pass to the text recognition stuff. By finishing this tutorial, you will be able to integrate text scanning and recognition capabilities into your own apps.
An Overview Of The Demo App
A small SwiftUI based app is going to be today our vehicle to the exploration of the text scanning and recognition world. In order to save valuable time, there is a starter project that you should download before going any further. Parts of that app have already been built, but there are other parts that we are going to create from scratch.
The demo app is navigation based with a main and a details view. ContentView is the main view that contains a NavigationView with a List and a button to initiate scanning on the navigation bar. You will find out however that the List view is originally disabled, and that’s because it contains a few bits code regarding implementation that still does not exist. Also, navigation in the starter project is still impossible; it’s necessary to add several missing parts in order to be enabled.
What we seek to achieve eventually in the demo app is this:
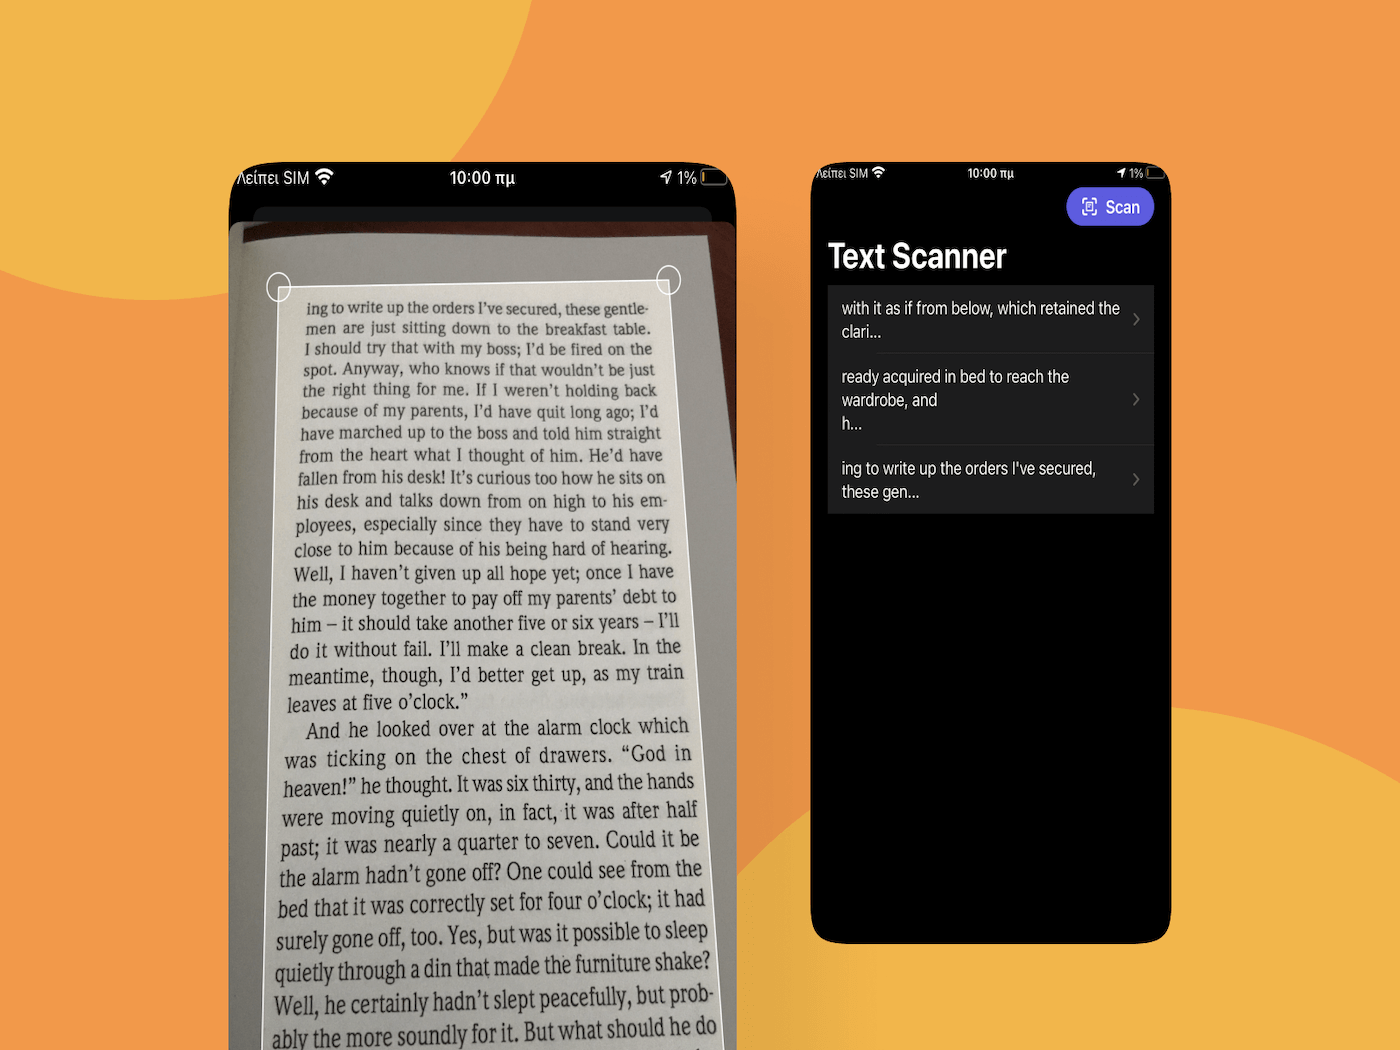
Using the scan button we’ll present a system-provided controller, through which we’ll manage to scan images. Upon finishing doing that, all images will be handed over the text recognition mechanism that we’ll implement, and the recognition process will begin. Part of the recognized text from each image that is being processed will be displayed on the List, and by tapping on each item we’ll be able to preview the full text in the second view called TextPreviewView.
While advancing in the following parts of this post we’ll create a few new source files in order to add new code, and we’ll make additions and changes to the SwiftUI view files already existing in the starter project. Take a quick look to the app once you download it, and when ready, keep reading to learn how to present a scanner view.
Important note: In order to use the camera and scan text it is necessary to get user’s permission. For that purpose an additional key must be added to the Info.plist file called NSCameraUsageDescription, or in a more descriptive form, Privacy – Camera Usage Description. That key with a description why camera usage is required already exists in the starter project. However, be warned that the lack of it makes the app crash when the camera will be used.
Implementing The Scanner
Let’s get started by implementing the scanner controller, and to do that we will add a new source file to the project. Press Cmd+N on your keyboard and in the window that appears, select the Swift File template. In the next step name the file as ScannerView, and finish the process.
As said in the introduction, VNDocumentCameraViewController is a UIKit view controller. In order to use it in SwifUI it’s necessary to implement a custom structure that will be conforming to UIViewControllerRepresentable protocol. Before doing that though, let’s replace the Foundation framework added by default to the file with the following two:
|
1 2 |
import SwiftUI import VisionKit |
We need the SwiftUI framework for accessing the UIViewControllerRepresentable protocol, and VisionKit for using the VNDocumentCameraViewController.
Let’s define that new custom type now, which we’ll name after the file; ScannerView:
|
1 2 3 |
struct ScannerView: UIViewControllerRepresentable { } |
There are two methods that have to be implemented mandatorily when using the UIViewControllerRepresentable protocol. The first one is the place where we initialize, configure and return a UIKit view controller. The second is for updating the view controller with changes coming from the SwiftUI environment. Even though the latter has to be defined, its body can be left empty.
So, starting with the first method called makeUIViewController(context:), let’s create a new VNDocumentCameraViewController instance and let’s return it:
|
1 2 3 4 5 6 7 |
func makeUIViewController(context: Context) -> VNDocumentCameraViewController { let scannerViewController = VNDocumentCameraViewController() // Set delegate here. return scannerViewController } |
See that the initializer of the VNDocumentCameraViewController class needs no arguments. However, in order to get the scanned images as results back from the view controller, it’s necessary to set an object as the scanner’s delegate and implement specific methods. That object won’t be the ScannerView instance; it has to be a class type, but we’ll get back to that in a moment.
Next, let’s add the second required method, but we will make no use of it:
|
1 |
func updateUIViewController(_ uiViewController: VNDocumentCameraViewController, context: Context) { } |
The Coordinator Class
In order to deal with delegate methods and all kind of messages coming from the UIKit side, it’s necessary to implement a class inside the UIViewControllerRepresentable type’s body called Coordinator.
Let’s start building it by declaring a stored property and defining a custom initializer:
|
1 2 3 4 5 6 7 8 9 10 11 |
struct ScannerView: UIViewControllerRepresentable { ... class Coordinator { let scannerView: ScannerView init(with scannerView: ScannerView) { self.scannerView = scannerView } } } |
The scannerView property will be storing the ScannerView instance which will be given to the Coordinator class upon initialization. It’s important to have it, because through that we will manage to let SwiftUI part know when scanning is finished later.
Let’s initialize a Coordinator instance now. To do that, it’s necessary to implement another UIViewControllerRepresentable method existing for that purpose exactly. Inside the ScannerView structure but out of the Coordinator class, add this:
|
1 2 3 4 5 6 7 |
struct ScannerView: UIViewControllerRepresentable { ... func makeCoordinator() -> Coordinator { Coordinator(with: self) } } |
We are able at this point to set the delegate object to the VNDocumentCameraViewController instance. Go back to the makeUIViewController(context:) method again, and replace the // Set delegate here. comment with the following:
|
1 |
scannerViewController.delegate = context.coordinator |
Notice that the coordinator object is accessible through the context parameter value of the method. After doing that, the makeUIViewController(context:) should be similar to this one:
|
1 2 3 4 5 |
func makeUIViewController(context: Context) -> VNDocumentCameraViewController { let scannerViewController = VNDocumentCameraViewController() scannerViewController.delegate = context.coordinator return scannerViewController } |
With the last addition we’re actually saying to scannerViewController that the Coordinator instance will be its delegate object. However, Xcode is complaining about that by showing errors. That’s because we still haven’t implemented any delegate method, but that’s our next step.
The Delegate Methods
Going back to the Coordinator class, let’s start by updating its header as follows:
|
1 2 3 |
class Coordinator: NSObject, VNDocumentCameraViewControllerDelegate { ... } |
Coordinator class is now conforming to the VNDocumentCameraViewControllerDelegate protocol, which contains the delegate method definitions we have to implement here. Also, Coordinator inherits from the NSObject class, because that’s a requirement coming from the VNDocumentCameraViewControllerDelegate; it’s conforming to the NSObjectProtocol in turn. In fact, we would have either to implement a series of NSObjectProtocol required methods, or simply inherit from the NSObject class; and obviously doing the second is the way to go.
There are three delegate methods that must be implemented. Each one is called by the VNDocumentCameraViewController instance in order to handle a different event:
- The first is called when there are scanned images to deal with.
- The second is called when the user cancels the scanning task.
- The third is called when an error has occurred and apparently there are no scanned images to handle.
Starting with the last two, here is their initial implementation:
|
1 2 3 4 5 6 7 8 9 10 11 |
class Coordinator: NSObject, VNDocumentCameraViewControllerDelegate { ... func documentCameraViewControllerDidCancel(_ controller: VNDocumentCameraViewController) { } func documentCameraViewController(_ controller: VNDocumentCameraViewController, didFailWithError error: Error) { } } |
The body of both those methods is going to be a single line that will be notifying the SwiftUI part about each respective outcome. But we’ll focus on that in a few moments. There is still missing the first delegate method as listed above, which is the most interesting and essential one:
|
1 2 3 4 5 6 7 |
class Coordinator: NSObject, VNDocumentCameraViewControllerDelegate { ... func documentCameraViewController(_ controller: VNDocumentCameraViewController, didFinishWith scan: VNDocumentCameraScan) { } } |
The scan parameter value in the above method is the one that contains all scanned documents as images, if any exists of course. It actually considers each scan as a page, so what we are talking about is scanned pages returned as images.
In order to keep all scanned pages, it’s necessary to initialize a collection of UIImage objects. Then, using a simple loop we will go through each page and we’ll keep the image. The number of available pages which also defines the upper limit of the loop, is a property in the scan value called pageCount. Here is everything:
|
1 2 3 4 5 6 7 |
func documentCameraViewController(_ controller: VNDocumentCameraViewController, didFinishWith scan: VNDocumentCameraScan) { var scannedPages = [UIImage]() for i in 0..<scan.pageCount { scannedPages.append(scan.imageOfPage(at: i)) } } |
The above is enough in order to get all scanned pages as images, so all we are left to do is to notify the SwiftUI view about the scan results.
Communicating With SwiftUI View
You’ve seen that none of the above three delegate methods actually communicates with the SwiftUI view, and that’s something we’ll change here.
We are going to use action handlers, or in other words, closures in order to send results back to the SwiftUI part. Those will be called by the Coordinator class, but they will be implemented in the SwiftUI view along with the initializer of the ScannerView structure. But all that will not work if we don’t declare them first; and the place to do that is the ScannerView struct.
We’ll start with the simpler one, the one that will be called when users cancel scanning:
|
1 2 3 4 5 |
struct ScannerView: UIViewControllerRepresentable { var didCancelScanning: () -> Void ... } |
This action handler needs no arguments. Calling it means just one thing, and its implementation is going to be specific too. The second handler, however, won’t be that simple. There we have to indicate two different situations; whether scanning was successful or failed, and at the same time to pass either the images of the scanned pages, or the error that has occurred respectively.
The best way to achieve that is to send back a Result value. Result is a special type in Swift which indicates a successful or failed outcome, and allows to pass any arbitrary value or an error object as an associated value respectively. In our case, we will provide it with the collection of scanned images on success, and with the error on failure.
With that in mind, it’s time to declare the second action handler, having as an argument this time a Result type. The syntax might look complicated, but it’s actually quite simple:
|
1 2 3 4 5 |
struct ScannerView: UIViewControllerRepresentable { var didFinishScanning: ((_ result: Result<[UIImage], Error>) -> Void) ... } |
The first type in the Result<[UIImage], Error> is the kind of data we’ll be passing on success, and the second is the error type.
With the above two action handlers declared, let’s head back to the Coordinator class and use them. Also, you will understand now why we declared the scannerView property in Coordinator; we are going to access both action handlers through that!
Let’s start with the documentCameraViewControllerDidCancel(_:) delegate method which is the simplest case. Update it so it calls the didCancelScanning inside its body:
|
1 2 3 |
func documentCameraViewControllerDidCancel(_ controller: VNDocumentCameraViewController) { scannerView.didCancelScanning() } |
Next, let’s deal with the delegate method regarding the error. See here that we are calling the didFinishScanning handler using the .failure case of the Result type, passing the error as an argument:
|
1 2 3 |
func documentCameraViewController(_ controller: VNDocumentCameraViewController, didFailWithError error: Error) { scannerView.didFinishScanning(.failure(error)) } |
Finally, let’s go to the documentCameraViewController(_:didFinishScanning:) delegate method, where we’ll provide the scannedPages array as argument to the .success case of the Result type:
|
1 2 3 4 5 |
func documentCameraViewController(_ controller: VNDocumentCameraViewController, didFinishWith scan: VNDocumentCameraScan) { ... scannerView.didFinishScanning(.success(scannedPages)) } |
The ScannerView is eventually ready! We can now use it, and once we have back scanned pages, to implement the recognition part.
Presenting The Scanner
Open the ContentView.swift file, and go by the end of the body where the sheet implementation exists:
|
1 2 3 |
.sheet(isPresented: $showScanner, content: { }) |
We are going to initialize a ScannerView instance in the sheet’s content. Both arguments that we will provide it with are going to be closures:
|
1 2 3 4 5 6 7 |
.sheet(isPresented: $showScanner, content: { ScannerView { result in } didCancelScanning: { } }) |
In case the user cancels the scanning task, then all we have to do is to make sheet go away. We can achieve that by setting false as the value of the showScanner @State property:
|
1 2 3 4 5 6 7 8 |
.sheet(isPresented: $showScanner, content: { ScannerView { result in } didCancelScanning: { // Dismiss the scanner controller and the sheet. showScanner = false } }) |
The first closure is more interesting though, as this is where we will handle the scanning results. Remember that in the didFinishScanning handler we pass a Result value as argument, and that argument is represented by the result value in the closure above. We need to examine the actual value of result, and depending on the case to act appropriately.
In order to get the case along with the associated value of a Result value, it’s necessary to use a switch statement exactly as shown right next:
|
1 2 3 4 |
switch result { case .success(let scannedImages): case .failure(let error): } |
In case of success, the scannedPages value contains all scanned images. In case of error, the error value contains the actual Error object.
Starting from the latter, the way errors are handled is up to each developer, and depends a lot on the app itself as well. Since we are working on a demo application here, we won’t do anything extraordinary with the error; we’ll simply print it:
|
1 2 3 4 5 |
switch result { case .success(let scannedImages): case .failure(let error): print(error.localizedDescription) } |
I advice you however to avoid doing just that in real applications! Handle the error gracefully, and if appropriate, show a message to users informing them that scanning has failed. If you skip doing so, users will be expecting to get scanned pages back, and if nothing happens they will be left wondering why they see no results. That would be a terrible user experience, wouldn’t it?
Regarding the successful case, for the time being we will add the break keyword and make Xcode that way stop showing an error:
|
1 2 3 4 5 6 7 |
switch result { case .success(let scannedImages): break case .failure(let error): print(error.localizedDescription) } |
We will return here later, and after we have implemented the text recognition part. We will replace the break command with the initialization of the recognition task, which we will also provide with the scannedPages value.
There is one last thing to do, and that is to make the showScanner @State property false once again right after the switch statement. That will make the sheet be dismissed in case the user has proceeded with scanning. With that addition, here’s how sheet’s content should be right now:
|
1 2 3 4 5 6 7 8 9 10 11 12 13 14 15 |
.sheet(isPresented: $showScanner, content: { ScannerView { result in switch result { case .success(let scannedPages): break case .failure(let error): print(error.localizedDescription) } showScanner = false } didCancelScanning: { showScanner = false } }) |
You can now give a first try to the app if you want, but remember to run it in a real device that has a camera on it, or you will get a crash. That’s also another thing to consider in real apps. When the sheet will be presented, you’ll meet the scanner view controller. Obviously nothing is going to happen even if you scan something.
A Basic Model
Before we pass to the text recognition implementation, let’s create a tiny model where recognized text will be stored into. Press Cmd+N in your keyboard, and create a new Swift file; name it Model.swift.
When that new file is ready, go to edit it. Start by adding the following class:
|
1 2 3 |
class TextItem: Identifiable { } |
You might be wondering why TextItem is a class and not a struct. This is done on purpose, as it will be necessary during text recognition to declare such objects in one place and modify them to another where they will have been passed as arguments. Doing so with a struct wouldn’t be that easy.
See that the TextItem class we just defined conforms to the Identifiable protocol. This is done on purpose, so we make it easy to use TextItem instances in a SwiftUI List view.
Identifiable types have one requirement; to declare a property that will mandatorily be called id. It can be of any type we want, but it has to be uniquely identifying the object among a collection of similar objects.
We are going to declare such a property here, which will be a String:
|
1 2 3 |
class TextItem: Identifiable { var id: String } |
In addition to that, we will add one more property only. This one will be storing the recognized text as a String value:
|
1 2 3 4 5 |
class TextItem: Identifiable { ... var text: String = "" } |
In addition, we have to implement an initializer method. In it we will assign a unique value to the id property.
That unique value is going to be a UUID string; a universaly unique value which is exactly what we need. Even though I don’t find it a good idea for large projects, I think it’s just fine for small applications like the one in this tutorial.
So, let’s implement the init method, where we’ll ask and get from the system a UUID value and assign it to the id property. All that is shown right next:
|
1 2 3 |
init() { id = UUID().uuidString } |
That’s all about our tiny model, and here it is entirely:
|
1 2 3 4 5 6 7 8 |
class TextItem: Identifiable { var id: String var text: String = "" init() { id = UUID().uuidString } } |
On top of the above, we will also create one more custom type. A class that will have one property only, a collection of TextItem objects. That class will be conforming to the ObservableObject protocol, so we can mark the TextItems array with the @Published property wrapper. That way we will use Combine in order to notify our SwiftUI view about changes made to that array.
Here is that class:
|
1 2 3 |
class RecognizedContent: ObservableObject { @Published var items = [TextItem]() } |
The above concludes our work to the Model.swift file, and we can now use the custom types we implemented here. Let’s head back to the ContentView.swift file, where at the beginning of the ContentView struct we will declare the following property:
|
1 2 3 4 5 |
struct ContentView: View { @ObservedObject var recognizedContent = RecognizedContent() ... } |
The line we just added creates a new RecognizedContent instance and stores it to the recognizedContent property. It’s marked with the @ObservedObject property wrapper, so any changes made to the items array (which was annotated with the @Published property wrapper) to become known to this SwiftUI view.
Implementing Text Recognition
In order to integrate text recognition capabilities in our demo application, we are going to need a new source file. So, similarly as before, press Cmd+N, create a new Swift file, and name it TextRecognition.swift.
We will start working on that brand new file by replacing the default Foundation framework with the following two:
|
1 2 |
import SwiftUI import Vision |
The Vision framework will provide us with all the APIs that will do the heavy work. All we have to do is to prepare the recognition process properly, and then we’ll hand the actual task to Vision.
That said, let’s start preparing the ground with a new custom type; a structure which we’ll also call TextRecognition:
|
1 2 3 |
struct TextRecognition { } |
We need to declare three properties in the TextRecognition type. The first one is a collection of UIImage objects; the array of scanned pages that we want to be recognized. Apparently, those are going to be the images that we’ll get after scanning with the ScannerView implemented previously.
The second property is the RecognizedContent instance that we initialized in the ContentView. As before, we’ll mark this one with the @ObservedObject property wrapper, but we won’t initialize it. It’s not necessary as the instance from the ContentView will be provided as argument.
The third one is an action handler that will be called once the recognition process is finished. Note that text recognition is a time consuming task that will be running on a background queue, and the exact completion time varies and cannot be determined. So, we’re talking about an asynchronous operation, and we’ll notify the ContentView about its completion with that handler.
Here are all those three properties that I just described:
|
1 2 3 4 5 |
struct TextRecognition { var scannedImages: [UIImage] @ObservedObject var recognizedContent: RecognizedContent var didFinishRecognition: () -> Void } |
Let’s focus on the actual recognition process now. In general, the required steps in order to go through that are the following:
For every scanned image we are going to create a special object; a VNImageRequestHandler instance. The purpose of such an object is to get the source image and trigger the actual recognition by performing a Vision request.
However, a Vision request is not simply a vague term. There are certain actions we should take as developers, and that’s the second step in the entire process described here. In particular, we have to initalize a VNRecognizeTextRequest object, which will make Vision perform the actual recognition.
The above works asynchronously, and on completion we will get back either the request results, or an error object if recognition failed. This is the place where we apply all the custom logic we want on the recognized text. In this tutorial and the demo app we are making, this is the place where we’ll keep recognized text from each image in TextItem instances.
Note that it’s also possible to configure a few properties regarding the recognition request before it is performed. We will do so for a couple of them.
We are going to manage all the above by implementing two custom methods in the TextRecognition structure, and the place where we will start from is what was presented last; the text request object.
Implementing A Text Recognition Request
Let’s begin by defining the following private method:
|
1 2 3 |
private func getTextRecognitionRequest(with textItem: TextItem) -> VNRecognizeTextRequest { } |
See that its parameter value is a TextItem instance. Since TextItem is a class, any changes made to it inside the method will be reflected to the caller as well. Also, we mark this method as private; we want it to be visible only inside our custom type and nowhere else.
Additionally, notice that the return value is a VNRecognizeTextRequest object. That the request is going to be used by an image request handler object according to what I briefly described earlier. Here we are going to initialize, configure and handle a text request object; but using it will take place in the other method we’ll implement next.
Let’s initialize now a text recognition object:
|
1 2 3 |
let request = VNRecognizeTextRequest { request, error in } |
I’ve said already that text recognition is an asynchronous task, so we are getting its results back in a closure once it’s complete. There are two parameters in the closure; The first is a VNRequest object and contains the recognition results, and the second is an error that may have potentially occurred.
Let’s get rid of the error case first, where we won’t do much with it; we are building a demo application so we will just print the error message. But please, do something meaningful in real apps.
|
1 2 3 4 5 6 |
let request = VNRecognizeTextRequest { request, error in if let error = error { print(error.localizedDescription) return } } |
Using return in the above if-let statement will stop the rest of the code in the closure from being executed.
Let’s handle the recognition results now. We access them through a property called results, which is an array of VNRecognizedTextObservation objects. Such an object contains information about regions of text in the source image, and we get them all like so:
|
1 |
guard let observations = request.results as? [VNRecognizedTextObservation] else { return } |
Note that results value might be nil, so unwrapping it as shown above is necessary. Unwrapped text observation objects are stored to the observations constant.
Next, we have to go through each observation and keep the recognized text. You have to understand here that artificial text recognition is not human recognition, and therefore it might return more than one pieces of text with different accuracy levels regarding a text portion into an image. What we will do here is to ask for the recognition with the best accuracy. In code all that are shown right next:
|
1 2 3 |
observations.forEach { observation in guard let recognizedText = observation.topCandidates(1).first else { return } } |
topCandidates(_:) method used above is the one that returns the actual recognized text or texts. The argument we provide it with is the number of recognized texts we want to get back for the current observation. Note that this value cannot be more than 10, and it’s possible to return less than the number of texts we are asking for.
Nevertheless, the recognizedText constant defined in the guard statement right above contains the actual recognized text, so now we can go ahead and keep it to the textItem parameter value:
|
1 2 3 4 5 6 |
observations.forEach { observation in ... textItem.text += recognizedText.string textItem.text += "\n" } |
Without adding the last line above, text spread in multiple lines would be stored in the text property of the textItem object with no breaks at all. However, you can handle text here in any way you want or need. There is no recipe and it’s all up to you.
Notice that the recognizedText constant is a VNRecognizedText object. We get the actual text by accessing its string property.
Summarizing at this point, our request object is this:
|
1 2 3 4 5 6 7 8 9 10 11 12 13 14 |
let request = VNRecognizeTextRequest { request, error in if let error = error { print(error.localizedDescription) return } guard let observations = request.results as? [VNRecognizedTextObservation] else { return } observations.forEach { observation in guard let recognizedText = observation.topCandidates(1).first else { return } textItem.text += recognizedText.string textItem.text += "\n" } } |
Right after the closing of the closure, we can do some configuration to the request object:
|
1 2 |
request.recognitionLevel = .accurate request.usesLanguageCorrection = true |
The first one specifies how much accurate the recognition is going to be. The .accurate value obviously will bring back better results, but the recognition process is going to take much more time to finish. The alternative is the .fast value, but the trade-off is obviously the lack of accuracy. It’s up to you to choose what it’s going to be. I suggest you play with both of these properties once you finish the tutorial and see what the differences are.
The second parameter says to Vision whether it should apply language correction or not upon recognition. When set to true as above, returned results are more accurate, but once again the process becomes more time expensive. If set to false, no language correction will be applied, but there are chances that the outcome will be less accurate.
Finally, before finishing the method implementation, we should not forget to return the request object we initialized and configured:
|
1 |
return request |
Entire the getTextRecognitionRequest(with:) method is shown right next:
|
1 2 3 4 5 6 7 8 9 10 11 12 13 14 15 16 17 18 19 20 21 |
private func getTextRecognitionRequest(with textItem: TextItem, currentImageIndex: Int) -> VNRecognizeTextRequest { let request = VNRecognizeTextRequest { request, error in if let error = error { print(error.localizedDescription) return } guard let observations = request.results as? [VNRecognizedTextObservation] else { return } observations.forEach { observation in guard let recognizedText = observation.topCandidates(1).first else { return } textItem.text += recognizedText.string textItem.text += "\n" } } request.recognitionLevel = .accurate request.usesLanguageCorrection = true return request } |
Performing Text Recognition
I believe that it’s been made clear up until now that text recognition is a time consuming process, and its completion time is unknown. While such a task is in progress, we definitely don’t want to keep the main thread of the app busy; we want the app to remain fluid and usable while recognizing text. For that purpose we are going to execute everything on the background using a background dispatch queue, and this is what we’ll start with in the second method we are going to define right now:
|
1 2 3 |
func recognizeText() { } |
Contrarily to the previous method, this one won’t be private. We need it to be accessible out of the TextRecognition type, as this will be putting in motion the entire text recognition process.
As said, our first step here is to define a new background queue and then use it to perform all the rest of the tasks asynchronously:
|
1 2 3 4 |
let queue = DispatchQueue(label: "textRecognitionQueue", qos: .userInitiated) queue.async { } |
We provide two arguments to the queue initialization; a label that can be any arbitrary string value, and a quality of service value. The second defines the priority of the queue among all running in the background, and the .userInitiated value indicates a high priority.
Note: Read more about dispatch queues to this post from the past.
Inside the queue’s async closure now we are going to continue by creating a loop; a for-in iteration where we’ll be going through all scanned images:
|
1 2 3 |
for image in scannedImages { } |
I said earlier that for each scanned image we are going to create a VNImageRequestHandler object; the one that will be getting the actual image and the text recognition request we implemented previously, and will be triggering the text recognition. The image that will be fed with can be of various types, however, not a UIImage, like the type of the images we have in the scannedImages array.
For that reason, the first action inside the loop is to get a CGImage object from the original UIImage. That’s easy:
|
1 |
guard let cgImage = image.cgImage else { return } |
It’s possible for cgImage property to be nil, so using the guard statement as above (or an if-let alternatively) is necessary.
With the CGImage representation of the original image we can now initialize a VNImageRequestHandler object. See that we will pass the cgImage object as argument upon initialization:
|
1 |
let requestHandler = VNImageRequestHandler(cgImage: cgImage, options: [:]) |
The second argument is a collection of options that we can optionally specify. There’s no need for that here, so we pass an empty dictionary.
We are going to contain the remaining code inside a do-catch statement, as the perform method we’ll call next can throw an exception. We could have avoided that and instead handle the exception as an optional value, but it’s always more proper to use a do-catch.
So, still inside the for-in loop, let’s add this:
|
1 2 3 4 5 |
do { } catch { print(error.localizedDescription) } |
Once again we do not make a proper error handling, but that’s something that’s up to you when working on real apps.
Inside the do block, we start by initializing a TextItem object; this is where recognized text will be stored into and we have already taken care of in the previous method.
|
1 |
let textItem = TextItem() |
It’s now time to use the requestHandler object and perform the text recognition request:
|
1 |
try requestHandler.perform([getTextRecognitionRequest(with: textItem)]) |
See that this is the place where we call the getTextRecognitionRequest(with:) method, passing the textItem as argument. However, also notice that this call is made inside an array. That’s because the perform(_:) method accepts an array of requests, regardless of the fact that we have just one here. Finally, the above line is why we need the do-catch statement. See that we mark the call to the perform(_:) method with the try keyword.
Once the text recognition of the current image is complete and the recognized text has been stored to the textItem object, it’s time to append it to the items collection of the recognizedContent property in the TextRecognition type. Remember that it was marked with the @ObservedObject property wrapper, and that means that any changes to it will become visible to the SwiftUI view. And because of that, any updates to that property must happen on the main thread:
|
1 2 3 |
DispatchQueue.main.async { recognizedContent.items.append(textItem) } |
Finally, there is one last thing to do out of the for-in loop and before the closing of the queue’s closure. That is to notify about the completion of text recognition by calling the didFinishRecognition handler:
|
1 2 3 |
DispatchQueue.main.async { didFinishRecognition() } |
Here is the entire implementation of the recognizeText() method:
|
1 2 3 4 5 6 7 8 9 10 11 12 13 14 15 16 17 18 19 20 21 22 23 24 25 |
func recognizeText() { let queue = DispatchQueue(label: "textRecognitionQueue", qos: .userInitiated) queue.async { for image in scannedImages { guard let cgImage = image.cgImage else { return } let requestHandler = VNImageRequestHandler(cgImage: cgImage, options: [:]) do { let textItem = TextItem() try requestHandler.perform([getTextRecognitionRequest(with: textItem)]) DispatchQueue.main.async { recognizedContent.items.append(textItem) } } catch { print(error.localizedDescription) } } DispatchQueue.main.async { didFinishRecognition() } } } |
The text recognition part is now complete! Let’s make use of what we just implemented.
Initiating Text Recognition
Let’s head back to the ContentView.swift file, where we’ll create an instance of the TextRecognition structure and initiate a text recognition process. We will do all that right after a user has finished scanning images with text.
Go to the sheet content implementation, where we had previously added a switch statement. In the .success case of the scanning results all we had done was to temporarily use the break statement:
|
1 2 |
case .success(let scannedImages): break |
Time to make things right, so remove break and in its place add this:
|
1 |
isRecognizing = true |
isRecognizing is a property in the ContentView annotated with the @State property wrapper, and it indicates whether a text recognition job is in progress or not. When true, a circular progress view will show up, which will disappear when isRecognizing becomes false again. Progress view is already implemented in the starter project.
Now we can initialize a TextRecognition instance:
|
1 2 3 4 |
TextRecognition(scannedImages: scannedImages, recognizedContent: recognizedContent) { } |
The first argument is the scannedImages array as it comes from the scanning results. The second is the recognizedContent property declared and initialized in the ContentView structure. And the last one is the didFinishRecognition closure that will be called when text recognition is finished. When that happens, we want to hide the progress view, therefore it’s necessary to set false to isRecognizing property:
|
1 2 3 4 5 6 |
TextRecognition(scannedImages: scannedImages, recognizedContent: recognizedContent) { // Text recognition is finished, hide the progress indicator. isRecognizing = false } |
The above is not enough in order to start text recognition. We also need to call the recognizeText() method. We’ll do that by chaining it to the TextRecognition initializer method:
|
1 2 3 4 5 |
TextRecognition(scannedImages: scannedImages, recognizedContent: recognizedContent) { ... } .recognizeText() |
Here’s how the .success case of the scanning results looks like eventually:
|
1 2 3 4 5 6 7 8 9 10 |
case .success(let scannedImages): isRecognizing = true TextRecognition(scannedImages: scannedImages, recognizedContent: recognizedContent) { // Text recognition is finished, hide the progress indicator. isRecognizing = false } .recognizeText() |
We are not done yet, however. Go to the beginning of the body where you will find the following comment:
|
1 |
// Uncomment the following lines: |
Do as the comment says, and uncomment the next three lines that define a List and its contents:
|
1 2 3 |
List(recognizedContent.items, id: \.id) { textItem in Text(String(textItem.text.prefix(50)).appending("...")) } |
The reason we made TextItem type conform to the Identifiable protocol previously in this post is the above List. We set the id property to the keypath that indicates the unique identifier on each object of the items array in the recognizedContent property.
Each item in the List is a Text that displays the first 50 characters only of the recognized text. We get them using the prefix(_:) method on the actual text, however the returned value is a Substring. That’s why it is given as argument to a String initializer, which is the one that eventually used with Text.
It’s now time to see if what we did actually works! Run the app in a real device and scan one or more images. By finishing with that, the recognition process will start, and you’ll understand that from the progress view that will appear. Gradually, you’ll start getting scanned text back in the list.
Previewing Recognized Text
The reason that we display the first 50 characters of each recognized text aims in two things:
- To keep the List fluid and avoid loading it with large amounts of data (in case there is long text recognized).
- To display only part of the text, and make it possible to view it entirely separately to another view.
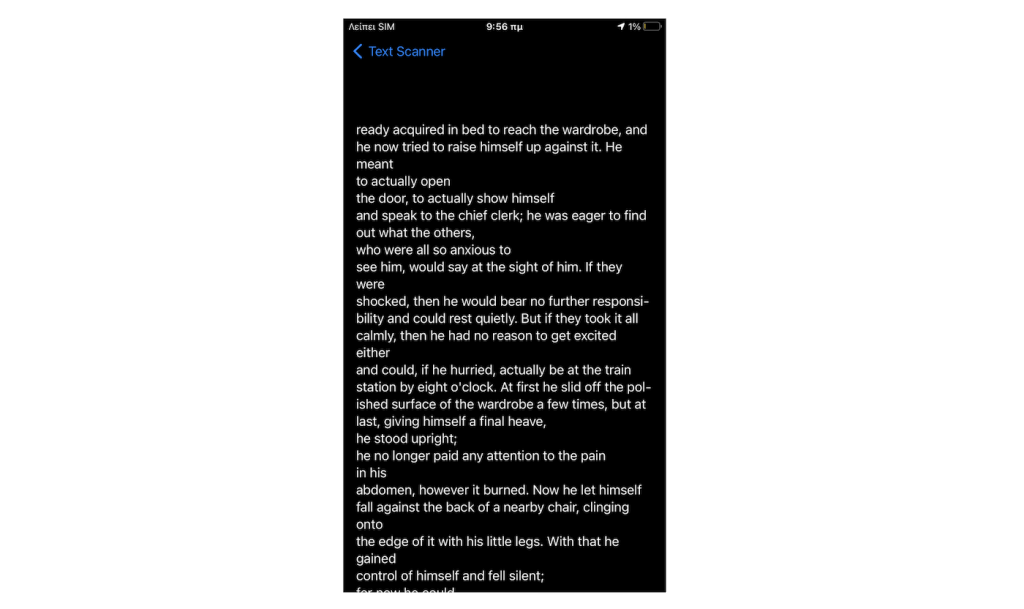
That view already exists in the starter project; it’s the TextPreviewView in the similarly named file, and there is nothing for us to do there. It’s given to you implemented, but it would a good idea to open and take a look at it.
You will notice that it contains a property called text. It doesn’t have an initial value, which makes it mandatory to pass a value during its initialization.
We will use TextPreviewView in order to show the full text of an item in the List when tapping on it. However, it’s necessary to make a few changes to the content of the List in the ContentView.
In particular, instead of having the Text view inside the List, we will have a NavigationLink. This will enable pushing an instance of the TextPreviewView to the navigation. The main-detail navigation is achieved with the NavigationView being the outermost view in ContentView.
The NavigationLink view gets as argument the SwiftUI view we want to present. In that case, it’s going to be an instance of the TextPreviewView:
|
1 2 3 |
NavigationLink(destination: TextPreviewView(text: textItem.text)) { } |
The closure will be containing the displayable content of each item in the List. This will be no other than the Text we previously had:
|
1 2 3 |
NavigationLink(destination: TextPreviewView(text: textItem.text)) { Text(String(textItem.text.prefix(50)).appending("...")) } |
Here’s the List after the above changes:
|
1 2 3 4 5 |
List(recognizedContent.items, id: \.id) { textItem in NavigationLink(destination: TextPreviewView(text: textItem.text)) { Text(String(textItem.text.prefix(50)).appending("...")) } } |
Scan again and proceed to text recognition as previously. This time you will be able to tap on a text item in the List and navigate to another view, where you can see the full text. Use the back button in the navigation bar to go back.
Summary
One more detailed tutorial comes to the end, and we met two really interesting and useful topics. How to implement and use the VNDocumentCameraViewController in SwiftUI for scanning images, and how to recognize text using the Vision framework. There are definitely things you could change or do differently, especially in the text recognition implementation.
However, what I shared with you is a general approach which you can use as the base for evolving further or customizing to your own needs. In any case, I hope you enjoyed what you’ve read here, and that this post will become helpful on your tasks. Thank you for reading!
For reference, you can check out the complete project on GitHub.

Gabriel has been a software developer for almost about two decades and he’s got long experience in programming using various languages. iOS development is what he’s being doing since 2010. On top of that, he’s added macOS programming to his repertoire over the last few years. Using Swift of course! Follow Gabriel at Google+ and Twitter.