Editor’s note: This is a guest post contributed by Eugene Trapeznikov. Imagine you’ve completed the development and testing of your app, you’re now ready to submit it for production release. The problem is that some of the web service URLs are pointing to the testing servers, and the API keys are configured for the test environment. Before submitting the app for Apple’s review, you’ll need to modify all these API keys and URLs to fit for production. This sounds good, right? But instead of changing the values back and forth between the development and production environment, is there a better approach to handle both the development and production builds? This is exactly what Eugene is going to discuss with you.
Enter Eugene’s tutorial.
For starters, some of you may be wondering why you should use two separate databases and environments while developing your app. The reason is because as you continue to build new features or develop your app, you want to separate the development version from the existing public production app. Standard software development practice is to use different environments for the different versions of the software, and in our case, iPhone apps. The development version of an app typically uses a different database (or other systems such as analytics) from the production environment. This is one reason why we should use separate servers and databases for different environments. Developers commonly use dummy images or data during testing. In testing or development environments, it’s not uncommon for one to use test data such as “test comment”, “argharghargh” and “one more test comment”. Obviously, you don’t want your real users to see these kind of messages. In the case of if your app using an analytics system, you may even send thousands of events during the testing stage. Again, you don’t want to mix the test data with the production data in the same database. This is why its always recommended to separate the development and production environments.
While using two separate environments, your app needs to have a way to find out which environment it should connect to. One popular method is to define a global variable in your main app delegate, which will initialize your app to development or production mode.
|
1 2 3 4 5 6 7 8 9 10 11 12 13 14 15 16 |
enum environmentType { case development, production } let environment:environmentType = .production switch environment { case .development: // set web service URL to development // set API keys to development print("It's for development") case .production: // set web service URL to production // set API keys to production print("It's for production") } |
This approach requires you to change the global variable every time you want to switch from one environment to another. While this method maybe quick and convenient, it comes with some major limitations. First, because we are using a single bundle ID for both the development and production environments, you cannot install both app versions on a single device. This becomes inconvenient when you want to test the development version of the app, but still use the production version of the app on the same device. Also, this approach allows for an opportunity to accidentally ship the development app to the store. If you forget to change that single global variable, you will be shipping the wrong app to your users. I remember once I forgot to change the global variable before submitting my app to the App Store, and users got the development version of the app. That was awful.
In this article I will show you a better approach to differentiate between the development and production builds. Specifically, we will create a development target in XCode. This method is suitable for both new and existing large projects, so you can use one of your existing apps to follow along in this tutorial.
By applying this approach, the production and development versions of the app will have the same base code, but can have different icons, bundle IDs and point to separate databases. The distribution and submission processes will be very straightforward. Most importantly, your testers and managers will be able to install both versions of the app on the same device, so they fully understand which version they’re trying out.
How to Create a New Target
So how can you create a development target in Xcode? I will walk you through the procedure step-by-step with my template project “todo”. You can use your own project and follow the procedures:
1. Go to project’s settings in the Project Navigator panel. Under the Targets sections, right click the existing target and select Duplicate to copy your existing target.
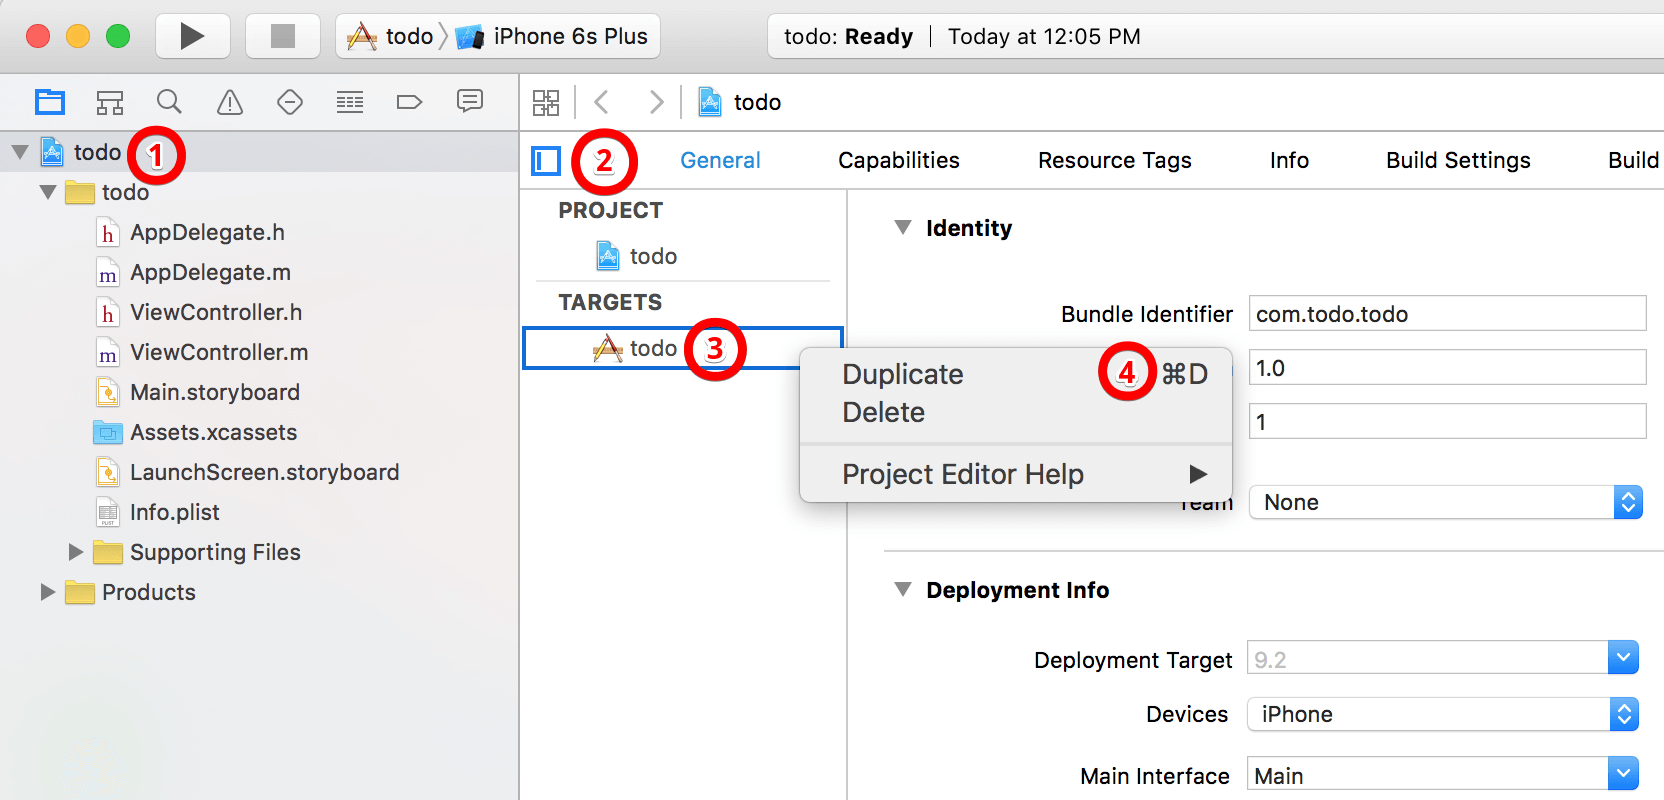
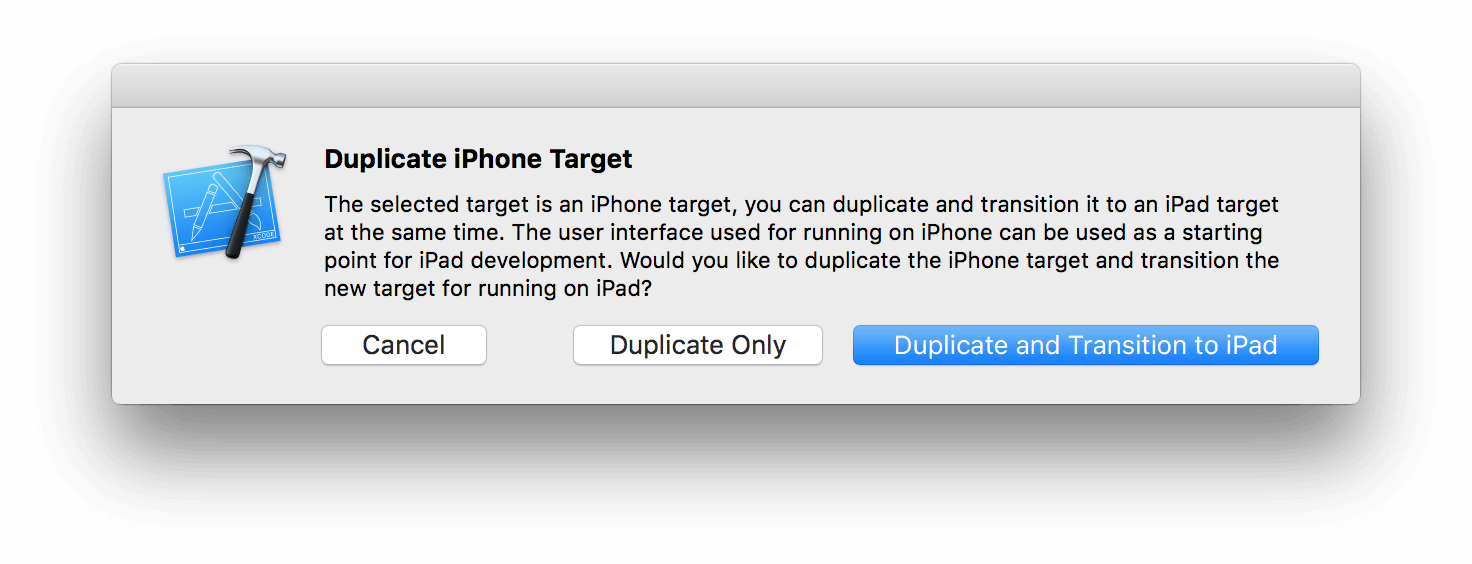
2. Xcode will ask you if your new target is for iPad development. For this tutorial, we just select “Duplicate Only”.
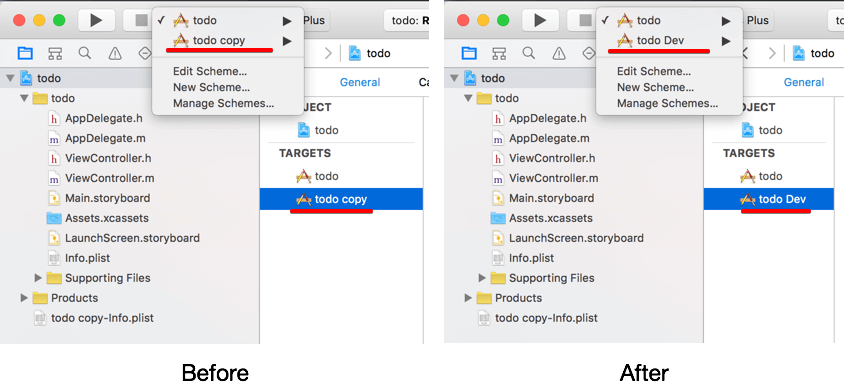
3. Now that we have a new target and a new build scheme with the name todo copy. Let’s rename it so it is easier to understand.
- Select the new target in the TARGETS list. Press
Enterto edit the text and put a more appropriate name. I prefer “todo Dev”. You’re free to choose whatever name you like. - Next, go to “Manage Schemes…”, select the new scheme you created in step 1 and press “Enter”. Make the scheme name the same as the new target name (which is the one you choose for the new target.)
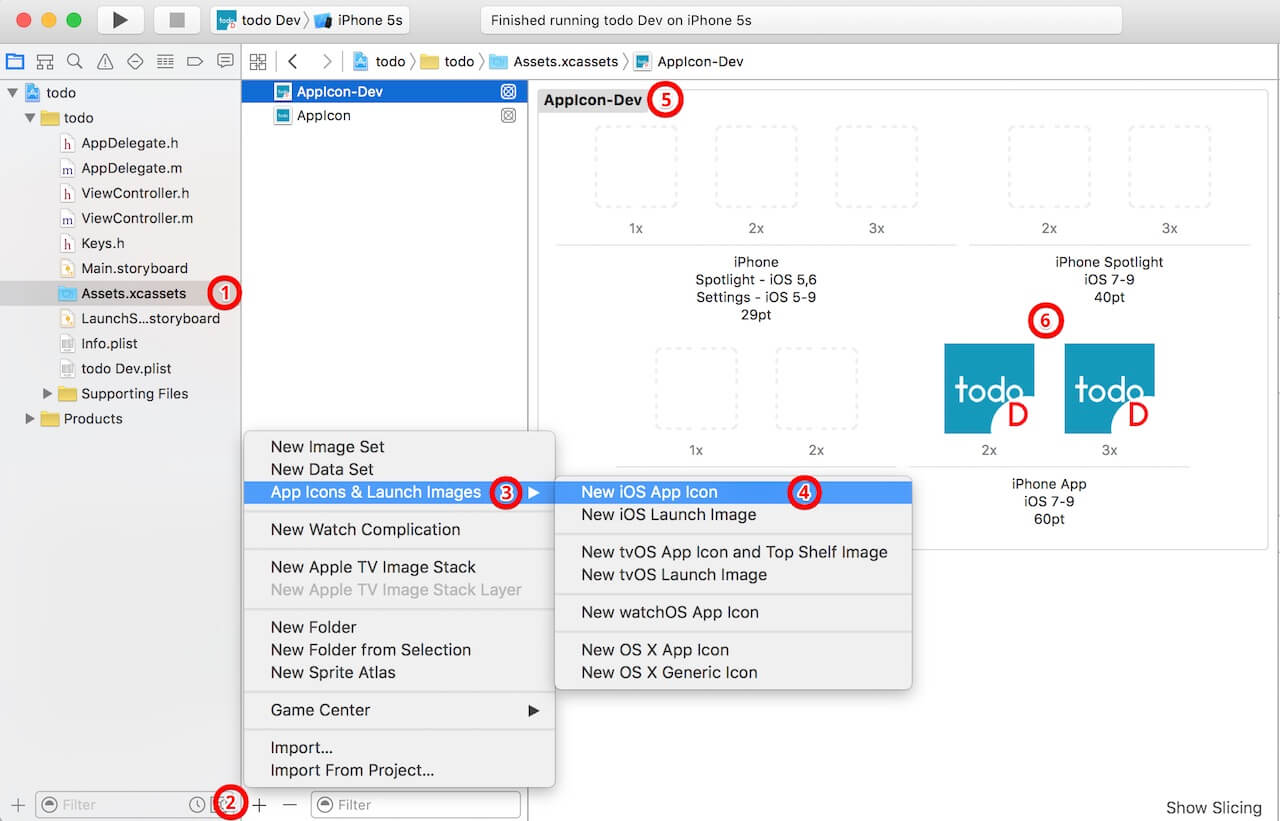
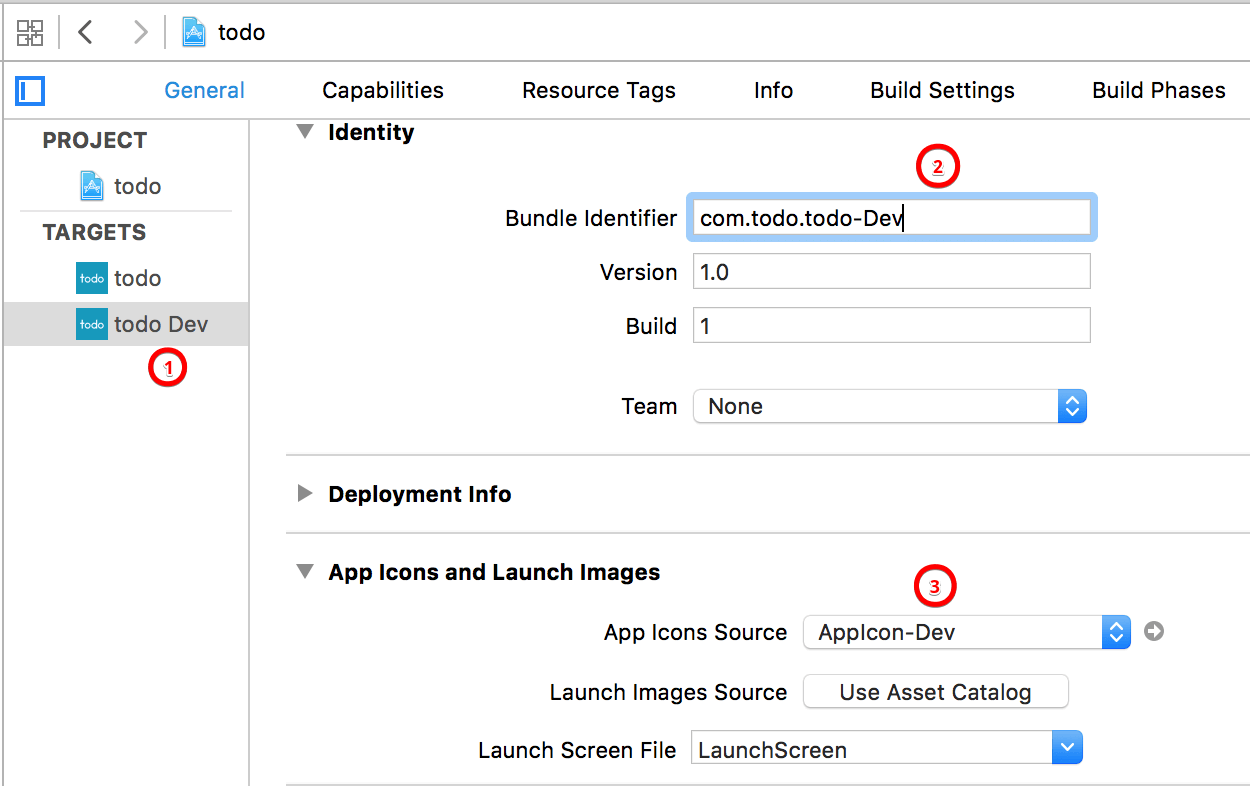
4. Steps 4 is optional, but highly recommended. If you want to make it easy and dummy-proof to distinguish between the development and production builds, you should use separate icons and launch screens for each version. This will make it obvious for your testers to know which app they are using, and hopefully prevent you from shipping a development version. 🙂
Go to Assets.xcassets and add a new icon. Right click icon > App Icons & Launch Images > New iOS App Icon. Rename the new icon to “AppIcon-Dev” and add your own images.
5. Now go back to project settings, select your development target and change the bundle identifier. Say, you can simply append “Dev” to the original ID. If you performed step 4, make sure you change the app icon setting to the one created in the previous step.
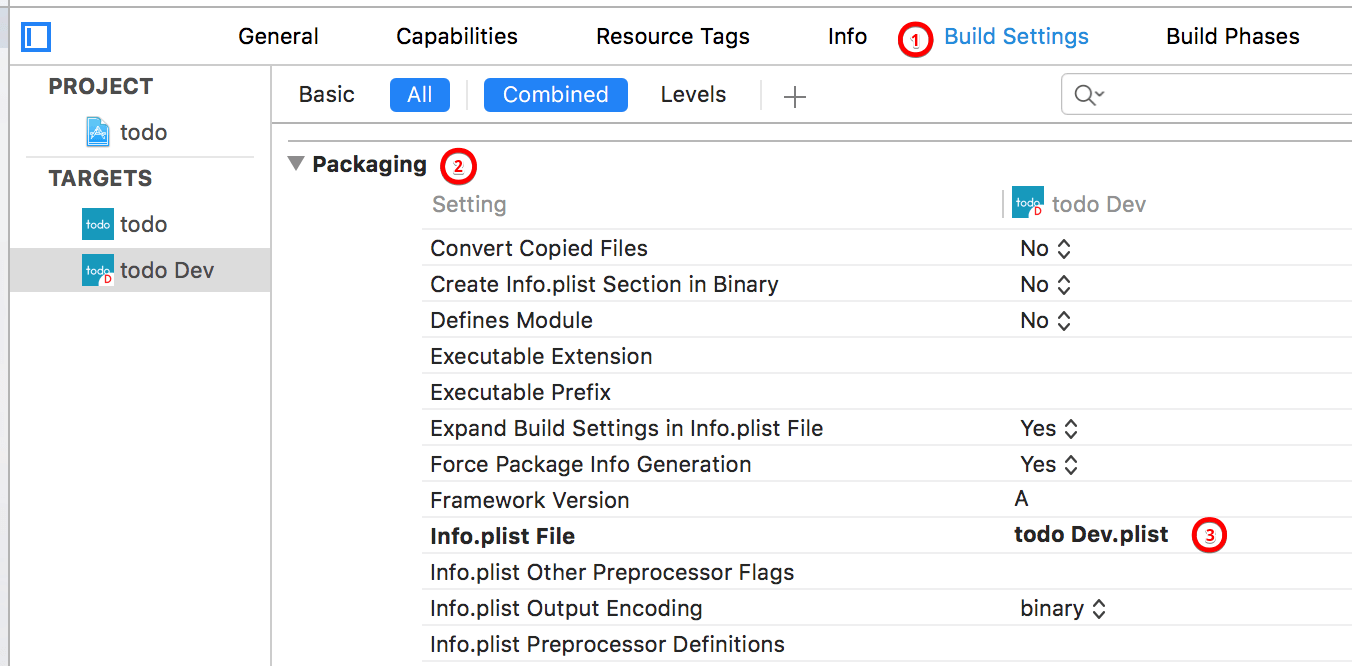
6. Xcode automatically added a plist file for your target (e.g. todo copy-Info.plist). You can find it at the root folder of your project. Rename it from “copy” to “Dev”, and place it right below your original plist file. Here, it will be easier for you to manage the file.
7. Now open “Build Settings” of your development target, scroll to “Packaging”, and change the value to the development plist file (e.g. todo Dev.plist).
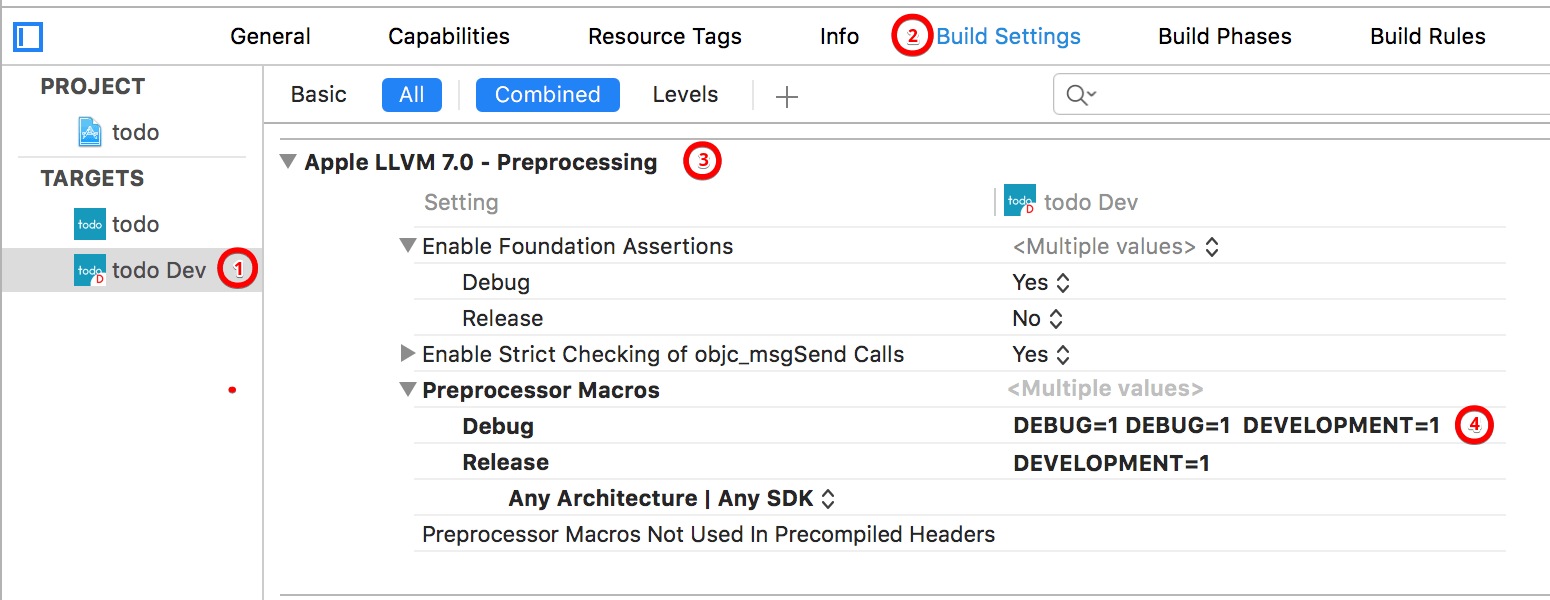
8. Lastly, we’ll configure a preprocessing macro/compiler flag for both production and development targets. So later we can use the flag in our code to detect which version the app is currently running.
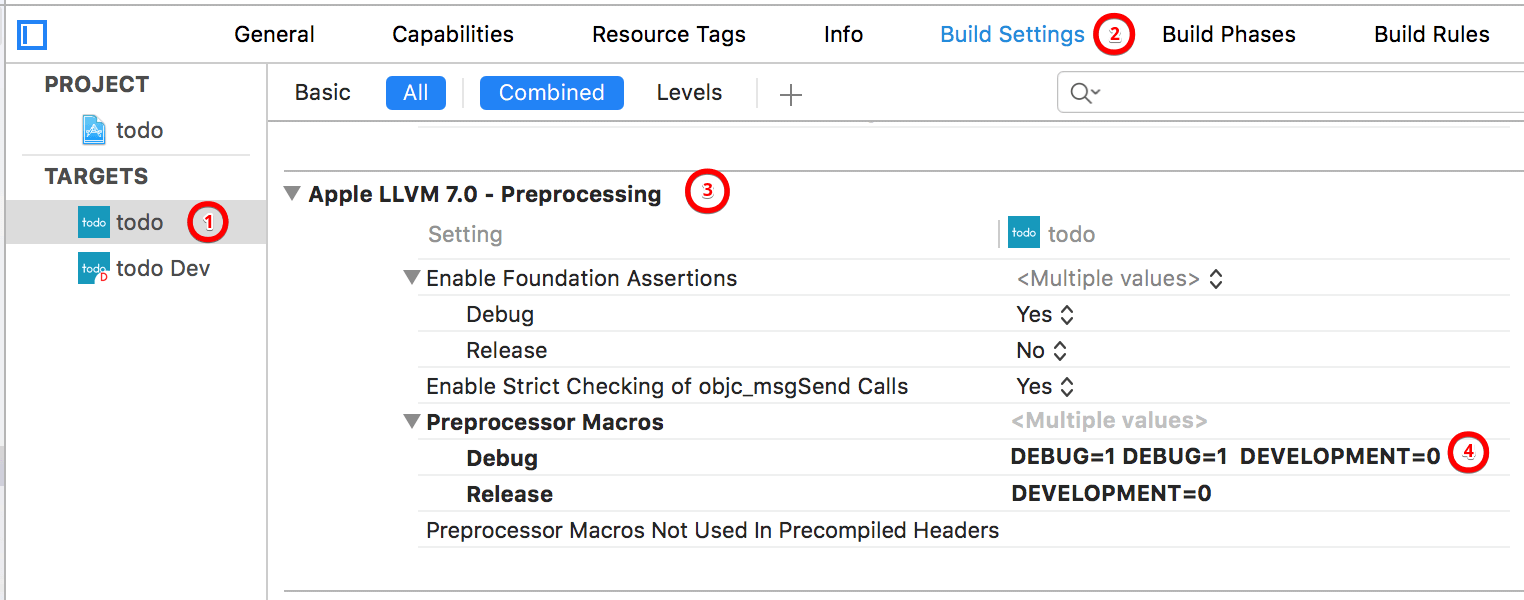
For Objective-C projects, go to Build Settings and scroll to Apple LLVM 7.0 - Preprocessing. Expand Preprocessor Macros and add a variable to both Debug and Release fields. For the development target (i.e. todo Dev), set the value to DEVELOPMENT=1. On the other hand, set the value to DEVELOPMENT=0 to indicate a production version.
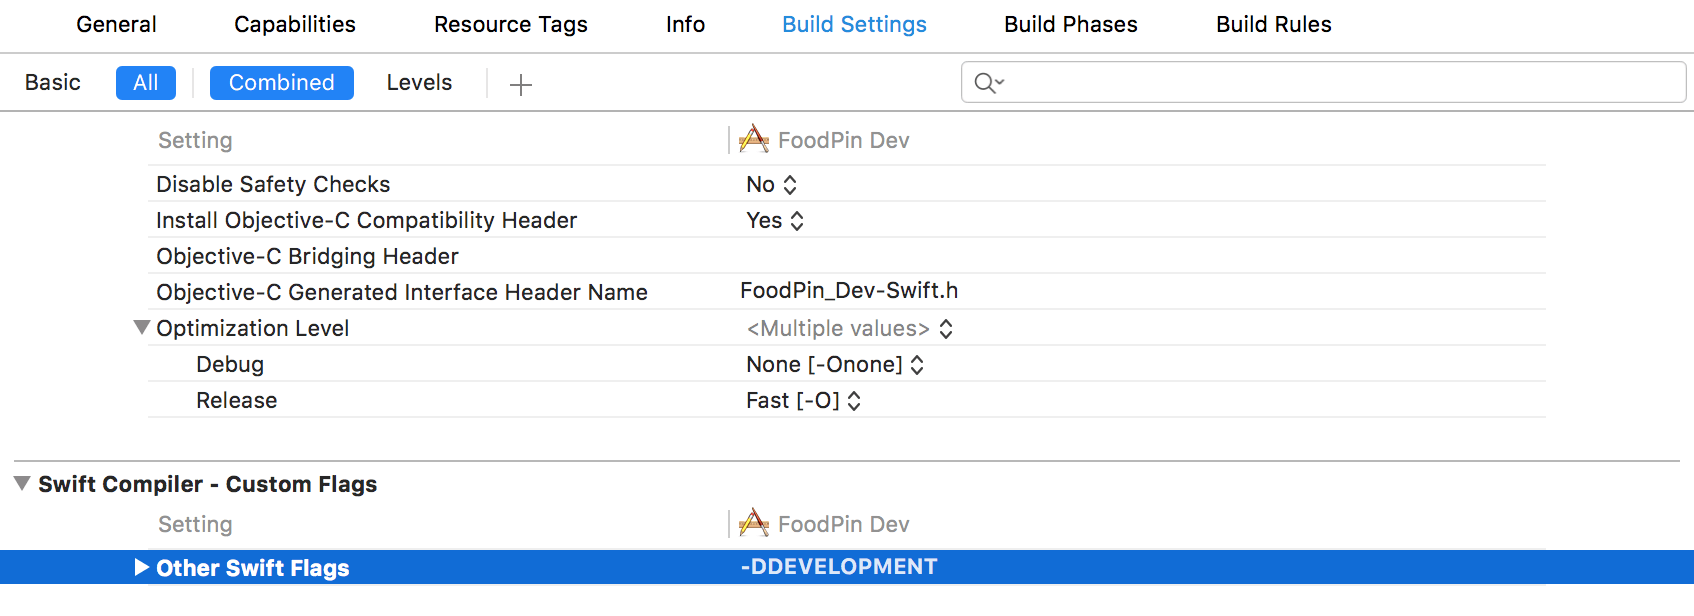
For Swift project, the compiler no longer supports preprocessor directives. Instead, it uses compile-time attributes and build configurations. To add a flag to indicate a development build, select the development target. Go to Build Settings and scroll down to the Swift Compiler - Custom Flags section. Set the value to -DDEVELOPMENT to indicate the target as a development build.
Now that you have created and configured the development target, what’s next?
Using the Target and Macro
With the macro DEV_VERSION configured, we can utilize it in the code and perform dynamic compilation for your project. Here is a simple example:
Objective-C:
|
1 2 3 4 5 6 7 |
#if DEVELOPMENT #define SERVER_URL @"http://dev.server.com/api/" #define API_TOKEN @"DI2023409jf90ew" #else #define SERVER_URL @"http://prod.server.com/api/" #define API_TOKEN @"71a629j0f090232" #endif |
In Objective-C, you can use #if to check the condition of DEVELOPMENT, and set up the URLs/API keys accordingly.
Swift:
|
1 2 3 4 5 6 7 |
#if DEVELOPMENT let SERVER_URL = "http://dev.server.com/api/" let API_TOKEN = "DI2023409jf90ew" #else let SERVER_URL = "http://prod.server.com/api/" let API_TOKEN = "71a629j0f090232" #endif |
In Swift, you can still use #if to evaluate the build configurations for dynamic compilations. However, instead of using #define to define a primitive constant, we simply use let to define a global constant in Swift.
Now when you select the “todo Dev” scheme and run the project, you’ll create the development build automatically with the server configuration set to the development environment. You’re now ready to upload the development build to TestFlight or HockeyApp for your testers and managers to test out.
Later if you need to create a production build, you can simply select the “todo” scheme. No code change is required.
Some Notes on Managing Multiple Targets
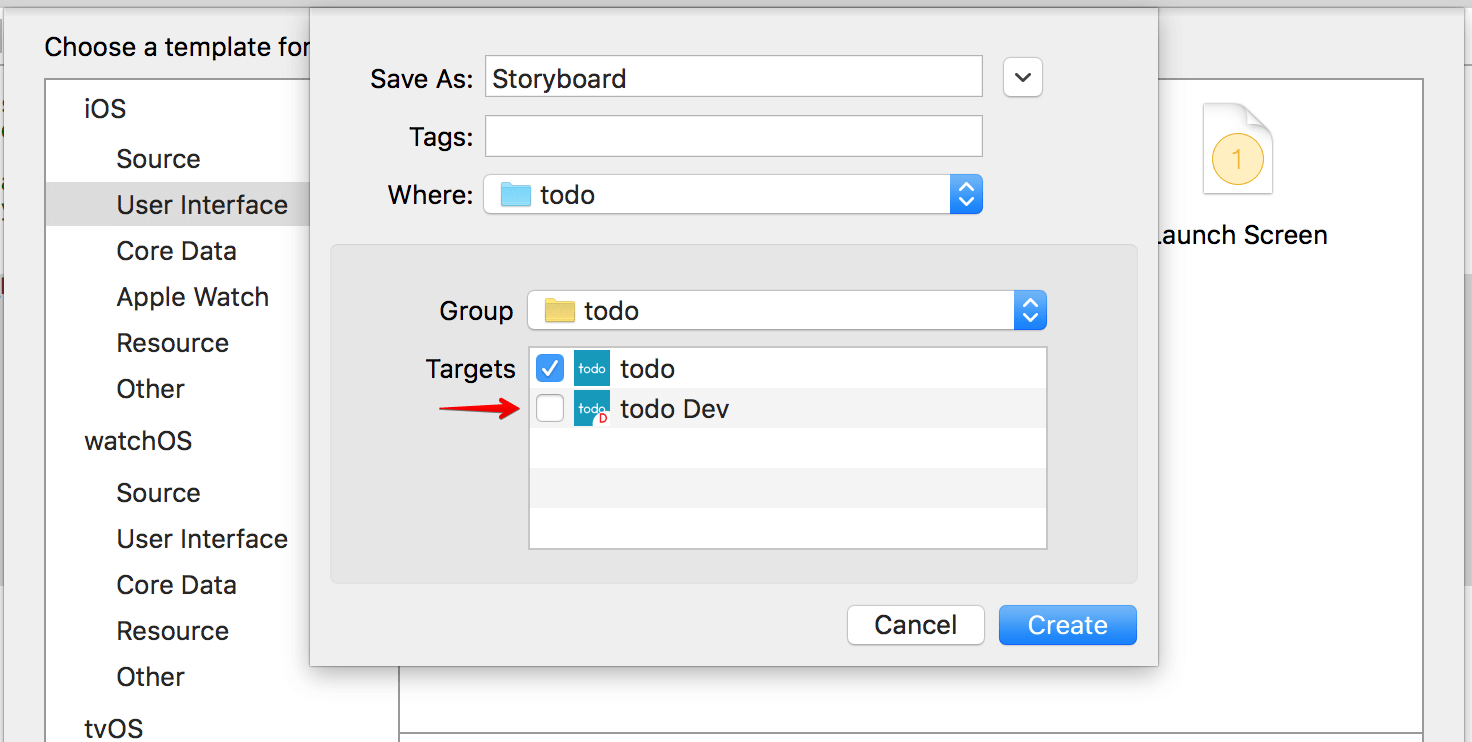
1. When you add new files to the project, don’t forget to select both targets to keep your code in sync in both builds.
2. In case you’re using Cocoapods, don’t forget to add the new target to your podfile. You can use link_with to specify multiple targets. You can further consult the Cocoapods documentation for details. Your podfile should look something like this:
|
1 2 3 4 5 6 |
source 'https://github.com/CocoaPods/Specs.git' platform :ios, '7.0' workspace 'todo' link_with 'todo', 'todo Dev' pod 'Mixpanel' pod 'AFNetworking' |
3. If you use continuous integration system such as Travis CI or Jenkins, don’t forget to configure to build and deliver both targets.
What do you think about this tutorial? How do you manage your development and production builds? Leave me comment and share your thought.

I am a senior iOS developer at TruckerPath, America's fastest growing platform for the trucking industry. I am constantly learning new technologies ranging from mobile and web to agile practices (continuous integration and behavior-driven development). In the past four years, I published more than 10 apps, two of them was featured by Apple. You can find me on LinkedIn and GitHub.
Comments
 reden87
AuthorI’m using this handy CocoaPod library to use different config data to different releases: https://github.com/team-supercharge/SCConfiguration 🙂
 Eugene Trapeznikov
AuthorThnx for this link. Will check it.
 Dario Carnesecchi
AuthorWonderful tut !!! Thank you! A question: do you think it’s possible to use targets to build similar app to submit to Apple review? (e.g: similar rss feed readers, each one for a different news site)
 Eugene Trapeznikov
AuthorYes, it is 100% possible. Because you will have different Bundle Ids for different targets, witch means you have different apps.
 Dario Carnesecchi
AuthorGood! I said it was possible! Some people told me it was not, but it sounded strange to me! Thanks!
 Benson
AuthorHow to handle Widget Extension&Today Extension&Watch Extension?
 Eugene Trapeznikov
AuthorHi Benson.
You want to have prod and dev versions of extensions?
 Uğur Çetinkaya
AuthorYes, I have the same issue. I added new target for development. But, I have also Today Extension. Do I need to create new target for extensions?
 Tom
Tom
AuthorIn my opinion targets are the wrong tool for just switching between server environments. They are error prone because you duplicate the whole build configuration and it is easy to change one target and forget to do the same change in all other targets at the same time (e.g. when adding new files). Instead of targets you could use different build configurations for each server environment.
 Eugene Trapeznikov
AuthorI think, adding file is one of the easiest case. Because you will catch it really faster, when your dev target will fail while building. Xcode will show that he doesn’t see some files and you will include them.
The only one situation, when you have different files for one purpose. Such as plists. So, be careful and don’t forget to test dev and prod separately.
In your case you will lost one of the main advantage of my solution – have both dev and prod versions on your device.
 Gw Zhang
AuthorI agree with Tom. Especially, your team member may forget to add the file to both target. Besides, if you want to dynamic switch settings in App when test the app, how can you do it?
 Tom
Tom
AuthorXCode won’t complain when you forget to add files to your prod target when you just build and test with your dev target.
Having dev and prod version on a device at the same time is also possible just using configurations instead of targets. The info.plist is preprocessed and you can use placeholder variables in your bundle identifier, e.g. “com.mycompany.app${BUNDLE_IDENTIFIER_SUFFIX}”. Then create a user-defined setting BUNDLE_IDENTIFIER_SUFFIX which is “.dev” for your dev configuration and empty for your prod configuration.
 Quang Quoc Tran
AuthorHi Eugene, there is another way better to resolve this issue by creating a new configuration in your project and adding swift flags for that configuration. For more details, view sample which i have just created on github https://github.com/quangtqag/DebugBetaReleaseSample
 Chris
Chris
AuthorUsing targets for dev/prod is the wrong way of doing. You want your dev builds as close as possible to your production builds and with different targets you might change something in one target but not the other. Terrible! Further you have a different bundle ID which makes testing in app purchases impossible. There are 1000 things that can go wrong and I don’t see a single advantages of this approach.
Having a dev and a prod version is easily archived with a single target as well.
 noxon
noxon
AuthorThis approach was useful prior schemes were introduced in Xcode and now it used only in old projects. Tom is right. It is better to take in account Xcode configuration files aka .xcconfig and keep all configuration there. Using Xcode targets for such task make you do extra work and checking so it takes more time to make all works.
It will be a good idea publish article how to do it in a proper way. And utilize best practices.
 Vineeth Vijayan
AuthorHi Eugene, seems good, just a question. if I have multiple images say AppIcon for different targets, then I will have supply different images, will all the images and assets go into the app binary?
 Miguel Rojas Cortés
AuthorAwesome Eugene, I have had the pleasure to work on projects with big companies and this is the way they do it, so I appreciate the effort you put into making this tutorial. By the way, as we are changing the bundle identifier for the development target, we may need to add a new app identifier along with its provisioning profiles or use a wildcard if I’m not wrong, can you please clarify this?
 Gavin Aiken
AuthorQuick update on “2. In case you’re using Cocoapods”, you can now use abstract targets for this. If link_with is still better I’d be interested to know, I’m relatively new at this. Mine looks like this :
use_frameworks!
# Inherent global abstract target – list pods here
pod ‘AFNetworking’
# List all targets
target ‘Prod’
target ‘Dev’
 Ігор Ільїн
AuthorThanx a lot!!! Great tutorial.
 Nguyen Thanh Thuc
AuthorGreat tutorial, thank you very much, this is good things which i need
 Prasad
AuthorI think this articale should be updated for better approach, we have used same approach and as mentioned by Tom, we have faced same issue in our multiple projects, team missed to select production target and after release only when we recieved crash reports we realised it. So either update this article with better approach or you might consider making explicit note somewhere which will highlight this issue. Thanks.
 Prata Catalin
AuthorHello, thanks for the article! I am using the targets strategy on some of the projects I am working and it works fine, mostly for white label apps but also for more complex build environments (that require not only server path changes). What I experienced though was that sometimes team members might forgot to tick all the targets when adding a file into the project and I build a plugin that scans the xcodeproj file for unsynced files across targets. The plugin is for Fastlane and it is very simple to use https://rubygems.org/gems/fastlane-plugin-itargetchecker Iwas thinking that this info might help other readers as well.
 Francis Rodrigues
AuthorI’m trying to duplicate a target (target Dev) and pointing “Framework search paths” to “$(PROJECT_DIR)/build/Debug-iphoneos”. The problem it’s don’t found the pods correctly.
 Francis Rodrigues
AuthorMy target Dev don’t found the frameworks already mentioned on PodFile
…
platform :ios, ‘9.3’
use_frameworks!
target ‘my-Project’ do
pod ‘Alamofire’, ‘~> 4.0’
pod ‘MBProgressHUD’
pod ‘PromiseKit’, ‘~> 4.0’
pod ‘MBAutoGrowingTextView’, ‘~> 0.1.0’
pod ‘PusherSwift’, ‘~> 3.0’
pod ‘PopupDialog’, ‘~> 0.4’
pod ‘SwiftMessages’, ‘3.5.1’
pod ‘Bugsnag’
pod ‘AutoCompleteTextField’
pod ‘Fabric’
pod ‘Crashlytics’
target ‘my-ProjectTests’ do
inherit! :search_paths
end
end
 Suby
Suby
AuthorSwift Compiler – Custom Flags is not listed on Xcode 9.2. What is the alternative for that
 suby
suby
AuthorOh!. I got it….