

When we first started the iOS programming course, we built a simple Recipe app together and walk you through the usage of table view. The initial version of Recipe app is very simple. All the recipe data are stored locally in an array. Later, we enhance the app by putting the recipes in a property list file. That’s better as it’s a good practice to separate static data from code.
However, both approaches face the same problem. Suppose you’ve published the Recipe app on App Store, what if you need to add more recipes or change some of the recipes?
Obviously, you’ll need to update the code (or the property file), re-build the app and submit to App Store again. And your users have to upgrade the app before viewing the updated recipes. That’s a lengthy process (normally it takes a week for Apple to review and approve your app).
A common solution is to put the recipe data into a backend database. Every time when the app launches, it retrieves the data from the backend via web service. As the data is saved and loaded remotely, you’re free to edit the recipe without rebuilding the app.
The downside is that you have to develop the backend. Apparently, this requires a different skill set and huge amount of work if you’re a beginner. Fortunately, several companies have pre-built the backend for you that your app can be easily integrated with the backend using API. This kind of service provider is usually known as Backend as a Service provider (or BaaS for short). Most of them offer the service for free to get you started. You only need to pay when the requests reach a certain volume.
In this series of tutorial, we’ll show you how to integrate the Recipe app with the Parse cloud. We’re not affiliate with Parse. We choose Parse as it is one of the leading BaaS providers and now a part of Facebook. Parse provides an easy-to-use SDK which is another reason we select Parse for the tutorial.
We’ll break the tutorials into two parts. The first part focuses on data retrieval from Parse backend. We’ll leave data update and deletion to the next article.
Okay, let’s get started.
Revisiting the Recipe App
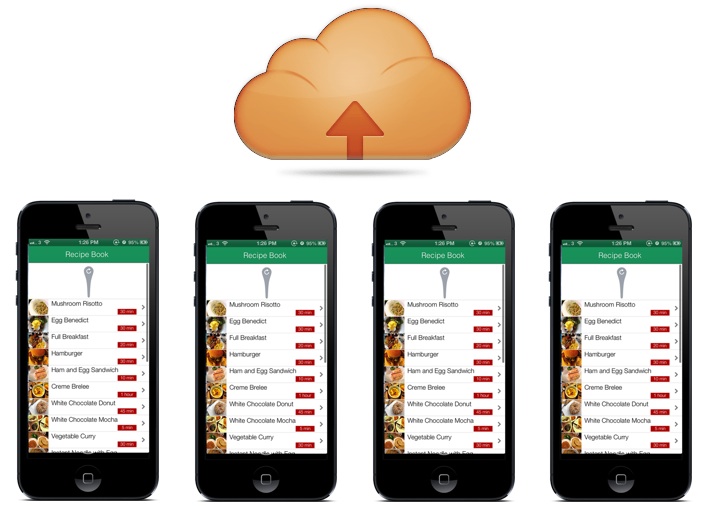
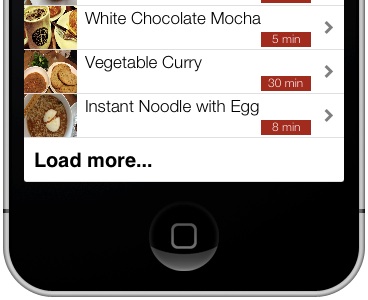
Before we setup the Parse backend, let’s revisit the Recipe app and give you an idea about it. The Recipe app is a simple app that displays a list of recipes. User is allowed to tap on any of the recipes and the app will show the details.

Simple Recipe App
So what are we going to change?
The user interface and table layout will remain the same. After going through the tutorial, you’ll end up with an app that looks just like before. However, internally the app will pull the recipes from the backend and we’ll add “Pull to Refresh” feature to the table view as well.
To save your time from building the Recipe app, you can download the Xcode project from here (tested on Xcode 4.6.3). Unzip it and try it out. The rest of the tutorial will be built on this code template.
Creating Your Parse Backend and Setup the Data
First, sign up a free account on Parse.com. During the sign-up process, you’ll be prompted to create your first app. Simply use “RecipeApp” as the name.

Sign up and create your first app
Once registered, log into the dashboard. The dashboard provides general and application-specific usage metrics for APIs, a data browser for viewing your data in the backend and interface for managing push notifications. In this tutorial, we’ll mainly deal with the data browser that is used for managing the recipe data.
Before you can upload the recipe data to your Parse backend, you have to define the recipe class in the data browser. Click “New Class” to create a new class. Set the name as “Recipe” and type as “Custom”. Once created, you should see the class under the class sidebar.
In the Recipe app, a recipe consists of the following properties:
- the name of recipe
- the recipe image
- the preparation time
- the ingredients
Each of the above properties should be mapped to a specific column of Recipe class in the data browser. So select the Recipe class and click “+ Col” to add a column.

Adding a new column in data browser
When prompted, set the column name as “name” and the type as “String”. Repeat the same procedures to add the other three columns with the following column name and type:
- recipe image – set the column name as “imageFile” and type as “File”. The PFile type is used for binary data like image.
- preparation time – set the column name as “prepTime” and type as “String”
- ingredients – set the column name as “ingredients” and type as “Array”
The Parse SDK handles the translation of native Objective-C types to JSON. For instance, if you retrieve a String type from Parse, it will be translated into a NSString object in the app.
Next, we’ll add the recipe data in the Recipe class. Click “+ Row” button to create a new row.

Adding a new row for Recipe class
Each row represents a single recipe. You only need to upload the recipe image and fill in the name, preparation time and ingredients columns. For the objectId, createdAt and updatedAt columns, the values will be automatically generated by Parse.
As an example, here is the code of a Recipe object:
Recipe *recipe1 = [Recipe new];
    recipe1.name = @"Egg Benedict";
    recipe1.prepTime = @"30 min";
    recipe1.imageFile = @"egg_benedict.jpg";
    recipe1.ingredients = [NSArray arrayWithObjects:@"2 fresh English muffins", @"4 eggs", @"4 rashers of back bacon", @"2 egg yolks", @"1 tbsp of lemon juice", @"125 g of butter", @"salt and pepper", nil];
To put this recipe into Parse, fill in the “name” column as “Egg Benedict”, the “prepTime” column as “30 min” and upload the “egg_benedict.jpg” for the “imageFile” column. To fill in the “ingredients” array, use the following format:
["2 fresh English muffins","4 eggs","4 rashers of back bacon","2 egg yolks","1 tbsp of lemon juice","125 g of butter","salt and pepper"]
Repeat the above procedures to add the rest of recipes.

Recipes in data browser
Isn’t it tedious to add the data one by one? Actually, we’ve prepared a data file for you. We just want to walk you through the data browser. Anyway, download the recipe data file here and import the data into the data browser (you may need to drop the Recipe class before importing).
Setting Up the Xcode Project for Parse
With the recipe data configured, we’ll tweak the Recipe app to retrieve the data from the backend. But you’ll first need to configure the Xcode project to work with Parse.
First, download the Parse SDK for iOS. Unzip the file and drag the Parse.framework folder into your Xcode project folder target.

Adding Parse SDK into Framework
You’ll need to add the following libraries into the project:
- AudioToolbox.framework
- CFNetwork.framework
- CoreGraphics.framework
- CoreLocation.framework
- libz.1.1.3.dylib
- MobileCoreServices.framework
- QuartzCore.framework
- Security.framework
- StoreKit.framework
- SystemConfiguration.framework
Under the “RecipeBook” targets, select “Build Phases” and expand the “Link Binary with Libraries”. Click the “+” button and add the above libraries one by one.

Adding libraries
Before your app can connect to Parse, you have to register it with the backend when it launches. Open “RecipeBookAppDelegate.m” and add the following header at the top of the file:
#import
Next, add the following code in the didFinishLaunchingWithOptions: method:
    [Parse setApplicationId:@"IRVN6Y5kIGL9RnHcFnpgbAq4QwVWWVBxN2lTTvLq"
                  clientKey:@"ANOHDG88JXVfHqYRbT3wLK9bXBOou94bTyWktOkU"];
Your application ID and client key will be different from the above. Make sure you replace them with your own ID and client key that can be found under “Settings” of the Parse dashboard.

Parse Dashboard – Settings
You’ve completed the configuration with Parse. Your app should be ready to connect with the Parse backend. Try to compile and run it. If you get everything correct, you should be able to run the app without any error.
Next, we’ll see how to retrieve the recipe objects that are just created from Parse.
Using PFQueryTableViewController for Cloud Data
As of now, the app uses the standard UITableViewController to display the list of recipes. This is a standard way in iOS for displaying data in table form. To retrieve data from backend and populate them into the table, however, it is a different story. There are a number of issues to consider:
- As we need to load the data from backend over Internet, it’s required to handle any network related errors such as connection failure.
- We can now update the recipe in the backend. The app should provide a mean for user to refresh the data without relaunching.
- The existing app saves the recipes and images locally. The recipe data are ready to load into table when the app launches. That’s a complete different story when the recipes are retrieved from the backend. During the app launches, the recipe data may not be ready. It’ll take time to download the recipe data and images. How can you ensure the recipes are ready before displaying them in the table?
- The time required to load the images varies depending on the network speed. Should your app wait until all images are downloaded before showing the recipes in the table? That’s an unpleasant user experience if it takes too long to load. It’s better to display the list of recipes while loading the recipe image in background.
- What if you have a large set of recipes? In this case you may not want to load the recipes all at once. For the sake of performance, you may just load a subset of recipes. Your app will only display another subset of recipes when users hit a “Load more” button.
- For best performance, you may consider to implement data caching in the app. So once the recipes are downloaded, they will be cached locally.
The above are some of the design considerations when developing data-driven apps with a backend. Luckily, the Parse SDK pre-built a controller named PFQueryTableViewController that handles the background loading, caching and error exception. This should save you a large amount of work from creating your own solution.
With this class, you’ll be able to setup a UITableView that displays your Parse data. The class inherits from UITableViewController but comes with a bunch of handy methods that make it easy to query, paginate, and display objects from Parse backend.
How To Use PFQueryTableViewController
When using Parse, each cell of a UITableView typically represents data from a PFObject. Basically, to display data in PFQueryTableViewController, all you have to do is to override these two methods:
- (PFTableViewCell *)tableView:(UITableView *)tableView cellForRowAtIndexPath:(NSIndexPath *)indexPath object:(PFObject *)object
- (PFQuery *)queryForTable
The first method is similar to the cellForRowAtIndexPath: method defined in the UITableViewDataSource protocol. You override the method to provide your implementation to return a custom table cell for the PFObject. The queryForTable: method is for you to load the objects from Parse backend.
Next, we’ll tweak the Recipe app and replace the UITableView with the PFQueryTableViewController. First, open RecipeBookViewController.h and change it as a subclass of PFQueryTableViewController. Don’t forget to import the Parse header too.
#import

@interface RecipeBookViewController : PFQueryTableViewController
Now open the RecipeBookViewController.m. As we no longer use UITableView and the recipe array, remove the following methods and the initialization code in the viewDidLoad: method:
- (NSInteger)tableView:(UITableView *)tableView numberOfRowsInSection:(NSInteger)section
{
    return [recipes count];
}

- (UITableViewCell *)tableView:(UITableView *)tableView cellForRowAtIndexPath:(NSIndexPath *)indexPath
{
    static NSString *simpleTableIdentifier = @"RecipeCell";

    UITableViewCell *cell = [tableView dequeueReusableCellWithIdentifier:simpleTableIdentifier];

    if (cell == nil) {
        cell = [[UITableViewCell alloc] initWithStyle:UITableViewCellStyleDefault reuseIdentifier:simpleTableIdentifier];
    }

    Recipe *recipe = [recipes objectAtIndex:indexPath.row];

    UIImageView *imageView = (UIImageView*) [cell viewWithTag:100];
    imageView.image = [UIImage imageNamed:recipe.imageFile];
    UILabel *nameLabel = (UILabel*) [cell viewWithTag:101];
    nameLabel.text = recipe.name;
    UILabel *prepTimeLabel = (UILabel*) [cell viewWithTag:102];
    prepTimeLabel.text = recipe.prepTime;

    return cell;
}
And replace them with these methods:
- (id)initWithCoder:(NSCoder *)aCoder
{
self = [super initWithCoder:aCoder];
if (self) {
// The className to query on
self.parseClassName = @"Recipe";
// The key of the PFObject to display in the label of the default cell style
self.textKey = @"name";
// Whether the built-in pull-to-refresh is enabled
self.pullToRefreshEnabled = YES;
// Whether the built-in pagination is enabled
self.paginationEnabled = NO;
}
return self;
}
- (PFQuery *)queryForTable
{
PFQuery *query = [PFQuery queryWithClassName:self.parseClassName];
return query;
}
- (UITableViewCell *)tableView:(UITableView *)tableView cellForRowAtIndexPath:(NSIndexPath *)indexPath object:(PFObject *)object
{
static NSString *simpleTableIdentifier = @"RecipeCell";
UITableViewCell *cell = [tableView dequeueReusableCellWithIdentifier:simpleTableIdentifier];
if (cell == nil) {
cell = [[UITableViewCell alloc] initWithStyle:UITableViewCellStyleDefault reuseIdentifier:simpleTableIdentifier];
}
// Configure the cell
PFFile *thumbnail = [object objectForKey:@"imageFile"];
PFImageView *thumbnailImageView = (PFImageView*)[cell viewWithTag:100];
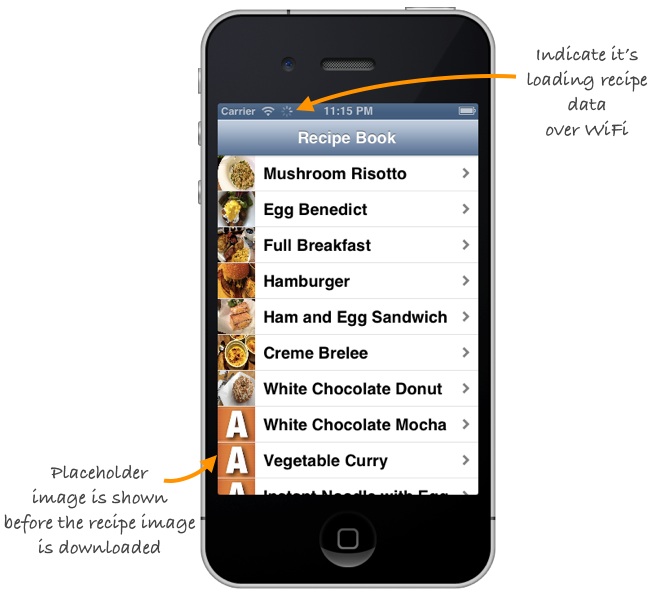
thumbnailImageView.image = [UIImage imageNamed:@"placeholder.jpg"];
thumbnailImageView.file = thumbnail;
[thumbnailImageView loadInBackground];
UILabel *nameLabel = (UILabel*) [cell viewWithTag:101];
nameLabel.text = [object objectForKey:@"name"];
UILabel *prepTimeLabel = (UILabel*) [cell viewWithTag:102];
prepTimeLabel.text = [object objectForKey:@"prepTime"];
return cell;
}
Let’s go through the above methods one by one. In the initWithCoder: method, we configure the behaviour of the PFQueryTableView. Here we set the name of the Parse class to retrieve, enable the built-in pull-to-refresh feature but disable the pagination.
We specify the objects to load into PFQueryTableView by implementing the queryForTable: method. The PFQuery class provides a handy way to load a list of objects from Parse. You can simply create the PFQuery object with the Parse class to query.
The cellForRowAtIndexPath: method is very similar to the one we’ve implemented before. The main difference is with the use of PFObject. In brief, storing data on Parse is built around the PFObject. Each PFObject contains key-value pairs of JSON-compatible data. Here is a sample PFObject of the Recipe class:
"imageFile": {
    "__type": "File",
    "name": "2516c9e3-ebd6-4e11-89cf-972ad77a942b-mushroom_risotto.jpg",
    "url": "http://files.parse.com/4838f7c6-c40b-4ed8-b750-a5a3d2948599/2516c9e3-ebd6-4e11-89cf-972ad77a942b-mushroom_risotto.jpg"
  },
  "ingredients": [
    "1 tbsp dried porcini mushrooms",
    "2 tbsp olive oil",
    "1 onion, chopped",
    "2 garlic cloves",
    "350g/12oz arborio rice",
    "1.2 litres/2 pints hot vegetable stock",
    "salt and pepper",
    "25g/1oz butter"
  ],
  "name": "Mushroom Risotto",
  "prepTime": "30 min"
When the cellForRowAtIndexPath: method is called, you’ll get a PFObject of the Recipe class. In other words, you get a single recipe. To get the values out of the PFObject, use the objectForKey: method. Say, to get the values of the “name” key, we use:
nameLabel.text = [object objectForKey:@"name"];
Parse stores files (such as images, audio, document) in the cloud in the form of PFFile. We use PFFile to reference the recipe image. The Parse SDK offers a handy class named PFImageView that downloads and displays remote image stored on Parse’s server. Best of all, the download is automatically done in background.
    PFFile *thumbnail = [object objectForKey:@"imageFile"];
    PFImageView *thumbnailImageView = (PFImageView*)[cell viewWithTag:100];
    thumbnailImageView.image = [UIImage imageNamed:@"placeholder.jpg"];
    thumbnailImageView.file = thumbnail;
    [thumbnailImageView loadInBackground];
We simply specify the recipe image (i.e. thumbnail) to load by setting the “file” property of PFImageView. Before the full recipe image is downloaded, the image view will just show the placeholder image.
Lastly go back to Storyboard. Change the class of the thumbnail in the Recipe Book View Controller from UIImageView to PFImageView.

Changing the custom class from UIImageView to PFImageView
Now compile and run the app. If everything is correct, the Recipe app should be able to retrieve data from Parse backend.
Pull to Refresh and Pagination
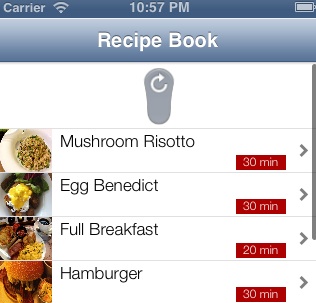 The PFQueryTableView looks the same as the UITableView. But try to pull down the table and you’ll see the “Pull To Refresh” is already built-in. Go back to the data browser and upload a new recipe. When you pull to refresh the data, you’ll find the new recipe. Cool, right? You can now manage all your data in the backend.
Other than pull to refresh, the PFQueryTableViewController also comes with the pagination feature. In the above section, we disable the pagination feature. To enable it, change the paginationEnabled property to YES. By default, it shows 25 objects per page. You can change the number by altering the objectsPerPage property.
self.paginationEnabled = YES;
self.objectsPerPage = 10;
Let’s say we limit the number of object per page to 10. Compile and run the app again. The app will only load the first 10 recipes when it first runs. Tapping the “Load more” row will automatically retrieve the next 10 records. The pagination feature is especially useful when dealing with a large date set.
Caching for Speed and Offline Access
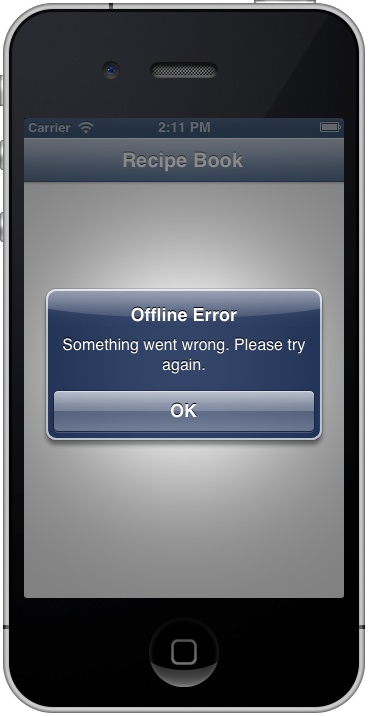
Try to close the app and re-launch it. Every time it opens, you’ll a “Loading…” screen that the app is downloading recipes from backend. What if there is no network access? Try to close the app and disable the network connection of your iPhone or Simulator. When running the app again, you’ll see an error message.
There is a better way to handle this situation. Parse query has a built-in support for caching that makes it a lot easier to save query results on disk. In case there is no network access, your app can load the result from cache. Caching also improves the app performance. Instead of loading data from Parse every time when the app runs, it retrieves the data from cache on startup.
By default, caching is disabled. But it can be easily enabled using a single line of code. Add the following code in queryForTable: method (after the initialization of PFquery):
query.cachePolicy = kPFCachePolicyCacheThenNetwork
The Parse query supports various types of cache policy. The kPFCachePolicyCacheThenNetwork policy is just one of them. It first loads data from the cache, then from the network.
Try to compile and run the app again. After you run it once, disable the WiFi or other network connection and launch the app again. This time, your app should be able to show the recipes even it’s offline.
Your Exercise
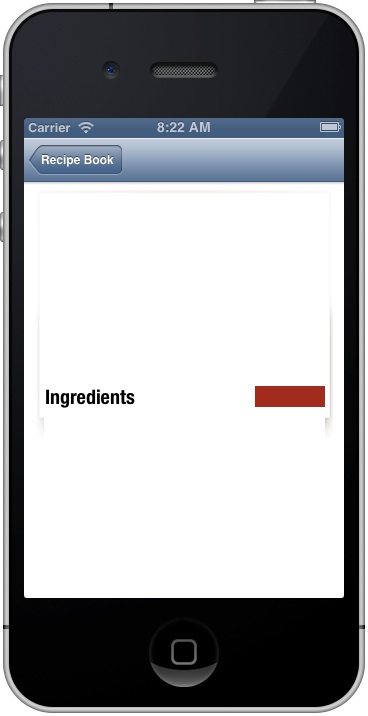
The recipe detail view doesn’t work right now. When you select any of the recipes, you’ll see a screen without any recipe information. So far we haven’t changed any code in the RecipeDetailViewController class. Also the prepareForSegue: method is still referring to the recipes array that is already obsolete. I’ll leave the changes for you as an exercise.
What’s Coming Next
In this tutorial, we’ve migrated all the recipes from the app to the Parse cloud backend. With the Parse SDK, it’s pretty easy to integrate the app with Parse to retrieve the data from the cloud. This is just the first part of the tutorial series. In part 2, we’ll show you how to store and update the recipe to the backend.
Parse is just one of the BaaS providers in the market. It’s easy to integrate and works pretty well. However, you’re free to explore other providers (such as StackMob, Kinvey, Kii Cloud, MobDB, etc) and pick the most suitable one for your development. The startup cost for most of the providers are almost zero. They’re free to use and you only need to pay when the number of requests reach a certain volume.
For complete reference, you can download the full source code from here. The Xcode project already includes answers for the exercise.
As always, leave us comment and share your thought about the tutorial. We want to hear your feedback and keep improving. Stay tuned. Part 2 of the tutorial series is on the way.
Update: Part 2 of the tutorial series is now here.


