

Today, Sleep Revolution is a fad and users are curious than ever to not only know about the the time they’ve been asleep but also to analyze the data gathered over a period to reveal their sleeping trends. Advancements in technology including hardwares, and mobiles in particular have brought this seemingly ever-growing subject into a whole new light.
Apple provides a cool way to communicate with user’s personal health information in a secure manner and store the information securely through the built-in Health app. Not only can you use HealthKit to build a fitness app, the framework also allows you access sleep analysis data.
In this tutorial, I will give you a quick introduction to the HealthKit framework, and demonstrate how you can build a simple app for sleep analysis.
Introduction
The HealthKit framework provides a structure to save data in an encrypted database called the HealthKit store. You can access this database using the HKHealthStore class. Both iPhone and Apple Watch have their own HealthKit store. Health data is synced between Apple Watch and iPhone; however, old data is periodically purged from Apple Watch to save space. HealthKit and the Health app are unavailable on iPad.
HealthKit is a powerful tool if you want to create an iOS or watchOS app based on health data. It is designed to manage data from a wide range of sources, automatically merging the data from different sources based on user’s preferences. Apps can also access the raw data for each source, and merge the data themselves. Not only for body measurements, fitness or nutrition, the data can also be used for sleep analysis.
For the rest of the article, I will show you how to make use of the HealthKit framework for saving and accessing sleep analysis data on iOS. The same methods are applicable for watchOS applications as well. Please note that the tutorial is written using Swift 2.0 and Xcode 7. So make sure you use Xcode 7 (or up) to follow the tutorial.
Before moving on, download the starter project and unzip it. I have already created the user interface with basic functionalities for you. When you run the starter project, you will see a timer UI that shows the time elapsed after you push the start button.
Working with the HealthKit Framework
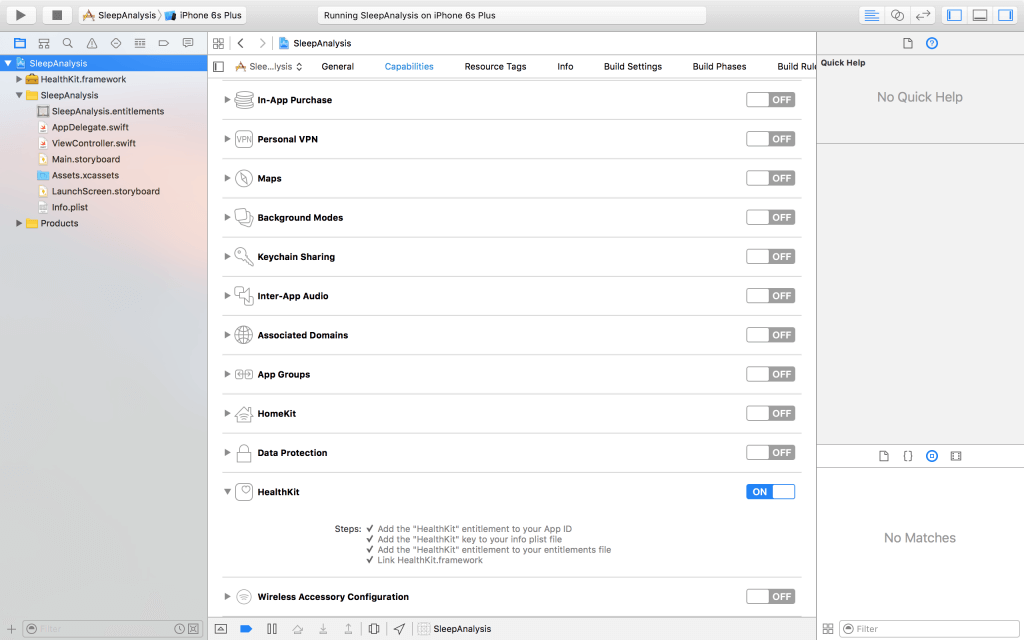
Our aim with the application is to save sleep analysis information and retrieve the data using the Start & Stop buttons. To use HealthKit, you must begin by granting the HealthKit capabilities to your app bundle. In your app project, navigate to your current target -> capabilities and turn on HealthKit.
Next, you will need to create an instance of HKHealthStore in the ViewController class using the following code:
let healthStore = HKHealthStore()
Later we will use the HKHealthStore instance to access the HealthKit store.
As mentioned, HealthKit grants users control over their health data. So you have to first request users’ permission before you can gain access (write/read) to the Sleep Analysis data of the user. To do so, first import the built-in HealthKit framework and update the viewDidLoad method like this:
override func viewDidLoad() {
    super.viewDidLoad()

    let typestoRead = Set([
        HKObjectType.categoryTypeForIdentifier(HKCategoryTypeIdentifierSleepAnalysis)!
        ])

    let typestoShare = Set([
        HKObjectType.categoryTypeForIdentifier(HKCategoryTypeIdentifierSleepAnalysis)!
        ])

    self.healthStore.requestAuthorizationToShareTypes(typestoShare, readTypes: typestoRead) { (success, error) -> Void in
        if success == false {
            NSLog(" Display not allowed")
        }
    }
}
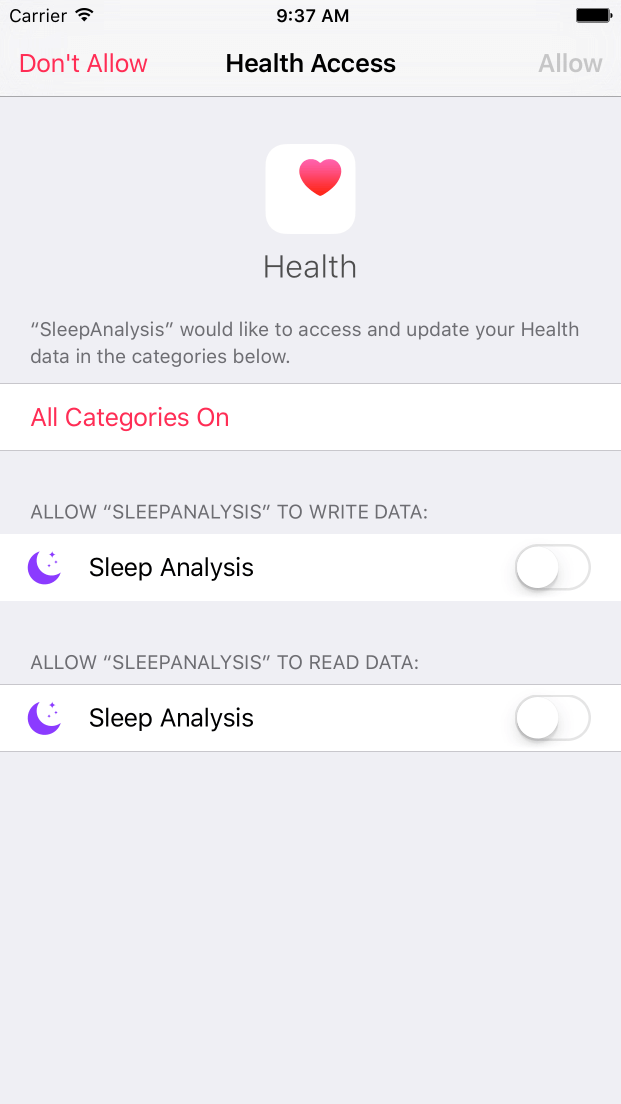
This code will prompt the user to allow or deny the requested permissions. With the completion block, you can handle success or error and get the final result. It is not necessary that the user grants your app all the requested permissions. You must handle the errors gracefully in your app.
But for testing purpose, you must have to select the “Allow” option to grant the app permission to access the health data on your device.
Writing Sleep Analysis Data
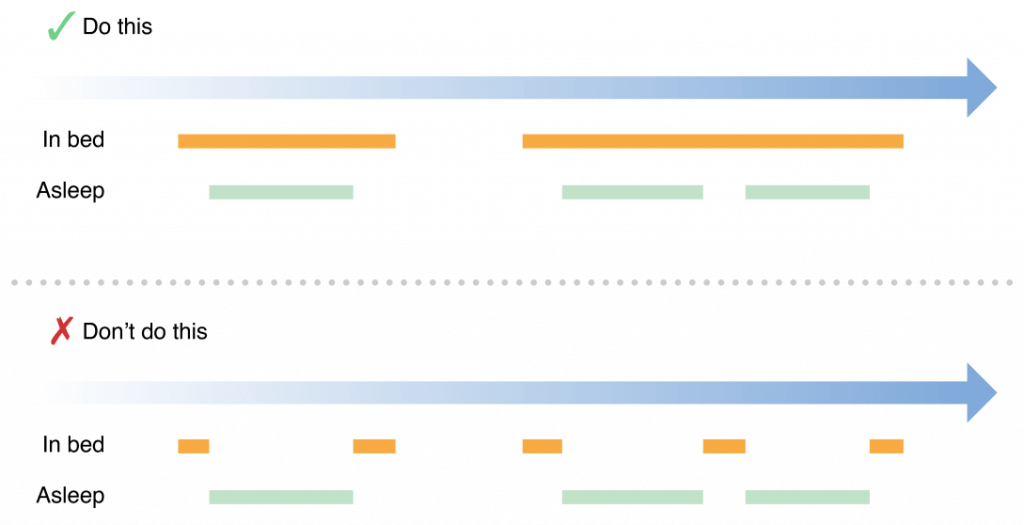
First, how can we retrieve the sleep analysis data? According to Apple’s documentation, each sleep analysis sample can have only one value. To represent the user being both in bed and asleep, HealthKit uses two or more samples with overlapping times. By comparing the start and end times of these samples, apps can calculate a number of secondary statistics:
- the amount of time it takes for the user to fall asleep
- the percentage of time in bed that the user actually sleeps
- the number of times the user wakes up while still in bed
- the total amount of time spent both in bed and asleep
In brief, you follow the below approach to save sleep analysis data to the HealthKit store:
- We need to define two
NSDateobjects corresponding to the start time and the end time. - We then create an instance of
HKObjectTypeusingHKCategoryTypeIdentifierSleepAnalysis. - We need to create a new object of the
HKCategorySampletype. You normally use category samples to record sleep data. Individual samples represent time periods when the user is in bed or asleep. So we will create both an in-bed sample and an asleep sample with overlapping times. - Finally, we’ll save the object using
saveObjectofHKHealthStore.
If you translate the above into Swift, here is the code snippet to save sleep analysis data for both in bed and asleep values. Please insert the method in the ViewController class:
func saveSleepAnalysis() {

    // alarmTime and endTime are NSDate objects
    if let sleepType = HKObjectType.categoryTypeForIdentifier(HKCategoryTypeIdentifierSleepAnalysis) {

        // we create our new object we want to push in Health app
        let object = HKCategorySample(type:sleepType, value: HKCategoryValueSleepAnalysis.InBed.rawValue, startDate: self.alarmTime, endDate: self.endTime)

        // at the end, we save it
        healthStore.saveObject(object, withCompletion: { (success, error) -> Void in

            if error != nil {
                // something happened
                return
            }

            if success {
                print("My new data was saved in HealthKit")

            } else {
                // something happened again
            }

        })


        let object2 = HKCategorySample(type:sleepType, value: HKCategoryValueSleepAnalysis.Asleep.rawValue, startDate: self.alarmTime, endDate: self.endTime)

        healthStore.saveObject(object2, withCompletion: { (success, error) -> Void in
            if error != nil {
                // something happened
                return
            }

            if success {
                print("My new data (2) was saved in HealthKit")
            } else {
                // something happened again
            }

        })

    }

}
This function can be called at the time we want to save the Sleep Analysis data to HealthKit.
Reading Sleep Analysis Data
To read the sleep analysis data, we will need to create a query. You should begin by defining the HKObjectType category to HKCategoryTypeIdentifierSleepAnalysis. You may also want to use a predicate to filter the retrieved data using startDate and endDate which are NSDate objects corresponding to the time range that you may want to retrieve. You will also need to create a sortDescriptor for sorting the retrieved queries to select the desired result.
Your code for retrieving sleep analysis data should look like this:
func retrieveSleepAnalysis() {

    // first, we define the object type we want
    if let sleepType = HKObjectType.categoryTypeForIdentifier(HKCategoryTypeIdentifierSleepAnalysis) {

        // Use a sortDescriptor to get the recent data first
        let sortDescriptor = NSSortDescriptor(key: HKSampleSortIdentifierEndDate, ascending: false)

        // we create our query with a block completion to execute
        let query = HKSampleQuery(sampleType: sleepType, predicate: nil, limit: 30, sortDescriptors: [sortDescriptor]) { (query, tmpResult, error) -> Void in

            if error != nil {

                // something happened
                return

            }

            if let result = tmpResult {

                // do something with my data
                for item in result {
                    if let sample = item as? HKCategorySample {
                        let value = (sample.value == HKCategoryValueSleepAnalysis.InBed.rawValue) ? "InBed" : "Asleep"
                        print("Healthkit sleep: \(sample.startDate) \(sample.endDate) - value: \(value)")
                    }
                }
            }
        }

        // finally, we execute our query
        healthStore.executeQuery(query)
    }
}
This code queries the HealthKit to get all Sleep Analysis data and then sorts it down to descending order. Then each query is printed with the startDate and endDate along with the type of value i.e. In Bed or Asleep. I have set the limit to 30 to retrieve the last 30 recorded samples. You can also use the predicate method to choose your custom start and end dates.
App Testing
For the demo application, I have used an NSTimer to show the time elapsed since you push the start button. The NSDate objects are created on the start and end buttons to save sleep analysis data as the elapsed time. In the stop action method, you can invoke the saveSleepAnalysis() and retrieveSleepAnalysis() methods to save and get the sleep data.
@IBAction func stop(sender: AnyObject) {
    endTime = NSDate()
    saveSleepAnalysis()
    retrieveSleepAnalysis()
    timer.invalidate()
}
In your apps, you may want to change the NSDate objects to choose relevant start and end times (probably different) for saving the in bed and asleep values.
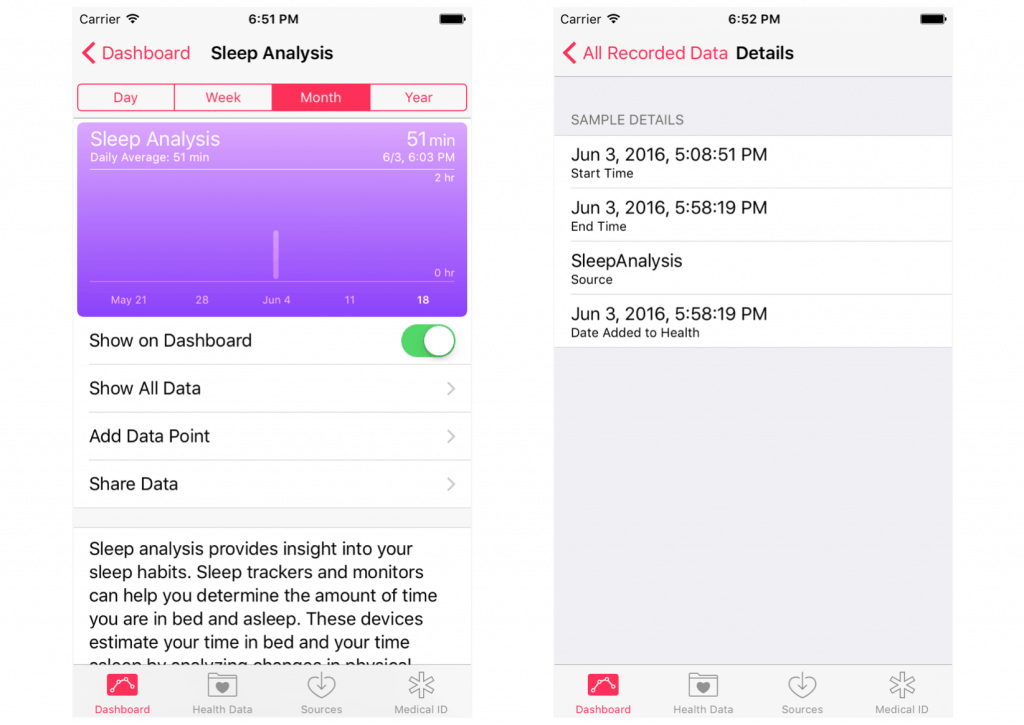
Once you’ve made the changes, you can run the demo app and start the timer. Let it run for a few minutes and then tap the Stop button. After that, open the Health app. You’ll find the sleep data in there.
Some Advices for HealthKit Apps
HealthKit is designed to provide a common platform for app developers to share and access user’s data easily and avoids any possible duplication or inconsistency in data. Apple review guidelines are very specific for apps using the HealthKit and requesting read/write permissions without a clear demonstration of their use might result in the app being rejected.
Apps that save fake or incorrect data to the Health App would also be rejected. This means, that you cannot be naïve with your algorithms for calculating different health values like sleep analysis in this tutorial. You should try using the inbuilt sensor data for reading and manipulating any parameters to avoid calculating false data.
For the complete Xcode project, you can get it here.


