

According to the news, health and fitness are more important today than at any point in history. It’s funny, though, as I seem to remember the news telling me the same thing a couple of days ago. Maybe it’s just a feeling that occurs while getting older – the need to get healthy and fit. Either way, this is a major topic. Advancements in tech, the mobile app and hardware world in particular, are bringing this seemingly ever-growing subject into a whole new light.
HealthKit is Apple’s bridge from the important, trackable health data to the health-conscious tech-consumer, exercise-fan, and regular person with an iPhone. That’s cool. A user can easily track measurable fitness and health data over a period of time. Aside from the benefit of awareness, seeing the positive slope in the graph is inspiring and a great motivator.
As one would imagine, security is of paramount importance when managing health information. HealthKit places absolute control of all HealthKit information squarely into the hands of the user. The user can grant or deny permission to any app that requests access to their health data.
For the developer, we need to ask permission to read or write data to HealthKit. In fact, we need to specifically state the data for which we would like to access or affect. Additionally, any app that uses HealthKit must contain a Privacy Policy, so the user can feel more comfortable with the transaction of information.
About OneHourWalker
Today, we’ll be building a fun little app that both reads information from HealthKit and writes new data. Meet OneHourWalker.

OneHourWalker is a fitness app that tracks the distance that a user travels while walking, or running, for one hour. The, the user can share that distance with HealthKit, and it will be accessible in the Health App. I know, one whole hour sounds a little optimistic, for me at least. To that end, the user can quit early and still share the distance.
So, that sounds like it only writes data to HealthKit. What are we going to read?
Great question! When I go walking, I like to hike on trails, in the woods. Often, I come across areas where there are low-hanging branches. Being as I am 6’4”, this can cause a real problem. Our solution: we will read the user’s height from HealthKit and print it to a label in the app. It will serve as a friendly reminder of the user’s limitations, so he or she can avoid being clotheslined while on a nice walk!
To start, here is the starter project for OneHourWalker. Go ahead a give it a run to get a feel for the way the app will work. The timer and the location tracking are already running, so we can focus solely on the HealthKit implementation. As a note, at the 60 minute point, the timer and tracking will stop.
Enable HealthKit
Our first step is to enable HealthKit in our app. In the project navigator, select OneHourWalker and OneHourWalker under Targets. Then, select the Capabilities tab at the top of the screen.
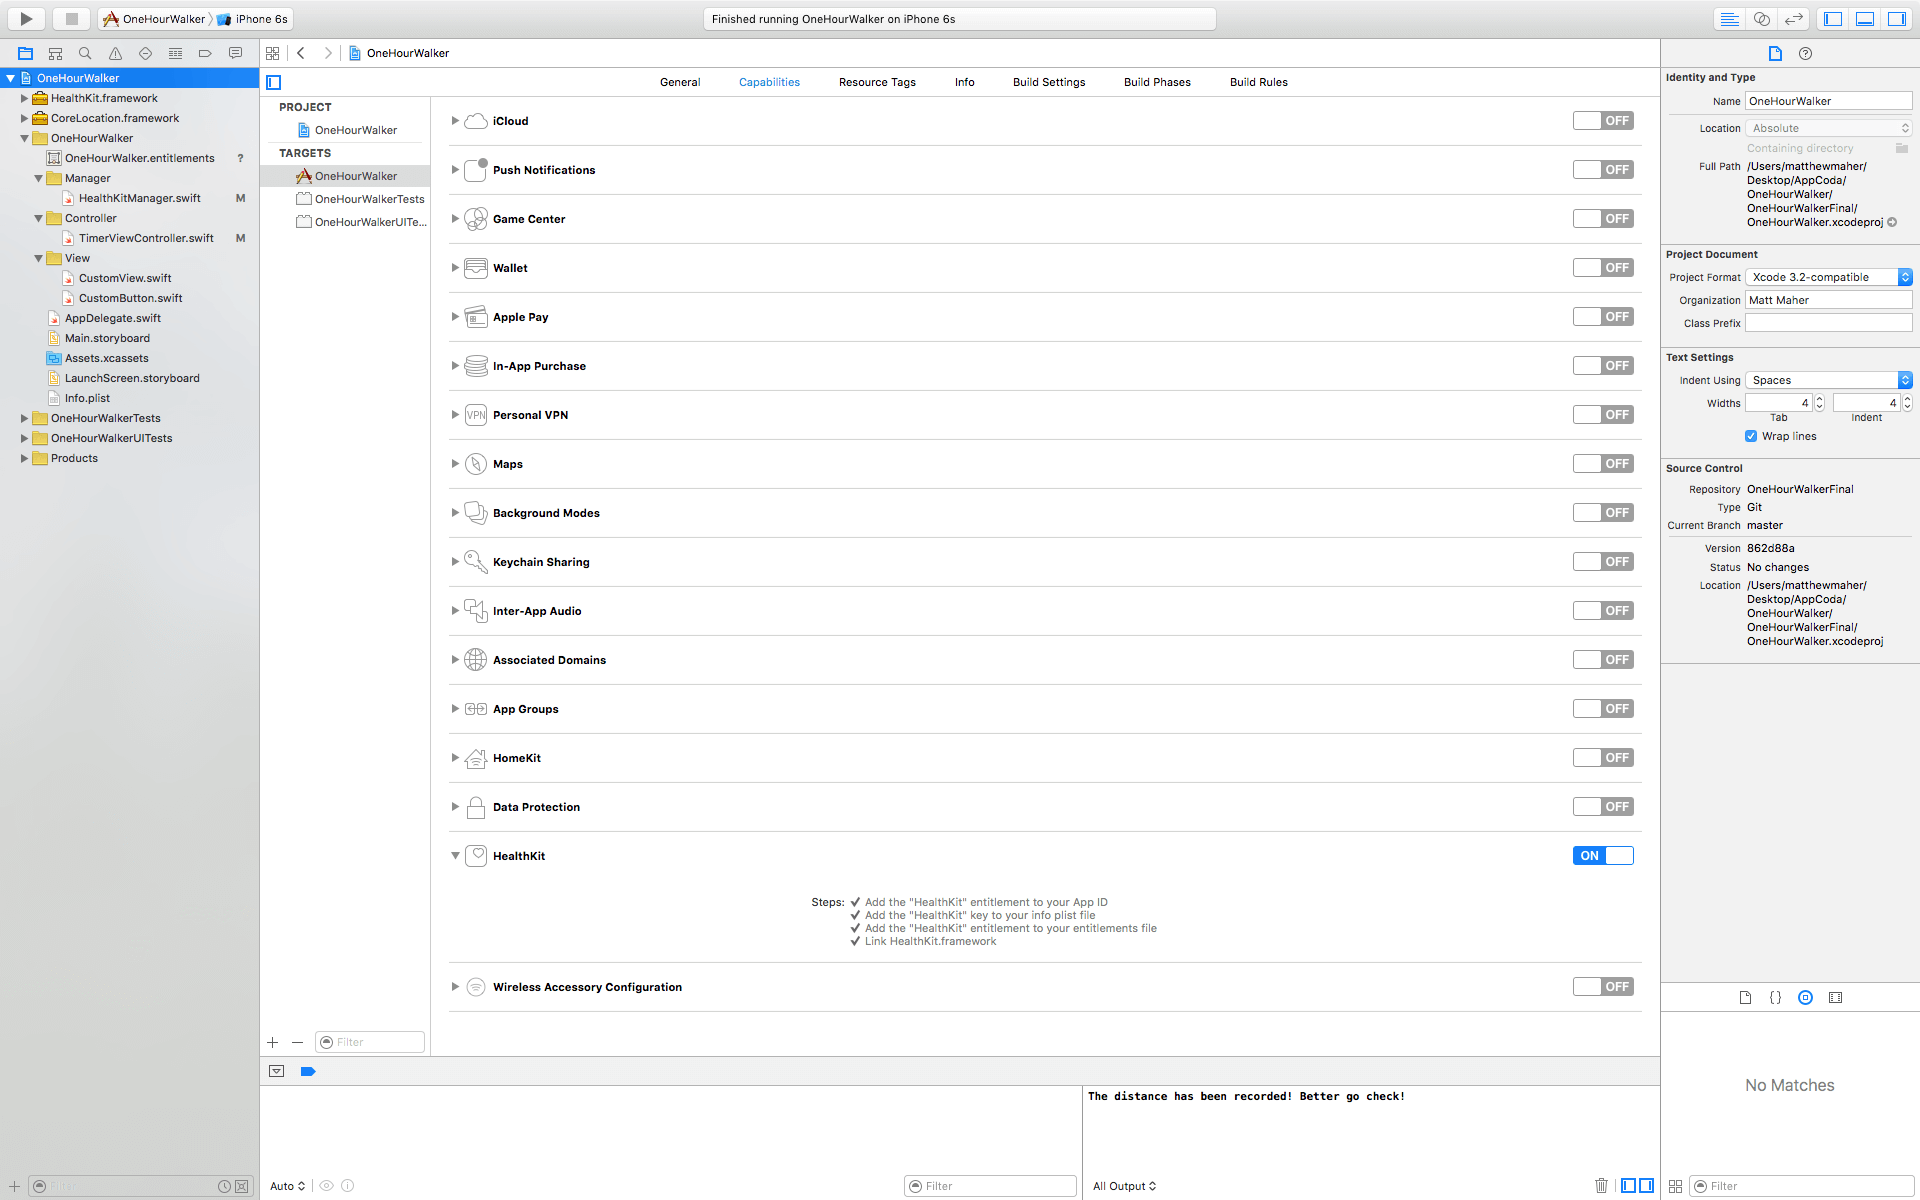
Looking toward the bottom of the list of Capabilities, turn On HealthKit. This single action adds the HealthKit entitlement to the App ID, the HealthKit key to the info plist file, the HealthKit entitlement to the entitlements file, and it links HealthKit.framework. It’s as simple as that.
Time to Code
Heading over to TimerViewController.swift, we will begin introducing HealthKit to OneHourWalker. First, let’s create an instance of our HealthKitManager.
import UIKit
import CoreLocation
import HealthKit

class TimerViewController: UIViewController, CLLocationManagerDelegate {

    @IBOutlet weak var timerLabel: UILabel!
    @IBOutlet weak var milesLabel: UILabel!
    @IBOutlet weak var heightLabel: UILabel!

    var zeroTime = NSTimeInterval()
    var timer : NSTimer = NSTimer()

    let locationManager = CLLocationManager()
    var startLocation: CLLocation!
    var lastLocation: CLLocation!
    var distanceTraveled = 0.0

    let healthManager:HealthKitManager = HealthKitManager()
HealthKitManager.swift is where all of the HealthKit work takes place. It will hold our important methods, and we’ll begin working on it in a moment.
As we have discussed in the introduction to this tutorial, we need to ask the user for permission to read and write to their health data. In viewDidLoad(), let’s get that ball rolling.
    override func viewDidLoad() {
        super.viewDidLoad()

        locationManager.requestWhenInUseAuthorization()

        if CLLocationManager.locationServicesEnabled(){
            locationManager.delegate = self
            locationManager.desiredAccuracy = kCLLocationAccuracyBest
        } else {
            print("Need to Enable Location")
        }

        // We cannot access the user's HealthKit data without specific permission.
        getHealthKitPermission()
    }
The getHealthKitPermission() method will call our manager’s authorizeHealthKit() method. If all goes well, we can call the setHeight() method, but we’ll talk more about that shortly.
    func getHealthKitPermission() {

        // Seek authorization in HealthKitManager.swift.
        healthManager.authorizeHealthKit { (authorized,  error) -> Void in
            if authorized {

                // Get and set the user's height.
                self.setHeight()
            } else {
                if error != nil {
                    print(error)
                }
                print("Permission denied.")
            }
        }
    }
Over in HealthKitManager.swift, we will build the authorizeHealthKit() method. Above that, however, we need to create our HealthKit store, which links the app to HealthKit’s data.
    let healthKitStore: HKHealthStore = HKHealthStore()

    func authorizeHealthKit(completion: ((success: Bool, error: NSError!) -> Void)!) {

        // State the health data type(s) we want to read from HealthKit.
        let healthDataToRead = Set(arrayLiteral: HKObjectType.quantityTypeForIdentifier(HKQuantityTypeIdentifierHeight)!)

        // State the health data type(s) we want to write from HealthKit.
        let healthDataToWrite = Set(arrayLiteral: HKObjectType.quantityTypeForIdentifier(HKQuantityTypeIdentifierDistanceWalkingRunning)!)

        // Just in case OneHourWalker makes its way to an iPad...
        if !HKHealthStore.isHealthDataAvailable() {
            print("Can't access HealthKit.")
        }

        // Request authorization to read and/or write the specific data.
        healthKitStore.requestAuthorizationToShareTypes(healthDataToWrite, readTypes: healthDataToRead) { (success, error) -> Void in
            if( completion != nil ) {
                completion(success:success, error:error)
            }
        }
    }
When requesting authorization to access the user’s heath data, we need to specifically state the information that we want to read and write. For us, we want to read the user’s height, so they can avoid those menacing low-hanging branches. We are hoping for HealthKit to provide an HKObject quantity that we can turn into an understandable height. We will also ask permission to write an HKObject quantity for the user’s distance walking and running.
After handling the possibility that OneHourWalker finds its way to an iPad, we make our official request.
While we’re in HealthKitManager.swift, let’s build our getHeight() method that will read the user’s height data from HealthKit.
    func getHeight(sampleType: HKSampleType , completion: ((HKSample!, NSError!) -> Void)!) {

        // Predicate for the height query
        let distantPastHeight = NSDate.distantPast() as NSDate
        let currentDate = NSDate()
        let lastHeightPredicate = HKQuery.predicateForSamplesWithStartDate(distantPastHeight, endDate: currentDate, options: .None)

        // Get the single most recent height
        let sortDescriptor = NSSortDescriptor(key: HKSampleSortIdentifierStartDate, ascending: false)

        // Query HealthKit for the last Height entry.
        let heightQuery = HKSampleQuery(sampleType: sampleType, predicate: lastHeightPredicate, limit: 1, sortDescriptors: [sortDescriptor]) { (sampleQuery, results, error ) -> Void in

                if let queryError = error {
                    completion(nil, queryError)
                    return
                }

                // Set the first HKQuantitySample in results as the most recent height.
                let lastHeight = results!.first

                if completion != nil {
                    completion(lastHeight, nil)
                }
        }

        // Time to execute the query.
        self.healthKitStore.executeQuery(heightQuery)
    }
Our first step in querying the height data is to build a predicate to define the time parameters. We are asking for all of the height data from a period of time – a distant past date to the current date. That, of course, will return an array. We only want the most recent height, so we will ask for the data with the newest data listed first.
In constructing the query, we will limit the array to a count of one. After accounting for the possibility of an error, we will assign the first, and only, item in results to lastHeight. Next, we can handle the completion of our getHeight() method. Finally, we execute out query against the user’s health data.
Returning to TimerViewController.swift, still before the app really gets going for the user, and assuming the proper permissions were granted by the user, setHeight() is called in getHealthKitPermission().
var height: HKQuantitySample?
First, we need to declare a height variable for our HKQuantitySample instance.
    func setHeight() {
        // Create the HKSample for Height.
        let heightSample = HKSampleType.quantityTypeForIdentifier(HKQuantityTypeIdentifierHeight)

        // Call HealthKitManager's getSample() method to get the user's height.
        self.healthManager.getHeight(heightSample!, completion: { (userHeight, error) -> Void in

            if( error != nil ) {
                print("Error: \(error.localizedDescription)")
                return
            }

            var heightString = ""

            self.height = userHeight as? HKQuantitySample

            // The height is formatted to the user's locale.
            if let meters = self.height?.quantity.doubleValueForUnit(HKUnit.meterUnit()) {
                let formatHeight = NSLengthFormatter()
                formatHeight.forPersonHeightUse = true
                heightString = formatHeight.stringFromMeters(meters)
            }

            // Set the label to reflect the user's height.
            dispatch_async(dispatch_get_main_queue(), { () -> Void in
                self.heightLabel.text = heightString
            })
        })

    }
Above the share() method, we will create our setHeight() method. The height data sample that we requested is returned as an HKQuantity, known by the identifier HKQuantityTypeIdentifierHeight.
Next, we will call the getHeight() method that we created in the manager. With the height sample, we will need to begin to translate it into an appropriate string to display in our label. As usual, it is important to account for any potential errors.
At this point, the user will be able to open the app, view their height, assuming there is a height recorded into he Health App, start their timer, and track the distance of their run or walk. The next step is to handle the process of writing the distance traveled to the Health App, so the user can keep all of their fitness data in one tidy location.
After the user has completed their outing, be it in the full 60 minutes or an abbreviated session, she or he will use the Share button to send their hard-earned distance value to the Health App. So, in the share() method, let’s call HealthKitManager.swift’s saveDistance() method and start the process. to the method, we will be sending the distance and the date that the distance was achieved. This way, the user can try to beat his or her distance tomorrow!
@IBAction func share(sender: AnyObject) {
    healthManager.saveDistance(distanceTraveled, date: NSDate())
}
Heading back over to the manager, we will build our saveDistance() method. First, we need to let HealthKit know that we want to write a distance running and walking quantity. Next, we will set the unit of measurement to miles and assign the official quantity sample. HealthKit’s saveObject() method will write the data to the user’d health data.
    func saveDistance(distanceRecorded: Double, date: NSDate ) {

        // Set the quantity type to the running/walking distance.
        let distanceType = HKQuantityType.quantityTypeForIdentifier(HKQuantityTypeIdentifierDistanceWalkingRunning)

        // Set the unit of measurement to miles.
        let distanceQuantity = HKQuantity(unit: HKUnit.mileUnit(), doubleValue: distanceRecorded)

        // Set the official Quantity Sample.
        let distance = HKQuantitySample(type: distanceType!, quantity: distanceQuantity, startDate: date, endDate: date)

        // Save the distance quantity sample to the HealthKit Store.
        healthKitStore.saveObject(distance, withCompletion: { (success, error) -> Void in
            if( error != nil ) {
                print(error)
            } else {
                print("The distance has been recorded! Better go check!")
            }
        })
    }
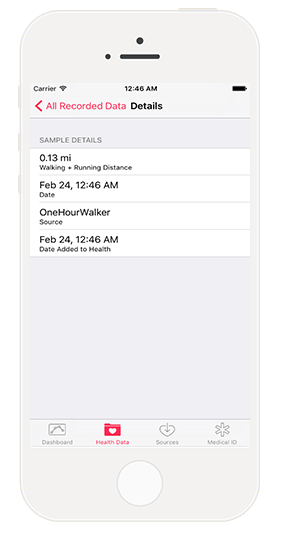
Navigating to the Health App, the recorded data will be included in the Walking + Running Distance tile, if enabled. Also, we can see a specific sample by following the following path: Health Data tab > Fitness > Walking + Running Distance > Show All Data. Our data is in that list. Tap on a cell, and our (lack of) icon is visible with the distance. Tap the cell again, and the full details are visible.
With OneHourWalker, we are well on our way to contributing to the physical health of iOS users around the world! This is, however, just a start. There are a lot more possibilities in both reading and writing health data using HealthKit.
Sure, it is great to have all of this trackable data for the user. People can easily make day to day, week to week, or other comparisons to drive them further toward their goals. The true greatness, though, lies in the developers’ ability to provide new, creative, and fun ways to capture the data.
Also, HealthKit apps are the most fun to test!
Here is the final version of OneHourWalker.


