Among the millions of applications existing on the App Store, there is a great number of them that deals with data fetched from the web. Even more, today that carriers provide constant Internet access through 3G and 4G networks at low cost, these apps seem to grow even more. News, weather and social applications are just some of them. Prior to iOS 7, there was a great disadvantage that was characterizing any app of that kind, and that was the awaiting time that users were facing until their apps got updated with new data taken from online servers every time they were launched. Developers didn’t have enough tools on their hands to counterattack that, or work around it, so they had to figure out tricky ways to download just the minimum possible amount of data and return control back to the user as soon as possible.
However, with the iOS 7 SDK coming things drastically changed thanks to the Background Fetch API, which is part of the new multitasking features that the latest version of iOS supports. When the Background Fetch feature is enabled to an app, the system wakes the app up in the background from time to time and lets it go online to fetch new data with goal to refresh its content. That way, the app is always up to date, and users don’t have to wait any more when they launch it. In other words, it is the tool that all developers have been expecting for a long time in order to have both their apps updated and the users happy. In this tutorial we are going to see how this new cool feature can be embedded into an application, but first let’s have a short look at some important details in order to fully get the meaning of this great API.
Enabling and using the Background Fetch API in an application, is a really easy, three-step process that contains the following:
- To enable it in the Multitasking Capabilities of the app.
- To set the time interval in which the system should fetch new data in the application:didFinishLaunchingWithOptions: delegate method.
- To implement a new delegate method in the AppDelegate class that will handle the result of the fetching process.
Let me do a clarification at this point, regarding the usage of the Background Fetch. It is not intended to work only with online data, but it can be used to perform tasks internally into an app too. However, that’s a rare case, as the most common usage involves data fetching from the web.
Continuing to this introduction, we are going to see all the above three steps in detail later on during our sample application implementation. For now, I would like to stay a little longer to the second step, and make some comments about it. Well, when talking about fetching interval we mean how often the system should wake an app and allow it to get new data. There are two options for setting this value: To either use predefined interval values by the system, or set your own custom time interval (NSTimeInterval values). However there is something that you should seriously take under account; The more often the Background Fetch is set to work to an app, the more resources will be used. iOS protects itself and the device by applying limitations to the apps that try to use the API very often, so be cautious when setting custom time intervals. Using the predefined values provided by the iOS it might be the best option. Unfortunately, Background Fetch is also a “nice” tool to cause a battery drain very quickly.
A very important and cool feature of the Background Fetch is its ability to learn the times that should allow an app to be launched to the background and get updated. Let’s suppose for example that a user uses a news app every morning about 8:30 am (read some news along with some hot coffee). After a few times of usage, the system learns that it’s quite possible that the next time the app will run will be around the same time, so it takes care to let it go live and get updated before the usual launch time (it could be around 8:00 am). That way, when the user opens the app the new and refreshed content is there awaiting for him, and not the opposite! This feature is called usage prediction. Note though that this happens when you let the system decide about the fetching interval.
When working with Background Fetch, there is a limitation that you should be aware about. The background execution time given to an application is not infinite. iOS provides a 30 seconds time frame in order the app to be woken up, fetch new data, update its interface and then go back to sleep again. It is your duty to make sure that any performed tasks will manage to get finished within these 30 seconds, otherwise the system will suddenly stop them. If more time is required though, then the Background Transfer Service API can be used, but we are not going to see that here. We’ll discuss about it in a future tutorial. So, keep that always in mind and develop wisely, otherwise unexpected results may appear to your apps.
Before reaching the end of this introduction, there are a couple more facts I would like to mention. First of all, Background Fetch can work even when the app is running and being in the foreground. In that case, it will just cause content update. Secondarily, the Background Fetch API should be used for non-critical updates, as it’s possible the system not to launch the app on the background, even if it’s expected so.
So, after having said all that, it’s time to continue and see some action. Keep reading to find out what we are going to work with in this tutorial and what our next steps will be, in order to make the best use of the Background Fetch API!
App Overview
The best scenario that will let us try the Background Fetch API out is to implement a part of a news app, and that’s exactly we are going to do here. Our sample application is going to be very simple, implemented to demonstrate the API in the best possible way. Let’s see everything from the beginning though.
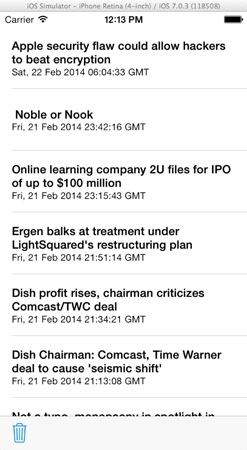
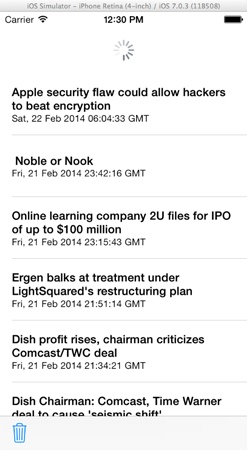
In our app we are going to fetch news titles along with their publish dates and links from a feed of the Reuters website. We won’t bother collecting more data for two reasons: We don’t want to exceed the 30 seconds time frame (something that’s possible to happen over a slow 3G network), and it’s the best case so as to keep things as simple as possible. So, we’ll select a specific feed, we’ll parse it and we’ll list the extracted data in a table view in our app. The hypothetic user of the app will have the option to manually refresh the content, using a refresh control. Once everything is ready and fully-functional, we’ll implement the Background Fetch API, and then we’ll test it trying to fetch new content while our app is on the background. There is a special way to do that on Simulator, and we’ll see how exactly this can be done as well.
Regarding the structure of the app, we are going to be based on a Single View Application template, and as I previously said, we are going to add a table view controller with a refresh control that will allow us to manually force a content update. The downloaded data will be stored internally into a NSArray, and each object of the array is going to be a NSDictionary that will contain the news title and the publish date, as well as a link to the full online article. After a successful update, the array’s contents will be permanently written to a file into the Documents Directory, so when using the Background Fetch and comparing to the existing content to know if there is any new data or not. Besides all that, we will add a toolbar with one bar button item that will allow us to delete the data file in case we would like to start over.
Respecting the terms of use of Reuters regarding the RSS feeds, when tapping on a news title we’ll make the Safari app open and load the respective full article. For that reason, the link matching to each title is going to be used.
A Starter App
It is an imperative need to make clear that the downloaded data will be in XML format, and we need a XML parser so as to extract the desired piece of information. For your convenience and in order to stay focused on the Background Fetch API, you can download a starter version of the app, where you’ll find a class named XMLParser already made and customized to the XML data of the Reuters feed. We are going to use this one just as a tool. The rest of the app is empty, ready to be built step by step.
So, grab it and get ready to start.
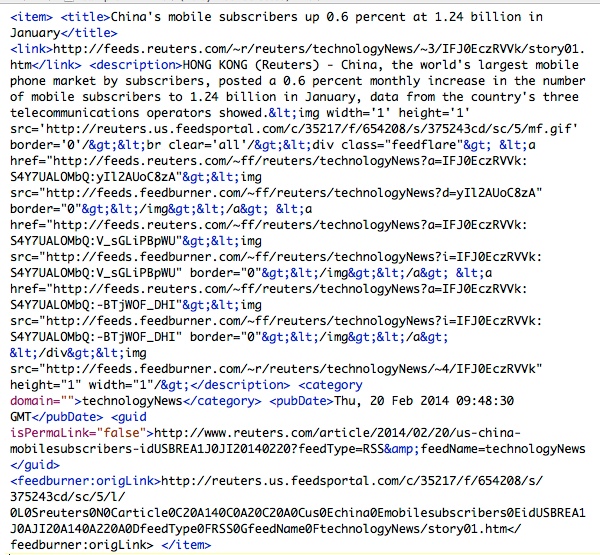
Before we go any further, here is a sample of the downloaded XML data:
Setup the Interface
Let’s get started by configuring the interface of our starter app (which I guess you have already downloaded) using the Interface Builder. Click on the Main.storyboard file and wait until the canvas appear on-screen. Next, open the Utilities pane and from the Objects Library drag and drop a Table View and a Toolbar to the canvas. Set their properties as follows:
- UITableView
- Frame: X=0, Y=20, Width=320, Height=504
- Toolbar
- Frame: X=0, Y=524, Width=320, Height=44
- Bar Button Identifier: Trash
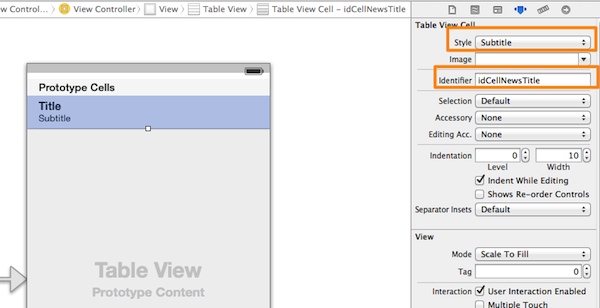
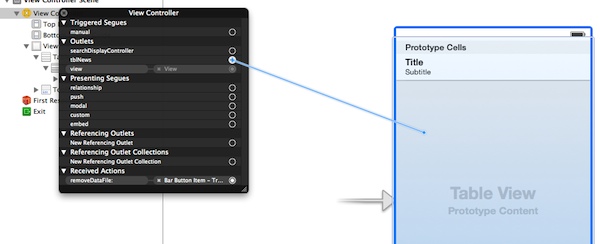
Once you finish doing all the above drag a UITableViewCell object on the table view. Select it and set its style to Subtitle, under the Table View Cell section in the Attributes Inspector. Right below, in the Identifier field set the idCellNewsTitle value.
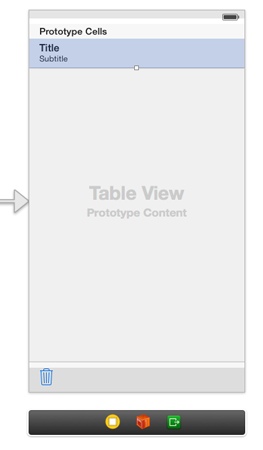
Finally, click on the Title label on the cell, and then in the Attributes Inspector set its font to System Bold with size 15.0. Also, set the value 3 in the Lines field. Your scene should now look like the next one:
Now that we have finished adding any necessary controls to our app, it’s time to create an IBOutlet property that we’ll connect to the table view, and an IBAction method that we’ll connect to the Trash bar button item.
Click on the ViewController.h file and add the next contents:
|
1 2 3 4 5 6 7 |
@interface ViewController : UIViewController @property (weak, nonatomic) IBOutlet UITableView *tblNews; - (IBAction)removeDataFile:(id)sender; @end |
Before we return to Interface Builder and once the ViewController.h file is open, let’s make our class conform to the UITableViewDelegate and UITableViewDatasource protocols. Modify the @interface header line as shown below:
|
1 |
@interface ViewController : UIViewController <UITableViewDelegate, UITableViewDataSource> |
Great! Now head back to the Main.storyboard file, and Ctrl-Click or Right-Click on the View Controller object, in the Document Outline pane. In the black window that popups, click on the circle being at the right of the tblNews IBOutlet property, and drag and drop to the table view on the canvas. The IBOutlet connection has been made! Follow the same steps to connect the IBAction method to the Trash bar button item and you are ready.
The Refresh Control and Some Code-Level Setup
As you just saw, the interface setup was pretty easy, and we had to create and connect just one IBOutlet property and one IBAction method. Now, it’s time to focus our attention in code, and for starters we must do two things: To create the refresh control that will enable us to refresh our data simply by pulling down the table view, and to declare and initialize some other objects that we’ll need along our way.
Open the ViewController.m file and go to the private section of the class. In there, declare the next properties:
|
1 2 3 4 5 6 7 8 9 |
@interface ViewController () @property (nonatomic, strong) UIRefreshControl *refreshControl; @property (nonatomic, strong) NSArray *arrNewsData; @property (nonatomic, strong) NSString *dataFilePath; @end |
Let me provide a short description about each one.
- refreshControl: Not much to say, it’s the refresh control that will appear on top of the table view upon a refresh.
- arrNewsData: This array will contain the actual data that will be displayed on the table view. As we are going to see later as well, each object on this array is going to be a NSDictionary containing three values: The news title, the publish date and the link of each one.
- dataFilePath: This string value will keep the path to the file where we will permanently store the downloaded data.
Let’s head now to the viewDidLoad method, and let’s do some initializations. In the code fragment that follows, we are going to perform the next tasks:
- We’ll make self the delegate and datasource of the table view.
- We will specify the path to the permanent file and store it to the dataFilePath property.
- Last but important, we will initialize the refresh control.
So, let’s see all that in code, and then we make any further discussion:
|
1 2 3 4 5 6 7 8 9 10 11 12 13 14 15 16 17 18 19 20 21 22 |
- (void)viewDidLoad { [super viewDidLoad]; // 1. Make self the delegate and datasource of the table view. [self.tblNews setDelegate:self]; [self.tblNews setDataSource:self]; // 2. Specify the data storage file path. NSArray *paths = NSSearchPathForDirectoriesInDomains(NSDocumentDirectory, NSUserDomainMask, YES); NSString *docDirectory = [paths objectAtIndex:0]; self.dataFilePath = [docDirectory stringByAppendingPathComponent:@"newsdata"]; // 3. Initialize the refresh control. self.refreshControl = [[UIRefreshControl alloc] init]; [self.refreshControl addTarget:self action:@selector(refreshData) forControlEvents:UIControlEventValueChanged]; [self.tblNews addSubview:self.refreshControl]; } |
I think that this code is simple enough, and easy to be understood by anyone. Just two comments though regarding the refresh control: The refreshData method in the selector is a private method that we are going to implement in a while, and it’s the one that will be invoked upon every refresh. Secondarily, using the [self.tblNews addSubview:self.refreshControl]; line we add the refresh button as a subview to the table view. Note that without it nothing is going to happen if you try to refresh your data.
As a final touch, go right below the #import command and add the next line where we define the source feed of our data:
|
1 |
#define NewsFeed @"http://feeds.reuters.com/reuters/technologyNews" |
Refreshing the Data
Now that our “base” has been established, let’s implement the way that we’ll use to update our data. By telling “update”, I don’t just mean to get any new data that may exist for download, but to get the initial data as well when the app is completely empty. Previously, we set in the selector the refreshData method, which has not been defined yet, and Xcode should throw an error for this reason.
So, head to the private section of the class, and declare the method:
|
1 2 3 4 5 6 |
@interface ViewController () ... -(void)refreshData; @end |
Before we go any further, and because we are going to use the XMLParser custom class I provided with the starter app, we must import the appropriate header at the top of our file:
|
1 |
#import "XMLParser.h" |
Nice. Now we are ready to proceed with the implementation. For starters, begin with the next code:
|
1 2 3 4 5 6 |
-(void)refreshData{ XMLParser *xmlParser = [[XMLParser alloc] initWithXMLURLString:NewsFeed]; [xmlParser startParsingWithCompletionHandler:^(BOOL success, NSArray *dataArray, NSError *error) { }]; } |
The first thing been done here is the initialization of a XMLParser object, where we provide the NewsFeed parameter so it knows where to fetch data from. Next, we invoke the startParsingWithCompletionHandler: method, which will trigger the data parsing and upon finish, the completion handler will be called so we manage the downloaded data in the block. A short comment about the completion handler block parameters:
- success: This flag indicates whether the data parsing has been successfully completed or not.
- dataArray: An array that contains the parsed data.
- error: A pointer to the error, if any occurs.
The important now is how we are going to manage the parsed data. Well, four tasks must take place:
- To keep the parsed data in the arrNewsData array we declared earlier.
- To reload the table view so it shows the downloaded data.
- To permanently save the data.
- To stop the refresh control from animating.
At this point I’m going to tell you in advance that the first three tasks are going to be performed when we’ll implement the Background Fetch too. So, it would be a great idea to create another private method and perform them in there, instead of writing them twice (after all, I really hate writing the same stuff again and again – it’s a really bad practice).
Go and declare the next method in the private class section:
|
1 2 3 4 5 6 |
@interface ViewController () ... -(void)performNewFetchedDataActionsWithDataArray:(NSArray *)dataArray; @end |
Next, implement it with the above three tasks in it:
|
1 2 3 4 5 6 7 8 9 10 11 12 13 14 15 |
-(void)performNewFetchedDataActionsWithDataArray:(NSArray *)dataArray{ // 1. Initialize the arrNewsData array with the parsed data array. if (self.arrNewsData != nil) { self.arrNewsData = nil; } self.arrNewsData = [[NSArray alloc] initWithArray:dataArray]; // 2. Reload the table view. [self.tblNews reloadData]; // 3. Save the data permanently to file. if (![self.arrNewsData writeToFile:self.dataFilePath atomically:YES]) { NSLog(@"Couldn't save data."); } } |
As you see, there is nothing especially hard here. Everything is done just like it was described, so let’s go back to the refreshData method, in the completion handler block and simply let’s invoke this method:
|
1 2 3 4 5 6 7 8 9 10 11 12 13 14 |
-(void)refreshData{ XMLParser *xmlParser = [[XMLParser alloc] initWithXMLURLString:NewsFeed]; [xmlParser startParsingWithCompletionHandler:^(BOOL success, NSArray *dataArray, NSError *error) { if (success) { [self performNewFetchedDataActionsWithDataArray:dataArray]; [self.refreshControl endRefreshing]; } else{ NSLog(@"%@", [error localizedDescription]); } }]; } |
Firstly, we check the success flag value. If it’s TRUE, or in other words our data has been successfully downloaded and parsed, we invoke the performNewFetchedDataActionsWithDataArray: method, and we stop refreshing by simply calling the endRefreshing method of the refresh control. In case that an error occured during the parsing stage, we just log its description.
With that, the data updating/refreshing capability of the app is ready, so we can keep on implementing the rest of the features.
Displaying Data
Now that we can update our data using the refresh control, it’s time to display it in the table view. For that reason, we need to implement the minimum required table view delegate and datasource methods. Begin by adding the next code in your project, and then I’ll make some comments on it:
|
1 2 3 4 5 6 7 8 9 10 11 12 13 14 15 16 17 18 19 20 21 22 23 24 25 26 27 28 29 30 31 32 33 34 35 36 37 |
-(NSInteger)numberOfSectionsInTableView:(UITableView *)tableView{ return 1; } -(NSInteger)tableView:(UITableView *)tableView numberOfRowsInSection:(NSInteger)section{ return self.arrNewsData.count; } -(UITableViewCell *)tableView:(UITableView *)tableView cellForRowAtIndexPath:(NSIndexPath *)indexPath{ UITableViewCell *cell = [tableView dequeueReusableCellWithIdentifier:@"idCellNewsTitle"]; if (cell == nil) { cell = [[UITableViewCell alloc] initWithStyle:UITableViewCellStyleSubtitle reuseIdentifier:@"idCellNewsTitle"]; } NSDictionary *dict = [self.arrNewsData objectAtIndex:indexPath.row]; cell.textLabel.text = [dict objectForKey:@"title"]; cell.detailTextLabel.text = [dict objectForKey:@"pubDate"]; return cell; } -(CGFloat)tableView:(UITableView *)tableView heightForRowAtIndexPath:(NSIndexPath *)indexPath{ return 80.0; } -(void)tableView:(UITableView *)tableView didSelectRowAtIndexPath:(NSIndexPath *)indexPath{ NSDictionary *dict = [self.arrNewsData objectAtIndex:indexPath.row]; NSString *newsLink = [dict objectForKey:@"link"]; [[UIApplication sharedApplication] openURL:[NSURL URLWithString:newsLink]]; } |
There are two noteworthy parts here. The first one is this segment:
|
1 2 3 4 |
NSDictionary *dict = [self.arrNewsData objectAtIndex:indexPath.row]; cell.textLabel.text = [dict objectForKey:@"title"]; cell.detailTextLabel.text = [dict objectForKey:@"pubDate"]; |
I have already mentioned a couple of times that each object in the arrNewsData array is a NSDictionary object, which contains three values, the title and publish date of the news, and a link to each one, with the “title”, “pubDate” and “link” as their respective keys. In the code above, we get this dictionary, we assign the title object to the cell’s text label, and the publish date to the detail text label.
The second one is the tableView:didSelectRowAtIndexPath: method. In there we get the link matching to the selected news title, and using the openURL: method of the sharedApplication property, we launch Safari to the specified link.
At this point we are able to test the app for the first time. If you do so, just pulldown the table view and you’ll see the refresh control working and new data being displayed on the table view.
Data Loading
In our previous implementation you saw that every time the data gets refreshed, it also gets saved permanently to a file. Having that in mind, it would be great if our app would launch by having the saved data displayed on the table view, instead of presenting it empty on start. Loading the data from the file is pretty easy; all you have to do is go to the viewDidLoad method, at the end of it, and add the next lines:
|
1 2 3 4 5 6 7 8 9 10 |
- (void)viewDidLoad { ... if ([[NSFileManager defaultManager] fileExistsAtPath:self.dataFilePath]) { self.arrNewsData = [[NSMutableArray alloc] initWithContentsOfFile:self.dataFilePath]; [self.tblNews reloadData]; } } |
At first, we check if the file exists or not in the documents directory. If that’s the case, then we initialize the arrNewsData array with the file’s contents, and then reload the table view data.
The next time you’ll run the app, if this file exists you will find the table view with data populated on it. Cool right?
The Background Fetch
Now that our app is capable of getting new data and displaying it on the table view, it’s time to enable and use the Background Fetch feature. As I described in the introduction of this tutorial, this is a three-step process, and here we are going to see each one in details.
Let’s get started by enabling the appropriate capability on Xcode, so click on the project target on the top side of the Project Navigator.
Next, on the main area of the Xcode, click on the Capabilities tab, and then turn on the switch matching to the Background Modes capability. From the various options that appear, click to enable the Background Fetch option, and Xcode will automatically add the appropriate value to your project’s info .plist file.
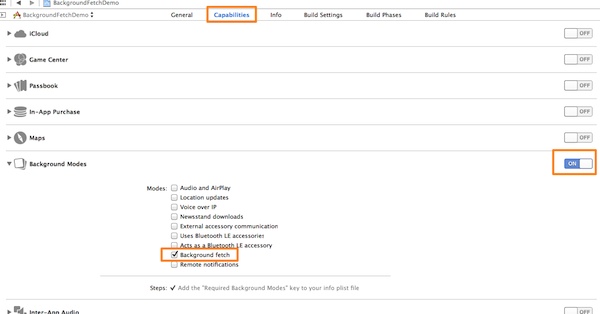
Great! The first step has been completed.
Now open the AppDelegate.m file, and go to the application:didFinishLaunchingWithOptions: delegate method. In this one, we must add a single line, in which we define how often we want the Background Fetch to be working on our app. In our case, we will use the UIApplicationBackgroundFetchIntervalMinimum predefined value, allowing the system to decide it, using the minimum allowed interval. Here you are:
|
1 2 3 4 5 6 |
- (BOOL)application:(UIApplication *)application didFinishLaunchingWithOptions:(NSDictionary *)launchOptions { [application setMinimumBackgroundFetchInterval:UIApplicationBackgroundFetchIntervalMinimum]; return YES; } |
In the third and last step we must define a new delegate method, in which we’ll handle the actions taken by the Background Fetch. Actually, in this method, we must implement all the logic required in order for our app to properly fetch data, manage it and update the UI. The contents of this method totally depend on the nature of each application, so there is no any general rule about what you should do in other cases.
Let’s see the delegate method:
|
1 2 3 |
-(void)application:(UIApplication *)application performFetchWithCompletionHandler:(void (^)(UIBackgroundFetchResult))completionHandler{ // We will add content here soon. } |
When the system runs the app on the background in order to use the Background Fetch and get new data, the application:performFetchWithCompletionHandler: delegate method is called to perform all the specified tasks you set in here. The last step must always be the completion handler call, where one of the following arguments should be provided:
- UIBackgroundFetchResultNoData: Indicates that no new data was found.
- UIBackgroundFetchResultNewData: Indicates that new data was found.
- UIBackgroundFetchResultFailed: Indicates that it failed to fetch new data.
Let’s focus on our case now. What we want to happen when the Background Fetch works in our app, is to let the XMLParser class to download and parse the data from the news feed and update the table view with it, if any found. In other words, we want to perform almost the same tasks as we did while refreshing the data. Also, depending on whether any new data is found or not, and if any error occurs along the whole procedure, we will call the completion handler of the delegate method with the appropriate parameter.
The best place to do all that is in the ViewController class, so we can directly access all of our objects and controls. So, for the time being let’s leave the app delegate and let’s work on that. Open the ViewController.h file to declare a public method that will be called later on by the application:performFetchWithCompletionHandler: delegate method. Here it is:
|
1 2 3 4 5 6 |
@interface ViewController : UIViewController <UITableViewDelegate, UITableViewDataSource> ... -(void)fetchNewDataWithCompletionHandler:(void (^)(UIBackgroundFetchResult))completionHandler; @end |
Let’s go to the ViewController.m file to implement it. Before we do so, let me describe the logic: Using the XMLParser class, we will download and parse the news data. We’ll check if the latest news matches to the existing latest news saved on our file (I hope you now see the purpose of the permanent saving), and depending on the comparison result we will call the completion handler specifying the appropriate parameter (one of the three presented above). In case new data is found, we will invoke the performNewFetchedDataActionsWithDataArray: private method to perform all the needed new data related actions. Here is the method implemented:
|
1 2 3 4 5 6 7 8 9 10 11 12 13 14 15 16 17 18 19 20 21 22 23 24 25 26 27 28 29 30 |
-(void)fetchNewDataWithCompletionHandler:(void (^)(UIBackgroundFetchResult))completionHandler{ XMLParser *xmlParser = [[XMLParser alloc] initWithXMLURLString:NewsFeed]; [xmlParser startParsingWithCompletionHandler:^(BOOL success, NSArray *dataArray, NSError *error) { if (success) { NSDictionary *latestDataDict = [dataArray objectAtIndex:0]; NSString *latestTitle = [latestDataDict objectForKey:@"title"]; NSDictionary *existingDataDict = [self.arrNewsData objectAtIndex:0]; NSString *existingTitle = [existingDataDict objectForKey:@"title"]; if ([latestTitle isEqualToString:existingTitle]) { completionHandler(UIBackgroundFetchResultNoData); NSLog(@"No new data found."); } else{ [self performNewFetchedDataActionsWithDataArray:dataArray]; completionHandler(UIBackgroundFetchResultNewData); NSLog(@"New data was fetched."); } } else{ completionHandler(UIBackgroundFetchResultFailed); NSLog(@"Failed to fetch new data."); } }]; } |
One could say that this method is the heart of the Background Fetch in our application. Notice how we make use of the completion handler, depending always on the result of the fetching.
So, now that the method that will handle everything when the Background Fetch will work is ready, let’s go back to the application:performFetchWithCompletionHandler: to implement it, but first, after you have the AppDelegate.m file opened, go at the top of it and make the next import:
|
1 |
#import "ViewController.h" |
Inside the delegate method, using the rootViewController property of the window object we will get access to the ViewController class, and then we will call the public method we previously implemented.
|
1 2 3 4 5 6 7 |
-(void)application:(UIApplication *)application performFetchWithCompletionHandler:(void (^)(UIBackgroundFetchResult))completionHandler{ ViewController *viewController = (ViewController *)self.window.rootViewController; [viewController fetchNewDataWithCompletionHandler:^(UIBackgroundFetchResult result) { completionHandler(result); }]; } |
As you see, in the completion handler block of the fetchNewDataWithCompletionHandler: method we just call the completion handler of the delegate method providing the result parameter. The actual work takes place in our public method.
That’s it! We just implemented the Background Fetch feature in our app, so we have to try it out.
Testing the Background Fetch
A little preparation is required prior to the Background Fetch test. Begin by clicking in your project schemes, and then by selecting the Manage Schemes… option.
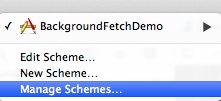
In the window that appears, make sure that the BackgroundFetchDemo scheme is selected, and then go to the small gear icon lying at the bottom-left side of the window. From the menu that appears, select the Duplicate option.

A new window comes up, where you should perform the following steps:
- Set the BackgroundFetchDemo_Test as the name of the scheme (or any other name you like).
- At the left pane, make sure that the Run options is selected.
- In the main window area, select the Options tab.
- Select the Launch due to a background fetch event checkbox.
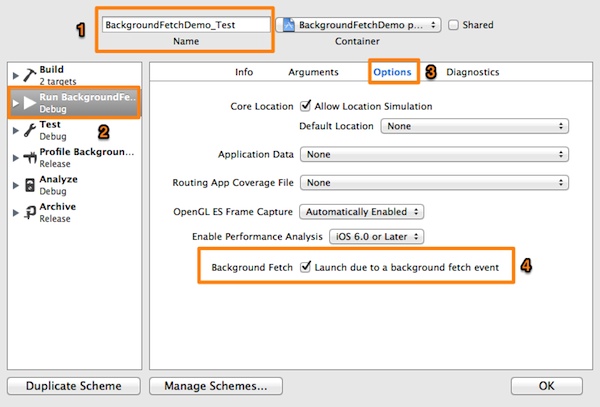
Click on the OK, and then again OK to close all windows.
On the Xcode toolbar, select the new scheme and then run the application. You’ll notice that the app won’t show on the Simulator, however on the debugger you’ll see a message regarding the result of the background fetch. If new data is found, then just click on the app’s icon on the Simulator, and… voila! The new data is there, displayed on the table view! Imagine that happening in a real app of yours, which your users would find it updated upon launch. Amazing!
To run the application in normal mode again, just select the BackgroundFetchDemo scheme (the default one), and you are ready. Note that you can test the Background Fetch while the app is running too. To do so, there is no need to change scheme or something like that. Simply, while you have the app running on Simulator, return to Xcode, and select the Debug > Simulate Background Fetch option.
Tracking the Time
In the introduction of the tutorial, I mentioned that the system provides only 30 seconds until all operations initiated by a background fetch to get finished. If the required time needed by an app is greater than that, then other kind of solutions should be figured out. Anyway, it would be really interesting to see how much time our app demands until it gets updated using the Background Fetch feature, so let’s make a few additions to our code with goal to give us a time report when a fetching has ended.
Go to the AppDelegate.m file, and in the application:performFetchWithCompletionHandler: delegate method. What we’ll do here is pretty simple: We will keep the date/time that the background fetch begins and ends, and we’ll calculate the elapsed time between those two when it ends. The calculated result will be logged to the debugger.
Below you are given the delegate method once again, this time filled in with the extra code needed to do what I just described:
|
1 2 3 4 5 6 7 8 9 10 11 12 13 14 15 |
-(void)application:(UIApplication *)application performFetchWithCompletionHandler:(void (^)(UIBackgroundFetchResult))completionHandler{ NSDate *fetchStart = [NSDate date]; ViewController *viewController = (ViewController *)self.window.rootViewController; [viewController fetchNewDataWithCompletionHandler:^(UIBackgroundFetchResult result) { completionHandler(result); NSDate *fetchEnd = [NSDate date]; NSTimeInterval timeElapsed = [fetchEnd timeIntervalSinceDate:fetchStart]; NSLog(@"Background Fetch Duration: %f seconds", timeElapsed); }]; } |
The additions that have been made here are obvious. Select the appropriate scheme and run the app to test the background fetch. This time, you’ll see the duration of the whole process. As you’ll see on your debugger, there is no danger for our app to exceed the 30 seconds time frame.

Data Deletion
If you remember, during the interface setup we added a toolbar along with a bar button item to the view, and we connected it to an IBAction method. This method is supposed to be used for deleting the app’s data, meaning the data file on the documents directory, but up to now we haven’t implemented it. Having the Background Fetch ready and nothing else actually remaining to be done, let’s work on the removeDataFile: IBAction method.
The steps that we’ll perform in it are very simple. We’ll just check if the file exists or not, and if exists we’ll just remove it. Then, we’ll make the data array nil and we’ll finally reload the table view data.
|
1 2 3 4 5 6 7 8 9 |
- (IBAction)removeDataFile:(id)sender { if ([[NSFileManager defaultManager] fileExistsAtPath:self.dataFilePath]) { [[NSFileManager defaultManager] removeItemAtPath:self.dataFilePath error:nil]; self.arrNewsData = nil; [self.tblNews reloadData]; } } |
That’s all. Nothing particularly difficult.
Compile and Run the App
If you are the kind of guy who likes to get finished with the implementation first and then run, then this is your time. If you haven’t tried the app out yet, run it using both of the schemes and see how it behaves. Try out every feature of it, but most importantly, try to get an understanding of the Background Fetch.
Summary
The Background Fetch API is in my opinion one of the most cool and useful additions that have been made to iOS. Using either only this, or in combination with other APIs, you can now create applications that will totally change the experience users used to have. Having happy users is always your final goal when building an app, and the Background Fetch API is one of the factors that will lead to that. If you already have apps that use data from the web, update them so they make use of this API. If you are planning to create such an app, then this is your one-way path. Generally, iOS 7 brings a lot of new great goodies, so you just have to take advantage of them and produce extraordinary applications!
For your reference, you can download the complete Xcode project from here. As always, leave me comment and share your thought about the tutorial.
Note: The featured image is created using PlaceIt.

Gabriel has been a software developer for almost about two decades and he’s got long experience in programming using various languages. iOS development is what he’s being doing since 2010. On top of that, he’s added macOS programming to his repertoire over the last few years. Using Swift of course! Follow Gabriel at Google+ and Twitter.
Comments
 AsimNet
Authorgreat
thanks
 Rezo
Rezo
AuthorVery very nice tutorial! Thank you very much!
Two issues.
1. Just as a note. iOS Refresh control has ability to show text string below animated activity indicator and it would be nice to have last updated date there – to decide whether you need to refresh content or not. But! As far as I’ve seen this in my application sometimes this control is not properly rendered and animated indicator is placed over the top area of the text message. Commercial applications would not relay on this control while the bug is not fixed.
2. The main problem (and pain!) with data downloading could be the Internet connection. I would prefer to have XML parser working in a separate thread using HTTP request rather than passing XML URL directly to the parser. In this case app main thread will not be blocked if something goes wrong and there could more possibilities to check the errors. It could be very useful if you plan to “slightly” modify this tutorial to have a separate thread for downloading and parsing.
Thank you very mach again!
 Ashish pisey
Authorgreat tutorial, but what about JSON?
 Simon Ng
AuthorAre you talking about a JSON tutorial? You can find it here:
http://104.131.120.244/fetch-parse-json-ios-programming-tutorial/
 Ashish pisey
AuthorNo i mean “working with background fetch with JSON response”
 outime
AuthorIn theory should be the same, you just need to parse the JSON instead of the XML
 Gabriel Theodoropoulos
AuthorHey, thanks. Data in JSON format can be used of course with the background fetch. In this tutorial I’m talking about XML though, because the RSS feeds are in this format.
 Zane Kleinberg
AuthorHay, does any one know how I can make a search bar search the table view of posts?
 outime
AuthorOff-Topic question:
How can I convert date to more sanitized one. The following code that I’m using just return null output.
– (NSString *) date:(NSString *)lafecha;
{
NSString *dateStr = lafecha;
NSDateFormatter *dateFormat = [[NSDateFormatter alloc] init];
[dateFormat setDateFormat:@”EE, d LLLL yyyy HH:mm:ss Z”];
NSDate *date = [dateFormat dateFromString:dateStr];
NSTimeInterval comparacion = [date timeIntervalSinceNow];
NSMutableString *returnDate;
//positiveValue
int comparacionInHours = abs(comparacion / 3600);
//returning the correct date
if (comparacionInHours 1) && (comparacionInHours 24) {
NSLog(@”%@”, date);
return returnDate;
}
else {
return returnDate;
}
}
 Ankit
Ankit
AuthorIn my case background fetch runs for 10 secs if no data is available. But if there is new data, it takes 50-70 secs and background fetch doesn’t get suspended. Why is that?
What I need to do if it exceeds 30 sec timeframe? How do I handle completion handler in that case?
 Gabriel Theodoropoulos
AuthorHi,
Please forgive my late answer. Well, the 50-70 secs that the background fetch lasts could be a Simulator “problem” that allows to exceed the 30 secs limit. If you need more than 30 secs, then you should schedule a download using the Background Transfer Service within that timeframe, and let the system do the job for you, no matter how much time is needed.
Stay put, as in a few days a new tutorial regarding the Background Transfer Service is going to be published.
 Mohammed Shawqi
AuthorMy view controller (MyViewController.h) is not the root view controller, therefore in the app delegate i changed it to:
MyViewController *viewController = [[MyViewController alloc]init];
 Suf
Suf
AuthorThis doesn’t work for me. When I did a background refresh the log keeps saying that there is new data when there isn’t any.
 Quân Chùa
Authorwhat should i do if i have a navigation controller in my storyborad file and this navigation points directly to MyTableViewController ? Please help me
 Mohammed Shawqi
AuthorTry to initialize the MyTableViewController. Just replace MyViewController in my previous comment with your view controller name. Make sure that your view controller is named in the storyboard.
 Michael Meinberg
AuthorThanks for the tutorial! You mentioned that background fetch’s should not be used for critical updates. What should be used for critical updates if your program is running in the background? I have an alert app and it is critical that the user gets the alerts in a timely manor, within seconds of them being issued. I have tried push notifications, and they work mostly, but sometimes Apple’s push servers can take minutes to deliver the notice, and that is unacceptable. The alerts are very small, and 99% of the time that background fetch would retrieve no data at all (an all clear) so I figured regular background fetches would be perfect. Any thoughts on that? Or is there a better way? Thanks
 Gabriel Theodoropoulos
AuthorHi there! I hope it’s not too late to answer.
The reason that the background fetch should not be used for critical updates is just because the operating system may not allow it to work as many times as you want, if you make fetches very often. It doesn’t play any role at all if it gets data indeed or not, it’s all about if it will be fired or not. If your app requirements do not demand quite often fetches, then of course you can use it, especially if you found out that this is the best tool for you.
Have you considered using remote notifications? If you want, take a look here, where I discuss in short about them.
Also, if there’s a remarkable amount of data that needs to be downloaded, then you must use background fetch along with the background transfer service (stay put, a tutorial regarding it is coming soon).
Regardless of all the above and as a final word, I would tell you to keep on going with background fetch, and see how the system will behave. If you see in action that your updates take place normally and you don’t miss any, you’re just fine. Think only of another solution if that won’t work for you.
 Neil M
AuthorAn interesting article. Thanks. May I pick up on your point “Let me do a clarification at this point, regarding the usage of the Background Fetch. It is not intended to work only with online data, but it can be used to perform tasks internally into an app too. However, that’s a rare case, as the most common usage involves data fetching from the web.”. I have ben unable to find anything from Apple that states this is for anything but online data, and was for that reason I hadn’t used it so far.
I am keen to use this for periodical updates to an app, processing locally gathered data, to ensure that it is up to date as the user re-opens the app, but also to allow for local notifications to the user as any of this local data that is processed meets certain thresholds. I realise the timings are not guaranteed, and I am not overly concerned by this, but having the ability for the app to briefly refresh circa every 3 to 6 hours, with what would amount to a few seconds of processing would be fantastic.
 Bhargavi
AuthorNice tutorial!
I have a few queries though.
I have an application where I want to download data using the Background Fetch and then insert/update my local database.
So my doubts are as follows:
1. Is it possible that applicationWillEnterForeground and performFetchWithCompletionHandler occur simultaneously ? ( If yes, I might end-up having a SQL deadlock )
2. I want performFetchWithCompletionHandler to be called only once a week. Can I just set the NSTimeInterval to 604800 s ? ( There was a huge battery drain when i set the interval to UIApplicationBackgroundFetchIntervalMinimum )
Would be grateful if you clarify my doubts.
Thank you very much once again!
 sam
sam
Authordid u find an answer for this question…?
 BeHuman
AuthorExactly, did you find the answer ?
 Suf
Suf
AuthorHow do I implement this when the TableViewController is not the rootView?
 Thomas Achim
AuthorThanks for the great tutorial!
I have one question.
I want to implement a timeout that actually stops the background fetch from reading the xml file if the timeout occures.
So if the user swipes down the tableview to refresh the data, the timer should start, if the background fetch could not read any data after e.g. 20 seconds I want to stop the background fetch and pop out an error message “please try again later” or something.
What would be the best place to implement this timeout function?
Thanks in advanced for your support!!
Regards
 Quân Chùa
Authorwhat could i do if i wanted the background fetch data every 10 minutes or something similiar like in the 8:00 AM ?.In the AppDelegate
// set background fetch time
NSTimeInterval interval = 25; // insane but for testing purpose
[application setMinimumBackgroundFetchInterval:interval];
but it didnt work ?.Please help me.I am new to IOS
 Bryan Lee
AuthorHi, thanks for the great tutorial.
I have a question on Data Loading.
I’m using the same tutorial but I’m pulling a big chuck of data
How can I ensure that all data are in before the table starts reloading.
Thank you
 Matt
Matt
Authorthanks for the great tutorial!
a question regarding the 30s limit. though dev tries to finish his job in the app delegate callback as fast, given the nature of background fetch (often network requests involved) there’s no way to guarantee it will be done in 30s. what exactly will happen when execution is halfway in the callback?
say to process the data I may have to allocate resources (let’s say we use non-ARC), how do i ensure they are recycled?
thanks in advance!
 Pradeep Jayaraman
AuthorSo, I have implemented background fetch in my app with performFetchWithCompletionHandler and setMinimumBackgroundFetchInterval:UIApplicationBackgroundFetchIntervalMinimum.
Requirement: In the handler, I am fetching remote data (1-2 second roundtrip) and comparing with existing data to see if there are changes. If changes exist, I display a local notification to the user.
Testing: I have modified the requirement to display local notifciation even if there is no change in data. ( So that I know background fetch works).
Issue: Background fetch does not work when NOTconnected to xcode and app running in debug or release mode.
Observations:
In Xcode, app debug mode using simulator, when I do “simulate background fetch” multiple times, the handler is called and local notifications are fired as expected. I stop running the app.
In Xcode, app debug mode and the iphone device connected to xcode, when I do “simulate background fetch” multiple times, the handler is called and local notifications are fired as expected. I stop running the app.
In Xcode, app release mode (with new scheme) using iphone device, when I run the app in xcode, the handler is called and local notifications are fired as expected first time. I stop running the app.
I also tried creating a ad-hoc DEBUG and RELEASE schemes and installing it on my device via itunes, so that I dont have to run the app via xcode. This doesnt seem to make any difference either. The notification didn’t even fire once.
I do understand that background fetch is started based on app usage. I keep opening and closing the app and manually refreshing the data within the app to show activity. But I haven’t seen any local notification firing at all.
For testing background fetch on my device without connecting xcode on debug or release modes, what should I do?
 jizani
Authorvery nice tutorial Thanks
 Ankit Deshwal
Authornice tutorial it work fine on my simulator but i have one ques if user remove the application from background so the background fetch will work or not.
 Gianni
AuthorHi, I try to execute you full demo project and it doesn’t work. It starts but doesn’t show nothing, only the blank TableView. If I call the refreshData from the viewDidLoad I can see the news but the BackgroundFetch doesn’t work … I do something in the wrong way but I don’t understand.
I’m using XCode 6.3.1.
Could you help me please?
 Nisha Parmar
AuthorHi i have tried this tutorial. this is working when app is running in background but not when app is closed. anyone have idea?
A very important and cool feature of the Background Fetch is its ability to learn the times that should allow an app to be launched to the background and get updated. Let’s suppose for example that a user uses a news app every morning about 8:30 am (read some news along with some hot coffee).
After a few times of usage, the system learns that it’s quite possible that the next time the app will run will be around the same time, so it takes care to let it go live and get updated before the usual launch time (it could be around 8:00 am).
Here it is written that app to be launched to the background and get updated. but i am not getting update when app is closed.
 Is_it
Is_it
AuthorYour observations are correct. If the user terminates the app, it will not be able to get updated. No matter if you use Background Fetch or push notifications. This is by design.
 Jorge
Jorge
AuthorThanks for the great tutorial. Everything worked fine, except that in iOS 9+ it is required to include a key (NSAppTransportSecurity) in the Info.plist file to gain internet access (e.g. Reuters website)
For instance:
NSAppTransportSecurity
NSAllowsArbitraryLoads
 cuong
cuong
AuthorI cannot download starter project, please check it. thanks
 Surendra Kumar
AuthorReally cool tutorial, very well documented
 Surendra Kumar
AuthorWell documented, easy to follow
 Pinkal
AuthorHi, i have tried this tutorial. But it’s not calling completion handler when i call the server api
 Sindhu Vannela
AuthorNice Tutorial. The above demo download link showing file not found in dropbox. Where can i get this tutorial demo link.
 Anu Patel
AuthorI can’t download starter project, please check it. Thanks