

On App Store, the most popular app category among all is the Games category, something that even Apple accepts as a fact. And how this couldn’t be true, regarding that all or almost all iOS users have downloaded and played one or more games, at least one time? Personally, I’m quite confident that those users who haven’t (still) played a game, are limited from very few to none. There are various kind of game players, from the fanatic ones, until those who play from time to time, as well as numerous kind of games. However, there is one common element, no matter what kind of player each of us is, or what kind of games we like to play: Games are much more interesting when they allow players to achieve goals, or when they allow to compete or play against other players. In iOS (and MacOS), this comes true through the Game Center network Apple provides, and through the GameKit Framework.
Let’s take things from the beginning, and let’s talk a bit about the Game Center. One could describe it as a social gaming network that offers multiplaying features, available for and used from iOS and MacOS users. Achievements, leaderboards, multiplayer gaming are some of those features. It was made available along with the iOS 4.1, and since then it’s been updated with new gaming options.
The features supported and provided by Game Center could be synopsized in the following list:
- Leaderboards: It is a database that keeps score data. Its purpose is to allow users post their scores in a game and compare them with other players’ scores. It actually measures how well a player does in a game.
- Achievements: These are goals set in a game that players try to exceed during the gameplay. Achievements give players a motivation to keep playing, earn as many of them as possible, and compare them with other players’ too. The noteworthy about achievements is that they are measured in points. A total of 1000 points are given to game creators in order to use them the way they want, with 100 points in maximum per achievement. Each game may use as many points as it’s needed, and the way it’s needed. Later on, we will see in practice how all these work.
- Multiplayer: This one supports a range of other sub-features, such as challenges, where players compete each other on either a score challenge or an achievement challenge, and matchmaking games for real-time, turn-based, or self-hosted matches.
Developing games that incorporate Game Center features is not hard, but it’s quite important to make clear that is a two-step process: The first one is to implement the game (of course) and integrate all those Game Kit framework’s libraries that should make it work with Game Center. On the other hand, the second step which should be done before you implement any Game kit-related features on your project, is to create your new app’s record on the iTunes Connect, enable the Game Center support and setup any leaderboards and achievements you want for your game. It’s not difficult to do all these, even if it seems so. If you do it once, then integrating Game Center features could be a piece of cake to everyone. Moreover, the good news is that Xcode 5 makes some of the job automatically for us, as for example to auto-create the required App ID, make the Game Kit configuration on Xcode, and more.
In this tutorial we are going to see how the leaderboards and achievements can be implemented into a game, and how Game Kit framework is used in order to give a simple game another dimension. I am intentionally not going to deal with multiplayer games, as there are so many aspects to be presented, and that wouldn’t require just one tutorial. After all, this is an introduction on how to make use of Game Center and Game Kit. However, I strongly recommend to visit the official documentation from Apple, especially if you are new to all these, so in combination with this tutorial to get the max out of the Game Center.
So, after having made this short prelude on today’s topic, let’s keep moving to see everything in action. All of you, readers, keep on reading to discover great and cool new stuff!
App Overview
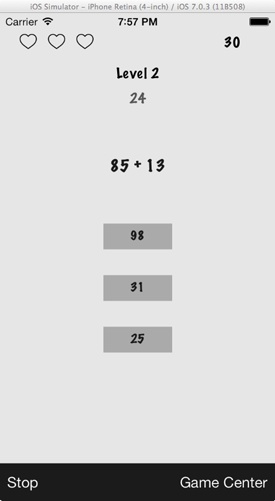
The sample app of this tutorial is going to be a very simple game, which will display additions and it will provide three possible answers that a player can choose from, of which just one will be the correct one. Don’t expect to see any special graphics or visual effects, as our goal is something completely different than a good-looking interface. Before I go into more details, here is a screenshot of it:
In order to totally focus on the Game Center features without be distracted from the game itself, you can download a starter application with the game’s basics already developed. Having it as a starting point we’ll add step by step all the GameKit-related stuff until the end of the tutorial.
Right next, are presented all the game’s features as a list, so you get to know what we are going to work with:
- Each addition will consist of two integer numbers randomly produced. Each number (operand) can have up to 2 digits.
- Three buttons right below the addition label will display three possible answers. Just one is the correct one.
- The game keeps track of scores. Each correct answer will give 10 points to the player.
- Levels are supported by the game. Actually, nothing different is going to happen from level to level, but they exist so we can better understand the achievements later on. Also, each level has 5 rounds (something that you can change in code).
- A timer makes the game more interesting and provides a time frame of 60 seconds for all rounds of a level to be completed. When a new level begins, the timer starts counting from 1 again. If the time is up, the game ends.
- Three “lives” are available to the player. When a wrong answer is given, a life is lost. When all lives have been consumed, the game ends.
- The game starts by using a bar button item at the toolbar lying at the bottom of the view. Using the same button (which changes title from Start to Stop) the player can stop the game (stop, meaning end the game, not pause for simplicity reasons).
- Another bar button item existing in the toolbar will become working later on this tutorial, that will display Game Center related tasks. These are going to be: View Leaderboard, View Achievements and Reset Achievements. In the starter app, this button is not working as there is no any Game Center functionality available.
Before I reach the end of this section, I would also like to say a couple of words regarding this tutorial. We’ll begin working by performing some tasks on Xcode, but generally the whole content can conceivably break in two parts: In the first one, we’ll do some necessary preparationi work on iTunes Connect, where we will create a new record for our sample app, we’ll enable Game Center there, and we’ll create and configure the leaderboard and the achievements of the game. The second part regards the programming work needed to be done, so our game be able to work with Game Center.
Get the Xcode Project Template and Resources
Before doing any actual work, it’s necessary to download the starter app if you want to manage to come along in this tutorial. So fetch it, and run it to see how it works. Also, look at the code which, as you’ll find out, is easy enough and documented. Generally, familiarize yourself with the app before we add any Game Center capabilities so you know how to move in the various parts of the given code.
It’s important to mention that in the project you will find a class named CustomActionSheet. That’s a custom-made class that I presented in a previous tutorial regarding blocks, and I imported here because I wanted to deal with a completion handler and have a shorter code instead of using the default delegate methods of the action sheet. It’s not necessary to go in more details about it, you may take a look at that tutorial.
Finally, you should also download some images that you will need along the way, during the app setup on iTunes Connect.
Automate Tasks Using Xcode
Xcode 5 has accepted great improvements, and some of them include the ability to perform certain tasks automatically, such as to create a new App ID for the application you develop, without you have to visit your Apple developer’s account and do it manually. The only basic precondition is to have it provided with your Apple ID info, and everything will be done for you. Adding your Apple ID to Xcode is easy, and here is how it’s done:
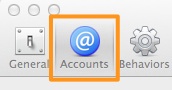
Initially, click on the Xcode menu > Preferences… to let the preferences window appear. At the top of it, there are various tabs, each one with a specific icon and a name. What we care about is the Accounts tab, so click it to make the contents behind it appear.
Now, go to the bottom-left corner of the window, and click on the button with the + symbol. A small menu appears, containing three options:
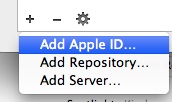
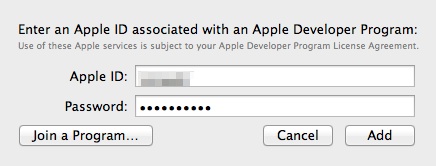
Click on the Add Apple ID… option, and in the small window that appears enter your Apple ID and Password values. When you’re done, click on the Add button.
The Accounts window should now look somehow similar to this:
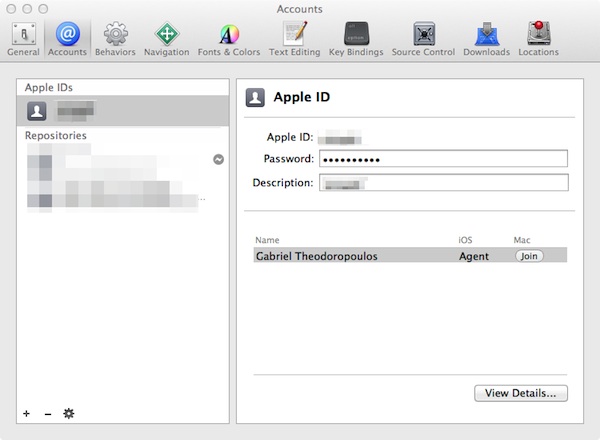
If you click on the View Details… button at the bottom-right corner of the window (make sure first to select your name), a new window will appear where you’ll find all of your Signing Identities and Provisioning Profiles. If you want take a look around, and when you are finished click on the Done button to close that window, and then close the Preferences window as well.
Now, on the Project Navigator, click on the project target, and look at the Identity section, under the General tab.
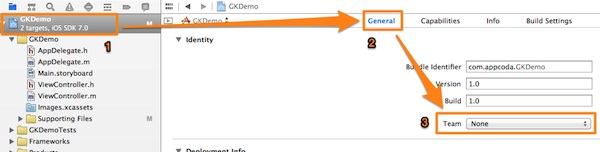
In there, there is a drop down menu named Team. If you open it, you should see your developer name inside it. Select it, and allow that way Xcode to use it in order to access your developer account behind the scenes and create the App ID automatically. Note though that this won’t happen simply by selecting your developer name.
What you have to do, is to click on the Capabilities tab at the top of Xcode, and in the list of all the provided capabilities, expand the Game Center row (second from the top) to see what will happen if you turn the respective switch on.
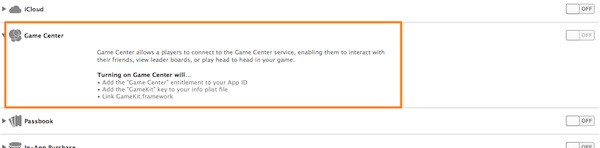
Besides all the described information, Xcode will also create the App ID, which we will use in a while to create an application record on iTunes Connect. So, turn on the switch, and sit back for a while until Xcode gets finished with any preparations been made in the background.
So, making a synopsis at this point, we have managed to do some important preparational work. By adding the Apple ID info to the Xcode Preferences and simply turning a switch on we enabled our application as far as Xcode’s part is concerned, in order to be ready to work with the Game Center. Starting from the next section, we will leave Xcode and the project behind us for a while, as we are going to pay a visit to iTunes Connect and make some setup there too. Don’t worry though; we’ll be back soon.
Create an App Record on iTunes Connect
If you have ever published an application on the App Store, then what we will see in this step will definitely look familiar to you. Creating a record in the iTunes Connect for a new application is not actually a part of integrating Game Center features into your application, however it is necessary in order to create any leader boards and achievements. So, in this step we’ll see how we can add a new application in iTunes Connect, and how to set its data. If you find yourself being comfortable with this process, feel free to skip this section and move to the next one. However, all of you who haven’t published an app yet, or you need a refresh on your knowledge, keep on reading here. Note that as the sample application of this tutorial is not going to be a real one, you can delete it when you have it run, tested and understood how it works.
So, let’s get started. Go to the iTunes Connect and use your credentials to sign in. Next, click on the Manage your apps option, at the right side of the provided options:

At the upper right corner of the main area, there is the Add New App button, which you should click:

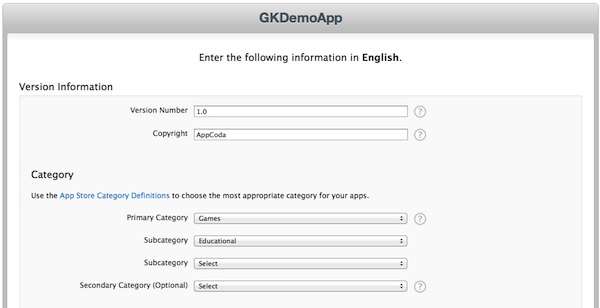
You will be transferred to a new window, where you must provide the initial information regarding the application. Set the next values to the respective fields, according to the next list and the figure that illustrates it:
- Default Language: English
- App Name: GKDemoApp
- SKU Number: gk_demo_app
- Bundle ID: Click on the drop down menu and select the option containing the GKDemo term

Note that the Bundle ID value was automatically created by Xcode in the previous section. If you haven’t completed what was described there, then you won’t find any option in the drop down menu having the GKDemo term in it.
If you are curious about all these fields, then click on the icon with the question mark next to each one, and you’ll find a description. Once you fill them in, click on the Continue button to move forward.
The next window regards the availability date, the price tier and some other selling options. Actually, we don’t care to enter real values here, as this application is never going to be sold. So, set any availability date you’d like, select any price tier you prefer (I chose the free tier) and proceed by clicking once again on the Continue button.

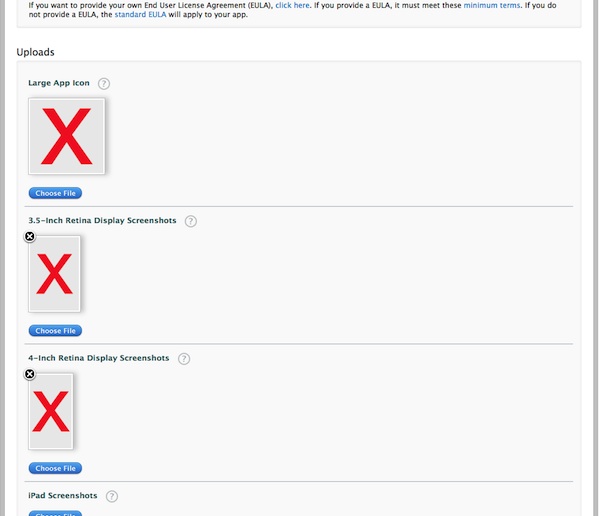
The third and last window regards information about the app itself. Go ahead and fill all the required fields in. The next three figures provide examples of that. At the bottom of the page, you are expected to provide a large app icon, at least one (or more) 3.5-inch retina display screenshot, and at least one (or more) 4-inch retina display screenshot. If you have downloaded the sample images, then you should use the following ones with the next order:
- appicon.png
- screenshot_35.png
- screenshot_4.png
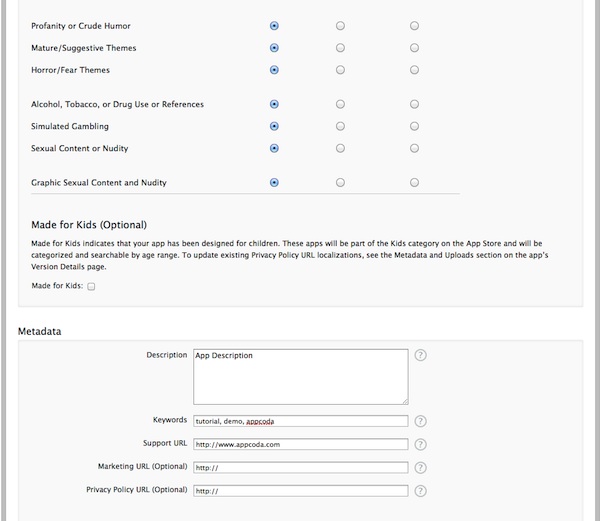
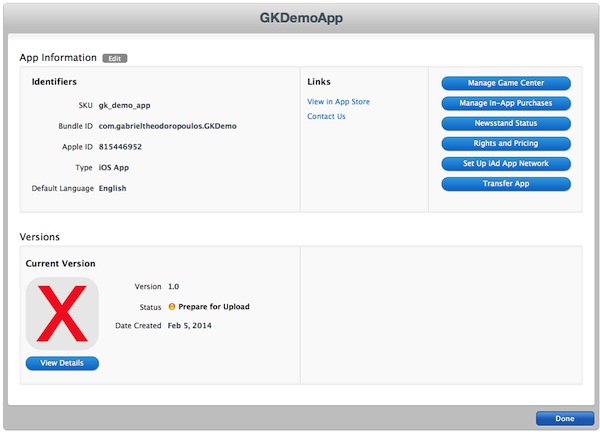
Don’t worry if you forget to set a value to any required field. Upon saving, there will be messages that will indicate what you forgot to type in. Anyway, when you are ready, save the info you just entered, and the new app record is ready. You will be navigated to a summary window, such as the next one:
Enable Game Center
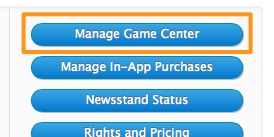
If that’s the first time you add a new app in iTunes Connect, then congratulations, you perfectly did it, even though you have to upload the app itself (the so-called binary) in order to sell to the App Store. From the summary screen we are now, we must perform one important task. That is to enable Game Center for the app through the iTunes Connect environment as well, as, if you recall, we already did it in Xcode by turning the Game Center switch on in the Capabilities tab. So, here click on the Manage Game Center button at the top-right side of the area.
The first thing you see when you click that button (and you’ll see it just once), is the next one:

You just have to click on the Enable for Single Game button, and the Game Center feature will become enabled for our application. You’ll be guided to the next control panel, which you can use to disable Game Center if you change your mind (why would you like to do that?), but most importantly, here is the place where you can create leader boards and achievements.
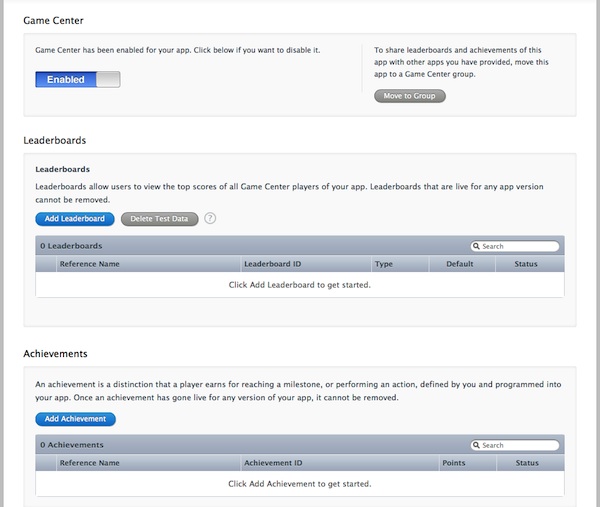
Create a Leaderboard
A leaderboard is the mechanism of Game Center to store game scores. It also consists of the primary and best way for a player to see how well does in a game, as well as to compare himself to other players. Scores stored in leader boards differ from game to game, and they can be points, units, money, coins, or any other measurement amount that fits to a game. A game can have one or more leader boards, and each leader board doesn’t require a lot of fields to be filled in, in order to be created. The cool thing is that a leader board can be localized without much effort, something that is great if a game supports more than one languages.
In this tutorial, and in order to keep simplicity so it would be easy to get the meaning of all these, we are going to create a single leader board, using one language only. There are various score format types, such as integer, elapsed time, money, fixed point, and variations of them. Also, there are two ways to display scores, either the best or the most recent ones. In our case, we’ll make our leader board to keep integer values of scores, and we will show the best score sorting it from the highest to the lowest value. Anyway, it’s time to let us move on and see how everything applies in action.
While being in the Game Center control panel illustrated in the last image above, you can see that there is a section named Leaderboards. Click on the Add Leaderboard button to create one. You will be guided to the next screen, where you need to click on the enabled Choose button.

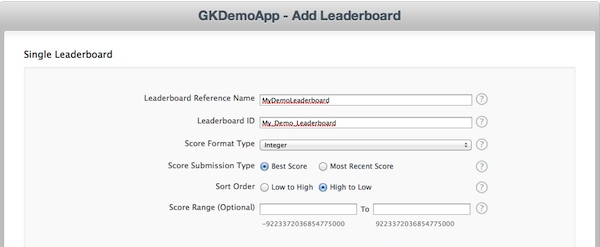
A new form appears, where there are certain fields needed to be filled in. The upper side of the form regards general information of the leaderboard, while in the bottom you can add all localizations you want. Let’s begin by providing the general information of the leaderboard. Note that next to each field there is an icon with a question mark, where you can click and see description about them. However, let me give you a short description of mine as well.
- Leaderboard Reference Name: This is a name required to be set that will be used internally by the iTunes Connect platform. It doesn’t appear anywhere to the user. In here, set the MyDemoLeaderboard value.
- Leaderboard ID: It’s a string value that uniquely identifies the leaderboard among all. Not all characters are permitted here, so just click on the question mark icon to see what’s allowed. Here specify the My_Demo_Leaderboard value.
- Score Format Type: This is a drop down menu, with some predefined options in it. Actually, here is the place where we specify the format of our scores, and in our case we just want Integer scores, which is the option you should pick.
- Score Submission Type: Here you define whether the scores will be displayed showing either the best or the most recent ones. Your choice here clearly depends on the kind of game you are making. For this sample application, just select the Best Score option.
- Sort Order: This is the way the scores will be sorted, in either ascending or descending order. Select High to Low.
- Score Range: Optionally, you can define a range of values that scores should be in. This is also up to your game, and in our case we don’t need to add any range at all, so leave the two fields empty.
Here is a screenshot with those values filled in:
Now we have provided the necessary general information, but we won’t be able to continue if we won’t add at least one language. So, click on the Add Language button to do that.
In the window that pops up, first of all select your desired language from the drop down menu at the top, which here should be English. Next, specify a name for the localized leaderboard, which in our example is the Additions Leaderboard. From the following drop down menu pick the appropriate score format, which may vary depending on the localization you chose. For now, select the 100.000.122 option. To the next couple of fields, you define the singular and plural voice of the score format suffix, such as point and points, coin and coins, etc. Here, add the point and points values respectively. Finally, you may optionally pick an image, which is not necessary to do here.
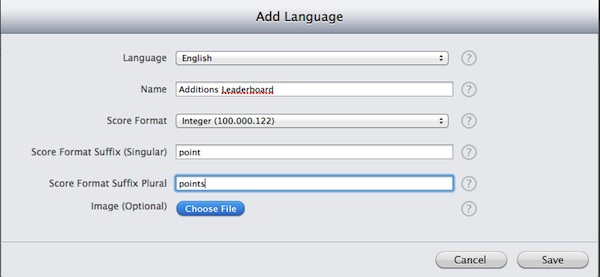
Save the localization, then save the leaderboard, and your first leaderboard is ready!
Create Achievements
Adding achievements for your game is not hard, and it’s similar to the creation of leaderboards. To begin, click on the Add Achievement button, lying at the Achievements section of the window. A new form appears on-screen, which you have to fill in for every achievement you want to add to a game. Don’t worry though, is not that hard as you’ll see right next. Once you have made your mind what the achievements are going to be, the rest is easy.
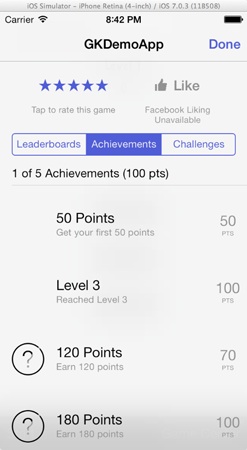
For our sample game application we are going to create five achievements. The first one is presented in details, so you learn how to do so. The rest of them are given in short format, so you know what to fill in every time in the form. A description of each achievement is also provided.
In accordance to the leaderboard fields presentation, let’s see here too each single field what is about, and at the same time let’s add values so by the end of the description to have our first achievement ready, which is to earn 50 points to the game. So:
- Achievement Reference Name: It’s a name used internally by the iTunes Connect, or by you when you’ll search for the current achievement at a later time. Set the Achievement50Points value here.
- Achievement ID: A string that uniquely identifies the achievement among all. Provide the Achievement_50Points value here.
- Point Value: For this field, pay some attention for a little bit. For every game you create, Game Center gives you a total of 1000 points in order to use them the way you want. These points can be split up per achievement, but 100 points at most are allowed for every single achievement, meaning that you can use as many as you want, but no more than 100 for one achievement. Depending on how many achievements you are going to add to your game, think wisely and divide the given 1000 point values in a proper manner, so you are left with enough points for all of your achievements. Also, it’s not necessary to waste all 1000 points if you don’t need to. I’m sure that after creating all achievements for this sample application, you’ll perfectly get the meaning of all that. For now, set the value 50.
- Hidden: Here you can decide if the current achievement is going to be visible to the players, or it will be revealed to them once they manage to achieve it. For now, pick the No value.
- Achievable More Than Once: You can specify if you want the same achievement to be achieved more than one time during the game. Click on the No value.

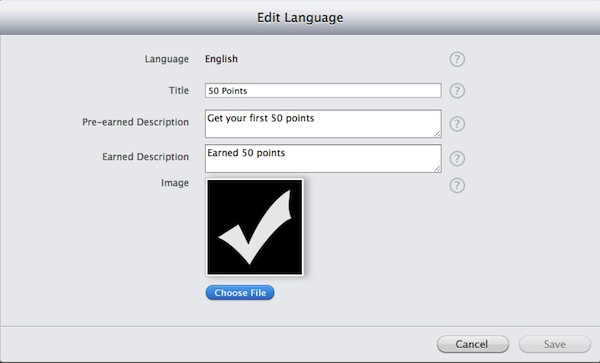
As you see on your screen, we have to set a localization as well, otherwise we are unable to save the achievement. Therefore, click on the Add Language button, and a popup window will appear.
I think that it’s unnecessary to describe each single field, as their titles speak for themselves. Select the desired language, type in a unique title for the achievement, as well as the description that will be displayed before and after the player has achieved it. Note however that you won’t be able to save, until you set an image for the achievement. For the sake of the simplicity, here we’ll set the same image to all achievements. However, in your games you may want or have to set different images for each single achievement. Anyway, use the ach.png image from the images you downloaded and then click on the Save button.
This figure illustrates all that:
Once you return at the achievements form, click on the Save button and you’re done!
Following the same steps, you can create the rest of the achievements for our app. Next, I provide you all the info you might need along your way:
- Achievement #2: Reach Level 3
Achievement – General:- Reference Name: AchievementLevel3
- Achievement ID: Achievement_Level3
- Point Value: 100
- Hidden: No
Achievement – Localization:
- Title: Level 3
- Pre-Earned Description: Reach Level 3
- Earned Description: Reached Level 3
- Image: ach.png
- Achievement #3: Earn 120 points
Achievement – General:- Reference Name: Achievement120Points
- Achievement ID: Achievement_120Points
- Point Value: 70
- Hidden: No
Achievement – Localization:
- Title: 120 Points
- Pre-Earned Description: Earn 120 points
- Earned Description: Earned 120 points
- Image: ach.png
- Achievement #4: Earn 180 points
Achievement – General:- Reference Name: Achievement180Points
- Achievement ID: Achievement_180Points
- Point Value: 100
- Hidden: No
Achievement – Localization:
- Title: 180 Points
- Pre-Earned Description: Earn 180 points
- Earned Description: Earned 180 points
- Image: ach.png
- Achievement #5: Complete Level 5
Achievement – General:- Reference Name: AchievementLevel5Complete
- Achievement ID: Achievement_Level5Complete
- Point Value: 100
- Hidden: No
Achievement – Localization:
- Title: Level 5
- Pre-Earned Description: Complete Level 5
- Earned Description: Level 5 Complete
- Image: ach.png
With that, we’ve done creating achievements. Note that I chose to set some easy achievements, simply regarding earning specific points and reaching certain game levels. In a real game, you might want to set more kind of achievements, as for instance an achievement based on the correct answers in a row, in order to make it much richer.
Create Test Users
During an application building, and while being in development mode, always create Test Users with fake Apple IDs to try out features such as Game Center. Do not, and I repeat that, do not use a real Apple ID for testing your application’s functionalities, otherwise you will probably see the under-construction app featuring in Game Center, and you’ll be asking yourself why. Even Apple is very strict on that. However, don’t also think that you could avoid testing the extra features of your app and not to use test users, because “surprises” might awaiting for you from real users when your app starts selling on the App Store, if it makes it until there of course.
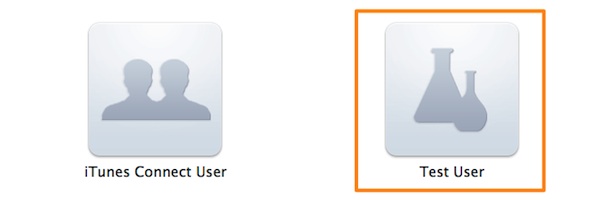
So, keeping in mind that test users are our friends, and as we are still logged in the iTunes Connect, let’s add a couple of them to test our application when it will be ready. So, start by going to the front page of iTunes Connect, and click on the Manage Users option:

You’ll be navigated to a new window, where two options are presented: The iTunes Connect User and the Test User, where obviously you should select the second one:
In the next step, click on the button titled Add New User that resides at the top-left of the form, and you’ll be guided to a form similar to this one:
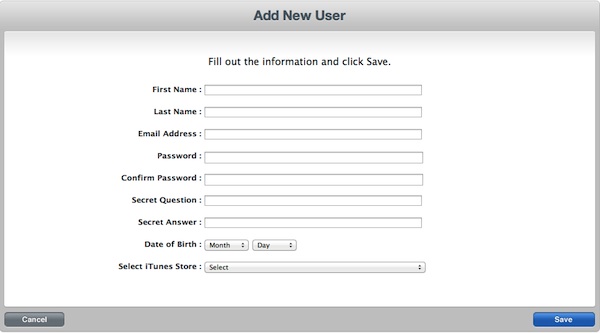
Create a couple (or more if you want, but it’s not necessary) of test users in order to try the leaderboard out when we’ll have it implemented. Remember that you can delete the test users at any time. Anyway, when you finish creating them, you can sign out from the iTunes Connect. There is nothing else that we need to do here, so let’s move on.
Setup Test Users
I’m pretty sure that you are now expecting to go back to the app and focus on the implementation, but I’m afraid that this won’t happen until we finish this step. Why? Because I simply want to let us get finished from all the prep work required to integrate and test the Game Center, and then totally concentrate on programming.
So, instead of going back to Xcode, launch the iPhone Simulator, and then run the Game Center app. In the sign-in form, enter the credentials of the first test user you created, and get connected. You’ll be guided through a series of steps and you will set an Apple ID for the current user. Once you finish with the first one, I suggest you do the same for the rest of the test users you previously created.
At this point, you might wonder why not to sign in through our app when we will implement the Game Kit features. The answer is that I’d like to stay totally focused on our app, and not on setting the test users up. Also, there is one more reason for that: It’s quite common the process of setting up a test user to repeatedly fail, due to continuous disconnections from the Game Center servers. That means that you have to try multiple times to create Apple IDs for your test users, and you wouldn’t like to do that through our app, as when you get there you’ll simply want to try it out.
Authenticate Players
Time to go back to Xcode, as any necessary preparations needed to be done, have been done. We’ll focus totally on code, and how to implement and integrate various Game Center concepts using the Game Kit framework. So, the first step that should always be performed in order to let the Game Center features get enabled into an application, is to authenticate players. Once a user gets connected to Game Center, then all of its features implemented into the application are available to the user, otherwise they are simply not. In a single device, just one player in a given time can play and be signed in to Game Center, but more than one players can access the Game Center from the same device, simply by signing in using each one his own credentials.
Authenticating a player is one of the first things that should happen once the app gets launched, if not the first one. Apple recommends this process to be initiated on the application:didFinishLaunchingWithOptions: delegate method, but not necessarily. To keep things simple, in our example we will trigger the authentication in the viewDidLoad method. However, in a real game where you want various Game Center resources available to more than one view controllers, seriously consider to do that in the application:didFinishLaunchingWithOptions: delegate method and to declare your important objects in the AppDelegate.h file, so they are app-wide accessible.
So, let’s get started by opening the ViewController.m file and going straight ahead to the private section of the interface. In there, declare the following private method, right under the already declared ones:
@interface ViewController ()
...
-(void)authenticateLocalPlayer;
@end
Game Kit framework provides a class named GKLocalPlayer. This one provides information about the currently logged in player, such as the player ID, name, friends, and more. This class also provides the mechanism of authenticating the player, therefore we are going to use it in the implementation of this private method. Let me firstly present the implementation, and then we’ll discuss it.
-(void)authenticateLocalPlayer{
    GKLocalPlayer *localPlayer = [GKLocalPlayer localPlayer];

    localPlayer.authenticateHandler = ^(UIViewController *viewController, NSError *error){
        if (viewController != nil) {
            [self presentViewController:viewController animated:YES completion:nil];
        }
        else{
            if ([GKLocalPlayer localPlayer].authenticated) {
                _gameCenterEnabled = YES;

                // Get the default leaderboard identifier.
                [[GKLocalPlayer localPlayer] loadDefaultLeaderboardIdentifierWithCompletionHandler:^(NSString *leaderboardIdentifier, NSError *error) {

                    if (error != nil) {
                        NSLog(@"%@", [error localizedDescription]);
                    }
                    else{
                        _leaderboardIdentifier = leaderboardIdentifier;
                    }
                }];
            }

            else{
                _gameCenterEnabled = NO;
            }
        }
    };
}
Initially, with the first line we instantiate a GKLocalPlayer object using the shared instance of the class. The interesting stuff however starts in the next line. As you can see, the authentication takes place in a block, where two parameters are provided. The first one regards a view controller, which actually is the login view controller that will automatically appear if the user is not already authenticated. The second parameter, is the familiar and famous error pointer, which will contain any error that might occurs.
Moving into the block body, what I just said before takes place here. We check if the viewController object is nil or not. When it’s not nil, then the user is not authenticated and it’s our duty to make it appear and let the player sign in to the Game Center. That’s exactly we perform in the only one line existing in the if clause. Note however that in a real game you should make any necessary pause actions before you display the login view controller, as you wouldn’t like the game to keep running while the user gets connected to Game Center. In such a simple case like ours, that’s not necessary, that’s why I immediately show the login view controller.
Let’s see now the else case. You notice that the shared instance of the GKLocalPlayer class provides the authenticated property, which indicates whether the player is authenticated or not. If that’s the case, then we want two things to happen:
- To make known in our class that the game center features can be used, simply by making the gameCenterEnabled member variable true, and,
- to get the identifier of the default leaderboard we previously created. You may wonder why don’t we use directly the leaderboard ID, as we defined it earlier. Well, the loadDefaultLeaderboardIdentifierWithCompletionHandler: method is more formal and correct way.
As you may notice, the completion handler block of this method gives us the leaderboard identifier, which we keep in the leaderboardIdentifier member variable if everything is okay. In case of error, we just show its description on the debugger.
Finally, if the user is not authenticated and the same time the login view controller is nil, then the user simply cancelled the login process and we must indicate that the supported by our app Game Center features are not available, simply by making the gameCenterEnabled flag false.
In order to see the authentication process in action, we must call this method, and we’ll do that in the viewDidLoad method. Just go there and add the next line:
- (void)viewDidLoad
{
    ...
    [self authenticateLocalPlayer];
}
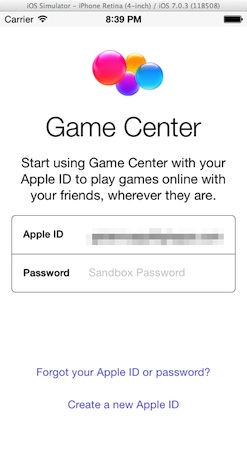
You may run the app now, and if you wait a couple of seconds you’ll see the Game Center in action. If you have a test user already logged in the Game Center, then you’ll see a welcome message like the next one:
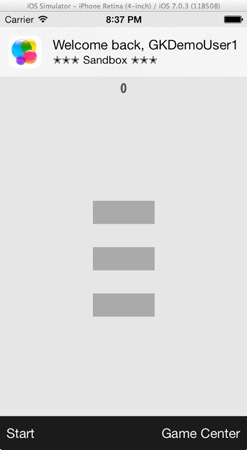
If not, then you’ll be presented with the default sing-in form of the Game Center:
Score Reporting
During the gameplay, every time that a correct answer is given to a random addition, the score gets increased by 10 points, and surely you know that if you’ve played our super-game at least once. When a game ends, we want to report the final score value to the Game Center, so it appears on the default leaderboard. After all, that’s why we got in trouble for creating and setting it up.
Actually, updating a leaderboard with a new score is very easy, and a matter of just a few lines of code. In order to keep things tidy, we’ll create a new private method for this cause, so go once again in the private section of the class and declare the following:
@interface ViewController ()
...
-(void)reportScore;
@end
Two things are important now: To implement it, and to see where it should be called. Let’s start with the implementation:
-(void)reportScore{
    GKScore *score = [[GKScore alloc] initWithLeaderboardIdentifier:_leaderboardIdentifier];
    score.value = _score;

    [GKScore reportScores:@[score] withCompletionHandler:^(NSError *error) {
        if (error != nil) {
            NSLog(@"%@", [error localizedDescription]);
        }
    }];
}
As usually, let’s talk about it. Firstly, we initialize a GKScore object, by specifying in the init method the leaderboard identifier we fetched upon authentication. The GKScore class is responsible for handling any score-related tasks, and in here we’ll use just the basics needed to do our job. Once the local score object has been initialized, we assign in its value property the actual score, stored in the score member variable.
Next, we invoke the reportScores:withCompletionHandler: class method of the GKScore class. Note that the first parameter expects a NSArray object, as it allows multiple score reporting. That’s why we set the @[score] object. With this syntax, we both create a NSArray and add the score object in it. Traditionally, the error pointer in the completion handler block will contain any error if occurs, which we simply show on the debugger.
So, updating the leaderboard with a new score is as simple as that. Let’s see where we should invoke our private method, and remember that in the beginning of this section I already said that we want to report our score when the game ends. Where is this happening? In the handleAnswer: IBAction method. Go to this one, and locate the if (_lives == 0) condition. At the end of the if body, we will invoke it:
- (IBAction)handleAnswer:(id)sender {
    ...
        if (_lives == 0) {
            ...

            [self reportScore];
        }
    ....
}
Also, this method should be called when the time is up, so go to the updateTimerLabel: and make the call at the end of the if clause.
-(void)updateTimerLabel:(NSTimer *)timer{
    ...
    if (_timerValue > 60) {
        ...
        [self reportScore];
    }
}
You may run the game again now, and after playing for a while just… lose. Upon finishing, the score will be reported to Game Center. However, for the time being you can only see that in the Game Center app and not in our application. Therefore, that’s the next feature we are going to implement in the section that follows.
Display Leaderboard And Achievements
When you first authenticated your test user with Game Center, you might would have noticed that the second bar button item in the toolbar became working. When tapping on it, an action sheet appears, where they are provided options for viewing either the leaderboard or the achievements of the currently authenticated player. However, none of those still works, and we are going to fix this here.
You might be problematized why in the title of the section I refer the achievements, except for the leaderboard, if you consider that we haven’t added any achievement-related code yet. Well, that’s because the process of showing either the leaderboard or the achievement is the same, so we’ll do it here for both of them.
Before I go any further, let me underline a fact. In this tutorial, we are going to display the leaderboard and the achievements by loading a predefined, standard view controller provided by Game Kit. This is the same to the Game Center app’s one. Note though that in a real game showing this view controller in a beautiful, full of graphics user interface might be prohibiting. Game Kit framework provides alternatives for getting just the data you want without presenting any pre-made view controller, so you can build your own one, use the data in the way you want and present a good-looking view containing either the leaderboard information or the achievements. So, I advise you that in case your goal is to process the data manually rather than using the default view controller, visit the Apple documentation and learn how to manage it. It’s not hard, it’s just out of this tutorial’s scope, as this is an introduction to Game Kit.
Let’s do some work now. As we usually do, declare the next method in the private section of the class:
@interface ViewController ()
...
-(void)showLeaderboardAndAchievements:(BOOL)shouldShowLeaderboard;
@end
The shouldShowLeaderboard parameter will indicate in its implementation whether the leaderboard or the achievements should appear to the player. Let’s implement it now:
-(void)showLeaderboardAndAchievements:(BOOL)shouldShowLeaderboard{
    GKGameCenterViewController *gcViewController = [[GKGameCenterViewController alloc] init];

    gcViewController.gameCenterDelegate = self;

    if (shouldShowLeaderboard) {
        gcViewController.viewState = GKGameCenterViewControllerStateLeaderboards;
        gcViewController.leaderboardIdentifier = _leaderboardIdentifier;
    }
    else{
        gcViewController.viewState = GKGameCenterViewControllerStateAchievements;
    }

    [self presentViewController:gcViewController animated:YES completion:nil];
}
We start by initializing a GKGameCenterViewController object and by making self (our class) the delegate of the object. When you write, or copy-paste this line, Xcode will show a warning, because we haven’t adopted the GKGameCenterControllerDelegate yet. Don’t worry, we’ll do that in a while.
Next, depending on the parameter flag, if the leaderboard is this that should be shown to the player, then the if is executed, otherwise the else case. Note that the viewState property of the gcViewController object rules what should be displayed, so it’s up to us to provide it with the appropriate value. For displaying the leaderboard, we set the GKGameCenterViewControllerStateLeaderboards value, otherwise we set the GKGameCenterViewControllerStateAchievements. Furthermore, you see that in the leaderboard case we set the leaderboard identifier, and keep in mind that this is mandatory.
Anyway, as a last move we present the gcViewController view controller to the user, and we’re done with this method.
Our next task is to call this method, and that has to be done either when the user taps on the View Leaderboard or on the View Achievements button of the action sheet. Go to the showGCOptions: IBAction method, and then inside the completion handler block, where there is nothing implemented there yet. The action sheet presents three options, so we must check what’s the button the player tapped. Right below you are given the code that is needed to be added:
- (IBAction)showGCOptions:(id)sender {
    ...
        [_customActionSheet showInView:self.view
                 withCompletionHandler:^(NSString *buttonTitle, NSInteger buttonIndex) {

                     if ([buttonTitle isEqualToString:@"View Leaderboard"]) {
                         [self showLeaderboardAndAchievements:YES];
                     }
                     else if ([buttonTitle isEqualToString:@"View Achievements"]) {
                         [self showLeaderboardAndAchievements:NO];
                     }
                     else{

                     }
                 }];
   ...
}
In case of leaderboard, we call the showLeaderboardAndAchievements: method specifying the YES as its parameter, otherwise we call it by setting the NO value. In the last else case, we’ll add some code later, so for now leave it empty.
If you run the app now, you’ll perfectly manage to display both the leaderboard and the achievements. However, you won’t manage to dismiss the view controller, simply because we still haven’t implemented the respective delegate method that will do that.
Open the ViewController.h file, and then modify the @interface header so it adopts the next protocol:
@interface ViewController : UIViewController
By doing so, the warning from Xcode also gets disappeared. Now, there is one really simple delegate method needed to be written. Go back to the ViewController.m file, and add this:
-(void)gameCenterViewControllerDidFinish:(GKGameCenterViewController *)gameCenterViewController
{
    [gameCenterViewController dismissViewControllerAnimated:YES completion:nil];
}
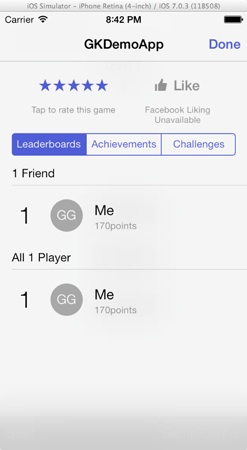
Run the game once again, and everything will work nice! Here are a couple of screenshots, showing both the leaderboard and the achievements views:
Manage Achievements
Up to this point, you have noticed that there is nothing extremely difficult in the code we added to the project. Continuing our work and dealing with the achievements, you’ll see that the same applies here as well. Before we see what we have to do, it’s important to mention a great difference existing between achievements and leaderboards that regards how often those two should be updated: In leaderboards, the score update takes place at the end of the game, however as far as the achievements are concerned, the updates should occur more often, in a reasonable rate, and when it’s necessary and dictated by the game logic. For example, in our case we must update the achievements every time our score and the level get changed in order to properly keep track of the player’s progress and reflect it in the achievements.
When an achievement is about to be updated, then it actually awaits for a progress percentage that has value from 1.0 to 100.0. It’s obvious that the 100.0 is the progress value given to an achievement that has been reached. It’s the app’s duty to calculate the progress percentage for each achievement that should be updated, and provide Game Center with it. Based on this exactly, we are going to implement a method where we will firstly calculate the progress percentage regarding both the level and the score values, and then we will report the achievements to Game Center. Initially, declare the next private method:
@interface ViewController ()
...
-(void)updateAchievements;
@end
Next, implement it:
-(void)updateAchievements{
    NSString *achievementIdentifier;
    float progressPercentage = 0.0;
    BOOL progressInLevelAchievement = NO;

    GKAchievement *levelAchievement = nil;
    GKAchievement *scoreAchievement = nil;

    if (_currentAdditionCounter == 0) {
        if (_level <= 3) {
            progressPercentage = _level * 100 / 3;
            achievementIdentifier = @"Achievement_Level3";
            progressInLevelAchievement = YES;
        }
        else if (_level < 6){
            progressPercentage = _level * 100 / 5;
            achievementIdentifier = @"Achievement_Level5Complete";
            progressInLevelAchievement = YES;
        }
    }

    if (progressInLevelAchievement) {
        levelAchievement = [[GKAchievement alloc] initWithIdentifier:achievementIdentifier];
        levelAchievement.percentComplete = progressPercentage;
    }


    if (_score <= 50) {
        progressPercentage = _score * 100 / 50;
        achievementIdentifier = @"Achievement_50Points";
    }
    else if (_score <= 120){
        progressPercentage = _score * 100 / 120;
        achievementIdentifier = @"Achievement_120Points";
    }
    else{
        progressPercentage = _score * 100 / 180;
        achievementIdentifier = @"Achievement_180Points";
    }

    scoreAchievement = [[GKAchievement alloc] initWithIdentifier:achievementIdentifier];
    scoreAchievement.percentComplete = progressPercentage;

    NSArray *achievements = (progressInLevelAchievement) ? @[levelAchievement, scoreAchievement] : @[scoreAchievement];

    [GKAchievement reportAchievements:achievements withCompletionHandler:^(NSError *error) {
        if (error != nil) {
            NSLog(@"%@", [error localizedDescription]);
        }
    }];
}
I won't get into details about the progress percentage calculation of the game level or score. I think it's clear how each progress gets calculated for every achievement. The important here is the new class we meet, the GKAchievement. As you see, an object of this class is initialized by specifying the achievement ID, therefore is necessary to define it in each case. At the end of this method, we report the achievements. The reportAchievement:withCompletionHandler: method expects an array of GKAchievement objects, therefore just right before its invocation we set the achievements NSArray object. Note that depending on the progressInLevelAchievement flag, this array contains either both the levelAchievement and the scoreAchievement objects, or just the scoreAchievement object.
The way such a method is implemented in a game totally depends on the game logic and the achievements have been set for the game. The above implementation serves our application, but in no case would serve any other game. The only element that should remain the same, is the way the achievements are reported to Game Center. So, keep in mind that it's up to you to figure out how to calculate the progress percentage of each achievement of your game, and then report it to Game Center.
Just implementing the method above is not enough. We must call it as well, and the best place to do that is at the end of the handleAnswer: IBAction method. That's because we want to report our progress right after we tap on an answer button. So, just right before the closing curly bracket of the if (shouldContinue) condition, add the next one:
- (IBAction)handleAnswer:(id)sender {
    ...
    if (shouldContinue){
        ...
        [self updateAchievements];
    }
}
You can now go and play for a while. From time to time, view your achievements and watch the progress you make. Interesting right? Even for such a small game!
Reset Achievements
There are times that you may need to reset the achievements, and thankfully Game Kit allows that to be done very easily. Note that after you have the achievements reset there is no way to go back. So, let's see how we can do this. Until here, for every new feature we added to the project, we created a new private method. We'll keep the same pattern here as well, so go and declare the next private method to the private section of the class:
@interface ViewController ()
...
-(void)resetAchievements;
@end
Right next it's the implementation. As you'll see, it's a very easy task:
-(void)resetAchievements{
    [GKAchievement resetAchievementsWithCompletionHandler:^(NSError *error) {
        if (error != nil) {
            NSLog(@"%@", [error localizedDescription]);
        }
    }];
}
We just make a call to the resetAchievementsWithCompletionHandler: class method of the GKAchievement class. In the completion handler you can add any code needed after the achievements have been reset. Here, we just log the error message to the debugger, if any occurs.
Lastly, we need to make a call to the resetAchievement method. Where should this take place? Well, if you remember in the completion handler of the action sheet (in the showGCOptions: IBAction method) we had left an else case empty. That case matches to the third option of the action sheet, titled Reset Achievements.
Locate that spot in the code by going to the showGCOptions: IBAction method and then in the completion handler block. Head directly to the empty else case and invoke the resetAchievements method.
- (IBAction)showGCOptions:(id)sender {
    ...

        [_customActionSheet showInView:self.view
                 withCompletionHandler:^(NSString *buttonTitle, NSInteger buttonIndex) {
                     if ([buttonTitle isEqualToString:@"View Leaderboard"]) {
                         ...
                     }
                     else if ([buttonTitle isEqualToString:@"View Achievements"]) {
                         ...
                     }
                     else{
                         [self resetAchievements];
                     }
                 }];
    ....
}
If you had previously played the game and done any progress, reset the achievements and view them again. You'll see that all of your progress has simply... gone!
Compile and Run the App
Over the last few sections of this tutorial we made our programming introduction in the most important aspects of Game Kit. We implemented the required features for reporting scores to leaderboard and progress to achievements, as well as the most common way to view both of them and how to reset achievements. If in any of those steps you didn't run the app, then I think that now it's time to do it. Run it in either the Simulator or in a development device, and test all of the features we implemented. Besides from trying out just the leaderboard and the achievements, try to authenticate more than one test users with Game Center and add scores for each one in leaderboard. Also, feel free to play around with code, do any modifications you'd like and then test again.
Summary
In this tutorial we made an introduction to Game Center and Game Kit framework. We walked through two major and different aspects of the same thing, how to integrate Game Center capabilities into a game. We could say that this tutorial consists of two general parts: The first one is the preparation that was made on iTunes Connect, and the second one regards any programming job required for implementing all the desired Game Kit features. By starting from an application that had nothing related to Game Center, we managed to implement the most basic and important stuff met in most of the games existing on the App Store. Maybe this tutorial is not enough to make your path from the beginning until the App Store, but surely it shows you the way on how to deal with Game Kit. You have already been given the advice to read the official documentation as well, so do it. Closing, I hope all the content described here to be helpful both for those who want to manage Game Kit for the very first time, and for those who might need a second look on GameKit in combination with iOS 7. Happy game-making!
For your complete reference, you can download the full source code and Xcode project from here.


