

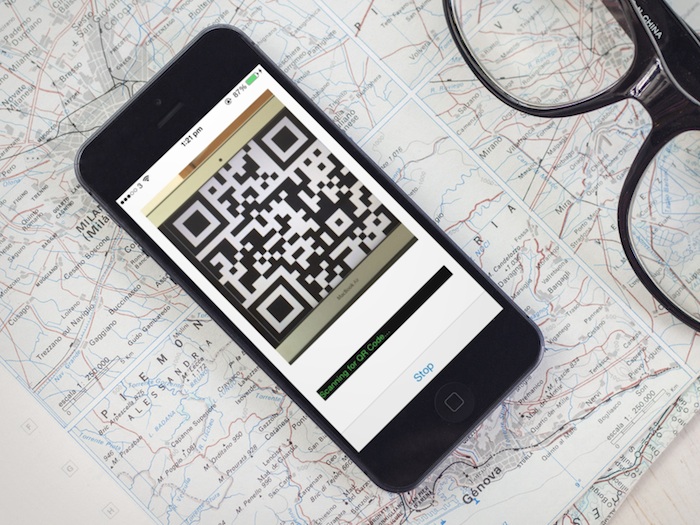
iOS 7 brings a wealth of new features that set it apart from all other mobile operating systems. Both major additions and minor improvements have been made, offering developers new or updated frameworks and APIs to work with, and the opportunity to provide single users with a much richer experience. The AVFoundation framework is just one of them, as it has accepted great enhancements and new class additions that make even more tools available. One of the new features that the AVFoundation incorporates, is the ability to discover and read bar codes in real-time, and one of the supported bar code types that we especially interested in at this tutorial, is the QR Code.
A Quick Response Code (QR Code) is actually a two-dimensional (2D) barcode. Instead of the vertical lines like those that the well-known barcode contains, a QR Code can have its lines designed in both horizontal and vertical directions. The data that’s being encapsulated into such a code, is read by devices specificly designed for this job, or by smart devices (smartphones, tablets) using the appropriate software. A QR Code can store a great amount of data (in relation to the ordinary barcode), so there is a variety of information that can be encoded in it. Some typical content examples of a QR Code are:
- URL
- Phone number
- Simple text
- SMS text
QR Codes are used mainly for marketing reasons, but not only. One can create a QR Code to use on its website, or on any other place that may wants.
Thanks to iOS 7, creating applications that can scan and translate a QR Code has been really a piece of cake. So, if you have ever been tempted to create such an app, or you are just curious to learn more about all these, then just keep reading!
Demo App Overview
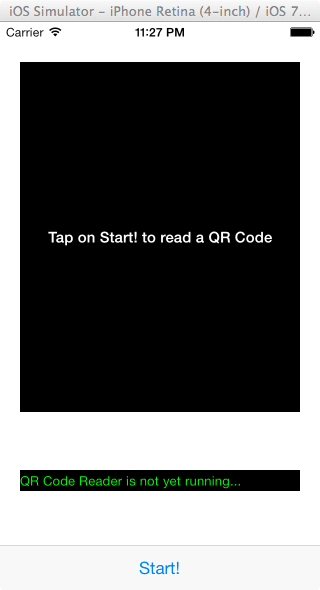
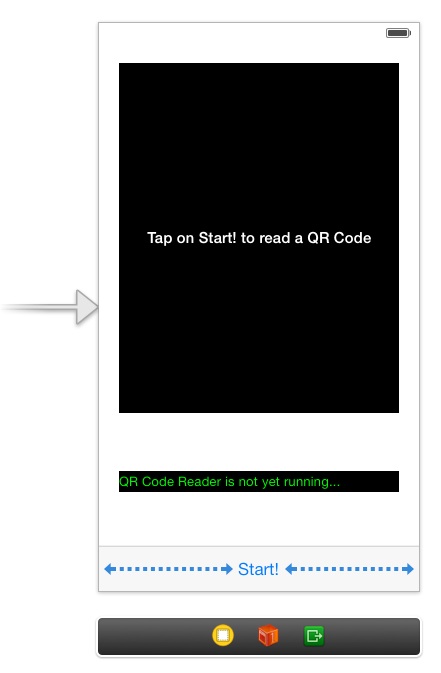
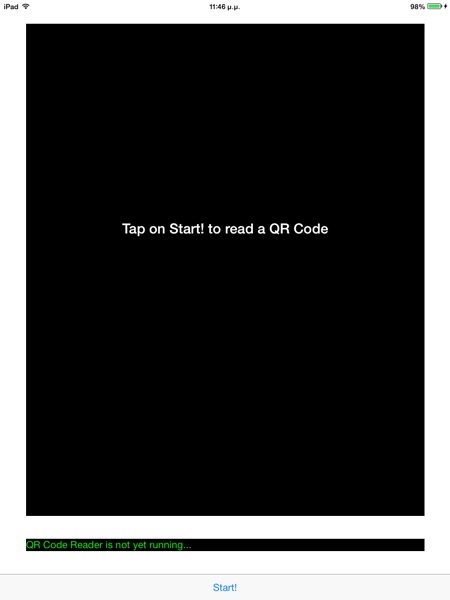
The demo application that we are going to implement in this tutorial is fairly simple and straightforward. It is going to be universal, meaning that it will be able to work in both iPhone and iPad, so you can run it on any device you might have with iOS 7 installed on it. Right next is shown a figure of the outcome in iPhone:
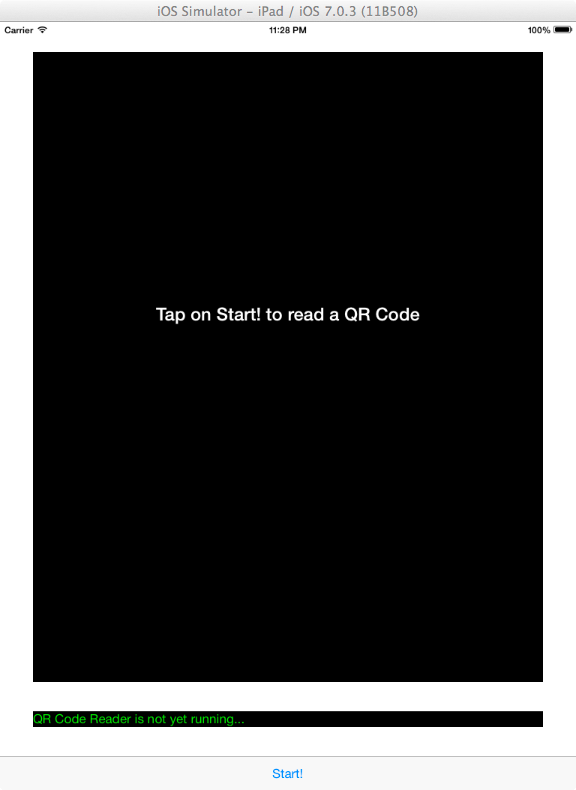
For the iPad, the interface is more or less the same:
Before I proceed to a discussion regarding the demo figures above, it’s important to underline at this point that any barcode scanning, including QR codes, is totally based on video capturing, that’s why AVFoundation framework supports the barcode reading feature. Keep this info on mind, as it’s the starting point for the entire application.
Even though it’s not hard to figure out what all subviews layed on the interface are for, I’ll make a quick reference on them, so it’ll become absolutely clear what our app is going to contain.
So, beginning from top to bottom, at first there is a UIView view, which is going to be the container for the preview layer of the video captured by the device. A UILabel exists on top of it, simply prompting to tap on the start button to begin reading a QR code. Right next, another UILabel plays the role of the status log while a code is being read, and finally a toolbar lies at the bottom of the view, with one bar button item only which will be used to start and stop the capturing.
Here is how the demo application is going to work:
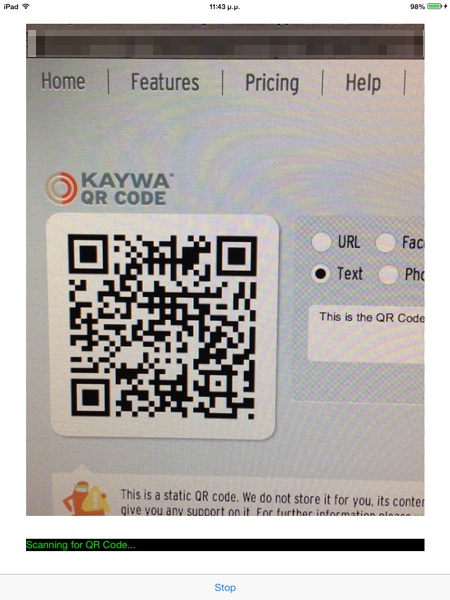
Initially, when the app is launched, the interface shown in the figure above is first displayed. By tapping the start bar button at the toolbar, a video capturing session is initiated in order to scan for QR codes. Once that happens, the start button’s title changes to Stop, while its functionality changes as well with aim to enable us to stop capturing at any time.
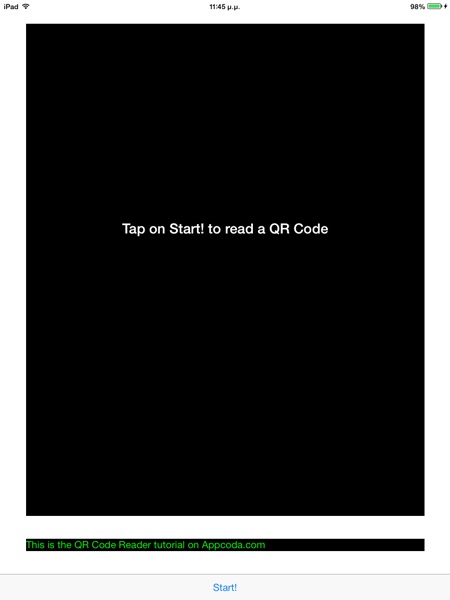
The status label is going to show three different messages, depending on the scanning state:
- When a code scanning is not yet performed.
- When a code scanning is in progress.
- When a scan has been completed and the contained information has been translated and is ready to be displayed.
Also, a sound effect (a beep sound) is being played every time a QR code has been successfully read to make our app more vivid and interactive.
Note that this application cannot be tested on the Simulator, neither to a device without a camera, as everything is based on real-time video capturing. Therefore, you’ll need to connect your device and run it there if you want to see the application live.
Building the Demo App
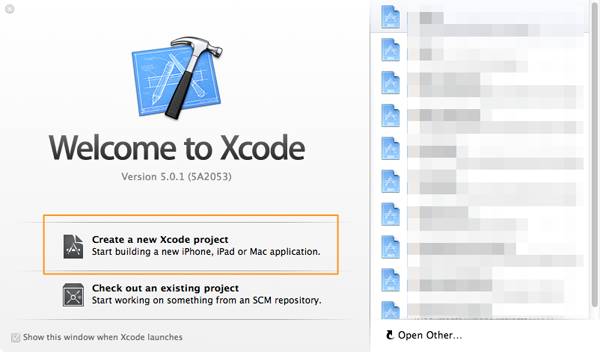
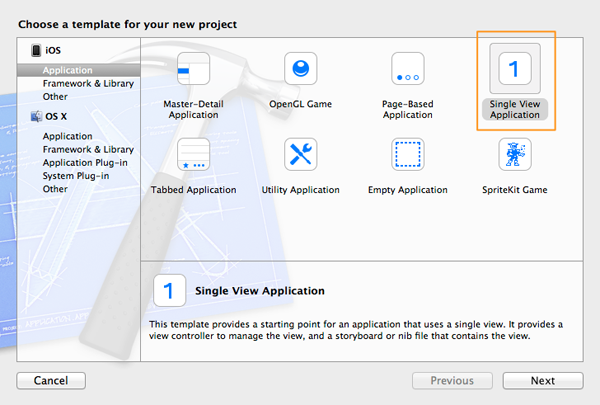
Ready to take off? Let’s begin by launching the Xcode. In the Welcome screen, select to create a new project.
In the project creation guide under the iOS section, select the Application category and then select the Single View Application template. Click Next to proceed.
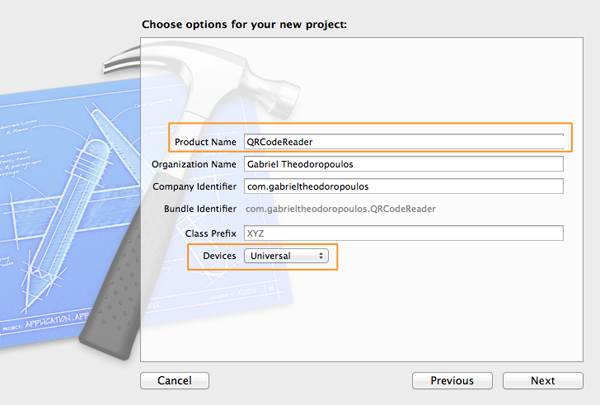
Next, give a name to the project. In the Product Name field add the QRCodeReader value. Also, in the Devices drop down menu select the Universal value in order to let your app run in both iPhone and iPad devices. Click Next to continue.
In the last window, select a directory to save the project and click on the Create button.
Xcode creates the project and makes any necessary initial, default configuration is required. Now we are ready to start building.
Setting Up the User Interface
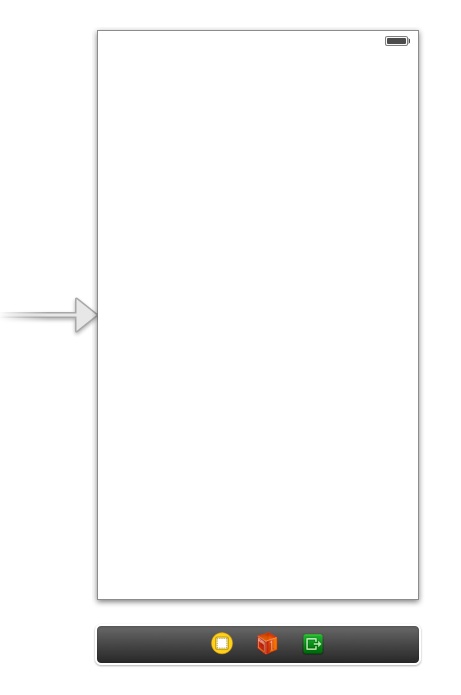
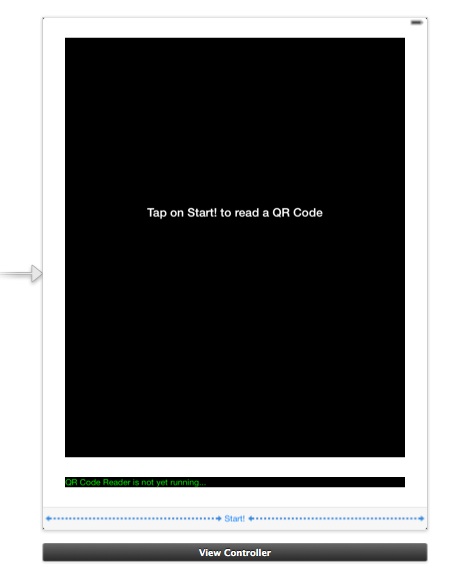
Our application is universal, so it’s needed to create the interface for both the iPhone and the iPad. Let’s begin from the iPhone, so click on the Main_iPhone.storyboard to bring the Interface Builder up. Initially, you should see only an empty view controller, just like the next image:
Here is a list of all the controls you need to drag and drop in the view of the view controller, along with all properties that need to be set in order to create an interface similar to the wanted one.
- UIView
- Frame: X=20 Y=40 Width=280 Height=350
- Background Color: Black
- UILabel Add this as a subview to the previous view
- Frame: X=17 Y=164 Width=247 Height=21
- Color: White
- Text: Tap on Start! to read a QR Code
- Font: System Bold 15.0
- Text Alignment: Center
- UILabel
- Frame: X=20 Y=448 Width=280 Height=21
- Color: R=0 G=255 B=0
- Text: QR Code Reader is not yet running…
- Font: System 15.0
- UIToolbar
- Frame: X=0 Y=524 Width=320 Height=44
- UIBarButtonItem (already existing on the toolbar)
- Title: Start!
- UIBarButtonItem
- New Flexible Space Bar Button Item on the left side of the start button.
- UIBarButtonItem
- New Flexible Space Bar Button Item on the right side of the start button.
After you’re done, the interface should look like the next one:
Here is the respective list with all the controls required to setup the interface for the iPad, along with the properties you need to configure.
- UIView
- Frame: X=44 Y=40 Width=680 Height=840
- Background Color: Black
- UILabel Add this as a subview to the previous view
- Frame: X=20 Y=329 Width=640 Height=41
- Color: White
- Text: Tap on Start! to read a QR Code
- Font: System Bold 24.0
- Text Alignment: Center
- UILabel
- Frame: X=20 Y=448 Width=280 Height=21
- Color: R=0 G=255 B=0
- Text: QR Code Reader is not yet running…
- Font: System 17.0
- UIToolbar
- Frame: X=0 Y=980 Width=768 Height=44
- UIBarButtonItem (already existing on the toolbar)
- Title: Start!
- UIBarButtonItem
- New Flexible Space Bar Button Item at the left side of the start button.
- UIBarButtonItem
- New Flexible Space Bar Button Item at the right side of the start button.
Here is how the iPad interface should now look like:
So far, so good. For both devices the interface is ready, but we are not finished yet. We need to create IBOutlet methods and connect them to the controls we need to touch in code. Open the ViewController.h file, and add the following IBOutlet property declarations:
@interface ViewController : UIViewController

@property (weak, nonatomic) IBOutlet UIView *viewPreview;
@property (weak, nonatomic) IBOutlet UILabel *lblStatus;
@property (weak, nonatomic) IBOutlet UIBarButtonItem *bbitemStart;

@end
As you see, we need properties for the video container view, the status label and the start bar button item. Besides these properties however, now it’s the best time to declare an IBAction method which we will connect to the start bar button item in order to make it start and stop video capturing. Therefore, right after the last property, add the next line:
- (IBAction)startStopReading:(id)sender;
Let’s make the connections now. Open the Main_iPhone.storyboard file and Control-Click or Right-Click on the View Controller object, inside the Document Outline pane. In the black popup window that appears, you can see all of the IBOutlet properties that were previously declared under the Outlets section. For each one of them, click on the circle on the right side and drag and drop to the appropriate control. The next image will make this procedure clear:

Follow the same steps to connect the startStopReading: IBAction method to the start bar button item. The IBAction method exists under the Received Actions section in the black popup window.
As a reminder, don’t forget to do the same job in the Main_iPad.storyboard file.
QR Code Reading Implementation
Up to now we have created the project, we have setup the interface and we have done all necessary configurations on the controls of our application. Time to make a deep dive and write the necessary code that will give life to the most important feature, the QR code reading.
The best point to start writing code is our IBAction method, the startStopReading:, which is already declared and connected to the start bar button item. However, before we begin implementing it, let’s remember something; while I was presenting the demo app and the way it’s going to work, I said that once the video capturing begins, the start button becomes a stop button and vice versa. Programmatically, that means that we need to find a way that lets the app know when to perform the start functionality, and when to perform the stop functionality. Well, what’s a better way than a flag?
If you haven’t done already, open the ViewController.m file. Navigate yourself at the top of it, in the private interface section, and add the following flag:
@interface ViewController ()
@property (nonatomic) BOOL isReading;
@end
It’s quite obvious by its name that, when the isReading variable is NO (false), then the app is not scanning for a QR code and the video capture functionality should start when the bar button is tapped. The exact opposite happens when the variable is set to YES (true). I would strongly advice that when declaring member variables, then the next step that should be done is to give them their initial value, as the most probable scenario is that you are going to forget to do so later. So, let’s go inside the viewDidLoad method to set the initial value for our flag:
- (void)viewDidLoad
{
    [super viewDidLoad];

    _isReading = NO;
}
Now we are absolutely ready to implement the startStopReading: IBAction method. Write the following code snippet and then we’ll discuss it a bit:
- (IBAction)startStopReading:(id)sender {
    if (!_isReading) {
        if ([self startReading]) {
            [_bbitemStart setTitle:@"Stop"];
            [_lblStatus setText:@"Scanning for QR Code..."];
        }
    }
    else{
        [self stopReading];
        [_bbitemStart setTitle:@"Start!"];
    }

    _isReading = !_isReading;
}
At first, we check if the isReading flag is NO, meaning that currently no QR code scanning is taking place. If that’s the case, then we call the startReading method, which we are going to implement in a while. If everything goes well when calling this method, then we change the bar button item’s title to Stop and we set another message on the status label. However, if the app is currently scanning for a QR code and the isReading flag is YES, then we call the stopReading method (yes, we’ll implement this one later too), and we also set the title of the bar button item to Start!. Finally, no matter what the case is, we set in the isReading flag the exact opposite value of the one that currently has.
As you just saw, we used two methods that we haven’t yet implemented. We will begin doing so by the startReading, which as you imagine, is one of the most important methods in this app. First of all, we need to declare it, so go to the private interface section and add the next declaration:
@interface ViewController ()
@property (nonatomic) BOOL isReading;

-(BOOL)startReading;

@end
Don’t leave there yet. Before we move to implementation, we need to declare a couple of objects that we’ll need right next. So, add the new lines shown in the snippet below:
@interface ViewController ()
@property (nonatomic) BOOL isReading;

@property (nonatomic, strong) AVCaptureSession *captureSession;
@property (nonatomic, strong) AVCaptureVideoPreviewLayer *videoPreviewLayer;

-(BOOL)startReading;
@end
At this point Xcode will probably complain about the AVCaptureSession and the AVCaptureVideoPreviewLayer classes. That’s because we still haven’t imported the AVFoundation framework. Before we fix this, go into the viewDidLoad method and make the captureSession object nil.
- (void)viewDidLoad
{
    [super viewDidLoad];
    _isReading = NO;

    _captureSession = nil;
}
Now, open the ViewController.h file and at the top of it, import the AVFoundation framework.
#import
Did you notice something weird here? Xcode didn’t show any error messages at all after importing this framework, despite we haven’t linked it to the project like the next frameworks:

Well, what is really happening here is that we are facing another new cool feature of Xcode 5, and to be more precise a new compiler’s feature. No need to get into details, but simply putting it, this is called Auto Linking and it automatically links any required frameworks we use (most of them) silently and behind the scenes to our project.
Having said all that, let’s do one more thing while the ViewController.h file is open. Modify the @interface line like the next one:
@interface ViewController : UIViewController
We do that because we want our class to conform to the AVCaptureMetadataOutputObjectsDelegate. More about it later.
Let’s go back now and let’s begin implementing the startReading method. To do that, open the ViewController.m file. I believe at this point that it would be useful to say that for everyone that has ever implemented video support to an app, then the following procedure will seem familiar until some point. For all those however who haven’t used the AVFoundation framework and video support before this project, then I strongly advice to visit Apple documentation and do some reading about it.
Add the next code snippet:
- (BOOL)startReading {
    NSError *error;

    AVCaptureDevice *captureDevice = [AVCaptureDevice defaultDeviceWithMediaType:AVMediaTypeVideo];

    return YES;
}
What we just did was to take an instance of the AVCaptureDevice class by specifying the AVMediaTypeVideo option as the media type. In human words, we access our device, telling at the same time that we’ll capture video. The NSError object is going to be used right next.
Now add the next lines:
    AVCaptureDeviceInput *input = [AVCaptureDeviceInput deviceInputWithDevice:captureDevice error:&error];

    if (!input) {
        NSLog(@"%@", [error localizedDescription]);
        return NO;
    }
Here we get an instance of the AVCaptureDeviceInput class in order to specify an input device. In our case the input device is the camera, and that’s obvious as in the deviceInputWithDevice:error: method we used the captureDevice that was instantiated just a bit earlier with the AVMediaTypeVideo media type. If for any reason the input device is not possible to be instantiated, then we simply log the error message and we end our job here by returning NO.
Previously we declared a AVCaptureSession object and now it’s time to use it. So, let’s initialize it and let’s assign our input device to it.
    _captureSession = [[AVCaptureSession alloc] init];
    [_captureSession addInput:input];
A capture session such as the captureSession object needs both an input and an output device in order to properly work. Instead of any usual kind of an output object that should be normally used now, we are going to use a AVCaptureMetadataOutput object. This class in combination with the AVCaptureMetadataOutputObjectsDelegate protocol will manage to intercept any metadata found in the input device (meaning data in a QR code captured by our camera) and translate it to a human readable format. Don’t worry if something sounds weird or if you don’t totally understand right now. Everything will become clear in a while. For now, add the next lines to the method:
    AVCaptureMetadataOutput *captureMetadataOutput = [[AVCaptureMetadataOutput alloc] init];
    [_captureSession addOutput:captureMetadataOutput];
Proceed by adding the next lines:
    dispatch_queue_t dispatchQueue;
    dispatchQueue = dispatch_queue_create("myQueue", NULL);
    [captureMetadataOutput setMetadataObjectsDelegate:self queue:dispatchQueue];
    [captureMetadataOutput setMetadataObjectTypes:[NSArray arrayWithObject:AVMetadataObjectTypeQRCode]];
Here’s the deal: First of all, we need to set self (our class) as the delegate for the captureMetadataOutput object. That’s a reason also for adopting the AVCaptureMetadataOutputObjectsDelegate protocol. This is achieved by using the setMetadataObjectsDelegate:queue method, which except for the delegate object, it also needs to be provided with a dispatch queue on which the delegate’s method will be executed. According to the official documentation, this queue must be a serial dispatch queue, and it should not execute any other task other than the one that’s assigned with. That’s why we create a new dispatch_queue_t variable named myQueue, and that’s the one being provided as a parameter to the method. In other and simpler words, we create a dispatch queue to be used totally by our task.
The setMetadataObjectTypes method is also quite important, as this is the point where we tell the app what kind of metadata we are interested in. The AVMetadataObjectTypeQRCode clearly indicates our purpose.
Now that we have set and configured a AVCaptureMetadataOutput object, we need to show to user what the camera of the device sees. This can be done using a AVCaptureVideoPreviewLayer, which actually is a CALayer, and it will be added as a sublayer into the viewPreview view’s layer. Here is how:
    _videoPreviewLayer = [[AVCaptureVideoPreviewLayer alloc] initWithSession:_captureSession];
    [_videoPreviewLayer setVideoGravity:AVLayerVideoGravityResizeAspectFill];
    [_videoPreviewLayer setFrame:_viewPreview.layer.bounds];
    [_viewPreview.layer addSublayer:_videoPreviewLayer];
Finally, we just have to let the session run by using the following command:
[_captureSession startRunning];
Here is the startReading method fully implemented:
- (BOOL)startReading {
    NSError *error;

    AVCaptureDevice *captureDevice = [AVCaptureDevice defaultDeviceWithMediaType:AVMediaTypeVideo];

    AVCaptureDeviceInput *input = [AVCaptureDeviceInput deviceInputWithDevice:captureDevice error:&error];
    if (!input) {
        NSLog(@"%@", [error localizedDescription]);
        return NO;
    }

    _captureSession = [[AVCaptureSession alloc] init];
    [_captureSession addInput:input];

    AVCaptureMetadataOutput *captureMetadataOutput = [[AVCaptureMetadataOutput alloc] init];
    [_captureSession addOutput:captureMetadataOutput];

    dispatch_queue_t dispatchQueue;
    dispatchQueue = dispatch_queue_create("myQueue", NULL);
    [captureMetadataOutput setMetadataObjectsDelegate:self queue:dispatchQueue];
    [captureMetadataOutput setMetadataObjectTypes:[NSArray arrayWithObject:AVMetadataObjectTypeQRCode]];

    _videoPreviewLayer = [[AVCaptureVideoPreviewLayer alloc] initWithSession:_captureSession];
    [_videoPreviewLayer setVideoGravity:AVLayerVideoGravityResizeAspectFill];
    [_videoPreviewLayer setFrame:_viewPreview.layer.bounds];
    [_viewPreview.layer addSublayer:_videoPreviewLayer];

    [_captureSession startRunning];

    return YES;
}
If you go and test the app on your device right now, the video capturing will begin when you tap on the start button. Don’t expect to stop of course, as we haven’t implemented that yet. Also, don’t expect to read any QR code, as we haven’t implemented a required delegate method.
This delegate method, the only one that the AVCaptureMetadataOutputObjectsDelegate provides, is the captureOutput:didOutputMetadataObjects:fromConnection:. This is the second most important part of our demo application, as in here the intercepted metadata captured by the device is recognized and translated by the iOS to a human readable format. Let’s begin implementing it, and we’ll add any further required code on the way.
The second parameter of this method is a NSArray object, which contains all the metadata objects been read. Our first job is to make sure that this array is not nil and of course, if it contains even one object, so we are able then to proceed.
-(void)captureOutput:(AVCaptureOutput *)captureOutput didOutputMetadataObjects:(NSArray *)metadataObjects fromConnection:(AVCaptureConnection *)connection{
    if (metadataObjects != nil && [metadataObjects count] > 0) {

    }
}
Good. In this demo app, a metadata for us is the data contained into a QR code. When one metadata object gets captured we stop reading, so we are always interested in the first object of the metadataObjects array. A metadata object is represented by the AVMetadataMachineReadableCodeObject class and once we get it, we must check if its type is the desired one, like the following code extract:
        AVMetadataMachineReadableCodeObject *metadataObj = [metadataObjects objectAtIndex:0];
        if ([[metadataObj type] isEqualToString:AVMetadataObjectTypeQRCode]) {

        }
When the condition is true, the app has just read a valid QR code, and in here we are going to process it. What we want to do, is to show the QR code data in the status label, then stop reading and of course, change the name of the bar button item once again. Before I show all these, just remember that our code is currently running on a secondary thread, so everything must be performed on the main thread for taking place immediately. Here is how:
    [_lblStatus performSelectorOnMainThread:@selector(setText:) withObject:[metadataObj stringValue] waitUntilDone:NO];

    [self performSelectorOnMainThread:@selector(stopReading) withObject:nil waitUntilDone:NO];
    [_bbitemStart performSelectorOnMainThread:@selector(setTitle:) withObject:@"Start!" waitUntilDone:NO];
    _isReading = NO;
Do you see the stringValue property of the metadataObj object? That’s the one that contains the QR code’s data in human readable format and it’s pretty important to us.
Here is the delegate method in once piece:
-(void)captureOutput:(AVCaptureOutput *)captureOutput didOutputMetadataObjects:(NSArray *)metadataObjects fromConnection:(AVCaptureConnection *)connection{
    if (metadataObjects != nil && [metadataObjects count] > 0) {
        AVMetadataMachineReadableCodeObject *metadataObj = [metadataObjects objectAtIndex:0];
        if ([[metadataObj type] isEqualToString:AVMetadataObjectTypeQRCode]) {
            [_lblStatus performSelectorOnMainThread:@selector(setText:) withObject:[metadataObj stringValue] waitUntilDone:NO];

            [self performSelectorOnMainThread:@selector(stopReading) withObject:nil waitUntilDone:NO];
            [_bbitemStart performSelectorOnMainThread:@selector(setTitle:) withObject:@"Start!" waitUntilDone:NO];
            _isReading = NO;
        }
    }
}
Finally, at this point the video capturing and the QR code recognition functionality implementation have been completed! We managed to reach our goal, as our app is now capable of reading and recognizing a QR code. However, is not yet completed, so let’s go ahead to do so.
Stopping the QR Code Reader
While implementing all the previous features, we called a couple of times the stopReading method. This one, as its name suggests, is actually used to stop a capture session from running and, in contrary of the startReading, is pretty easy. Before we go to implement it, let’s declare it at the private interface section:
@interface ViewController ()
...
...
-(void)stopReading;
@end
Straight ahead to the implementation:
-(void)stopReading{
    [_captureSession stopRunning];
    _captureSession = nil;

    [_videoPreviewLayer removeFromSuperlayer];
}
Three tasks are performed in this method: First of all, the session stops running and then it becomes nil. Finally the view preview layer is being removed from the viewPreview view’s layer. Let me remind you that this method is used in two places. The first one is inside the startStopReading: IBAction method. The second place is the capture metadata output delegate method, where when a QR code has been read, it’s being called to stop capturing.
Playing a Sound Effect
In the App Overview section of this tutorial and during the app presentation, I mentioned that a sound effect will be played back when a valid QR code has been successfully read. In this section we are going to build this functionality, by taking advantage of the AVFoundation framework that it has already been imported into the project.
First of all, the beep.mp3 file needs to be added to the project. So, now it’s the best time to download it and add it to your project.
There are two approaches to play a sound using the AVFoundation framework. Either to have it pre-loaded and just play it when it’s required, or load it just right at the moment that the sound should be played back. In our case, we’ll follow the first way, so we’ll begin by preparing our sound effect for playback. Also, we’ll use a AVAudioPlayer object for our purpose.
Once again, go at the private interface section to add a AVAudioPlayer property and new method declaration:
@interface ViewController ()
...
...

@property (nonatomic, strong) AVAudioPlayer *audioPlayer;

-(void)loadBeepSound;
@end
Let’s focus now on developing this method. The audio file resides at the application bundle, so that’s where we’ll get it from. Right next is given the entire method. Pay special attention to the fact that the audioPlayer object accepts a NSURL object during its initialization, so we must handle the path to the audio file appropriately. The code is self-explanatory enough:
-(void)loadBeepSound{
    NSString *beepFilePath = [[NSBundle mainBundle] pathForResource:@"beep" ofType:@"mp3"];
    NSURL *beepURL = [NSURL URLWithString:beepFilePath];
    NSError *error;

    _audioPlayer = [[AVAudioPlayer alloc] initWithContentsOfURL:beepURL error:&error];
    if (error) {
        NSLog(@"Could not play beep file.");
        NSLog(@"%@", [error localizedDescription]);
    }
    else{
        [_audioPlayer prepareToPlay];
    }
}
The code that actually loads the sound in memory is the [_audioPlayer prepareToPlay]; one and the whole method is built mostly for this line.
Now that the sound effect file has been loaded into memory, we need to play it. Where should this be done? Inside the capture metadata output delegate method of course, right after the point that a QR code has been successfully read. Right below is presented the delegate method one more time, but now contains the sound effect playback feature:
-(void)captureOutput:(AVCaptureOutput *)captureOutput didOutputMetadataObjects:(NSArray *)metadataObjects fromConnection:(AVCaptureConnection *)connection{
    if (metadataObjects != nil && [metadataObjects count] > 0) {
        AVMetadataMachineReadableCodeObject *metadataObj = [metadataObjects objectAtIndex:0];
        if ([[metadataObj type] isEqualToString:AVMetadataObjectTypeQRCode]) {
            [_lblStatus performSelectorOnMainThread:@selector(setText:) withObject:[metadataObj stringValue] waitUntilDone:NO];

            [self performSelectorOnMainThread:@selector(stopReading) withObject:nil waitUntilDone:NO];
            [_bbitemStart performSelectorOnMainThread:@selector(setTitle:) withObject:@"Start!" waitUntilDone:NO];
            _isReading = NO;

            if (_audioPlayer) {
                [_audioPlayer play];
            }

        }
    }
}
Note that we make sure that the audio player object has been initialized. If it’s okay, then we playback simply by calling the play method of the audio player object.
There is one last thing that remains to be done, and that is to call the loadBeepSound method. If you notice, that’s something that has not yet been performed. The best place to do that is inside the viewDidLoad method, just as the next code snippet:
- (void)viewDidLoad
{
    [super viewDidLoad];
    _captureSession = nil;
    _isReading = NO;

    [self loadBeepSound];
}
With this addition, the app is now capable of playing a sound effect every time it recognizes a QR code.
Compile and Test the Final App
After having done all this job, it’s time to enjoy the fruits of our efforts. If you haven’t done so yet, connect your device on your Mac and run the application. Find various QR codes and test it. Even more, search on Google for QR code creators and create your own ones. Or simply use the below one. If your app scans it properly, you should see the message “It’s great! Your app works!”.

Here are the sample screenshots showing a demo of the app running on my device:
Summary
Just the idea of creating an application which incorporates QR code reading features initially might sounds scary and really hard to be built. Through this tutorial, I hope that it was made totally clear that such an app nowadays can be pretty simple, thanks to iOS 7. This demo project binds various AVFoundation features together, such as video capture, sound playback and of course, barcode reading. For your complete reference, you can download the source code of the Xcode project from here.
By taking this tutorial as a starting point, do some brainstorming and find useful and real applications regarding this topic to build. QR code reading is a cool feature, and I’d like to believe that through this content you get all the knowledge you need to use it in your own applications! Happy QR code testing!
Author bio: Gabriel Theodoropoulos has been a software developer for almost two decades. Experienced in the most known programming languages, I have developed numerous applications for various target platforms. Since the middle of 2010, I’ve been working almost exclusively on iOS. Having built applications and libraries, I keep doing so up to date. By writing tutorials I’m in position to share knowledge with other developers.


