iOS

Storyboard Tutorial: Create Tab Bar Controller and Web View


This is the third article of the Storyboards series. Last time, we discussed how to pass data between view controllers with segue. It should be easy, right? Now let’s continue to polish our Storyboard project and see how you can create to two other common UI elements in iPhone apps.

In this tutorial, you’ll learn:

  • How to Create a Tab Bar Controller
  • How to Create an About page using UIWebView

If you’re new to Storyboards, I suggest you to check out the first tutorial. All the materials discussed in this material are based on the work we’ve done before.

Tab Bar Controller and UIWebView

First, as usual, let’s have a brief introduction for Tab Bar Controller and UIWebView. You may not be familiar with the term “Tab Bar” but it’s commonly found in most of the iPhone apps. Just take a look at the below sample apps. All of them make use of the Tab Bar controller to display distinct view in each tab. Normally the Tab Bar contains at least two tabs and you’re allowed to add up to five tabs depending on your needs.
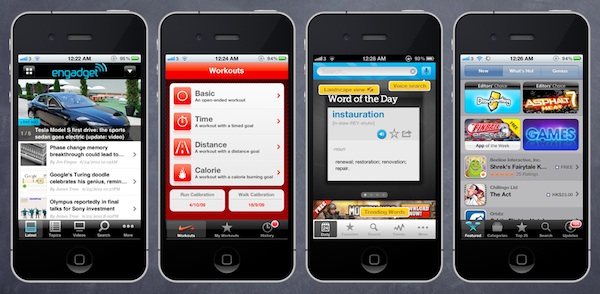
Sample App with Tab Bar Interface

Sample App with Tab Bar Interface

UIWebView, on the other hand, is a handy component to load web content. In some cases, you want to display a single web page locally in your app or let users access external web pages within your app. You can simply embed the UIWebView object in your app and send it a request to load the web content.

Creating a Tab Bar Controller

Now back to our Xcode project. Let me first recap what we’ve done. If you’ve followed the previous tutorial, you should build a simple recipe app with Navigation interface. It’s not completely implemented but just works.

Recipe App With Correct Detail View

Final Deliverable in Previous Tutorial

In this tutorial, we’re going to polish the app and create a tab bar interface. You may think it’ll be difficult and requires a lot of coding. The introduction of Storyboarding feature simplifies everything. It’s so easy to embed the navigation controller into a tab bar controller with just point and click.

First, select the “Navigation Controller” in MainStoryboard.storyboard. Then select “Editor” in the menu and choose “Embed in”, followed by “Tab Bar Controller”.

Storyboard Embed Tab Bar Controller

Embed Navigation Controller in Tab Bar Controller

As you can see from below figure, Xcode automatically puts the navigation controller inside a tab bar controller. Super easy, right? You may think that’s trivial. Before Apple introduced the Storyboarding feature, you would need to write code and design a separate NIB in order to embed a navigation controller.

Storyboards Tab Bar Controller Added

Navigation Controller is embedded in Tab Bar Controller

Changing Tab Bar Item Name

By default, the tab bar item is not named and without an icon. Select the tab item in Navigation Controller. You’re free to change the name and specify an icon in the Attributes Inspector. The tab bar item is default to the “custom” identifier. When it’s set to custom, that means you have to specify the title and image manually.

Storyboard Tab Bar Item

Customize Tab Bar Item

You can also use some built-in tab bar items (e.g. More, Favorites, Top Rated) that already include an icon. Let’s keep the tutorial simple and utilize the built-in item. Select “Featured” for the identifier and your screen should look like this:

Storyboard Featured Tab Bar Item

Change Tab Bar Item to Featured

Run Your App

It’s now ready to test the app. Hit the Run button and see how it looks. The app should be very similar the one we built in the previous tutorial but with the tab bar.
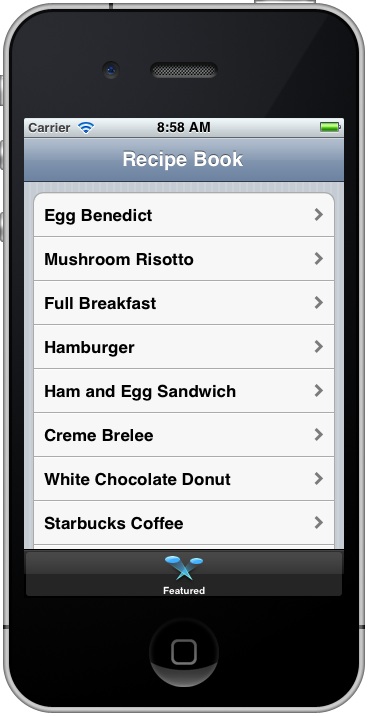
Recipe App with Tab Bar

Adding a New Tab

You use tab bar interface to organize your app into distinct modes of operation. Each tab delivers specific functions. Obviously, there are at least two tabs in an app when tab bar controller is used. So we’re going to create a new tab for displaying the app’s “About” page.

Drag a “Navigation Controller” object into the Storyboard. The default navigation controller is associated with a table view controller. Just leave it as is. We’ll change it later.

Tab Bar New Navigation Controller

Add a New Navigation Controller

Next, we have to establish a relationship between the new navigation controller and the existing tab bar controller. Press and hold the “control” key, click the Tab Bar Controller and drag the pointer to the new Navigation Controller.

Tab Bar Controller Links Navigation Controller

Link Up Tab Bar Controller and Navigation Controller

Release both buttons and a pop-up is displayed. Select the “Relationship – View Controllers” option. This tells Xcode that the new Navigation Controller is a part of Tab Bar Controller.

Tab Bar Controller Relationship Prompt

Establish Relationship with Navigation Controller

As soon as the relationship is established, the Tab Bar Controller automatically adds a new tab and associates it with the new Navigation Controller.

Tab Bar Controller with New Unamed Tab

Tab Bar Controller with New Tab

Change the tab bar item of the new Navigation Controller to “More”. Save the Storyboard and run the app again. Don’t you see the new “More” tab?
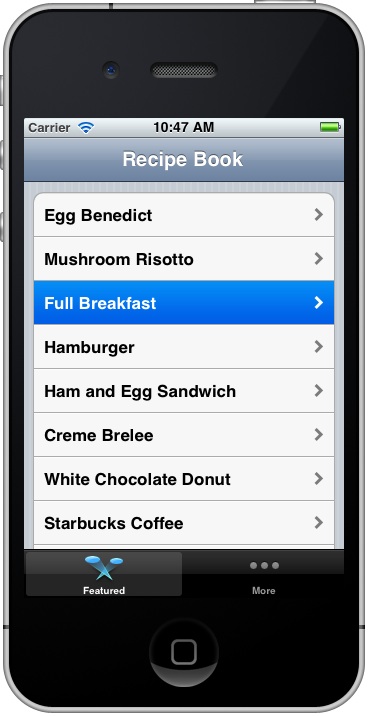
Recipe App with Two Tabs

Creating the ‘About’ Page with UIWebView

The “More” tab is now empty. We’re going to turn it into a web view for displaying the “About” page of the app. First, delete the “Table View Controller” and replace it with a View Controller. Simply select the “Table View Controller” and click DELETE button to remove it. Then drag the “View Controller” object from Object Library.

Storyboard Blank View Controller

Replace Table View Controller with View Controller

As of now, the blank View Controller is not associated with the Navigation Controller. We have to link them up. Press and hold the command key, select the Navigation Controller and drag it towards the View Controller.

Storyboard link View Controller

Link up View Controller and Navigation Controller

Like what we’ve done earlier, select the “Relationship – View Controllers” option to establish the relationship between both controllers.

Storyboard View Controller Relationship

Associated the Relationship Between View Controllers

The main purpose of this view controller is to render the “About” web page. iOS SDK has a built-in UIWebView object to display web content. You can simply embed the UIWebView object in any view controller. Later you send it a HTTP request and it automatically loads the web content for you. Locate the “Web View” in Object Library and add it into the View Controller.

View Controller UIWebView

Add Web View into View Controller

Assigning a New View Controller Class

As explained in previous tutorial, a blank view controller is assigned with the default UIViewController class, that only provides the fundamental view management model. Apparently, it doesn’t come with a variable for controlling the UIWebView. Yet we have to create a new View Controller class that extends from the UIViewController.

In the Project Navigator, right-click the “RecipeBook” folder and select “New File…”.

Storyboard New View Controller

Create New File in Xcode Project

Choose “Objective-C Class” under Cocoa Touch as the class template.

Storyboard New ObjectiveC Class

Select Objective C Class

Name the class as “AboutViewController” and it’s a subclass of “UIViewController”. Make sure you uncheck the option of “With XIB for user interface”. As we’re using Storyboards for designing the user interface, we do not need to create a separate interface builder file. Click “Next” and save the file in your project folder.

New Class AboutViewController

Create a new class – AboutViewController

Next, assign the view controller with the “AboutViewController”. Go back to the Storyboards editor and select the view controller. In the identity inspector, change the class to “AboutViewController”.

View Controller with AboutViewController

Set the Custom Class to AboutViewController

Use UIWebView to Load a Request

To request UIWebView to load web content, we have to write a few lines of code. In brief, there are three things we need to implement:

  • Add the “about.html” and “about.jpg” to your Xcode project
  • Assign a variable for UIWebView and associate it with the Web View object in Storyboard
  • Use the loadRequest: method in UIWebView to load web content

Adding ‘About.html’

The UIWebView class allows you to load web content both locally and remotely. You can send it a HTTP request (e.g. http://www.google.com) to load a remote website. Alternatively, you can tell UIWebView to load web pages embed in your app. For this tutorial, we’ll put the “about.html” inside our app.

You can create your own about.html. For your convenience, however, download the about.zip, extract it and add all the files into the Xcode project.

Assign a Variable for UIWebView

Select the “AboutViewController.h” and add a new property for UIWebView:

Go to the “AboutViewController.m” and add the synthesis for the variable. Make sure you place the code under “@implementation AboutViewController”:

If you’ve forgotten what the interface and implementation are, go back to this tutorial and revisit the concept.

As usual, it’s required to establish connection between the “webView” variable and the visual web view. In the Storyboards editor, press & hold the command key and then click the “View Controller” icon, drag it to the Web View object. Release both buttons and a pop-up shows variables for your selection. Choose the “webView” variable.

Link Up UIWebView and webView

Link Up UIWebView and webView Variable

Load Web Content

Inside viewDidLoad method, add the following code to load the “about.html”:

The UIWebView class provides a convenient method named “loadRequest:” to load web content. What you need to do is to pass it a URL request. Line 5 of the above code returns the system path of the “about.html” in the form of NSURL object. Line 6 creates a NSURLRequest using the URL. Obviously, line 7 sends the request to web view.

Final Deliverable

Hit the Run button and try out the app. If you got everything correctly, your final deliverable should look like below. When you select the “More” tab, it automatically loads the “about.html”.
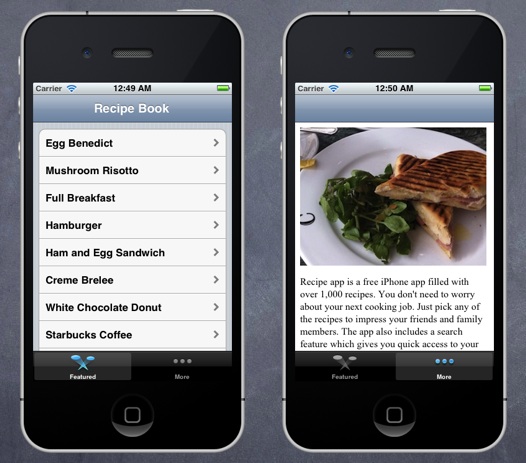
Recipe App with Two Tabs

Summary

Storyboarding has streamlined the user interface design of iOS app. As you can see from this tutorial, without a single line of code, you can create a tab bar controller and embed other controllers in the tab items. We’ve also showed you how to use UIWebView to load web content. UIWebView offers basic function of a mobile browser. Whenever you need to display web page within your app, embed the web view and send it a request.

In the upcoming tutorials, we’ll continue to explore other new features of Storyboards. Stay tuned and make sure you leave us comment below if you have any questions.

Update: You can now download the full source code for your reference.

iOS
Delete a Row from UITableView and Model-View-Controller
iOS
Introduction to ReplayKit: Building a Simple Screen Recording App
iOS
iOS Programming 101: How To Send Email in Your iPhone App
  • gezt

    geztgezt

    Author Reply

    nice tutorial, will try this :D, thnx


  • Jake

    JakeJake

    Author Reply

    great tutorial 😀
    i love all your tutorials


  • Tekle

    TekleTekle

    Author Reply

    Wow! This is great!

    Thanks!


  • sanz

    sanzsanz

    Author Reply

    I have been following your tutorials and these tutorial are the best than others i tried


  • Toby powell

    Your tutorials are the best I’ve read! And I’ve read many, every tutorial is like gold! Keep up the great work


    • Simon Ng

      Simon NgSimon Ng

      Author Reply

      Thanks, Toby! Great to hear that.


  • samsulfreude

    Wow, today i successfully learned UIWebView, THANKS TO YOU! 😀
    Gratitude, my friend! 🙂


  • Miti

    MitiMiti

    Author Reply

    Why can’t I subscribe? No message comes to my inbox:(


  • 4ki

    4ki4ki

    Author Reply

    That’s great tutorials. I want to develop push notification for iOS WebBroswer app using UIWebView. My plan is to push notification from Desktop web browser to iOS WebBrower. Do you have any tutorials to do that? Thanks in advance!


  • jacovoxdot.com

    i just want to say thank you,,, really, i’ve been looking a way to put multiple urls on different views and your post is the only useful on internet right now,, i am not kidding.

    thanks again


    • Simon Ng

      Simon NgSimon Ng

      Author Reply

      Great to hear that! Thanks. 🙂


  • trice

    tricetrice

    Author Reply

    Great tutorials! In the storyboard view, you mention connecting some of the controllers, views, variables, etc. by selecting the item then holding down the command key and dragging to the other item. That didn’t work for me…but holding down the control key worked instead. Maybe xcode changed a shortcut key on me?


  • BRIAN LAURA

    Aloha,
    I really enjoyed this tutorial, but I am having trouble going back to the previous view— webview, I was thinking a back button might work. Once I am on the webview page — html page, I press a button which loads a image then I am stuck on that image-page. I can’t go back to the previous webview page — html page, after pressing a button that loads an image. How do you solve this problem? Thanks for all your help.

    Sincerely,
    Brian Laura


  • Natarajan

    NatarajanNatarajan

    Author Reply

    Hi

    When i run this code.. i get the below error under main.m

    int main(int argc, char *argv[])
    {
    @autoreleasepool {
    return UIApplicationMain(argc, argv, nil, NSStringFromClass([RecipeBookAppDelegate class]));
    }
    }


    • Natarajan

      NatarajanNatarajan

      Author Reply

      the run time error is Thread 1: EXC_BREAKPOINT(code=EXC_I386_BPT,sub code=0*0)


      • Tim

        TimTim

        Author Reply

        I just had the something, read through the error output box, and found out it’s looking for a UITableViewController … eventho, there’s no UITableViewController for the about page. In order to fix this, delete the two AboutDetailViewController files (h/m). go back to the step where you had to the AboutDetailViewController .. and ENSURE your subclass dropdown menu is selected as UIViewController, instead of UITableViewController = ) Good luck. mine works now


        • Nat4an

          Nat4anNat4an

          Author Reply

          I tried this trick out and it didn’t work for me. 🙁 But however, I was able to find out another way to do this. I think it might be simplier:

          instead of:

          NSURL *url = [NSURL fileURLWithPath:[[NSBundle mainBundle]pathForResource:@”yourfileorurl” ofType:nil]];

          use this:

          NSURL *url = [NSURL URLWithString:@”http://yourpathorwebfile”];

          This is because what this tutorial is intended to do it load a resource file from the project resources and the reason for getting the above error is because we are trying to load a remote webpage into the UIWebView instead of a local resource file. Hope this helps. I know it did for me and I stood up and looked accomplished when i figured this out. 🙂


          • Ratima

            RatimaRatima

            Author

            Thanks!!


  • Alex

    AlexAlex

    Author Reply

    Finally a Tutorial that is easy to follow and makes me understand Xcode! Please write more.. it’s so much better than the youtube tutorials. Please keep it up.


  • ravi

    raviravi

    Author Reply

    Tutorial is awesome..But u forgot to show how to display the lable


  • Eduardo Jose Christofoletti

    Nice tutorial and easy to learn nice work bro! congrats from Brazil … 🙂


    • Simon Ng

      Simon NgSimon Ng

      Author Reply

      Thanks! More tutorials to come. Stay tuned 🙂


  • Hugh Jeremy

    Thats brilliant, I would really appreciate it if you could add a quick note on how to make the web view load when the view is not on the tab bar currently displaying, so when you go on the web view tab it has already loaded 🙂 I assume it would be in the appDelegate? Thanks for all the helpful tutorials!


  • Okpongu Ebirulz

    Great tutorial…… Thanks a lot.


  • Vikas

    VikasVikas

    Author Reply

    Such a nice tutorials
    thank’s


  • Bharath Rajakumar

    Thank you so much… This is gonna helpful for my Software Engineering Project 🙂


  • tcm692

    tcm692tcm692

    Author Reply

    When attempting to connect the “View Controller” icon & dragging it to the Web View object, I cannot choose the “webView” variable, I only see “view”. I think on the previous step when attempting to rename the view controller (in the identity inspector, change the class to “AboutViewController” for the UIWebView), it does not seem to work. While I can type in ‘AboutViewController’ it does not save.

    Any help would be greatly appreciated!!


    • Paul Paul

      Paul PaulPaul Paul

      Author Reply

      I had that problem too, but I’ve solved it by erasing the current About view controller, and replace it with a new one; Also do not forget to follow the same steps again; Hope it works for you


  • tcm692

    tcm692tcm692

    Author Reply

    How you you sort placement of tabs when you have multiple tabs? As you add new navigation controllers to the tab bar controller, it puts the new tabs as next in line. For example, if I’ve made tabs 1 (i.e. main) & 2 (help) and then I need to add a 3rd tab, but it makes more sense to be seen before the #2 (help) tab, how do I tell the tab bar controller that?


    • tcm692

      tcm692tcm692

      Author Reply

      Never mind – I found it…you can drag & drop within the tab bar controller. I had to restart Xcode, but that did it.


  • shailesh

    shaileshshailesh

    Author Reply

    Nice tutorial


  • aamir khan

    aamir khanaamir khan

    Author Reply

    best tutorials


  • HLA

    HLAHLA

    Author Reply

    Thanks a lot…..bro


  • Jon G

    Jon GJon G

    Author Reply

    I’m having an issue I hope you can help with. Everytime I try to run your code I get this error:

    Terminating app due to uncaught exception ‘NSInvalidArgumentException’, reason: ‘*** -[NSURL initFileURLWithPath:]: nil string parameter’

    The code is this:

    NSURL *url = [NSURL fileURLWithPath:[[NSBundle mainBundle]pathForResource:@”ImportClearance.html” ofType:nil]];

    NSURLRequest *request = [NSURLRequest requestWithURL:url];

    [webView loadRequest:request];

    And it immediately crashed on the first line. What am I missing here?

    Love the site it has been very helpful to me as a total newbie!


  • arttrav

    arttravarttrav

    Author Reply

    Thanks very much, this was just what we needed to build our simple app!


  • Kim

    KimKim

    Author Reply

    YES! Just what i needed!
    Now back to my project 🙂

    Thanks for GREAT tut`s!!!! 🙂 🙂 🙂


  • CEMSOFT SOFTWARE

    I really enjoyed this tutorial,go on appcoda , thanks.


  • NJ

    NJNJ

    Author Reply

    Thank You 🙂


  • sam

    samsam

    Author Reply

    What in case if I want to make my tab bar customized? I mean in .xib, we generally subclass the UITabbarController but I didn’t get any way to do this via this magical tool (StoryBoards).


  • Miguel Cardoso

    Great job with all the tutorials!!
    I’m really learning.

    All so clean and understable.

    Thanks man!


  • Spyridon

    SpyridonSpyridon

    Author Reply

    Thank you, it’s very helpful. I had a question: How can I set another directory in “pathForResource:@”about.html” ofType:nil”?


  • shasvat jain

    You really make xcode easier to understand…awesome


    • Simon Ng

      Simon NgSimon Ng

      Author Reply

      Thank you! Love to hear that.


  • Quân Chùa

    thank you very much,i dont know what to do without your tutorials.How can i thank you teacher ?


  • Ryan Hu

    Ryan HuRyan Hu

    Author Reply

    Thank you, Simon. This is the greatest article I ever read for iOS programming ! In following your tutorial, I found the following may be a typo:

    “Like what we’ve done earlier, select the “Relationship – View Controllers” option to establish the relationship between both controllers.”

    There is no such thing as “Relationship – View Controllers”, but “root controller”


  • Pedro Borges

    That’s another great tutorial, you really go in depth with the details, thanks a bunch.
    However, what about if one wants the TabBarController to init in the second or third tab? Is there a way to do it using storyboard? or does one need to implement a specific UITabBarController


  • khushboo

    khushbookhushboo

    Author Reply

    thnxx alot..:)


  • sarascruz

    sarascruzsarascruz

    Author Reply

    I followed this tutorial and everything works however the layout is messed up. Even after reading the tutorial about auto layout I couldn’t figure it out how to fix it. Any tips? Thanks


  • sazzadhusen iproliya

    code is so nice..
    thank u so much for helping like this


  • gudipudi pavankumar

    which url u can passed in the program


  • gudipudi pavankumar

    Excellent,
    this example programs r useful to get knowledge in ios


  • Ranveer Rathore

    why give this “You can now download the full source code for your reference” link if we not able to download source code.


Shares