What’s New in Swift 2.0: A Brief Introduction
Editor’s note: This post is contributed by Maxime. He was recently awarded the WWDC scholarship to attend this year’s conference. We’re so happy to have him to share with us about the new features of Swift 2.
Update: We’ve published a beginner’s guide to Swift 2.
One year ago, Apple brought us Swift, a brand new programming language for both iOS and OS X. When it was first announced, just like other iOS developers, I was thrilled. Advertised as a fast and safe language, Swift has now grown to one of the most popular programming languages. As expected, the company introduced Swift 2 at WWDC this year. I am fortunate that I got an opportunity to attend the conference so I can share some updates on Swift.
We’re stepping on the gas this year with Swift 2. We think Swift is the next big programming language, the one we will all do application and systems programming on for 20 years to come. We think it should be everywhere and used by everyone.
Craig Federighi, Apple’s senior vice president of Software Engineering
We measure temperature in Celsius or Fahrenheit scale. At WWDC, we measure the popularity of a new feature in decibel. The two biggest applauses this year were when Apple announced UI testing support in Xcode 7 and Swift goes Open Source. If you missed the WWDC keynote or have been living under a rock lately, you read it right: Swift goes open source. This is a huge deal. Later this year, Apple will release Swift’s source code to the public, including the compiler and standard libraries, under an OSI-compliant license. Apple will also port the source code to Linux. Developers will be able to contribute to the development of the language and write programs on Linux using Swift. In fact, you’re encouraged to contribute to the development of the language.
Along with this exciting news, Swift 2 includes some new features such as improved error handling, protocol extensions and availability check. Let me give you a brief overview of the updates.
Error Handling
Sometimes things may go wrong. When a function fails, it’s always good to catch the error and understand why it fails. Swift version 1 lacked proper error handling model. In Swift 2, it comes with an exception-like model using try / throw / catch keywords.
Imagine you’re modelling a car engine. The engine can fail for the following reasons:
- No fuel
- Oil leakage
- Low battery
In Swift, errors are represented by values of types conforming to the ErrorType protocol. In this case, you can create an enumeration that adopts ErrorType to model the error conditions:
|
1 2 3 4 5 |
enum CarEngineErrors: ErrorType { case NoFuel case OilLeak case LowBattery } |
To create a function that can throw an error, you use the throws keyword in its declaration. Here is an example:
|
1 2 |
func checkEngine() throws { } |
To throw an error in the function, you use the throw statement. Here is a sample function that performs a simple check on the engine:
|
1 2 3 4 5 6 7 8 9 10 11 12 13 14 15 16 17 |
let fuelReserve = 20.0 let oilOk = true let batteryReserve = 0.0 func checkEngine() throws { guard fuelReserve > 0.0 else { throw CarEngineErrors.NoFuel } guard oilOk else { throw CarEngineErrors.OilLeak } guard batteryReserve > 0.0 else { throw CarEngineErrors.LowBattery } } |
The guard keyword may be new to you. It is first introduced in Swift 2 to improve control flow. When the control reaches the guard statement, it first checks the condition. If the condition evaluates to false, the else part will be executed. In the above code, the function will throw an error if a certain condition is not met.
To call the throwing function, you put the try keyword in front of the call. Here is an example:
|
1 2 3 |
func startEngine() { try checkEngine() } |
If you write the above code in Playgrounds, you will end up with an error as we haven’t handled the errors. The error handling model in Swift requires you to use a do-catch statement to catch all errors and handle them.
Here is a sample function that specifies what to do when an error is caught:
|
1 2 3 4 5 6 7 8 9 10 11 12 13 14 15 |
func startEngine() { do { try checkEngine() print("Engine started", appendNewline: true) } catch CarEngineErrors.NoFuel { print("No Fuel!") } catch CarEngineErrors.OilLeak { print("Oil Leak!") } catch CarEngineErrors.LowBattery { print("Low Battery!") } catch { // Default print("Unknown reason!") } } |
Each catch clause matches a particular error and you specify what to do in the body. In the above example, the batteryReserve variable is set to zero. In this case, the .LowBattery error is thrown when you call startEngine().
Try to set the value of batteryReserve to 1.0. In this case, no error is thrown and ‘Engine started’ is printed.
Similar to the switch statement, the error handling model in Swift 2 is exhaustive. You have to handle all the possible errors. This is why we need to include a catch clause without specifying a pattern.
If you want to learn more about error handling in Swift, I recommend you to go over the Apple Documentation.
No More println()
Something I noticed when writing this tutorial is the absence of the println() function. In Swift 2, we can only use print() to write something to the output. Apple has combined both println() and print() functions into one. If you want to output something with a newline, you can set the appendNewline parameter to true. Here is an example:
|
1 |
print("Engine started", appendNewline: true) |
Protocol Extensions
In the first release of Swift, you can use extensions to add new functionalities to an existing class, structure or enumeration. Swift 2 allows developers to apply extensions to protocol types. With Protocol Extensions, you can add functions or properties to all classes that conform to a certain protocol. The is useful when you want to extend the protocol’s functionality.
As an example, let’s create a new protocol called Awesome. The protocol can be implemented by any type that provides a way to return the awesomeness index of a particular object in percentage.
|
1 2 3 |
protocol Awesome { func awesomenessPercentage() -> Float } |
Now we declare two classes that adopt our new protocol. Each class implements the required method of the Awesome protocol:
|
1 2 3 4 5 6 7 8 9 10 11 12 13 14 15 16 17 18 19 |
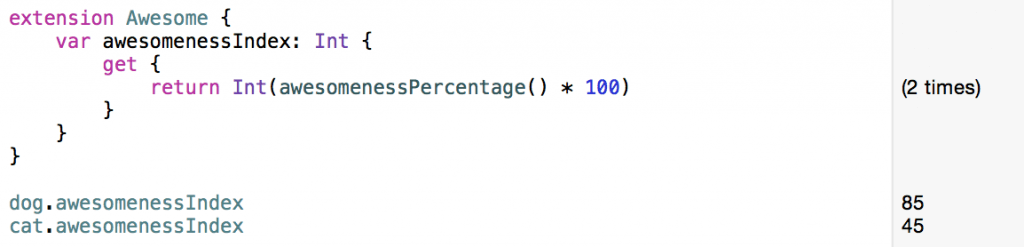
class Dog: Awesome { var age: Int! func awesomenessPercentage() -> Float { return 0.85 } } class Cat: Awesome { var age: Int! func awesomenessPercentage() -> Float { return 0.45 } } let dog = Dog() dog.awesomenessPercentage() let cat = Cat() cat.awesomenessPercentage() |
If you instantiate the classes and call the awesomenessPercentage() method in Playground, you will see an output like this:

Let’s say you want to extend the Awesome protocol to provide an awesomenessIndex property, which uses the result of the awesomenessPercentage() method to calculate the awesomeness index. You can write the code like this:
|
1 2 3 4 5 6 7 |
extension Awesome { var awesomenessIndex: Int { get { return Int(awesomenessPercentage() * 100) } } } |
By creating an extension on the protocol, all classes that adopt the Awesome protocol automatically gain access to the awesomenessIndex property.
This is really awesome, right?
Availability Checking
Every developer knows the struggle when building an app that supports multiple iOS versions. You always want to use the latest version of APIs, but sometimes this may cause errors when the app is run on older versions of iOS. Prior to Swift 2, there is no standard way to do availability check. As an example, the NSURLQueryItem class was only available since the release of iOS 8. If you use the class on older versions of iOS, you’ll end up with an error and probably causes an app crash. To prevent the error, you may perform the availability checking like this:
|
1 2 3 4 5 |
if NSClassFromString("NSURLQueryItem") != nil { // iOS 8 or up } else{ // Earlier iOS versions } |
This is one way to check if the class exists. Starting with Swift 2, it finally comes with built-in support for checking API availability. You can easily define an availability condition so that the block of code will only be executed on certain iOS versions. Here is an example:
|
1 2 3 4 5 6 7 8 |
if #available(iOS 8, *) { // iOS 8 or up let queryItem = NSURLQueryItem() } else { // Earlier iOS versions } |
do-while is now repeat-while
The classic do-while loop is now renamed to repeat-while. Here is an example:
|
1 2 3 4 5 |
var i = 0 repeat { i++ print(i) } while i < 10 |
Summary
I hope you enjoy reading this quick overview of Swift 2. There are so much (say, Markdown comment) I haven’t explored. You can further refer to this WWDC video to learn more about Swift 2. At the time of this writing, some companies are still using Objective-C as the primary programming language for iOS. Probably you’re still programming in Objective-C too. I firmly believe that Swift is the way to go. In fact, all major sessions at WWDC 2015 are in Swift. So if you haven’t started to learn Swift, now is the time to take action.
For reference, you can download the Playground file of this tutorial here. Make sure you use Xcode 7 to run the code as this is the only Xcode version that supports Swift 2.0. Xcode 7 is currently in beta. You can download it from Apple.

Maxime Defauw is an experienced programmer and the creator of multiple apps in both the App Store and Google Play store. He is 16 years old and lives in Belgium. Recently, he got a scholarship at Apple for WWDC15 in San Francisco. Max is proficient in Objective-C, C, C# and now Swift. When he is not buried in code, you can find him in on hockey pitch or golf course. Follow him @MaximeDefauw.