

You probably have heard about automated tests before. People talk about it a lot these days, especially when the topic is about software quality.
They say that if you don’t write any tests for your project, you’re in big trouble. It may not affect you at the moment. But in the long run, it would become a huge technical debt.
That’s true.
Project with no tests is impossibile to maintain when it gets big and there are multiple developers involved. As you change something in the code, things start to break. You don’t even know that it breaks until your boss comes to your desk and starts yelling. You know that feeling, right?
So, it’s better to know a thing or two about testing so that you can improve your project quality and also improve yourself as a software engineer.
There are 2 types of automated tests in iOS:
- Unit test:
- test a specific case in a class.
- make sure that the class works independently on its own.
- UI test:
- is also called Integration test.
- test user interactions with the app.
- make sure that all classes fit well together.
Both are equally important.
If you only write unit tests and completely ignore UI tests, you’ll be trapped in this situation:

As you can see, each window works fine on its own. But when put together, bad things happen. You can see how mad that man is. 😉
UI tests are simple. Even simpler than unit tests.
Today we’re gonna learn to write some very basic UI tests and yet still cover a fully-functional app from start to finish.
What app will we be working on?
It’s a simple note-taking app with the following features:
- Login with username and password.
- View list of notes.
- Create new note.
- Update existing note.
- Delete a note.
Here’s a gif that runs through all functionalities of the app:
Look like a piece of cake, right?
However, our job today is not about how to build such app. What we’re gonna do instead is learning to write automated UI tests for it, for all screens and functionalities. That’s the exciting part.
But what does automated UI tests look like?
Let’s have a look at this video:
https://youtube.com/watch?v=HEGl3Lj4SLE
As soon as the test suite is launched, it simulates all kinds of user interactions:
- filling in a text field.
- tapping a button.
- swiping around.
It travels through each screen and test all scenarios in sequence:
- at Login screen, it tests scenario when:
- entering correct username and password.
- password field is empty.
- username field is empty.
- entering incorrect username or password.
- at Home screen, it tests scenario when:
- adding a new note.
- deleting notes.
- editting an existing note.
I don’t know about you but I have to admit that it looks funny.
Firing up the UI tests and watch it flies through everything is a fun experience. So next time when someone asks you to show your app, just run the UI tests. He’ll be amazed and impressed at the same time. 😜
Why should we write automated UI tests?
There are some key benefits here:
- Avoid regression bugs and minimize time spent on manual testing:
Actually this is the benefit of automated tests in general.
When you make some changes in the code, the tests are there to make sure that you don’t break anything (regression). And that your app still works as expected.
If there is no tests, it’s dangerous to make even a slightest change. One has to be very careful and do a lot of manual testing to gain back his confidence.
If there is no tests, we will need the whole QC team to sit together trying to break the app and looking for bugs. Now we don’t anymore. UI tests will take care of that pretty nicely.
I’m not saying that we should totally rely on automated tests. There is always something that tests can’t cover. We still need to test the app manually ourselves. However, the time we spend on it is kept to a minimum.
- Helps test view controllers:
Given the design of UIKit framework where everything is tightly coupled (the window, the view, the controller, the app lifecycle), that makes it very hard to write unit tests for view controllers even for the simplest scenario.
It’s still possible but we would have to mock and stub things around, simulate events and stuffs, which turns out to be a ton of work and doesn’t prove useful at all.
Why fight the system when we can ride with it?
UI test puts us in the role of a user. A user doesn’t care about any logic underneath. All he wants to do is tapping buttons and expect to see something appear on the screen. That’s it.
-
Helps to document your code:
Look at this:
func testWrongUsernameOrPassword() {
  fillInUsername()
  fillInWrongPassword()
  tapButton("Login")
  expectToSeeAlert("Username or password is incorrect")
  tapButton("OK")
}
This is a UI test for scenario when user tries to login with wrong credentials (username or password).
Actually you don’t need me to tell you what that is. It’s obvious.
You’ll quickly understand what the app can do just by reading the tests. It’s the best documentation.
- Provides a visual run-through of your app:
As I mentioned earlier, this is simply fun. It’s a nice thing to have and you’re gonna love it.
Seriously, you’re gonna love it for sure.
Alright! I hope that gets you a little bit more excited about UI testings. Let’s dive deeper.
Understand UI testing
A typical UI test might look like this (in pseudo code):
fill in a text field
tap a button
expect to go to next screen
As you can see, UI test is composed of actions that a normal user can take. It’s like a step-by-step guide with some expectations along the way. The common format is:
do something
expect something to happen
For example:
tap on a table cell
expect it to expand
tap on it again
expect it to collapse
Another example:
pull to refresh
expect to see new contents on top
swipe to delete a row
expect the row to be deleted from the table view
In UI tests, we care about user interactions much more than the underlying code structure. We focus heavily on what a user can do and what he’ll see on the screen. All the background stuffs can be ignored.
How do we express UI test in Swift?
We’re gonna need a framework called KIF. It offers a whole lot of APIs to deal with UI interactions. For example:
Fill in “some random text” into a text field.
tester().enterText("some random text", intoViewWithAccessibilityLabel: "my text field")
Tap a button.
tester().tapViewWithAccessibilityLabel("my button")
You may wonder: What is this accessibility label thing?
Actually it’s a way to address UI components on the screen.
Or frankly, accessibility label is a name you give for each UIView to distinguish among them.
When you say you wanna tap a button, you have to tell the framework which button to tap. Therefore, you assign it an accessibility label (let’s say “my button”) and then tap it:
tester().tapViewWithAccessibilityLabel("my button")
Here’s a couple more examples:
Expect a view (with accessibility label of “my view”) to appear on the screen:
tester().waitForViewWithAccessibilityLabel("my view")
Expect a view (with accessibility label of “my view”) to disappear from the screen:
tester().waitForAbsenceOfViewWithAccessibilityLabel("my view")
Get a reference to a view with accessibility label of “my view”:
let myView = tester().waitForViewWithAccessibilityLabel("my view") as! UIView
Swipe left on view with accessibility label of “my view”:
tester().swipeViewWithAccessibilityLabel("my view", inDirection: .Left)
For full list of supported UI interactions in KIF, you can read here.
How do we assign accessibility label for UIView?
There are 2 ways that we can do:
- Using Storyboard:
- Open Storyboard.
- Click on a view you wanna assign accessbility label.
- Choose the Identity Inspector tab.
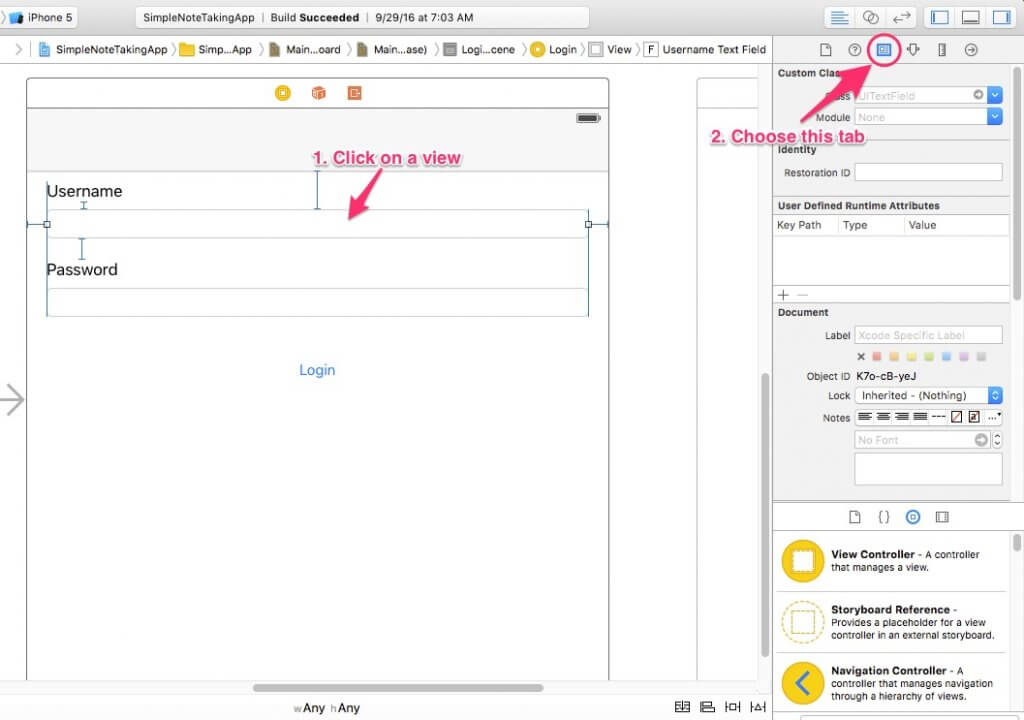
- Scroll down to the Accessibility section.
- Input the accessbility label you want into the Label field. (“Login – Username” in this case)

For UITableView and UICollectionView, there won’t be an Accessibility section available. I have no idea why Apple does that. However, we can workaround anyway:
So basically what we do is we assign a key path that matches the accessibilityLabel property of UITableView. Then at runtime, it will read value from key path and set its property accordingly.
Another thing to note is that: for UIButton or UILabel, it has a default accessibility label which is equal to its text property. Let’s say you have a button with the text “click me”, then its accessibility label is also “click me”. You don’t need to set it again.
- Using code:
If you have a text field that is a reference from the Storyboard:
@IBOutlet weak var usernameTextField: UITextField!
Then you can:
usernameTextField.accessibilityLabel = "my username textfield"
Although it looks simpler when using code, it is still recommended to set your accessibility label directly from the Storyboard if possible. The best code is no code at all.
Prepare the project
First, download the project here. Run it. Make sure it compiles fine.
Play around with the app to get a sense of what we’re gonna do next.
How to setup KIF for UI testing?
Step 1: Import KIF and Nimble using cocoapods.
Add pod 'KIF' and pod 'Nimble' to your Podfile. Remember to put them in the test target.
Nimble is a framework to help you better express your expectation in test. I once wrote an article about it here.
platform :ios, '9.0'

target 'SimpleNoteTakingApp' do
  use_frameworks!

  #...

  target 'SimpleNoteTakingAppTests' do
    inherit! :search_paths
    pod 'KIF'
    pod 'Nimble'
  end

end
Open Terminal and run:
pod install
Step 2: Create KIF helper for Swift
Create a KIF+Extensions.swift file in your test target.
import KIF

extension XCTestCase {
  func tester(file : String = #file, _ line : Int = #line) -> KIFUITestActor {
    return KIFUITestActor(inFile: file, atLine: line, delegate: self)
  }

  func system(file : String = #file, _ line : Int = #line) -> KIFSystemTestActor {
    return KIFSystemTestActor(inFile: file, atLine: line, delegate: self)
  }
}

extension KIFTestActor {
  func tester(file : String = #file, _ line : Int = #line) -> KIFUITestActor {
    return KIFUITestActor(inFile: file, atLine: line, delegate: self)
  }

  func system(file : String = #file, _ line : Int = #line) -> KIFSystemTestActor {
    return KIFSystemTestActor(inFile: file, atLine: line, delegate: self)
  }
}
Step 3: Create a briding header
Create a new temporary Objective-C file in your test target. You can name it to anything.
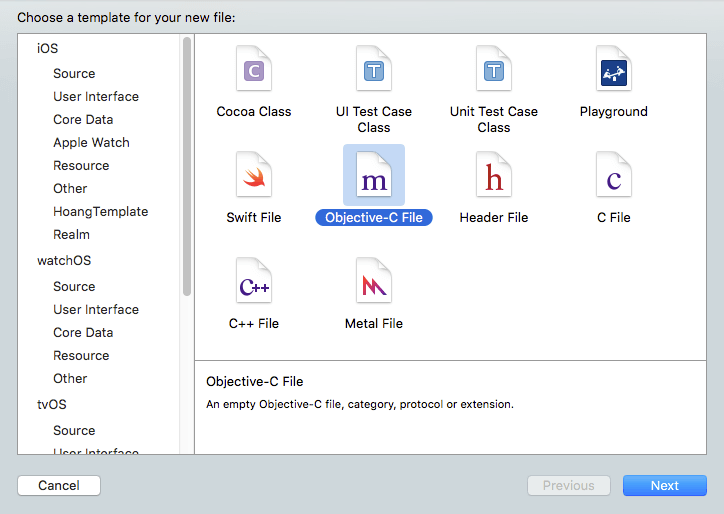
Xcode will ask whether you also want to add a briding header. Hit Create Bridging Header.
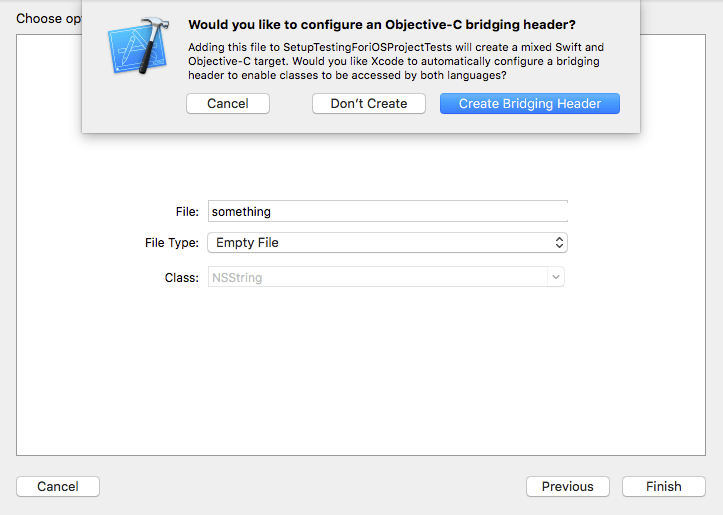
Delete the temporary ObjC file we just created above. We don’t need it anymore.
Import KIF from within the bridging header (SimpleNoteTakingApp-Bridging-Header.h).
#import
Step 4: Create our first UI test
Create a new file in the test target and name it to LoginTests.swift.
import KIF

class LoginTests : KIFTestCase {

  func testSomethingHere() {
    tester().tapViewWithAccessibilityLabel("hello")
  }

}
Please note that:
- your UI test must subclass from KIFTestCase.
- test methods must begin with the word test. For example: testA, testB, testLogin, testSomethingElse, ect…
Now let’s run the test to see how it works (Cmd + U).
It should open up the iOS simulator and stop at the login screen. Wait for a couple of seconds. Then fail.
That’s because we haven’t had any view with accessibility label of hello yet. We’re gonna fix that later. But for now, our first UI test is up and running. It’s cool.
Let’s start writing UI tests for our elegent note-taking app
Test the login screen:
There are 4 scenarios in the login screen:
Scenario 1: Empty username and password.
In this case, the user should see an alert telling him that “Username cannot be empty”.
Now before we move on to the nitty gritty, I want you to take some time and design the scenario first: what step will you perform? And what do you expect out of it?
- First, we would like our username and password fields to be cleared out.
- Then we tap the Login button.
- And we expect to see an alert that says “Username cannot be empty”.
Actually there’s a better way to express these steps, using Gherkin format. Here’s the basic structure of a scenario:
Scenario: Your scenario name
  Given some pre-condition
  When I do something
  Then I expect something to happen
  ...
In our case, the scenario would become:
Scenario: Empty username and password
  Given I clear out the username and password fields
  When I tap "Login" button
  Then I expect to see alert "Username cannot be empty"
Although this is just something we draft on a paper, or directly in our mind, it’s very close to the human language. Everyone should be able to read and understand.
Let’s translate it into Swift.
Open LoginTests.swift and write our first test. Again, test method name must begin with prefix test.
func testEmptyUsernameAndPassword() {

}
Then we perform the first step: clear out both fields.
func testEmptyUsernameAndPassword() {
  clearOutUsernameAndPasswordFields()
}
Although this clearOutUsernameAndPasswordFields method is not defined yet, you don’t have to worry about it. Just write what we want first. We’ll fix the compile errors later.
Next step is tapping the “Login” button:
func testEmptyUsernameAndPassword() {
  clearOutUsernameAndPasswordFields()
  tapButton("Login")
}
Again, this tapButton method is also undefined. We just put it there to structure the test.
Then we do the same thing with the remaining steps:
func testEmptyUsernameAndPassword() {
  clearOutUsernameAndPasswordFields()
  tapButton("Login")
  expectToSeeAlert("Username cannot be empty")
  tapButton("OK")
}
Now we have the whole scenario written down in Swift. It’s time to fill in the definition for each method.
To clear the text field, we use the KIF method clearTextFromViewWithAccessibilityLabel, which is quite self-explanatory. So the clearOutUsernameAndPasswordFields would be:
func clearOutUsernameAndPasswordFields() {
  tester().clearTextFromViewWithAccessibilityLabel("Login - Username")
  tester().clearTextFromViewWithAccessibilityLabel("Login - Password")
}
The tapButton method:
func tapButton(buttonName: String) {
  tester().tapViewWithAccessibilityLabel(buttonName)
}
And the expectToSeeAlert method:
func expectToSeeAlert(text: String) {
  tester().waitForViewWithAccessibilityLabel(text)
}
This is the LoginTests.swift at this point:
import KIF

class LoginTests : KIFTestCase {

  func testEmptyUsernameAndPassword() {
    clearOutUsernameAndPasswordFields()
    tapButton("Login")
    expectToSeeAlert("Username cannot be empty")
    tapButton("OK")
  }

  func clearOutUsernameAndPasswordFields() {
    tester().clearTextFromViewWithAccessibilityLabel("Login - Username")
    tester().clearTextFromViewWithAccessibilityLabel("Login - Password")
  }

  func tapButton(buttonName: String) {
    tester().tapViewWithAccessibilityLabel(buttonName)
  }

  func expectToSeeAlert(text: String) {
    tester().waitForViewWithAccessibilityLabel(text)
  }

}
Now run your test by pressing Cmd + U.
The simulator will pop up and run over your steps auto-magically.
The test should pass. (since all functionalities are already implemented)
Let’s do a litte refactoring here. Create a new file called LoginSteps.swift and move all step methods there.
extension LoginTests {

  func clearOutUsernameAndPasswordFields() {
    tester().clearTextFromViewWithAccessibilityLabel("Login - Username")
    tester().clearTextFromViewWithAccessibilityLabel("Login - Password")
  }

  func tapButton(buttonName: String) {
    tester().tapViewWithAccessibilityLabel(buttonName)
  }

  func expectToSeeAlert(text: String) {
    tester().waitForViewWithAccessibilityLabel(text)
  }

}
Then the LoginTests.swift would look fairly short and sweet.
import KIF

class LoginTests : KIFTestCase {

  func testEmptyUsernameAndPassword() {
    clearOutUsernameAndPasswordFields()
    tapButton("Login")
    expectToSeeAlert("Username cannot be empty")
    tapButton("OK")
  }

}
Scenario 2: Empty password.
Again, we will start with the scenario design first:
Scenario: Empty password
  Given I clear out the username and password fields
  When I fill in username
  And I tap "Login" button
  Then I expect to see alert "Password cannot be empty"
Then translate it:
func testEmptyPassword() {
  clearOutUsernameAndPasswordFields()
  fillInUsername()
  tapButton("Login")
  expectToSeeAlert("Password cannot be empty")
  tapButton("OK")
}
The fillInUsername method is also very straightforward.
func fillInUsername() {
  tester().enterText("appcoda", intoViewWithAccessibilityLabel: "Login - Username")
}
Remember to put the step method in LoginSteps.swift instead of LoginTests.swift. Always keep the test clean.
Run the test. Make sure it passes.
Notice that the 2 tests now have a same common step (clearOutUsernameAndPasswordFields). We will move it to the beforeEach method. That’s where you put things you wanna execute first before each test runs.
class LoginTests : KIFTestCase {

  override func beforeEach() {
    clearOutUsernameAndPasswordFields()
  }

  func testEmptyUsernameAndPassword() {
    tapButton("Login")
    expectToSeeAlert("Username cannot be empty")
    tapButton("OK")
  }

  func testEmptyPassword() {
    fillInUsername()
    tapButton("Login")
    expectToSeeAlert("Password cannot be empty")
    tapButton("OK")
  }

}
Now that we’re quite familiar with writing UI tests. Let’s move on more quickly.
Scenario 3: Wrong username or password
The scenario design:
Scenario: Wrong username or password
  Given I clear out the username and password fields
  When I fill in username
  And I fill in wrong password
  And I tap "Login" button
  Then I expect to see alert "Username or password is incorrect"
The implementation:
func testWrongUsernameOrPassword() {
  fillInUsername()
  fillInWrongPassword()
  tapButton("Login")
  expectToSeeAlert("Username or password is incorrect")
  tapButton("OK")
}
Note that the first step (clearOutUsernameAndPasswordFields) is already in the beforeEach method so we don’t need to call it here anymore.
The fillInWrongPassword method:
func fillInWrongPassword() {
  tester().enterText("wrongPassword", intoViewWithAccessibilityLabel: "Login - Password")
}
Scenario 4: Correct username and password
The scenario design:
Scenario: Correct username and password
  Given I clear out the username and password fields
  When I fill in username
  And I fill in correct password
  And I tap "Login" button
  Then I expect to go to home screen
The implementation:
func testCorrectUsernameAndPassword() {
  fillInUsername()
  fillInCorrectPassword()
  tapButton("Login")
  expectToGoToHomeScreen()
}
The fillInCorrectPassword method:
func fillInCorrectPassword() {
  tester().enterText("correctPassword", intoViewWithAccessibilityLabel: "Login - Password")
}
This is the correct password because I hard-coded it. (a combination of “appcoda” and “correctPassword”) 😜
About the expectToGoToHomeScreen, how do we know if we’ve already transitioned into another screen?
Well, we do it by:
- expect the UI elements in the login screen to disappear.
- expect to see UI elements of the Home screen.
func expectToGoToHomeScreen() {
  // expect login screen to disappear
  tester().waitForAbsenceOfViewWithAccessibilityLabel("Login - Username")
  tester().waitForAbsenceOfViewWithAccessibilityLabel("Login - Password")
  tester().waitForAbsenceOfViewWithAccessibilityLabel("Login")

  // expect to see Home screen
  tester().waitForViewWithAccessibilityLabel("No notes")
  tester().waitForViewWithAccessibilityLabel("Add note")
}
Test the home screen:
Create file HomeTests.swift.
import KIF

class HomeTests: KIFTestCase {

}
And its corresponding HomeSteps.swift.
extension HomeTests {

}
Now that we have more than 1 test class (LoginTests and HomeTests). There will be common step methods that we’re gonna reuse between them. Let’s create a base class called BaseUITests.swift.
class BaseUITests: KIFTestCase {

}
Then make LoginTests and HomeTest inherit from it.
// in LoginTests.swift
class LoginTests: BaseUITests { ... }

// in HomeTests.swift
class HomeTests: BaseUITests { ... }
Create another file called CommonSteps.swift. Move all common step methods there:
extension BaseUITests {
  // move common steps here
}
So whenever you write a step method, be sure to put it into the right place:
- steps that are widely used among test classes should belong to
CommonSteps.swift. - steps that are only used in a specific screen should go to its corresponding step file. (Ex:
LoginSteps.swiftorHomeSteps.swift)
// in CommonSteps.swift
extension BaseUITests {
  // common steps
}

// in LoginSteps.swift
extension LoginTests {
  // step specific for Login screen
}

// in HomeSteps.swift
extension HomeTests {
  // step specific for Home screen
}
The Home screen is where we create/edit/delete our notes so there’re a lot of database interactions happening.
We don’t wanna put a bunch of test records into our production database every time we run the UI tests. Instead, we will create a test database and use it in our testing environment.
Since I’m using Realm as the database layer. It only takes me 1 line of code to setup a test database:
func useTestDatabase() {
  Realm.Configuration.defaultConfiguration.inMemoryIdentifier = "put any name here"
}
This will create a Realm database in memory and it only exists for as long as the tests are still running.
Your project may use a different database technology (CoreData, FMDB, SQLite) but the idea is the same. You create a test database file and direct all test records into it. Your main database file is safe.
We’re gonna put this database setup into the beforeAll block so that it is executed only once.
class HomeTests: KIFTestCase {

  override func beforeAll() {
    useTestDatabase()
  }

}
Now we’re ready for the 4 scenarios of the Home screen.
Scenario 1: When there’s no notes, display label “No notes”
Since Home is not the initial screen. We must have a step to go to Home before we can do anything else.
Scenario: If there's no notes, display label "No notes"
  Given I have no notes
  When I visit home screen
  Then I expect to see label "No notes"
  And I expect not to see the note list
The implementation:
func testNoNotes() {
  haveNoNotes()
  visitHomeScreen()
  expectToSeeLabel("No notes")
  expectNotToSeeNoteList()
}
For the haveNoNotes, we have to delete all records from database:
func haveNoNotes() {
  let realm = try! Realm()
  try! realm.write {
    realm.deleteAll()
  }
}
For visitHomeScreen, it’s a little bit tricky because after the previous test finishes, you may not know which screen you’re on. You may be at the Login screen, Home screen, or any other screen.
It’s hard to go anywhere when you have no idea where you are at the moment, right?
However, if we put ourselves at the initial (Login) screen, there is always at least 1 way to reach every screens in the app.
Therefore, the solution is that no matter where you are, go back to the initial screen first, then you can proceed to other screens very easily.
But how to do that?
The first thing to do is grabbing a reference to the root view controller:
let rootViewController = UIApplication.sharedApplication().keyWindow?.rootViewController
Then depends on your app architecture, we will proceed in different ways. In my case, it’s a navigation controller on top of everything. So all I need to do is popping back to first controller in the navigation stack:
func backToRoot() {
  if let rootViewController = UIApplication.sharedApplication().keyWindow?.rootViewController as? UINavigationController {
    rootViewController.popToRootViewControllerAnimated(false)
  }
}
With this in place, we’ll put it in the beforeEach method so every time a test gets executed, it has to go back to root first.
After that, it’s recommended to clear out the database to ensure a fresh start for subsequent tests. We’re gonna move the haveNoNotes step into the beforeEach method too.
class HomeTests: KIFTestCase {

  override func beforeAll() {
    useTestDatabase()
  }

  override func beforeEach() {
    backToRoot()
    haveNoNotes()
  }

  func testNoNotes() {
    visitHomeScreen()
    expectToSeeLabel("No notes")
    expectNotToSeeNoteList()
  }

}
The visitHomeScreen method:
func visitHomeScreen() {
  fillInUsername()
  fillInCorrectPassword()
  tapButton("Login")
}
The expectToSeeLabel method:
func expectToSeeLabel(label: String) {
  tester().waitForViewWithAccessibilityLabel(text)
}
The expectNotToSeeNoteList method:
func expectNotToSeeNoteList() {
  tester().waitForAbsenceOfViewWithAccessibilityLabel("Note - Table View")
}
Scenario 2: Create new note.
The scenario design:
Scenario: Create new note
  Given I have no notes
  When I visit home screen
  And I tap "Add note" button
  Then I expect the Create button to be disabled
  When I fill in the note title with "new note"
  Then I expect the Create button to be enabled
  And I fill in the note body with "new body"
  And I tap "Create" button
  Then I expect to see note with title "new note" and body "new body" at row 0
  And I expect the number of notes in list to be 1
There’s little bit of logic here. The create button is only enabled if there’s some text in the title field, otherwise it will be disabled.
The implementation:
func testCreateNewNote() {
  haveNoNotes()
  visitHomeScreen()
  tapButton("Add note")
  expectTheCreateButtonToBeDisabled()
  fillInNoteTitle("new note")
  expectTheCreateButtonToBeEnabled()
  fillInNoteBody("new body")
  tapButton("Create")
  expectToSeeNoteWithTitle("new note", body: "new body", atRow: 0)
  expectNumberOfNotesInListToEqual(1)
}
For the expectTheCreateButtonToBeDisabled method, we have to:
- First, get a reference to the Create button.
- Then assert its property using Nimble. (If you don’t know what Nimble is, read here)
func expectTheCreateButtonToBeDisabled() {
  let createButton = tester().waitForViewWithAccessibilityLabel("Create") as! UIButton
  expect(createButton.enabled) == false
}
Same with expectTheCreateButtonToBeEnabled:
func expectTheCreateButtonToBeEnabled() {
  let createButton = tester().waitForViewWithAccessibilityLabel("Create") as! UIButton
  expect(createButton.enabled) == true
}
The fillInNoteTitle and fillInNoteBody are easy. We just need to fill in the field with some texts.
The expectToSeeNoteWithTitle method can be done using the same approach too.
- Get a reference to the cell.
- Assert for its property.
func expectToSeeNoteWithTitle(title: String, body: String, atRow row: NSInteger) {
  let indexPath = NSIndexPath(forRow: row, inSection: 0)
  let noteCell = tester().waitForCellAtIndexPath(indexPath, inTableViewWithAccessibilityIdentifier: "Note - TableView")
  expect(noteCell.textLabel?.text) == title
  expect(noteCell.detailTextLabel?.text) == body
}
The expectNumberOfNotesInListToEqual method:
func expectNumberOfNotesInListToEqual(count: Int) {
  let noteTableView = tester().waitForViewWithAccessibilityLabel("Note - TableView") as! UITableView
  expect(noteTableView.numberOfRowsInSection(0)) == count
}
Scenario 3: Edit a note
The scenario design:
Scenario: Edit a note
  Given I have 3 notes
  When I visit home screen
  And I tap on note at row 1
  And I update note title to "updated note"
  And I update note body to "updated body"
  And I tap "Update" button
  Then I expect to see note with title "updated note" and body "updated body" at row 1
The implementation:
func editANote() {
  have3Notes()
  visitHomeScreen()
  tapOnNoteAtRow(1)
  updateNoteTitleTo("updated note")
  updateNoteBodyTo("updated body")
  tapButton("Update")
  expectToSeeNoteWithTitle("updated note", body: "updated body", atRow: 1)
}
The have3Notes method: we add 3 records to Realm database.
func have3Notes() {
  let realm = try! Realm()
  try! realm.write {
    for i in 0...2 {
      let note = Note()
      note.title = "title \(i)"
      note.body = "body \(i)"
      realm.add(note)
    }
  }
}
The tapOnNoteAtRow method:
func tapOnNoteAtRow(row: Int) {
  let indexPath = NSIndexPath(forRow: row, inSection: 0)
  tester().tapRowAtIndexPath(indexPath, inTableViewWithAccessibilityIdentifier: "Note - TableView")
}
Scenario 4: Delete notes
The scenario design:
Scenario: Delete notes
  Given I have 3 notes
  When I visit home screen
  When I delete a note
  Then I expect the number of note in list to be 2
  When I delete a note
  Then I expect the number of note in list to be 1
  When I delete a note
  Then I expect to see label "No notes"
The implementation:
func deleteNotes() {
  have3Notes()
  visitHomeScreen()
  deleteANote()
  expectNumberOfNotesInListToEqual(2)
  deleteANote()
  expectNumberOfNotesInListToEqual(1)
  deleteANote()
  expectToSeeLabel("No notes")
}
The deleteANote method:
func deleteANote() {
  let noteTableView = tester().waitForViewWithAccessibilityLabel("Note - TableView") as! UITableView
  let indexPath = NSIndexPath(forRow: 0, inSection: 0)
  tester().swipeRowAtIndexPath(indexPath, inTableView: noteTableView, inDirection: .Left)
  tapButton("Delete")
}
Wrap up
UI tests are easy to learn but yield a lot of benefits.
It might take a couple of days to familiarize yourself with KIF and how to work with accessibility labels. But then after that, you’re unstoppable.
Your UI tests are going to cover all user scenarios across the app. Whenever you change something in the code, you’re good to go as long as the tests are still passing.
The only downside I found is that it really take time to run the whole UI test suite as your app grows. For this note taking app, it take me around 80 seconds to run through everything, considering I’m using an old hackintosh with Intel Core i3.
For bigger real-world app, it may take much longer, from a couple of minutes to even hours. But the good news is we can delegate the test running task to another service called Continuous Integration. That deserves another blog post for itself.
You can download the full project (with all UI tests) here.
If you have any questions regarding UI tests, feel free to put a comment down below. I would love to hear more from you guys. Thanks and have a good day.


