

Today, we’ll be learning how to use AV Foundation, an Apple system framework that exists on macOS and iOS, along with watchOS and tvOS. The goal of this tutorial will be to help you build a fully functional iOS app that’s capable of capturing photos and videos using the device’s cameras. We’ll also be following the principles of good object oriented programming and designing a utility class that can be reused and extended in all your projects.
What is AV Foundation?
AV Foundation is the full featured framework for working with time-based audiovisual media on iOS, macOS, watchOS and tvOS. Using AV Foundation, you can easily play, create, and edit QuickTime movies and MPEG-4 files, play HLS streams, and build powerful media functionality into your apps. – Apple
So, there you have it. AV Foundation is a framework for capturing, processing, and editing audio and video on Apple devices. In this tutorial, we’ll specifically be using it to capture photos and videos, complete with multiple camera support, front and rear flash, and audio for videos.
Do I need AV Foundation?
Before you embark on this journey, remember that AV Foundation is a complex and intricate tool. In many instances, using Apple’s default APIs such as UIImagePickerController will suffice. Make sure you actually need to use AV Foundation before you begin this tutorial.
Sessions, Devices, Inputs, and Outputs
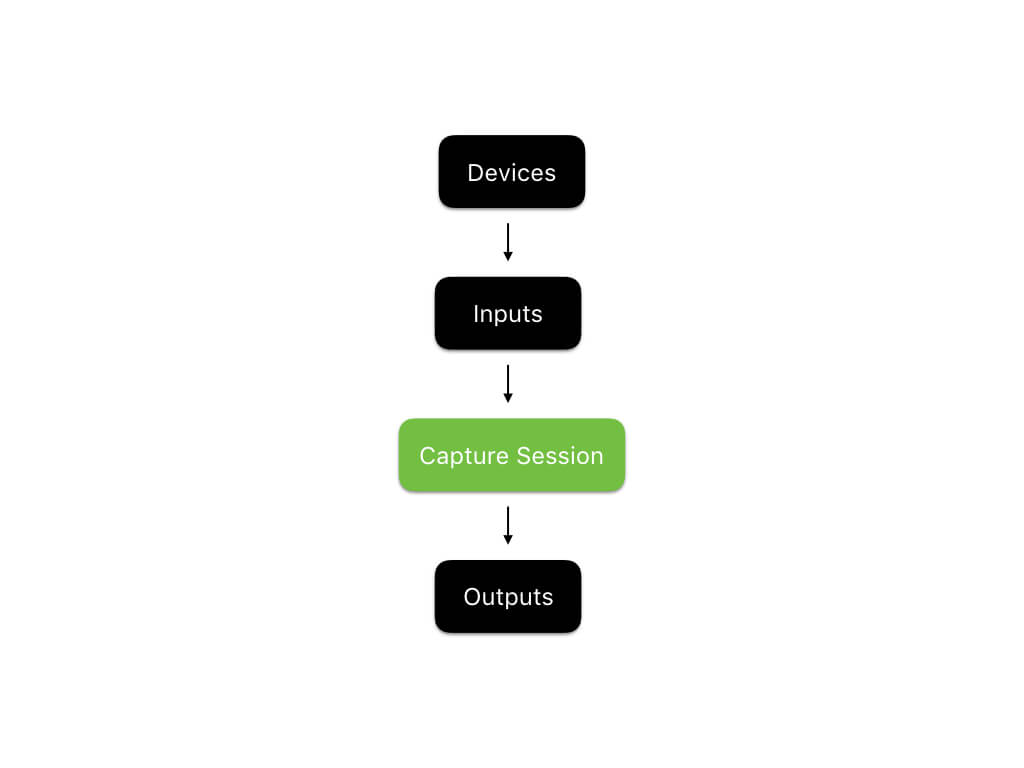
At the core of capturing photos and videos with AV Foundation is the capture session. According to Apple, the capture session is “an object that manages capture activity and coordinates the flow of data from input devices to capture outputs.” In AV Foundation, capture sessions are managed by the AVCaptureSession object.
Additionally, the capture device is used to actually access the physical audio and video capture devices available on an iOS device. To use AVFoundation, you take capture devices, use them to create capture inputs, provide the session with these inputs, and then save the result in capture outputs. Here’s a diagram that I made that depicts this relation:
Example Project
As always, we want you to explore the framework by getting your hands dirty. You’ll work on an example project, but to let us focus on the discussion of the AVFoundation framework, this tutorial comes with a starter project. Before you move on, download the starter project here and take a quick look.
The example project is rather basic. It contains:
- An
Assets.xcassetsfile that contains all of the necessary iconography for our project. Credit goes to Google’s Material Design team for these icons. You can find them, along with hundreds of others, available for free at material.io/icons. - A Storyboard file with one view controller. This view controller will be used to handle all photo and video capture within our app. It contains:
- A capture button to initiate photo / video capture.
- A capture preview view so that you can see what the camera sees in real time.
- The necessary controls for switching cameras and toggling the flash.
- A
ViewController.swiftfile that’s responsible for managing the view controller mentioned above. It contains:- All of the necessary outlets that connect the UI controls mentioned above to our code.
- A computed property to hide the status bar.
- A setup function that styles the capture button appropriately.
Build and run the project, and you should see something like this:

Cool! Let’s get started!
Working with AVFoundation
In this tutorial, we’re going to design a class called CameraController, that will be responsible for doing the heavy lifting related to photo and video capture. Our view controller will use CameraController and bind it to our user interface.
To get started, create a new Swift file in your project and call it CameraController.swift. Import AVFoundation and declare an empty class, like this:
import AVFoundation

class CameraController { }
Photo Capture
To begin, we’re going to implement the photo capture feature with the rear camera. This will be our baseline functionality, and we will add the ability to switch cameras, use the flash, and record videos by adding onto our photo capture functionality. Since configuring and starting a capture session is a relatively intensive procedure, we’re going to decouple it from init and create a function, called prepare, that prepares our capture session for use and calls a completion handler when it’s done. Add a prepare function to your CameraController class:
func prepare(completionHandler: @escaping (Error?) -> Void) { }
This function will handle the creation and configuration of a new capture session. Remember, setting up the capture session consists of 4 steps:
- Creating a capture session.
- Obtaining and configuring the necessary capture devices.
- Creating inputs using the capture devices.
- Configuring a photo output object to process captured images.
We’ll use Swift’s nested functions to encapsulate our code in a manageable way. Start by declaring 4 empty functions within prepare and then calling them:
func prepare(completionHandler: @escaping (Error?) -> Void) {
    func createCaptureSession() { }
    func configureCaptureDevices() throws { }
    func configureDeviceInputs() throws { }
    func configurePhotoOutput() throws { }

    DispatchQueue(label: "prepare").async {
        do {
            createCaptureSession()
            try configureCaptureDevices()
            try configureDeviceInputs()
            try configurePhotoOutput()
        }

        catch {
            DispatchQueue.main.async {
                completionHandler(error)
            }

            return
        }

        DispatchQueue.main.async {
            completionHandler(nil)
        }
    }
}
In the above code listing, we’ve created boilerplate functions for performing the 4 key steps in preparing an AVCaptureSession for photo capture. We’ve also set up an asynchronously executing block that calls the four functions, catches any errors if necessary, and then calls the completion handler. All we have left to do is implement the four functions! Let’s start with createCaptureSession.
Create Capture Session
Before configuring a given AVCaptureSession, we need to create it! Add the following property to your CameraController.swift file:
var captureSession: AVCaptureSession?
Next, add the following to the body of your createCaptureSession function that’s nested within prepare:
self.captureSession = AVCaptureSession()
This is simple code; it simply creates a new AVCaptureSession and stores it in the captureSession property.
Configure Capture Devices
Now that we’ve created an AVCaptureSession, we need to create the AVCaptureDevice objects to represent the actual iOS device’s cameras. Go ahead and add the following properties to your CameraController class. We’re going to add the frontCamera and rearCamera properties now because we’ll be setting up the basics of multicamera capture, and implementing the ability to change cameras later.
var frontCamera: AVCaptureDevice?
var rearCamera: AVCaptureDevice?
Next, declare an embedded type within CameraController.swift. We’ll be using this embedded type to manage the various errors we might encounter while creating a capture session:
   enum CameraControllerError: Swift.Error {
        case captureSessionAlreadyRunning
        case captureSessionIsMissing
        case inputsAreInvalid
        case invalidOperation
        case noCamerasAvailable
        case unknown
    }
You’ll notice that there are various error types in this enum. Just add them now, we’re going to use them later.
Now it comes to the fun part! Let’s find the cameras available on the device. We can do this with AVCaptureDeviceDiscoverySession. Add the following to configureCaptureDevices:
//1
let session = AVCaptureDeviceDiscoverySession(deviceTypes: [.builtInWideAngleCamera], mediaType: AVMediaTypeVideo, position: .unspecified)
guard let cameras = (session?.devices.flatMap { $0 }), !cameras.isEmpty else { throw CameraControllerError.noCamerasAvailable }

//2
for camera in cameras {
    if camera.position == .front {
        self.frontCamera = camera
    }

    if camera.position == .back {
        self.rearCamera = camera

        try camera.lockForConfiguration()
        camera.focusMode = .continuousAutoFocus
        camera.unlockForConfiguration()
    }
}
Here’s what we just did:
- These 2 lines of code use
AVCaptureDeviceDiscoverySessionto find all of the wide angle cameras available on the current device and convert them into an array of non-optionalAVCaptureDeviceinstances. If no cameras are available, we throw an error. - This loop looks through the available cameras found in code segment 1 and determines which is the front camera and which is the rear camera. It additionally configures the rear camera to autofocus, throwing any errors that are encountered along the way.
Cool! We used AVCaptureDeviceDiscoverySession to find the available cameras on the device and configure them to meet our specifications. Let’s connect them to our capture session.
Configure Device Inputs
Now we can create capture device inputs, which take capture devices and connect them to our capture session. Before we do this, add the following properties to CameraController to ensure that we can store our inputs:
var currentCameraPosition: CameraPosition?
var frontCameraInput: AVCaptureDeviceInput?
var rearCameraInput: AVCaptureDeviceInput?
Our code won’t compile in this state, because CameraPosition is undefined. Let’s define it. Add this as an embedded type within CameraController:
public enum CameraPosition {
    case front
    case rear
}
Great. Now we have all the necessary properties for storing and managing our capture device inputs. Let’s implement configureDeviceInputs:
func configureDeviceInputs() throws {
    //3
    guard let captureSession = self.captureSession else { throw CameraControllerError.captureSessionIsMissing }

    //4
    if let rearCamera = self.rearCamera {
        self.rearCameraInput = try AVCaptureDeviceInput(device: rearCamera)

        if captureSession.canAddInput(self.rearCameraInput!) { captureSession.addInput(self.rearCameraInput!) }

        self.currentCameraPosition = .rear
    }

    else if let frontCamera = self.frontCamera {
        self.frontCameraInput = try AVCaptureDeviceInput(device: frontCamera)

        if captureSession.canAddInput(self.frontCameraInput!) { captureSession.addInput(self.frontCameraInput!) }
        else { throw CameraControllerError.inputsAreInvalid }

        self.currentCameraPosition = .front
    }

    else { throw CameraControllerError.noCamerasAvailable }
}
Here’s what we did:
- This line simply ensures that
captureSessionexists. If not, we throw an error. - These
ifstatements are responsible for creating the necessary capture device input to support photo capture.AVFoundationonly allows one camera-based input per capture session at a time. Since the rear camera is traditionally the default, we attempt to create an input from it and add it to the capture session. If that fails, we fall back on the front camera. If that fails as well, we throw an error.
Configure Photo Output
Up until this point, we’ve added all the necessary inputs to captureSession. Now we just need a way to get the necessary data out of our capture session. Luckily, we have AVCapturePhotoOutput. Add one more property to CameraController:
var photoOutput: AVCapturePhotoOutput?
Now, let’s implement configurePhotoOutput like this:
func configurePhotoOutput() throws {
    guard let captureSession = self.captureSession else { throw CameraControllerError.captureSessionIsMissing }

    self.photoOutput = AVCapturePhotoOutput()
    self.photoOutput!.setPreparedPhotoSettingsArray([AVCapturePhotoSettings(format: [AVVideoCodecKey : AVVideoCodecJPEG])], completionHandler: nil)

    if captureSession.canAddOutput(self.photoOutput) { captureSession.addOutput(self.photoOutput) }

    captureSession.startRunning()
}
This is a simple implementation. It just configures photoOutput, telling it to use the JPEG file format for its video codec. Then, it adds photoOutput to captureSession. Finally, it starts captureSession.
We’re almost done! Your CameraController.swift file should look something similar to this:
import AVFoundation

class CameraController {
    var captureSession: AVCaptureSession?

    var currentCameraPosition: CameraPosition?

    var frontCamera: AVCaptureDevice?
    var frontCameraInput: AVCaptureDeviceInput?

    var photoOutput: AVCapturePhotoOutput?

    var rearCamera: AVCaptureDevice?
    var rearCameraInput: AVCaptureDeviceInput?
}

extension CameraController {
    func prepare(completionHandler: @escaping (Error?) -> Void) {
        func createCaptureSession() {
            self.captureSession = AVCaptureSession()
        }

        func configureCaptureDevices() throws {
            let session = AVCaptureDeviceDiscoverySession(deviceTypes: [.builtInWideAngleCamera], mediaType: AVMediaTypeVideo, position: .unspecified)
            guard let cameras = (session?.devices.flatMap { $0 }), !cameras.isEmpty else { throw CameraControllerError.noCamerasAvailable }

            for camera in cameras {
                if camera.position == .front {
                    self.frontCamera = camera
                }

                if camera.position == .back {
                    self.rearCamera = camera

                    try camera.lockForConfiguration()
                    camera.focusMode = .autoFocus
                    camera.unlockForConfiguration()
                }
            }
        }

        func configureDeviceInputs() throws {
            guard let captureSession = self.captureSession else { throw CameraControllerError.captureSessionIsMissing }

            if let rearCamera = self.rearCamera {
                self.rearCameraInput = try AVCaptureDeviceInput(device: rearCamera)

                if captureSession.canAddInput(self.rearCameraInput!) { captureSession.addInput(self.rearCameraInput!) }

                self.currentCameraPosition = .rear
            }

            else if let frontCamera = self.frontCamera {
                self.frontCameraInput = try AVCaptureDeviceInput(device: frontCamera)

                if captureSession.canAddInput(self.frontCameraInput!) { captureSession.addInput(self.frontCameraInput!) }
                else { throw CameraControllerError.inputsAreInvalid }

                self.currentCameraPosition = .front
            }

            else { throw CameraControllerError.noCamerasAvailable }
        }

        func configurePhotoOutput() throws {
            guard let captureSession = self.captureSession else { throw CameraControllerError.captureSessionIsMissing }

            self.photoOutput = AVCapturePhotoOutput()
            self.photoOutput!.setPreparedPhotoSettingsArray([AVCapturePhotoSettings(format: [AVVideoCodecKey : AVVideoCodecJPEG])], completionHandler: nil)

            if captureSession.canAddOutput(self.photoOutput) { captureSession.addOutput(self.photoOutput) }
            captureSession.startRunning()
        }

        DispatchQueue(label: "prepare").async {
            do {
                createCaptureSession()
                try configureCaptureDevices()
                try configureDeviceInputs()
                try configurePhotoOutput()
            }

            catch {
                DispatchQueue.main.async {
                    completionHandler(error)
                }

                return
            }

            DispatchQueue.main.async {
                completionHandler(nil)
            }
        }
    }
}

extension CameraController {
    enum CameraControllerError: Swift.Error {
        case captureSessionAlreadyRunning
        case captureSessionIsMissing
        case inputsAreInvalid
        case invalidOperation
        case noCamerasAvailable
        case unknown
    }

    public enum CameraPosition {
        case front
        case rear
    }
}
Display Preview
Now that we have the camera device ready, it is time to show what it captures on screen. Add another function to CameraController (outside of prepare), called it displayPreview. It should have the following signature:
func displayPreview(on view: UIView) throws { }
Additionally, import UIKit in your CameraController.swift file. We’ll need it to work with UIView.
As its name suggests, this function will be responsible for creating a capture preview and displaying it on the provided view. Let’s add a property to CameraController to support this function:
var previewLayer: AVCaptureVideoPreviewLayer?
This property will hold the preview layer that displays the output of captureSession. Let’s implement the method:
func displayPreview(on view: UIView) throws {
    guard let captureSession = self.captureSession, captureSession.isRunning else { throw CameraControllerError.captureSessionIsMissing }

    self.previewLayer = AVCaptureVideoPreviewLayer(session: captureSession)
    self.previewLayer?.videoGravity = AVLayerVideoGravityResizeAspectFill
    self.previewLayer?.connection?.videoOrientation = .portrait

    view.layer.insertSublayer(self.previewLayer!, at: 0)
    self.previewLayer?.frame = view.frame
}
This function creates an AVCaptureVideoPreview using captureSession, sets it to have the portrait orientation, and adds it to the provided view.
Wiring It Up
Cool! Now, let’s try connecting all this to our view controller. Head on over to ViewController.swift. First, add a property to ViewController.swift:
let cameraController = CameraController()
Then, add a nested function in viewDidLoad():
func configureCameraController() {
    cameraController.prepare {(error) in
        if let error = error {
            print(error)
        }

        try? self.cameraController.displayPreview(on: self.capturePreviewView)
    }
}

configureCameraController()
This function simply prepares our camera controller like we designed it to.
Unfortunately, we still have one more step. This is a security requirement enforced by Apple. You have to provide a reason for users, explaining why your app needs to use the camera. Open Info.plist and insert a row:

This key tells the user why you’re using the camera when it asks for the necessary permissions.
Your ViewController.swift file should now look like this:
import UIKit

class ViewController: UIViewController {
    let cameraController = CameraController()

    @IBOutlet fileprivate var captureButton: UIButton!

    ///Displays a preview of the video output generated by the device's cameras.
    @IBOutlet fileprivate var capturePreviewView: UIView!

    ///Allows the user to put the camera in photo mode.
    @IBOutlet fileprivate var photoModeButton: UIButton!
    @IBOutlet fileprivate var toggleCameraButton: UIButton!
    @IBOutlet fileprivate var toggleFlashButton: UIButton!

    ///Allows the user to put the camera in video mode.
    @IBOutlet fileprivate var videoModeButton: UIButton!

    override var prefersStatusBarHidden: Bool { return true }
}

extension ViewController {
    override func viewDidLoad() {
        func configureCameraController() {
            cameraController.prepare {(error) in
                if let error = error {
                    print(error)
                }

                try? self.cameraController.displayPreview(on: self.capturePreviewView)
            }
        }

        func styleCaptureButton() {
            captureButton.layer.borderColor = UIColor.black.cgColor
            captureButton.layer.borderWidth = 2

            captureButton.layer.cornerRadius = min(captureButton.frame.width, captureButton.frame.height) / 2
        }

        styleCaptureButton()
        configureCameraController()
    }
}
Build and run your project, press accept when the device asks for permission, and HOORAY! You should have a working capture preview. If not, recheck your code and leave a comment if you need help.

Toggling the Flash / Switching Cameras
Now that we have a working preview, let’s add some more functionality to it. Most camera apps allow their users to switch cameras and enable or disable the flash. Let’s make ours do that as well. After we do this, we’ll add the ability to capture images and save them to the camera roll.
To start, we’re going to enable the ability to toggle the flash. Add this property to CameraController:
var flashMode = AVCaptureFlashMode.off
Now, head over to ViewController. Add an @IBAction func to toggle the flash:
@IBAction func toggleFlash(_ sender: UIButton) {
    if cameraController.flashMode == .on {
        cameraController.flashMode = .off
        toggleFlashButton.setImage(#imageLiteral(resourceName: "Flash Off Icon"), for: .normal)
    }

    else {
        cameraController.flashMode = .on
        toggleFlashButton.setImage(#imageLiteral(resourceName: "Flash On Icon"), for: .normal)
    }
}
For now, this is all we have to do. Our CameraController class will handle the flash when we capture an image. Let’s move on to switching cameras.
Switching cameras in AV Foundation is a pretty easy task. We just need to remove the capture input for the existing camera and add a new capture input for the camera we want to switch to. Let’s add another function to our CameraController class for switching cameras:
func switchCameras() throws { }
When we switch cameras, we’ll either be switching to the front camera or to the rear camera. So, let’s declare 2 nested functions within switchCameras:
func switchToFrontCamera() throws { }
func switchToRearCamera() throws { }
Now, add the following to switchCameras():
//5
guard let currentCameraPosition = currentCameraPosition, let captureSession = self.captureSession, captureSession.isRunning else { throw CameraControllerError.captureSessionIsMissing }

//6
captureSession.beginConfiguration()

func switchToFrontCamera() throws { }
func switchToRearCamera() throws { }

//7
switch currentCameraPosition {
case .front:
    try switchToRearCamera()

case .rear:
    try switchToFrontCamera()
}

//8
captureSession.commitConfiguration()
Here’s what we just did:
- This
guardstatement ensures that we have a valid, running capture session before attempting to switch cameras. It also verifies that there is a camera that’s currently active. - This line tells the capture session to begin configuration.
- This
switchstatement calls eitherswitchToRearCameraorswitchToFrontCamera, depending on which camera is currently active. - This line commits, or saves, our capture session after configuring it.
Great! All we have to do now is implement switchToFrontCamera and switchToRearCamera:
func switchToFrontCamera() throws {
    guard let inputs = captureSession.inputs as? [AVCaptureInput], let rearCameraInput = self.rearCameraInput, inputs.contains(rearCameraInput),
        let frontCamera = self.frontCamera else { throw CameraControllerError.invalidOperation }

    self.frontCameraInput = try AVCaptureDeviceInput(device: frontCamera)

    captureSession.removeInput(rearCameraInput)

    if captureSession.canAddInput(self.frontCameraInput!) {
        captureSession.addInput(self.frontCameraInput!)

        self.currentCameraPosition = .front
    }

    else { throw CameraControllerError.invalidOperation }
}

func switchToRearCamera() throws {
    guard let inputs = captureSession.inputs as? [AVCaptureInput], let frontCameraInput = self.frontCameraInput, inputs.contains(frontCameraInput),
        let rearCamera = self.rearCamera else { throw CameraControllerError.invalidOperation }

    self.rearCameraInput = try AVCaptureDeviceInput(device: rearCamera)

    captureSession.removeInput(frontCameraInput)

    if captureSession.canAddInput(self.rearCameraInput!) {
        captureSession.addInput(self.rearCameraInput!)

        self.currentCameraPosition = .rear
    }

    else { throw CameraControllerError.invalidOperation }
}
Both functions have extremely similar implementations. They start by getting an array of all the inputs in the capture session and ensuring that it’s possible to switch to the request camera. Next, they create the necessary input device, remove the old one, and add the new one. Finally, they set currentCameraPosition so that the CameraController class is aware of the changes. Easy! Go back to ViewController.swift so that we can add a function to switch cameras:
@IBAction func switchCameras(_ sender: UIButton) {
    do {
        try cameraController.switchCameras()
    }

    catch {
        print(error)
    }

    switch cameraController.currentCameraPosition {
    case .some(.front):
        toggleCameraButton.setImage(#imageLiteral(resourceName: "Front Camera Icon"), for: .normal)

    case .some(.rear):
        toggleCameraButton.setImage(#imageLiteral(resourceName: "Rear Camera Icon"), for: .normal)

    case .none:
        return
    }
}
Great! Open up your storyboard, connect the necessary outlets, and build and run the app. You should be able to freely switch cameras. Now we get to implement the most important feature: image capture!
Implementing Image Capture
Now we can implement the feature we’ve been waiting for this whole time: image capture. Before we get into it, let’s have a quick recap of everything we’ve done so far:
- Designed a working utility class that can be used to easily hide the complexities of AV Foundation.
- Implemented functionality within this class to allow us to create a capture session, use the flash, switch cameras, and get a working preview.
- Connected our class to a
UIViewControllerand built a lightweight camera app.
All we have left to do is actually capture the images!
Open up CameraController.swift and let’s get to work. Add a captureImage function with this signature:
func captureImage(completion: (UIImage?, Error?) -> Void) {

}
This function, as its name suggests, will capture an image for us using the camera controller we’ve built. Let’s implement it:
func captureImage(completion: @escaping (UIImage?, Error?) -> Void) {
    guard let captureSession = captureSession, captureSession.isRunning else { completion(nil, CameraControllerError.captureSessionIsMissing); return }

    let settings = AVCapturePhotoSettings()
    settings.flashMode = self.flashMode

    self.photoOutput?.capturePhoto(with: settings, delegate: self)
    self.photoCaptureCompletionBlock = completion
}
Great! It’s not a complicated implementation, but our code won’t compile yet, because we haven’t defined photoCaptureCompletionBlock and CameraController doesn’t conform to AVCapturePhotoCaptureDelegate. First, let’s add a property, photoCaptureCompletionBlock to CameraController:
var photoCaptureCompletionBlock: ((UIImage?, Error?) -> Void)?
And now, let’s extend CameraController to conform to AVCapturePhotoCaptureDelegate:
extension CameraController: AVCapturePhotoCaptureDelegate {
    public func capture(_ captureOutput: AVCapturePhotoOutput, didFinishProcessingPhotoSampleBuffer photoSampleBuffer: CMSampleBuffer?, previewPhotoSampleBuffer: CMSampleBuffer?,
                        resolvedSettings: AVCaptureResolvedPhotoSettings, bracketSettings: AVCaptureBracketedStillImageSettings?, error: Swift.Error?) {
        if let error = error { self.photoCaptureCompletionBlock?(nil, error) }

        else if let buffer = photoSampleBuffer, let data = AVCapturePhotoOutput.jpegPhotoDataRepresentation(forJPEGSampleBuffer: buffer, previewPhotoSampleBuffer: nil),
            let image = UIImage(data: data) {

            self.photoCaptureCompletionBlock?(image, nil)
        }

        else {
            self.photoCaptureCompletionBlock?(nil, CameraControllerError.unknown)
        }
    }
}
Great. Now the compiler is raising one more issue:
Type 'CameraController' does not conform to protocol 'NSObjectProtocol'.
We just need to make CameraController inherit from NSObject to fix this, so let’s do so now. Change the class declaration for CameraController to class CameraController: NSObject and we’ll be set!
Now, head back to ViewController one more time. First, import the Photos framework since we will use the built-in APIs to save the photo.
import Photos
And then insert the following function:
@IBAction func captureImage(_ sender: UIButton) {
    cameraController.captureImage {(image, error) in
        guard let image = image else {
            print(error ?? "Image capture error")
            return
        }

        try? PHPhotoLibrary.shared().performChangesAndWait {
            PHAssetChangeRequest.creationRequestForAsset(from: image)
        }
    }
}
We simply call the captureImage method of the camera controller to take photo, and then use the PHPhotoLibary class to save the image to the built-in photo library.
Lastly, connect the @IBAction func to the capture button in the Storyboard, and head over to Info.plist to insert a row:
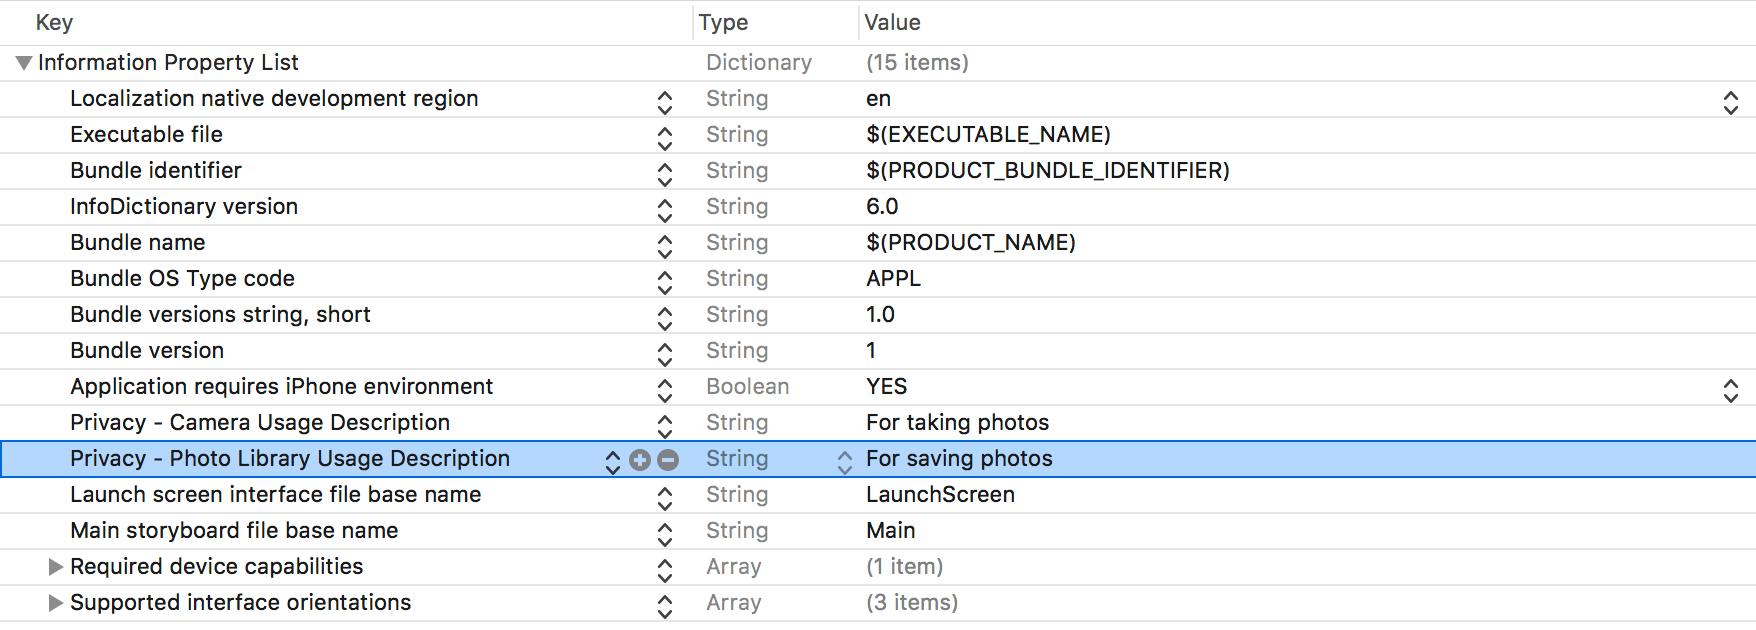
This is a privacy requirement introduced in iOS 10. You have to specify the reason why your app needs to access the photo library.
Now build and run the app to capture a photo! After that, open your photo library. You should see the photo you just captured. Congrats, you now know how to use AV Foundation in your apps! Good luck, and stay tuned for the second part of this tutorial, where we’ll learn how to capture videos.
For the complete project, you can download it from GitHub.


