

So, what’s QR code? I believe most of you know what a QR code is. In case you haven’t heard of it, just take a look at the above image – that’s a QR code.
QR (short for Quick Response) code is a kind of two-dimensional bar code developed by Denso. Originally designed for tracking parts in manufacturing, QR code has gained popularity in consumer space in recent years as a way to encode the URL of a landing page or marketing information. Unlike the basic barcode that you’re familiar with, a QR code contains information in both the horizontal and vertical direction. Thus this contributes to its capability of storing a larger amount of data in both numeric and letter form. I don’t want to go into the technical details of the QR code here. If you’re interested in learning more, you can check out the official website of QR code.
With the rising prevalence of iPhone and Android phones, the use of QR codes has been increased dramatically. In some countries, QR codes can be found nearly everywhere. They appear in magazines, newspapers, advertisements, billboards, name cards and even food menu. As an iOS developer, you may wonder how you can empower your app to read a QR code. Prior to iOS 7, you had to rely on third-party libraries to implement the scanning feature. Now, you can use the built-in AVFoundation framework to discover and read barcodes in real-time.
Creating an app for scanning and translating QR codes has never been so easy.
Creating a QR Code Reader App
The demo app that we’re going to build is fairly simple and straightforward. Before we proceed to build the demo app, however, it’s important to understand that any barcode scanning in iOS, including QR code scanning, is totally based on video capture. That’s why the barcode scanning feature is added in the AVFoundation framework. Keep this point in mind, as it’ll help you understand the entire chapter.
So, how does the demo app work?
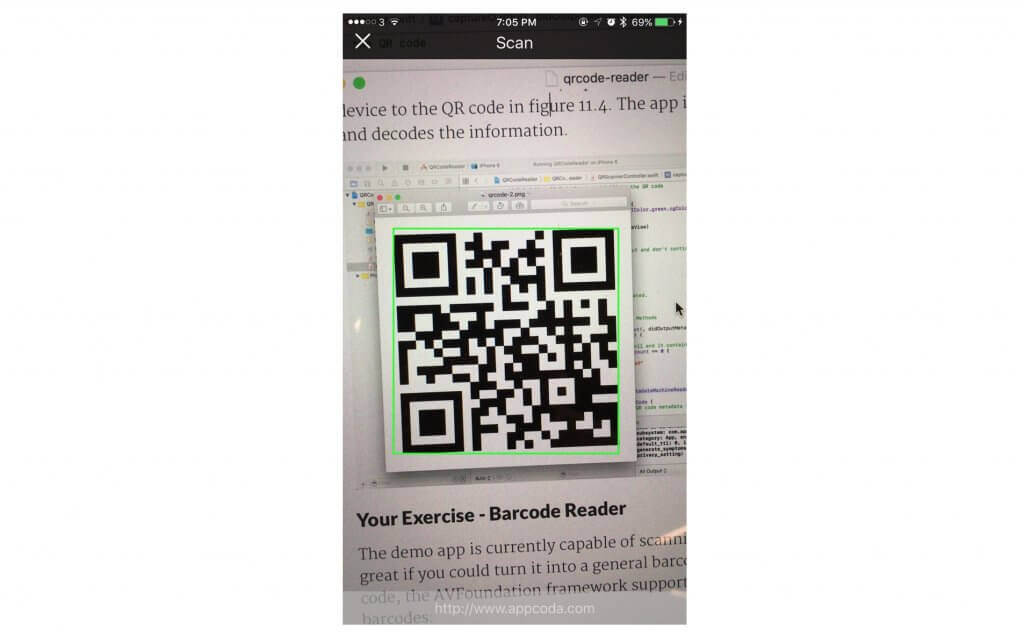
Take a look at the screenshot below. This is how the app UI looks. The app works pretty much like a video capturing app but without the recording feature. When the app is launched, it takes advantage of the iPhone’s rear camera to spot the QR code and recognizes it automatically. The decoded information (e.g. an URL) is displayed right at the bottom of the screen.
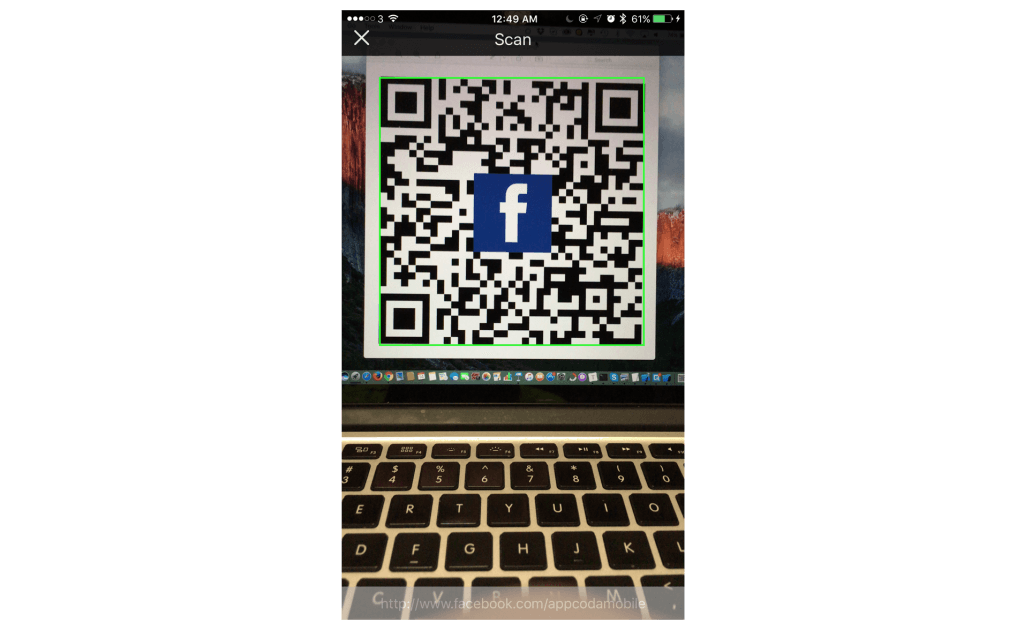
It’s that simple.
To build the app, you can start by downloading the project template from here. I have pre-built the storyboard and linked up the message label for you. The main screen is associated with the QRCodeViewController class, while the scanner screen is associated with the QRScannerController class.
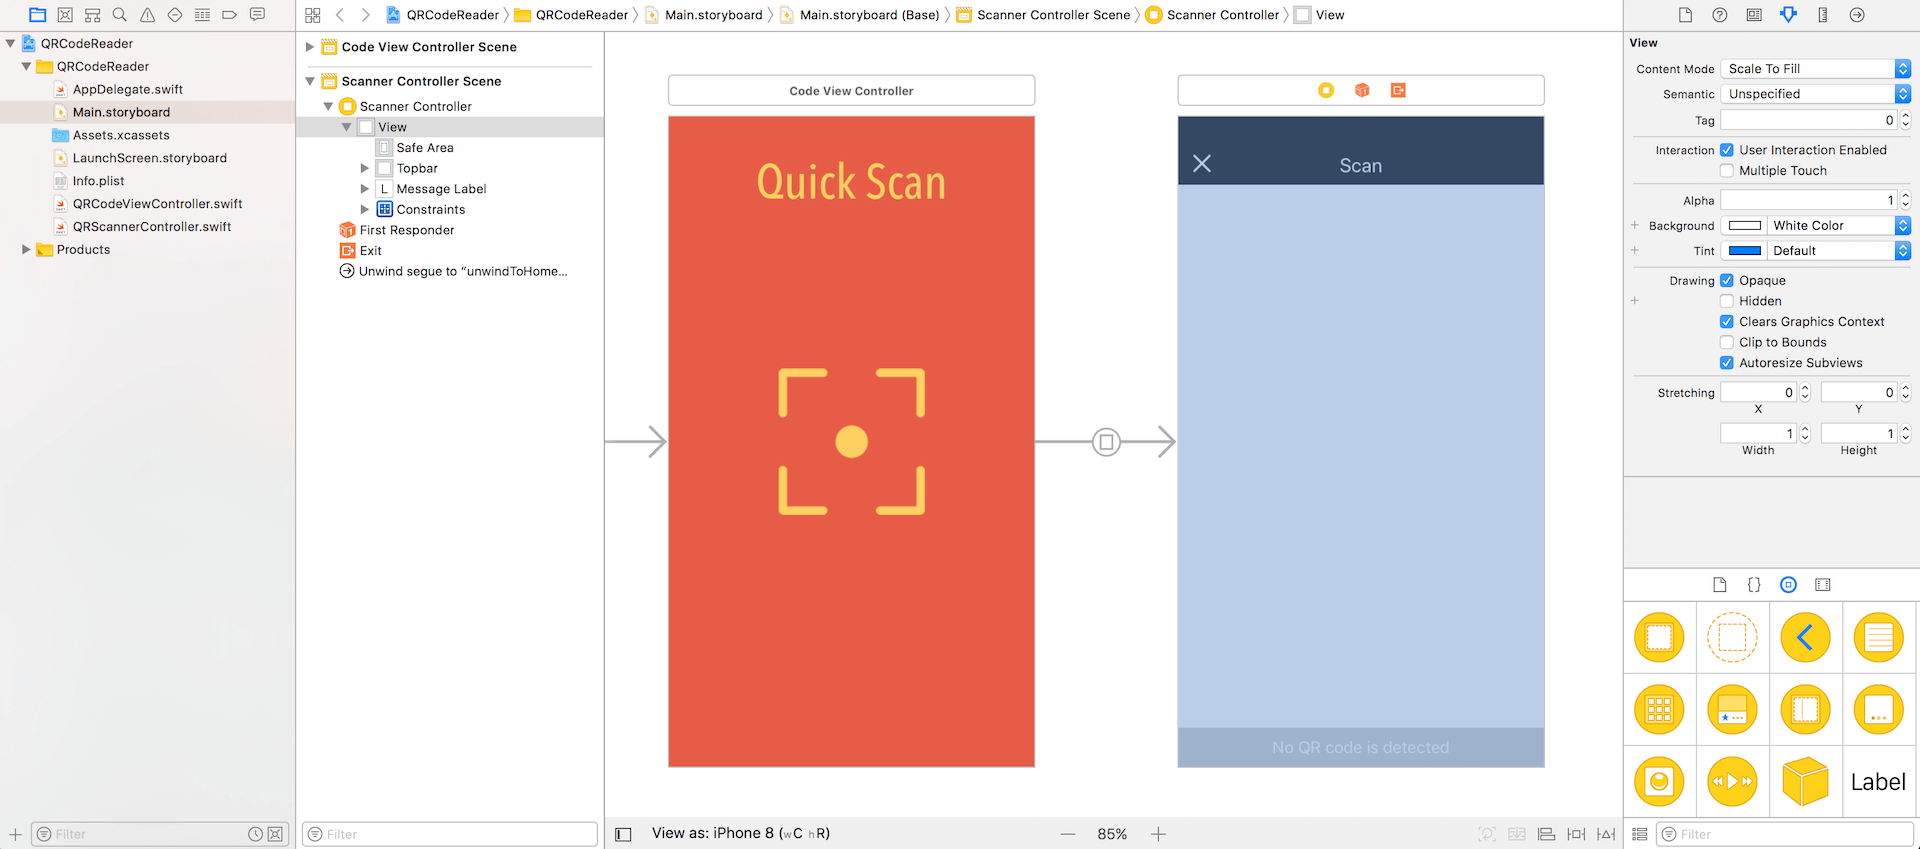
You can run the starter project to have a look. After launching the app, you can tap the scan button to bring up the scan view. Later we will implement this view controller for QR code scanning.
Now that you understand how the starter project works, let’s get started and develop the QR scanning feature in the app.
Import AVFoundation Framework
I have created the user interface of the app in the project template. The label in the UI is used to display the decoded information of the QR code and it is associated with the messageLabel property of the QRScannerController class.
As I mentioned earlier, we rely on the AVFoundation framework to implement the QR code scanning feature. First, open the QRScannerController.swift file and import the framework:
import AVFoundation
Later, we need to implement the AVCaptureMetadataOutputObjectsDelegate protocol. We’ll talk about that in a while. For now, adopt the protocol with an extension:
class ViewController: UIViewController, AVCaptureMetadataOutputObjectsDelegate
Before moving on, declare the following variables in the QRScannerController class. We’ll talk about them one by one later.
var captureSession:AVCaptureSession?
var videoPreviewLayer:AVCaptureVideoPreviewLayer?
var qrCodeFrameView:UIView?
Implementing Video Capture
As mentioned in the earlier section, QR code reading is totally based on video capture. To perform a real-time capture, all we need to do is:
- Look up the back camera device.
- Set the input of the
AVCaptureSessionobject to the appropriateAVCaptureDevicefor video capturing.
Insert the following code in the viewDidLoad method of the QRScannerController class:
// Get the back-facing camera for capturing videos
let deviceDiscoverySession = AVCaptureDevice.DiscoverySession(deviceTypes: [.builtInDualCamera], mediaType: AVMediaType.video, position: .back)

guard let captureDevice = deviceDiscoverySession.devices.first else {
    print("Failed to get the camera device")
    return
}

do {
    // Get an instance of the AVCaptureDeviceInput class using the previous device object.
    let input = try AVCaptureDeviceInput(device: captureDevice)

    // Set the input device on the capture session.
    captureSession.addInput(input)

} catch {
    // If any error occurs, simply print it out and don't continue any more.
    print(error)
    return
}
Assuming you’ve read the previous chapter, you should know that the AVCaptureDevice.DiscoverySession class is designed to find all available capture devices matching a specific device type. In the code above, we specify to retrieve the device that supports the media type AVMediaType.video.
To perform a real-time capture, we use the AVCaptureSession object and add the input of the video capture device. The AVCaptureSession object is used to coordinate the flow of data from the video input device to our output.
In this case, the output of the session is set to an AVCaptureMetaDataOutput object. The AVCaptureMetaDataOutput class is the core part of QR code reading. This class, in combination with the AVCaptureMetadataOutputObjectsDelegate protocol, is used to intercept any metadata found in the input device (the QR code captured by the device’s camera) and translate it to a human-readable format.
Don’t worry if something sounds weird or if you don’t totally understand it right now – everything will become clear in a while. For now, continue to add the following lines of code in the do block of the viewDidLoad method:
// Initialize a AVCaptureMetadataOutput object and set it as the output device to the capture session.
let captureMetadataOutput = AVCaptureMetadataOutput()
captureSession.addOutput(captureMetadataOutput)
Next, proceed to add the lines of code shown below. We set self as the delegate of the captureMetadataOutput object. This is the reason why the QRReaderViewController class adopts the AVCaptureMetadataOutputObjectsDelegate protocol.
// Set delegate and use the default dispatch queue to execute the call back
captureMetadataOutput.setMetadataObjectsDelegate(self, queue: DispatchQueue.main)
captureMetadataOutput.metadataObjectTypes = [AVMetadataObject.ObjectType.qr]
When new metadata objects are captured, they are forwarded to the delegate object for further processing. In the above code, we specify the dispatch queue on which to execute the delegate’s methods. A dispatch queue can be either serial or concurrent. According to Apple’s documentation, the queue must be a serial queue. So, we use DispatchQueue.main to get the default serial queue.
The metadataObjectTypes property is also quite important; as this is the point where we tell the app what kind of metadata we are interested in. The AVMetadataObject.ObjectType.qr clearly indicates our purpose. We want to do QR code scanning.
Now that we have set and configured an AVCaptureMetadataOutput object, we need to display the video captured by the device’s camera on screen. This can be done using an AVCaptureVideoPreviewLayer, which actually is a CALayer. You use this preview layer in conjunction with an AV capture session to display video. The preview layer is added as a sublayer of the current view. Insert the code below in the do-catch block:
// Initialize the video preview layer and add it as a sublayer to the viewPreview view's layer.
videoPreviewLayer = AVCaptureVideoPreviewLayer(session: captureSession)
videoPreviewLayer?.videoGravity = AVLayerVideoGravity.resizeAspectFill
videoPreviewLayer?.frame = view.layer.bounds
view.layer.addSublayer(videoPreviewLayer!)
Finally, we start the video capture by calling the startRunning method of the capture session:
// Start video capture.
captureSession.startRunning()
If you compile and run the app on a real iOS device, it crashes unexpectedly with the following error when you tap the scan button:
This app has crashed because it attempted to access privacy-sensitive data without a usage description. The app's Info.plist must contain an NSCameraUsageDescription key with a string value explaining to the user how the app uses this data.
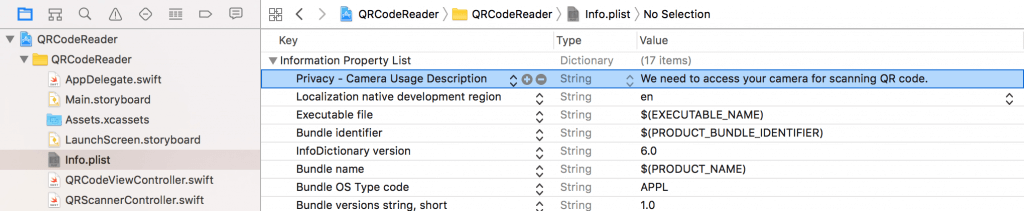
Similar to what we have done in the audio recording chapter, iOS requires app developers to obtain the user’s permission before allowing to access the camera. To do so, you have to add a key named NSCameraUsageDescription in the Info.plist file. Open the file and right-click any blank area to add a new row. Set the key to Privacy – Camera Usage Description, and value to We need to access your camera for scanning QR code.
Once you finish the editing, deploy the app and run it on a real device again. Tapping the scan button should bring up the built-in camera and start capturing video. However, at this point the message label and the top bar are hidden. You can fix it by adding the following line of code. This will move the message label and top bar to appear on top of the video layer.
// Move the message label and top bar to the front
view.bringSubview(toFront: messageLabel)
view.bringSubview(toFront: topbar)
Re-run the app after making the changes. The message label No QR code is detected should now appear on the screen.
Implementing QR Code Reading
As of now, the app looks pretty much like a video capture app. How can it scan QR codes and translate the code into something meaningful? The app itself is already capable of detecting QR codes. We just aren’t aware of that. Here is how we are going to tweak the app:
- When a QR code is detected, the app will highlight the code using a green box
- The QR code will be decoded and the decoded information will be displayed at the bottom of the screen
Initializing the Green Box
In order to highlight the QR code, we’ll first create a UIView object and set its border to green. Add the following code in the do block of the viewDidLoad method:
// Initialize QR Code Frame to highlight the QR code
qrCodeFrameView = UIView()

if let qrCodeFrameView = qrCodeFrameView {
    qrCodeFrameView.layer.borderColor = UIColor.green.cgColor
    qrCodeFrameView.layer.borderWidth = 2
    view.addSubview(qrCodeFrameView)
    view.bringSubview(toFront: qrCodeFrameView)
}
The qrCodeFrameView variable is invisible on screen because the size of the UIView object is set to zero by default. Later, when a QR code is detected, we will change its size and turn it into a green box.
Decoding the QR Code
As mentioned earlier, when the AVCaptureMetadataOutput object recognizes a QR code, the following delegate method of AVCaptureMetadataOutputObjectsDelegate will be called:
optional func metadataOutput(_ output: AVCaptureMetadataOutput, didOutput metadataObjects: [AVMetadataObject], from connection: AVCaptureConnection)
So far we haven’t implemented the method; this is why the app can’t translate the QR code. In order to capture the QR code and decode the information, we need to implement the method to perform additional processing on metadata objects. Here is the code:
func metadataOutput(_ output: AVCaptureMetadataOutput, didOutput metadataObjects: [AVMetadataObject], from connection: AVCaptureConnection) {
    // Check if the metadataObjects array is not nil and it contains at least one object.
    if metadataObjects.count == 0 {
        qrCodeFrameView?.frame = CGRect.zero
        messageLabel.text = "No QR code is detected"
        return
    }

    // Get the metadata object.
    let metadataObj = metadataObjects[0] as! AVMetadataMachineReadableCodeObject

    if metadataObj.type == AVMetadataObject.ObjectType.qr {
        // If the found metadata is equal to the QR code metadata then update the status label's text and set the bounds
        let barCodeObject = videoPreviewLayer?.transformedMetadataObject(for: metadataObj)
        qrCodeFrameView?.frame = barCodeObject!.bounds

        if metadataObj.stringValue != nil {
            messageLabel.text = metadataObj.stringValue
        }
    }
    }
The second parameter (i.e. metadataObjects) of the method is an array object, which contains all the metadata objects that have been read. The very first thing we need to do is make sure that this array is not nil, and it contains at least one object. Otherwise, we reset the size of qrCodeFrameView to zero and set messageLabel to its default message.
If a metadata object is found, we check to see if it is a QR code. If that’s the case, we’ll proceed to find the bounds of the QR code. These couple lines of code are used to set up the green box for highlighting the QR code. By calling the transformedMetadataObject(for:) method of viewPreviewLayer, the metadata object’s visual properties are converted to layer coordinates. From that, we can find the bounds of the QR code for constructing the green box.
Lastly, we decode the QR code into human-readable information. This step should be fairly simple. The decoded information can be accessed by using the stringValue property of an AVMetadataMachineReadableCode object.
Now you’re ready to go! Hit the Run button to compile and run the app on a real device.
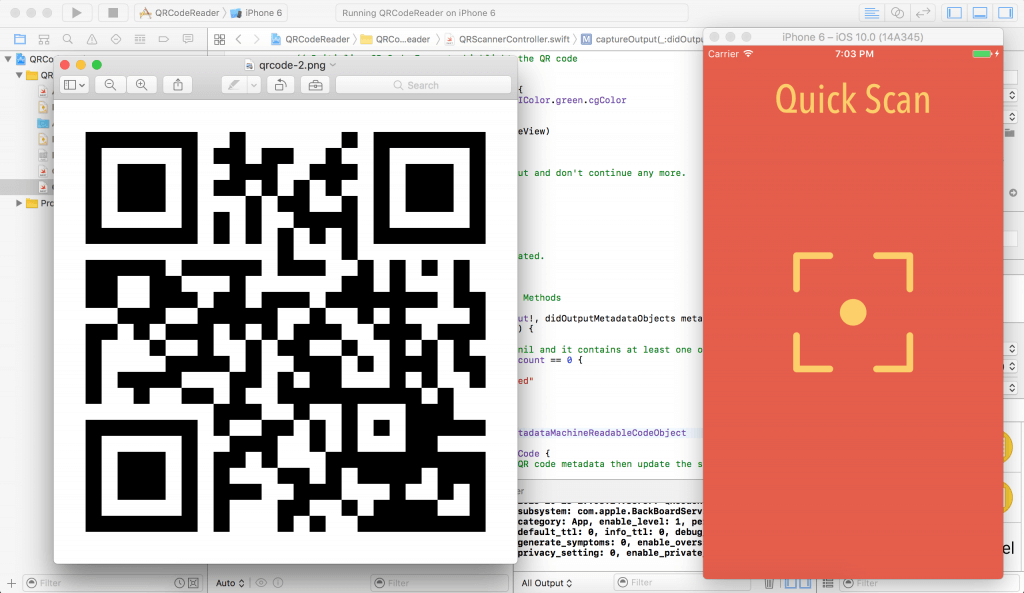
Once launched, tap the scan button and then point the device to the QR code in figure 11.4. The app immediately detects the code and decodes the information.
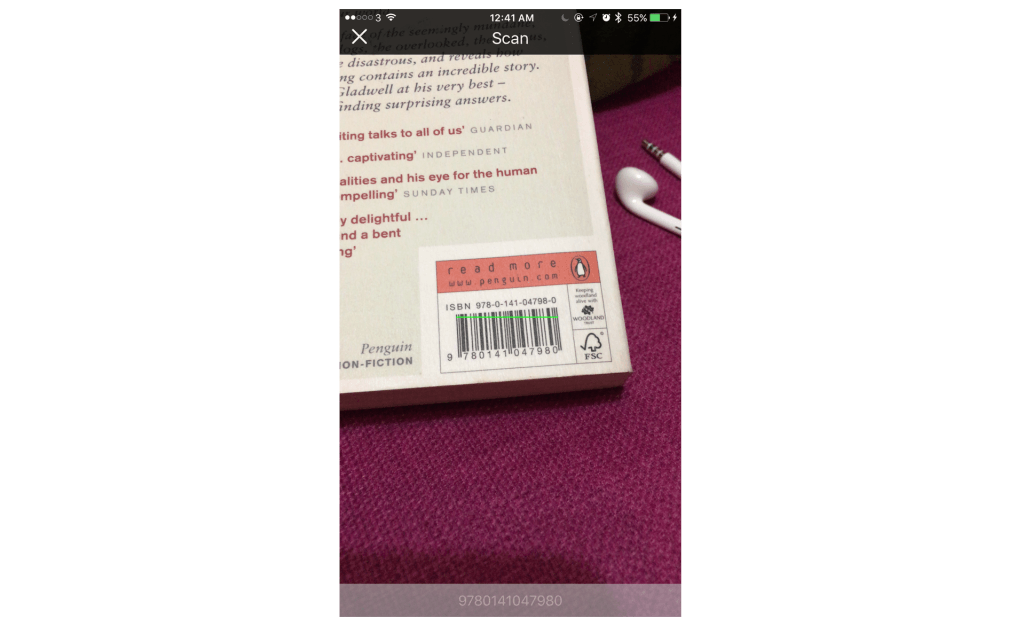
Your Exercise – Barcode Reader
The demo app is currently capable of scanning a QR code. Wouldn’t it be great if you could turn it into a general barcode reader? Other than the QR code, the AVFoundation framework supports the following types of barcodes:
- UPC-E (
AVMetadataObject.ObjectType.upce) - Code 39 (
AVMetadataObject.ObjectType.code39) - Code 39 mod 43 (
AVMetadataObject.ObjectType.code39Mod43) - Code 93 (
AVMetadataObject.ObjectType.code93) - Code 128 (
AVMetadataObject.ObjectType.code128) - EAN-8 (
AVMetadataObject.ObjectType.ean8) - EAN-13 (
AVMetadataObject.ObjectType.ean13) - Aztec (
AVMetadataObject.ObjectType.aztec) - PDF417 (
AVMetadataObject.ObjectType.pdf417) - ITF14 (
AVMetadataObject.ObjectType.itf14) - Interleaved 2 of 5 codes (
AVMetadataObject.ObjectType.interleaved2of5) - Data Matrix (
AVMetadataObject.ObjectType.dataMatrix)
Your task is to tweak the existing Xcode project and enable the demo to scan other types of barcodes. You’ll need to instruct captureMetadataOutput to identify an array of barcode types rather than just QR codes.
captureMetadataOutput.metadataObjectTypes = [AVMetadataObject.ObjectType.qr]
I’ll leave it for you to figure out the solution. While I include the solution in the Xcode project below, I encourage you to try to sort out the problem on your own before moving on. It’s gonna be fun and this is the best way to really understand how the code operates.
If you’ve given it your best shot and are still stumped, you can download the solution on GitHub.


