

Every developer always uses color combinations along with images to produce a good-looking result when creating an app, trying always to achieve the best user experience possible. Sometimes, however, something more might be needed; simple colors might not be good enough for the best outcome in certain cases, but gradient colors could become the perfect fit. I had personally a few times only the opportunity to create gradient colors, and the last time I did so I considered to be a good idea to have a post discussing about gradients, so here it is. The technique to create gradients is simple and it’s a pity not to be used by developers.
So, how can a gradient effect be created quickly and painlessly? There are actually three ways to achieve that. The first and least recommended way is to use images that contain the gradient effect. However the big disadvantage here is that you cannot change the gradient on the fly, unless you design and use a bunch of images representing various states of the gradient. That’s totally unproductive. The second way involves the use of Core Graphics techniques, but you need to have some knowledge about all that (for example the graphics context, color spaces, and more). Also, Core Graphics framework is addressed to more advanced users, so new developers might won’t like the idea of using it just to create a gradient effect. And that brings us to the third, super-fast and simplest approach: The use of a CAGradientLayer object.
The CAGradientLayer, a subclass of the CALayer class that every view object contains, exists just for that purpose; to make gradient effects. Generating a simple gradient takes four lines of code and less than a minute only, while the extremely few properties provided can be used for fine-tuning the final result. Almost all of them can be animated, so at the end you have beautiful results with a little effort. All the details will be discussed in the following parts of this post, but it’s important to understand that when using the CAGradientLayer class to create gradient effects, you’re actually working on the layer of the view that the gradient should apply to. One disadvantage of the CAGradientLayer is the fact that radial gradient is not supported, but that’s something you can live with if you mostly need to make linear gradients.
In the following parts I’m going into the details of each property that can be used to configure the gradient effect. I’m using mostly fancy colors just to make my point, and two colors only so as to keep things simple. However, that’s totally fine for our demo, as whatever you see works for more than two colors as well.
Creating a Gradient Layer
Creating a layer with gradient colors is a fast and simple task, including specific actions that must be taken. Actually, there are a few properties that you need to set, and you’re ready to go after that. Most probably, the greatest part of your time will be consumed in fine-tuning the final result when working with gradient layers; different values to the layer’s properties can lead to completely different outcome.
We’ll see everything step by step and in details, but first we need an app to play with. So, open Xcode and create a new application. Make sure to select the Single View Application template in the first step. Follow the on-screen guides and prompts, and when you’re ready continue reading here.
Supposing now that you have prepared a new project, click to the ViewController.swift file in the Project Navigator. Declare the following property right after the class opening line:
var gradientLayer: CAGradientLayer!
The gradientLayer property is going to be our test object from now on in this post. The minimum implementation we have to do in order to display a gradient layer in a target view can be outlined in the following simple steps:
- Initialise the
CAGradientLayerobject (thegradientLayerin our case). - Set the frame of the gradient layer.
- Set the colors you want to be used for producing the gradient effect.
- Add the gradient layer as a sublayer to the target view’s layer.
On top of those steps, there are more properties that can, and actually should be configured as well. We’ll see them in the following parts. For now, let’s focus on the above steps only. In order to keep things simple, we’ll use the default view of the ViewController class as the target view for our experiments, and we’ll fill it with gradient colors.
In the ViewController class now, let’s create a new method which we’ll use for initialising and setting some default values to the gradientLayer property:
func createGradientLayer() {
    gradientLayer = CAGradientLayer()

    gradientLayer.frame = self.view.bounds

    gradientLayer.colors = [UIColor.redColor().CGColor, UIColor.yellowColor().CGColor]

    self.view.layer.addSublayer(gradientLayer)
}
Here’s what is taking place in the above snippet (in fast forward mode): At first, we initialise the gradientLayer object. Then we set its frame and we make it equal to the view controller view’s bounds. Next we specify the colors we want for the gradient effect, and lastly we add the gradient layer as a sublayer to the default layer of the view.
If we call the above in the viewWillAppear(_: ) method:
override func viewWillAppear(animated: Bool) {
    super.viewWillAppear(animated)
    createGradientLayer()
}
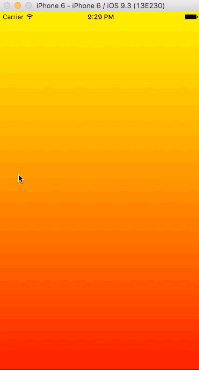
…and we run the app, here’s what we will get as a result:
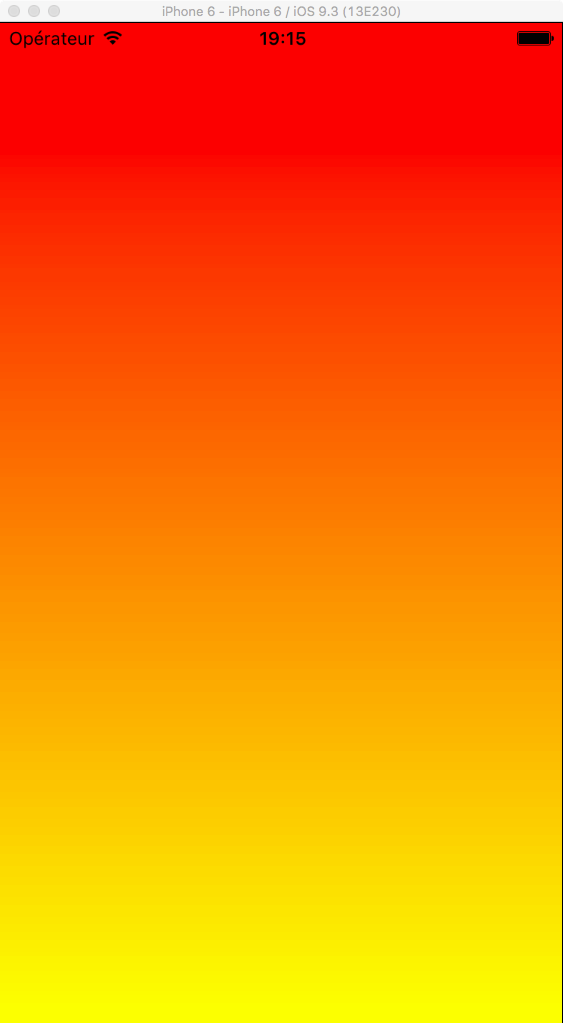
No bad at all, given the fact that we wrote four simple lines of code only. Let’s dive to some details now.
Gradient Colors
Even though the previous code snippet is really simple, there is actually one line that contains an important property: The colors property. Firstly, I think it’s needless to say that if you don’t use it to set colors, you’ll see no gradient at all. Secondly, this property expects an array of colors (to be honest, it expects an array of AnyObject objects) but not UIColor objects; instead the colors must always be CGColor objects. In the above example I used two colors only, but you can have as many colors as you want. For example, if we use the following set of colors:
gradientLayer.colors = [UIColor.redColor().CGColor, UIColor.orangeColor().CGColor, UIColor.blueColor().CGColor, UIColor.magentaColor().CGColor, UIColor.yellowColor().CGColor]
…then this is the result we’ll get when we run the app:

One great thing with the colors property is that it’s animatable, meaning that you can change the gradient effect’s colors in an animated way. To demonstrate that, let’s create a collection of color arrays that we can use. We’ll make each color set (the colors from each array) to be applied when we tap once to the view, but the transition from one to another color set will take place with an animation.
First things first, so go to the top of the ViewController class and declare the following two new properties right after the gradientLayer property:
var colorSets = [[CGColor]]()

var currentColorSet: Int!
The colorSets array expects as elements other arrays with CGColor objects. The currentColorSet will indicate the color set that is currently being applied to the gradient effect.
Now, let’s create the color sets. The following colors are just a sample, you can use any colors you may wish:
func createColorSets() {
    colorSets.append([UIColor.redColor().CGColor, UIColor.yellowColor().CGColor])
    colorSets.append([UIColor.greenColor().CGColor, UIColor.magentaColor().CGColor])
    colorSets.append([UIColor.grayColor().CGColor, UIColor.lightGrayColor().CGColor])

    currentColorSet = 0
}
In the above method, except for just preparing the arrays with the desired colors and appending them to the colorSets array, we also set the initial value of the currentColorSet property.
Let’s call it now in the viewDidLoad() method so the app executes that piece of code:
override func viewDidLoad() {
    super.viewDidLoad()

    createColorSets()
}
We also need to make a small change in the createGradientLayer() method. Find the following line:
gradientLayer.colors = [UIColor.redColor().CGColor, UIColor.orangeColor().CGColor, UIColor.blueColor().CGColor, UIColor.magentaColor().CGColor, UIColor.yellowColor().CGColor]
…and replace it with this one:
gradientLayer.colors = colorSets[currentColorSet]
Now the colors specified in the array indicated by the currentColorSet property will be used instead of the default colors we had before that change.
I said before that we’ll trigger the animated transition between colors simply by tapping on the view. That means that we need to add a tap gesture recognizer to the view, so while being in the viewDidLoad() let’s do so:
override func viewDidLoad() {
    ...

    let tapGestureRecognizer = UITapGestureRecognizer(target: self, action: #selector(ViewController.handleTapGesture(_:)))
    self.view.addGestureRecognizer(tapGestureRecognizer)
}
The handleTapGesture(_:) method will be called when the view receives the tap gesture. It doesn’t exist so far, so let’s create it. Notice that a CABasicAnimation is used in the following code so it’s possible to animate the layer’s colors property. At that point I take it for granted that you have some basic knowledge about the CABasicAnimation class and how animations are achieved with it. If not, then a quick search on the web will return interesting results. In any case, I’m excluding some properties and I’m just keeping the basics needed to perform the animation.
func handleTapGesture(gestureRecognizer: UITapGestureRecognizer) {
    if currentColorSet < colorSets.count - 1 {
        currentColorSet! += 1
    }
    else {
        currentColorSet = 0
    }

    let colorChangeAnimation = CABasicAnimation(keyPath: "colors")
    colorChangeAnimation.duration = 2.0
    colorChangeAnimation.toValue = colorSets[currentColorSet]
    colorChangeAnimation.fillMode = kCAFillModeForwards
    colorChangeAnimation.removedOnCompletion = false
    gradientLayer.addAnimation(colorChangeAnimation, forKey: "colorChange")
}
Initially we determine what the index of the next color set should be. If the currently selected color set is the last one in the colorSets array, then we start again from the beginning (currentColorSet = 0) otherwise we just increase the currentColorSet property by one.
The next bunch of code regards the animation. The most important properties specified here are the duration that means how long the animation will last, and the toValue that sets the desired final value we want for the property colors (which is specified upon the CABasicAnimation class initialisation). The other two properties make the animated changes stay to the layer, and not revert back to the original colors. However, that's not permanent. We need to explicitly set the new gradient colors. When? Right after the animation has finished. This can be achieved by overriding the following method that's being called when the CABasicAnimation gets finished:
override func animationDidStop(anim: CAAnimation, finished flag: Bool) {
    if flag {
        gradientLayer.colors = colorSets[currentColorSet]
    }
}
And one more addition to the handleTapGesture(_:) method, so the above method has an actual effect:
func handleTapGesture(gestureRecognizer: UITapGestureRecognizer) {
    ...

    // Add this line to make the ViewController class the delegate of the animation object.
    colorChangeAnimation.delegate = self

    gradientLayer.addAnimation(colorChangeAnimation, forKey: "colorChange")
}
That's all. Feel free to increase or decrease the animation duration. I intentionally set two seconds duration, so it's easy to see the gradient colors changing:
Color Locations
Knowing how to set or change the colors of the gradient effect consists of the basics regarding the gradient layers, but that's not enough if you want to have full control over the final result. It's equally useful to know how to modify the area covered by each color on the layer and override the default layout of the colors.
If you look at any gradient effect created previously, you'll notice that each color is occupying the half of the layer by default:
That can change by using a property called locations provided by the CAGradientLayer class. That property expects an array with NSNumber objects as a value, where each number determines the starting location for each color. Also, and that's important, those numbers should mandatorily range from 0.0 to 1.0.
To make it perfectly clear, all you need is to see it action. Go to the createGradientLayer() method, and add that line:
gradientLayer.locations = [0.0, 0.35]
Here's how the gradient is affected when the app runs again:

The second color's starting location is according to the second value we set in the locations array. We can also say that the second color covers the 65% of the layer (1.0 - 0.35 = 0.65). As a precaution, make sure that the location of an earlier color is not greater than the location of a color that comes next, otherwise an undesired overlapping will take place as it's shown in the following figure:

If you want to see the above happening in your own app, just set the [0.5, 0.35] values as the locations for the colors.
Let's make the demo app now a bit more spicy, and let's add a new tap gesture recogniser to the view. This time we require two fingers for the tap. In the viewDidLoad() add the next lines:
override func viewDidLoad() {
    ...

    let twoFingerTapGestureRecognizer = UITapGestureRecognizer(target: self, action: #selector(ViewController.handleTwoFingerTapGesture(_:)))
    twoFingerTapGestureRecognizer.numberOfTouchesRequired = 2
    self.view.addGestureRecognizer(twoFingerTapGestureRecognizer)
}
In the handleTwoFingerTapGesture(_:) method we'll create random values for the locations of both colors. However, we'll make sure that the first location value is always smaller than the second one's. In addition to that, the new locations will be printed to the console at the same time. Here it is:
func handleTwoFingerTapGesture(gestureRecognizer: UITapGestureRecognizer) {
    let secondColorLocation = arc4random_uniform(100)
    let firstColorLocation = arc4random_uniform(secondColorLocation - 1)

    gradientLayer.locations = [NSNumber(double: Double(firstColorLocation)/100.0), NSNumber(double: Double(secondColorLocation)/100.0)]

    print(gradientLayer.locations!)
}
And that's what happens when tapping with two fingers now in the app:

Note that by default the locations property is nil, so watch out for potential crashes when you use it in your code. Besides that, even though we're working with two colors only in this demo app to keep things simple, every aspect that's discussed applies when having more than two colors for the gradient effect as well.
Gradient Direction
By knowing at this point how to handle the colors property of the gradient layer, let's proceed in learning how we can deal with the direction of the gradient effect. For starters, just watch the following screenshot again:
You can instantly realize that the gradient effect starts from the top and heads towards bottom. Actually, this is the default direction for the colors applied to any gradient layer, and like everything else, it can be overridden so the final effect gets a different direction.
The CAGradientLayer class provides two properties that can be used in order to specify the direction of the gradient. These are:
startPointendPoint
A CGPoint value shall be always assigned to any of the above properties, and both the x and y values should range from 0.0 to 1.0. Actually, the startPoint describes the starting coordinates of the first color, and the endPoint describes the ending coordinates of the last color, creating that way the direction of the gradient. However, there is an important detail here; the coordinates are expressed in the operating system's coordinate space.
What does this mean?
In order to easily understand it, take a look at the following figure:
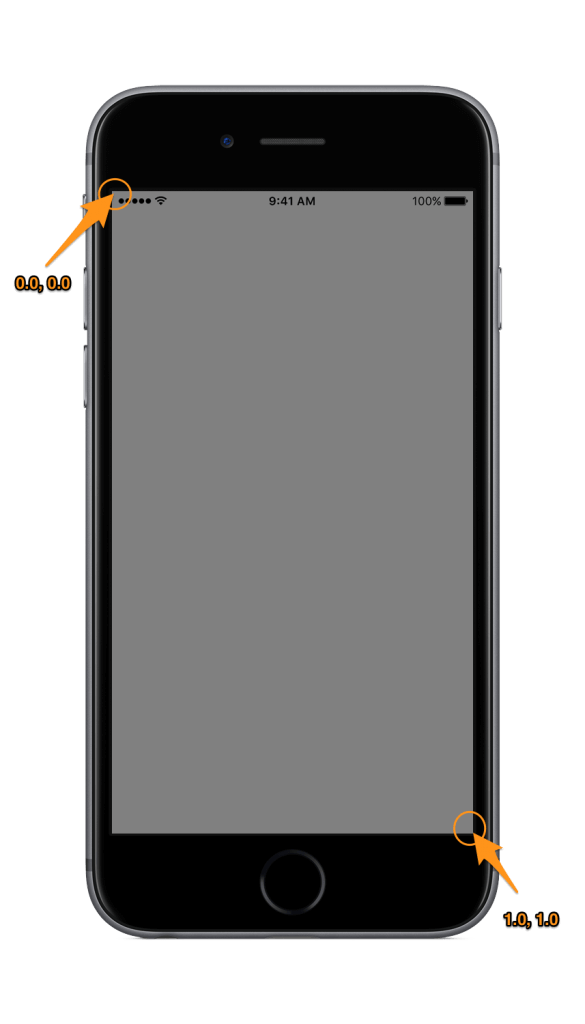
In iOS, the zero point (starting point) is the top-left corner of the screen (x = 0.0, y = 0.0), while the bottom-right corner is the ending point (x = 1.0, y = 1.0). Any other point is within those coordinates, and as I've already said both x and y must be limited in the range 0.0 to 1.0.
The above coordinates are not the same for other operating systems. Take for example a simple window (here's the Textedit) on Mac:
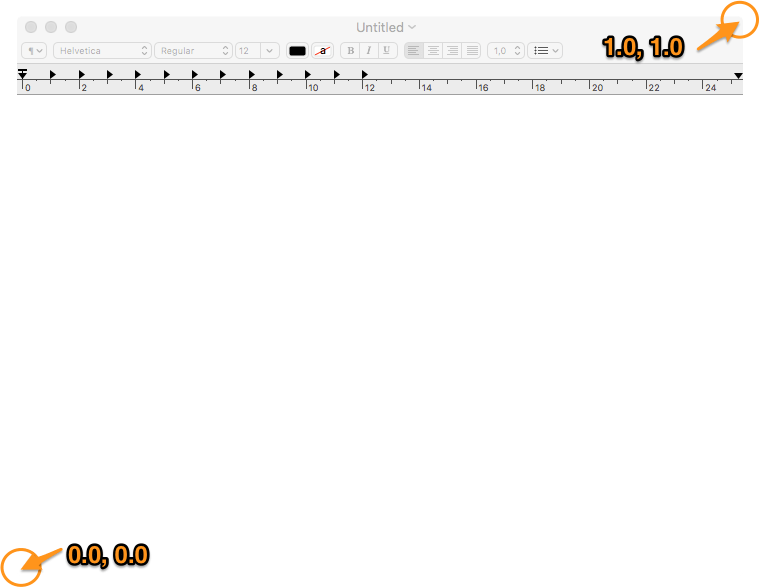
The starting point here is the bottom-left corner, and the ending point is the top-right corner, and therefore the coordinate space is different than that in iOS.
By default, the startPoint equals to the (0.5, 0.0) point, while the endPoint equals to the (0.5, 1.0). Notice that the x value remains the same, but the y value starts from 0.0 (top) and ends to 1.0 (bottom), so the direction towards bottom is created. If you want to see a different direction fast, go to the createGradientLayer() method and the following two lines:
func createGradientLayer() {
    ...

    gradientLayer.startPoint = CGPointMake(0.0, 0.5)
    gradientLayer.endPoint = CGPointMake(1.0, 0.5)
}
In that case the x value changes from 0.0 to 1.0, while the y value remains unmodified. The above will result in a gradient effect with direction towards right:

To fully understand the gradient direction, modify the above properties by setting any value between 0.0 and 1.0 for both x and y and watch what happens with every new change. Here, we are going to make our demo app more interesting by adding a new functionality so we can play with the gradient direction: We will add a pan gesture to the view, and depending on the gesture movement we'll change the direction accordingly. We'll support the following directions:
- Towards Top
- Towards Bottom
- Towards Right
- Towards Left
- From Top-Left to Bottom-Right
- From Top-Right to Bottom-Left
- From Bottom-Left to Top-Right
- From Bottom-Right to Top-Left
Back to our project, let's get started by creating an enum to represent all the possible directions we'd like to have:
enum PanDirections: Int {
    case Right
    case Left
    case Bottom
    case Top
    case TopLeftToBottomRight
    case TopRightToBottomLeft
    case BottomLeftToTopRight
    case BottomRightToTopLeft
}
And after that, declare a new property in the ViewController class to indicate the gradient direction:
var panDirection: PanDirections!
The panDirection property will get the proper value depending on the movement of the finger. We are going to handle that as a two-step task: Initially we'll determine the desired direction and we'll assign it to the above property. Next, and right after the pan gesture is finished, we'll set the proper values to the startPoint and endPoint properties, taking into account of course the indicated direction.
Before doing all that, we need to create a new pan gesture recogniser object and add it to the view. For that, go to the viewDidLoad() method and add the lines you see next:
override func viewDidLoad() {
    ...

    let panGestureRecognizer = UIPanGestureRecognizer(target: self, action: #selector(ViewController.handlePanGestureRecognizer(_:)))
    self.view.addGestureRecognizer(panGestureRecognizer)
}
In the implementation of the handlePanGestureRecognizer(_:) we will use the velocity property of the gesture recogniser. If that velocity is more than 300.0 points towards any direction (x or y), that direction will be taken into account. The logic is simple to understand: The primary case is to check the velocity on the horizontal axis. The velocity on the vertical axis is a check being made in a secondary level. See the comments to get it:
func handlePanGestureRecognizer(gestureRecognizer: UIPanGestureRecognizer) {
    let velocity = gestureRecognizer.velocityInView(self.view)

    if gestureRecognizer.state == UIGestureRecognizerState.Changed {
        if velocity.x > 300.0 {
            // In this case the direction is generally towards Right.
            // Below are specific cases regarding the vertical movement of the gesture.

            if velocity.y > 300.0 {
                // Movement from Top-Left to Bottom-Right.
                panDirection = PanDirections.TopLeftToBottomRight
            }
            else if velocity.y < -300.0 {
                // Movement from Bottom-Left to Top-Right.
                panDirection = PanDirections.BottomLeftToTopRight
            }
            else {
                // Movement towards Right.
                panDirection = PanDirections.Right
            }
        }
        else if velocity.x < -300.0 {
            // In this case the direction is generally towards Left.
            // Below are specific cases regarding the vertical movement of the gesture.

            if velocity.y > 300.0 {
                // Movement from Top-Right to Bottom-Left.
                panDirection = PanDirections.TopRightToBottomLeft
            }
            else if velocity.y < -300.0 {
                // Movement from Bottom-Right to Top-Left.
                panDirection = PanDirections.BottomRightToTopLeft
            }
            else {
                // Movement towards Left.
                panDirection = PanDirections.Left
            }
        }
        else {
            // In this case the movement is mostly vertical (towards bottom or top).

            if velocity.y > 300.0 {
                // Movement towards Bottom.
                panDirection = PanDirections.Bottom
            }
            else if velocity.y < -300.0 {
                // Movement towards Top.
                panDirection = PanDirections.Top
            }
            else {
                // Do nothing.
                panDirection = nil
            }
        }
    }
    else if gestureRecognizer.state == UIGestureRecognizerState.Ended {
        changeGradientDirection()
    }
}
There are two things to notice above (further than how we determine the pan gesture direction of course):
- The
panDirectionbecomes nil if none of the other conditions is satisfied. - The direction is specified in the
Changedstate of the gesture. When the gesture is ended, a call to thechangeGradientDirection()method is taking place, so the new direction to apply based on the value of thepanDirectionproperty.
The following method is simple, as we just set the appropriate values to the startPoint and endPoint properties of the gradient layer. Watch how the x and y values are set depending on the gesture direction:
func changeGradientDirection() {
    if panDirection != nil {
        switch panDirection.rawValue {
        case PanDirections.Right.rawValue:
            gradientLayer.startPoint = CGPointMake(0.0, 0.5)
            gradientLayer.endPoint = CGPointMake(1.0, 0.5)

        case PanDirections.Left.rawValue:
            gradientLayer.startPoint = CGPointMake(1.0, 0.5)
            gradientLayer.endPoint = CGPointMake(0.0, 0.5)

        case PanDirections.Bottom.rawValue:
            gradientLayer.startPoint = CGPointMake(0.5, 0.0)
            gradientLayer.endPoint = CGPointMake(0.5, 1.0)

        case PanDirections.Top.rawValue:
            gradientLayer.startPoint = CGPointMake(0.5, 1.0)
            gradientLayer.endPoint = CGPointMake(0.5, 0.0)

        case PanDirections.TopLeftToBottomRight.rawValue:
            gradientLayer.startPoint = CGPointMake(0.0, 0.0)
            gradientLayer.endPoint = CGPointMake(1.0, 1.0)

        case PanDirections.TopRightToBottomLeft.rawValue:
            gradientLayer.startPoint = CGPointMake(1.0, 0.0)
            gradientLayer.endPoint = CGPointMake(0.0, 1.0)

        case PanDirections.BottomLeftToTopRight.rawValue:
            gradientLayer.startPoint = CGPointMake(0.0, 1.0)
            gradientLayer.endPoint = CGPointMake(1.0, 0.0)

        default:
            gradientLayer.startPoint = CGPointMake(1.0, 1.0)
            gradientLayer.endPoint = CGPointMake(0.0, 0.0)
        }
    }
}
In case the panDirection is nil, no action is taken at all.
Now run the app and move your finger towards any supported direction. The gradient will change direction too in accordance to the movement you're making.
Summary
I hope at this point that I've proven the ease of use that governs the CAGradientLayer and the generation of gradient effects programmatically. By properly combining the values of the properties previously discussed you can easily achieve a really good-looking result. Animating is also a big plus if it fits to the UI, so give it a chance. As this topic has been fairly easy, I think all you have to do is to go and start experimenting with gradient colors. You now have all the knowledge you need. So, have fun!
For the sample project, you can check it out at GitHub.


