
When programming in iOS, there are certain aspects of the SDK that pull the developers’ attention and interest a lot more than others, and one of them is the Multipeer Connectivity framework. As you know, the MPC framework is not new in iOS 8, instead it was first-introduced in the seventh (7th) version of it, about a year and a half ago. In the past, I’d written a couple of tutorials about it, and to tell the truth, I was surprised from the interest that people seemed to have about it. Now, some months later, I return with a new post regarding it, as I believe that there are still things that need to be explained.
You may wonder why I bring to the surface a topic a bit old, and not something new included in iOS 8. Well, I’m doing that for three reasons:
- Many readers have approached me through e-mail messages, asking how to perform various tasks in multipeer connectivity that were not mentioned in the previous two tutorials. By answering to all those messages, I found out that there’s a need that I hadn’t noticed earlier; People want more information about it, which is hard to find sometimes.
- The implementation I presented in the last couple tutorials was based in the use of a default, pre-made view controller existing in the iOS SDK for inviting other peers and establishing a connection. I found out that people was asking for manual implementation, and that’s something we are about to see here.
- I think that it will be quite useful and educational to see how to implement MPC in Swift.
During the lifetime of the multipeer connectivity framework, it has been proved that the possibilities that it came to offer gave birth to new ideas to a great number of developers. Connecting devices using such a simple way seems so attractive, and that’s why programmers want to integrate it into their applications. However, if you haven’t used the MPC framework yet, I must warn you: Sometimes it’s not as reliable as you may expect, and that’s something I’ve seen personally in my projects, and also other developers have reported to me. MPC uses both Bluetooth and WiFi to connect nearby devices, but even though it sounds too good and promising, sometimes the connection either fails or is to slow, leading to communication errors. That’s important in cases you need to transfer vital data. I would advice you to use a backup communication solution (such as a web service), so you make sure that there is an alternative and your application will continue to work even if the MPC fails. However, despite to what I just said, I still believe that MPC if a good tool for all iOS developers, so it worths it one (last) more tutorial.
Getting into the details of MPC is not something I’m planning to do. If you want to get a taste of it, then simply pay a visit to this tutorial here. Instead, I’m going to give you a short overview of the multipeer connectivity framework.
So, MPC contains four important classes representing the following concepts:
- Peer (MCPeerID): A peer is actually a device, programmatically represented. It’s usually the first thing needs to be set up, as an object of this class is used as a parameter upon the initialization of the next classes’ instances. Also, it contains an important property, named displayName. This is the device name appearing to the other, nearby peers.
- Session (MCSession class): It’s the connection established between two peers, after the first one has invited the second, and of course the invitation has been accepted. A session regards two devices only. A third device cannot be connected to an existing session, instead another one is used.
- Browser (MCNearbyServiceBrowser class): The methods of this class are used to find other nearby devices and invite them to join a session. As a prerequisite, the other devices must advertise themselves. In this tutorial we’ll use this class to manually invite other devices.
- Advertiser (MCNearbyServiceAdvertiser): This class is responsible for advertising a device, meaning making the device visible or not to others, and for accepting or not invitations from other peers for connecting to sessions.
The logic of the multipeer connectivity framework is simple: A device (a peer) using its browser, searches for other devices around. As I said, a device must advertise itself so as to be discoverable. Once it finds one or more peers, it can send an invitation for connecting to a session. The invitation can be sent either automatically once a nearby peer is found, or after the user has decided to do so. Actually, this is totally up to the application that is being implemented, so there’s not a standard recipe. You will be the one to decide when you’ll send an invitation. In any case, once the invitation has been accepted, the session is established and then the two peers can send and receive data, resources, or streams.
My goal in this post is to show you how to programmatically browse, invite and connect to other peers. Note that what you’ll see next, it’s just a way of implementation. Obviously, you can use all the provided tools by the MPC in the way you want and perform your own implementation that suits to the application you build. What you’ll see it’s just a sample of how the MPC framework can be implemented and integrated purely programmatically from the beginning to the end, without using any pre-made view controller of the SDK. Hopefully, by the end of this tutorial, many of you may find some answers to what you seek.
Lastly, if you’ve never worked with the MPC framework before I encourage you to take a quick look at both the official documentation by Apple, and my previous tutorials, so you have an idea before you proceed. Having said that, let’s don’t waste any more time, and let’s dive in some programming aspects of the multipeer connectivity.
About the Demo App
Let’s talk now a bit about the demo application of this tutorial, which is going to be a chat application. Okay, I know that it might be a scenario too common and that we created a chat app in the first multipeer connectivity tutorial, however let me justify myself by saying this: No matter how hard I tried to find another, better example, the chat application was always the #1 in my list when I was thinking about the programming stuff I wanted to present today. I believe this is something that you’ll agree with too by the end of the tutorial, so let’s move forward.
As we have already done in many tutorials, we are not going to build the app from scratch. Instead, I’ll give you a starter project which you can download here, and we’ll keep working on that. The application will be called MPCRevisited, and I think that is the best title in this case. Please go and navigate yourself around the project once you download it, so you get familiarized with it and be able to work fast in it.
As I said, we are going to build a chat application. This application will be parted by two view controllers, where the second one will be modally displayed to the user. If you look to the Interface Builder in the project, you’ll see that in the first view controller’s scene there’s a tableview. In this tableview we are going to display all the nearby devices discovered by the multipeer connectivity framework, while the peers’ list will be dynamically refreshed as existing peers will be lost, and new peers will appear near to the device. In the first view controller you will also find a toolbar with a bar button item in it. Later on, we’ll use this button item to turn on and off the discoverability of the device with aim to see how the advertising feature of the MPC works.
Once a listed peer is tapped, we’ll ask the user at the other end if he wants to chat or not. If he declines, nothing will happen. But upon acceptance, the second view controller named ChatViewController will be displayed on the screen, so the two devices can exchange text messages. In the second view controller scene there is a textfield for writing the message, and a tableview where all the messages will be listed. Also, a toolbar at the top and with another bar button item will be used to end the chat. I believe its completely pointless to discuss any further details here, as we’ll see everything quite thoroughly upon implementation.
Before I present you a few screenshots of the final app, let me also say one last thing. Even though we can connect a device with up to seven (7) more using the multipeer connectivity, in our example we are going to connect it to just one more peer, the one that we’ll chat with each time. Let me clarify that connecting peers together using sessions is a completely different thing from discovering and listing all nearby peers, and now I’m referring to the first case. Anyway, you’ll see everything step by step starting from the next part, but for now, just take a taste from the app:


A Custom Class
Knowing what our project is all about, let’s get our hands dirty by creating a custom class. In this class we will deal with the multipeer connectivity by implementing all the necessary framework methods needed to function properly. Also, as you’ll see by the end of this part, we will create a new protocol with ultimate goal to use the delegation pattern and pass that way messages to the calling class.
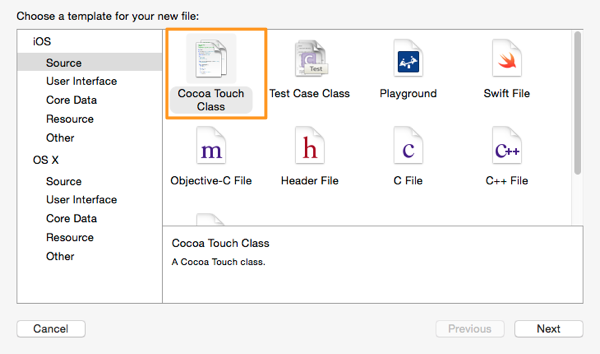
But, first things first. In Xcode, hit the Cmd-N key combination on your keyboard. In the guide that appears, select to create a new Cocoa Touch Class as shown below:
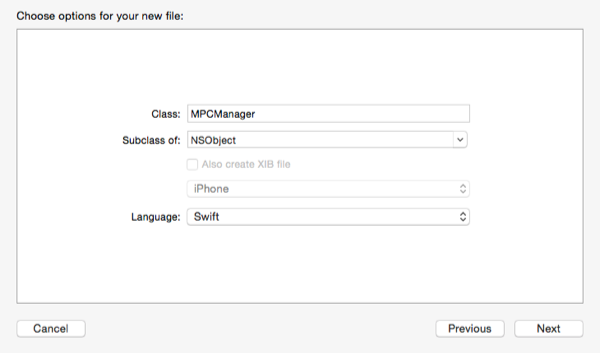
In the second step, make the new class subclass of the NSObject class, and name it MPCManager.
Proceed to get finished with the guide, and then make sure that you are working on the MPCManager.swift file.
As the first line of code, we’ll import the multipeer connectivity framework to the class. So, head to the top of the file and add the following:
import MultipeerConnectivity
Now, let’s declare the objects of the MPC framework classes that we’re going to use. At the top of the class add the next lines:
var session: MCSession!

var peer: MCPeerID!

var browser: MCNearbyServiceBrowser!

var advertiser: MCNearbyServiceAdvertiser!
Apart from the above, let’s declare in advance two more variables that we are going to need later:
var foundPeers = [MCPeerID]()

var invitationHandler: ((Bool, MCSession!)->Void)!
In the foundPeers array we will store all the peers that the browser of a device will discover. Note that no connection to these peers will be made, we just need to know all the found peers by the device. Also, this array is initialized upon declaration, as there’s no need to keep it nil. We want it ready to accept new objects once we they’re found.
The invitationHandler is actually a completion handler declaration, but for now I won’t say anything more. We’ll talk about it when it’s time to use it.
Our next step is to make our custom class conform to specific MPC protocols. The delegate methods of these protocols will make us able to handle the multipeer connectivity, and deal with the browser, the advertiser and the session. So, modify the class’s header line by adding the protocols as shown below:
class MPCManager: NSObject, MCSessionDelegate, MCNearbyServiceBrowserDelegate, MCNearbyServiceAdvertiserDelegate
I think it’s needless to say what each protocol is for.
Now, let’s create an initializer and let’s initialize all the MPC objects. We’ll see them one by one, starting from the peer object. This one represents the device as seen by all the other nearby devices, and upon its initialization it requires to be provided with a display name. This display name will be visible to other peers, and it can be any string you want. We will keep things simple here by simply setting the device’s name as the display name of the peer, however I don’t recommend to do so in a real application. Maybe you should let users type the name they desire, or use another method to specify the peer’s name. In code, the initialization is the following:
override init() {
    super.init()

    peer = MCPeerID(displayName: UIDevice.currentDevice().name)
}
Through the UIDevice class we access the device’s name.
With the peer object already initialized, we can proceed to the rest of the objects. Note that the peer must be the first one that gets initialized, as it’s used by all the other objects as a parameter upon their initialization. Let’s focus on the session object:
override init() {
    ...

    session = MCSession(peer: peer)
    session.delegate = self
}
As you can see, a session object is initialized with just one argument, the peer we previously specified. Besides the initialization, we also make our class the delegate of the session object.
Next, the browser object:
override init() {
    ...

    browser = MCNearbyServiceBrowser(peer: peer, serviceType: "appcoda-mpc")
    browser.delegate = self
}
The initializer of this object accepts two parameters: The first one is the peer. The second one is a value that can’t be changed after the initialization, and it regards the service type that the browser should browse for. In simple words, it uniquely identifies the application among others so the MPC knows what to search for, and the same service type value must be set to the advertiser as well (you’ll see that in just a second). There are two rules that you should always follow when setting this value: (a) It mustn’t be longer than 15 characters, and (b) it can contain only lowercase ASCII characters, numbers and hyphens. In case you break any rule, an exception will be thrown at runtime and the app will crash.
Regarding the advertiser:
override init() {
    ...

    advertiser = MCNearbyServiceAdvertiser(peer: peer, discoveryInfo: nil, serviceType: "appcoda-mpc")
    advertiser.delegate = self
}
Notice that here we set the same service type value as before. The extra parameter existing here, named discoveryInfo, is a dictionary that can contain any kind of extra information you want to pass to the other peers upon discovery. Note that both keys and values of this dictionary must be strings. For simplicity reasons, we set this parameter to nil.
The init method is ready, and here it is in one piece:
override init() {
    super.init()

    peer = MCPeerID(displayName: UIDevice.currentDevice().name)

    session = MCSession(peer: peer)
    session.delegate = self

    browser = MCNearbyServiceBrowser(peer: peer, serviceType: "appcoda-mpc")
    browser.delegate = self

    advertiser = MCNearbyServiceAdvertiser(peer: peer, discoveryInfo: nil, serviceType: "appcoda-mpc")
    advertiser.delegate = self
}
Before we reach the end of this part, let’s create a new protocol for implementing the delegation pattern. Note that we’ll declare all the delegate methods that we’re about to need during the development of this application in advance. We won’t bother again to deal with the protocol, and we’ll have them handy when we need them.
Go above the class definition, and add the next code segment:
protocol MPCManagerDelegate {
    func foundPeer()

    func lostPeer()

    func invitationWasReceived(fromPeer: String)

    func connectedWithPeer(peerID: MCPeerID)
}
I’m not going to discuss what each of the above function is for. We’ll see them in details in the next parts.
Lastly, let’s declare a delegate object in the MPCManager class:
var delegate: MPCManagerDelegate?
For the time being, we have successfully managed to reach the first important checkpoint of the project and we can take a breath here. Before I finish this part, let me say that any errors you see in Xcode are normal, and they’ll go away after we have all the MPC’s delegate methods implemented.
Browsing for Peers
The MCNearbyServiceBrowserDelegate protocol contains three methods that allow us to handle the found and lost peers, and any error that may occur during browsing. We’ll continue developing this demo application by implementing these methods, but as you’ll find out, they’re easy enough as there is no much to do in any of them.
Let’s get started with the first one, which is called by the MPC when a nearby peer is found (in other words, when another device is discovered). Let me give you the implementation first, and then we’ll talk about it:
func browser(browser: MCNearbyServiceBrowser!, foundPeer peerID: MCPeerID!, withDiscoveryInfo info: [NSObject : AnyObject]!) {
    foundPeers.append(peerID)

    delegate?.foundPeer()
}
The first and most important action we must take, is to add the found peer in the foundPeers array (we declared it in the previous part, remember?). Later, we are going to use this array as the datasource of the tableview in the ViewController class, where we will list all the found peers. So, once we do so, we make a call to the foundPeer delegate method of the MPCManagerDelegate protocol. This delegate method will be implemented in the ViewController class (in the next part), and in there we’ll reload the tableview data so the newly found peer to be displayed to the user.
Now that we have handled the case where a peer is found, we must deal with the exact opposite case; we must take care of the peers that are no longer available (discoverable). For this reason, let’s implement the next delegate method:
func browser(browser: MCNearbyServiceBrowser!, lostPeer peerID: MCPeerID!) {
    for (index, aPeer) in enumerate(foundPeers){
        if aPeer == peerID {
            foundPeers.removeAtIndex(index)
            break
        }
    }

    delegate?.lostPeer()
}
No much to say here, as the code explains itself pretty well I think. At first we locate the peer that was lost in the foundPeers array, and then we remove it. After having done so and the peer is no longer in our “list”, we must notify the ViewController class so it updates the tableview with the displayed peers. For that reason, we call the lostPeer delegate method, in which later during its implementation we’ll reload the tableview data.
Lastly, there’s one more delegate method we should implement, and that is for managing any error that may occur and the browsing is unable to be performed. Obviously, we are not going to do any serious error handling here, we’ll just display the error message. Here it is:
func browser(browser: MCNearbyServiceBrowser!, didNotStartBrowsingForPeers error: NSError!) {
    println(error.localizedDescription)
}
Before we reach the end of this part, let me highlight the following: Instead of using the above delegate methods to inform the ViewController class about the changes happening to the peers, we could have used the Key-Value Coding and Key-Value Observing mechanisms to track any changes of the foundPeers array. However, we don’t do that just because there’s no need to write extra code since the MPCManagerDelegate protocol exists. If we wouldn’t need it to implement more methods other than the above two, then we could have used the KVC and KVO instead of the delegation pattern. So, we stick to it, as the implementation of the delegate methods consists of a much faster and simple process in this case.
With all the above, the application is capable of browsing for other peers. Now, let’s go ahead to add the necessary code so we display them once they’re found.
Displaying Found Peers
Now that our demo application can discover nearby peers and add (or remove) them in the foundPeers array, let’s go to the ViewController class to display them in the existing tableview. Prior to that though, we will pay a visit to the AppDelegate class, where we will declare an MPCManager object. In the rest of classes we’ll be able to access it through the application delegate instance.
In the Project Navigator just click to the AppDelegate.swift file to open it. At the top of the class, add the following line:
var mpcManager: MPCManager!
Also, go to the application(application:didFinishLaunchingWithOptions:) method to initialise it:
func application(application: UIApplication, didFinishLaunchingWithOptions launchOptions: [NSObject: AnyObject]?) -> Bool {
    // Override point for customization after application launch.

    mpcManager = MPCManager()

    return true
}
Now, we can open the ViewController.swift file and keep working there. If you take a look around, you will see that a minimum implementation has been already done. Apparently, we are going to add more code, and we will fix the tableview-related methods so everything to be working properly. Let’s begin by declaring and instantiating at the same time an application delegate object at the top of the class:
let appDelegate = UIApplication.sharedApplication().delegate as AppDelegate
Instantiating or initialising an object upon declaration is an awesome feature of Swift, because less code is required to be written and the development process becomes faster. The next step is to set the ViewController as the delegate of the MPCManager class, so in the viewDidLoad method add the next simple line:
override func viewDidLoad() {
    ...

    appDelegate.mpcManager.delegate = self

}
Xcode will show an error in this line now, and that’s because of an easy reason: We didn’t adopt the MPCManagerDelegate protocol yet. So, go to the class header line, and add it as you see next:
class ViewController: UIViewController, UITableViewDelegate, UITableViewDataSource, MPCManagerDelegate
Let’s continue now by implementing the two delegate methods we used in the previous part, the foundPeer and lostPeer. In both cases what we only want is to refresh the tableview, so their implementation is quite easy:
func foundPeer() {
    tblPeers.reloadData()
}


func lostPeer() {
    tblPeers.reloadData()
}
The above is an important step towards our goal, but still nothing is going to appear unless we “tell” the tableview what the datasource is and of course, unless we do the proper modifications so it displays the names of the nearby peers. So, let’s do that by starting from the total number of rows that the one and only section is going to have. Obviously, the rows will match to the total number of the found peers:
func tableView(tableView: UITableView, numberOfRowsInSection section: Int) -> Int {
    return appDelegate.mpcManager.foundPeers.count
}
Now, it’s time to display the name of each peer:
func tableView(tableView: UITableView, cellForRowAtIndexPath indexPath: NSIndexPath) -> UITableViewCell {
    var cell = tableView.dequeueReusableCellWithIdentifier("idCellPeer") as UITableViewCell

    cell.textLabel?.text = appDelegate.mpcManager.foundPeers[indexPath.row].displayName

    return cell
}
Notice in the above code that we access the display name of each peer in the foundPeers array.
Finally, let’s specify the height of each row:
func tableView(tableView: UITableView, heightForRowAtIndexPath indexPath: NSIndexPath) -> CGFloat {
    return 60.0
}
After having done all the above, the tableview is going to perfectly work.
Even though we’ve done an important work here, we are not over yet as there is another final and crucial detail: By default the browsing functionality is off, and the device is not going to browse for other peers unless we instruct it to do so. Starting the browser can be done at any time you want, depending always on the requirements of your application. Here, we’ll start the browser right after the app gets launched, so go to the viewDidLoad method and add the next line:
override func viewDidLoad() {
    ...

    appDelegate.mpcManager.browser.startBrowsingForPeers()
}
To perform the exact opposing thing and stop the browser, you can make a call to the stopBrowsingForPeers() method of the browser.
Everything regarding the browser is now ready, so we can move ahead and focus on the advertising functionality of the device.
Handling Advertising
Apart from browsing, the multipeer connectivity framework lets a device to advertise itself to the nearby peers as well. Browsing would be pointless without advertising. Actually, they complete each other, and they’re equally important. When talking about advertising, it’s like saying whether a device is visible to others or not. If the advertising functionality is enabled to an app, then the device is visible to other nearby peers. If not, then there’s no way to be discovered by other peers. We are going to see that in a bit more detailed level in this part, as we’ll make make our demo application capable of enabling and disabling the advertising functionality.
If you explored for a while the starter project you’ve got in your hands, then you would have definitely seen that in the ViewController scene there is a toolbar with a bar button item in it. We are going to use this button by implementing the startStopAdvertising(sender:) action method, where, as you assume, we’ll toggle the advertising functionality of the multipeer connectivity framework. To keep things simple, we’ll just display an action sheet when the button is tapped. In this action sheet, two buttons only are going to exist: One to switch between the two advertising states, and one to cancel and close the action sheet dialog. To make it more interesting, we’ll make the first button title get changed depending on the current state.
Before we see all the above in code, let’s declare a new Bool property, which we’ll use to check if the device is advertising or not. Make sure that you still have the ViewController.swift open, and then go to the top of the class and add the next line:
var isAdvertising: Bool!
This variable needs to have a value, and we’ll do so in the viewDidLoad method. We are going to set its value to true, meaning that the device is currently advertising itself. However, in order for this to be true, we must turn this feature on, so in the viewDidLoad method go and do both of what we just said:
override func viewDidLoad() {
    ...

    appDelegate.mpcManager.advertiser.startAdvertisingPeer()

    isAdvertising = true
}
Now, we can go to the action method and implement it. At first, I give you the respective code snippet. Then, we’ll say a few things about it:
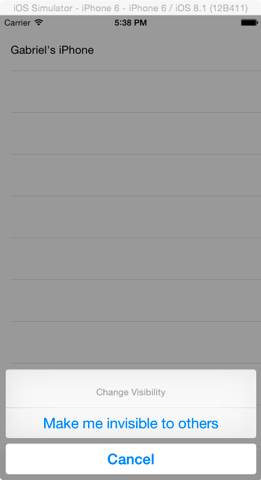
@IBAction func startStopAdvertising(sender: AnyObject) {
        let actionSheet = UIAlertController(title: "", message: "Change Visibility", preferredStyle: UIAlertControllerStyle.ActionSheet)

        var actionTitle: String
        if isAdvertising == true {
            actionTitle = "Make me invisible to others"
        }
        else{
            actionTitle = "Make me visible to others"
        }

        let visibilityAction: UIAlertAction = UIAlertAction(title: actionTitle, style: UIAlertActionStyle.Default) { (alertAction) -> Void in
            if self.isAdvertising == true {
                self.appDelegate.mpcManager.advertiser.stopAdvertisingPeer()
            }
            else{
                self.appDelegate.mpcManager.advertiser.startAdvertisingPeer()
            }

            self.isAdvertising = !self.isAdvertising
        }

        let cancelAction = UIAlertAction(title: "Cancel", style: UIAlertActionStyle.Cancel) { (alertAction) -> Void in

        }

        actionSheet.addAction(visibilityAction)
        actionSheet.addAction(cancelAction)

        self.presentViewController(actionSheet, animated: true, completion: nil)
    }
Let’s see in short what is being taking place in the above implementation:
- Firstly, we initialize an action sheet controller by providing it with a message and the proper style.
- Next, depending on the current value of the isAdvertising variable, we specify the title for the first button of the action sheet by assigning the proper value to the actionTitle local variable.
- By having the correct title, we create a new alert action which will be triggered when the user will tap in the first button.
- The most important part is here: Based on the value of the isAdvertising variable, we either stop or start the advertising of the device. Of course, don’t forget to set the exact opposing value to the isAdvertising variable.
- We create an (empty) action for the cancel button.
- Both of the actions are added to the action sheet controller.
- Finally, the action sheet controller is presented animated to the view.
You will see how the above action method works later on, during the app testing. With all the above, you’ll be able to change the discoverability state of your device on will.
Inviting a Peer
The purpose of the multipeer connectivity is to let two (or more) devices to establish a connection and exchange data. That means that we are in the half-way until now, as we have only implemented the peer discovery and the advertising functionality. The next step is to invite a peer to join a session, so it’s possible between two devices to communicate.
The most important here is to understand that when implementing the MPC manually (like this demo), it’s totally up to you to decide when it’s the best time to invite a found peer to connect to a session. There’s not a default time to do that, and the appropriate timing is strictly related to the nature of the application. For example, here we are going to invite a nearby peer when we’ll tap on its name in the ViewController class’s tableview. In other cases, you might need to send the invitation right after the peer is discovered by the browser. Again, you are free to decide based on the app requirements when you should send the invitation. Additionally, it’s equally important to know that the invitation can be sent and a connection to be established without asking for the user’s consent; you can perform anything simply behind the scenes. However, I would advice you to always inform the user that his app is about to get connected to another device, to send and receive data, etc.
With the above in mind, let’s get back to our demo. Our goals in this part are:
- To send an invitation to another peer when we tap on its name in the tableview.
- To receive the invitation.
- To ask user if he accepts to chat with the inviter (actually if he accepts the invitation).
- To accept or decline the invitation.
Being already in the ViewController.swift file, let’s get started by making the tableview respond when tapping on it. Right next, we are going to implement the tableView(tableView:didSelectRowAtIndexPath:) delegate method, and in it we’ll perform a quite important task: We’ll send the invitation to the selected peer. As you’ll see, this takes just one line of code. Let’s see the method and then we’ll keep discussing about it:
func tableView(tableView: UITableView, didSelectRowAtIndexPath indexPath: NSIndexPath) {
    let selectedPeer = appDelegate.mpcManager.foundPeers[indexPath.row] as MCPeerID

    appDelegate.mpcManager.browser.invitePeer(selectedPeer, toSession: appDelegate.mpcManager.session, withContext: nil, timeout: 20)
}
To be honest, we could have even avoided the first line where we assign the selected peer into a local variable, and with one line only to perform something really important. Anyway, the first line makes things clearer, so let’s keep it there.
Using the invitePeer(peerID:toSession:withContext:timeout:) of the browser object, we sent an invitation to the selected peer using the multipeer connectivity framework. It accepts the following parameters:
- peerID: The peer to which we want to send the invitation.
- toSession: The session object that we initialized in the MPCManager class.
- withContext: This parameter can be used if you want to send some extra data to the invited peer. It requires a NSData object.
- timeout: Here we specify how many seconds the inviter will be waiting for the other peer’s answer. The default value is 30 seconds, here we set it to 20. Your app requirements will “tell” you how much the waiting time should be in a real application.
Now, jump for a second right above the class, and import the MPC framework so a new error shown in the above line to disappear:
import MultipeerConnectivity
The above was the first step. Next, we must implement a couple of delegate methods of the MCNearbyServiceAdvertiserDelegate protocol, so the app can handle a received invitation. Open the MPCManager.swift file to keep working.
The method you are going to see next, contains an invitation handler which is used to reply to the peer that sent the invitation. This handler accepts two arguments, where the first one is a bool value indicating whether the invitation was accepted or not, and the second is the session object, in case of a positive answer. In this demo application we are not going to give an answer straight away back to the inviter, because we will ask the user if he wants to chat or not first. So, we must temporarily store the invitation handler to a property, and after the user has responded we can call it in order to reply to the invitation. If you remember, we had previously declared the following:
var invitationHandler: ((Bool, MCSession!)->Void)!
In this one we will store the invitation handler. With that said, we can see the implementation of the first delegate method:
func advertiser(advertiser: MCNearbyServiceAdvertiser!, didReceiveInvitationFromPeer peerID: MCPeerID!, withContext context: NSData!, invitationHandler: ((Bool, MCSession!) -> Void)!) {
    self.invitationHandler = invitationHandler

    delegate?.invitationWasReceived(peerID.displayName)
}
Keeping the invitation handler to the invitationHandler property is as simple as that. Note that both handlers have the same name, so the use of the self specifier is mandatory here.
Besides that, we make a call to another method of the MPCManagerDelegate protocol. With it, we notify the ViewController class that an invitation was received, so it shows an alert controller to the user asking to chat. We’ll see its implementation in just a while, but for now notice that we pass just the display name of the peer. This is what we care about for now.
The second delegate method of the MCNearbyServiceAdvertiserDelegate protocol is used to handle the case in which the advertiser cannot be turned on. Here, we’ll just print the error message to the console:
func advertiser(advertiser: MCNearbyServiceAdvertiser!, didNotStartAdvertisingPeer error: NSError!) {
    println(error.localizedDescription)
}
Now, let’s head back to the ViewController.swift file, where we will implement the invitationWasReceived(fromPeer:) delegate method. In it, we will simply show an alert controller to the user. Its message will inform which the user asking to chat is (we’ll show the display name of the peer), and we’ll provide two options: Accept and Decline. No matter what the user selects, we’ll use the invitationHandler property of the MPCManager class to reply to the inviter. Let’s see the implementation now:
func invitationWasReceived(fromPeer: String) {
    let alert = UIAlertController(title: "", message: "\(fromPeer) wants to chat with you.", preferredStyle: UIAlertControllerStyle.Alert)

    let acceptAction: UIAlertAction = UIAlertAction(title: "Accept", style: UIAlertActionStyle.Default) { (alertAction) -> Void in
        self.appDelegate.mpcManager.invitationHandler(true, self.appDelegate.mpcManager.session)
    }

    let declineAction = UIAlertAction(title: "Cancel", style: UIAlertActionStyle.Cancel) { (alertAction) -> Void in
        self.appDelegate.mpcManager.invitationHandler(false, nil)
    }

    alert.addAction(acceptAction)
    alert.addAction(declineAction)

    NSOperationQueue.mainQueue().addOperationWithBlock { () -> Void in
        self.presentViewController(alert, animated: true, completion: nil)
    }
}
The above is a typical alert controller implementation, so there’s nothing complex in it. In the case of the acceptAction action, we call the invitationHandler property of the mpcManager object, setting the true as the response to the invitation and providing the session object. On the other hand, if the user doesn’t want to chat, then we set the false value to the invitation handler and the nil as the second argument; there’s no need to send the session in this case.
One more significant step has just finished, so we can go and see what the states of a session are and what happens (in this demo app) when a connection is made.
Connecting to a Session
A session, which is represented by the session object in the MPCManager class, is the ultimate target when working with the multipeer connectivity. Once both peers have connected to a session, it’s possible for them to exchange data or resources, and perform streaming. A session has three states in total: The desired one is the Connected. The second is the Connecting state, which is an intermediate, temporary state that a session enters to when trying to connect. Lastly, the third one is the Not Connected state, which can either be the result of the user’s decline to connect (not accepting the invitation), or the connection simply fails.
The multipeer connectivity framework allows us to have control over each state, and that’s possible through a delegate method of the MCSessionDelegate protocol. Usually, the implementation of this method is not difficult, as it’s only required to examine each case and take the proper actions. In the following code snippet, you’ll see that only in the Connected state we make a call to another delegate method of the MPCManagerDelegate protocol. In the other two cases, we simply display a message to the console, so we can know during testing what’s the exact state of the session at any time. Before you copy the next code, make sure to open the MPCManager.swift file.
func session(session: MCSession!, peer peerID: MCPeerID!, didChangeState state: MCSessionState) {
    switch state{
    case MCSessionState.Connected:
        println("Connected to session: \(session)")
        delegate?.connectedWithPeer(peerID)

    case MCSessionState.Connecting:
        println("Connecting to session: \(session)")

    default:
        println("Did not connect to session: \(session)")
    }
}
Using the connectedWithPeer(peerID:) delegate method, we inform the ViewController class that the device has connected to a session with a nearby peer, the one specified by the peerID parameter above.
Back to the ViewController.swift file again, let’s implement the connectedWithPeer(peerID:) method. In this demo application we want to start chatting right after the peers have connected to the session, so we only have to navigate to the Chat View Controller scene. Easy enough, here it is:
func connectedWithPeer(peerID: MCPeerID) {
    NSOperationQueue.mainQueue().addOperationWithBlock { () -> Void in
        self.performSegueWithIdentifier("idSegueChat", sender: self)
    }
}
Note that the above will make both devices (the inviter and the invitee) to perform the segue, as the session will eventually reach the Connected state in both of them.
From now on we’ll be working on the ChatViewController class. Let me underline just one thing before we proceed: We are not going to deal with the case where the user turns down the invitation for chatting. I don’t think that there’s anything really important to that, so I leave it to you to implement it if you want.
A Handy Method To Send Data
In this part we are going to create a custom method in the MPCManager class, which we’ll use to send data to another peer. Actually, in this one we are going to make a call to special method of the MCSession class which is responsible for sending data, but first we will prepare and configure all the arguments that this method accepts. The reason we create this custom method is simply to avoid doing all the configuration more than one time later on.
Let me start by giving you the implementation first (make sure to open the MPCManager.swift file):
func sendData(dictionaryWithData dictionary: Dictionary, toPeer targetPeer: MCPeerID) -> Bool {
    let dataToSend = NSKeyedArchiver.archivedDataWithRootObject(dictionary)
    let peersArray = NSArray(object: targetPeer)
    var error: NSError?

    if !session.sendData(dataToSend, toPeers: peersArray, withMode: MCSessionSendDataMode.Reliable, error: &error) {
        println(error?.localizedDescription)
        return false
    }

    return true
}
The MPCSession method called above is the sendData(data:toPeers:withMode:error:) and it accepts the following parameters:
- data: The actual data that will be sent, expressed as a NSData object.
- toPeers: An array (NSArray) with the peers that should receive the data.
- withMode: The data sending mode. There are two modes: Reliable and Unreliable. You can use the second mode in less crucial cases, where any unreceived data won’t cause any problems at all.
- error: A NSError object that will contain any error that may occur.
Now, let’s see what takes place in the above implementation. As you see, the method gets two parameters: (a) A dictionary object, which in our case will contain the message. (b) The target peer. At first, the dictionary is converted to a NSData object by archiving it using the NSKeyedArchiver class. Then, a new array named peersArray is initialized with one object only, the target peer. After the error variable declaration, we make a call to the data sending method of the session object, providing all the above variables as parameters.
If any error occurs while sending data, then we display its description and we return false from the method. Otherwise, the true value is returned, meaning that everything went smoothly.
The above method will be used in the next part. For us it consists of a tool, and that’s the way we are going to use it.
Sending Data Between Peers
All the messages that the peers will send and receive during the chat session, are going to be displayed in the tableview existing in the Chat View Controller scene. The last displayed message will be always the most recent one, and every time a message is either sent or received will force a reload to that tableview.
As you may guess, we are going to use an array for storing all messages. Obviously, this array is going to be the datasource of the tableview. It’s important to say that each object of this array is going to be a Dictionary with both its key and value to be String values. Why a dictionary? Because we need to have a pair of data for each message sent or received: The sender (author) of the message and the message itself. When our device is the one sending the message (when we’re the authors), then the “self” value will be set as the sender of the message in our device, while our peer display name will be sent to the other device.
Let’s get back to work again, as we have more than a few things to do here too. The first step is to declare and initialize the messages array (the datasource of the tableview). Along with it, we are going go declare and instantiate an application delegate object, so we can access the mpcManager property of the AppDelegate class. Let’s see all that by opening the ChatViewController.swift file. At the top of the class add the next two lines:
var messagesArray: [Dictionary] = []

let appDelegate = UIApplication.sharedApplication().delegate as AppDelegate
The messagesArray is initialized as an empty array. Also, we are not going to set the ChatViewController class as the delegate of the mpcManager object. Instead, we’ll use another approach to get messages from the MPCManager class.
When chatting, all actions are triggered after a new message gets written and the Send button is tapped. Once this happens, there are certain things we should do:
- To hide the keyboard.
- To create a dictionary with the message and call the custom method of the previous part to send it to the other peer.
- To create another dictionary with both the sender and the message as its contents, and then store it in the messagesArray array.
- To update the tableview.
- To clear the textfield after the message has been sent.
The above will take place in the textFieldShouldReturn(textField:) delegate method of the UITextFieldDelegate protocol. If you look at the viewDidLoad method, the ChatViewController class has already been set as the delegate of the textfield.
Here is the implementation:
func textFieldShouldReturn(textField: UITextField) -> Bool {
    textField.resignFirstResponder()

    let messageDictionary: [String: String] = ["message": textField.text]

    if appDelegate.mpcManager.sendData(dictionaryWithData: messageDictionary, toPeer: appDelegate.mpcManager.session.connectedPeers[0] as MCPeerID){

        var dictionary: [String: String] = ["sender": "self", "message": textField.text]
        messagesArray.append(dictionary)

        self.updateTableview()
    }
    else{
        println("Could not send data")
    }

    textField.text = ""

    return true
}
A couple of notes now: You see that we call the sendData(dictionaryWithData:toPeer:) custom method by providing it with the messageDictionary we created right above of it. Also, it’s interesting how we specify the target peer using the appDelegate.mpcManager.session.connectedPeers[0] object. To make this a bit more clear, it’s necessary to say that the MCSession class contains an array property named connectedPeers, to which all the peers connected to our device are added. In our implementation, we know that only one peer will be connected to the session, so it’s safe to access it directly using in the first index of that array.
If the data is successfully sent, then we prepare a new dictionary with the sender and the message. As this is our message, the “self” value is set as the sender. Then, using the append method of the messagesArray we add the dictionary to the array. Lastly, we call the updateTableview method to update the tableview. It’s a custom one, and we’ll implement it right next.
If any error occurs, then we just display a message to the console. No matter what will happen, at the end of the above method we clear the textfield.
The updateTableview method that we are about to write has double purpose: Firstly, to reload the tableview data, so any new message to be displayed there. Secondly, to automatically scroll to the end of the tableview, so the most recent message to be always visible. Here it is:
func updateTableview(){
    self.tblChat.reloadData()

    if self.tblChat.contentSize.height > self.tblChat.frame.size.height {
        tblChat.scrollToRowAtIndexPath(NSIndexPath(forRow: messagesArray.count - 1, inSection: 0), atScrollPosition: UITableViewScrollPosition.Bottom, animated: true)
    }
}
If the height of the tableview’s content size becomes greater than the height of the tableview’s frame, then we must scroll. We do so by using the method you see above.
Now, at the top of the class import the multipeer connectivity framework to fix the error issued by Xcode in the textFieldShouldReturn(textField:) method:
import MultipeerConnectivity
There’s one final job we must do before we end this part. We must fix the tableview-related methods. First of all, the number of the rows must match to the total objects existing in the messagesArray array:
func tableView(tableView: UITableView, numberOfRowsInSection section: Int) -> Int {
    return messagesArray.count
}
In the tableView(tableView:cellForRowAtIndexPath:) method, we are going to check which the sender of the message is. If the sender’s value is the “self” value, then we’ll set the purple color to the subtitle label and we’ll display the message “I said:”. In the opposite case, we’ll specify the orange color and we’ll display the message “X said:”, where X is the display name of the other peer. Here it is:
func tableView(tableView: UITableView, cellForRowAtIndexPath indexPath: NSIndexPath) -> UITableViewCell {
    var cell = tableView.dequeueReusableCellWithIdentifier("idCell") as UITableViewCell

    let currentMessage = messagesArray[indexPath.row] as Dictionary

    if let sender = currentMessage["sender"] {
        var senderLabelText: String
        var senderColor: UIColor

        if sender == "self"{
            senderLabelText = "I said:"
            senderColor = UIColor.purpleColor()
        }
        else{
            senderLabelText = sender + " said:"
            senderColor = UIColor.orangeColor()
        }

        cell.detailTextLabel?.text = senderLabelText
        cell.detailTextLabel?.textColor = senderColor
    }

    if let message = currentMessage["message"] {
        cell.textLabel?.text = message
    }

    return cell
}
There is nothing difficult at all in the above method, therefore there’s nothing else to discuss about it.
It would be interesting at this point to mention something about the height of the tableview rows. It’s obvious that we can’t tell for sure what the height should be, as the length of the messages will vary, and the height of each row should be dynamically set. For this reason, we use a new feature of iOS 8, named self sizing cells. You can find a great tutorial on this by Simon here. What it gets is simple: We set the number of lines in the cell’s text label to zero, and then in the viewDidLoad method we set the next two properties:
tblChat.estimatedRowHeight = 60.0
tblChat.rowHeight = UITableViewAutomaticDimension
iOS will take care of the rest. You can find the above already existing in the viewDidLoad.
With the above said, we can carry on and handle the received data.
Receiving Data
Now that the app sends messages, we must handle them when they are received. We are going to work in both the MPCManager and the ChatViewController classes. For starters, we are going to implement a new method of the MPCSessionDelegate protocol.
Open the MPCManager.swift file, and add the next method:
func session(session: MCSession!, didReceiveData data: NSData!, fromPeer peerID: MCPeerID!) {
    let dictionary: [String: AnyObject] = ["data": data, "fromPeer": peerID]
    NSNotificationCenter.defaultCenter().postNotificationName("receivedMPCDataNotification", object: dictionary)
}
It contains only two, but important lines. At first, both the received data object and the sender peer are added to a dictionary. Next, we post a notification (NSNotification) named receivedMPCDataNotificaton. In the ChatViewController we’ll observer for it, and then we’ll handle it properly, so the display name of the sender and the message to be shown in the tableview. In the previous part I said that the ChatViewController won’t be set as the delegate of the MPCManager class, and that we would use another approach to get messages from this class. This different approach is the above notification we post.
Now, let’s head back to the ChatViewController.swift file, where in the viewDidLoad method we must observe for the above notification. That’s simple to do, as it only takes the next line:
override func viewDidLoad() {
    ...

    NSNotificationCenter.defaultCenter().addObserver(self, selector: "handleMPCReceivedDataWithNotification:", name: "receivedMPCDataNotification", object: nil)
}
With that, every time that new data is received a notification will be posted, and the ChatViewController class will be aware of that.
We’ve left one last step here, to implement the handleMPCReceivedDataWithNotification(notification:) custom message. This one will be called when the notification arrives.
Before we see its implementation, let me outline what is going to take place in it:
- Initially, we’ll get the dictionary posted along with the notification, and we’ll “extract” the data and the peer contained in it.
- We’ll convert the data object to a Dictionary, so we can access the message.
- At this point, we’ll make a convention, and we’ll agree to a special phrase that means the end of chat. This phrase will be the “end_chat“ message.
- If the message is other than the above special value, then we’ll create a new dictionary containing the sender’s display name and the message. This dictionary will be added to the messagesArray array. Also, we will update the tableview.
- If the message signals the end of chat, then we’ll show an alert to the user letting him know that the other peer ended the chat, and we’ll dismiss the view controller. We’ll write the code for this step in the next part.
Let’s see all the above in code. Extra comments in the next snippet will help you get it much easier:
func handleMPCReceivedDataWithNotification(notification: NSNotification) {
    // Get the dictionary containing the data and the source peer from the notification.
    let receivedDataDictionary = notification.object as Dictionary

    // "Extract" the data and the source peer from the received dictionary.
    let data = receivedDataDictionary["data"] as? NSData
    let fromPeer = receivedDataDictionary["fromPeer"] as MCPeerID

    // Convert the data (NSData) into a Dictionary object.
    let dataDictionary = NSKeyedUnarchiver.unarchiveObjectWithData(data!) as Dictionary

    // Check if there's an entry with the "message" key.
    if let message = dataDictionary["message"] {
        // Make sure that the message is other than "_end_chat_".
        if message != "_end_chat_"{
            // Create a new dictionary and set the sender and the received message to it.
            var messageDictionary: [String: String] = ["sender": fromPeer.displayName, "message": message]

            // Add this dictionary to the messagesArray array.
            messagesArray.append(messageDictionary)

            // Reload the tableview data and scroll to the bottom using the main thread.
            NSOperationQueue.mainQueue().addOperationWithBlock({ () -> Void in
                self.updateTableview()
            })
        }
        else{

        }
    }
}
We are ready. Now when a new message arrives, the app will handle it by displaying it to the tableview.
End Chatting
Few things remain to be done until the application is ready to function. One of them is to make it capable of ending a chat, either when one of the peers wants so, or when the session is not in the Connected state any more.
In the Chat View Controller scene, there is a bar button item in the toolbar at the top side, which calls the endChat(sender:) action method when is tapped. We’ll use this action method to send one last message to the other peer telling that the chat is over, and then we’ll dismiss the view controller. This message of course, is the “_end_chat” phrase we said about in the previous part.
Let’s see the implementation now:
@IBAction func endChat(sender: AnyObject) {
    let messageDictionary: [String: String] = ["message": "_end_chat_"]
    if appDelegate.mpcManager.sendData(dictionaryWithData: messageDictionary, toPeer: appDelegate.mpcManager.session.connectedPeers[0] as MCPeerID){
        self.dismissViewControllerAnimated(true, completion: { () -> Void in
            self.appDelegate.mpcManager.session.disconnect()
        })
    }
}
As you see, we dismiss the view controller and then we disconnect the peer from the session using the disconnect() method of the MCSession class. The above implementation gives enough time to the session so as to stay alive until the last message has been sent.
In the last part we implemented partially the handleMPCReceivedDataWithNotification(notification:) custom method. I’m saying partially, because we didn’t add any code at all in the case where the end chat message is received. Now it’s time to add it, and before we do so I’m just mentioning that we are going to display an alert controller to the user notifying him that the other peer ended the chat. After that, we’ll disconnect from the session and we’ll dismiss the view controller. Here’s the missing part of that method:
func handleMPCReceivedDataWithNotification(notification: NSNotification) {
...
// Check if there's an entry with the "message" key.
if let message = dataDictionary["message"] {
...
else{
// In this case an "_end_chat_" message was received.
// Show an alert view to the user.
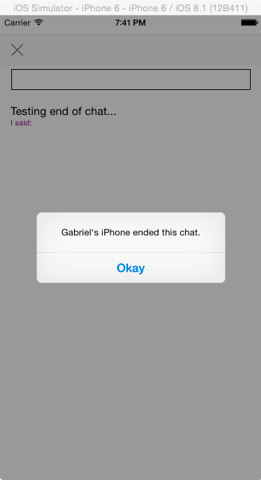
let alert = UIAlertController(title: "", message: "\(fromPeer.displayName) ended this chat.", preferredStyle: UIAlertControllerStyle.Alert)
let doneAction: UIAlertAction = UIAlertAction(title: "Okay", style: UIAlertActionStyle.Default) { (alertAction) -> Void in
self.appDelegate.mpcManager.session.disconnect()
self.dismissViewControllerAnimated(true, completion: nil)
}
alert.addAction(doneAction)
NSOperationQueue.mainQueue().addOperationWithBlock({ () -> Void in
self.presentViewController(alert, animated: true, completion: nil)
})
}
}
}
A chat can also be ended when the other peer just terminates the application, or for some reason the connection between the two devices is lost. That’s a case we must take care of also. What must be done is to post a new notification from the browser(browser:lostPeer:) delegate method in the MPCManager.swift file. Then, we must observe for it and handle it, exactly as we did in the previous notification. However, this time I’m not going to show you that implementation. To make things more interesting, I let you do that all alone as an exercise. I said what must be done, so go ahead and try it out if you want.
So, we’re almost there. One small addition and we’ll be ready to test everything.
Finishing Touches
We are just a step away from testing the app, but still there is something missing. That is to define some delegate methods of the MCSessionDelegate protocol in the MPCManager class that we don’t actually need, but they must be there. By doing so, any error Xcode might still showing will disappear too.
Without any further delay open the MCPManager.swift file and just paste the next methods:
func session(session: MCSession!, didStartReceivingResourceWithName resourceName: String!, fromPeer peerID: MCPeerID!, withProgress progress: NSProgress!) { }

func session(session: MCSession!, didFinishReceivingResourceWithName resourceName: String!, fromPeer peerID: MCPeerID!, atURL localURL: NSURL!, withError error: NSError!) { }

func session(session: MCSession!, didReceiveStream stream: NSInputStream!, withName streamName: String!, fromPeer peerID: MCPeerID!) { }
Testing the App
You can run the demo application either in two devices (at least), or in a device and the Simulator. Then start playing with the browser and the advertiser, by turning on and off the advertising functionality of the app. Then select another peer and tap on its name to begin chatting. Send and receive some messages, and then end the conversation. Once you get finish testing, change any part of the code you want and add extra functionalities.
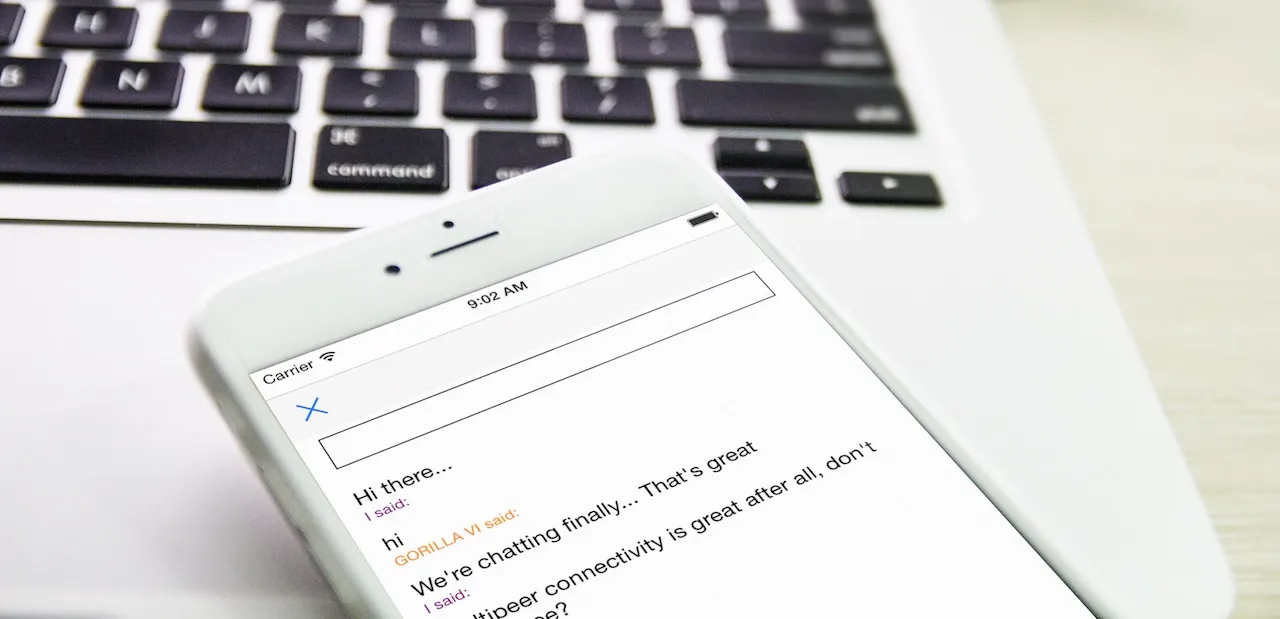
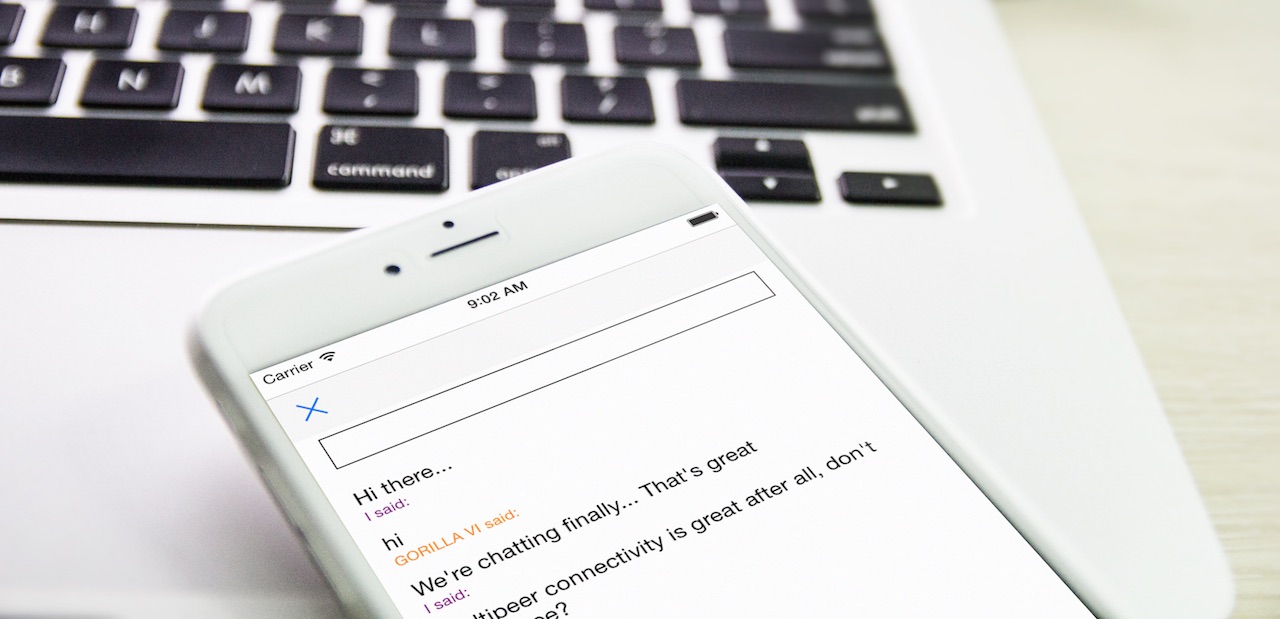
Right next I’m giving you a few screenshots of mine. Note that I ran the app in iPhone and the Simulator.
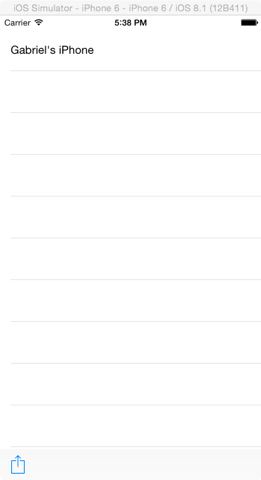
Having discovered a nearby peer:
Turning off the advertiser:
Asking the user to chat:
Chatting:
End of chat:
Summary
One more tutorial about the multipeer connectivity came to the end, hoping that all the implementation and coding we did in the previous parts to have been proven useful. What I presented you today is just a sample of how you can use MPC, and there are a few rules you have to follow. Regarding anything else, it’s up to you to decide about the MPC’s flow, or when and how you should perform all the various tasks and actions (i.e. when to send an invitation). Obviously there are aspects of the framework that we didn’t touch at all, and some that we worked partially with. The demo application we implemented has still tons of stuff missing so it starts looking like a normal one, but to me it was just perfect so as to make my point. As a final word, I hope that this tutorial will work as a quick how-to for many of you, if not all, and furthermore it will guide you towards the direction that you should look for more information and resources. The multipeer connectivity framework can give birth to countless new app ideas, so don’t lose any more time! Start thinking now!
For your reference, you can download the final project here.


