

WWDC 2017 brought many amazing and powerful APIs to iOS. Among the most popular is Core ML (of course, ARKit is hot too!). Core ML allows developers to use machine learning models in their apps without the knowledge of neural networks or machine learning algorithms. Today, I will show you how simple it is to create a game using Core ML. We will be creating a simple scavenger hunt game which will have the player running around the room looking for objects. We have already covered the basics of Core ML in our tutorial which I suggest you read over before continuing.
App Overview
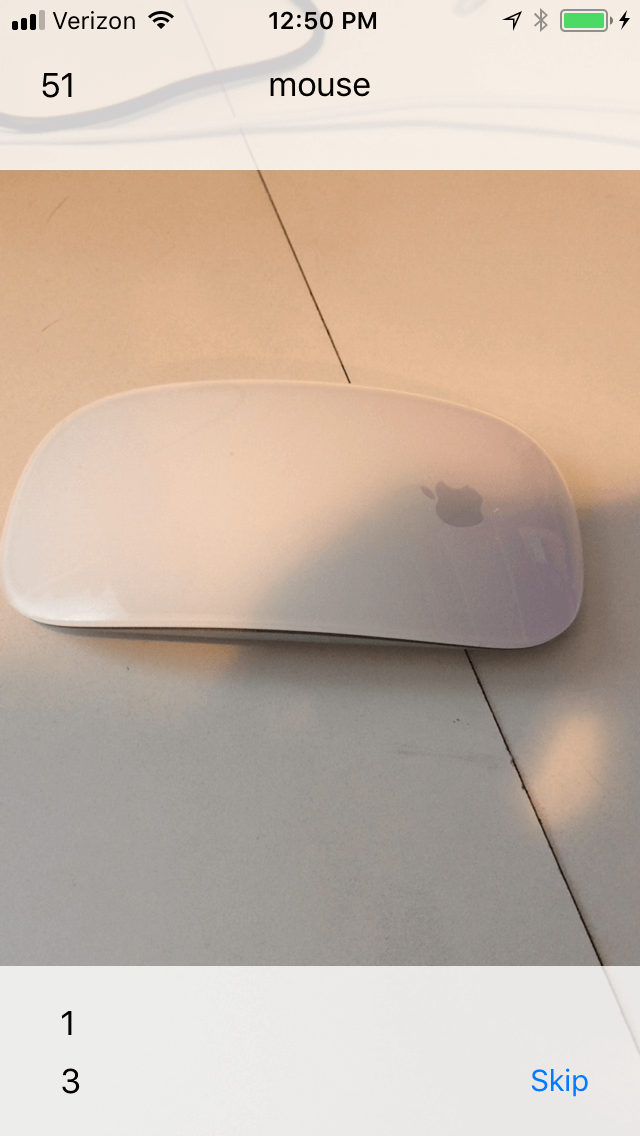
The game that we are making today is simple to create and play. After the user taps the Start button, the name of a random object will appear at the top of the screen. It is the player’s job to find that object. Once the player does, they will point the phone at it. Using the machine learning algorithm, the iPhone will recognize the object and then ask for another one. Every object found adds a point to the score. The player also has the option to skip an object if they cannot find it.
This app recognizes objects slightly differently than the one demonstrated in the Introduction to Core ML tutorial. This is mainly because we will have a live camera view and predicting objects in real time rather than choosing a single photo.
Creating the Project
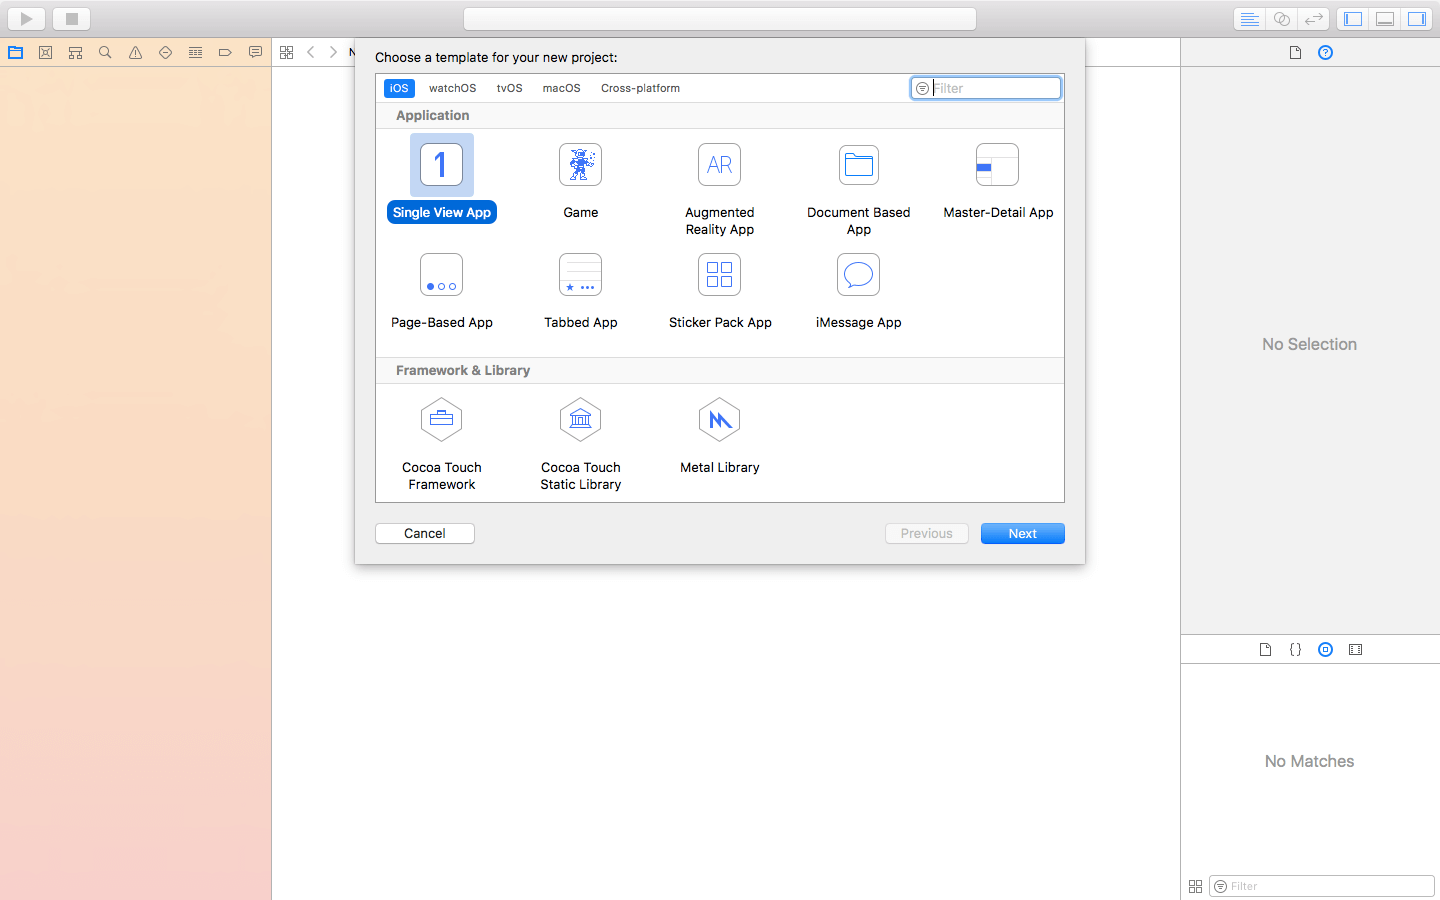
First things first! Let’s open Xcode 9 beta and create a new project. Choose the Single View App template for this app. Though we are building a game, the Single View Application template is good enough. I will be naming the project CoreMLScavenge but you can name it whatever you wish. Make sure to set the language to Swift.
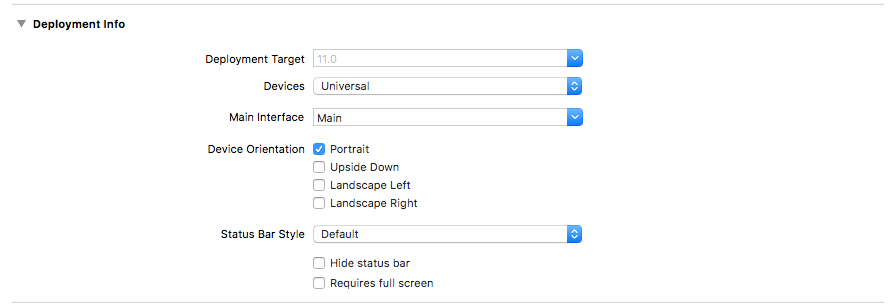
Once the project is created, uncheck the boxes next to Landscape Left and Landscape Right. We will stick to portrait mode for this game.
Creating the User Interface
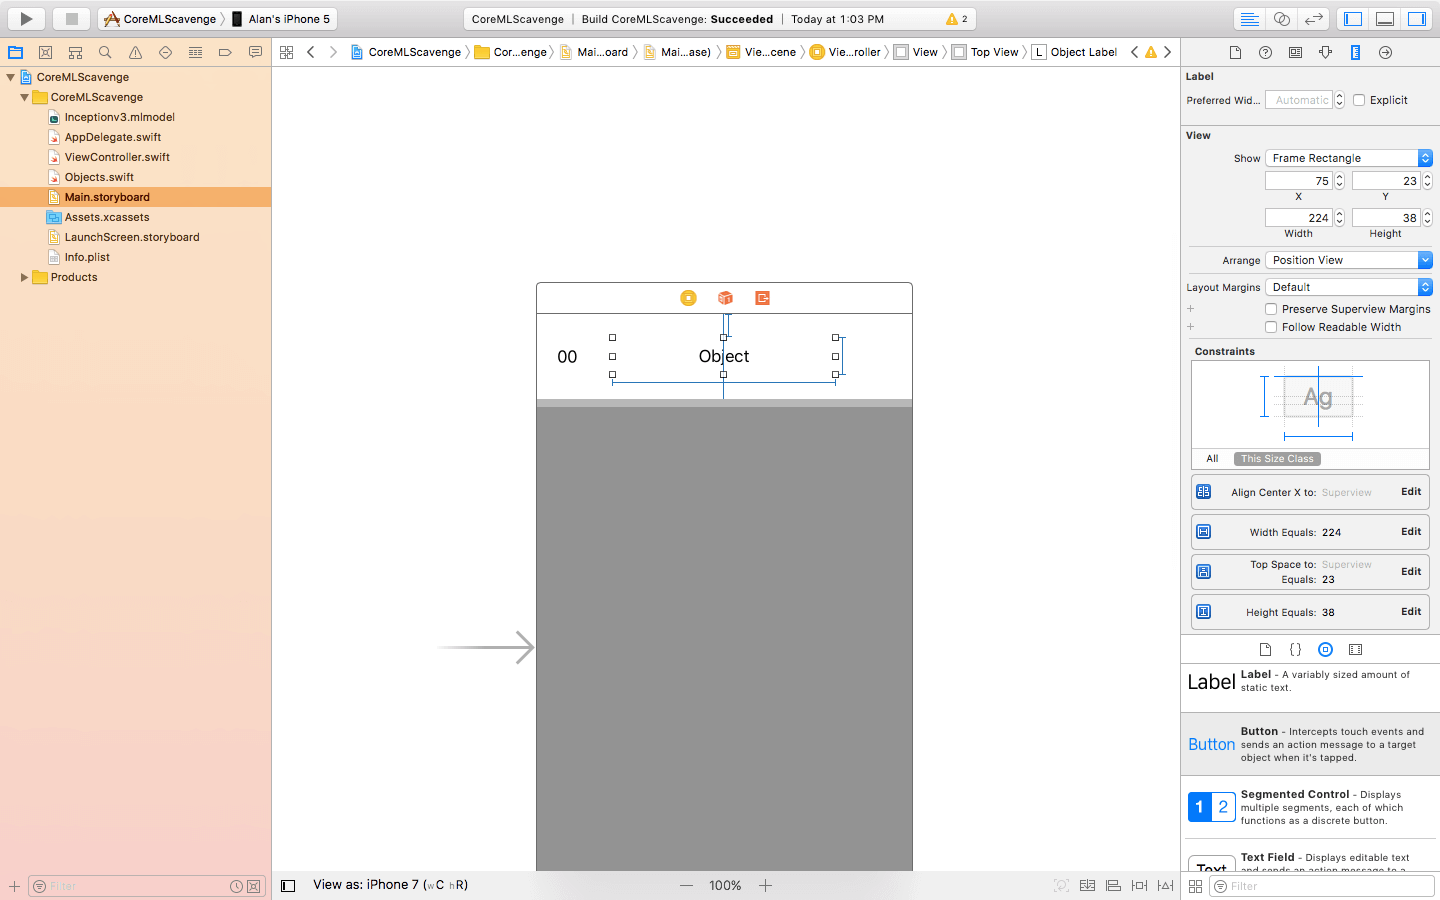
Now it’s time to have fun! Go to the Main.storyboard file in the project navigator. Start by adding a View to the top and bottom of the View Controller. Stretch the widths to the size of the View Controller and make the height around 85 pixels for each. The entire background is going to be the live camera feed, so we are adding these views so we can see the labels and buttons on top of it. Make the background of the view a light-gray color. This way we know not to accidentally put any elements on top of it.
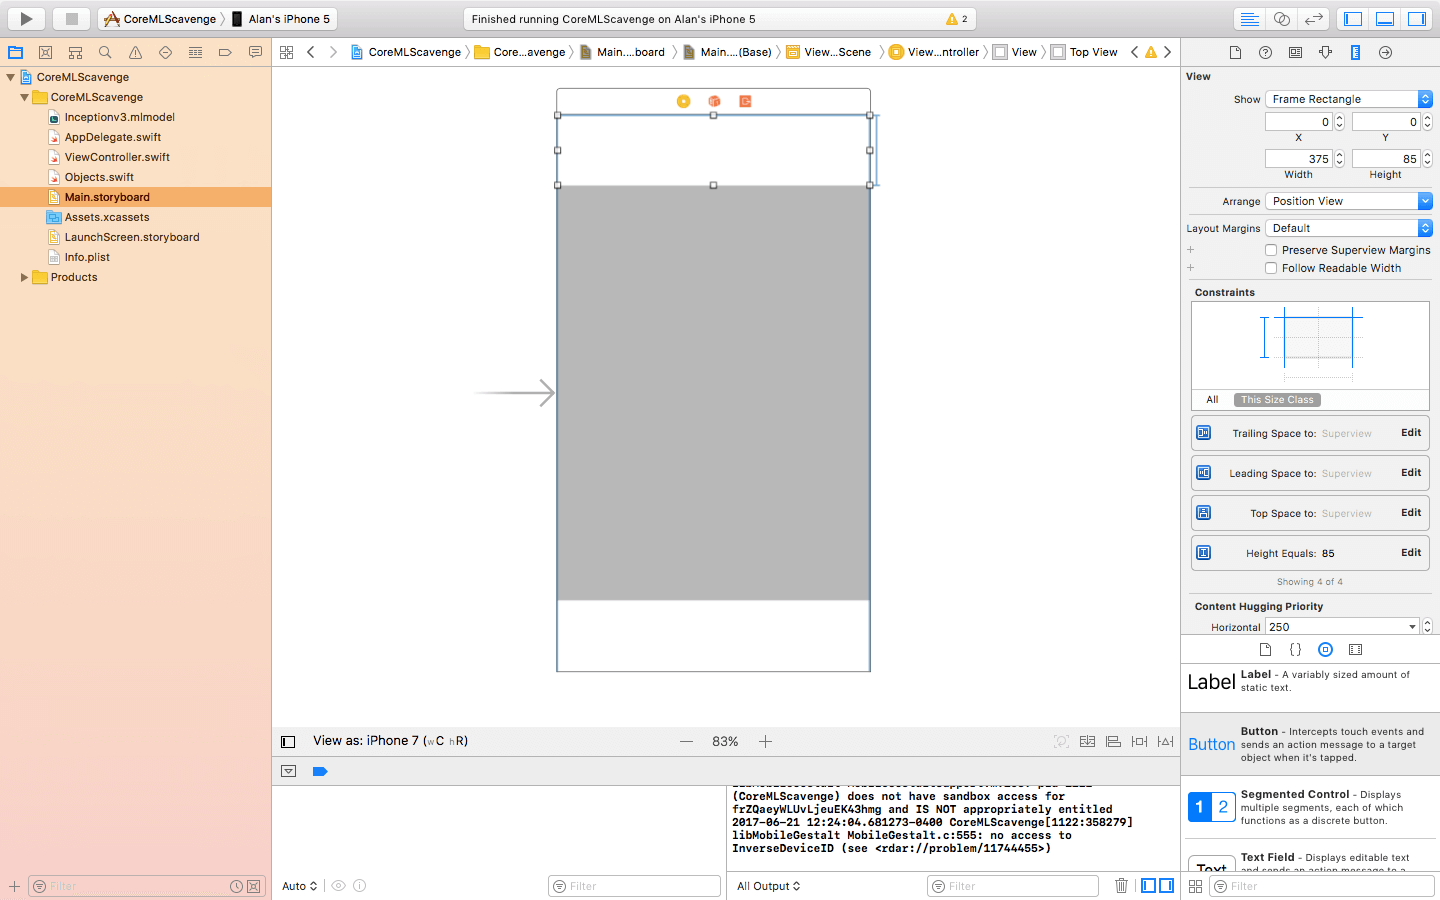
In the top view, add a UILabel to the center and another one to the left. The center label will show the object for the player to find, so stretch it out a bit so it can fit longer words. The label on the left will show the score. You can condense it a bit since it will only need to show two digits.
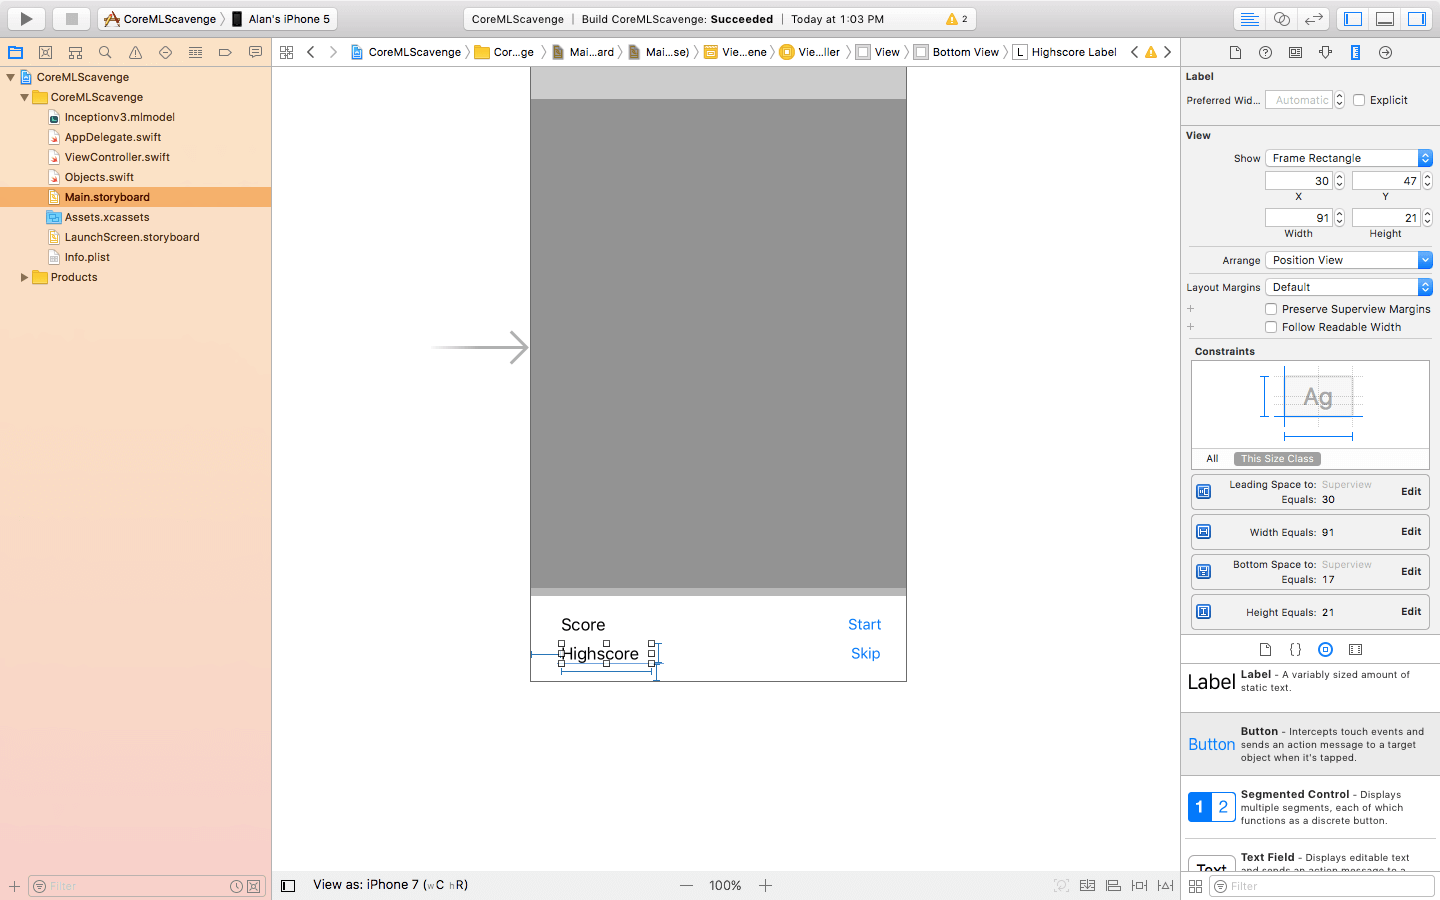
In the bottom view, add two UILabels and two UIButtons. One label will show the score, and the other will show the player’s highest score. Make one of the buttons say “start”, which will of course start the game. Make the other button say “skip”. The players can tap this if they cannot find the object and want another one.
I will not cover how to add layout constraints to these elements in this tutorial. However, I highly suggest that you do. Check out our Auto Layout Tutorial if you would like to learn how to use it. If you are not going to use Auto Layout, be sure to make your view controller’s size to the type of the device you are going to run the app on.
Setting Up the View
Now that the UI is done, we can start coding. Select the ViewController.swift file in the project navigator. Let’s start by importing the necessary frameworks above the class.
import MobileCoreServices
import Vision
import CoreML
import AVKit
Next add the outlets so we can connect our code to the UI. We need to add 8 outlets in total.
    @IBOutlet var scoreLabel: UILabel!
    @IBOutlet var highscoreLabel: UILabel!
    @IBOutlet var timeLabel: UILabel!
    @IBOutlet var objectLabel: UILabel!
    @IBOutlet var startButton: UIButton!
    @IBOutlet var skipButton: UIButton!
    @IBOutlet var topView: UIView!
    @IBOutlet var bottomView: UIView!
Your code should now look like this:
import UIKit
import MobileCoreServices
import Vision
import CoreML
import AVKit

class ViewController: UIViewController {
    @IBOutlet var scoreLabel: UILabel!
    @IBOutlet var highscoreLabel: UILabel!
    @IBOutlet var timeLabel: UILabel!
    @IBOutlet var objectLabel: UILabel!
    @IBOutlet var startButton: UIButton!
    @IBOutlet var skipButton: UIButton!
    @IBOutlet var topView: UIView!
    @IBOutlet var bottomView: UIView!

    override func viewDidLoad() {
        super.viewDidLoad()
        // Do any additional setup after loading the view, typically from a nib.
    }

    override func didReceiveMemoryWarning() {
        super.didReceiveMemoryWarning()
        // Dispose of any resources that can be recreated.
    }

}
Now we need to create some global variables. Let’s add the following variables right under where we added the outlets.
    var cameraLayer: CALayer!
    var gameTimer: Timer!
    var timeRemaining = 60
    var currentScore = 0
    var highScore = 0
Let me explain each variable one by one:
Line #1: This is the camera layer which we will add to the view later on. It will take up the entire background of the screen.
Line #2: We will initialize the game timer later. We are making it global so we can invalidate it (stop it) from any function.
Line #3: This variable will hold the time remaining in the game and it is initialized to 60 so the game lasts one minute. Feel free to change it to another number if you want the game to be shorter or longer.
Line #4: This will hold the player’s score and increase by one each time they find an object.
Line #5: This will hold the player’s high score. It will be set from UserDefaults each time the app loads.
Putting a lot of code in the viewDidLoad can make our code look messy and unorganized. To fix this, we’re going to add a viewSetup function right after the viewDidLoad to take care of some of the basic UI settings that need to be done at runtime.
Add this into the viewDidLoad:
viewSetup()
Then add this right after the viewDidLoad:
func viewSetup() {

    let backgroundColor = UIColor.init(red: 255/255, green: 255/255, blue: 255/255, alpha: 0.8)
    topView.backgroundColor = backgroundColor
    bottomView.backgroundColor = backgroundColor
    scoreLabel.text = "0"
}
What this is doing is adding some transparency to the top and bottom views so we can see the live camera feed behind them. We are also setting the score label text to 0.
Your code should now look like this:
import UIKit
import MobileCoreServices
import Vision
import CoreML
import AVKit

class ViewController: UIViewController {
    @IBOutlet var scoreLabel: UILabel!
    @IBOutlet var highscoreLabel: UILabel!
    @IBOutlet var timeLabel: UILabel!
    @IBOutlet var objectLabel: UILabel!
    @IBOutlet var startButton: UIButton!
    @IBOutlet var skipButton: UIButton!
    @IBOutlet var topView: UIView!
    @IBOutlet var bottomView: UIView!

    var cameraLayer: CALayer!
    var gameTimer: Timer!
    var timeRemaining = 60
    var currentScore = 0
    var highScore = 0

    override func viewDidLoad() {
        super.viewDidLoad()

        viewSetup()
    }

    func viewSetup() {

        let backgroundColor = UIColor.init(red: 255/255, green: 255/255, blue: 255/255, alpha: 0.8)
        topView.backgroundColor = backgroundColor
        bottomView.backgroundColor = backgroundColor
        scoreLabel.text = "0"
    }

    override func didReceiveMemoryWarning() {
        super.didReceiveMemoryWarning()
        // Dispose of any resources that can be recreated.
    }

}
Setting Up the Camera
Now it’s time to setup the live camera feed which will the entire background of the view. Before we start adding code, we need to ask the user’s permission to use the camera. iOS will take care of most of the work related to this. However, we need to provide a description of why we need the camera.
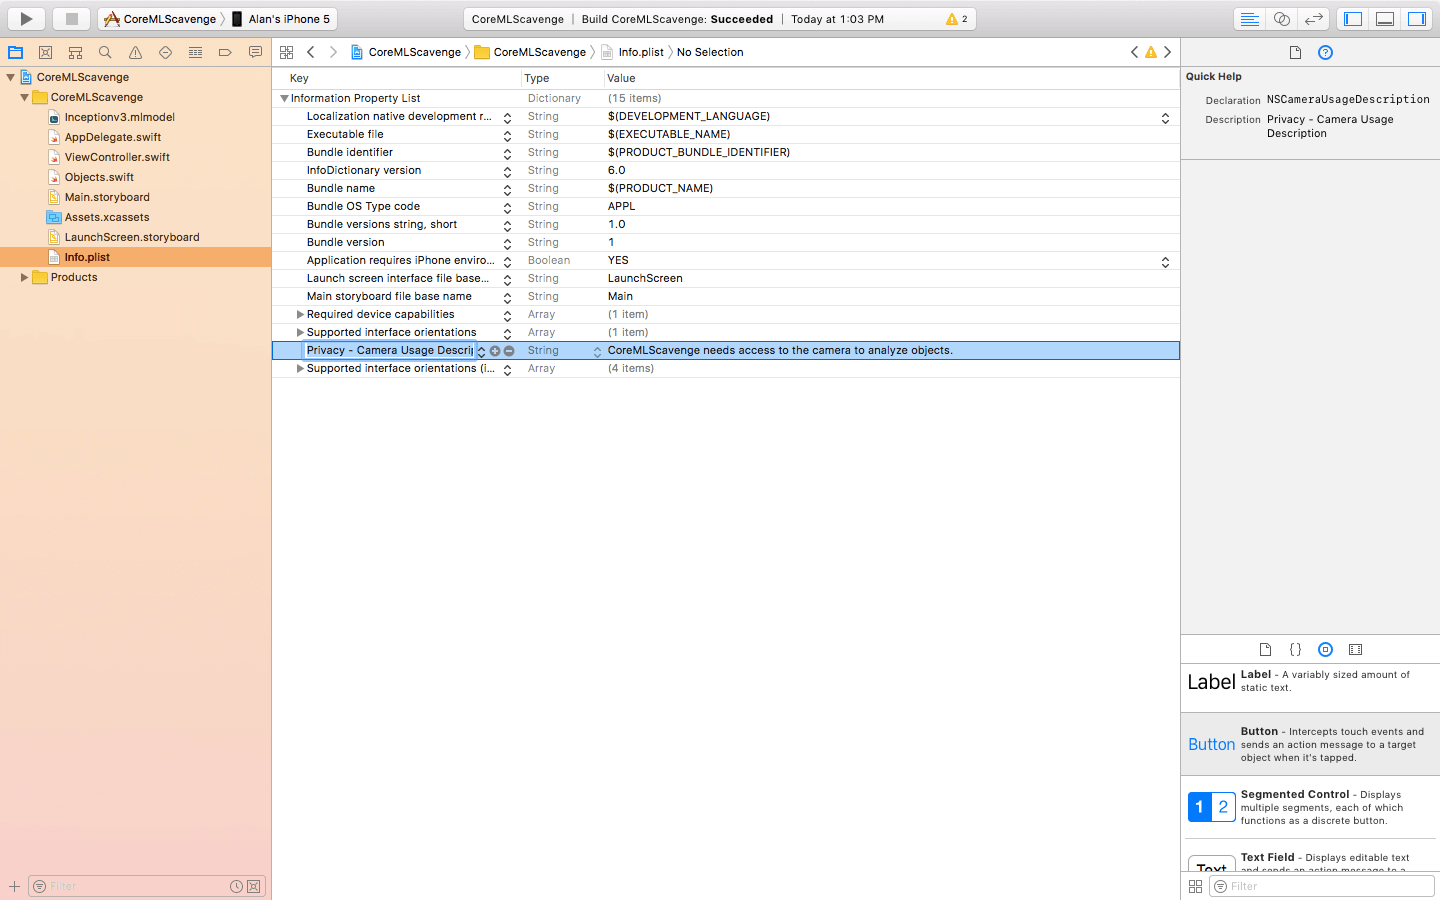
Head over to the info.plist file in the project navigator. Add a row with the key Privacy – Camera Usage Description and type a description in the value.
Now it’s time to add code. To keep things organized, we will add the code to prepare the camera in a function called cameraSetup.
Add the following to the viewDidLoad under viewSetup method call:
cameraSetup()
Next, add the following function after the viewSetup() function:
func cameraSetup() {

}
Now we are going to create something called AVCaptureSession which will make it possible to have a real time capture. Add the following to the cameraSetup function:
let captureSession = AVCaptureSession()
captureSession.sessionPreset = AVCaptureSession.Preset.photo
let backCamera = AVCaptureDevice.default(.builtInWideAngleCamera, for: .video, position: .back)!
let input = try! AVCaptureDeviceInput(device: backCamera)
captureSession.addInput(input)
So what is going on here?
Line #1: We create the AVCaptureSession constant.
Line #2: We set the preset for the caption which pretty much sets the quality for the output. We are setting it to photo for it to be high resolution.
Line #3: We create an AVCaptureDevice which is the back camera. There is no reason to use the front camera for this game.
Line #4: We specify that we are using the back camera by referencing the backCamera AVCaptureDevice.
Line #5: We are adding the backCamera device as the input for the captureSession.
Remember the variable we made earlier called cameraLayer? Now it’s time to use it. We’re going to be adding the camera layer as a sublayer and setting it to the view controller’s size.
Add the following after the code we just added for the capture session:
cameraLayer = AVCaptureVideoPreviewLayer(session: captureSession)
view.layer.addSublayer(cameraLayer)
cameraLayer.frame = view.bounds

view.bringSubview(toFront: topView)
view.bringSubview(toFront: bottomView)
Line #1-3: Here we are initializing the cameraLayer as an AVCaptureVideoPreviewLayer and setting the setting parameter to captureSession. After that, we add it to the view as a sublayer and set the size to the size of the entire view controller.
Line #5-6: Here we are bringing the top and bottom views to the front. This way, the camera layer doesn’t cover them.
To finish off this function, add the following code under what we just added:
let videoOutput = AVCaptureVideoDataOutput()
videoOutput.setSampleBufferDelegate(self, queue: DispatchQueue(label: "buffer delegate"))
videoOutput.recommendedVideoSettings(forVideoCodecType: .jpeg, assetWriterOutputFileType: .mp4)

captureSession.addOutput(videoOutput)
captureSession.sessionPreset = .high
captureSession.startRunning()
Line #1-3: Here we are creating the data output and specifying the output settings. You will see an error here but don’t worry about it. We will take care of that soon.
Line #5-7: Finally, we add the video output to the capture session and start running it.
The cameraSetup function should now look like this:
func cameraSetup() {
    let captureSession = AVCaptureSession()
    captureSession.sessionPreset = AVCaptureSession.Preset.photo

    let backCamera = AVCaptureDevice.default(.builtInWideAngleCamera, for: .video, position: .back)!
    let input = try! AVCaptureDeviceInput(device: backCamera)

    captureSession.addInput(input)

    cameraLayer = AVCaptureVideoPreviewLayer(session: captureSession)
    view.layer.addSublayer(cameraLayer)
    cameraLayer.frame = view.bounds
    view.bringSubview(toFront: topView)
    view.bringSubview(toFront: bottomView)

    let videoOutput = AVCaptureVideoDataOutput()
    videoOutput.setSampleBufferDelegate(self, queue: DispatchQueue(label: "buffer delegate"))
    videoOutput.recommendedVideoSettings(forVideoCodecType: .jpeg, assetWriterOutputFileType: .mp4)

    captureSession.addOutput(videoOutput)
    captureSession.sessionPreset = .high
    captureSession.startRunning()
}
Adding the Core ML Data Model
After setting up the UI and camera, it is time to work with Core ML for object recognition.
Before we continue coding, we need to add the Core ML data model into the project. In order to use Core ML, you need to have a pre-trained model. While it is possible to build your own model for this game, we will use a model available on Apple’s developer website.
Go to “Apple’s machine learning website” and scroll to the bottom. Here you will find four different pre-trained Core ML models available for download.
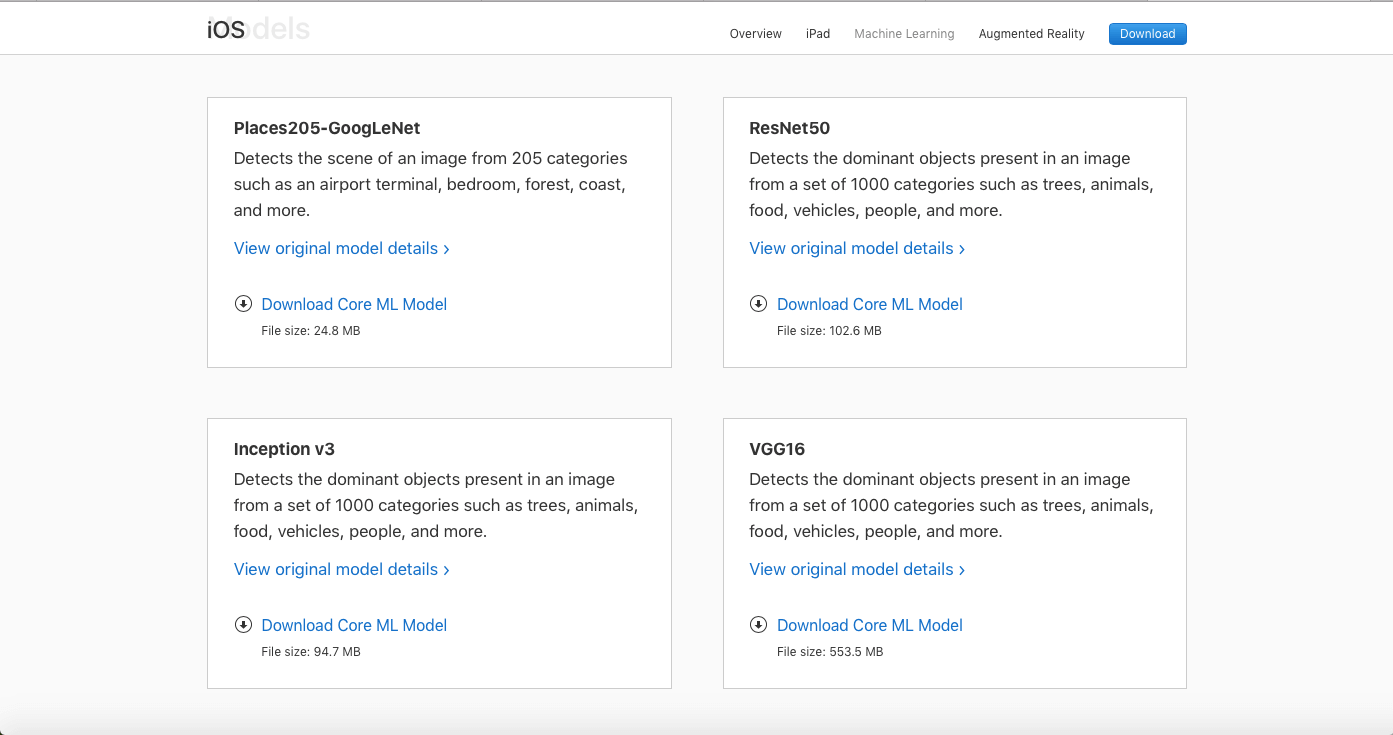
For this game, we will be using the Inception V3 model. Once you have the model downloaded, drag it into the Xcode project’s project navigator. Click on it and observe what is displayed.
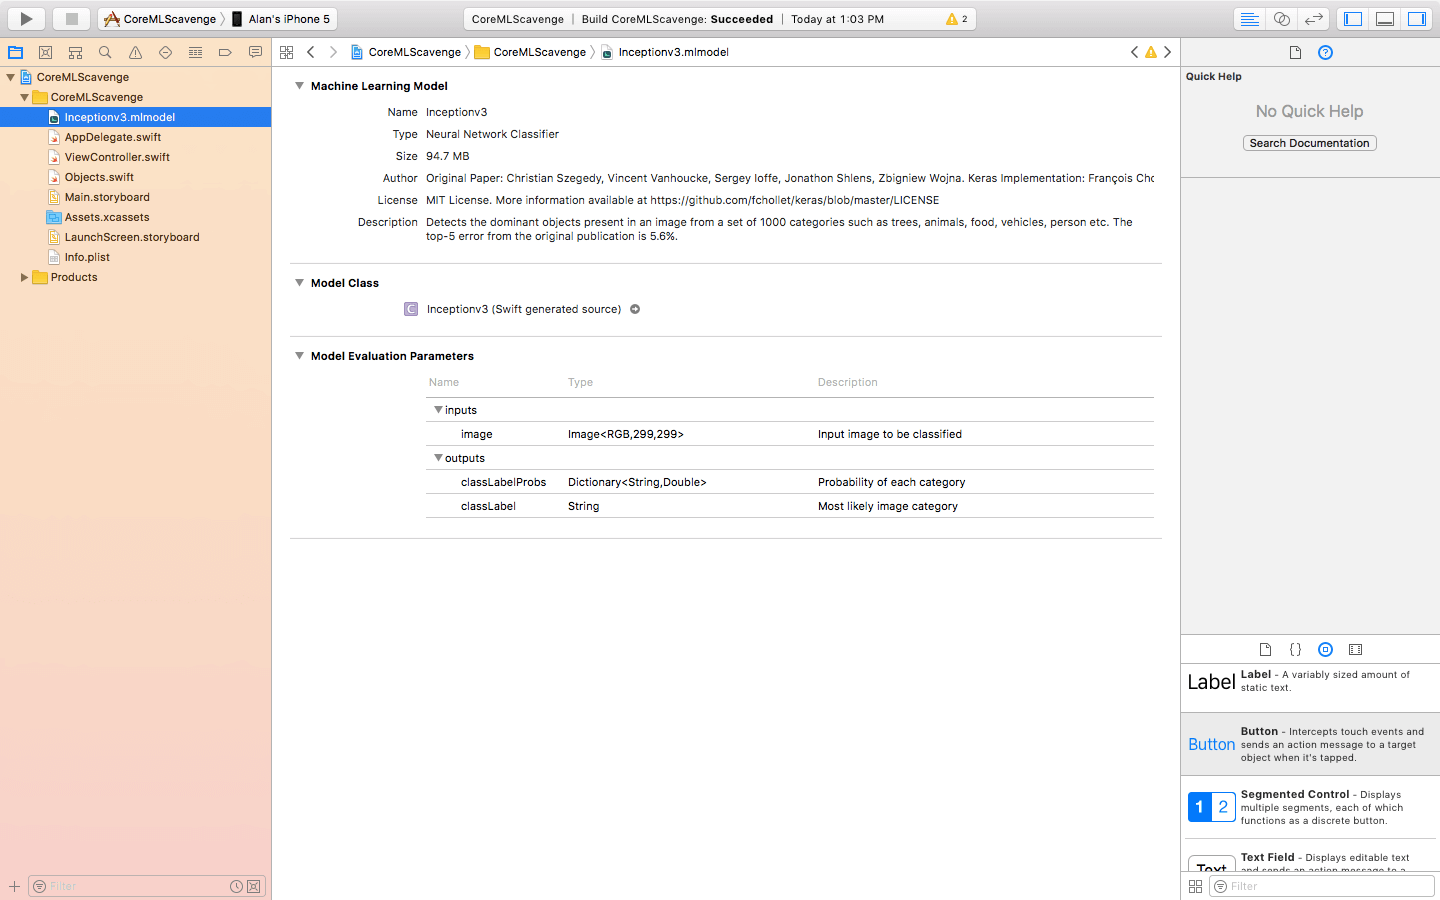
As you can see, this model has a type of a Neural Network Classifier. It takes in an image size 299×299 and outputs two things. A dictionary which is the probability or confidence level for the calculations of the model, and a string with the actual name of the object in the picture.
Predicting the Object
Now our little field trip is over and it’s time go to back to the View Controller and add two awesome functions that make the magic happen.
First we’re going to add the predict function. Add the following code after the cameraSetup function:
func predict(image: CGImage) {
    let model = try! VNCoreMLModel(for: Inceptionv3().model)
    let request = VNCoreMLRequest(model: model, completionHandler: results)
    let handler = VNSequenceRequestHandler()
    try! handler.perform([request], on: image)
}
Don’t let its size fool you, this is a powerful function. Here is what the code does:
Line #2: We create a model constant for the Inception V3 model.
Line #3: We create a VNCoreMLRequest which will call the results function (we are writing that next, so don’t worry about the error.)
Line #4-5: We create a constant for a VNSequenceRequestHandler object and then perform it with the image passed into the predict function via its parameter.
Next, it’s time to add the results function which will handle the results of the predict method and keep the game moving forward.
Add the following code after the predict function:
func results(request: VNRequest, error: Error?) {
    guard let results = request.results as? [VNClassificationObservation] else {
        print("No result found")
        return
    }

    guard results.count != 0 else {
        print("No result found")
        return
    }

    let highestConfidenceResult = results.first!
    let identifier = highestConfidenceResult.identifier.contains(", ") ? String(describing: highestConfidenceResult.identifier.split(separator: ",").first!) : highestConfidenceResult.identifier

    if identifier == objectLabel.text! {
        currentScore += 1
        //nextObject()
    }
}
This function is called after a prediction. It first has two guards to make sure that there is actually a result. If there is, it will take the result with the highest confidence and put it into its own string called identifier. Then the function will check to see if the identifier is the same as the object label’s text. If they are equal, that means the player found the correct object and the score will be increased. There is also a function call for nextObject which is commented out. We have not yet created that function so leave it that way for now.
Okay! So we are done with the majority of the Core ML code for the game. Isn’t that easy? Yourpredict and results functions should look like this:
func predict(image: CGImage) {
    let model = try! VNCoreMLModel(for: Inceptionv3().model)
    let request = VNCoreMLRequest(model: model, completionHandler: results)
    let handler = VNSequenceRequestHandler()
    try! handler.perform([request], on: image)
}

func results(request: VNRequest, error: Error?) {
    guard let results = request.results as? [VNClassificationObservation] else {
        print("No result found")
        return
    }


    guard results.count != 0 else {
        print("No result found")
        return
    }

    let highestConfidenceResult = results.first!
    let identifier = highestConfidenceResult.identifier.contains(", ") ? String(describing: highestConfidenceResult.identifier.split(separator: ",").first!) : highestConfidenceResult.identifier

    if identifier == objectLabel.text! {
        currentScore += 1
        //nextObject()
    }
}
One more thing we need to do before we are done with the Core ML part of this game. We need to add an extension to call the predict function. Add the following code the the very bottom of the file, after the last bracket:
extension ViewController: AVCaptureVideoDataOutputSampleBufferDelegate {
    func captureOutput(_ output: AVCaptureOutput, didOutput sampleBuffer: CMSampleBuffer, from connection: AVCaptureConnection) {
        guard let pixelBuffer = CMSampleBufferGetImageBuffer(sampleBuffer) else { fatalError("pixel buffer is nil") }
        let ciImage = CIImage(cvPixelBuffer: pixelBuffer)
        let context = CIContext(options: nil)

        guard let cgImage = context.createCGImage(ciImage, from: ciImage.extent) else { fatalError("cg image") }
        let uiImage = UIImage(cgImage: cgImage, scale: 1.0, orientation: .leftMirrored)

        DispatchQueue.main.sync {
            predict(image: uiImage.cgImage!)
        }
    }
}
This extension adopts the AVCaptureVideoDataOutputSampleBufferDelegate protocol to process the captured video sample buffers, and creates a CGImage from the video feed. With the images, we pass it to the predict function. You should now be able to build your project without any errors. This is how we continuously capture video and pass it to the built-in machine learning model for object recognition.
Preparing an Array of Objects for the Game
In order for the game to give the player random objects to look for, we have to prepare a list of objects to choose from. To do this, we will create an array with the names of a bunch of objects. Later we will create a function to choose an element from this array randomly and tell the player to go find it.
This is going to be a somewhat lengthy array, so for organization purposes, I have decided to create it in a struct in a separate Swift file. Right click in the project navigator and choose New File....
Now select the Swift File option and click next. Name the file “Objects” and click create. Place the following code snippet into the file after the import statement:
struct Objects {
    let objectArray = ["computer keyboard", "mouse", "iPod", "printer", "digital clock", "digital watch", "backpack", "ping-pong ball", "envelope", "water bottle", "combination lock", "lampshade", "switch", "lighter", "pillow", "spider web", "sandal", "vacuum", "wall clock", "bath towel", "wallet", "poster", "chocolate"]
}
Here I have created an array called objectArray of some common, random, household objects that the Core ML model looks for. These are just a select few so feel free to add more.
Now go back to ViewController.swift before we jump into the next step.
Saving the Score
We will be saving the player’s highest score using UserDefaults. This means that we need a setter function to save the score into UserDefaults and a getter function to retrieve it.
Add the following two functions to your code after the results function:
func getHighScore() {
    if let score = UserDefaults.standard.object(forKey: "highscore") {
        highscoreLabel.text = "\(score)"
        highScore = score as! Int
    }
    else {
        print("No highscore, setting to 0.")
        highscoreLabel.text = "0"
        highScore = 0
        setHighScore(score: 0)
    }
}

func setHighScore(score: Int) {
    UserDefaults.standard.set(score, forKey: "highscore")
}
The first function, getHighScore, uses an if let statement to check if there is already a saved score in UserDefaults. If there is, it sets the highScore variable to it, if not, it sets the highScore to 0. The second function, setHighScore, simply sets the current score as the high score. We will call this when the player beats their score.
The getHighScore function needs to be called when the app loads up. This way, the player can see their high score when they open the app.
Add getHighScore() to the viewDidLoad under the cameraSetup function call. Your ViewDidLoad should look like this:
override func viewDidLoad() {
    super.viewDidLoad()

    viewSetup()
    cameraSetup()
    getHighScore()

}
Handling the Game Play
Now it’s time to add a number of different functions to pull everything we have already done together and make this app work. We will start by adding functions to choose a random object from the objects array and handle when the game ends.
Add the following to your code after the setHighScore method:
    //1
    func endGame() {
        //2
        startButton.isHidden = false
        skipButton.isHidden = true
        objectLabel.text = "Game Over"
        //3
        if currentScore > highScore {
            setHighScore(score: currentScore)
            highscoreLabel.text = "\(currentScore)"
        }
        //4
        currentScore = 0
        timeRemaining = 60

    }

    //5
    func nextObject() {
        //6
        let allObjects = Objects().objectArray
        //7
        let randomObjectIndex = Int(arc4random_uniform(UInt32(allObjects.count)))
        //8
        guard allObjects[randomObjectIndex] != objectLabel.text else {
            nextObject()
            return
        }
        //9
        objectLabel.text = allObjects[randomObjectIndex]
        scoreLabel.text = "\(currentScore)"
    }
So what exactly are these functions doing you ask?
- The
endGamefunction is called when the timer is up. - We first unhide the start button and hide the skip button since it is no longer needed when the game is not in play. We also set the object label’s text to say “Game Over”.
- We check if the score that the player just got is higher than the high score. If it is, than we call the
setHighScorefunction. - We reset the variables for the next game.
- The
nextObjectfunction is called when the player either finds the correct object or taps the skip button. This function will take a random object from the object array and set it to the objects label so the player knows to find it. - We create an instance of the objectArray.
- We generate a random number from 0 to the length of the object array.
- We use a guard to make sure that the random number that was just chosen is not the same as the last one. This way, the player will not get the same object twice in a row.
- We set the object label to the random object and make sure the score label is displaying the correct score.
Next, we need to add the actions that we will connect to the play and skip buttons. Add the following code after the nextObject function:
@IBAction func startButtonTapped() {
    //1
    gameTimer = Timer.scheduledTimer(withTimeInterval: 1, repeats: true, block: { (gameTimer) in
        //2
        guard self.timeRemaining != 0 else {
            gameTimer.invalidate()
            self.endGame()
            return
        }

        self.timeRemaining -= 1
        self.timerLabel.text = "\(self.timeRemaining)"
    })
    //3
    startButton.isHidden = true
    skipButton.isHidden = false
    nextObject()

}

//4
@IBAction func skipButtonTapped() {
    nextObject()
}
So what did we do here?
- First we added an action that will be called when the start button is tapped. Here we initialize the gameTimer using the new method that takes a block to invoke rather than a selector which makes the code much cleaner and more organized.
- We add a guard to make sure that there is time left in the game. If there is not, we invalidate the timer and run the
endGamefunction. If there is time, we subtract one from the time remaining and update the timer label. - Here we hide the startButton, show the skip button, and call the
nextObjectfunction to show the first object to find. - We add an action to connect to the skip button which simply calls for a new object.
Playing the Game
Now it’s finally time to build and run your game. Once loaded, tap the play button and point your phone at the object stated at the top. See how high is your score! You might need to wait a second for the app to focus before it can recognize an object. Also, please note that if you have an older device such as an iPhone 5s or 6, the app might run really slow because of the power and resources that Core ML needs. As I testedt, the game ran great on my iPhone 7. But when I tried it on my iPhone 5s, it was really slow and laggy.
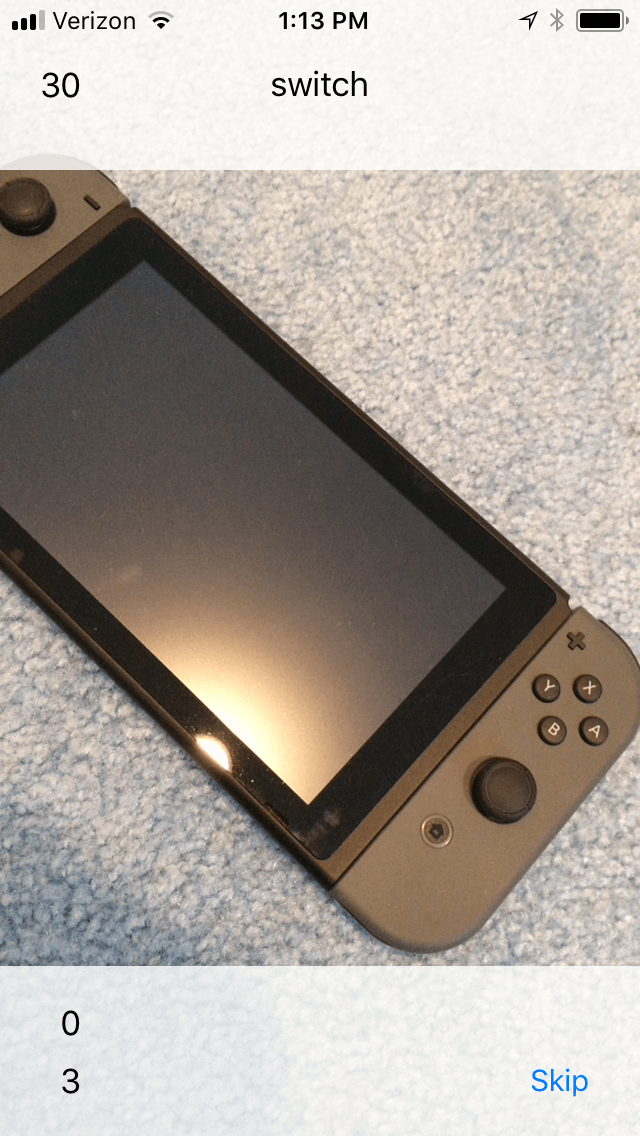
In case you were wondering, this model cannot recognize the Nintendo Switch!
Recap
I hope you had fun creating this game and have some more insight on how much you can do with Core ML. The game is not perfect, there are a lot of things you can improve (say, play a sound when the object is matched). But this is just a simple example showing how you can apply Core ML. So get creative and see how you can improve upon it.
For reference, the complete demo app is available on GitHub.
For more details about the Core ML framework, you can refer to the official Core ML documentation.
Do you like this tutorial? Feel free to leave a comment and let me know.


