

At WWDC 2017, Apple released a lot of exciting frameworks and APIs for us developer to use. Among all the new frameworks, one of the most popular is definitely Core ML. Core ML is a framework that can be harnessed to integrate machine learning models into your app. The best part about Core ML is that you don’t require extensive knowledge about neural networks or machine learning. Another bonus feature about Core ML is that you can use pre-trained data models as long as you convert it into a Core ML model. For demonstration purpose, we will be using a Core ML model that is available on Apple’s Developer Website. Without further ado, let’s start to learn Core ML.
What’s Core ML
Core ML lets you integrate a broad variety of machine learning model types into your app. In addition to supporting extensive deep learning with over 30 layer types, it also supports standard models such as tree ensembles, SVMs, and generalized linear models. Because it’s built on top of low level technologies like Metal and Accelerate, Core ML seamlessly takes advantage of the CPU and GPU to provide maximum performance and efficiency. You can run machine learning models on the device so data doesn’t need to leave the device to be analyzed.
Core ML is a brand new machine learning framework, announed during this year’s WWDC, that comes along with iOS 11. With Core ML, you can integrate machine learning models into your app. Let’s back up a little bit. What is machine learning? Simply put, machine learning is the application of giving computers the ability to learn without being explicitly programmed. A trained model is the result of combining a machine learning algorithm with a set of training data.
As an application developer, our main concern is how we can apply this model to our app to do some really interesting things. Luckily, with Core ML, Apple has made it so simple to integrate different machine learning models into our apps. This opens up many possibilities for developers to build features such as image recognition, natural language processing (NLP), text prediction, etc.
Now you may be wondering if it is very difficult to bring this type of AI to your app. This is the best part. Core ML is very easy to use. In this tutorial, you will see that it only takes us 10 lines of code to integrate Core ML into our apps.
Cool, right? Let’s get started.
Demo App Overview
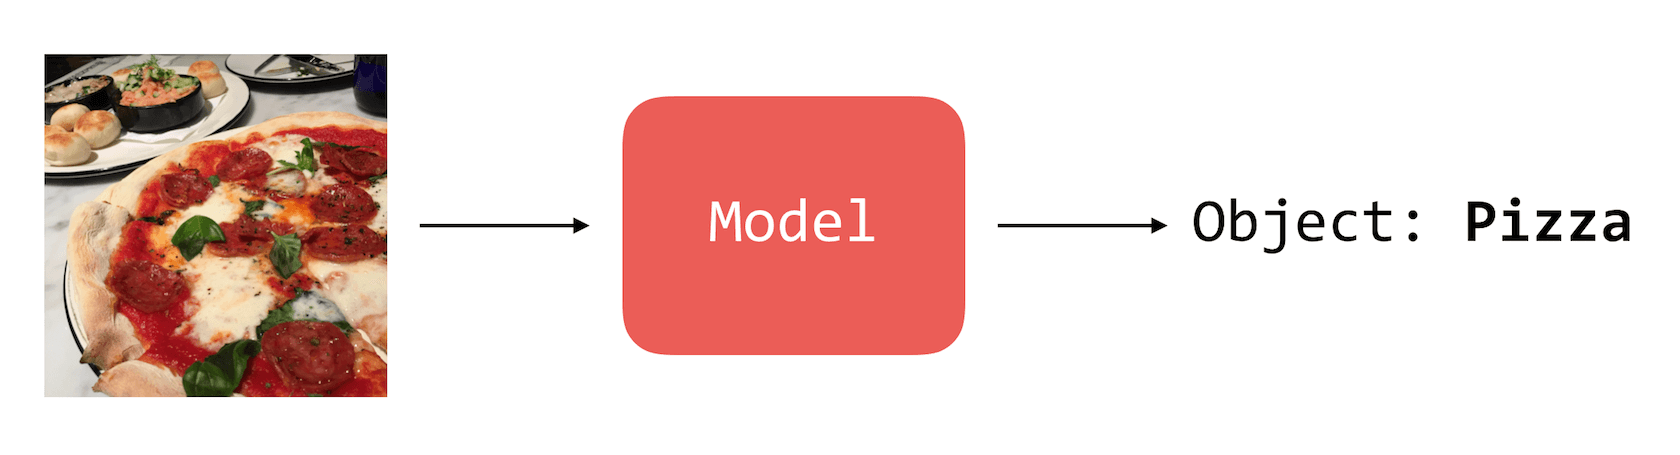
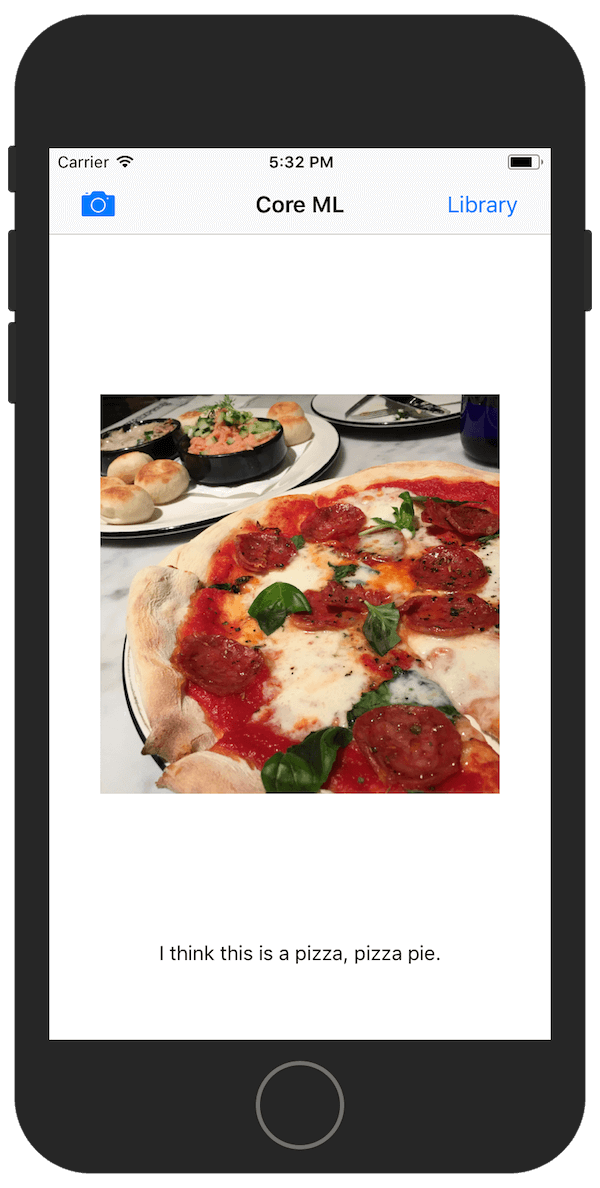
The app we are trying to make is fairly simple. Our app lets user either take a picture of something or choose a photo from their photo library. Then, the machine learning algorithm will try to predict what the object is in the picture. The result may not be perfect, but you will get an idea how you can apply Core ML in your app.
Getting Started
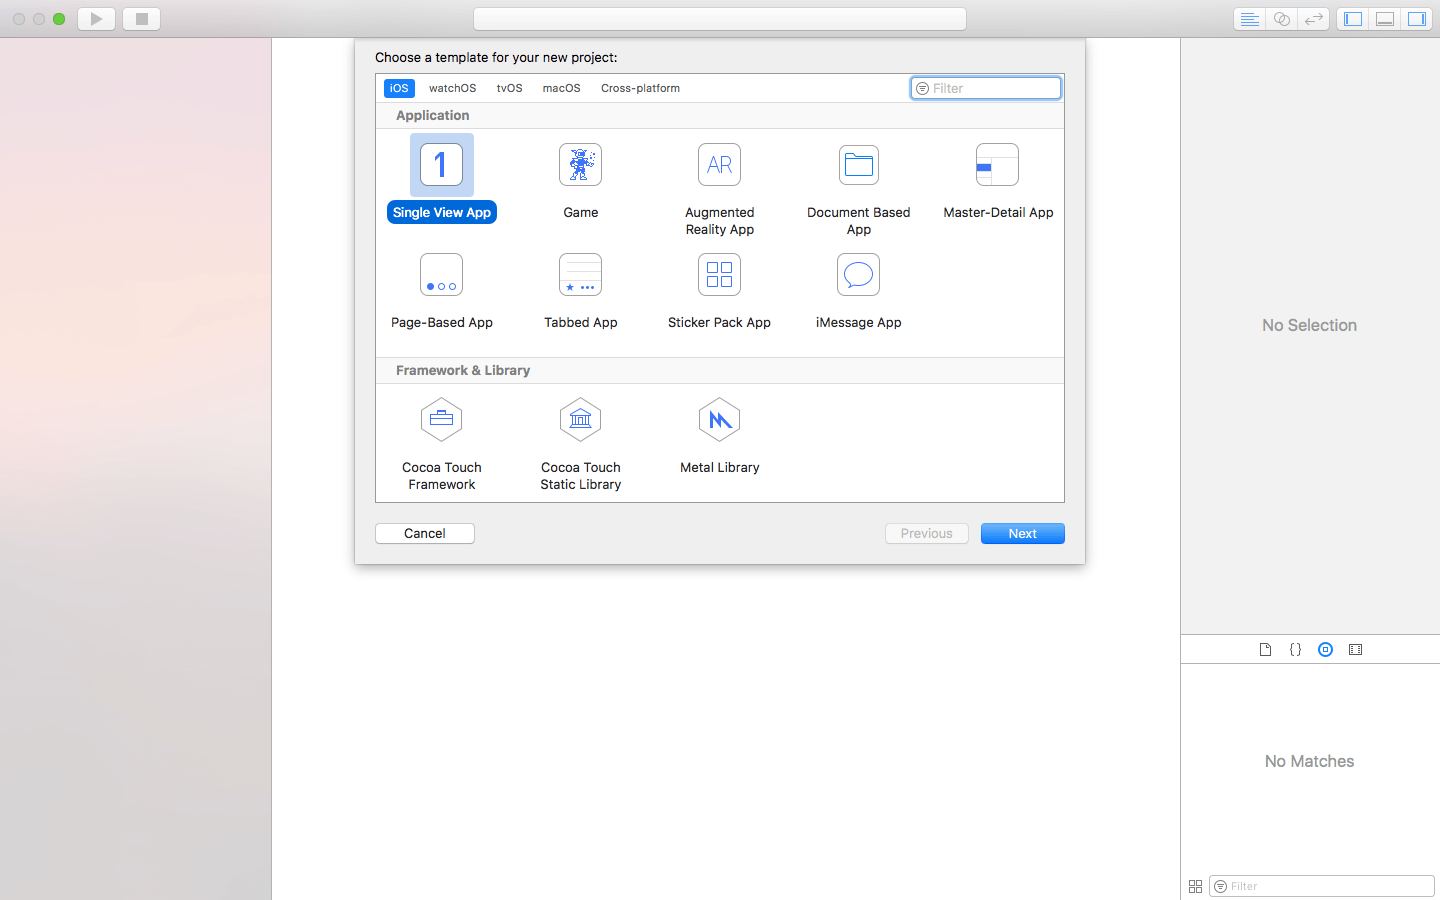
To begin, first go to Xcode 9 and create a new project. Select the single-view application template for this project, and make sure the language is set to Swift.
Creating the User Interface
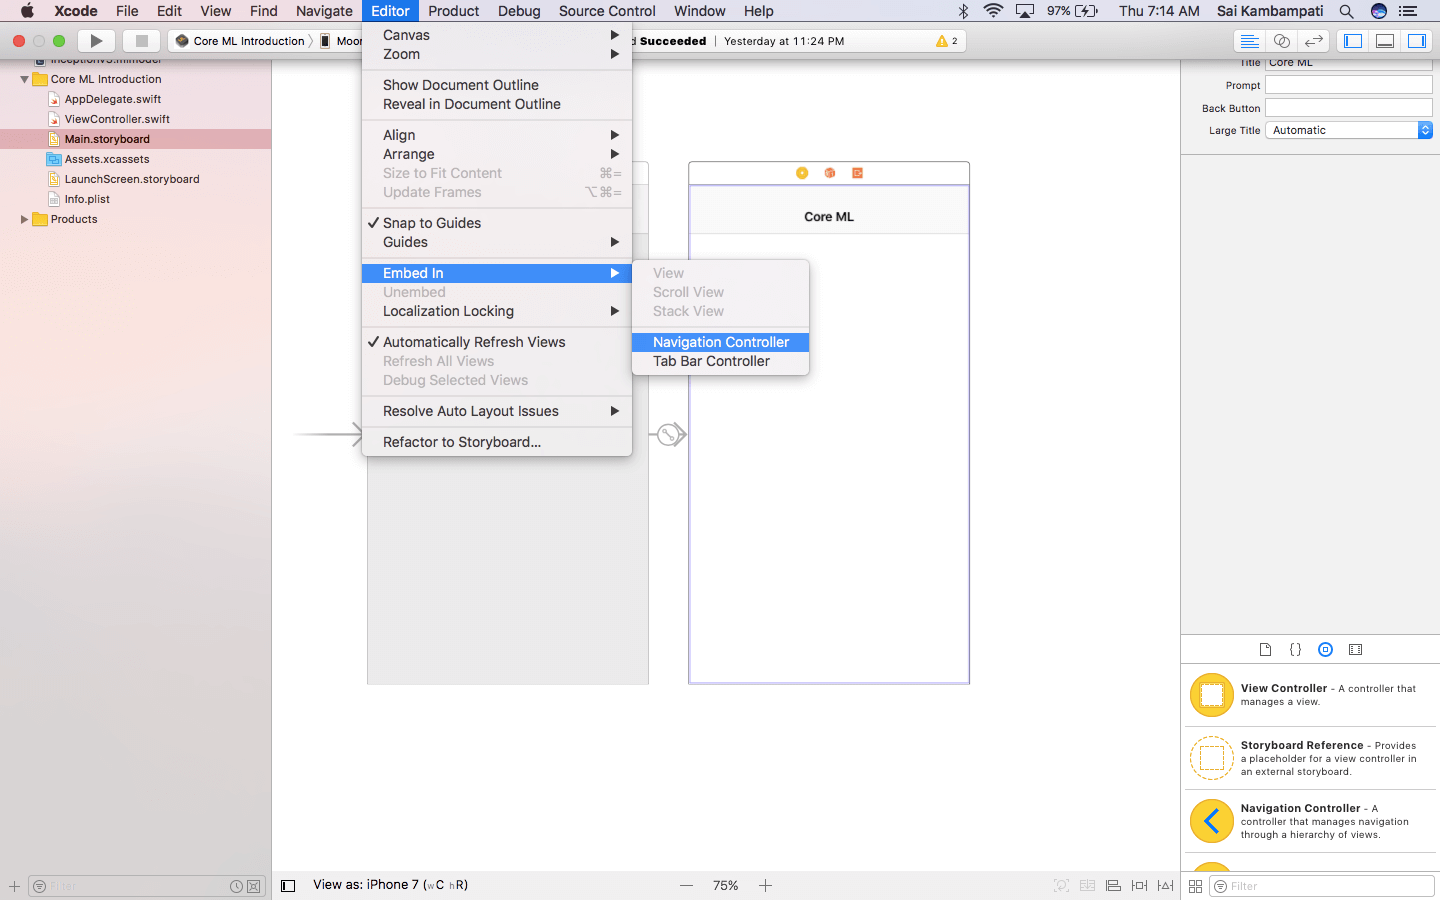
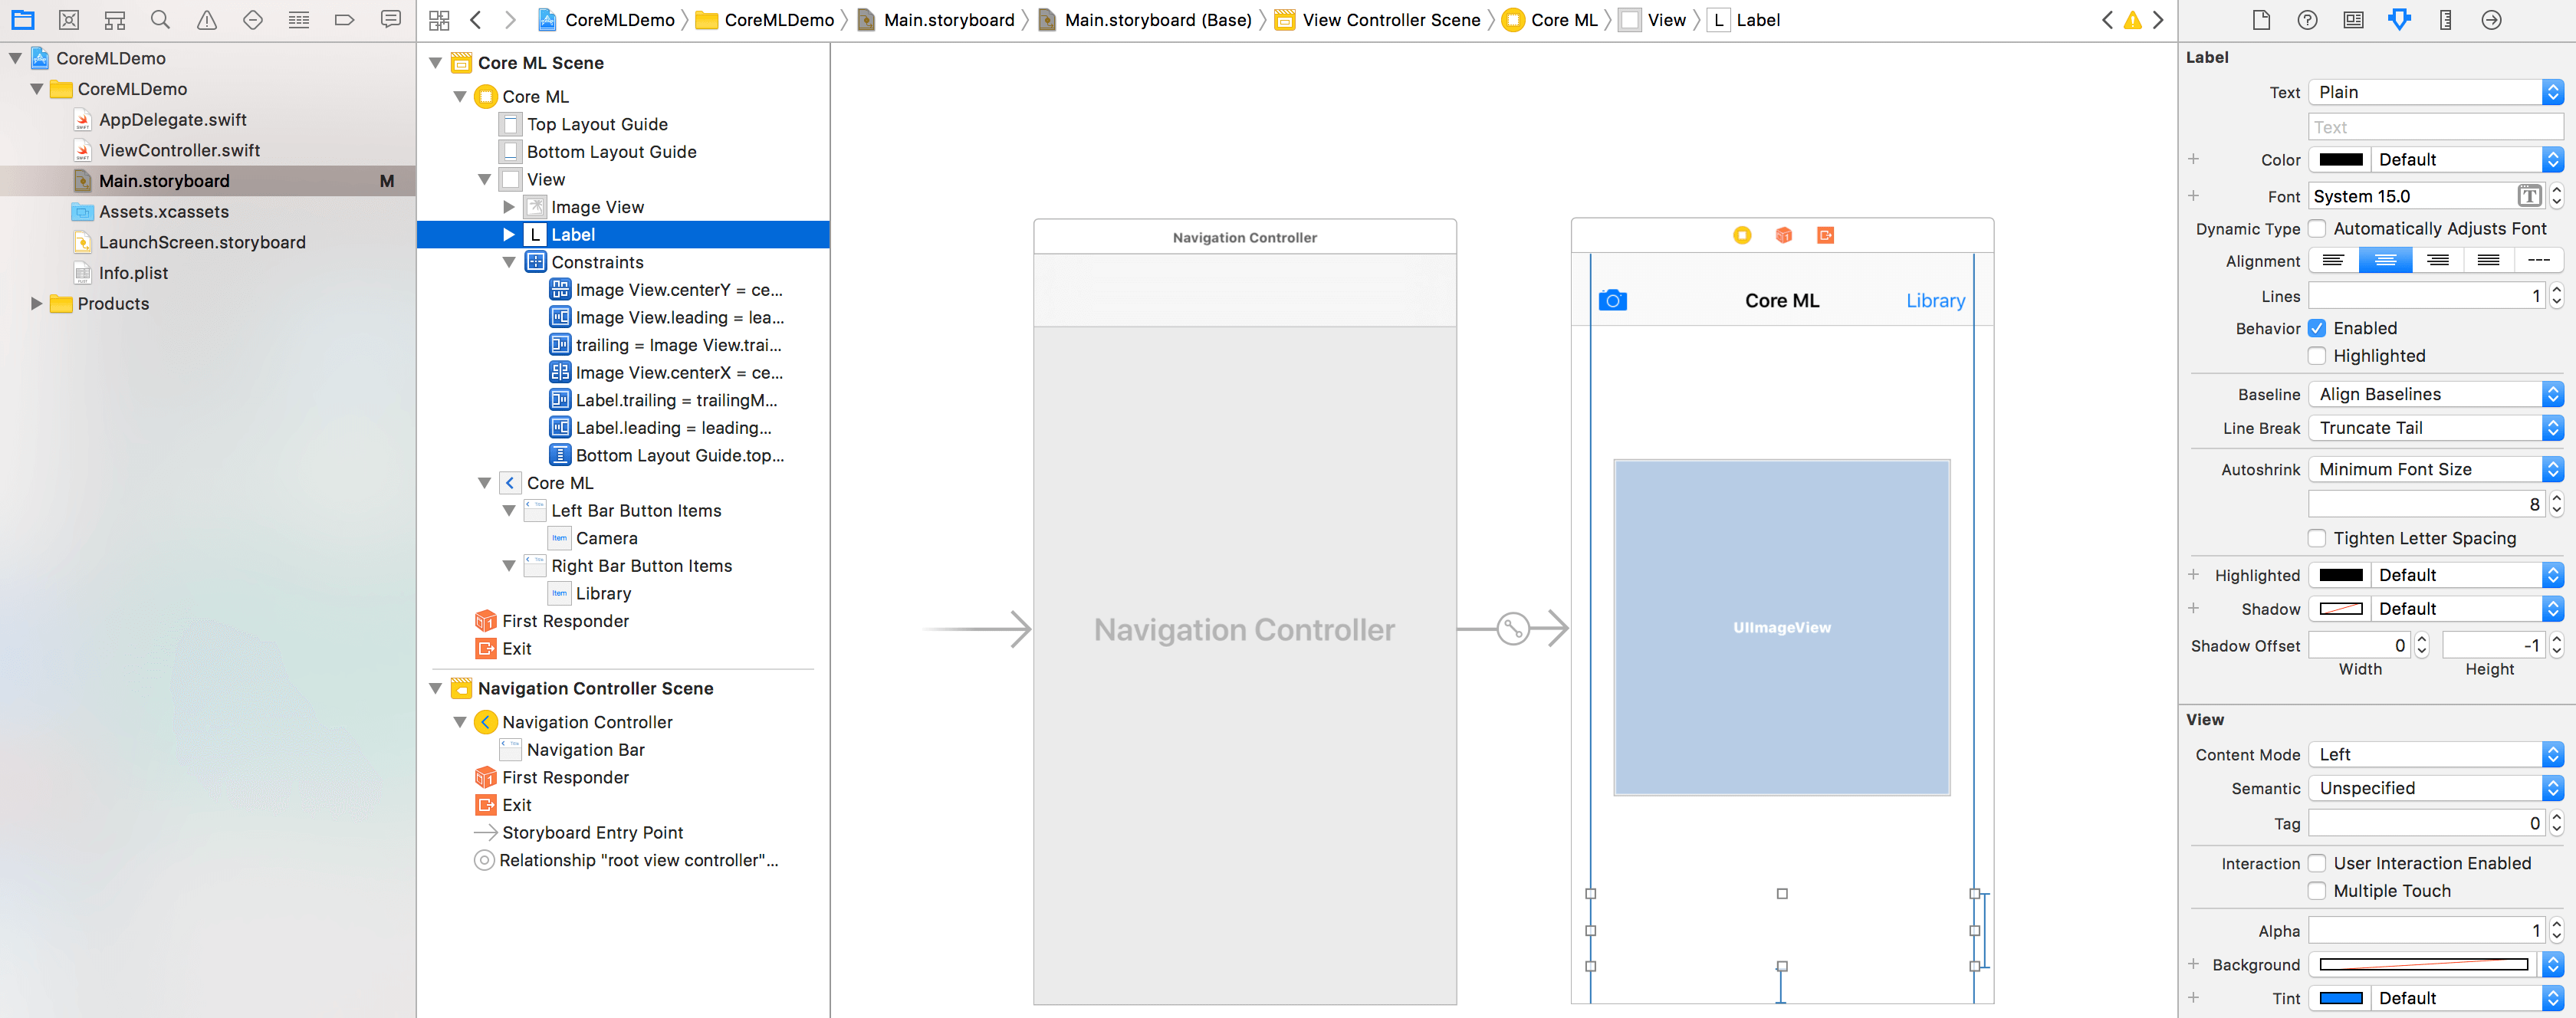
Let’s begin! The first thing we want to do is to head on over to Main.storyboard and add a couple of UI elements to the view. Choose the view controller in storyboard, and then go up to the Xcode menu. Click Editor-> Embed In-> Navigation Controller. Once you have done that, you should see a navigation bar appear at the top of your view. Name the navigation bar Core ML (or whatever you see fit).
Next, drag in two bar button items: one on each side of the navigation bar title. For the bar button item on the left, go to the Attributes Inspector and change the System Item to “Camera”. On the right bar button item, name it “Library”. These two buttons let users pick a photo from his/her photo library or shoot one using camera.
The final two objects you need are a UILabel and a UIImageView. Take the UIImageView and center it into the middle of the view. Change the width and height of the image view to 299x299 thus making it a square. Now for the UILabel, place it all the way to the bottom of the view and stretch it such that it is touching both ends. That completes the UI for the app.
While I am not covering how to Auto Layout these views, it is highly recommended that you try to do so to avoid any misplaced views. If you can’t accomplish this, then build the storyboard on a device which you will be using to run the app.
Implementing the Camera and Photo Library Functions
Now that we have designed the UI, let’s move onto the implementation. We will implement both the library and camera buttons in this section. In ViewController.swift, first adopt the UINavigationControllerDelegate protocol that will be required by the UIImagePickerController class.
class ViewController: UIViewController, UINavigationControllerDelegate
Then add two new outlets for both the label and image view. For simplicity, I have named the UIImageView imageView and the UILabel classifier. Your code should look like this:
import UIKit

class ViewController: UIViewController, UINavigationControllerDelegate {
    @IBOutlet weak var imageView: UIImageView!
    @IBOutlet weak var classifier: UILabel!

     override func viewDidLoad() {
        super.viewDidLoad()
    }

    override func didReceiveMemoryWarning() {
        super.didReceiveMemoryWarning()
    }
}
Next, you need to create the respective actions from clicking the bar button items. Now insert the following action methods in the ViewController class:
@IBAction func camera(_ sender: Any) {

    if !UIImagePickerController.isSourceTypeAvailable(.camera) {
        return
    }

    let cameraPicker = UIImagePickerController()
    cameraPicker.delegate = self
    cameraPicker.sourceType = .camera
    cameraPicker.allowsEditing = false

    present(cameraPicker, animated: true)
}

@IBAction func openLibrary(_ sender: Any) {
    let picker = UIImagePickerController()
    picker.allowsEditing = false
    picker.delegate = self
    picker.sourceType = .photoLibrary
    present(picker, animated: true)
}
To summarize what we did in each of these actions, we created a constant that is a UIImagePickerController. Then we made sure that the user can’t edit the photo that is taken (either from the photo library or the camera). Then we set the delegate to its self. . Finally, we present the UIImagePickerController to the user.
Because we didn’t add the UIImagePickerControllerDelegate class method to ViewController.swift, we will receive an error. We will adopt the delegate using an extension:
extension ViewController: UIImagePickerControllerDelegate {
    func imagePickerControllerDidCancel(_ picker: UIImagePickerController) {
        dismiss(animated: true, completion: nil)
    }
}
The line above handles the app if the user cancels the image taken. It also assigns the class method UIImagePickerControllerDelegate to our Swift file. Your code should now look a little like this.
import UIKit

class ViewController: UIViewController, UINavigationControllerDelegate {

    @IBOutlet weak var imageView: UIImageView!
    @IBOutlet weak var classifier: UILabel!

    override func viewDidLoad() {
        super.viewDidLoad()
        // Do any additional setup after loading the view, typically from a nib.
    }

    override func didReceiveMemoryWarning() {
        super.didReceiveMemoryWarning()
        // Dispose of any resources that can be recreated.
    }

    @IBAction func camera(_ sender: Any) {

        if !UIImagePickerController.isSourceTypeAvailable(.camera) {
            return
        }

        let cameraPicker = UIImagePickerController()
        cameraPicker.delegate = self
        cameraPicker.sourceType = .camera
        cameraPicker.allowsEditing = false

        present(cameraPicker, animated: true)
    }

    @IBAction func openLibrary(_ sender: Any) {
        let picker = UIImagePickerController()
        picker.allowsEditing = false
        picker.delegate = self
        picker.sourceType = .photoLibrary
        present(picker, animated: true)
    }

}

extension ViewController: UIImagePickerControllerDelegate {
    func imagePickerControllerDidCancel(_ picker: UIImagePickerController) {
        dismiss(animated: true, completion: nil)
    }
}
Make sure you go back to the storyboard and connect all the outlet variables and action methods.
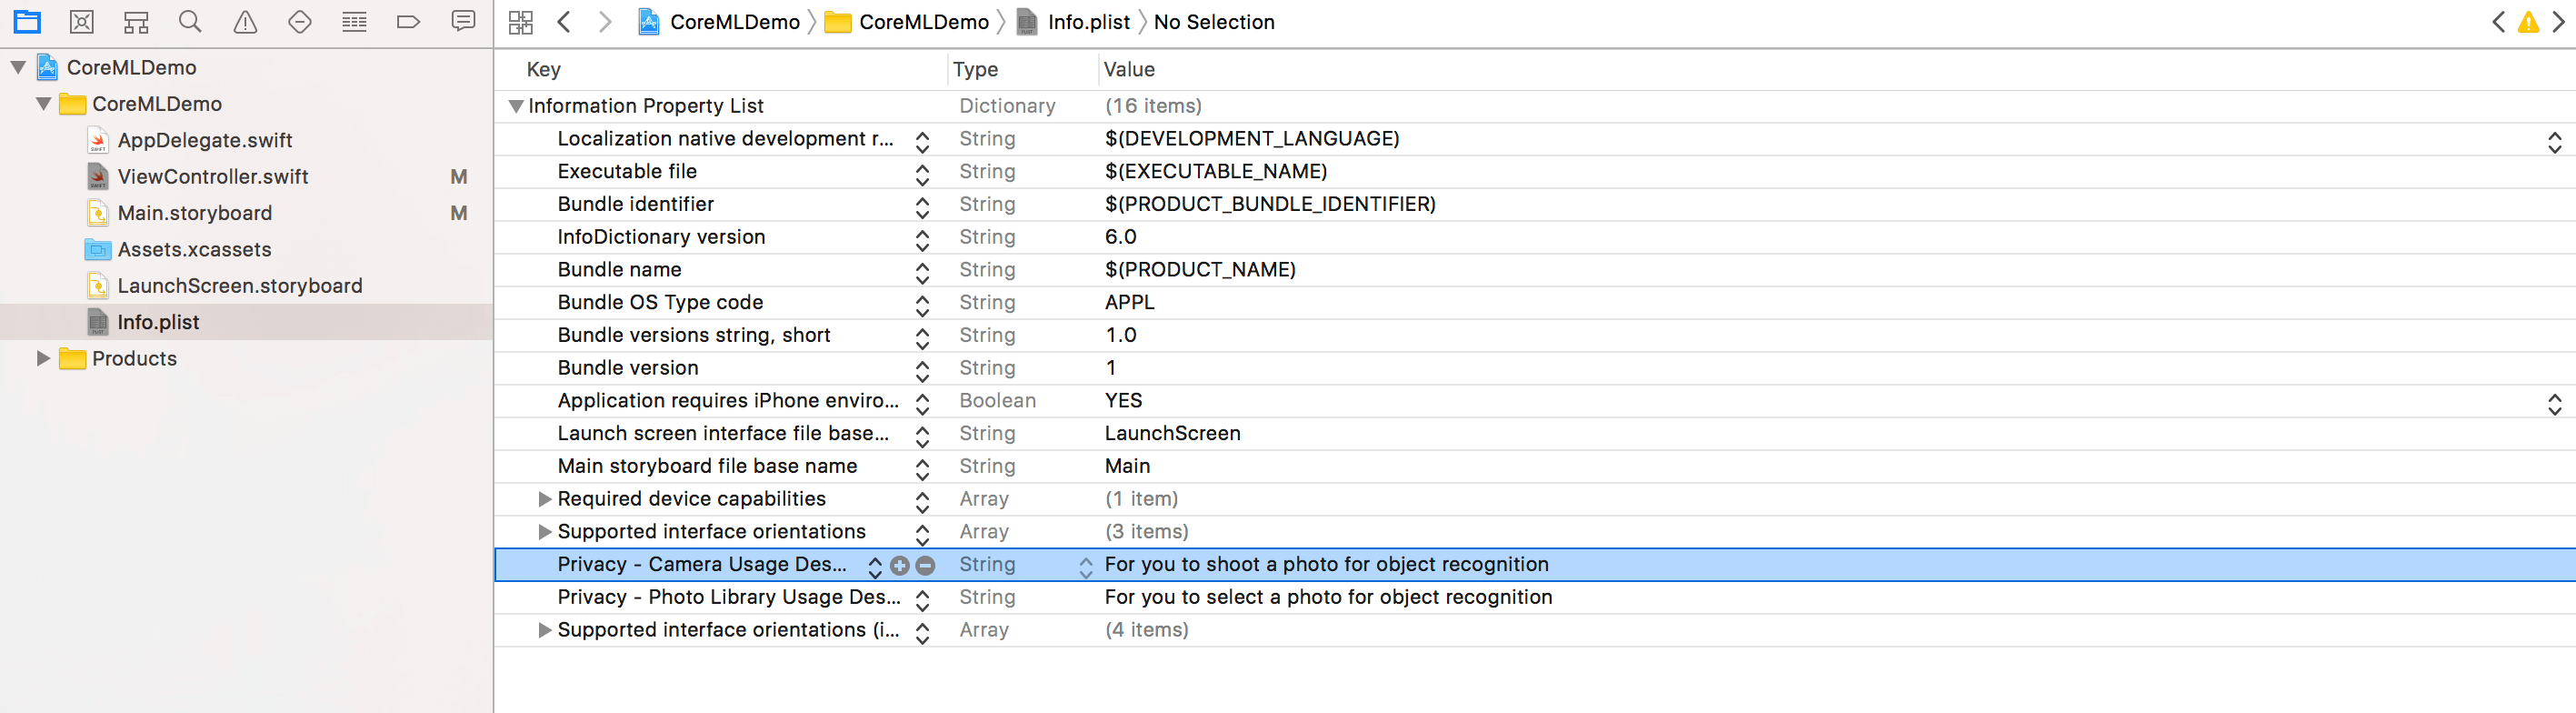
To access your camera and photo library, there is still one last thing you must do. Go to your Info.plist and two entries: Privacy – Camera Usage Description and Privacy – Photo Library Usage Description. Starting from iOS 10, you will need to specify the reason why your app needs to access the camera and photo library.
Okay, that’s it. You’re now ready to move onto the core part of the tutorial. Again, if you don’t want to build the demo app from scratch, download the starter project here.
Integrating the Core ML Data Model
Now, let’s switch gears for a bit and integrate the Core ML Data Model into our app. As mentioned earlier, we need a pre-trained model to work with Core ML. You can build your own model, but for this demo, we will use the pre-trained model available on Apple’s developer website.
Go to Apple’s Developer Website on Machine Learning, and scroll all the way down to the bottom of the page. You will find 4 pre-trained Core ML models.
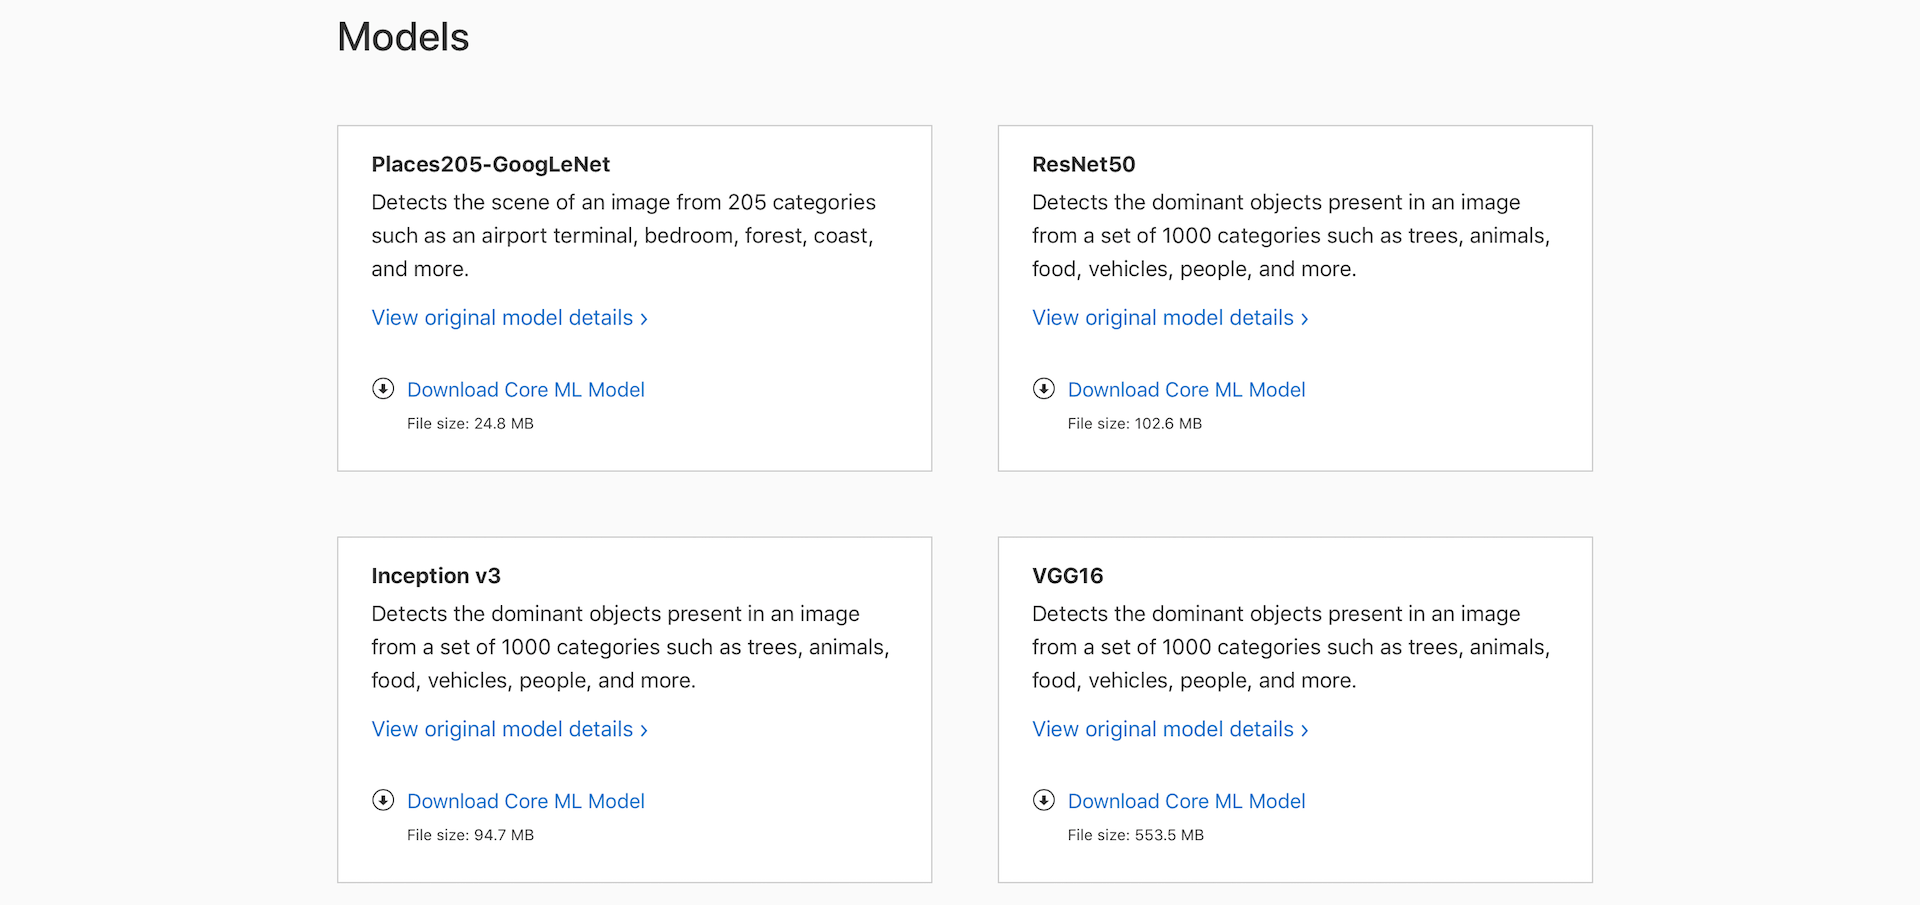
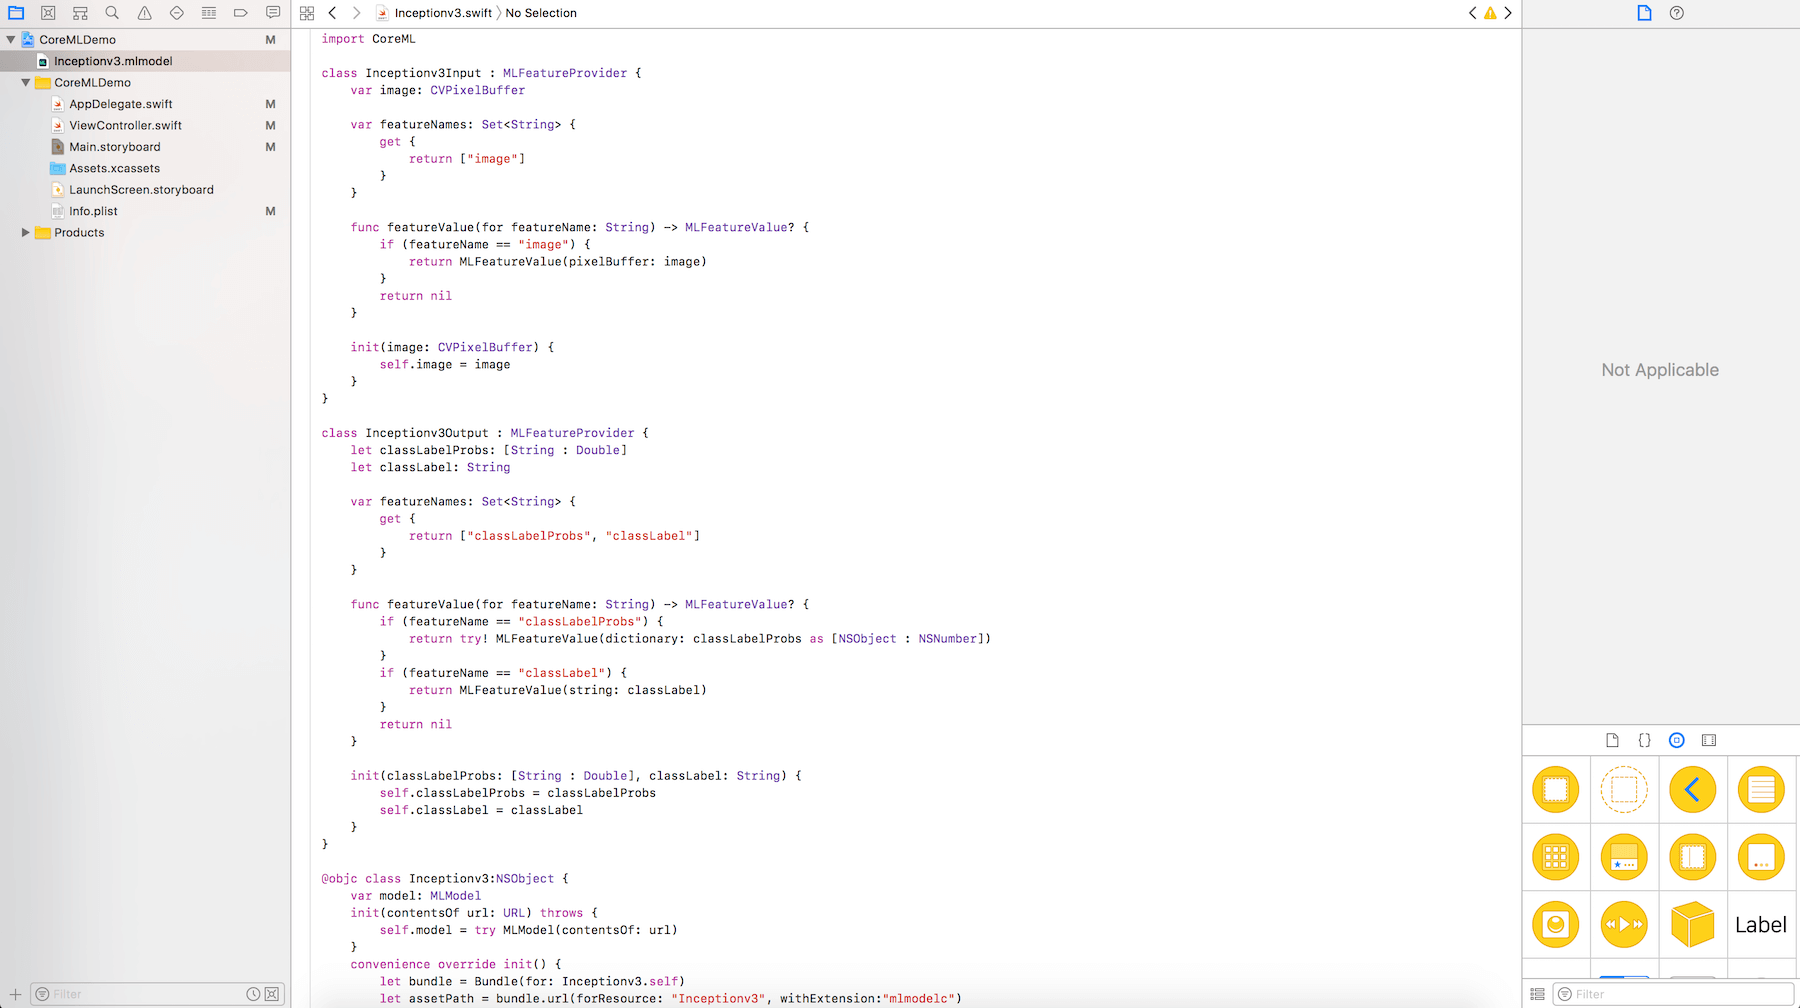
For this tutorial, we use the Inception v3 model but feel free to try out the other three. Once you have the Inception v3 model downloaded, add it into the Xcode Project and take a look at what is displayed.
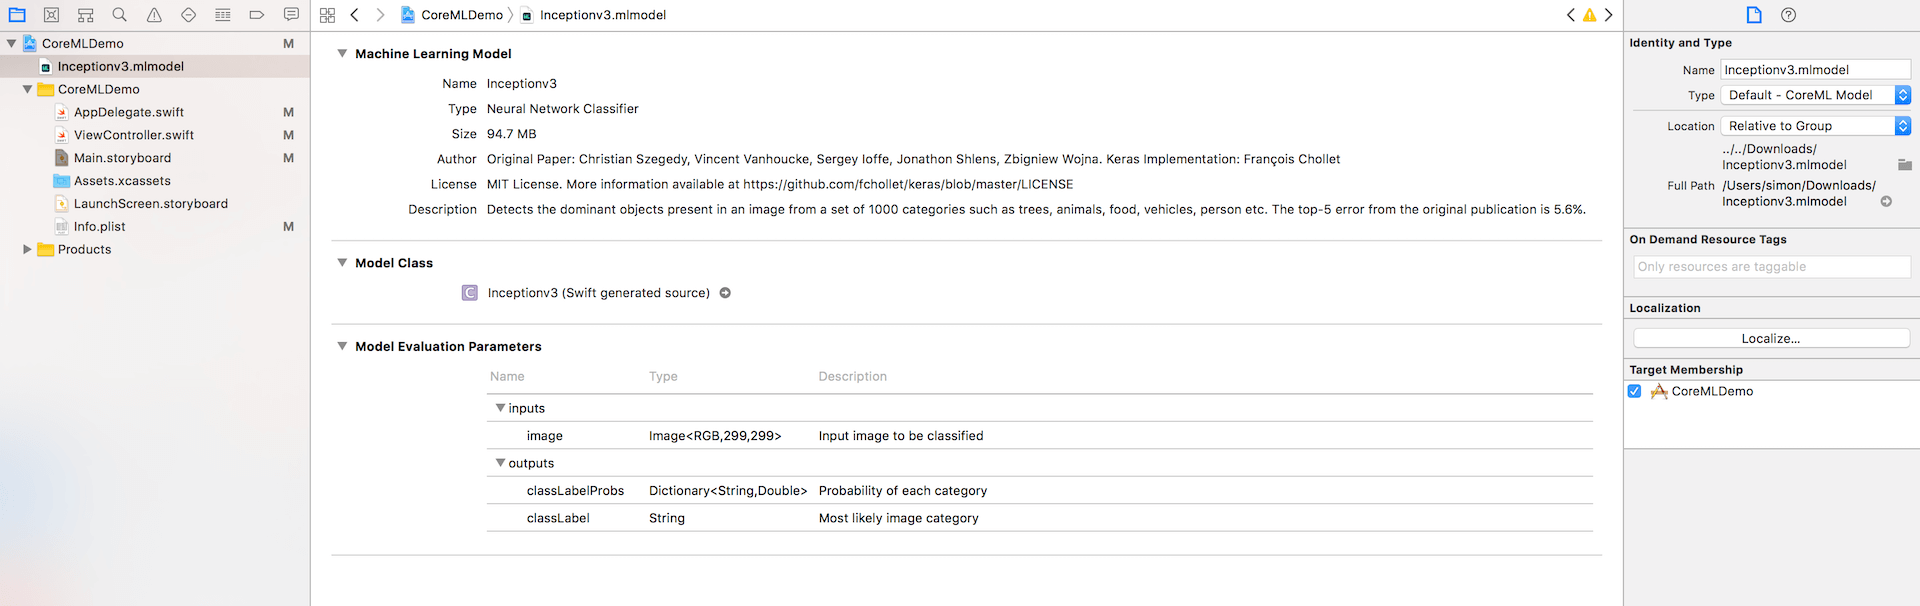
In the above screen, you can see the type of data model, which is neural network classifier. The other information that you have to take note is model evaluation parameters. It tells you the input the model takes in, as well as, the output the model returns. Here it takes in a 299×299 image, and returns you with the most like category, plus the probability of each category.
The other thing you will notice is the model class. This is the model class (Inceptionv3) generated from the machine learning model such that we can directly use in our code. If you click the arrow next to Inceptionv3, you can see the source code of the class.
Now, let’s add the model in our code. Go back to ViewController.swift. First, import the CoreML framework at the very beginning:
import CoreML
Next, declare a model variable in the class for the Inceptionv3 model, and initialize it in the viewWillAppear() method:
var model: Inceptionv3!

override func viewWillAppear(_ animated: Bool) {
    model = Inceptionv3()
}
I know what you’re thinking.
“Well Sai, why don’t we initialize this model earlier?”
“What’s the point of defining it in the viewWillAppear function?”
Well, dear friends, the point is that when your app will try to recognize what the object in your image is, it will be a lot faster.
Now if we go back to Inceptionv3.mlmodel, we see that the only input this model takes is an image with dimensions of 299x299. So how do we convert an image into these dimensions? Well, that is what we wil be tackling next.
Converting the Images
In the extension of ViewController.swift, update the code like below. We implement the imagePickerController(_:didFinishPickingMediaWithInfo) method to process the selected image:
extension ViewController: UIImagePickerControllerDelegate {
    func imagePickerControllerDidCancel(_ picker: UIImagePickerController) {
        dismiss(animated: true, completion: nil)
    }

    func imagePickerController(_ picker: UIImagePickerController, didFinishPickingMediaWithInfo info: [String : Any]) {
        picker.dismiss(animated: true)
        classifier.text = "Analyzing Image..."
        guard let image = info["UIImagePickerControllerOriginalImage"] as? UIImage else {
            return
        }

        UIGraphicsBeginImageContextWithOptions(CGSize(width: 299, height: 299), true, 2.0)
        image.draw(in: CGRect(x: 0, y: 0, width: 299, height: 299))
        let newImage = UIGraphicsGetImageFromCurrentImageContext()!
        UIGraphicsEndImageContext()

        let attrs = [kCVPixelBufferCGImageCompatibilityKey: kCFBooleanTrue, kCVPixelBufferCGBitmapContextCompatibilityKey: kCFBooleanTrue] as CFDictionary
        var pixelBuffer : CVPixelBuffer?
        let status = CVPixelBufferCreate(kCFAllocatorDefault, Int(newImage.size.width), Int(newImage.size.height), kCVPixelFormatType_32ARGB, attrs, &pixelBuffer)
        guard (status == kCVReturnSuccess) else {
            return
        }

        CVPixelBufferLockBaseAddress(pixelBuffer!, CVPixelBufferLockFlags(rawValue: 0))
        let pixelData = CVPixelBufferGetBaseAddress(pixelBuffer!)

        let rgbColorSpace = CGColorSpaceCreateDeviceRGB()
        let context = CGContext(data: pixelData, width: Int(newImage.size.width), height: Int(newImage.size.height), bitsPerComponent: 8, bytesPerRow: CVPixelBufferGetBytesPerRow(pixelBuffer!), space: rgbColorSpace, bitmapInfo: CGImageAlphaInfo.noneSkipFirst.rawValue) //3

        context?.translateBy(x: 0, y: newImage.size.height)
        context?.scaleBy(x: 1.0, y: -1.0)

        UIGraphicsPushContext(context!)
        newImage.draw(in: CGRect(x: 0, y: 0, width: newImage.size.width, height: newImage.size.height))
        UIGraphicsPopContext()
        CVPixelBufferUnlockBaseAddress(pixelBuffer!, CVPixelBufferLockFlags(rawValue: 0))
        imageView.image = newImage
    }
}
What the highlighted code does:
- Line #7-11: In the first few lines of the method, we retrieve the selected image from the
infodictionary (usingUIImagePickerControllerOriginalImagekey). We also dismiss theUIImagePickerControlleronce an image is selected. - Line #13-16: Since our model only accepts images with dimensions of
299x299, we convert the image into a square. We then assign the square image to another constantnewImage. - Line #18-23: Now, we convert the
newImageinto aCVPixelBuffer. For those of you not familiar withCVPixelBuffer, it’s basically an image buffer which holds the pixels in the main memory. You can find out more aboutCVPixelBuffershere. - Line #31-32: We then take all the pixels present in the image and convert them into a device-dependent RGB color space. Then, by creating all this data into a
CGContext, we can easily call it whenever we need to render (or change) some of its underlying properties. This is what we do in the next two lines of code by translating and scaling the image. - Line #34-38: Finally, we make the graphics context into the current context, render the image, remove the context from the top stack, and set
imageView.imageto thenewImage.
Now, if you do not understand most of that code, no worries. This is really some advanced Core Image code, which is out of the scope of this tutorial. All you need to know is that we converted the image taken into something which the data model can take into. I would recommend you playing around with the numbers and seeing what the results in order to have a better understanding.
Using Core ML
Anyway, let’s shift the focus back to Core ML. We use the Inceptionv3 model to perform object recognition. With Core ML, to do that, all we need is just a few lines of code. Paste the following code snippet below the imageView.image = newImage line.
guard let prediction = try? model.prediction(image: pixelBuffer!) else {
return
}
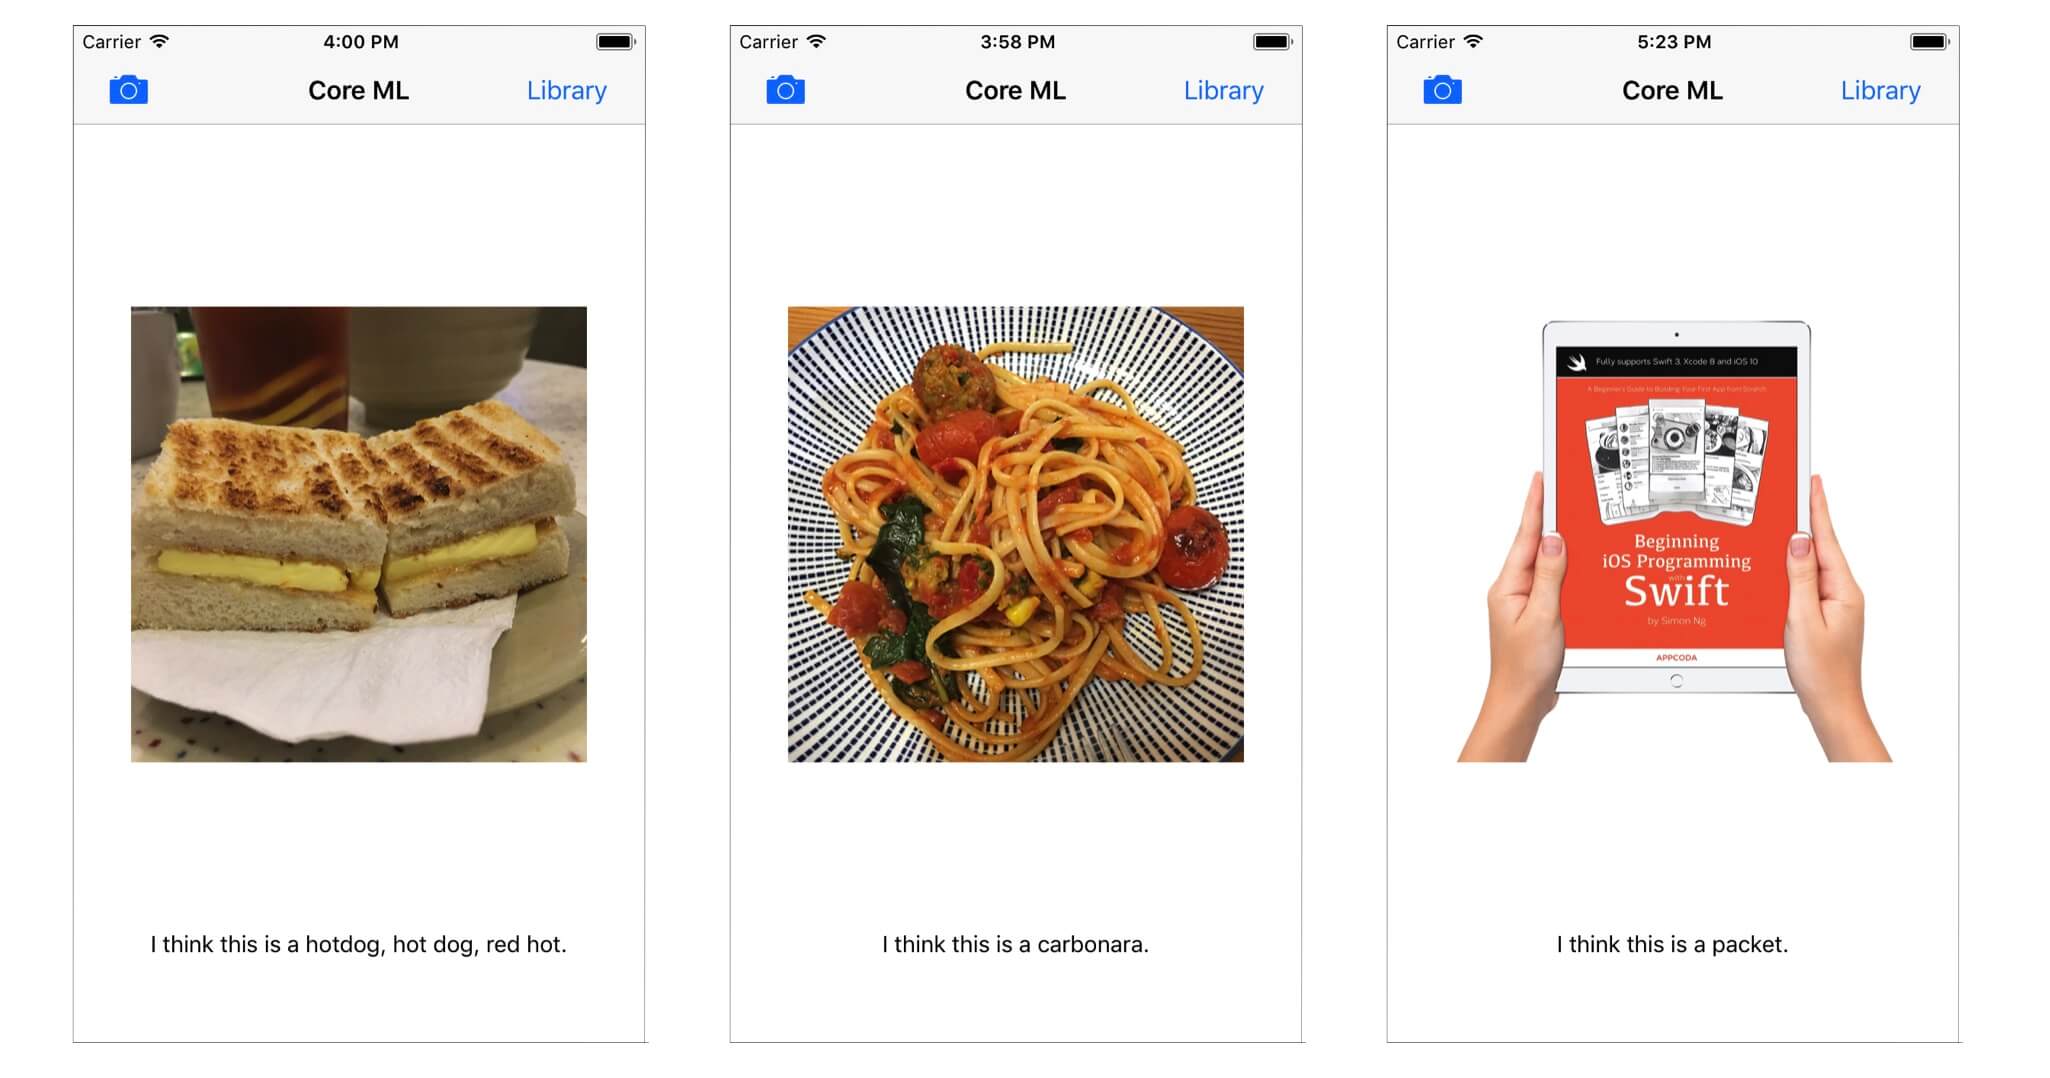
classifier.text = "I think this is a \(prediction.classLabel)."
That’s it! The Inceptionv3 class has a generated method called prediction(image:) that is used to predict the object in the given image. Here we pass the method with the pixelBuffer variable, which is the resized image. Once the prediction, which is of the type String, is returned, we update the classifier label to set its text to what it has been recognized.
Now it’s time to test the app! Build and run the app in the simulator or your iPhone (with iOS 11 beta installed). Pick a photo from your photo library or take a photo using camera. The app will tell you what the image is about.
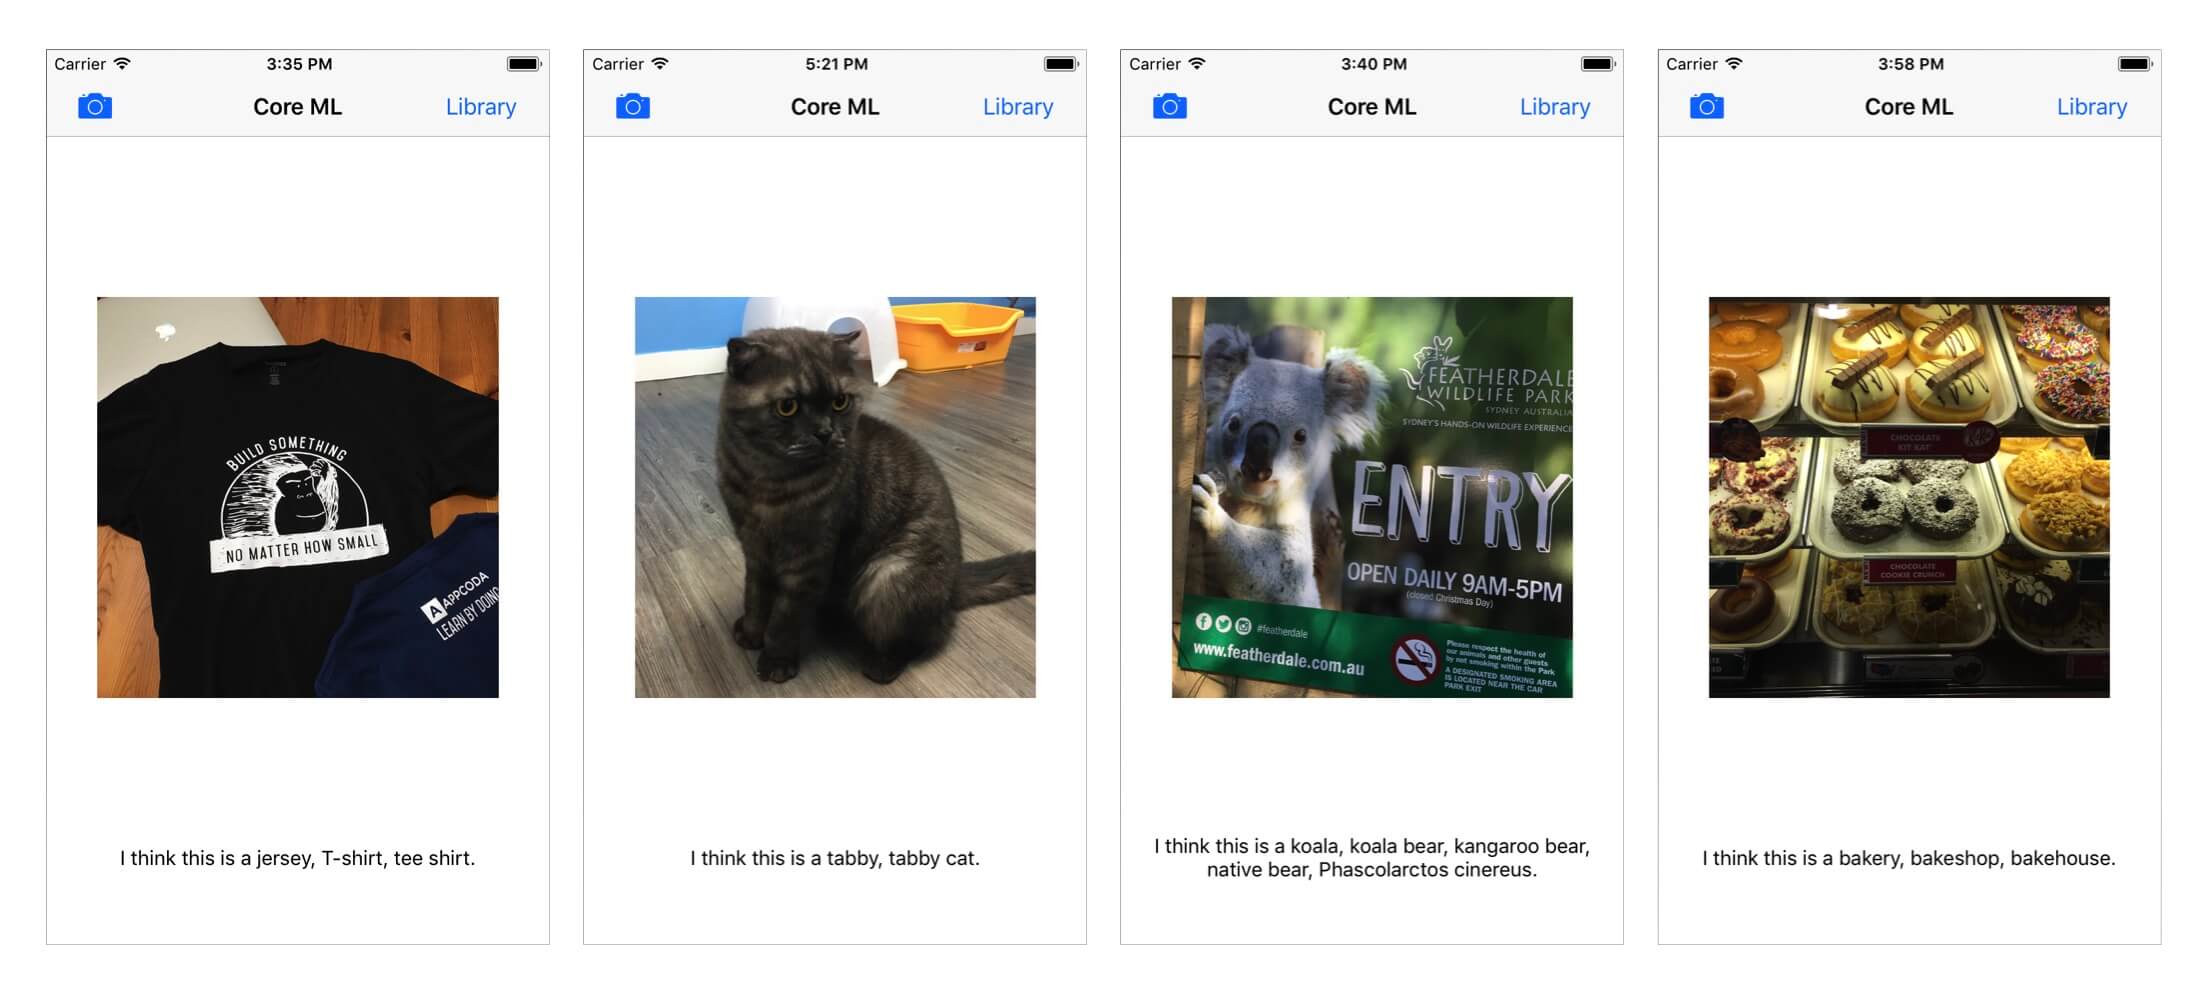
While testing out the app, you may notice that the app doesn’t correctly predict what you pointed it at. This is not a problem with your code, but rather with the trained model.
Wrap Up
I hope you now understand how to integrate Core ML in your app. This is just an introductory tutorial. If you are interested in converting your trained Caffe, Keras, or SciKit models into a Core ML model, stay tuned with the next tutorial of our Core ML series. I will teach you how to convert a model into a Core ML model.
For reference of the demo app, you can check out the complete project on GitHub.
For more details about the Core ML framework, you can refer to the official Core ML documentation. You an also refer to Apple’s sessions on Core ML during WWDC 2017:
What do you think about Core ML? Please leave me comment and let me know.


