

When the fifth version of iOS (iOS 5) was released to the public, it introduced a brand new, revolutionary approach to the way the interface of an application was designed. That was the use of storyboards, and it was meant to change the existing designing philosophy from the ground up. Before iOS 5, each view controller had almost always an accompanying Interface Builder file, known as nib or xib, and the idea was simple: The interface of each view controller was supposed to be designed in the respective nib file, whereas all the nibs together were composing the full interface of the application. From one hand, that was handy because developers could only focus on the interface they were designing at the time, but on the other side, too much files were eventually had to be created, and even more, developers could not have a whole overview of the app’s interface.
With storyboards all that became just history, as this new way has been used by almost the entire developer community. Storyboards had (and have) to offer three significant advantages compared to the old-fashioned technique:
- The whole interface design takes place in just one file. The total number of the files in a project is dramatically reduced, especially in big-sized ones. Using extra nib files is optional and is allowed for creating auxiliary views only.
- Developers have at their disposal an instant overview of the app’s interface and flow.
- The transitions between the view controllers (named scenes in terms of the interface design) and how they happen are now perfectly defined and clearly presented to developers.

From all the above, the transitions between scenes consist of a special chapter of the storyboards, and they’re mostly known as segues.
A segue is closely related to the navigation and handling of an application, as it actually defines the transitioning details when moving from one view controller to another. These details specify whether animation should be applied or not, what kind of animation, and of course, the preparation and performance of the actual transition. But not just that. A segue can also be used to pass data to the view controller that’s about to be shown, and that’s a common case scenario for almost all developers.
From the programming point of view, a segue is an object of the UIStoryboardSegue class, which it was first-introduced in iOS 5 as already said. Unlike the objects of other classes, such an object cannot be created and used directly. However, the properties of a segue can be specified, so they’re applied when the segue is about to be performed during the application running. The UIKit framework provides some predefined segues with default animated transitions, which are more than perfect for simple cases. These include push segues (when a navigation controller is present to the app), modal segues with animation options, and popover segues. For more advanced cases though, the default segues of the iOS SDK might not be sufficient, so developers must implement their own custom segues.
Creating a custom segue is not difficult at all, as it consists of a standard programming technique in iOS. What is actually only required, is to subclass the UIStoryboardSegue class and override just one method, named perform. In this method the custom animation logic must be implemented. Triggering the transition from a view controller to another and back must also be programmatically performed by the developers, but this is a totally standard procedure.
My goal in this tutorial is to show you how to implement custom segues, presenting all the aspects of this concept through a simple but straight into the point demo application. Knowing how to create custom segues is a skill that can drive you to the development of more powerful applications. Additionally, that can ultimately result to maximized user experience, as well as to beautiful, eye-catching applications.
So, if you’re interested in learning how to do what I just said, come along to explore through the upcoming tutorial parts all the details and secrets of the custom segues.
App Overview
Unlike to my last few tutorials where I provided you a starter project to work with, in this one we are going to create the application from scratch. The truth is that I’m doing that intentionally, because some significant parts of our work will have to do with the Interface Builder, so I believe it’s much better to see everything step by step and from the start.
As I previously said, we are going to develop a quite simple application, in which we will create two custom segues. To explain everything from the beginning, our demo app will have three view controllers, meaning three scenes in the Interface Builder and three respective classes. By default, the first one will be created by Xcode, therefore we’ll just add two more. The custom segues that we are about to create will be used to navigate from the first view controller to the second (and back), and from the first view controller to the third (and back again). We won’t add any connection between the second and third view controller.
As I already mentioned, we’ll create two custom segues. For each one, we will create two respective classes (therefore, four in total): In the first one we will implement all the custom logic needed to perform the segue from the first view controller to the next one. In the second, we will implement the logic to transit back to the first view controller, or in other words we will implement the unwind segue. More about unwind segues we’ll see later; for now just keep in mind that are segues that are used to let us go back to the previous view controller.
The view controllers themselves won’t do much. All of them are going to have a label stating the name of the view controller, and each one will have a different background color so we can easily view the transitions (yes, it will be a colorful app). The first and the second view controllers will also have one more label, where a custom message passed from the other view controller will be displayed.
Lastly, the segues will be performed when the following actions will take place:
- For transitioning from the first view controller to the second, we will use a swipe up gesture. To return, we’ll use a swipe down gesture. I’m not going to describe the animation we’ll implement, I’ll let you see it.
- For transitioning from the first view controller to the third, we will use a button (UIButton). To return, we’ll use a swipe up gesture. Once again, I won’t say anything about the animation.
Of course, we are going to pass data between the view controllers as well.
Before we proceed, here’s a demo of what we’re going to do, and how our custom segues are going to work:
Notice that when creating a custom segue, you can implement any animated effect you can imagine or need. By what we’ll do here, you will take a taste of it.
Creating the App
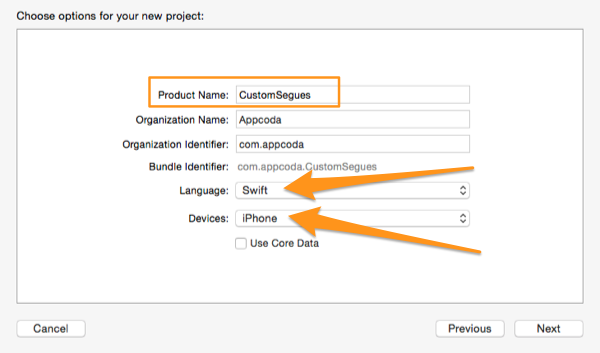
Let’s begin by launching Xcode. There, select to create a new project. In the guide that appears, select the Single View Application as the template for the project. Click on the Next button. In the Product Name: field, set the CustomSegues as the name of the project. Also, make sure that the selected programming language is the Swift, and the device is the iPhone.
Click on the Next again. In this step, select a place in the disk to save the project, and click on the Create button.
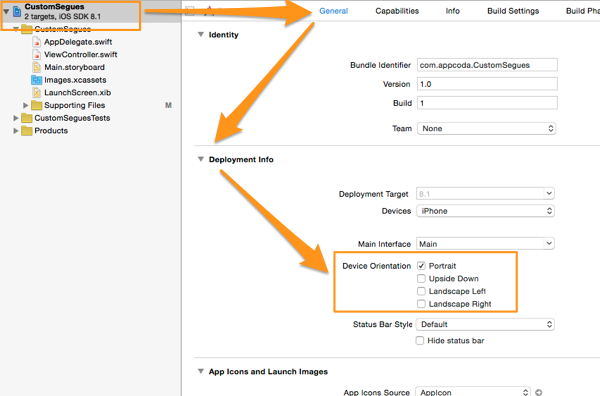
Now that the project is ready, select the respective group in the Project Navigator. By default, the General tab will open, and this is the one we need. In the Deployment Info section, unselect the Landscape Left and Landscape Right options in the Device Orientation area. Leave the Portrait option only selected. Also, feel free to change the deployment target from 8.1 to any previous iOS version if you’re going to test the app in a device with an earlier operating system (but you should better not go to before iOS 8).
Now, we are ready to proceed to the implementation, beginning by doing the first interface setup.
Initial Interface Setup
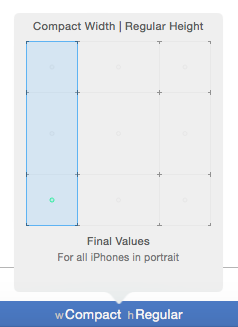
The first step is to add the view controllers that we are about to use in the interface. So, in the Project Navigator click on the Main.storyboard file to let the Interface Builder appear. We are going to break our work here in three distinct parts, where in each one we are going to setup a view controller. But first, make sure to change the current size class to Compact Width and Regular Height, so the interface matches to the iPhone’s one:
Configuring the First View Controller
When you open the Interface Builder, you see the default scene added by Xcode. This is the place where we’ll begin from. Initially, add two UILabel objects to the scene. To the first one, set the following attributes:
- Frame: X=16, Y=77, W=368, H=21
- Font: System Bold
- Font size: 24
- Text: View Controller #1
- Text alignment: Center
Also, set the Top, Leading, Trailing and Height constraints:
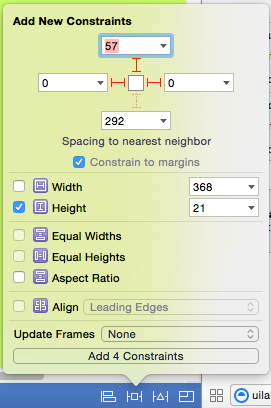
To the second label, set the next attributes:
- Frame: X=16, Y=390, W=368, H=21
- Text: None
- Text alignment: Center
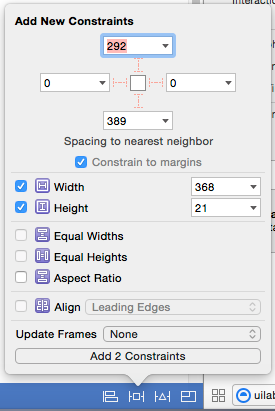
Next, set the Horizontal Center in Container, Vertical Center in Container, Width and Height constraints to it:

When you finish configuring the attributes and the constraints of the two labels, add a UIButton object to the scene. For it specify the following:
- Frame: X=169, Y=712, W=62, H=30
- Title: Tap Me!
- Text Color: Black
Regarding its constraints, simply tap on the Pin button in the bottom-right side of the Interface Builder, and select the Add Missing Constraints option under the Selected Views section.
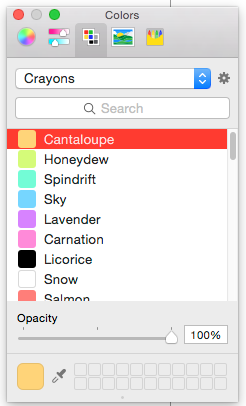
When you’re done, select the view and change its background color by opening the respective drop-down menu in the Attributes Inspector and selecting the Other… option. In the color picker, click on the Color Palettes* button and then select the Crayons** palette. Pick the Cantaloupe color (because it’s a bit pal), and then close the color picker.
Here’s a screenshot of the first scene:

Configuring the Second View Controller
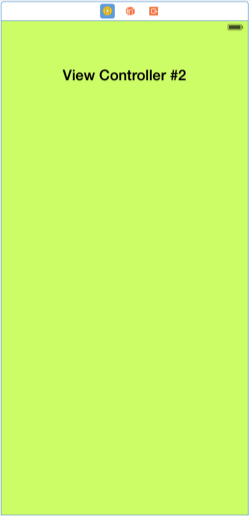
Time to focus on the second view controller. Start by dragging a new view controller object from the library straight in the canvas. Then add two UILabel objects here too, and specify the same attributes exactly as shown above. Don’t forget to set the constraints too. The only difference here is the first label’s text, which should be changed to “View Controller #2” (without the quotes).
Next, select the view and once again open the color picker. This time, pick the Honeydew color (second in the list), and close the picker.
Xcode will show you a warning as there’s no segue yet connecting the two view controllers. Don’t mind about that, as we’ll fix it soon.
The next image illustrates the second scene of the project:
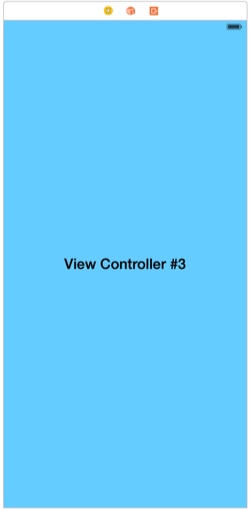
Configuring the Third View Controller
Lastly, let’s add one more view controller to the canvas taken from the Object library. In this case, add just one UILabel object, not two. Set the attributes you set for the first label in the previous two scenes, but with two differences: At first, set the Y-origin point of the label’s frame to 389. At second, set the “View Controller #3” value as the label’s text. No other subview will be added in this one, so you just have to pick a background color for the view. Following the same steps as you have already did twice, open the color picker one last time and select the Sky color.
Regarding its constraints, set the Horizontal Center in Container, Vertical Center in Container, Width and Height constraints to it, exactly as you did in the second label of the other two view controllers. The change to the Y-origin point and these constraints will make the label appear totally centered in the view.
Here’s how it should look like the third scene in your Interface:
Adding New View Controller Classes
For every scene that we added to the interface previously, we must set a different class so we can implement the details of each one. By default, the ViewController is set as the class to each scene, and that’s perfectly suits us in the case of the first view controller (the one created automatically by Xcode). However for the other two we must create two new classes, so let’s go ahead to do that.
The first step is to create the new class files, so go to the File > New > File… menu on Xcode to initiate this procedure. A guide to set the details of the new file is appeared, so in the first step of it make sure to select the Cocoa Touch Class, in the Source category under the iOS section.
Click on the Next button. In the second step of the guide, in the Subclass of: field select or type the UIViewController value. Then, specify the SecondViewController as the name of the file you’re currently creating. Of course, you shouldn’t change the programming language, so be sure that the Swift is the selected one in the last field.
Click on the Next again, and then on the Create to let the new file to be created. Once you get finished, you’ll see a new file named SecondViewController.swift appearing in the Project Navigator.
Repeat the above process once again, and add the class file for the third view controller of the project. As the name of the class set the ThirdViewController, while the rest of the steps remain the same.
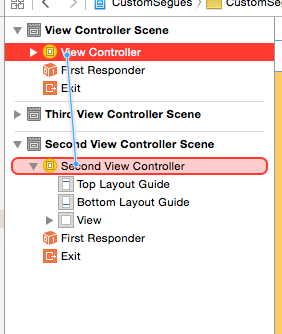
After you’ve added the second file as well, you should be able to view both of them in the Project Navigator as shown next:

Now, before we go back to the Interface Builder and set the newly created classes to the respective scenes, let’s declare a couple of IBOutlet properties that we’ll need later. Begin by going to the ViewController.swift file. There, add the next property:
@IBOutlet weak var lblMessage: UILabel!
Now go to the SecondViewController.swift file, and add the exact same line as above. Both of these properties will be connected to the second label of the first two view controllers, so we can later display a message to them.
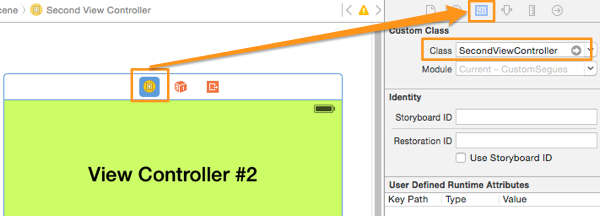
Open again now the Main.storyboard file, and select the second scene (the one with the green background color). Above it, click on the view controller object, and then head to the Identity inspector of the Utilities pane. In the Custom Class section, in the Class field specifically, set the first class we added at the beginning of this part to the project; the SecondViewController:
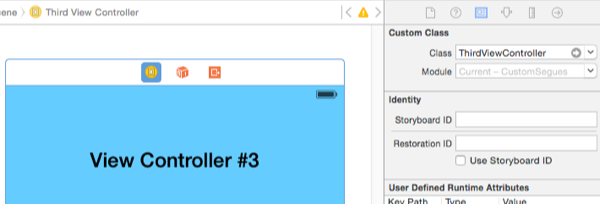
Do the same to the third scene (this with the light blue background color). Once you select it, click on the view controller object at the top of the scene, and then set the ThirdViewController as its class:
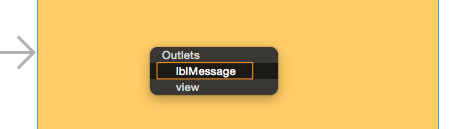
Great! Now each scene matches to a different class. Before we reach at the end of this part, let’s connect the two IBOutlet properties we declared, and let’s begin by the first view controller (the orange one). Click on the view controller object at the top of the screen, and then Ctrl – Drag towards the label existing at the center of the scene:
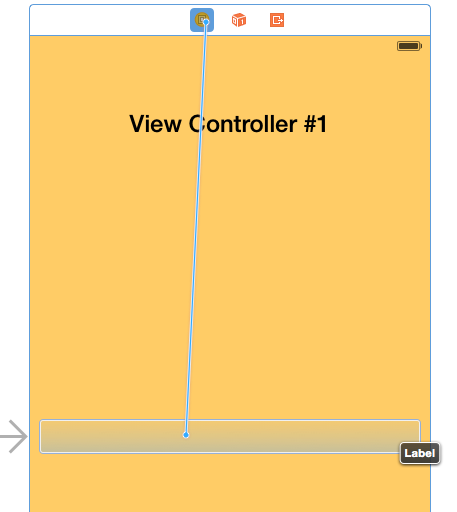
In the popup small window, select the lblMessage property, and the connection will have successfully been done.
Follow the same steps now in the Second View Controller scene, and connect the lblMessage property of that view controller to the label in the center of the scene.
Adding Custom Segue Classes
The creation of a custom segue involves the subclassing of the UIStoryboardSegue class and the implementation of one mandatory method, named perform. In this method the custom logic that performs the transition between two view controllers is actually applied, so before we write any segue-related code, let’s add all the necessary missing classes.
The way to add a new class in the project was presented in details in the previous part, so use it as a guide if you want when adding the needed files here too. Before I give you the details of each file, let me say that we are going to create four (4) files in total. That’s because two classes are needed for each custom segue, and we’re going to have two of them. Specifically, the first class is used to implement all the logic and the transition animation that actually performs the segue. The second class is used to implement the opposite action for transitioning from the second to the first view controller. That’s also known as unwind segue, and we’ll see more details about it in a while.
With all that in mind, start adding new class files to the project. Make sure about two things when adding each single file: To always select the Cocoa Touch Class template, and to set the UIStoryboardSegue as the value of the Subclass of: field in the second step of the guide.
The names of all four files should be:
- FirstCustomSegue
- FirstCustomSegueUnwind
- SecondCustomSegue
- SecondCustomSegueUnwind
Here they’re all together in the Project Navigator, after having added all of them to the project.
Creating the First Custom Segue
Let’s start working on the first custom segue now. Before writing any line of code, it’s necessary to add the segue in the Interface Builder and connect the two scenes for which we want to apply a custom transition. In this case, we are about to create a segue from the View Controller scene (orange background) to the Second View Controller scene (green background).
Once again, open the Main.storyboard file. To easily create the new segue, expand the Document Outline if it’s hidden and select the View Controller object in the View Controller Scene section:

Then, Ctrl – Drag to the Second View Controller under the Second View Controller Scene section:
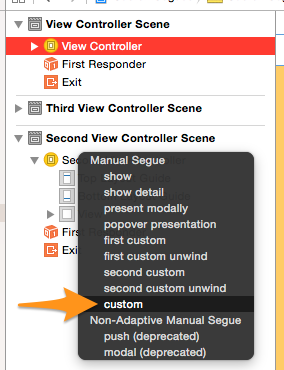
A black popup window appears with various options regarding the new segue. Among them, there’s one named custom:
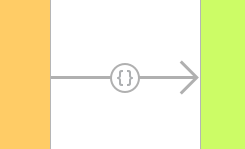
Click it and the segue will be created at once. You can verify that by checking if a line connecting the two scenes has been added to the canvas:
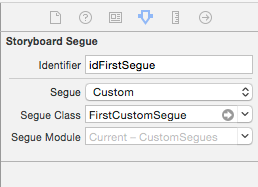
A couple of settings remain to be done before we’ll start coding. First, click to select the segue line on the canvas and then open the Attributes inspector in the Utilities pane. One of the most important tasks we have to do, is to set an identifier value for the segue, which we’ll use in our code so we reference it. It’s really important not to specify the same identifier for two or more segues. So, in this case, set the idFirstSegue as the identifier for our segue. Also, in the Segue Class field we must specify the name of the custom class we’ll use to perform the custom transition. Here, set the FirstCustomSegue as the class of the custom segue. In runtime, the app will execute the code existing in this class so as the segue to be properly performed.
Custom Segue Implementation
Now that the new custom segue exists and its settings have been specified, let’s implement the desired transition when navigating from the first to the second view controller. In short, what is usually done when writing code regarding custom segues, is to “play” with the views of the two view controllers. At first, the initial state of the destination view controller’s view is specified, and it’s manually added to the app’s window. Then, using animation the destination view is placed to the desired, final position, while the view of the source view controller is leaving the screen, also animated.
Note: A segue object refers to the view controller that’s about to be presented as the destination view controller, while the current view controller is referred as the source view controller.
Finally, when the animated transitioned is over, the new view controller is presented to the user directly without any further animation.
In the app overview part of the tutorial you’ve already seen what’s the effect we want to achieve here. No matter how the segue will be performed, we want the first view controller’s view to slide up, and the view of the second view controller to follow that move. No space will exist between the two views; the second will be “stuck” to the first one.
Let’s start coding now, and let’s see everything step by step. At the end, I’ll provide you the full implementation of the following method in one piece.
Open the FirstCustomSegue.swift file, and add the next function definition:
override func perform() {

}
As this function is already defined in the UIStoryboardSegue superclass, here we just override it so we can add the custom logic we want. So, the first step is to make our work a bit easier by assigning the views of the source and destination view controllers to two local variables as shown next:
override func perform() {
    // Assign the source and destination views to local variables.
    var firstVCView = self.sourceViewController.view as UIView!
    var secondVCView = self.destinationViewController.view as UIView!

}
Also, we’re going to need the screen’s width and height value, so let’s keep them in two variables as well:
override func perform() {
    ...

    // Get the screen width and height.
    let screenWidth = UIScreen.mainScreen().bounds.size.width
    let screenHeight = UIScreen.mainScreen().bounds.size.height

}
Okay, now let’s specify the initial position of the view that should be appeared. Considering that we want the views to be moving from the bottom to the top, we’ll place the view out of the visible area of the screen, right below the current view. That’s easy to do; we’ll simply set the frame of the view:
override func perform() {
    ...

    // Specify the initial position of the destination view.
    secondVCView.frame = CGRectMake(0.0, screenHeight, screenWidth, screenHeight)

}
At this point, the view of the second view controller is not a subview of the app’s window yet. So, before we implement the actual animation, it’s obvious that we must add it to the window. This will be achieved using the insertSubview(view:aboveSubview:) method of the app’s window object. As you see next, at first we access the window object, and then we add the destination view:
override func perform() {
    ...

    // Access the app's key window and insert the destination view above the current (source) one.
    let window = UIApplication.sharedApplication().keyWindow
    window?.insertSubview(secondVCView, aboveSubview: firstVCView)

}
Don’t get confused by the above word. Regarding the order of the window’s subviews, all of them are placed like being in a stack. This won’t cause any troubles at all.
Lastly, let’s animate the transition. At first, we’ll move the first view controller’s view out of the screen by moving it at the top side of it, and at the same time we’ll place the second view to the position of the first one’s. Actually, by saying “move”, I mean that we’ll modify the frame of both views:
override func perform() {
    ...

    // Animate the transition.
    UIView.animateWithDuration(0.4, animations: { () -> Void in
        firstVCView.frame = CGRectOffset(firstVCView.frame, 0.0, -screenHeight)
        secondVCView.frame = CGRectOffset(secondVCView.frame, 0.0, -screenHeight)

        }) { (Finished) -> Void in

    }

}
The above two lines will perform the desired effect. However, we’re not completely over, as we haven’t still presented the new view controller (the destination view controller). We’ll do that in the second closure exactly as shown next:
override func perform() {
    ...

    // Animate the transition.
    UIView.animateWithDuration(0.4, animations: { () -> Void in
        firstVCView.frame = CGRectOffset(firstVCView.frame, 0.0, -screenHeight)
        secondVCView.frame = CGRectOffset(secondVCView.frame, 0.0, -screenHeight)

        }) { (Finished) -> Void in
            self.sourceViewController.presentViewController(self.destinationViewController as UIViewController,
                animated: false,
                completion: nil)
    }

}
That’s all. Right next you’re given the above function in one piece:
override func perform() {
    // Assign the source and destination views to local variables.
    var firstVCView = self.sourceViewController.view as UIView!
    var secondVCView = self.destinationViewController.view as UIView!

    // Get the screen width and height.
    let screenWidth = UIScreen.mainScreen().bounds.size.width
    let screenHeight = UIScreen.mainScreen().bounds.size.height

    // Specify the initial position of the destination view.
    secondVCView.frame = CGRectMake(0.0, screenHeight, screenWidth, screenHeight)

    // Access the app's key window and insert the destination view above the current (source) one.
    let window = UIApplication.sharedApplication().keyWindow
    window?.insertSubview(secondVCView, aboveSubview: firstVCView)

    // Animate the transition.
    UIView.animateWithDuration(0.4, animations: { () -> Void in
        firstVCView.frame = CGRectOffset(firstVCView.frame, 0.0, -screenHeight)
        secondVCView.frame = CGRectOffset(secondVCView.frame, 0.0, -screenHeight)

        }) { (Finished) -> Void in
            self.sourceViewController.presentViewController(self.destinationViewController as UIViewController,
                animated: false,
                completion: nil)
    }

}
Before you give the app a first try, we must also go and make the custom segue to be performed. This is going to happen when we’ll do a swipe up gesture in the view of the ViewController view controller. So, continue by opening the ViewController.swift file. There, go to the viewDidLoad method to create a new gesture object, and then add it to the view:
override func viewDidLoad() {
    ...

    var swipeGestureRecognizer: UISwipeGestureRecognizer = UISwipeGestureRecognizer(target: self, action: "showSecondViewController")
    swipeGestureRecognizer.direction = UISwipeGestureRecognizerDirection.Up
    self.view.addGestureRecognizer(swipeGestureRecognizer)
}
When this gesture is performed, the showSecondViewController function is supposed to be called, but it’s not implemented yet. Therefore, let’s add its definition, where we’ll have one simple line: We’ll perform the custom segue:
func showSecondViewController() {
    self.performSegueWithIdentifier("idFirstSegue", sender: self)
}
As you can notice, we access the segue by using its identifier value. The above call makes our custom implementation in the FirstCustomSegue class to be executed when we’ll swipe up to the view.
If you want now, you can go and test the app. You can run it either in the Simulator, or in a real device. You’ll see that even though the transition is taking place by swiping up, you still can’t navigate back to the first view controller. That’s normal, as we’re going to implement this functionality right next.
The Unwind Segue
When creating custom segues, it’s always necessary to implement both ways of navigation: From the source view controller to the destination, and back. It’s almost unlikely to build the one way only. Now that we have implemented the segue so it shows the second view controller animated in the fashion we desire, we must make the application capable of doing the exact opposing thing. The segue that performs the backward navigation, is called unwind segue.
To simply put it, an unwind segue is… a segue just like a normal one, but its configuration it’s a bit more complex. Certain steps are required to be done, but yet everything consists of a standard programming technique. Note two things:
- An unwind segue usually comes in pair with a normal custom segue.
- To make the unwind segue work we must override the perform method again, and apply any custom logic and animation we want or required by the app. However, the transitioning effect when navigating back to the source view controller doesn’t have to be the same to the normal segue’s.
The implementation of an unwind segue is parted from four steps. These are:
- The creation of an IBAction method, which can optionally execute some code when the unwind segue is performed. This method can have any name you want, and it’s not mandatory to contain anything. It’s required though to be defined, even if it remains empty, so the unwind segue can be defined.
- The unwind segue creation, and the configuration of its settings. It’s not exactly the same to what we did in the previous segue in the Interface Builder, but you’ll see in a while how it is done.
- The implementation of the custom logic by overriding the perform method in a subclass of the UIStoryboardSegue class.
- The definition of a specific method provided by the UIViewController class, so the system knows what the unwind segue that is about to be performed is.
You might find all these confusing at the moment, but as we’ll move forward you’ll perfectly get the meaning of everything.
Let’s get started by defining the IBAction method I mentioned in the first step above. This action method is always implemented in the initial view controller to which we want to navigate. As I said, the body of it can be empty, but you must constantly have in mind that you can’t proceed if you don’t define at least one such method. It’s not necessary to have as many such action methods as the unwind segues existing in your app. In most cases, simply defining one such action method and checking which the unwind segue that makes the call is, it is more than enough.
In action now, open the ViewController.swift file. There, add the following code:
@IBAction func returnFromSegueActions(sender: UIStoryboardSegue){

}
We’ll add some sample code later. Notice that the parameter of this method is a UIStoryboardSegue object, and that’s an important detail to remember.
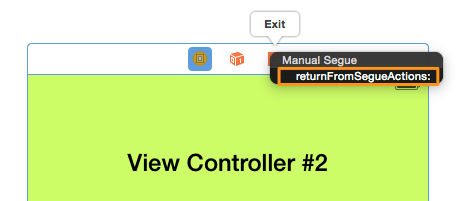
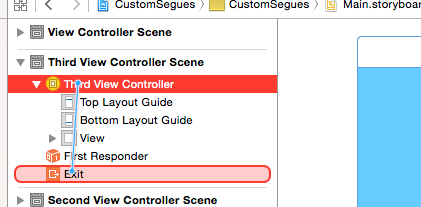
Now, let’s go to the Interface Builder, so open the Main.storyboard file. It’s time to create the unwind segue. We’ll begin by examining the objects that the Second View Controller scene contains, either you look at the scene itself, or in the Document Outline. If you look closely, you’ll find out that there’s an object there named Exit:
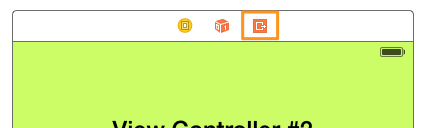
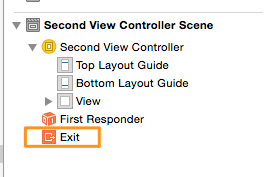
It’s quite possible that you’ve never used it if you haven’t created custom segues up to now, and maybe wonder what that’s for. Well, this is what you need to create an unwind segue.
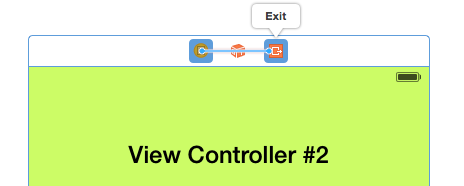
Click on the Second View Controller object of the scene, and then Ctrl-Drag to the Exit object:
The following popup will be shown with the IBAction method we defined earlier:
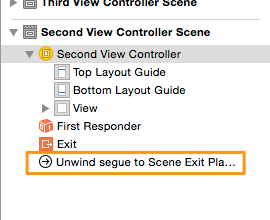
Make sure to select it. The unwind segue will be created and you can check that in the Document Outline. No new line is created, but the segue is there:
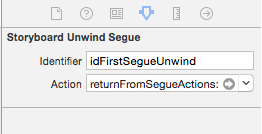
Now, click on the unwind segue we just created, and open the Attributes inspector. There, set the ** idFirstSegueUnwind** as the identifier value of the segue:
The second part in the unwind segue creation process is now over. That means that is time to write some code again, and bring in life the way the unwind segue is going to be performed.
Initially, open the FirstCustomSegueUnwind.swift file. Once again, we are going to override the perform method and to keep references to the views using local variables. Also, we’ll keep in a variable the height of the screen too:
override func perform() {
    // Assign the source and destination views to local variables.
    var secondVCView = self.sourceViewController.view as UIView!
    var firstVCView = self.destinationViewController.view as UIView!

    let screenHeight = UIScreen.mainScreen().bounds.size.height
}
Notice that this time the source view controller is the Second View Controller, and the destination is the View Controller. Continuing, here we won’t specify the initial state of any view at all, we’ll just add the view of the first view controller (the one we want to return to) to the window’s subviews:
override func perform() {
    ...

    let window = UIApplication.sharedApplication().keyWindow
    window?.insertSubview(firstVCView, aboveSubview: secondVCView)

}
Lastly, we must animate the movement of the two views. This time, they’re both going to move towards bottom:
override func perform() {
    ...

    // Animate the transition.
    UIView.animateWithDuration(0.4, animations: { () -> Void in
        firstVCView.frame = CGRectOffset(firstVCView.frame, 0.0, screenHeight)
        secondVCView.frame = CGRectOffset(secondVCView.frame, 0.0, screenHeight)

        }) { (Finished) -> Void in

            self.sourceViewController.dismissViewControllerAnimated(false, completion: nil)
    }


}
By changing the y-point (changing the offset in the Y axis) of both views, we manage to place them in their new positions within the predefined animation duration. When the transition is over, we just dismiss the second view controller without any other animation, and we’re over. Right next you’re given this method implemented in one piece:
override func perform() {
    // Assign the source and destination views to local variables.
    var secondVCView = self.sourceViewController.view as UIView!
    var firstVCView = self.destinationViewController.view as UIView!

    let screenHeight = UIScreen.mainScreen().bounds.size.height

    let window = UIApplication.sharedApplication().keyWindow
    window?.insertSubview(firstVCView, aboveSubview: secondVCView)

    // Animate the transition.
    UIView.animateWithDuration(0.4, animations: { () -> Void in
        firstVCView.frame = CGRectOffset(firstVCView.frame, 0.0, screenHeight)
        secondVCView.frame = CGRectOffset(secondVCView.frame, 0.0, screenHeight)

        }) { (Finished) -> Void in

            self.sourceViewController.dismissViewControllerAnimated(false, completion: nil)
    }
}
So far, so good. We managed to create the initial required IBAction method and the unwind segue, and to implement the custom logic for performing an animated transition. Now, there’s one last standard method that should be always implemented, and in that method we’ll make use of the FirstCustomSegueUnwind class.
Open the ViewController.swift file, and define the following method:
override func segueForUnwindingToViewController(toViewController: UIViewController, fromViewController: UIViewController, identifier: String?) -> UIStoryboardSegue {

}
This is a method provided by the UIViewController class. It’s called automatically when the unwind segue is performed, and its implementation is mandatory. It has three parameters:
- fromViewController: This is the view controller that is currently being shown, and that we want to dismiss.
- toViewController: This is the destination view controller, or in other words the one we want to show.
- identifier: The identifier of the segue that is being performed.
Notice that this method returns a segue object. What we’ll do is fairly simple: We’ll use the identifier value to determine the segue that is being performed, and then we’ll initialise an object of the unwind segue custom class, which we’ll finally return. Also, we’ll make a call to the super method, as we override it here. Let’s see it in code:
override func segueForUnwindingToViewController(toViewController: UIViewController, fromViewController: UIViewController, identifier: String?) -> UIStoryboardSegue {
    if let id = identifier{
        if id == "idFirstSegueUnwind" {
            let unwindSegue = FirstCustomSegueUnwind(identifier: id, source: fromViewController, destination: toViewController, performHandler: { () -> Void in

            })
            return unwindSegue
        }
    }

    return super.segueForUnwindingToViewController(toViewController, fromViewController: fromViewController, identifier: identifier)
}
At first, we make sure that the identifier parameter has an actual value, so we use the if let statement. Then, using the idFirstSegueUnwind value we make sure that the segue is the one we want, and in the if statement we initialise an object of the FirstCustomSegueUnwind class. This object is returned in the body of the if statement. Outside, we return the value of the same method after having called the super class.
The unwind segue is now ready. What we’ve left to implement is the gesture that will trigger it. Open the SecondViewController.swift file, and go straight ahead to the viewDidLoad method. There, add the next lines:
override func viewDidLoad() {
    ...

    var swipeGestureRecognizer: UISwipeGestureRecognizer = UISwipeGestureRecognizer(target: self, action: "showFirstViewController")
    swipeGestureRecognizer.direction = UISwipeGestureRecognizerDirection.Down
    self.view.addGestureRecognizer(swipeGestureRecognizer)

}
The gesture we define above is the swipe down gesture, the exact opposing from the previous one.
Now, let’s define the showFirstViewController action method:
func showFirstViewController() {
    self.performSegueWithIdentifier("idFirstSegueUnwind", sender: self)
}
Everything is now ready, so go ahead and try the app once again. This time, you can navigate back and forth between the view controllers.
Performing Actions
In the previous part we declared an empty method named returnFromSegueActions(sender:), and we said that this method is necessary so we can create the unwind segue. Also, I told you that we’re going to add some code at a later point, and this is the time to do that.
So, in this action method we are going to perform one really easy task: We will change the background color of the view of the first view controller, and then using a UIView animation we will revert it back to normal. Even though it’s pointless to do something like that in a real application, it’s more than a good example so we can see how to perform actions when an unwind segue is executed.
For starters, go to the ViewController.swift file, and then to the IBAction method. In it, add the following content:
@IBAction func returnFromSegueActions(sender: UIStoryboardSegue){
    if sender.identifier == "idFirstSegueUnwind" {
        let originalColor = self.view.backgroundColor
        self.view.backgroundColor = UIColor.redColor()

        UIView.animateWithDuration(1.0, animations: { () -> Void in
            self.view.backgroundColor = originalColor
        })
    }
}
At first, we check if the unwind segue is the one we are interested in. Then, we store the background color locally, and we change it to red. Finally, using the animation block, we set back its original value.
The above shows clearly how you should work when you want to perform an action at the time a custom unwind segue is executed. Later we are going to add a little more code in the above method.
Passing Data
When implementing custom segues (and unwind segues), you have to pay attention to two things: First, to the transition you want to take place, so your app provides great user experience. Second, to the data that should be exchanged between the view controllers, either you perform a normal segue, or an unwind one.
In the previous parts we already covered the first case, where we specified a nice animated transition for going forth and back between the first and the second view controller. Now, we’ll see how it’s possible to pass data as well. It’s quite possible that you’ve already used the procedure that you’ll see next even with the predefined segues the UIKit provides.
In the demo application we’re developing, we won’t pass any important data at all from one view controller to another. Simply, we’ll just send a string value to each other, which we’ll display in the second label we added earlier to the View Controller and Second View Controller scenes.
Initially, open the SecondViewController.swift file. Add the following property declaration right after the IBOutlet property:
var message: NSString!
Right next, we’ll use this property to pass a string value from the ViewController class to this one right before the segue is performed.
Now, open the ViewController.swift file. In the class’s body, add the next function implementation:
override func prepareForSegue(segue: UIStoryboardSegue, sender: AnyObject?) {
    if segue.identifier == "idFirstSegue" {
        let secondViewController = segue.destinationViewController as SecondViewController
        secondViewController.message = "Hello from the 1st View Controller"
    }
}
The above function is part of the UIViewController class. Based on the identifier of the segue that’s about to be performed, we access the destination view controller, which in this case is the SecondViewController. Then, we set the above string message to the message property of the SecondViewController class.
The above is always all you need to pass any kind of data to another view controller when using segues. It consists of a really straightforward way to do that.
Once again now, open the SecondViewController.swift file. It’s time to handle the message property and display the received string passed above. In the viewDidLoad method, simply add the next line:
override func viewDidLoad() {
    ...

    lblMessage.text = message
}
Finally, let’s send a string value from the second view controller to the first one. Let’s implement the above method again:
override func prepareForSegue(segue: UIStoryboardSegue, sender: AnyObject?) {
    if segue.identifier == "idFirstSegueUnwind" {
        let firstViewController = segue.destinationViewController as ViewController
        firstViewController.lblMessage.text = "You just came back from the 2nd VC"
    }
}
In the above implementation, notice that we access directly the message label of the ViewController class. This is an alternative way to display data to a subview of another view controller. Note that in both cases it was necessary to access the destination view controller through the segue object.
That’s almost everything you need when passing data between view controllers. In the second custom segue we’ll create in a while, you’ll see one last way to do so, but what is presented here is what you’ll mostly use.
Run the app once again if you want. This time, the second label in both view controllers display the message we pass as a string value. Note that our work in the SecondViewController class is over, and from now on we’ll focus on the third view controller existing in the project.
Creating the Second Custom Segue
All the concepts we discussed in the previous parts are all you need to create and manage custom segues. However, I believe that creating one more would be make everything to be digested much easier, and also we’ll be able to see a couple of different things. So, let’s get started.
The first step, is to create the custom segue in the Interface Builder, so click on the Main.storyboard file in the Project Navigator to open it.
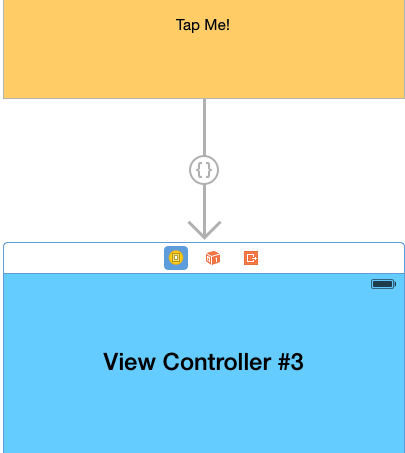
Once the interface appears on your screen, open the Document Outline pane (if it’s collapsed). Then, click on the View Controller object in the View Controller Scene, and by holding down the Ctrl key and the mouse button, drag to the Third View Controller object of the Third View Controller Scene. The blue connection line will appear:
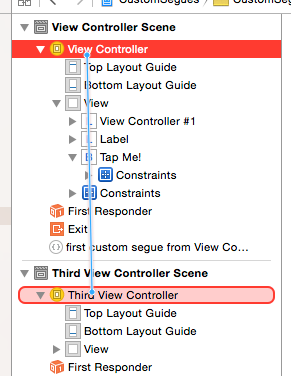
In the popup window, select the custom segue. After doing so, make sure that the new segue was created by looking at your canvas:
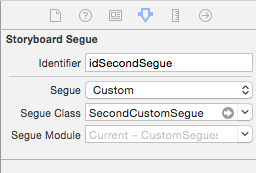
Click on the above line, and open the Attributes inspector in the Utilities pane. There you must specify two things: The segue identifier, and its class. For the identifier, set the idSecondSegue value in the Identifier field. Then, in the Segue Class field, start typing the SecondCustomSegue value, so the app knows what class to use when it’s about to perform this new custom segue.
The second custom segue has been created, so let’s go ahead to implement the animated transition we want to see.
Implementing the Second Custom Segue
As I said in the introduction, when subclassing the UIStoryboardSegue class and overriding the perform method you are free to implement any kind of transition you desire. You can either have a simple animated transition, a complex one, or no animation at all (but why would you create a custom segue for not applying any custom animated effect at all?).
For this segue we’ll specify another kind of animation to transit to the third view controller. This time, we’ll implement a zoom-out and zoom-in effect. Specifically, the view of the View Controller view controller will go away by scaling down its frame, and this will result to a zoom-out effect. On the other hand, the frame of the third view controller will be initially scaled down, and upon the animation execution it will become to its original state. This will lead to a zoom-in effect. In the app overview part of the tutorial you can see the app running, and get the idea.
Let’s begin coding now. Open the SecondCustomSegue.swift file, and as we did twice already, let’s create references to the view controllers’ views by assigning them to local variables. Of course, our implementation will take place in the perform method:
override func perform() {
    var firstVCView = sourceViewController.view as UIView!
    var thirdVCView = destinationViewController.view as UIView!

}
Note that you can skip this step and use directly the views through the properties of the source and the destination view controllers. However, I believe things become more clear that way, even it requires a couple more lines of code.
Now, let’s add the view of the third view controller to the window. This is something that you should always do, otherwise there will be no second view for the transition.
override func perform() {
    ...

    let window = UIApplication.sharedApplication().keyWindow
    window?.insertSubview(thirdVCView, belowSubview: firstVCView)

}
Now, we can specify the initial state of the third view controller’s view. We won’t touch its frame, instead we’ll modify its transform property as shown below:
override func perform() {
    ...

    thirdVCView.transform = CGAffineTransformScale(thirdVCView.transform, 0.001, 0.001)

}
As you see, we scale down both its width and height. We don’t set these values to zero, as this would have no effect at all. A really small value though is good for our purposes.
The next step is to perform the animation. In this case, we’ll apply two subsequent animations, where in the first one we’ll scale down the source view, and then we’ll scale-up the destination view.
override func perform() {
    ...

    UIView.animateWithDuration(0.5, animations: { () -> Void in
        firstVCView.transform = CGAffineTransformScale(thirdVCView.transform, 0.001, 0.001)

        }) { (Finished) -> Void in

            UIView.animateWithDuration(0.5, animations: { () -> Void in
                thirdVCView.transform = CGAffineTransformIdentity

                }, completion: { (Finished) -> Void in

                    firstVCView.transform = CGAffineTransformIdentity
                                        self.sourceViewController.presentViewController(self.destinationViewController as UIViewController, animated: false, completion: nil)
            })
    }
}
When the first animation takes place, the first view becomes really small, and this looks like a zoom-out effect. In the completion handler, we begin a new animation where we revert the view of the destination view controller to its normal. Lastly, once this animation is over too, we bring the first view to its normal state, and we present without any further animation the third view controller.
Here’s the whole method in one piece:
override func perform() {
    var firstVCView = sourceViewController.view as UIView!
    var thirdVCView = destinationViewController.view as UIView!

    let window = UIApplication.sharedApplication().keyWindow
    window?.insertSubview(thirdVCView, belowSubview: firstVCView)

    thirdVCView.transform = CGAffineTransformScale(thirdVCView.transform, 0.001, 0.001)

    UIView.animateWithDuration(0.5, animations: { () -> Void in

        firstVCView.transform = CGAffineTransformScale(thirdVCView.transform, 0.001, 0.001)

        }) { (Finished) -> Void in

            UIView.animateWithDuration(0.5, animations: { () -> Void in
                thirdVCView.transform = CGAffineTransformIdentity

                }, completion: { (Finished) -> Void in

                    firstVCView.transform = CGAffineTransformIdentity
                                        self.sourceViewController.presentViewController(self.destinationViewController as UIViewController, animated: false, completion: nil)
            })
    }
}
The custom transition is ready. We’re not over yet, as we must perform the segue. If you remember, in the scene of the View Controller there’s a button titled “Tap Me!”. This is what we’ll use to initiate the segue.
At first, open the ViewController.swift file and add the following IBAction method:
@IBAction func showThirdViewController(sender: AnyObject) {
    self.performSegueWithIdentifier("idSecondSegue", sender: self)
}
As you may expected, we do nothing more than simply performing the segue. Notice that the segue’s identifier value must match to the one we set in the Interface Builder.
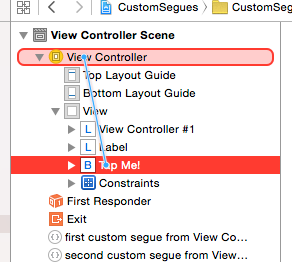
Lastly, we must connect the above action method to the button. Open the Main.storyboard.swift file, and go to the View Controller Scene in the Document Outline. Click on the button object, and then hold down the Ctrl key and the mouse button, and drag to the View Controller object:
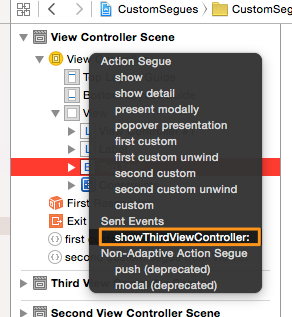
A popup window with many options appears. Among them, there’s a section called Sent Events, where below that the IBAction method name is listed. Select it and the connection will be successfully done.
If you want now you can go ahead and test the app. Click on the button of the initial view controller and watch how the third view controller is presented.
The Second Unwind Segue
In the first unwind segue we implemented in this demo application, I said that the first thing that you should always do must be the definition of an IBAction method that should be called when the segue is performed. There, we implemented such a method named returnFromSegueActions(sender:), and once we have it at our disposal we are going to use it in the new unwind segue too.
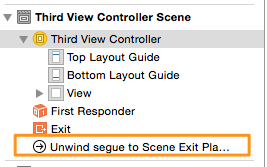
The above means that we can actually go to the next step, and create the unwind segue in the Interface Builder. So, open the Main.storyboard file and go to the Third View Controller Scene. Select the Third View Controller object, and Ctrl – Drag to the Exit object.
In the popup window click on the action method’s name, and the unwind segue will be created.
Next, select that segue, and open the Attributes inspector. In the identifier field, set the idSecondSegueUnwind value.
Now that we have the unwind segue ready, we can code the transition behavior we want it to have. This time, we won’t simply perform the exact opposing animation to the normal segue. We are going to create a bit more complex animation, where the view of the third view controller will be zoomed-out and moved at the same time towards the top of the screen, and the view of the first view controller will be zoomed-in and moved from the bottom of the screen to the top of it, so it occupies the whole available area. This view initially is going to be out of the visible screen area.
Open the SecondCustomSegueUnwind.swift file, where we’ll implement for one last time the perform method. Let’s begin with the easy ones:
override func perform() {
    var firstVCView = destinationViewController.view as UIView!
    var thirdVCView = sourceViewController.view as UIView!

    let screenHeight = UIScreen.mainScreen().bounds.size.height

}
As always, we keep the views of the two view controllers to local variables, and furthermore we store the height of the screen to a variable as well. Next, let’s specify the initial state of the firstVCView view. As I said, at first it’s going to be positioned off-screen, and the it will be scaled down:
override func perform() {
    ...

    firstVCView.frame = CGRectOffset(firstVCView.frame, 0.0, screenHeight)
    firstVCView.transform = CGAffineTransformScale(firstVCView.transform, 0.001, 0.001)


    let window = UIApplication.sharedApplication().keyWindow
    window?.insertSubview(firstVCView, aboveSubview: thirdVCView)

}
Besides than setting the initial state, we also added that view to the app’s window.
Lastly, let’s go ahead to perform the animation. Remember that the view that should go away is scaled down and the view that should appear on-screen is scaled-up, and both views are moved towards top.
override func perform() {
    ...

    UIView.animateWithDuration(0.5, animations: { () -> Void in

        thirdVCView.transform = CGAffineTransformScale(thirdVCView.transform, 0.001, 0.001)
        thirdVCView.frame = CGRectOffset(thirdVCView.frame, 0.0, -screenHeight)

        firstVCView.transform = CGAffineTransformIdentity
        firstVCView.frame = CGRectOffset(firstVCView.frame, 0.0, -screenHeight)

        }) { (Finished) -> Void in

            self.sourceViewController.dismissViewControllerAnimated(false, completion: nil)
    }
}
That’s all it takes the implementation of this custom unwind segue. Right next you can have it in one piece:
override func perform() {
    var firstVCView = destinationViewController.view as UIView!
    var thirdVCView = sourceViewController.view as UIView!

    let screenHeight = UIScreen.mainScreen().bounds.size.height

    firstVCView.frame = CGRectOffset(firstVCView.frame, 0.0, screenHeight)
    firstVCView.transform = CGAffineTransformScale(firstVCView.transform, 0.001, 0.001)

    let window = UIApplication.sharedApplication().keyWindow
    window?.insertSubview(firstVCView, aboveSubview: thirdVCView)

    UIView.animateWithDuration(0.5, animations: { () -> Void in

        thirdVCView.transform = CGAffineTransformScale(thirdVCView.transform, 0.001, 0.001)
        thirdVCView.frame = CGRectOffset(thirdVCView.frame, 0.0, -screenHeight)

        firstVCView.transform = CGAffineTransformIdentity
        firstVCView.frame = CGRectOffset(firstVCView.frame, 0.0, -screenHeight)

        }) { (Finished) -> Void in

            self.sourceViewController.dismissViewControllerAnimated(false, completion: nil)
    }
}
Back to the ViewController.swift file again, let’s pay a visit to the segueForUnwindingToViewController(toViewController:fromViewController:identifier:) method. We have already discussed about it, and now we must check for the new unwind segue, so we initialize and return a segue object of our subclass. Accordingly to what we previously did, we’re going to create one more case where we’ll check if the identifier of the segue matches to the second unwind segue’s one and then we’ll proceed. Modify the method by adding the code shown below:
override func segueForUnwindingToViewController(toViewController: UIViewController, fromViewController: UIViewController, identifier: String?) -> UIStoryboardSegue {
    if let id = identifier{
        ...
        else if id == "idSecondSegueUnwind" {
            let unwindSegue = SecondCustomSegueUnwind(identifier: id,
                source: fromViewController,
                destination: toViewController,
                performHandler: { () -> Void in

            })

            return unwindSegue
        }
    }

    ...
}
Nothing new or difficult here. Now the new unwind segue can be perfectly performed. However, we must initiate somehow, and we are going to manage that by adding a new swipe up gesture in the third view controller. So, go to the ThirdViewController.swift file, and add the next lines in the viewDidLoad method:
override func viewDidLoad() {
    ...

    var swipeGestureRecognizer: UISwipeGestureRecognizer = UISwipeGestureRecognizer(target: self, action: "showFirstViewController")
    swipeGestureRecognizer.direction = UISwipeGestureRecognizerDirection.Up
    self.view.addGestureRecognizer(swipeGestureRecognizer)
}
What we have only left is to implement the showFirstViewController action method, which is simple and similar to others:
func showFirstViewController() {
    self.performSegueWithIdentifier("idSecondSegueUnwind", sender: self)
}
Now, before we go and run the app fully implemented, why don’t we show a message in the ViewController view controller when the third view controller gets dismissed?
Instead of passing the message as data according to what we previously saw, we’ll do so in the returnFromSegueActions(sender:) IBAction method. We already added some sample code to it, and we said that this method is used to perform various actions along with an unwind segue.
Open the ViewController.swift file, and locate the aforementioned method. In it, add the following else case:
@IBAction func returnFromSegueActions(sender: UIStoryboardSegue){
    ...

    else{
        self.lblMessage.text = "Welcome back!"
    }
}
With the above addition this message will be displayed to the first view controller every time the second unwind segue is performed.
Running the App
At this point, our demo application is over. You can go and test it, and of course, feel free to change any part of it if you wish so you get more familiarized with the custom segues. Right next it’s being displayed once again the animated graphic with the app running.
Summary
If you take a step back and do a quick recap on what we’ve done in this tutorial, you will definitely conclude that working with custom segues is not hard. Applying custom animated transitions for navigating between view controllers can result to great user experience, and make your application distinguish among others. If custom segues are something new to you, then go ahead and use them. I strongly encourage you to do so. The demo application we implemented can guide you to the right way to perform custom segues and unwind segues. The animations we created and applied were not too complex, but good enough to get you into the meaning of all these. Unleash your imagination, and create astonishing effects. I leave you with that, and I hope you enjoyed it and found this post useful. As always, we’re waiting for your thoughts.
For your reference, you can download the Xcode project here.


