

In this tutorial, I’ll show you how to embrace iOS 11’s Files app. First, I’ll walk you through configuration of an app so that any files stored in its iOS file system-based “Documents” folder are made visible in the Files app and exposed to other apps installed on your device. Second, I’ll demonstrate how you can incorporate Files app-like interface and functionality into your own apps. All of the Swift code I wrote to accomplish these two tasks is included below — and I’ve taken lots of screenshots regarding Files app integration. Sit back, enjoy, and learn about a fundamental paradigm shift in the iOS zeitgeist, moving from a “hide-the-details” (like hiding individual files) mindset to providing users with the ability to look at and manipulate files related to their apps using a macOS Finder-like interface, except on iOS.
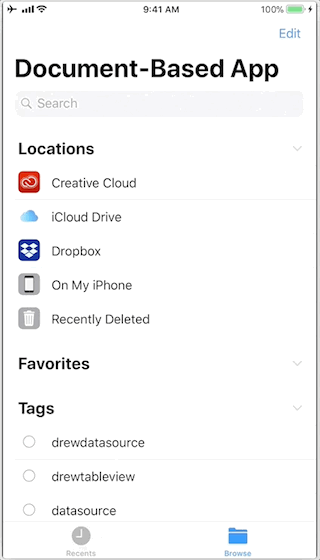
To pique your interest, let’s look at a feature I encoded in the final app for this tutorial. We’ll use my app, named “Document-Based App,” to view an image file in the app’s main folder:
Introduction
Most iOS app developers — and users — are not accustomed to seeing the files associated with their apps, at least not in a Finder-like or Explorer-like or even command line-like listing format. In other words, they’re not used to seeing files organized as just files and directories and being able to navigate around in a file system. For years, the closest thing to an iOS file browser has been through apps like Photos, where you can see individual thumbnail images of photos hinting at the fact that their content is stored in individual files. But Photos gives you no sense of how the image files are organized… In folders or subfolders? Which folders and where in your device’s file system?
iOS 11 changed all that with the introduction of the Files app.
Note that before the Files app, developers like myself had to build custom Finder-like hierarchical file/directory user interface (UI) representations of the iOS file system, and provide corresponding functionality for navigation and manipulation of files and folders. Download one of my iPad-based apps to see an example of my custom file “explorer” or “finder” here — it’s a free app.
Exposing Your App’s File to the Files App
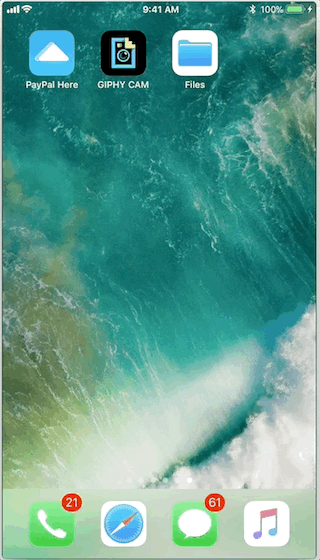
Let’s first walk through the basic use of the Files app. Remember that you must be running iOS 11 to follow along with this tutorial. I’ve found that many people out there, even amongst developers, haven’t even used the Files app yet. Let’s look at how the app works, and remember that today I’m limiting my discussion only to files stored locally on a device — an iPhone in this case. Getting into iCloud or Dropbox support is too much for one tutorial. I’ll start up the Files app and show you how to view files stored locally on your device:
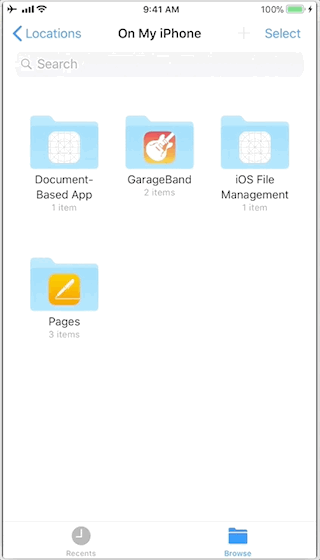
For the purposes of this tutorial, we’ll always want to “Browse” to the “location” called “On My iPhone,” as you just saw in the previous graphic.
Whether you actively use it or not, every iOS app you develop has its own unique sandboxed file system comprised of a set of directories, most notably the “Documents” directory. Detailed discussion of the iOS file system’s structure and how you perform tasks like reading, writing, deleting, renaming, moving, and listing files is beyond the scope of this tutorial, but don’t worry if this is all new to you. I’ve wrote several detailed tutorials covering most salient iOS file management topics, for example, here and here.
Developers who want to expose certain app files to users should always use the “Documents” directory. Files meant for internal use, like templates or configuration files, or temporary files say, used for converting files between different formats, should be stored in other predefined sandboxed folders like “Library/” or “tmp/”.
Opting your app into showing its files in the Files app
Configuring your app so that its files appear in the Files app is pretty simple. I’ll show you how by setting up the app I used in a tutorial for explaining the iOS file system, named “iOS File Management.” It’s a great candidate for opting into the Files app because it contains Swift code for reading, writing, deleting, renaming, moving, and listing iOS files.
The easiest way to configure the app is to add the following two keys inside the main <dict> in the Xcode project’s Info.plist file:
...
UIFileSharingEnabled
LSSupportsOpeningDocumentsInPlace
Remember that you can view and edit an Xcode project’s Info.plist file as XML by:
- going to the Project Navigator;
- right-clicking or control-clicking on the
Info.plistfile; and, - selecting Open As -> Source Code from the context menu.
If you prefer to edit the Info.plist file through Xcode’s default property list interface, hover your mouse over an existing entry and press the plus sign (+) that appears. Add the two keys I showed above and set each of their Value toggles to “YES,” like so:

There are good definitions of both of these keys at this link. You can see my project’s Info.plist file with these two keys added here and the whole project here in my GitHub repo.
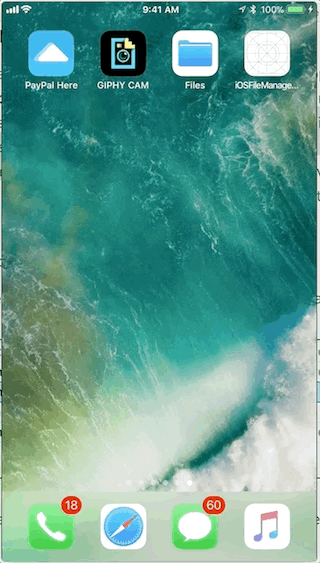
I’ll now install the newly-configured “iOS File Management” app on my iPhone. I added some code in the viewDidLoad method of my only UIViewController subclass. That code runs on app startup and writes a text file named “textFile1.txt” into the app’s “Documents” folder.
Let’s look for that file in the Files app:
See the folder representing my “iOS File Management” app’s files? It contains the file, “textFile1.txt,” that I encoded to be written on startup of the app. You can even see a thumbnail via (Quick Look) previewing the contents of my text file. Here’s some iOS documentation from Apple that describes the keys I added to my “iOS File Management” app’s Info.plist file, providing the perfect segue (segue?) — into the rest of this tutorial:
To give other apps access to the files in your Documents directory, just set the proper keys in your app’s Info.plist file. You can either set the UISupportsDocumentBrowser key (for document browser-based apps), or set both the UIFileSharingEnabled and LSSupportsOpeningDocumentsInPlace keys.
These keys enable other apps to open and edit the contents of your Documents directory in place. Your files also appear in both the Files app and the document browser. For more information, see the UIDocumentBrowserViewController class.
Providing a File App-like Experience
Let’s pick up right where we left off in the last section of this tutorial where I mentioned building “document browser-based apps” using a UIDocumentBrowserViewController. In other words, you can provide an iOS 11 Files app-like experience in your own apps. This is especially useful if your business model relies heavily on storing and manipulating information in flat files, like image files, audio files, video files, etc., or files that encode some kind of design representations, like CAD or vector graphics files.
I strongly encourage you to use Xcode to create a new project based on the iOS Document Based App template (see next section), review it thoroughly, and follow along with my steps in this tutorial. I’ll tell you when I customize the template code, show you what code I’ve edited or added, and explain my changes to the template code. Please follow along.
Starting with a Document Based App template
To get started, open Xcode and go to File, New ->, Project…, select iOS, and select the Document Based App template:

Click the Next button, fill out the usual new project details, and choose a location for your new project. You’ll notice later that I named my Document Based App template project “Document-Based App.” You’ll need to turn on Signing under your app target’s General settings tab.
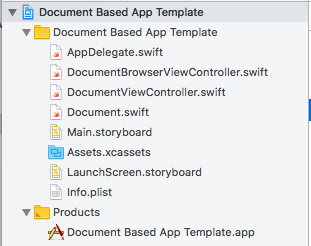
Here’s the project file/bundle structure for the Document Based App template:
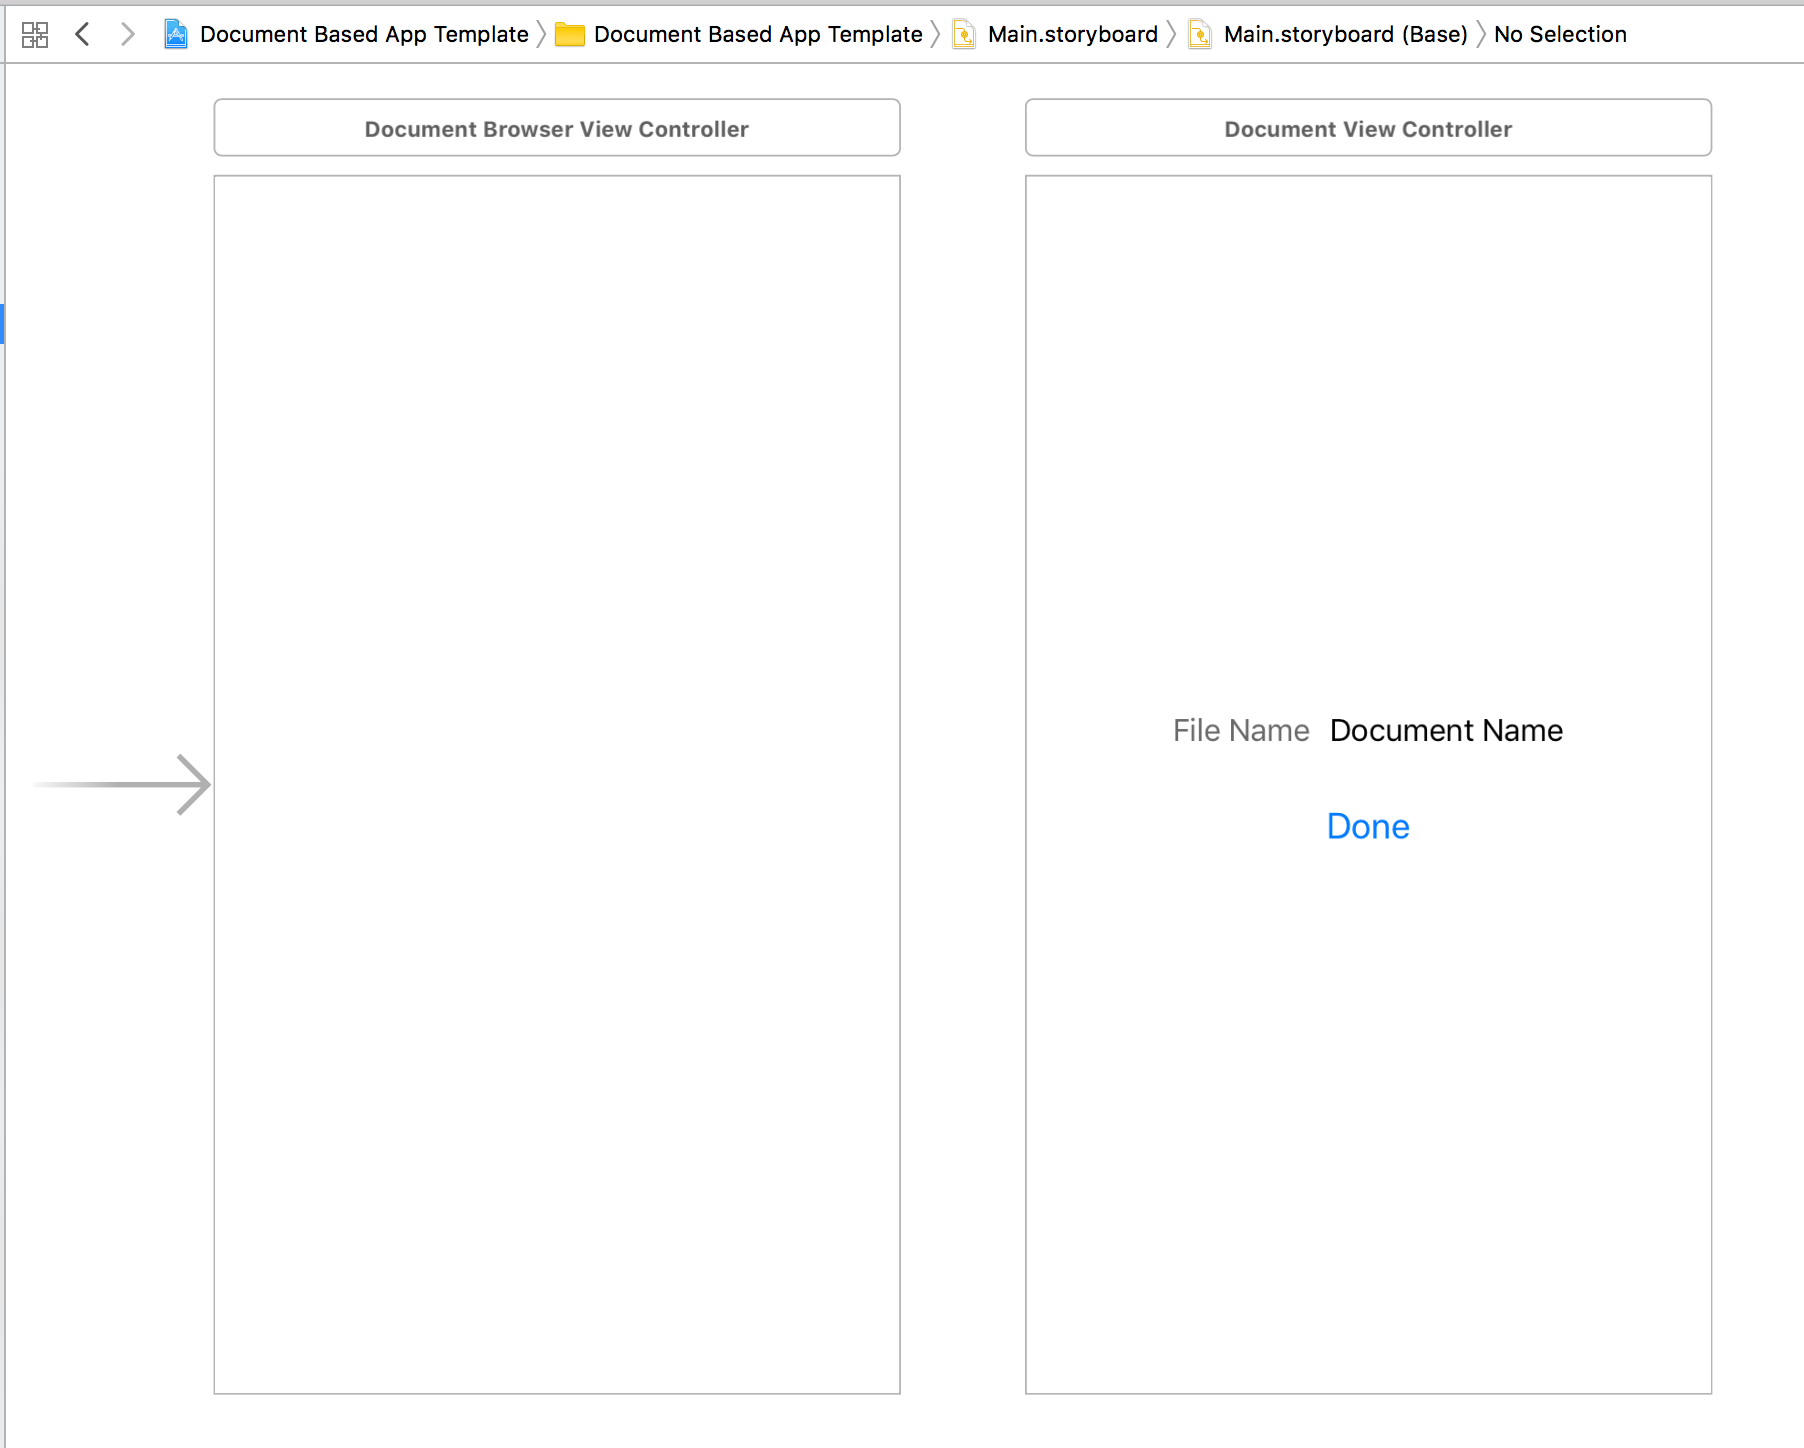
Here’s the storyboard that comes preconfigured with that same project template:
Configuring the document types your app will support
When you create Xcode projects that can manipulate files, there’s a bit of configuration you must do to tell the app what kind of files it can manipulate. For example, the Document Based App template app is minimally usable in terms of providing you with the Files app interface and allowing you to tap on and see a little meta data about image files (recognized by the “public.image” uniform type identifier or “UTI”). Apple decided that the template would support images, but I want to support text files, too.
Make sure the Document Based App template project you created is open in Xcode and:
- go to the Project Navigator;
- find and click on the project’s target;
- select the Info tab;
- scroll down to and find the Document Types section; and,
- expand the Document Types disclosure triangle.
Here’s what you’ll see:
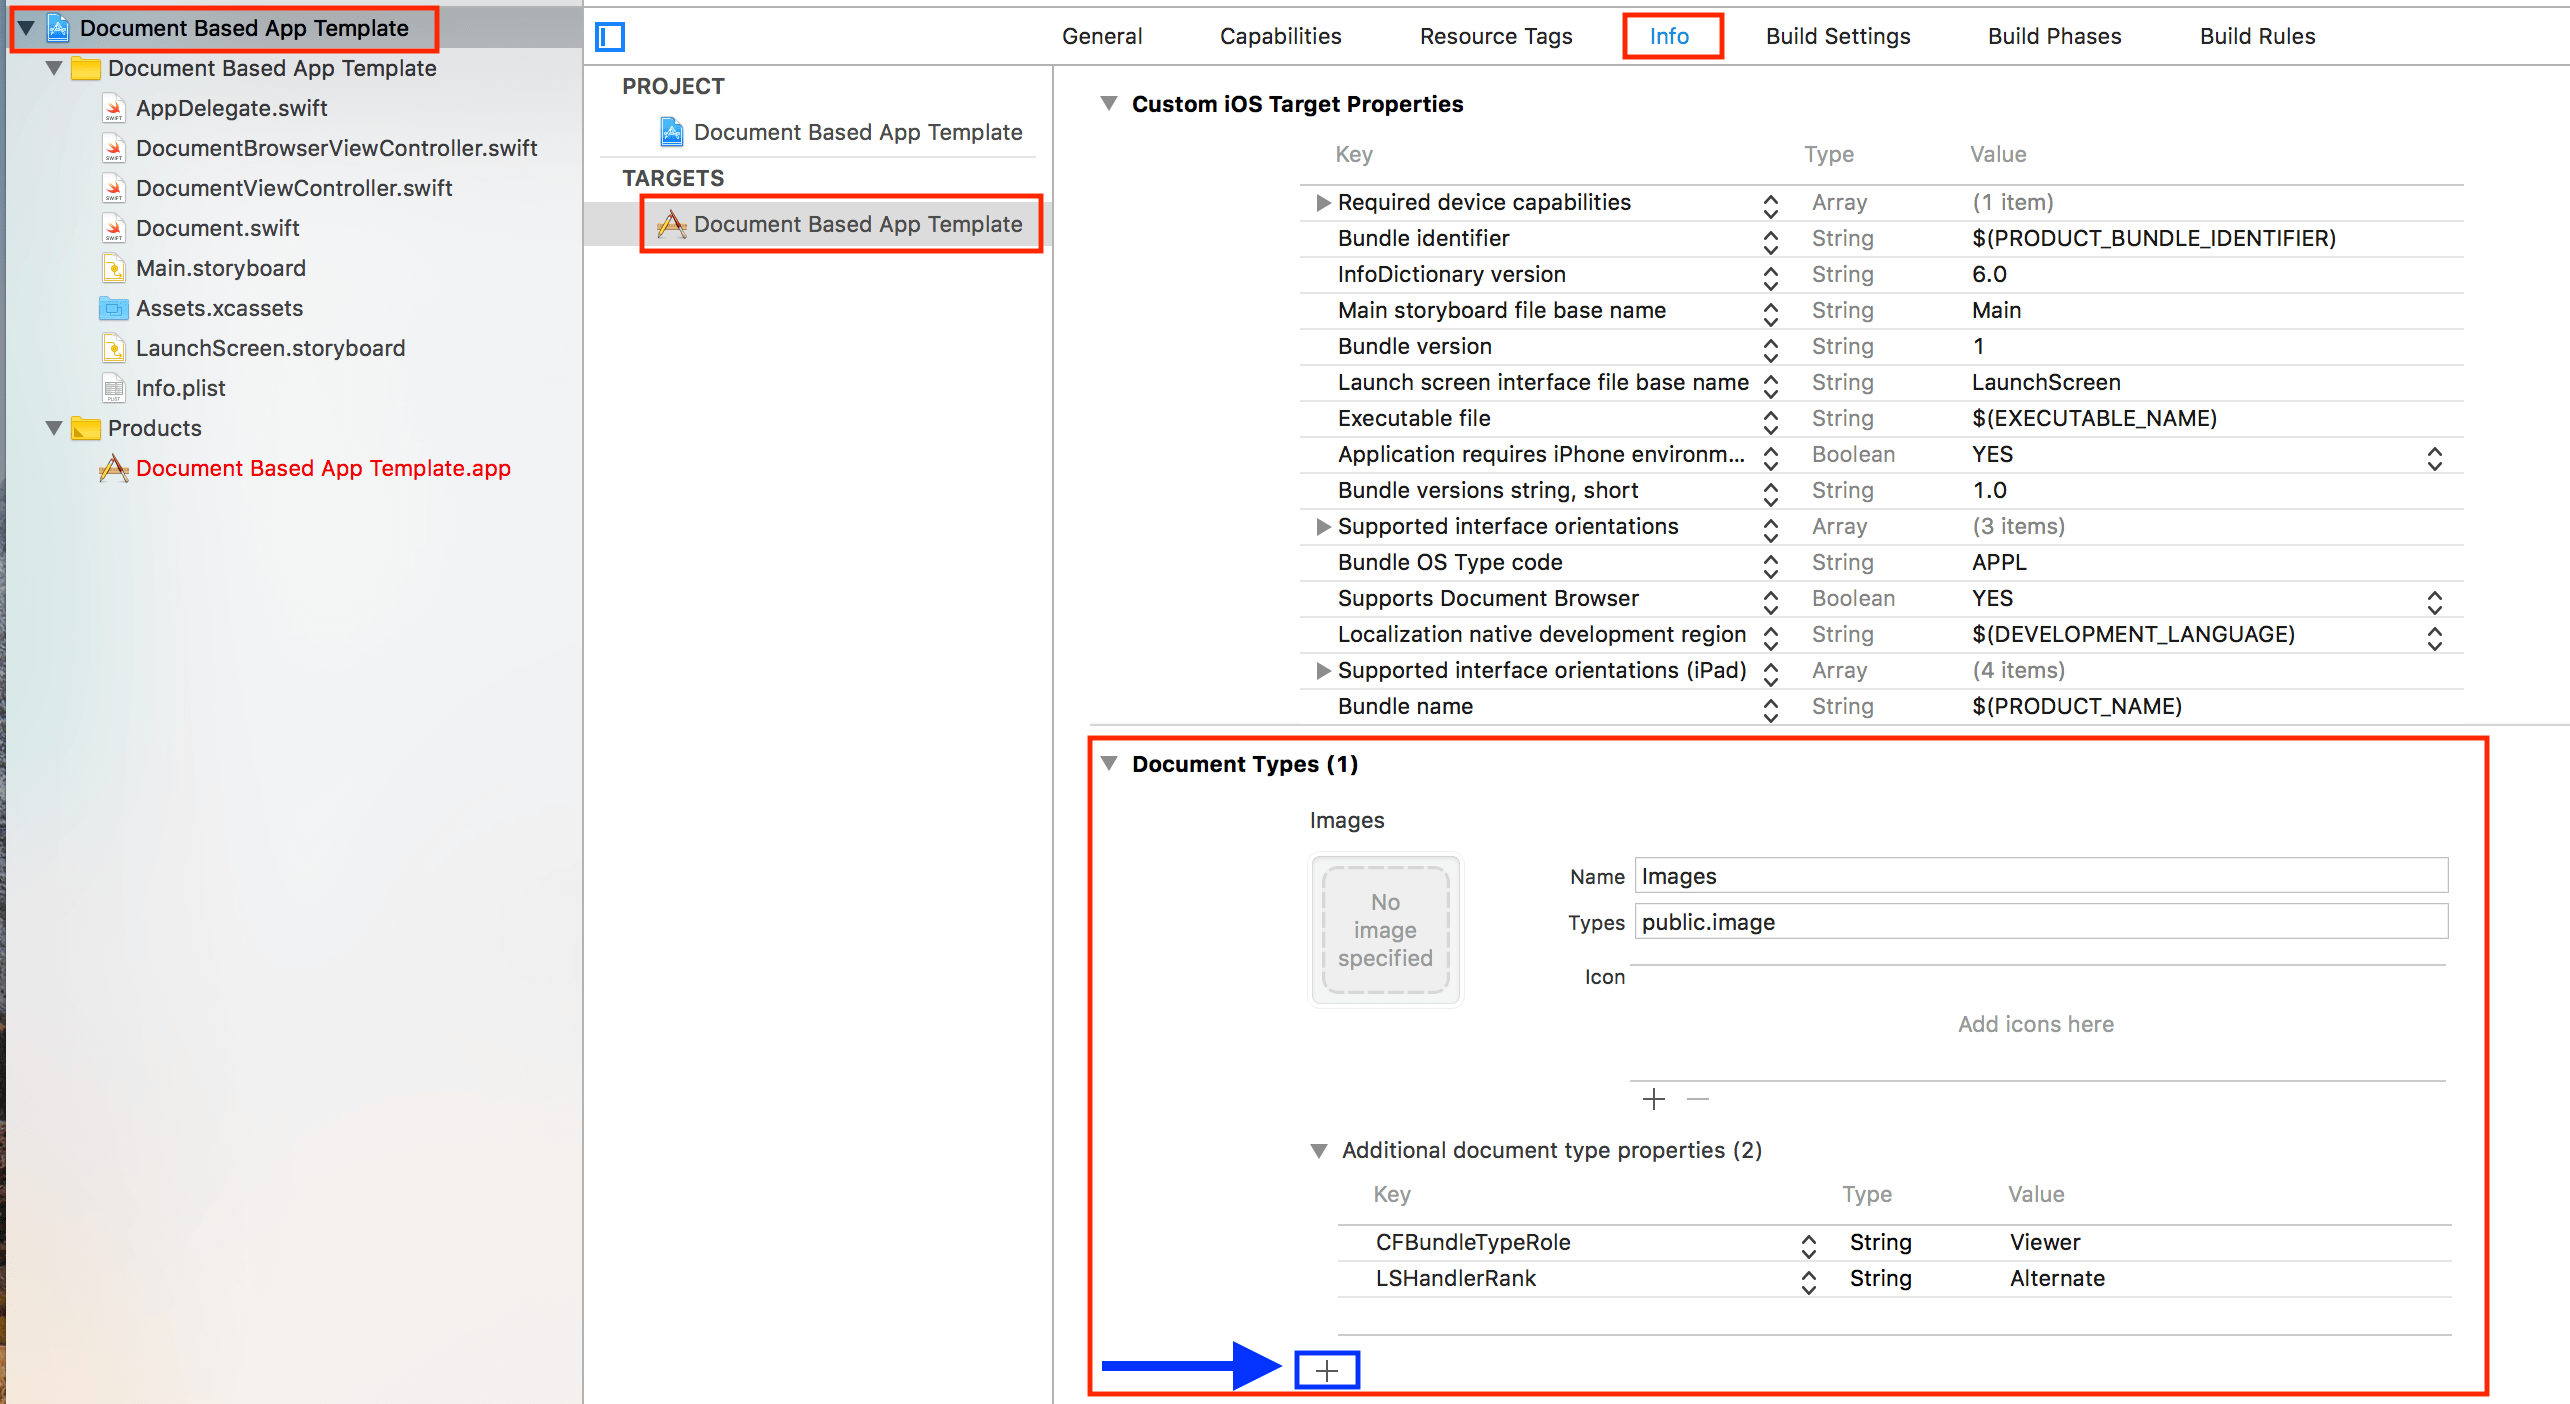
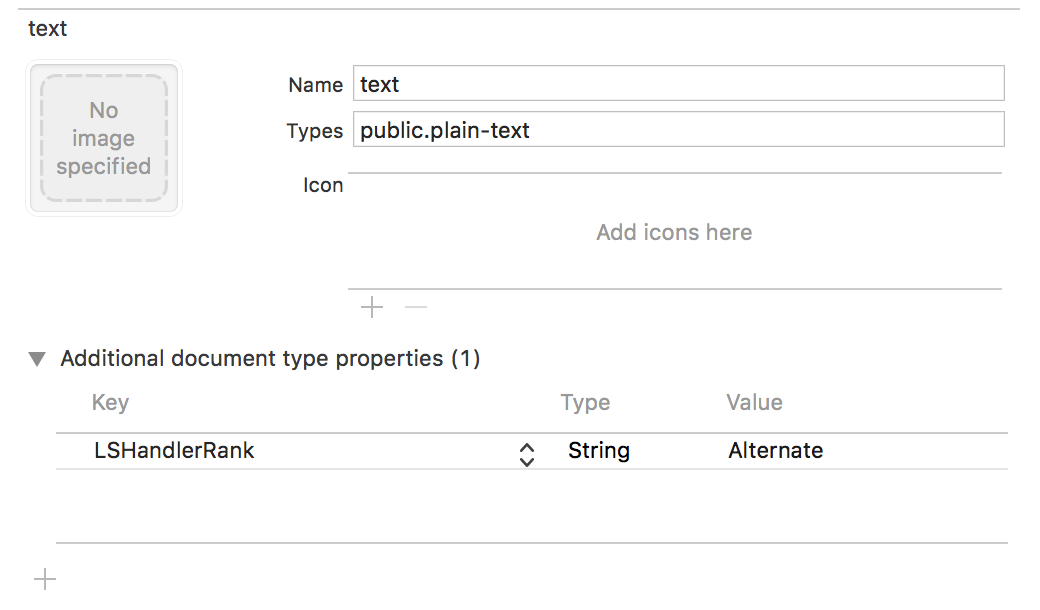
As I’d mentioned and as you can see in the previous image, your app is already configured to notice and open image type files. To add support for text files, click the plus (+) sign that I highlighted in blue in the previous image and fill in the various fields so that you have a second document type. The Document Types section will now have a new entry that looks like this:
If you prefer manipulating XML in your Info.plist file, you can add document type support for image and text files inside the main <dict> section:
...
    CFBundleDocumentTypes


            CFBundleTypeIconFiles

            CFBundleTypeName
            Images
            CFBundleTypeRole
            Viewer
            LSHandlerRank
            Alternate
            LSItemContentTypes

                public.image


            CFBundleTypeIconFiles

            CFBundleTypeName
            text
            LSHandlerRank
            Alternate
            LSItemContentTypes

                public.plain-text


...
Other preconfigured app options
The Document Based App template app comes preconfigured with its Info.plist containing the UISupportsDocumentBrowser key set to YES (or <true/> in XML). This is absolutely essential for your app to provide Files app-like behavior. You can read about this key here.
Since your app now declares the UISupportsDocumentBrowser key, that has the same effect as declaring the UIFileSharingEnabled and LSSupportsOpeningDocumentsInPlace key combination as discussed above in the section entitled “Opting your app into showing its files in the Files app.” You’ll be exposing your app’s files to the Files app and you’ll also be making those same files available to other developers’ apps. Think about it carefully before you write things like a user’s personal information or details about your own proprietary trade secrets into files that will be made possibly public.
The Implementation for a Files App-like Experience
I started with an Xcode iOS Document Based App template and customized it so that I could: 1) browse for, open, display, edit, and save UTF-8 encoded text files and 2) browse for, open, and display .PNG and .JPG image files. Let’s walk through my project code.
Browsing for and selecting documents with UIDocumentBrowserViewController
The preliminaries for browsing documents and opening documents are already configured for you in Xcode’s iOS Document Based App template. A user interface for navigating and selecting documents, identical to what the Files app provides, is furnished for you. You start coding when you want to add functionality for reading the contents of user-selected documents into a document model, editing contents, writing the edited contents back to the original file, writing contents to a new file name/path, creating new files, closing the original file, and a number of other operations.
I modified the Main.storyboard a bit later in the process of customizing the project template, especially the “Document View Controller” scene on the right. But we need to look at the scene on the left to get started, the “Document Browser View Controller” scene, whose backing class is DocumentBrowserViewController in file DocumentBrowserViewController.swift. Notice it has the Storyboard Entry Point:
App template file: DocumentBrowserViewController.swift
I’m going to describe my code in a series of steps — steps that are also comments in my code shown below. I’ll show you my code first, then describe the steps/comments.
I’ve only made minimal changes to the template code in DocumentBrowserViewController.swift, so I won’t show the original template, I’ll just show you my code and explain the comments I added:
import UIKit

// #1 - Create an object for browsing the iOS file
// system. It adopts a protocols that notifies
// the browser class when users interact with documents.
class DocumentBrowserViewController: UIDocumentBrowserViewController, UIDocumentBrowserViewControllerDelegate {

    override func viewDidLoad() {
        super.viewDidLoad()

        // #1.1 - Set the delegate of the UIDocumentBrowserViewControllerDelegate
        // protocol to the DocumentBrowserViewController class.
        delegate = self

        // #1.2 - I'm not going to do anything fancy.
        // COMMENT OUT: allowsDocumentCreation = true
        allowsPickingMultipleItems = false

        // Update the style of the UIDocumentBrowserViewController
        // browserUserInterfaceStyle = .dark
        // view.tintColor = .white

        // Specify the allowed content types of your application via the Info.plist.

        // Do any additional setup after loading the view, typically from a nib.
    }

    // MARK: UIDocumentBrowserViewControllerDelegate

    func documentBrowser(_ controller: UIDocumentBrowserViewController, didRequestDocumentCreationWithHandler importHandler: @escaping (URL?, UIDocumentBrowserViewController.ImportMode) -> Void) {
        let newDocumentURL: URL? = nil

        // Set the URL for the new document here. Optionally, you can present a template chooser before calling the importHandler.
        // Make sure the importHandler is always called, even if the user cancels the creation request.
        if newDocumentURL != nil {
            importHandler(newDocumentURL, .move)
        } else {
            importHandler(nil, .none)
        }
    }

    // #2.0 - "When the user selects one or more documents in the browser view controller,
    // the system calls your delegate's documentBrowser(_:didPickDocumentURLs:) method."
    func documentBrowser(_ controller: UIDocumentBrowserViewController, didPickDocumentURLs documentURLs: [URL]) {
        guard let sourceURL = documentURLs.first else { return }

        // #2.1 - Present the Document View Controller for the first document that was picked.
        // If you support picking multiple items, make sure you handle them all.
        presentDocument(at: sourceURL)
    }

    func documentBrowser(_ controller: UIDocumentBrowserViewController, didImportDocumentAt sourceURL: URL, toDestinationURL destinationURL: URL) {
        // Present the Document View Controller for the new newly created document
        presentDocument(at: destinationURL)
    }

    func documentBrowser(_ controller: UIDocumentBrowserViewController, failedToImportDocumentAt documentURL: URL, error: Error?) {
        // Make sure to handle the failed import appropriately, e.g., by presenting an error message to the user.
    }

    // MARK: Document Presentation

    // #3.0 - Prepare for and present my custom user interface
    // which uses a UIDocument subclass to manipulate and/or
    // display the user-select document.
    func presentDocument(at documentURL: URL) {

        // #3.1 - Get the UIViewController scene on the right side of Main.storyboard
        // which is backed by the DocumentViewController class in the
        // DocumentViewController.swift file and instantiate it.
        // That's my custom UI.
        let storyBoard = UIStoryboard(name: "Main", bundle: nil)
        let documentViewController = storyBoard.instantiateViewController(withIdentifier: "DocumentViewController") as! DocumentViewController

        // #3.2 - In the template project, the DocumentViewController
        // class has a member "document" of type UIDocument, which is an
        // "abstract base class." I had to subclass UIDocument.
        // I then initialize my UIDocument subclass.
        documentViewController.document = Document(fileURL: documentURL)

        // #3.3 - Present my custom user interface for
        // displaying and manipulating a user-selected
        // document.
        present(documentViewController, animated: true, completion: nil)

    }

} // end class DocumentBrowserViewController
#1.0 – When my app starts up, an instance DocumentBrowserViewController is created. That object, an instance of a subclass of UIDocumentBrowserViewController, is initialized via a callback to its viewDidLoad method. Notice it adopts the UIDocumentBrowserViewControllerDelegate protocol, whose main job is to notify the developer about user interactions with the document browser.
#1.1 – Set the delegate property of the UIDocumentBrowserViewControllerDelegate protocol to the DocumentBrowserViewController class. By doing so, the DocumentBrowserViewController class gets notified of user interactions with the document browser and UIDocumentBrowserViewControllerDelegate callbacks get invoked.
#1.2 – I commented out code to allow document creation, I left multiple document selection disabled, and left code for changing the appearance of the document browser commented out as it originally was as-is in the template. I didn’t want to get too fancy in this introductory tutorial.
#2.0 – When a user taps on a document icon in the browser interface, documentBrowser(_:didPickDocumentURLs:) is called. As Apple describes the process, “When the user selects one or more documents in the browser view controller, the system calls your delegate’s documentBrowser(_:didPickDocumentURLs:) method” with the URL corresponding to the document icon that the user tapped/selected.
#2.1 – Then documentBrowser(_:didPickDocumentURLs:) calls the template project’s presentDocument(at documentURL: URL) method to give the developer a chance to prepare for and display the document’s contents, and/or display meta data about the document, and/or do something else with the selected document.
#3.0 – Prepare for and present my custom user interface which uses a UIDocument subclass to manipulate and/or display the user-select document.
#3.1 – Get the “Document View Controller” scene on the right side of Main.storyboard, which is backed by the DocumentViewController class, a subclass of UIViewController, in the DocumentViewController.swift file, and instantiate it. That’s my custom UI which we’ll discuss in detail later.
#3.2 – In the template project, the DocumentViewController class has a member document of type UIDocument, which is an “abstract base class.” According to Apple, “A document-based application must create a subclass of UIDocument for its documents.” An instance of my UIDocument subclass is initialized with the URL of the document that was selected by the user in my UI. My UIDocument subclass is initialized using init(fileURL: URL).
#3.3 – Finally, present(_:animated:completion:) is called and my customized UI, based on the work I did in Main.storyboard to add features to the DocumentViewController, and the work I did in DocumentViewController.swift, is displayed.
Opening, displaying, editing, closing the selected UIDocument
App template file DocumentViewController.swift contains a subclass of UIViewController which, in concert with its counterpart, the “Document View Controller” scene in Main.storyboard, provides a simple user interface for displaying the name of the document the user selected as described in the previous section. Notice that it declares a property document of type UIDocument while Apple admonishes us that “A document-based application must create a subclass of UIDocument for its documents.”
App template file: DocumentViewController.swift
Here’s the skeletal app template file as generated by Xcode:
import UIKit

class DocumentViewController: UIViewController {

    @IBOutlet weak var documentNameLabel: UILabel!

    var document: UIDocument?

    override func viewWillAppear(_ animated: Bool) {
        super.viewWillAppear(animated)

        // Access the document
        document?.open(completionHandler: { (success) in
            if success {
                // Display the content of the document, e.g.:
                self.documentNameLabel.text = self.document?.fileURL.lastPathComponent
            } else {
                // Make sure to handle the failed import appropriately, e.g., by presenting an error message to the user.
            }
        })
    }

    @IBAction func dismissDocumentViewController() {
        dismiss(animated: true) {
            self.document?.close(completionHandler: nil)
        }
    }
}
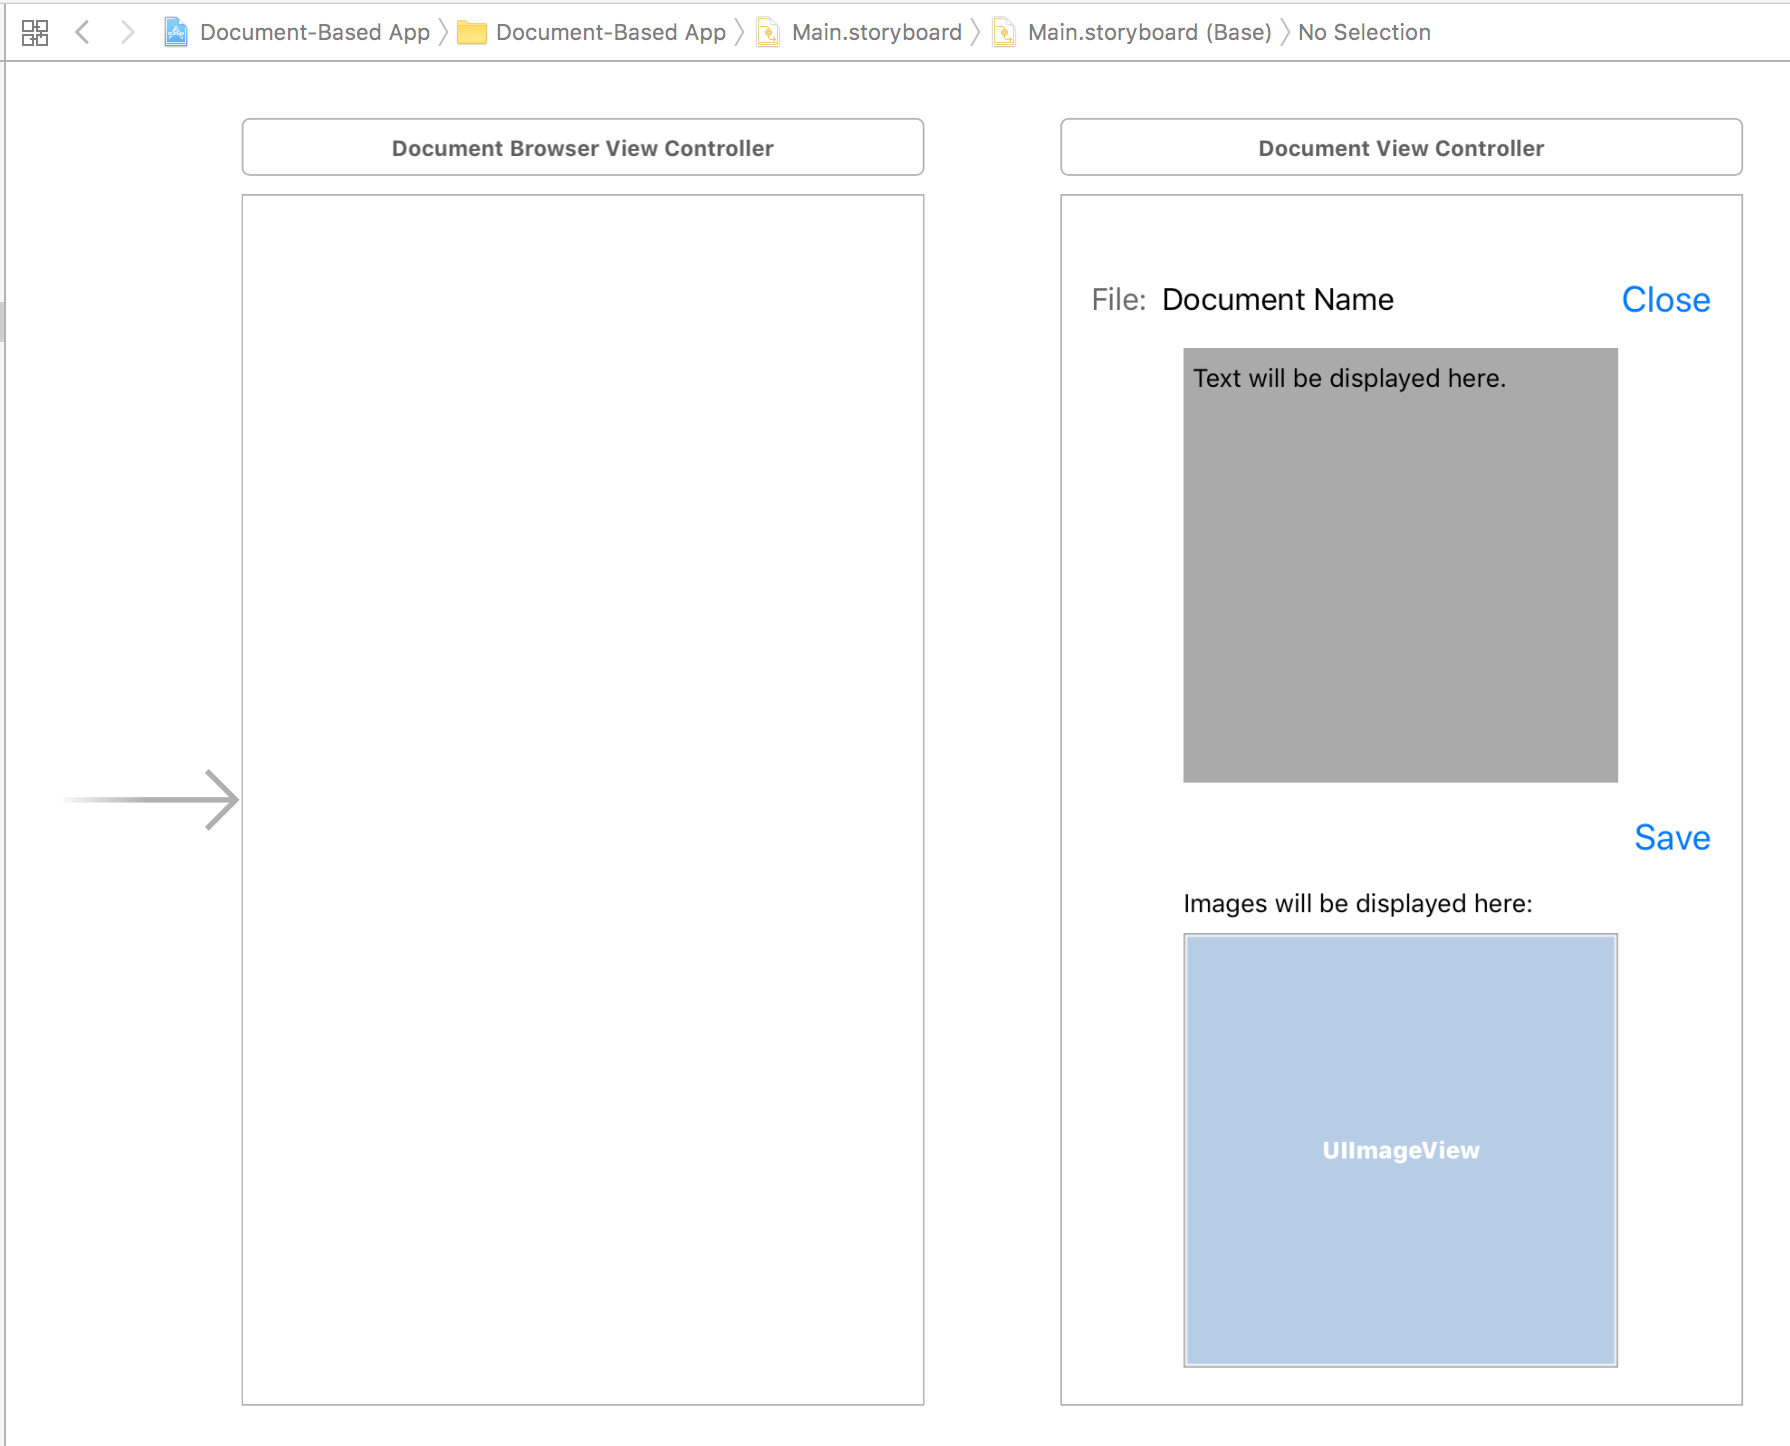
I’ve extended and enhanced this file and its corresponding “Document View Controller” scene quite a bit. First, let me show you the user interface I built in the “Document View Controller” scene in Main.storyboard for viewing and editing documents:
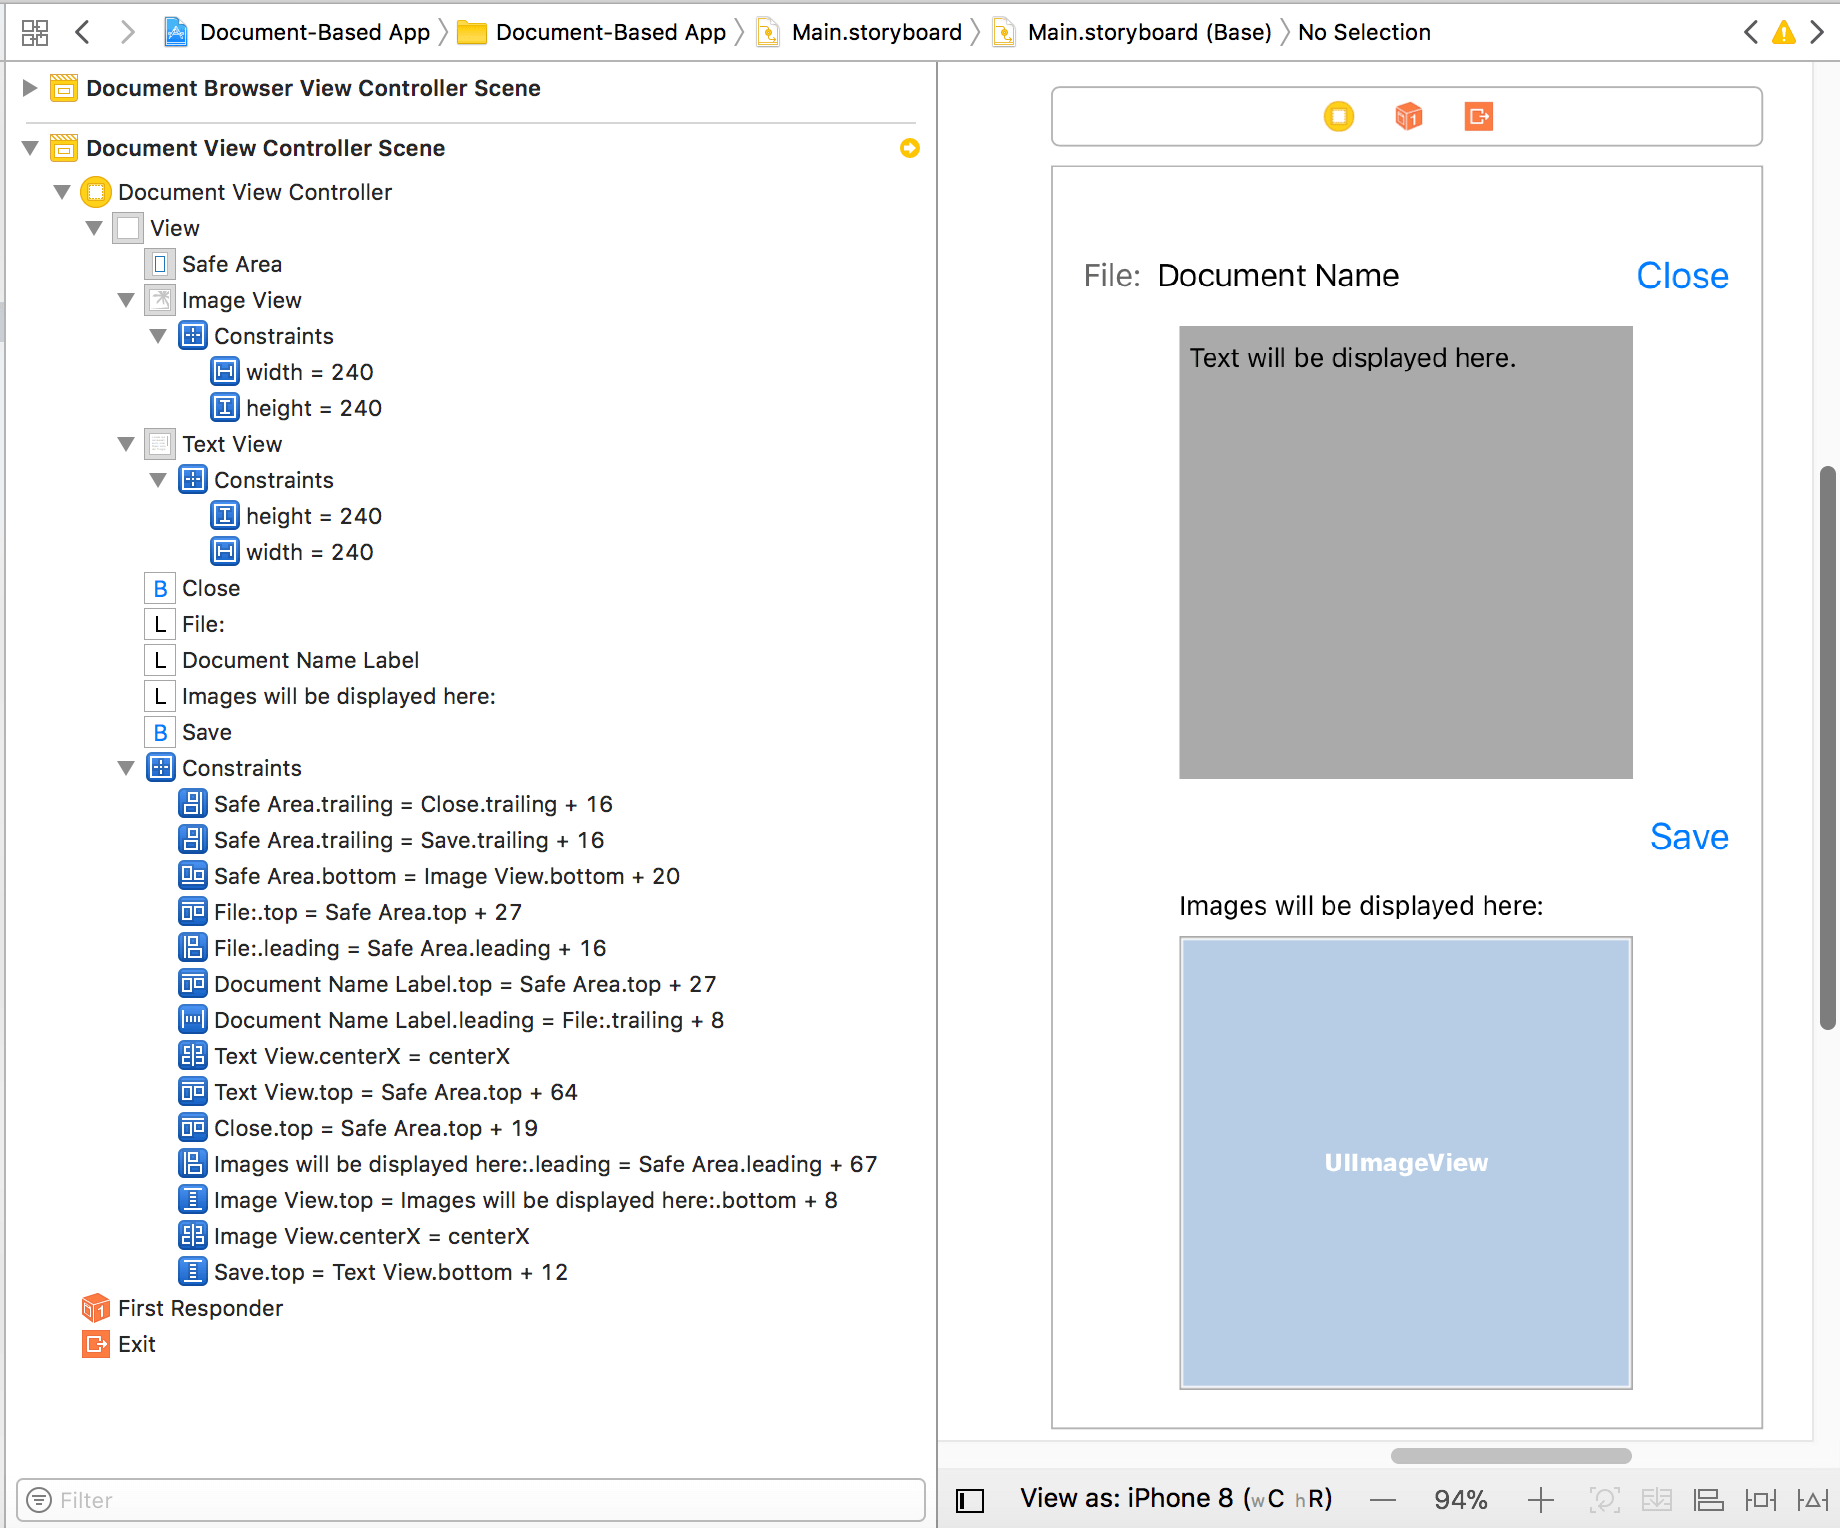
While DocumentViewController is “just” a subclass of a UIViewController, a view controller is very powerful — an open slate that can be customized extensively. I’ve modified both the storyboard scene so it can display the contents of a text file, so the text can be edited, and so the text can be saved to disk. I’ve also added the ability for the scene and backing class to display a user-selected image file on screen.
DocumentViewController contains what I need for my app’s user interface and functionality in terms of IBOutlet and IBAction properties and methods, respectively, but especially has a member property representing the document a user selects to manipulate. This document is encapsulated in the document property of the DocumentViewController which is my subclass of UIDocument. We’ll discuss my Document class a bit later.
I’m going to describe my code in a series of steps — steps that are also comments in my code shown below. I’ll show you my code first, then describe the steps/comments:
import UIKit

class DocumentViewController: UIViewController {

    // #1.0 - Outlets for displaying the user-selected
    // file's name, the image if the file is a .PNG
    // or .JPG, the editable text of any raw
    // text file, and the "Save" button.
    @IBOutlet weak var documentNameLabel: UILabel!
    @IBOutlet weak var imageView: UIImageView!
    @IBOutlet weak var textView: UITextView!
    @IBOutlet weak var saveFileButton: UIButton!

    // #2.0 - "A document-based application must create
    // a subclass of UIDocument for its documents."
    var document: Document? // UIDocument?

    // #3.0 - Added viewDidLoad method for UI configuration. I
    // made the UITextView gray in the storyboard
    // so I could see it in Interface Builder. I make
    // it white when showing it to the user.
    override func viewDidLoad() {
        super.viewDidLoad()
        textView.backgroundColor = UIColor.white
    }

    // #4.0 - Open the document that the user
    // selected in the DocumentBrowserViewController
    // class.
    override func viewWillAppear(_ animated: Bool) {
        super.viewWillAppear(animated)

        // #4.1 - "Opens a document asynchronously."
        // Document data will become available for
        // me to display in this method's completion
        // handler, which must occur on the main queue.
        document?.open(completionHandler: { (success) in

            if success {

                // #4.2 - Display the document's file name.
                self.documentNameLabel.text = self.document?.fileURL.lastPathComponent

                // #4.3 - If the UIDocument reports that it is an image file...
                if self.document?.fileType == "public.png" || self.document?.fileType == "public.jpeg" {

                    // #4.4 - Display the image built from binary data read from the file in
                    // UIDocument's "load" method. See my "Document" class.
                    self.imageView.image = UIImage(data: (self.document?.fileData)!)

                    self.saveFileButton.isEnabled = false

                // #4.5 - If the UIDocument reports that it is a text file...
                } else if self.document?.fileType == "public.plain-text" {

                    // #4.6 - Display the text decoded from data read from the file in
                    // UIDocument's "load" method. See my "Document" class.
                    self.textView.text = self.document?.filesText!

                    self.saveFileButton.isEnabled = true

                }

                print("Document state: \((self.document?.state)!)")

            } else {
                // Make sure to handle the failed import appropriately, e.g., by presenting an error message to the user.
            }

        }) // end document?.open

    } // end func viewWillAppear

    // #5.0 - Called when "Close" button is tapped.
    // Always close the document since the only way
    // to get to this screen is by opening one.
    @IBAction func dismissDocumentViewController() {
        dismiss(animated: true) {
            self.document?.close(completionHandler: nil)
        }
    }

    // #6.0 - Called when "Save" button is tapped.
    @IBAction func saveTextViewToFile(_ sender: Any) {

        // #6.1 - Capture any changes made to the original
        // file's text that the user may have edited
        // in the UITextView in this app's UI.
        self.document?.filesText = self.textView.text
        // Show the path at which we'll save the
        // file we opened. I save in situ.
        print("Save to: \(String(describing: self.document?.fileURL.path))!")

        // #6.2 - Writing the text to disk occurs
        // asynchronously. I save the file in place.
        // "The default implementation of this method
        // first calls the contents(forType:) method..."
        self.document?.save(to: (self.document?.fileURL)!, for: .forOverwriting,
                            completionHandler: {(success: Bool) -> Void in
                                if success {
                                    print("File created OK")
                                    // #6.3 - Close this view controller
                                    // after the file is saved.
                                    self.dismissDocumentViewController()
                                } else {
                                    print("Failed to save file.")
                                    // #6.4 - Tell user about save error(s).
                                    self.textView.backgroundColor = UIColor.red
                                    // #6.5 - Document's state may give us
                                    // insight into the save failure.
                                    let docState = self.document?.state
                                    self.textView.text = "Failed to save file. Document state: " + docState!
                                }
        })

    } // end func saveTextViewToFile

} // end class DocumentViewController
#1.0 – These are IBOutlet instances I connected to UI components in the “Document View Controller” scene in Main.storyboard that I showed you above.
#2.0 – “A document-based application must create a subclass of UIDocument for its documents.”
#3.0 – I make the background color of my UITextView white so file text is easy to read. It’s gray in Interface Builder so I can see it when working with it.
#4.0 – When the “Document View Controller” scene appears on screen, I open the document that the user selected in the DocumentBrowserViewController class.
#4.1 – Open the document the user selected asynchronously as it may be a large file and I want the UI to remain responsive. Once iOS finishes reading the document, a completion handler is called, letting me know that data is ready and giving me the opportunity to display that data. Make note for later in this tutorial: Calling open(completionHandler:) leads to a call to load(fromContents:ofType:).
#4.2 – As a convenience, display the document’s file name on screen.
#4.3 – Check if an image file was opened.
#4.4 – When I know an image file was opened, I can display the file’s data in a UIImageView. Image data is stored in my UIDocument subclass’s model, in the fileData property.
#4.5 – Check if an text file was opened.
#4.6 – When I know a text file was opened, I can display the file’s data in a UITextView. Text data is stored in my UIDocument subclass’s model, in the filesText property.
#5.0 – The user tapped the “Close” button so I close and clear my DocumentViewController instance off the screen. I close the document asynchronously.
6.0 – This user tapped the “Save” button.
6.1 – I capture all the text in the UITextView, which may contain edits the user made. I save this text in my UIDocument subclass’s model, in the filesText property.
#6.2 – Writing the text to disk occurs asynchronously. The completion handler is called when writing finishes, signalling me whether the save was successful or not. I save the file in place — to the same URL from which it was opened. Make note of the following statement for later reading in this tutorial: “The default implementation of this [save] method first calls the contents(forType:) method…” See save(to:for:completionHandler:).
#6.3 – Automatically close this view controller once the file is saved.
#6.4 – Tell user about any error(s) that occurred during a file save.
#6.5 – The document’s state may give us insight into the save failure. See more detailed discussion below.
Subclassing UIDocument to manipulate files
As part of the process of creating UIDocument-centric or Files app-like projects, or whatever you want to call it, one of the key steps is creating a subclass of UIDocument. There are so many different types of file formats. While the UIDocument provides a great substrate and general infrastructure for manipulating documents, developers must provide the data model and logic specific to their app’s domain/business logic regarding files.
As a reminder of my last AppCoda tutorial, the subject of which was design patterns, I emphasize that:
In the Model-View-Controller design pattern, a
UIDocumentobject is a model object or model-controller object–it manages the data of a document or the aggregate model objects that together constitute the document’s data. You typically pair it with a view controller that manages the view presenting the document’s contents.UIDocumentprovides no support for managing document views.
Remember from my discussion in the previous section that I did provide “a view controller that manages the view presenting the document’s contents” in the form of my DocumentViewController class.
App template file: Document.swift
Here’s the skeletal app template file as generated by Xcode:
import UIKit

class Document: UIDocument {

    override func contents(forType typeName: String) throws -> Any {
        // Encode your document with an instance of NSData or NSFileWrapper
        return Data()
    }

    override func load(fromContents contents: Any, ofType typeName: String?) throws {
        // Load your document from contents
    }
}
For my purposes, supporting the display and editing of text files and supporting the display of image files, I subclassed UIDocument as shown below. I’m going to describe my code in a series of steps — steps that are also comments in my code shown below. I’ll show you my code first, then describe the steps/comments:
import UIKit

// #1.0 - Subclass UIDocument to add a data
// model and provide functionality to read and
// write model data.
class Document: UIDocument {

    // #2.0 - Model for storing binary data when file type is "public.image".
    var fileData: Data?
    // #2.1 - Model for storing text when file type is "public.plain-text".
    var filesText: String?

    // #3.0 - Use this for WRITING/SAVING files. I only allow
    // editing/saving of text files, not image files.
    // "Override this method to return the document data to be saved."
    override func contents(forType typeName: String) throws -> Any {

        // #3.1 - UIDocument knows what type of file it
        // currently represents. The file type is passed
        // to this method when it's called during saves.
        if typeName == "public.plain-text" {

            // #3.2 - Use optional binding to find out
            // whether the "filesText" optional contains a value.
            if let content = filesText {

                // #3.3 - Return a Data instance containing
                // a representation of the String encoded using
                // UTF-8 (basically, plain text).
                let data = content.data(using: .utf8)
                return data!

            } else {
                return Data()
            }

        } else {
            return Data()
        }

    } // end func contents

    // #4.0 - "load" is called soon after "open"; used for READING data
    // from the user-selected document and storing that data
    // in the UIDocument's model. Called when document is opened.
    // "Override this method to load the document data into the app's data model."
    override func load(fromContents contents: Any, ofType typeName: String?) throws {

        // #4.1 - We can only read data if we know
        // what type of file we're reading from.
        if let fileType = typeName {

            // #4.2 - I only support .PNG and .JPG type image files.
            if fileType == "public.png" || fileType == "public.jpeg" { // .jpg not recognized

                // #4.3 - If reading was successful, store
                // the binary data into the document model.
                if let fileContents = contents as? Data {

                    fileData = fileContents

                }

            // #4.4 - If reading from a text file...
            } else if fileType == "public.plain-text" {

                // #4.5 - ... and if reading was successful, store
                // the UTF-8 encoded text data into the document model.
                if let fileContents = contents as? Data {

                    filesText = String(data: fileContents, encoding: .utf8)

                }

            } else {
                print("File type unsupported.")
            }

        } // end if let fileType = typeName

    } // end func load

    // #5.0 - "A UIDocument object has a specific state at
    // any moment in its life cycle. You can check
    // the current state by querying the documentState
    // property..." State can help us in debugging.
    public var state: String {

        switch documentState {

        case .normal:
            return "Normal"
        case .closed:
            return "Closed"
        case .inConflict:
            return "Conflict"
        case .savingError:
            return "Save Error"
        case .editingDisabled:
            return "Editing Disabled"
        case .progressAvailable:
            return "Progress Available"

        default:
            return "Unknown"

        }

    } // end public var state

} // end class Document
#1.0 – Subclass UIDocument to add a data model and provide functionality to read and store image file model data and read, store, and write text file model data.
#2.0 – I use the Data type when my document model is storing binary data when the file type is “public.image”.
#2.1 – I use the String type when my document model is storing text when the file type is “public.plain-text”.
#3.0 – I’m getting data from the model here. Use the contents(forType:) method for writing/saving files. According to the method’s documentation, “Override this method to return the document data to be saved.” I only allow editing/saving of text files, not image files.
#3.1 – UIDocument knows what type of file it currently represents. The file type is passed to this method when it’s called during saves. I need to know the file type so I can return the right type of data from the model.
#3.2 – Use optional binding to find out whether the filesText optional contains a value.
#3.3 – Return a Data instance containing a String representation of the file data encoded in UTF-8 (basically, plain text).
#4.0 – I’m setting/storing data into the model here. Use the load(fromContents:ofType:) method when opening a file, i.e., reading a file. According to the method’s documentation, “Override this method to load the document data into the app’s data model.”
#4.1 – I can only read data if we know what type of file we’re reading from. I use optional binding to prevent from reading a nil value.
#4.2 – I only support .PNG and .JPG type image files. This is a demo app.
#4.3 – If reading from the image file succeeded, I store binary image data, the contents of the image file, into the document model.
#4.4 – Check if I’m reading from a text file.
#4.5 – If reading from the text file was successful, store the UTF-8 encoded text data into the document model.
#5.0 – I wrote a helper property to convert the document’s state, as stored in an enum, into human readable values meaningful to me. According to the documentation on the documentState property of UIDocument, “A UIDocument object has a specific state at any moment in its life cycle. You can check the current state by querying the documentState property…” State can help in debugging.
My App in Action
Let me show you how my app, built from the code shown above, and based on the Xcode Document Based App template, works. My app’s Display Name as set in Xcode is “Document-Based App,” and you’ll see that name automatically inserted into the UIDocumentBrowserViewController instance below in my ani-GIFs. Remember the app with name “iOS File Management,” whose files I exposed to other apps and the Files app? You’ll see that, too. Remember that because of how I configured both apps’ Info.plist files, you’re supposed to see their files in the Files app and any app that is properly configured to use a UIDocumentBrowserViewController.
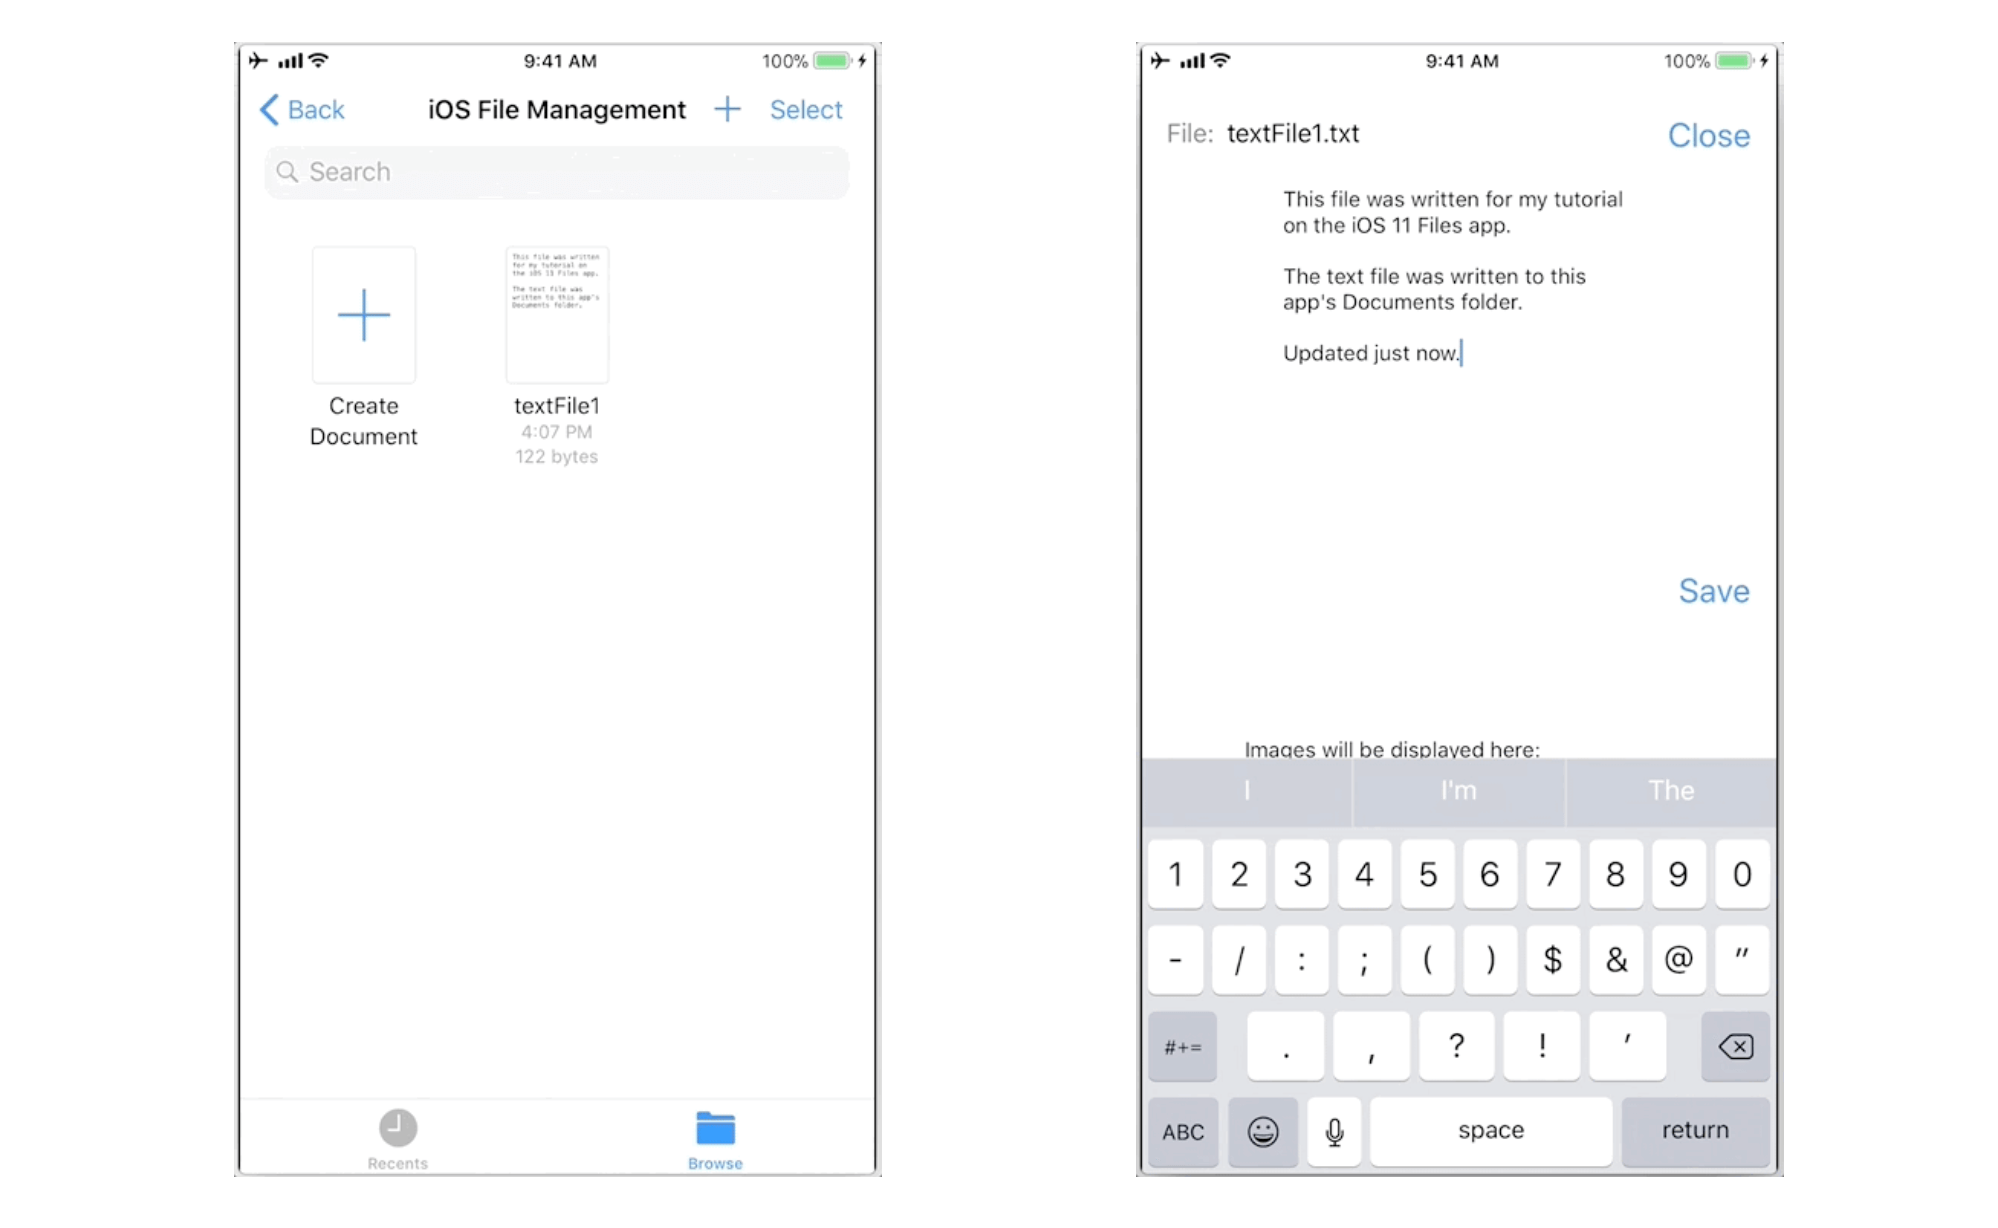
- Let’s run my “Document-Based App” app, open a text file owned by the “iOS File Management” app, edit the text, save the file, and make sure that the edits were saved to disk. Notice that the
Quick Look-generated thumbnail/icon for the text file I edit showed the changes I saved almost immediately:
- Let’s pick and view an image file in the main (“Documents”) folder of my “Document-Based App”:
Miscellaneous Notes
Note that “public.image” is a “Base type for images,” like an abstract type, so during development I found that UIDocument methods like load(fromContents:ofType:) were reporting values like “public.jpeg” in their ofType arguments. Note also that a file with the “.jpg” extension is reported as “public.jpeg” by the fileType property of the UIDocument subclass instance.
Conclusion
If your business model relies heavily on storing and manipulating information in flat files, then then a Files app interface based on the iOS UIDocumentBrowserViewController and UIDocument classes could be just the right tool for you. You can incorporate these classes into an existing app or start with the Xcode Document Based App template.
This document-centric model can be very convenient for apps that manipulate or manage documents like image files, audio files, video files, etc., or files that encode some kind of design representations, like CAD or vector graphics files. One specific subject comes to my mind, that of a situation in which your business model involves many different file formats which are intended to basically store the same information, and you need portability, and you need to convert between different formats.
Think of word processing and how often people convert their files between formats like Pages, Word, and PDF. You can download one of my iPad-based apps to see an example of converting between many different files formats here.
If you’re interested in pursing the iOS file-centric app model, I suggest you become very familiar with Apple’s technical documentation provided here, here, and here.
Thank you for joining me for another tutorial. I hope to see you soon for my next tutorial.


