Push Notifications is a loud and powerful way for our apps to engage with our users. We engage with our users by letting them see values with their very owns eyes. Users see values. Users engage. We can engage our users by letting them know about something important. Perhaps their favorite sport team is about to compete. A flash sale on watermelons is on for 30 minutes. Or there is an important meet up in the desert later this weekend. These are some scenarios when our users may want to be notified.
One way to implement push notifications for iOS apps is through Firebase Notifications.
In this tutorial, we will dive into Firebase Notifications. We will see how we can implement this feature into our Xcode project one step at a time. This tutorial is split into 7 fine looking sections:
- Apple Developer Account Configuration
- Generating a CSR file
- Uploading your CSF file
- Preparing the APNs Certificate
- Configuring Firebase for Push Notifications
- Building the Firebase Notification Demo App
- Testing Push Notifications
I will try to be as clear and concise as possible. Hope you enjoy the article and let’s get started!
Configuring Your Apple Developer Account
The first step is to have a paid Apple developer account. Yes, you need to enroll into the Apple Developer Program ($99 per year) to unlock the push notifications capability.
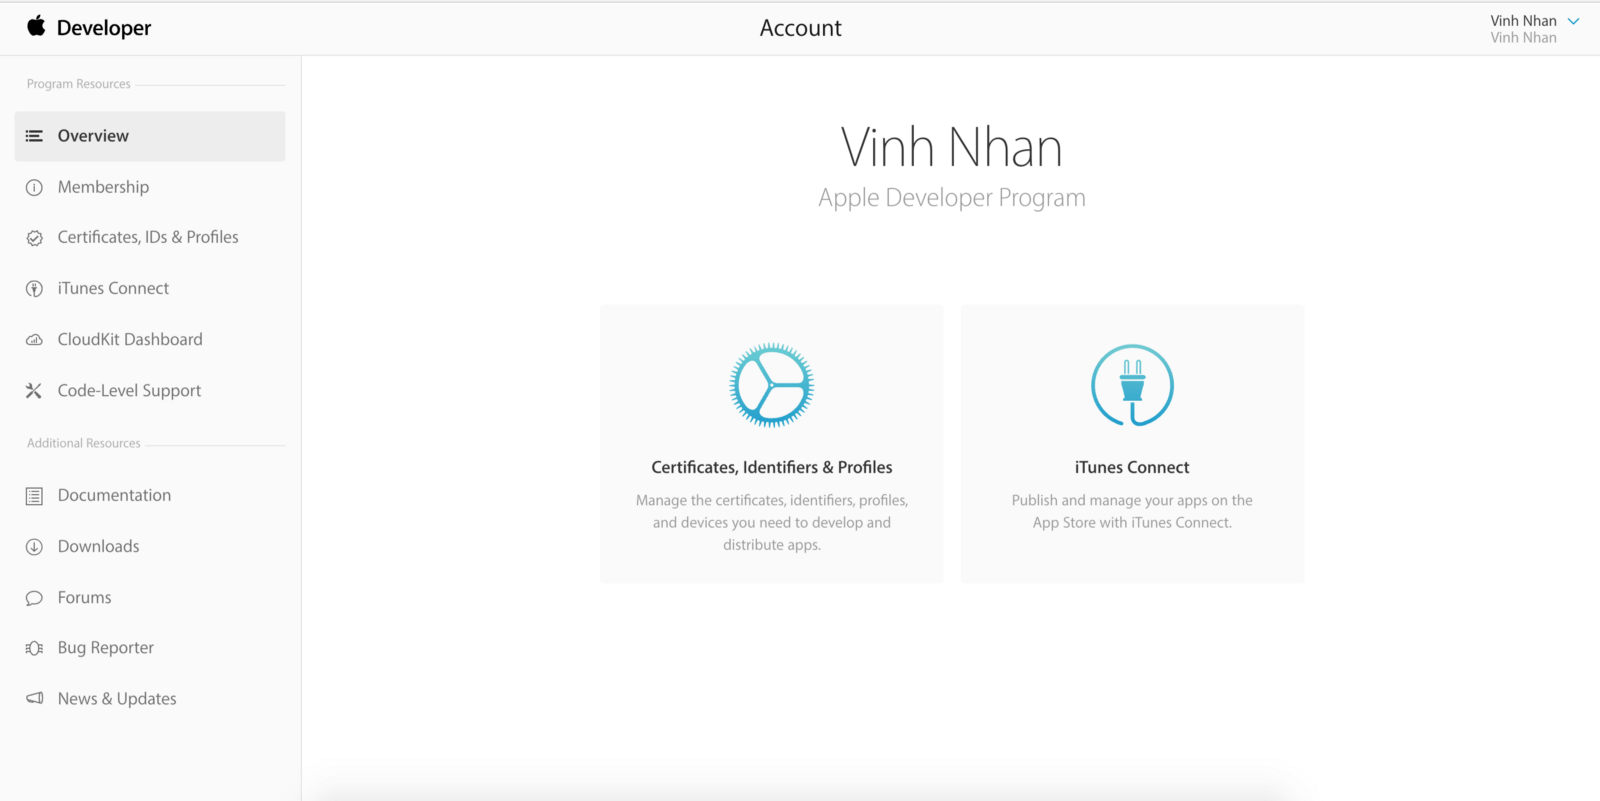
Assuming you already got a paid developer account, go ahead and login to your Apple Developer account. Once logged in, you will be re-directed to the Apple Developer homepage. From there, you should see “Account” at the top navigation bar. Click that option.
Now you should be inside of your Apple Developer account.

Now look to the left side bar. The third row should say “Certificates, IDs & Profiles.” Select that option.

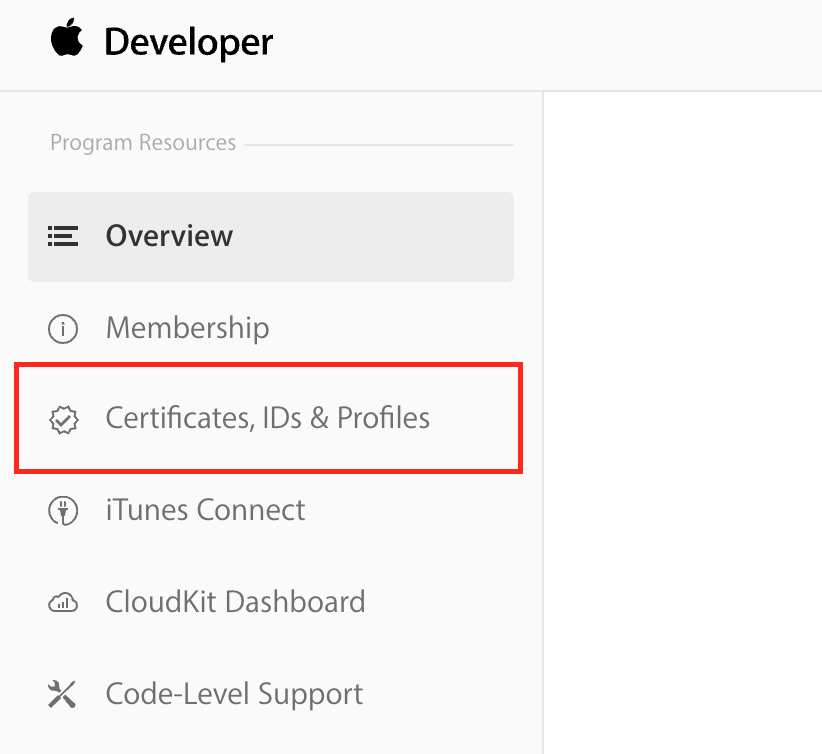
Now you are in the “Certificates, Identifiers & Profiles” page.

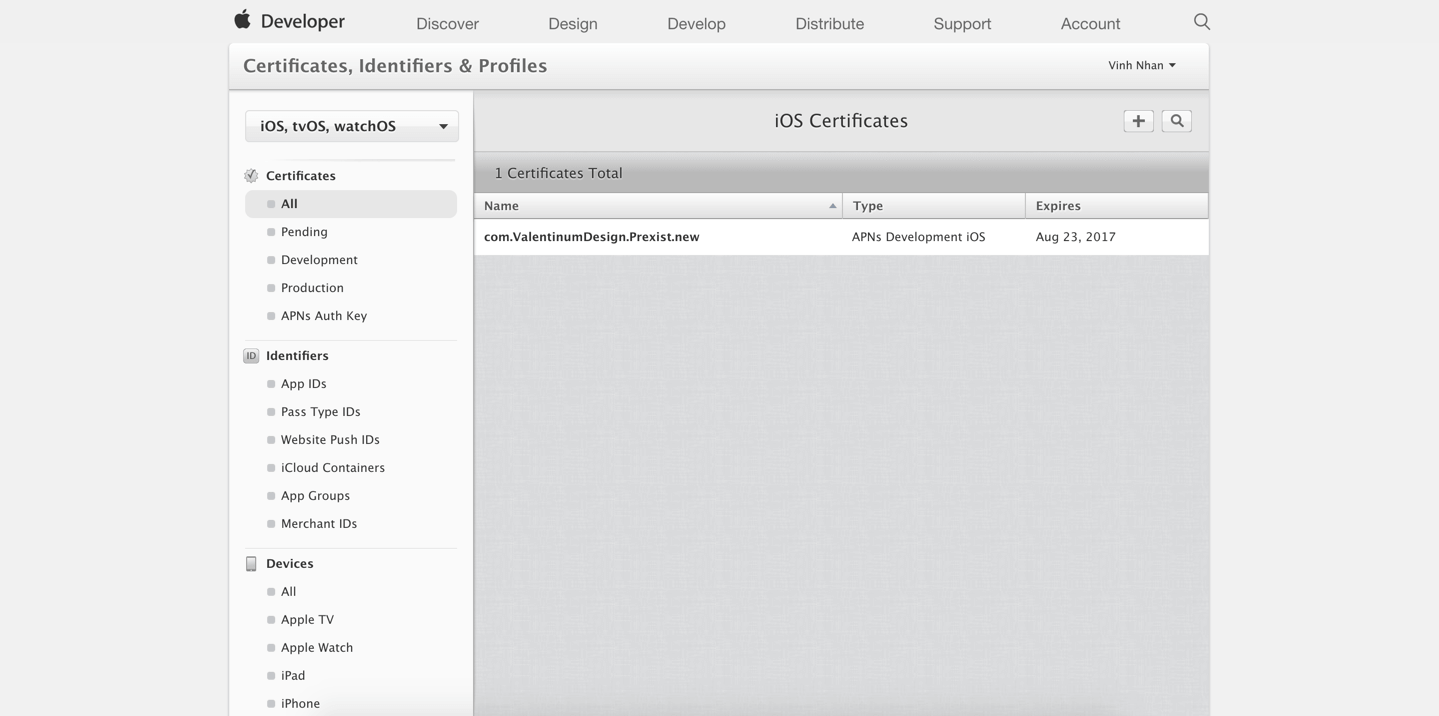
Look to left side bar and there should be a section called “Identifiers.” Under that section, there is a link that says “App IDs.” Press that.

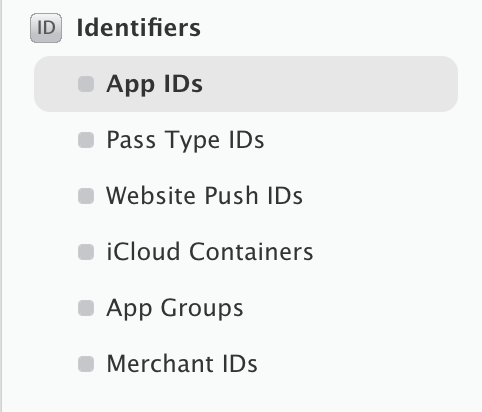
You should see all your iOS App IDs.

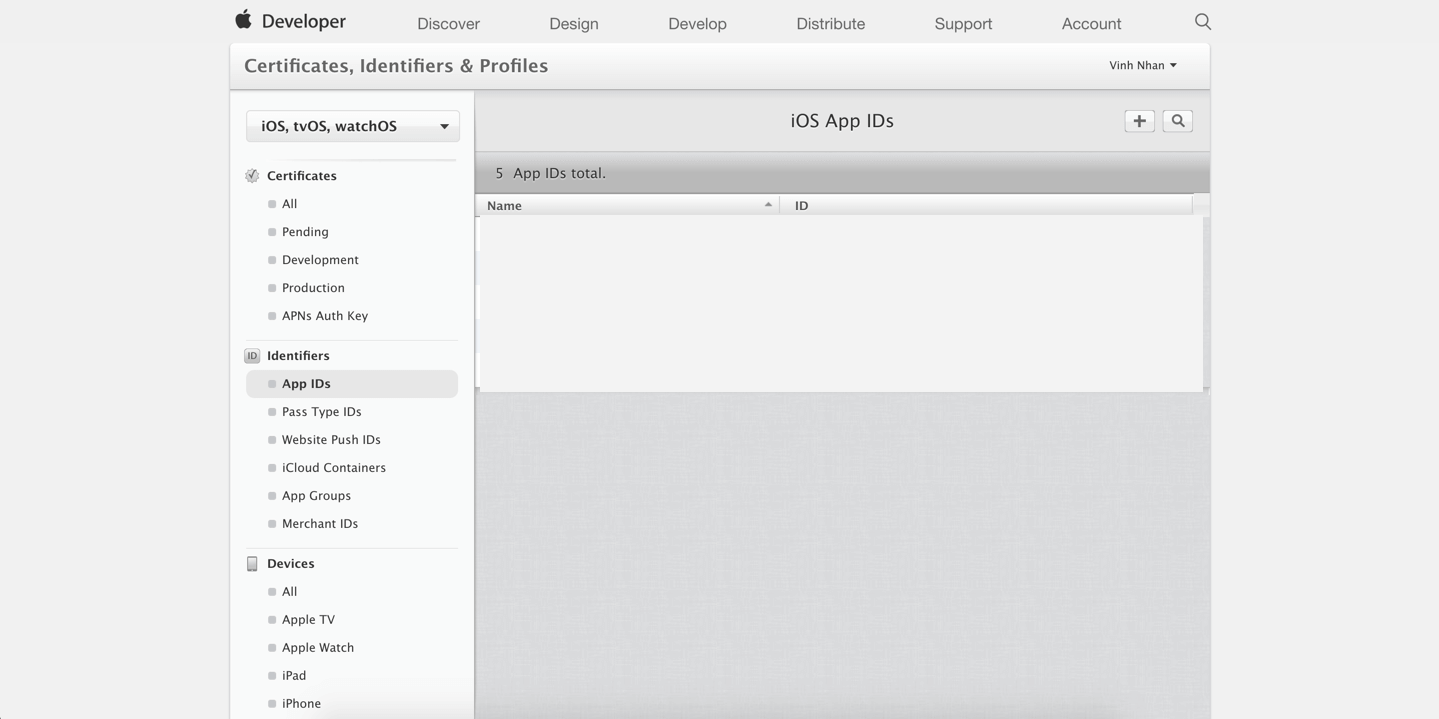
Now at the top right, you should see a +
button. Press that. After that, you should be at this stage:

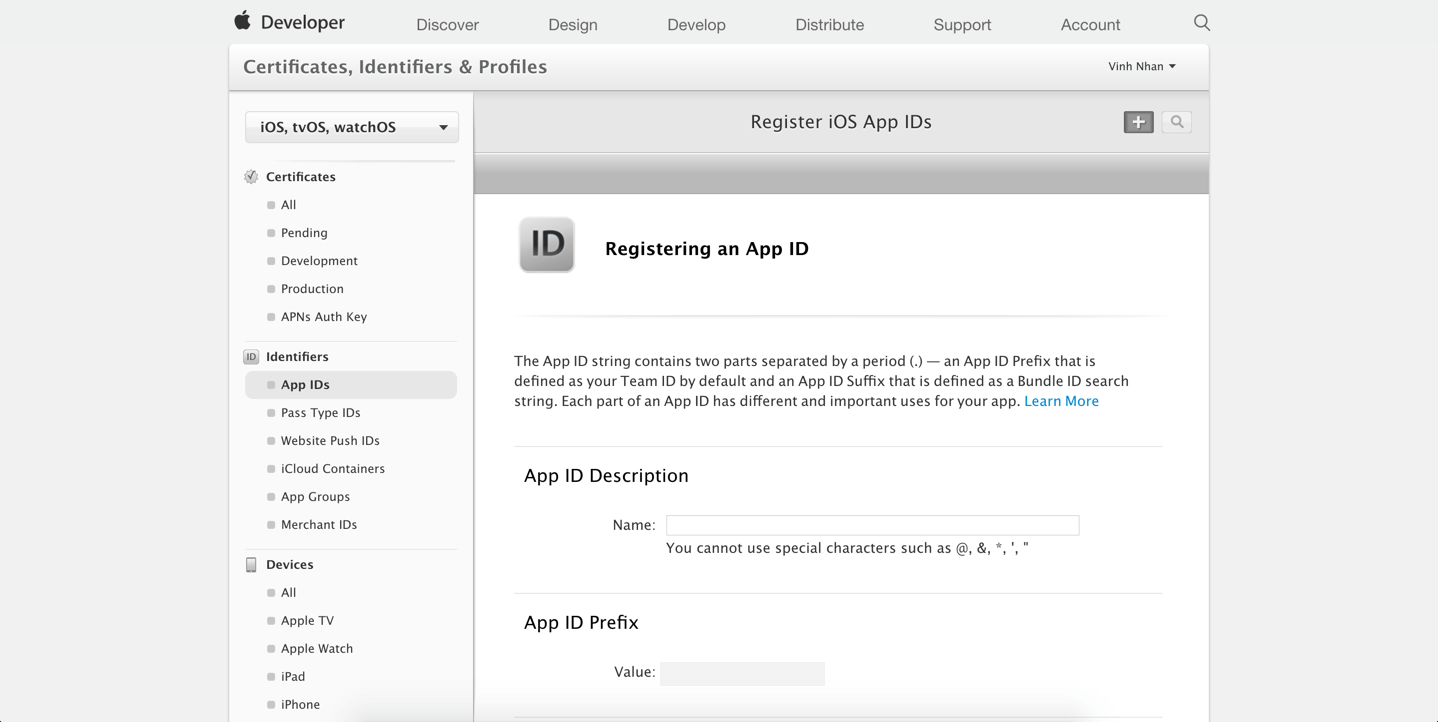
We now need to fill out the followings:
- App ID Description — Name. Here, you should put your app’s name (e.g. Firebase Notification Demo)
- App ID Suffix — Explicit App ID — Bundle ID. Here, you need to select a unique bundle identifier for your app (e.g. com.appcoda.firebasenotificationsdemo). Please make sure you use your own bundle ID instead of using mine.
Then under App Services, tick “Push Notifications.” Press continue.
After that, you will be redirected to a “Confirm your App ID” page. Press register.
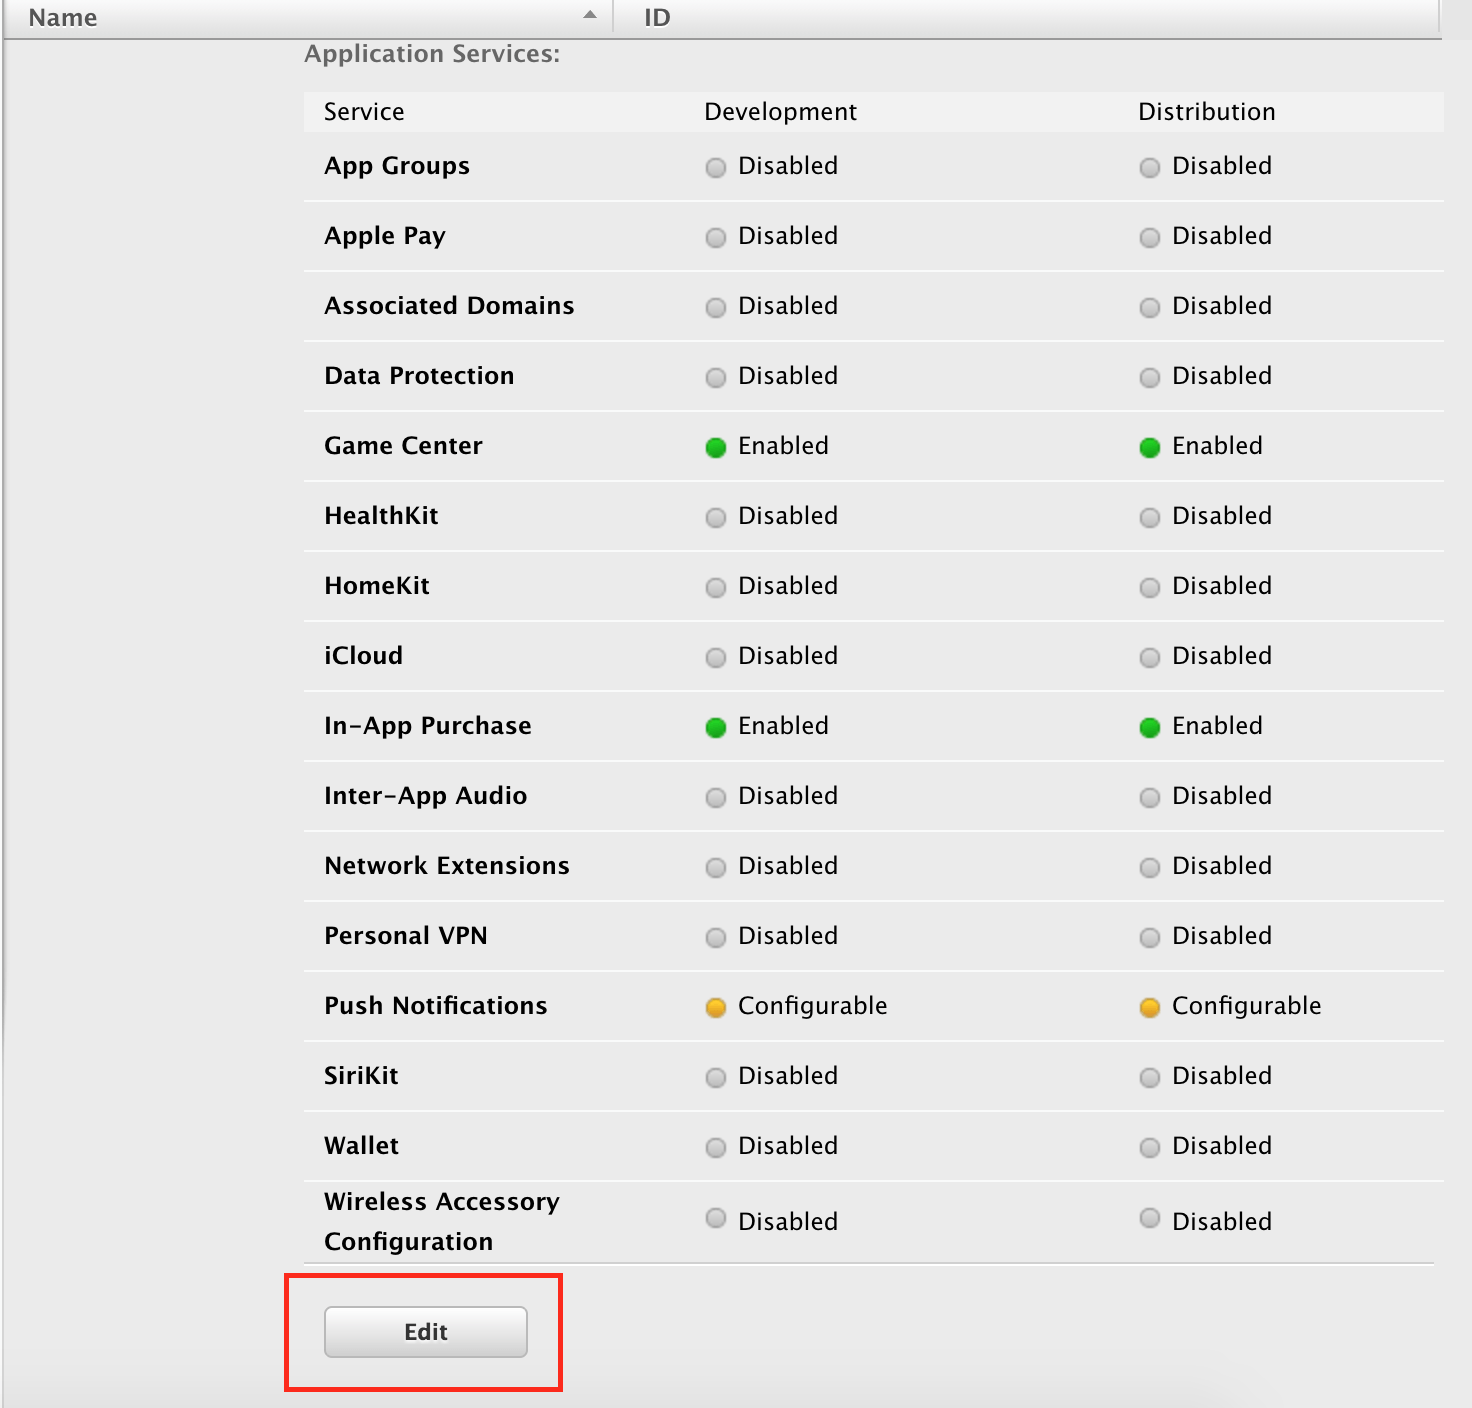
Now we are back to our “iOS App IDs” page. Look for the App ID you just created. Press on it and you should see a a drop down of Application Services.
Scroll down until you reach the end of the drop down and you should see an “Edit” button. Press that.

The “iOS App ID Settings” page will show up.

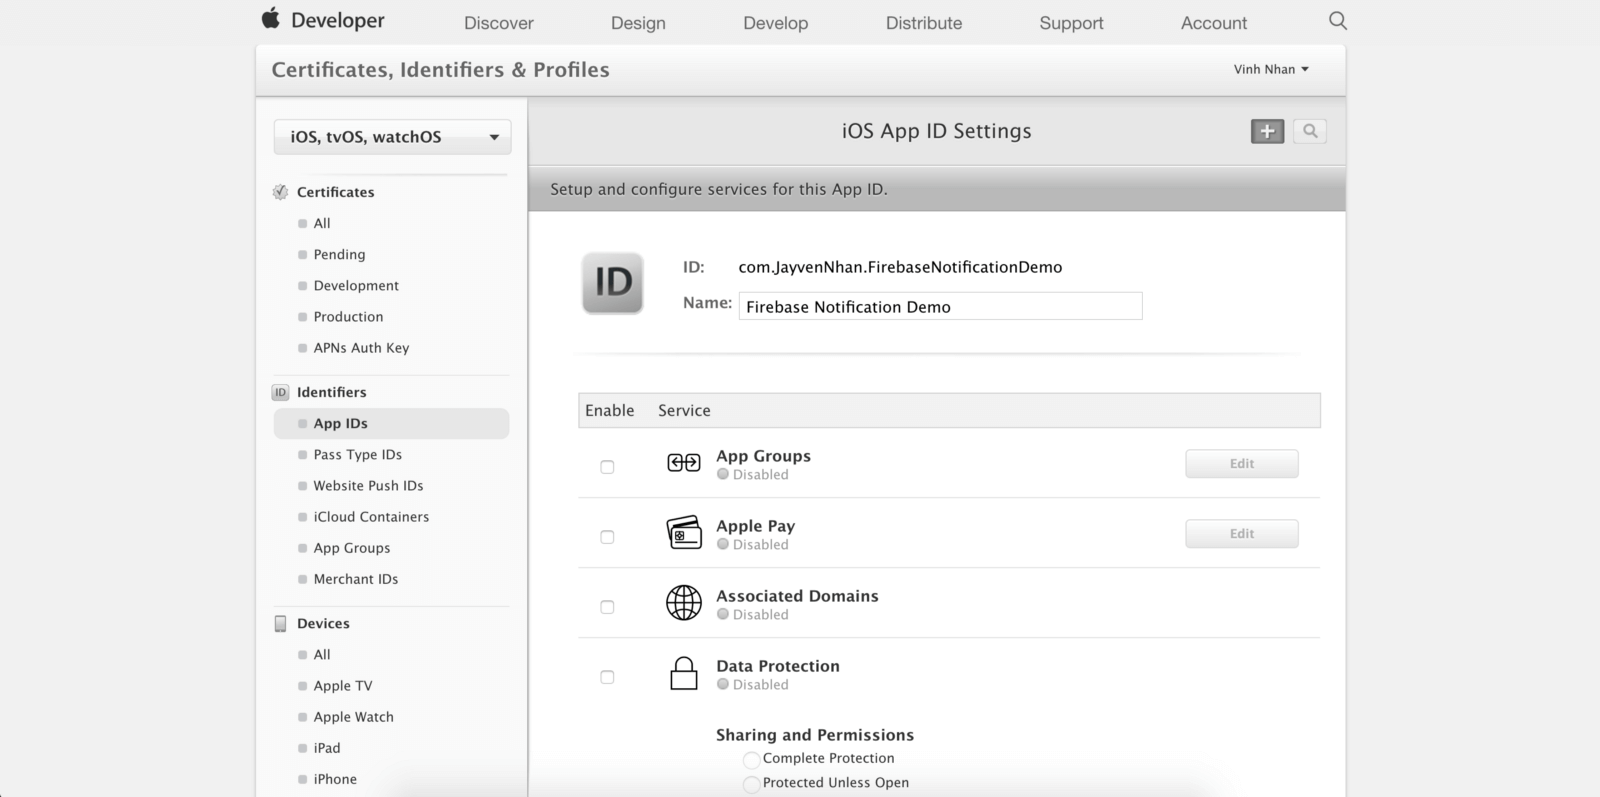
Scroll all the way down until you see “Push Notifications.”
It is time for us to create a “Client SSL Certificate.” This will allow our notification server (Firebase) to connect to the Apple Push Notification Service. Under Development SSL Certificate, press on the “Create Certificate…” button.

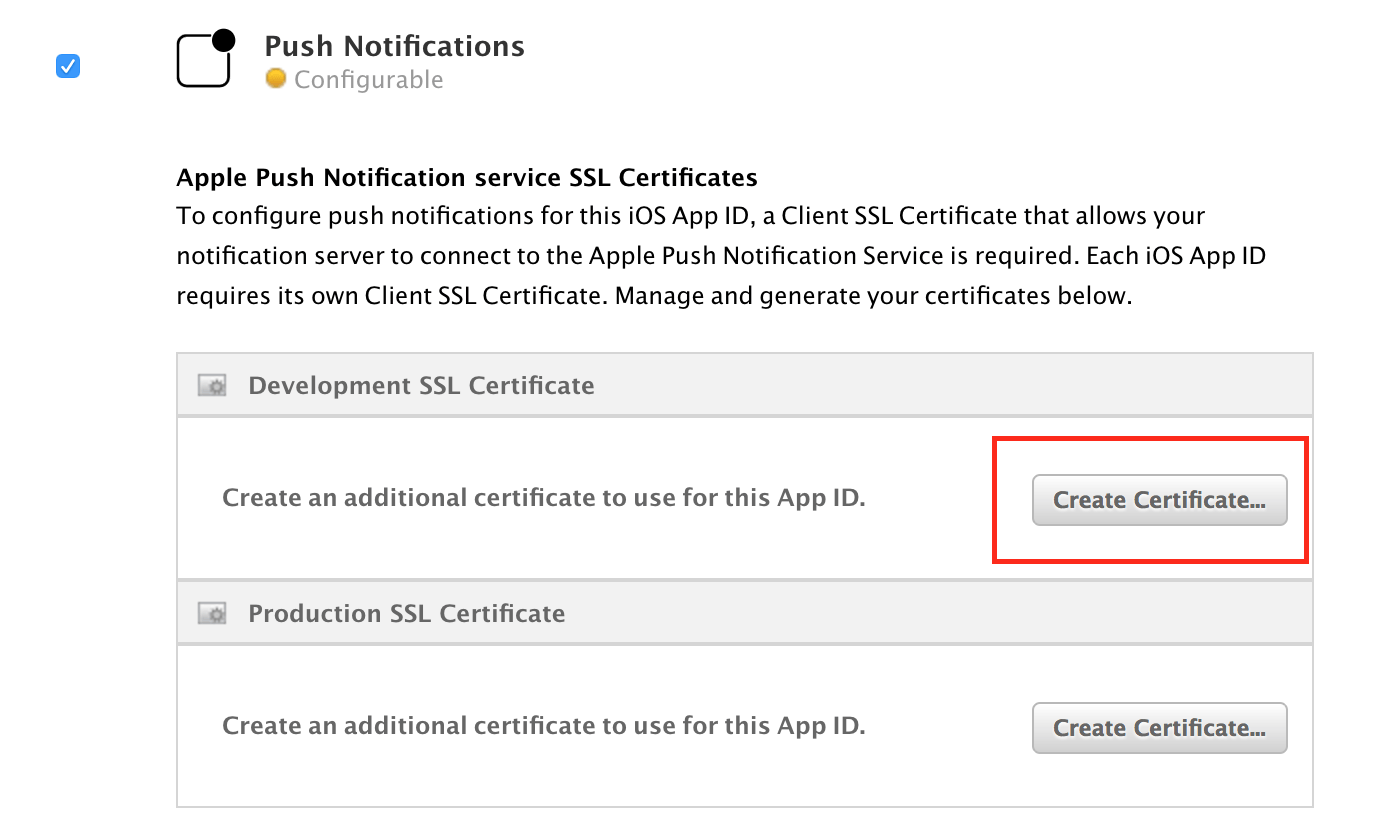
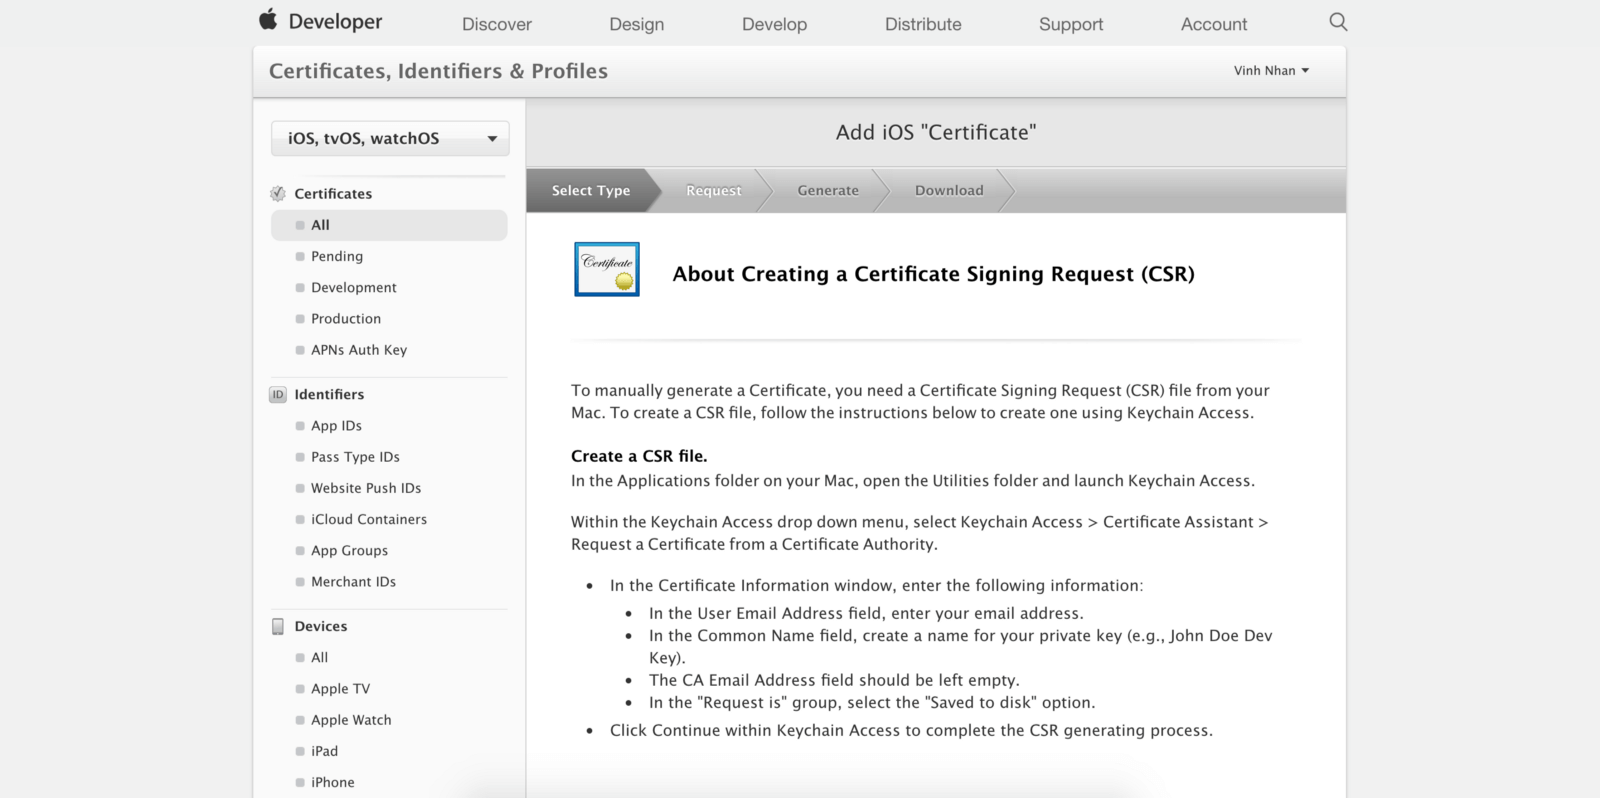
Now we will see this.

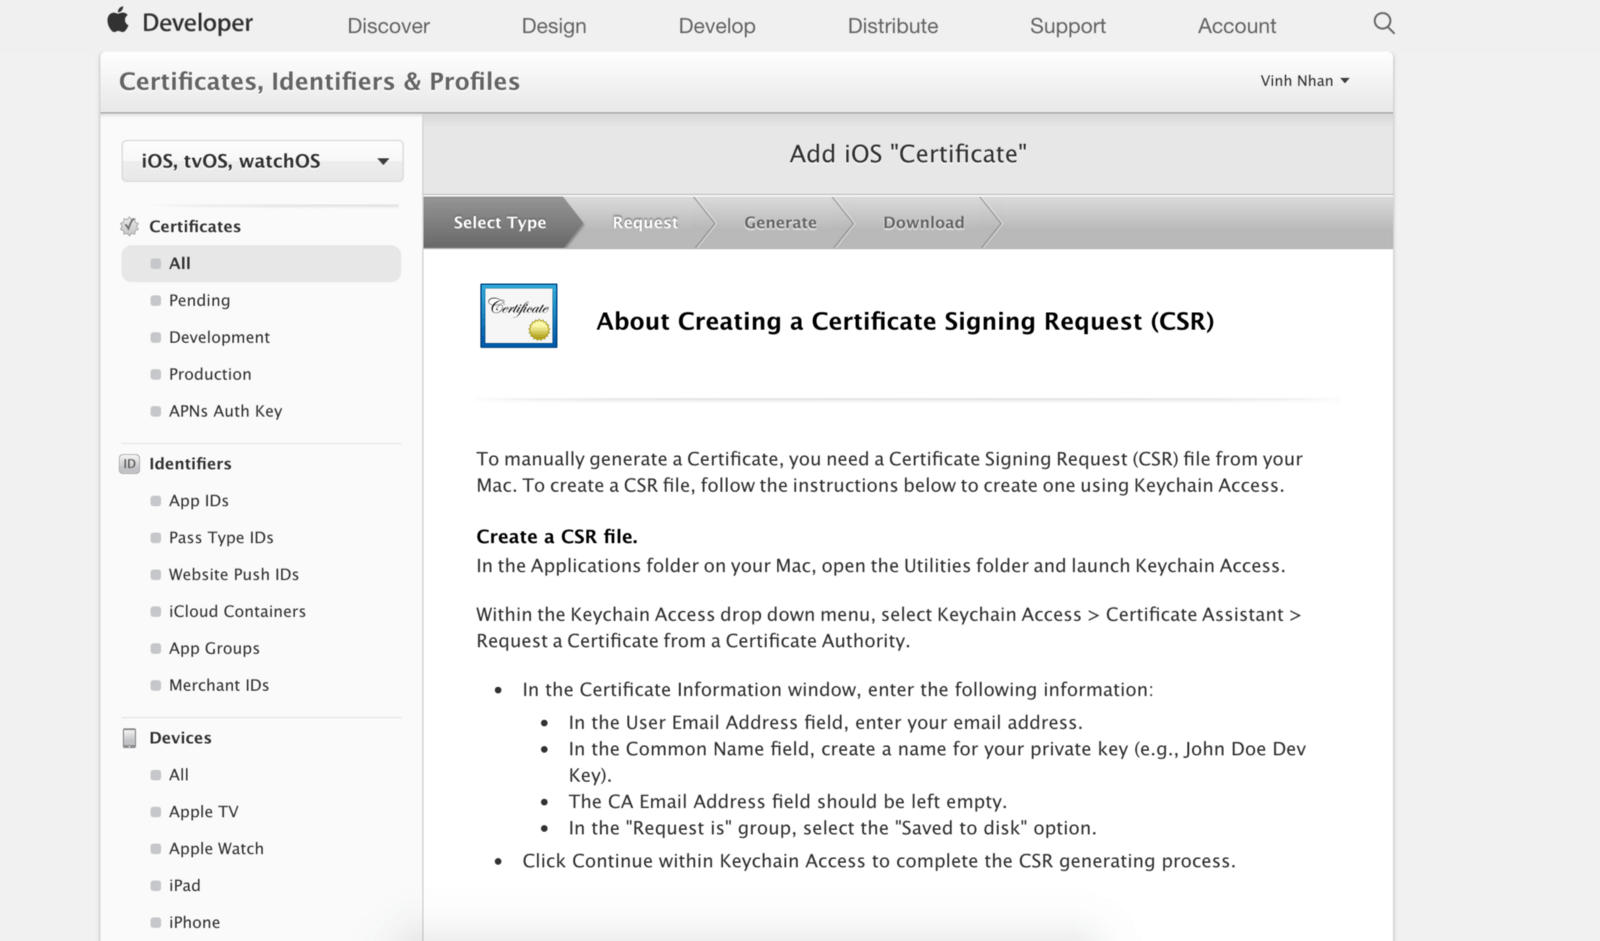
To generate a certificate, we would need a Certificate Signing Request (CSR) file from our Mac. We will get back to this page later, but now we need the CSR file.
Generating a CSR file
To generate a CSR file, press cmd + space and do a spotlight search for “Keychain Access.” Open Keychain Access, and go up to the menu to select Keychain Access > Certificate Assistant > Request a Certificate From a Certificate Authority…

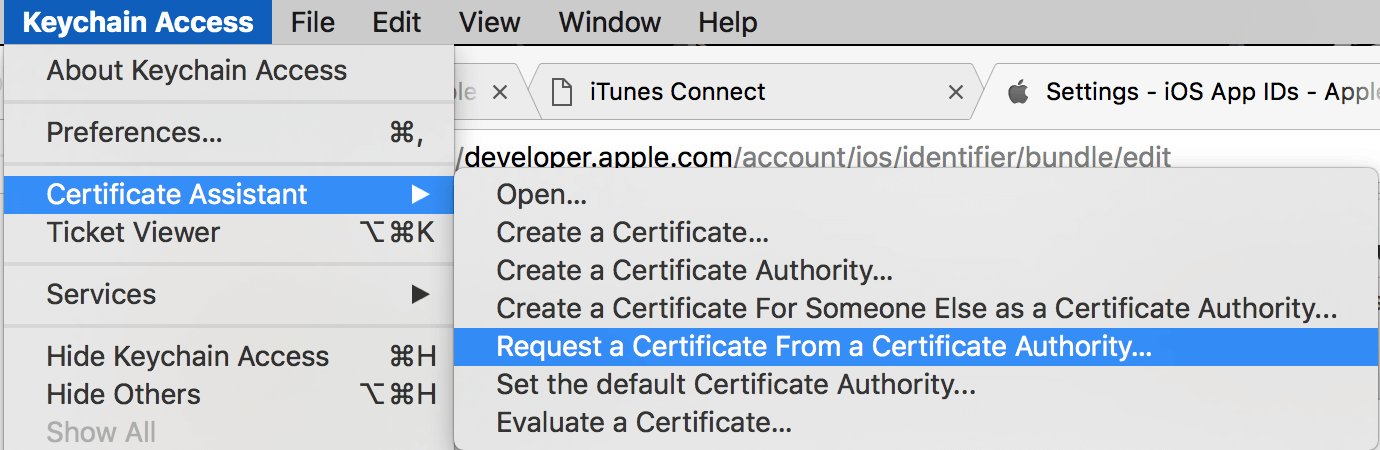
A “Certificate Assistant” pop up should appear.

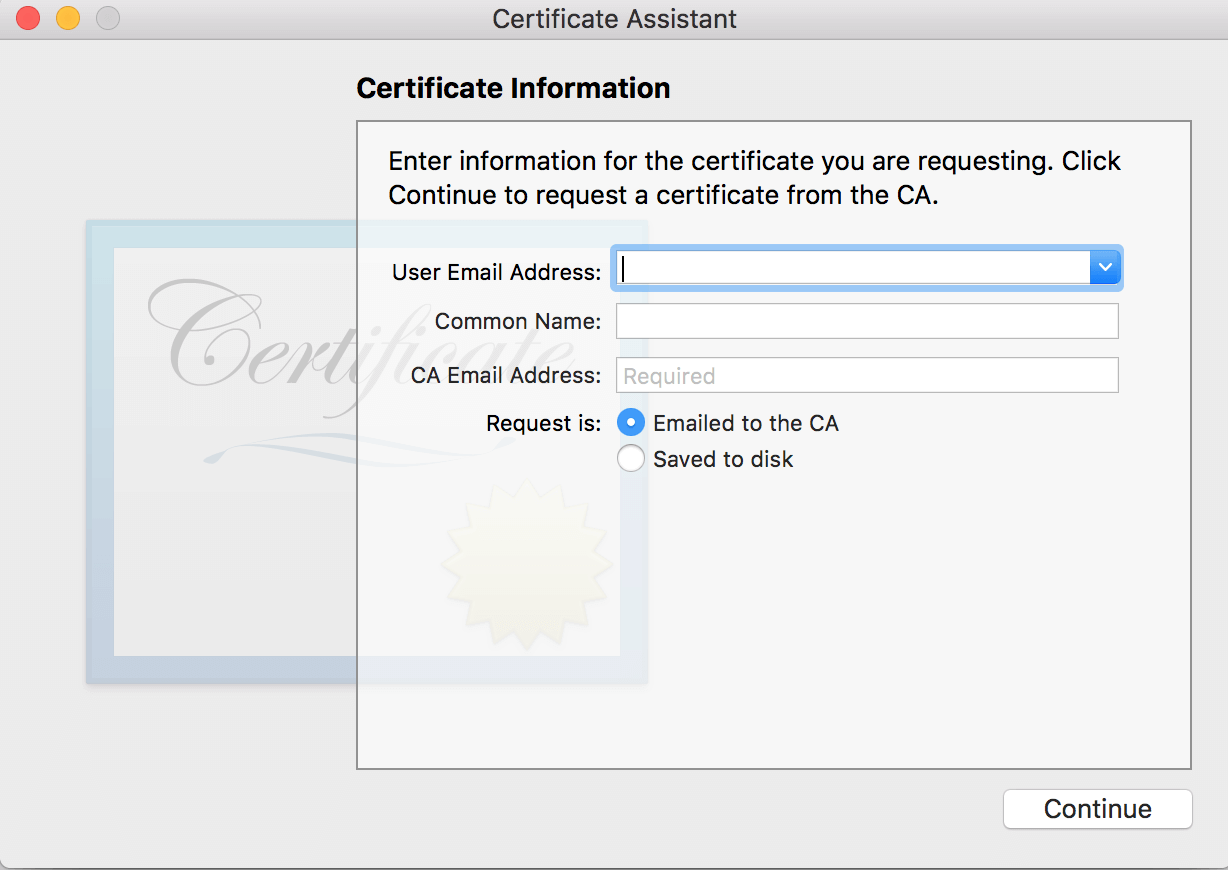
Fill in your email address and name. Choose “Saved to disk” and press Continue. Then save your CSR somewhere on your hard drive.
Uploading Your CSR File
Now that we have our CSR generated, it is ready to go back to the “Add iOS Certificate” page.

Scroll down. Press continue, and then click “Choose file…” Select the CSR file you just saved on your hard drive.

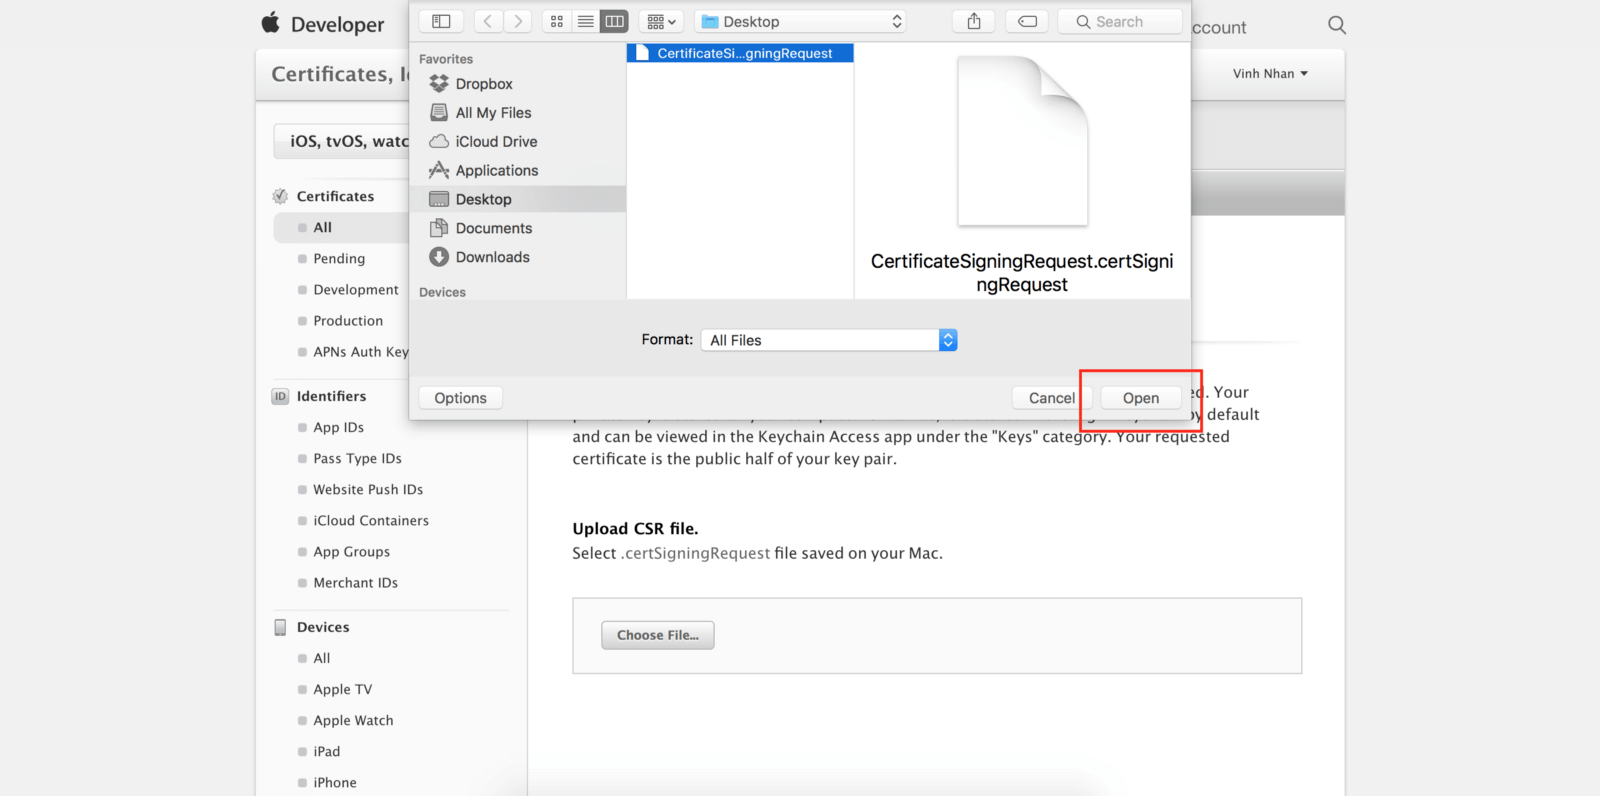
Next, click continue again. Then the web page should say “Your certificate is ready.”

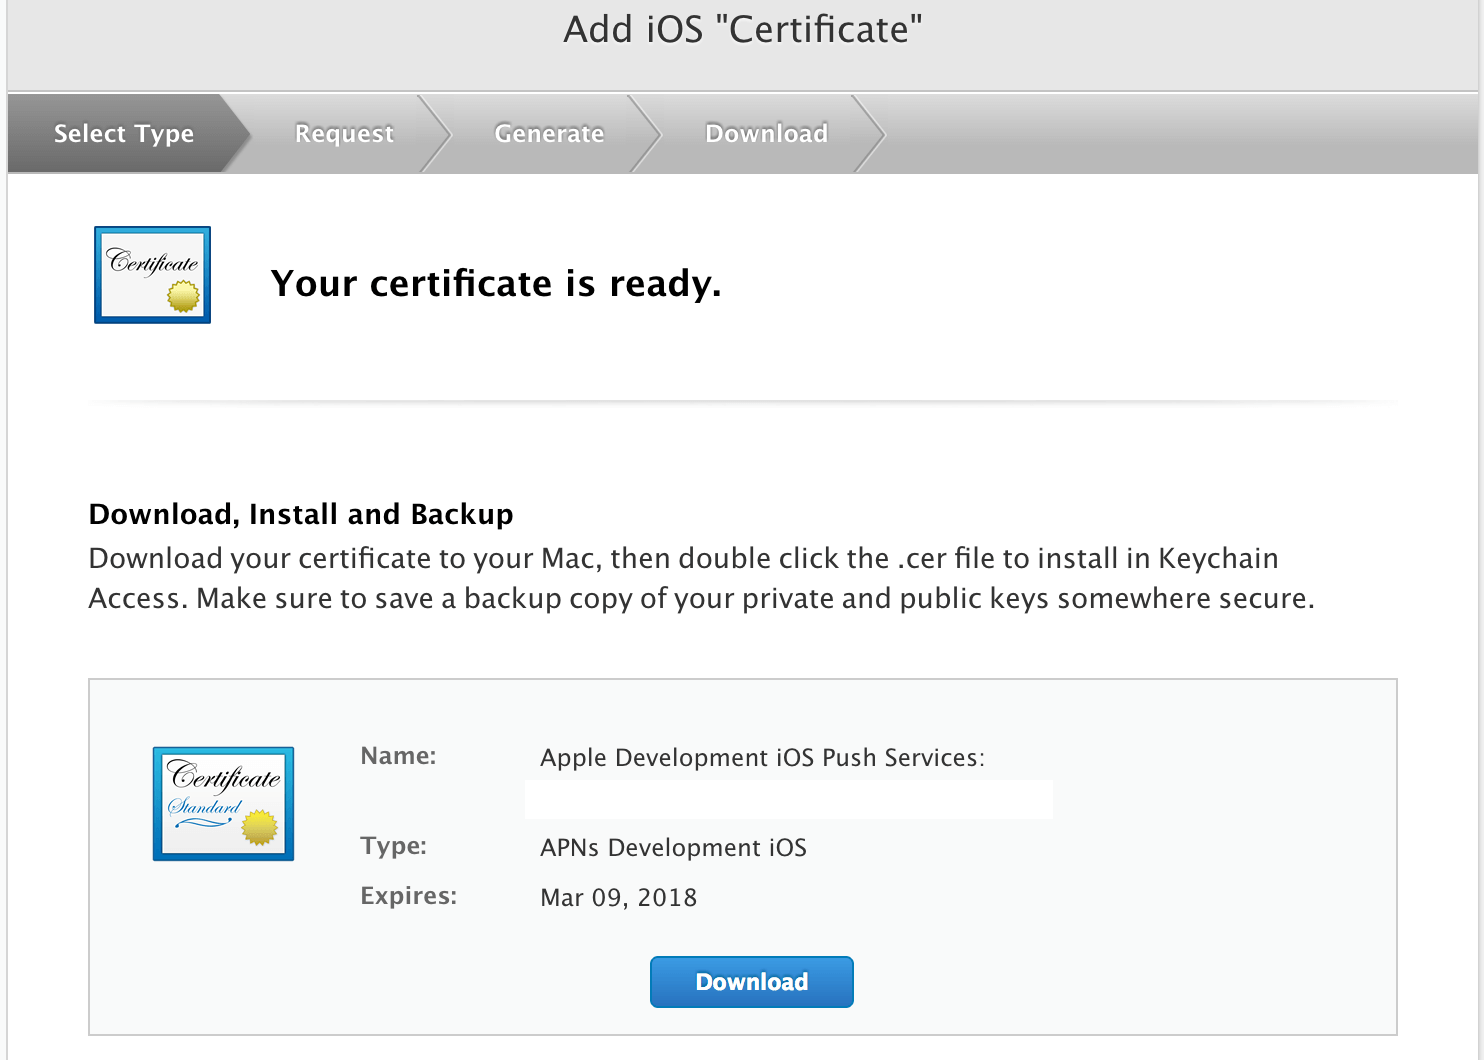
Now you can go ahead and click on the blue download button to download your certificate.
Preparing the APNs Certificate
Now that you have created the iOS certificate, we will then prepare the APNs (short for Apple Push Notifications) certificate, which will be used later in the Firebase configuration. Open up Finder and locate the certificate you downloaded earlier.

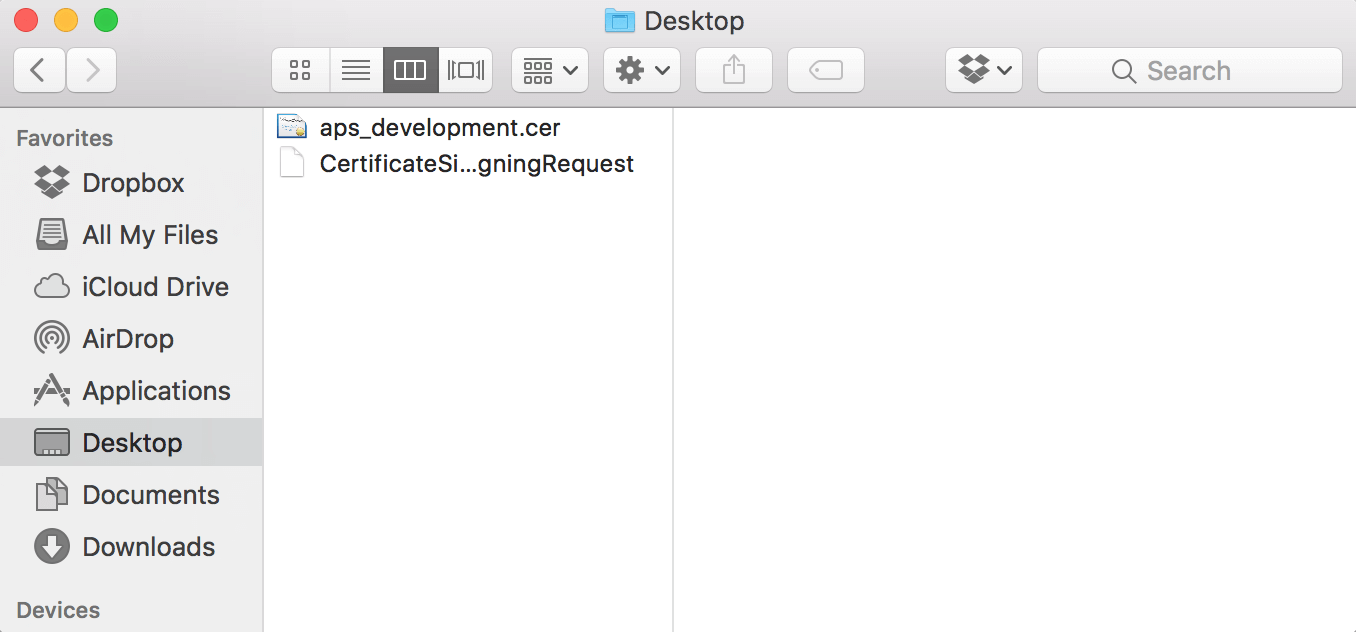
Double click the certificate file (e.g. aps_development.cer) to add the certificate into Keychain Access.
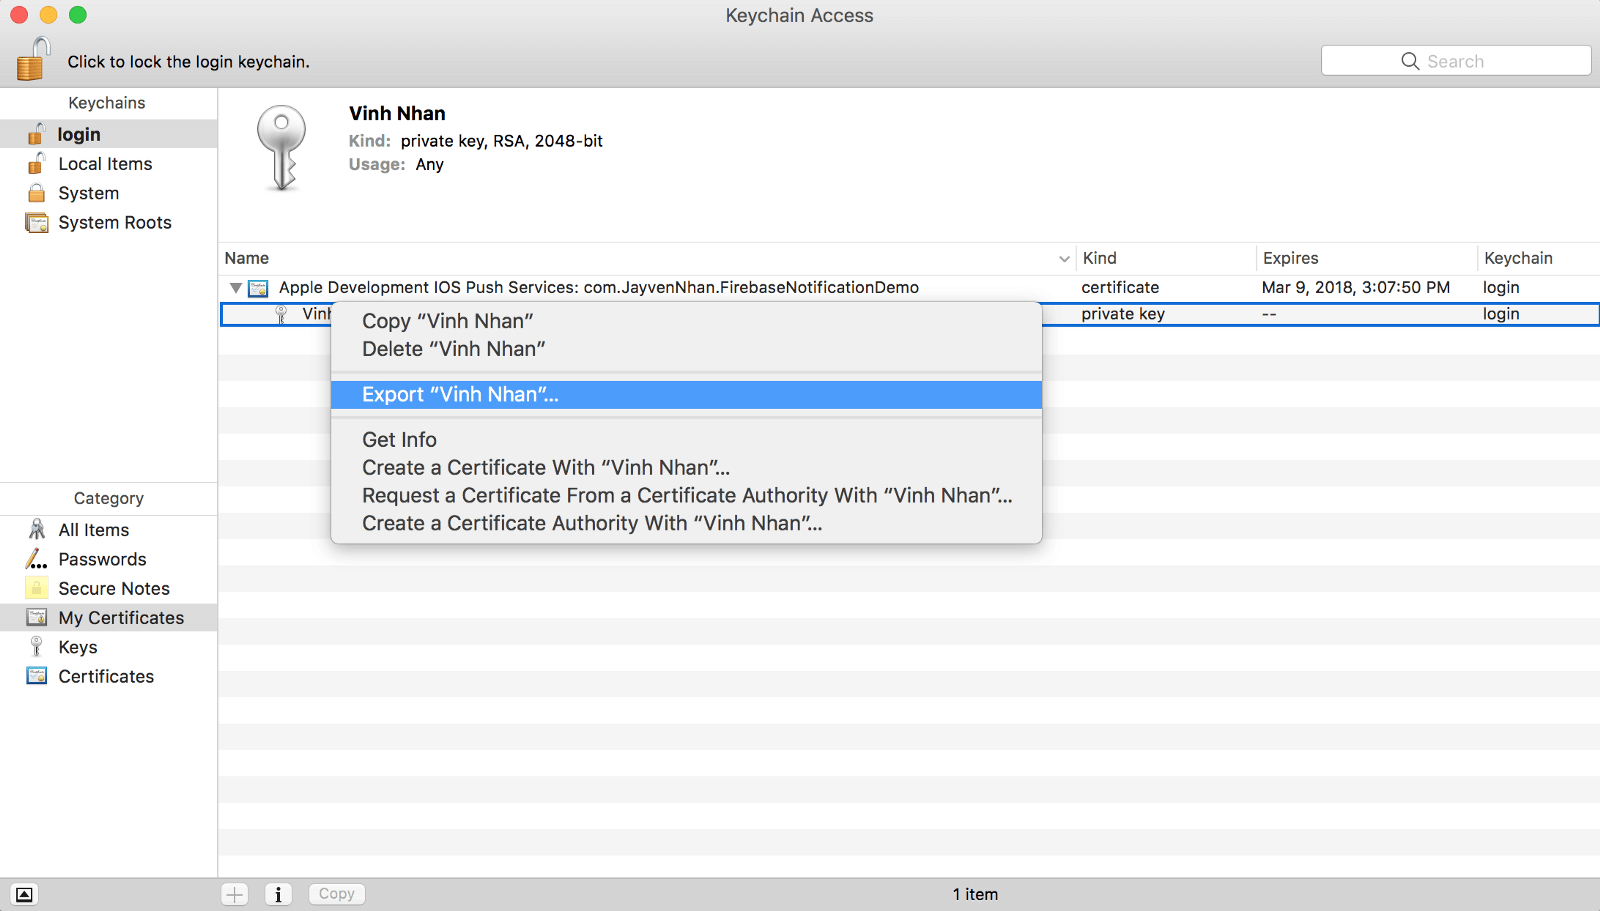
Now open up Keychain Access. Under the “My Certificates” category, you should see the certificate you just added. It should be called:
1 2 |
Apple Development IOS Push Services: <your.bundle.id> |
Click the expand arrow to the left of the certificate’s name to reveal the private key option. Right click on the private key and press export.

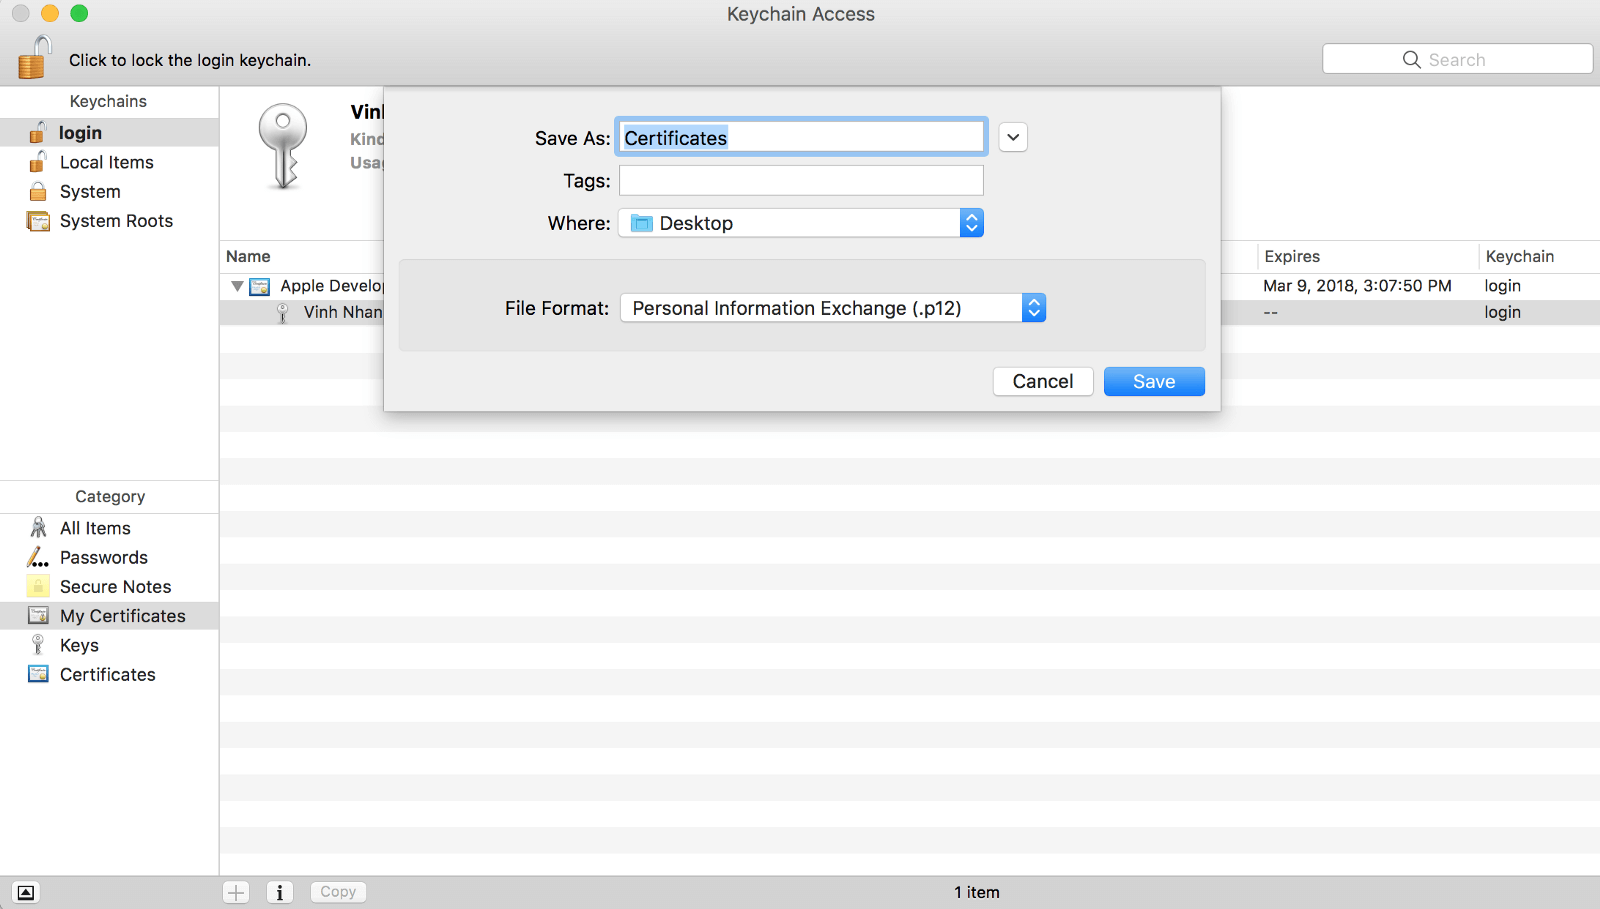
Once clicking Export, a pop up will prompt you to save your private key as a .p12
file. Go ahead and click save.

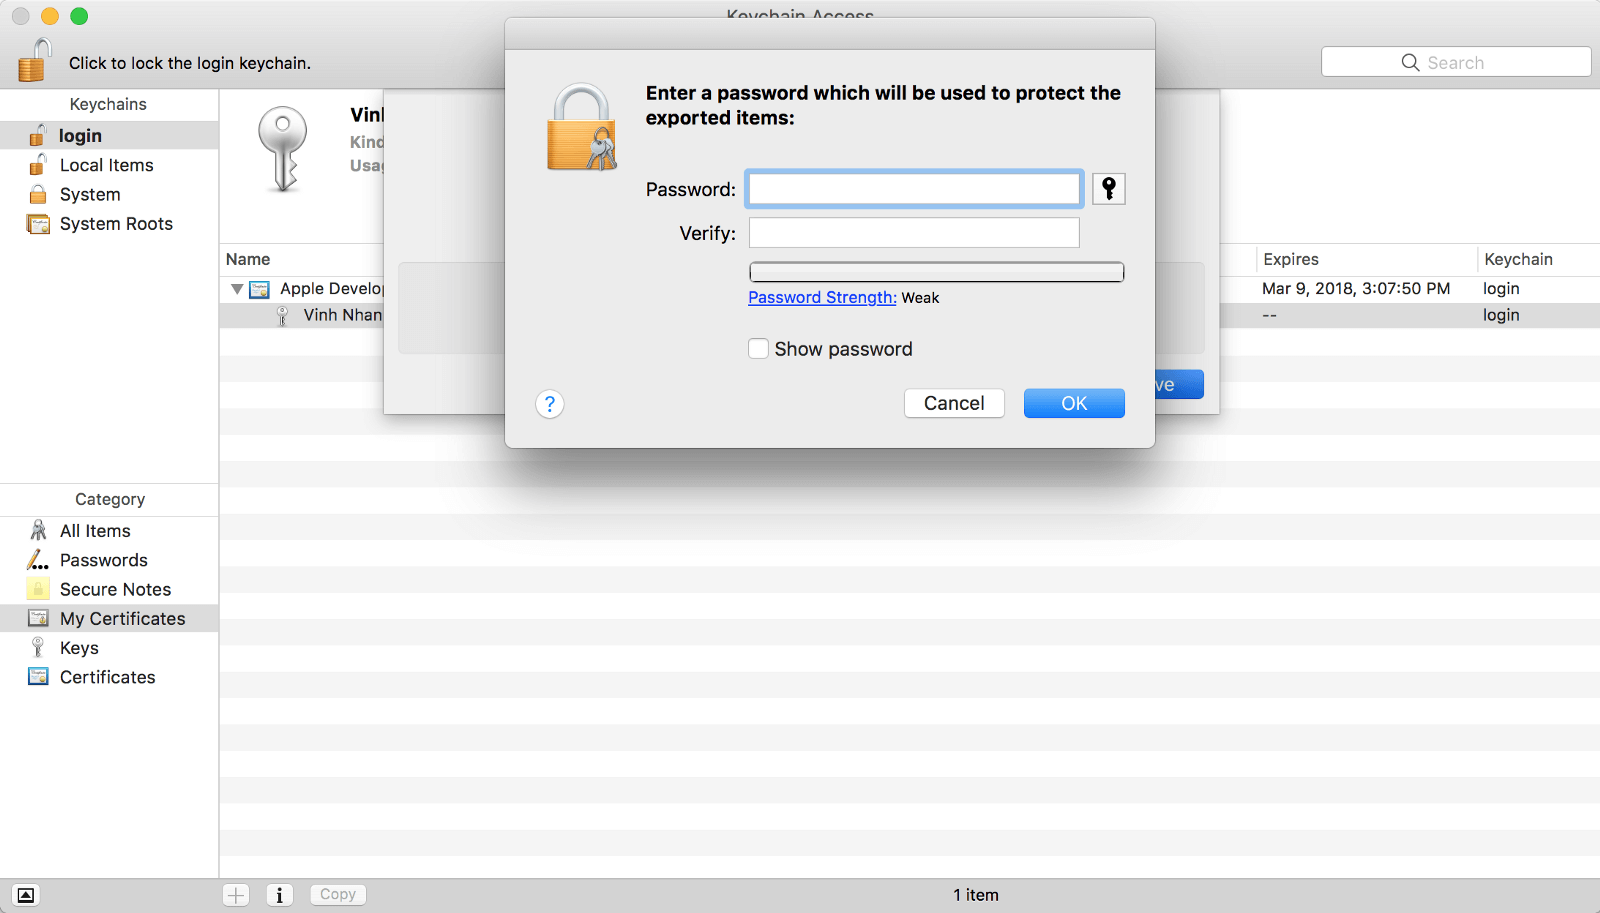
Then enter a password if you want to protect your exported certificate. Click OK to confirm.

Awesome! We just completed the configuration and preparation. Now we are ready to move onto Firebase! Let’s get started.
Configuring Firebase for Push Notifications
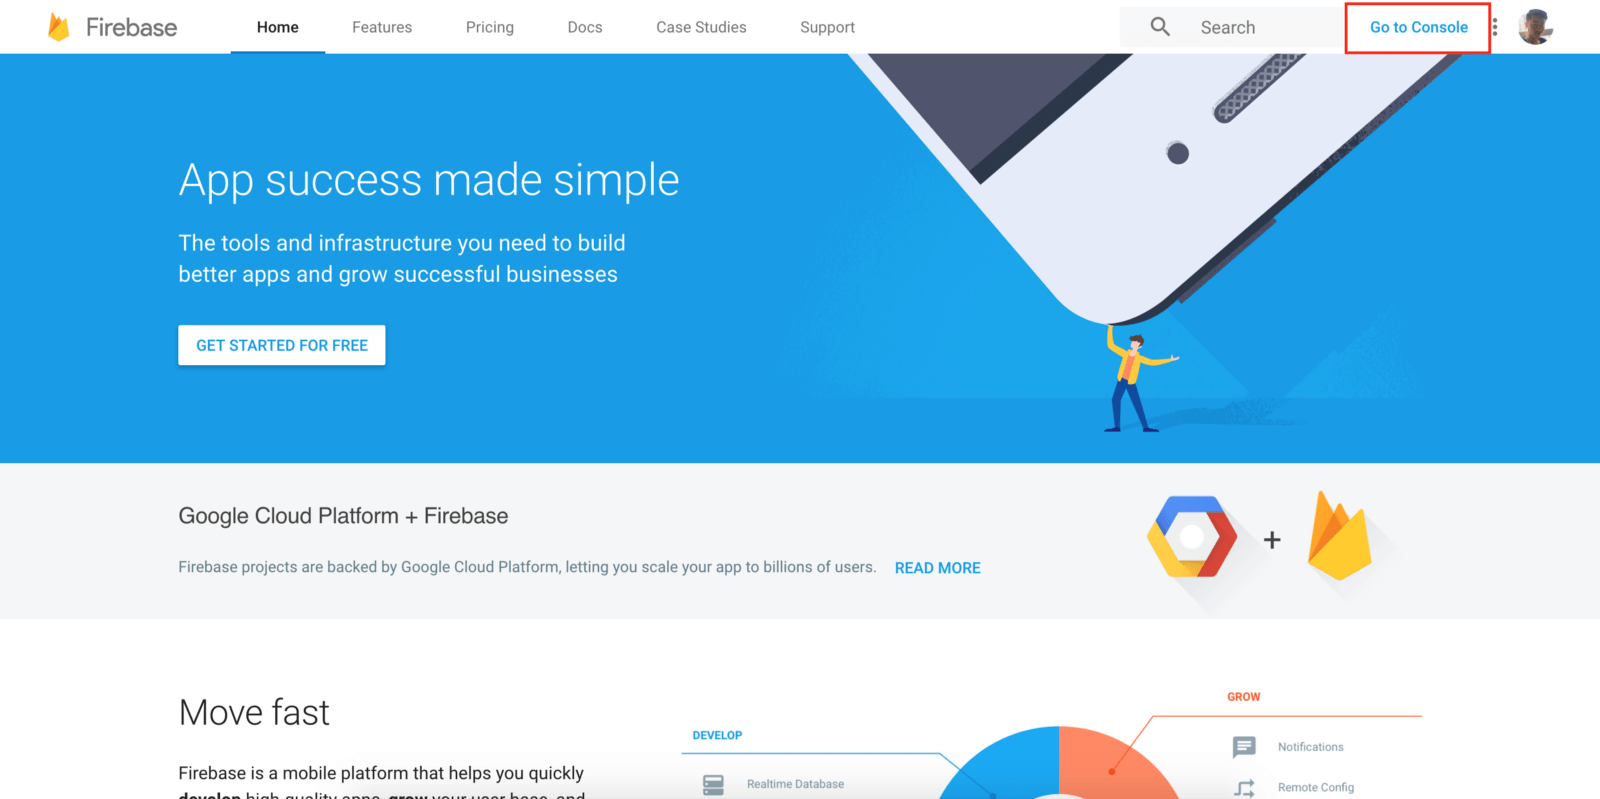
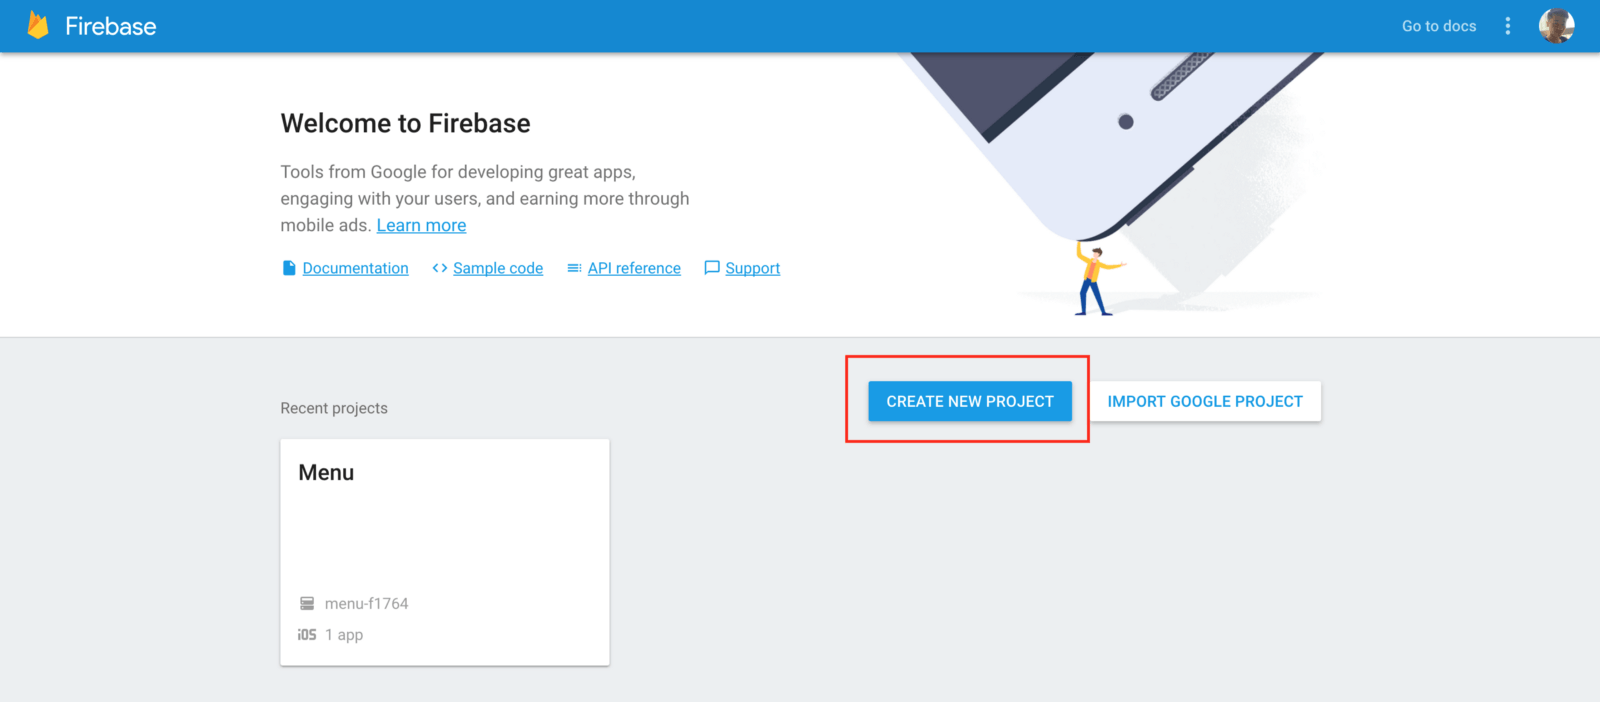
First, head over to Firebase console. Sign in with your Google account to enter the console. If you don’t know how to switch to the console, there is a button at the very top right that says “Go to console.” Go ahead and click on that.

Once you are at the console, click on the “CREATE A NEW PROJECT” button.

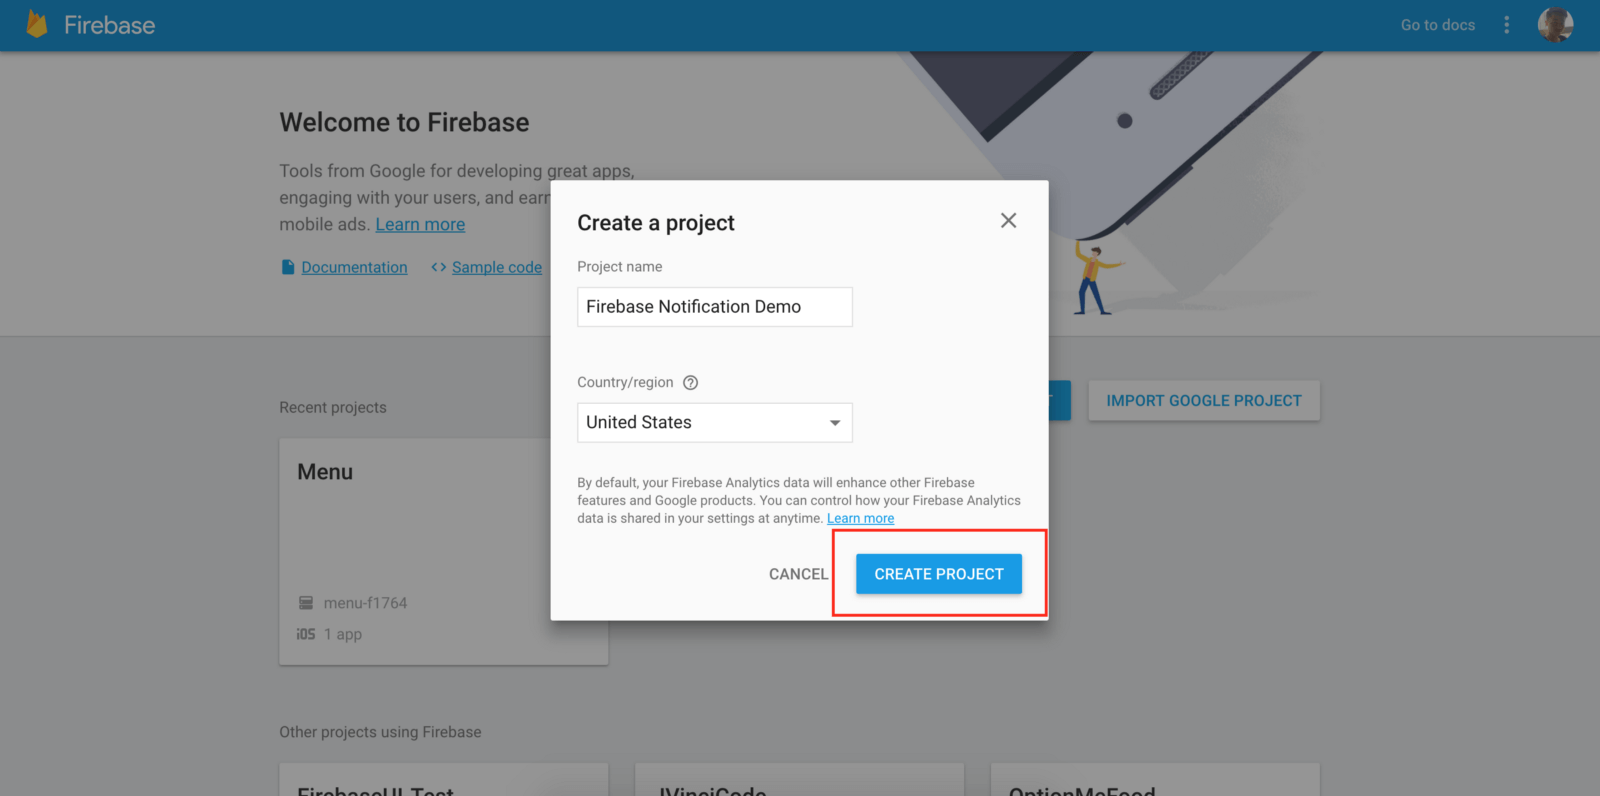
I name my project “Firebase Notification Demo” but you’re free to use other names. Simply click the “CREATE A NEW PROJECT” button to proceed.

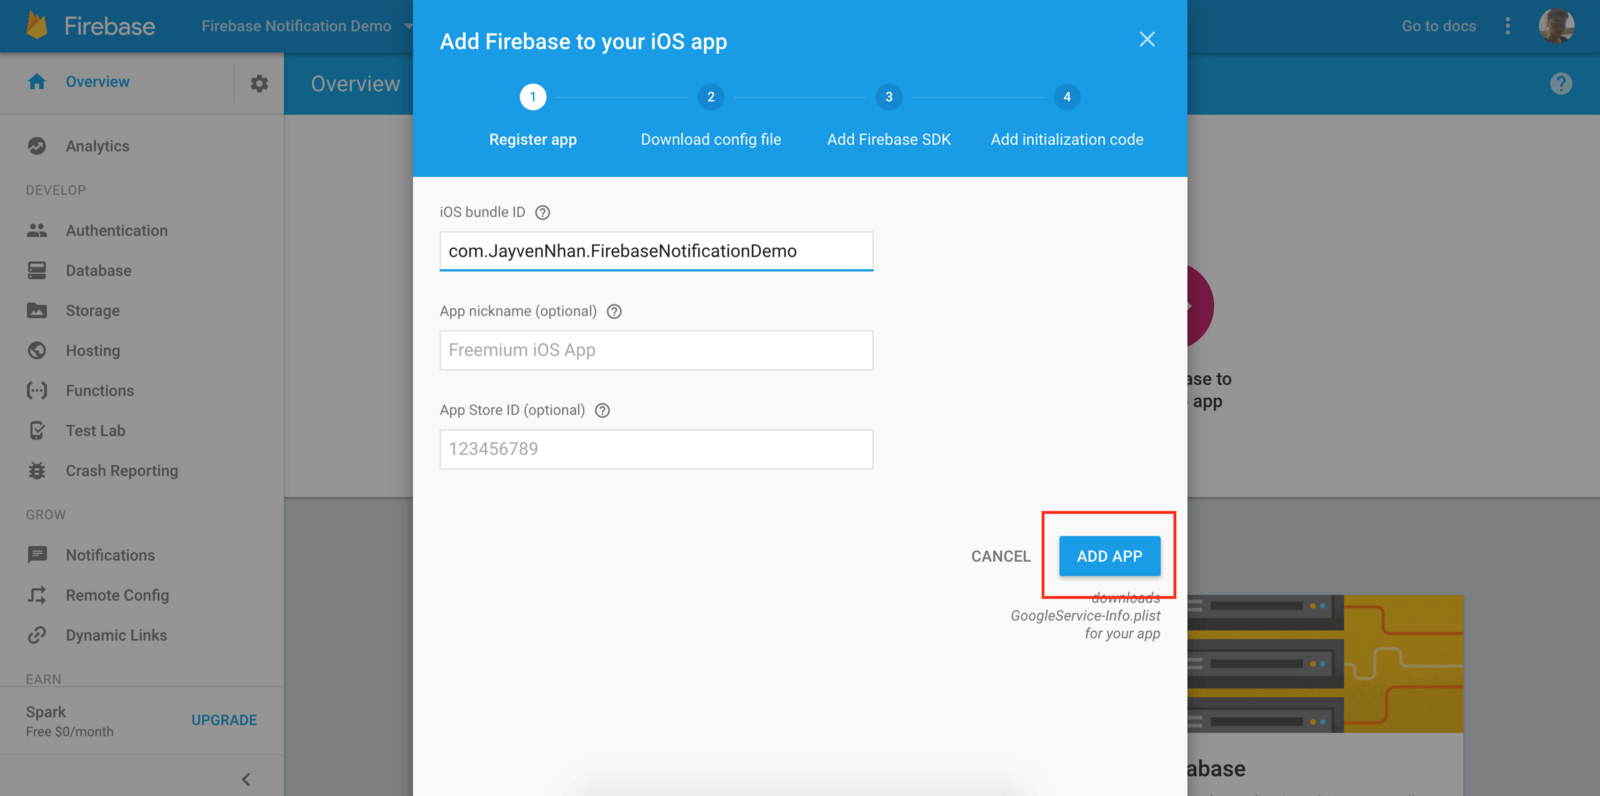
After that, you are redirected to the project overview page. Now click the “Add Firebase to your iOS” button. Enter your iOS bundle ID. Then click the “ADD APP” button.

Follow the on-screen instruction to download the GoogleInfo.plist
file. We are going to need this file later.

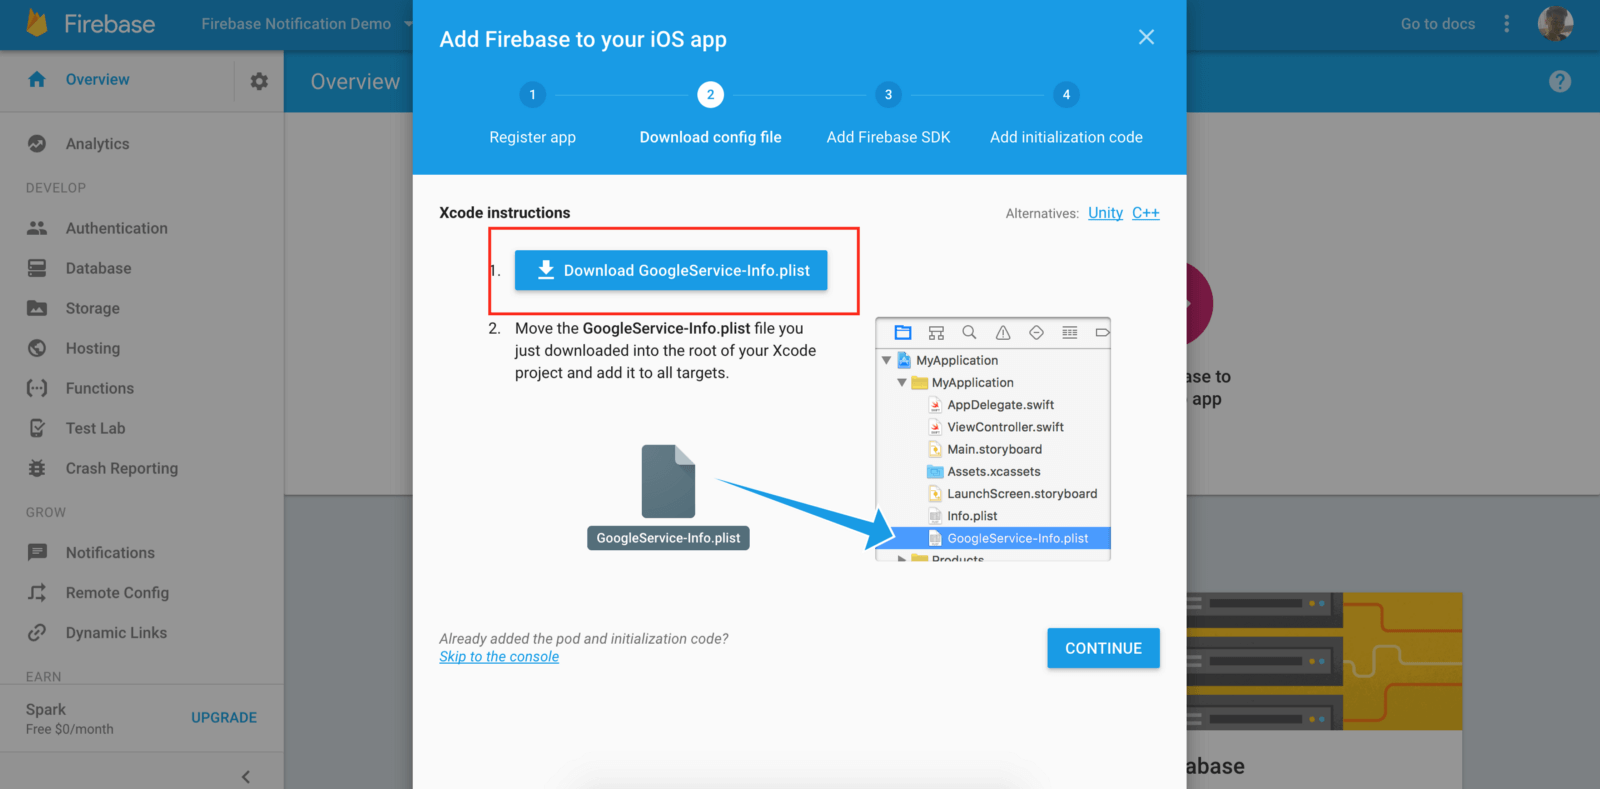
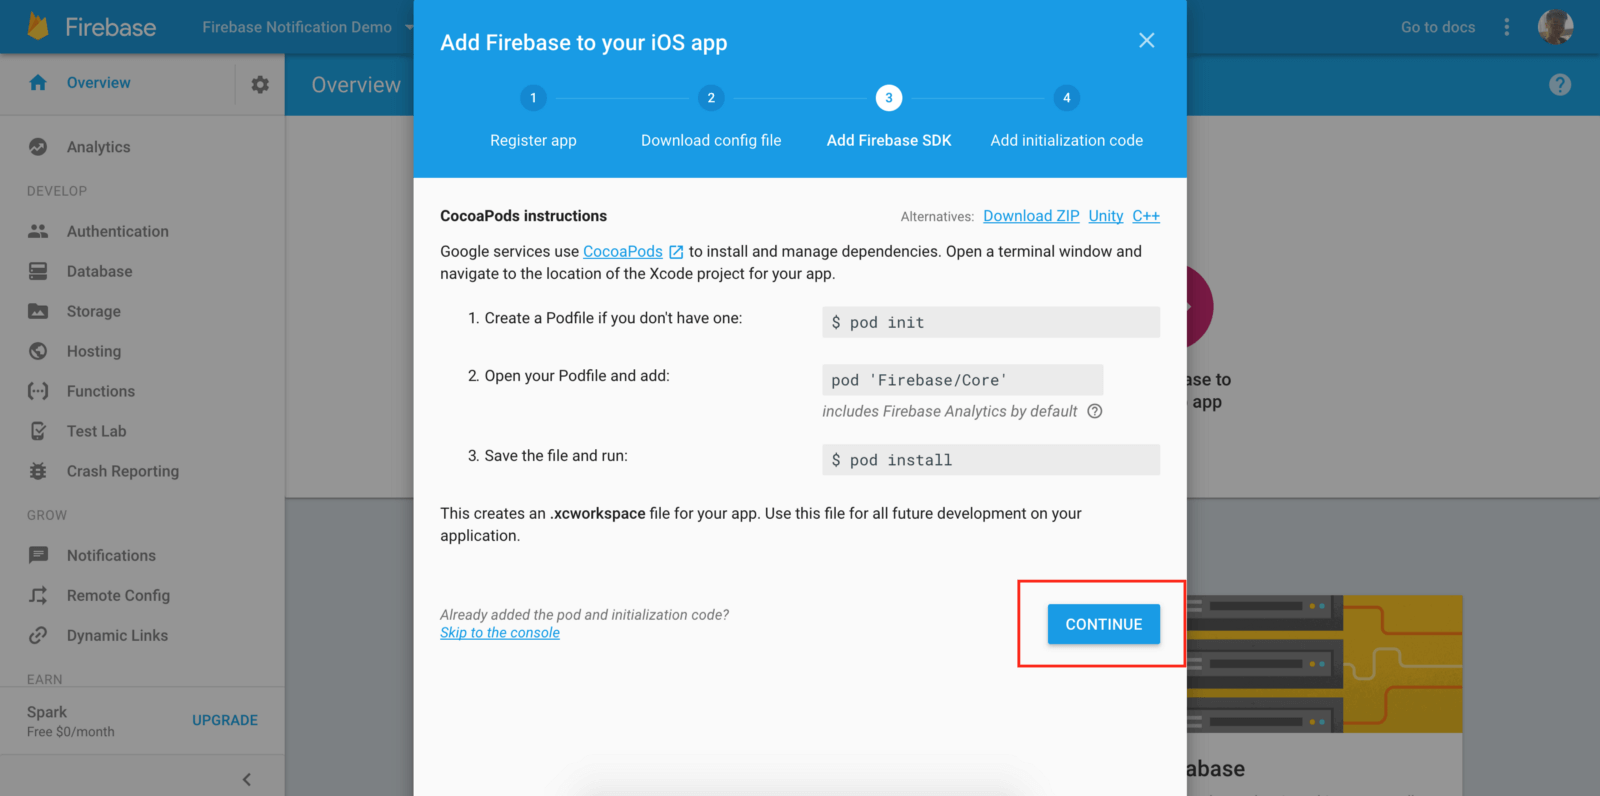
Click “continue” to go to the next step. You will see instructions showing you how to add the Firebase SDK into our project. I will walk you through how to configure the SDK later. For now, just ignore and click “Continue” to proceed.

Finally click “Finish” to complete the configuration. You should then see your iOS app in the Firebase overview page.

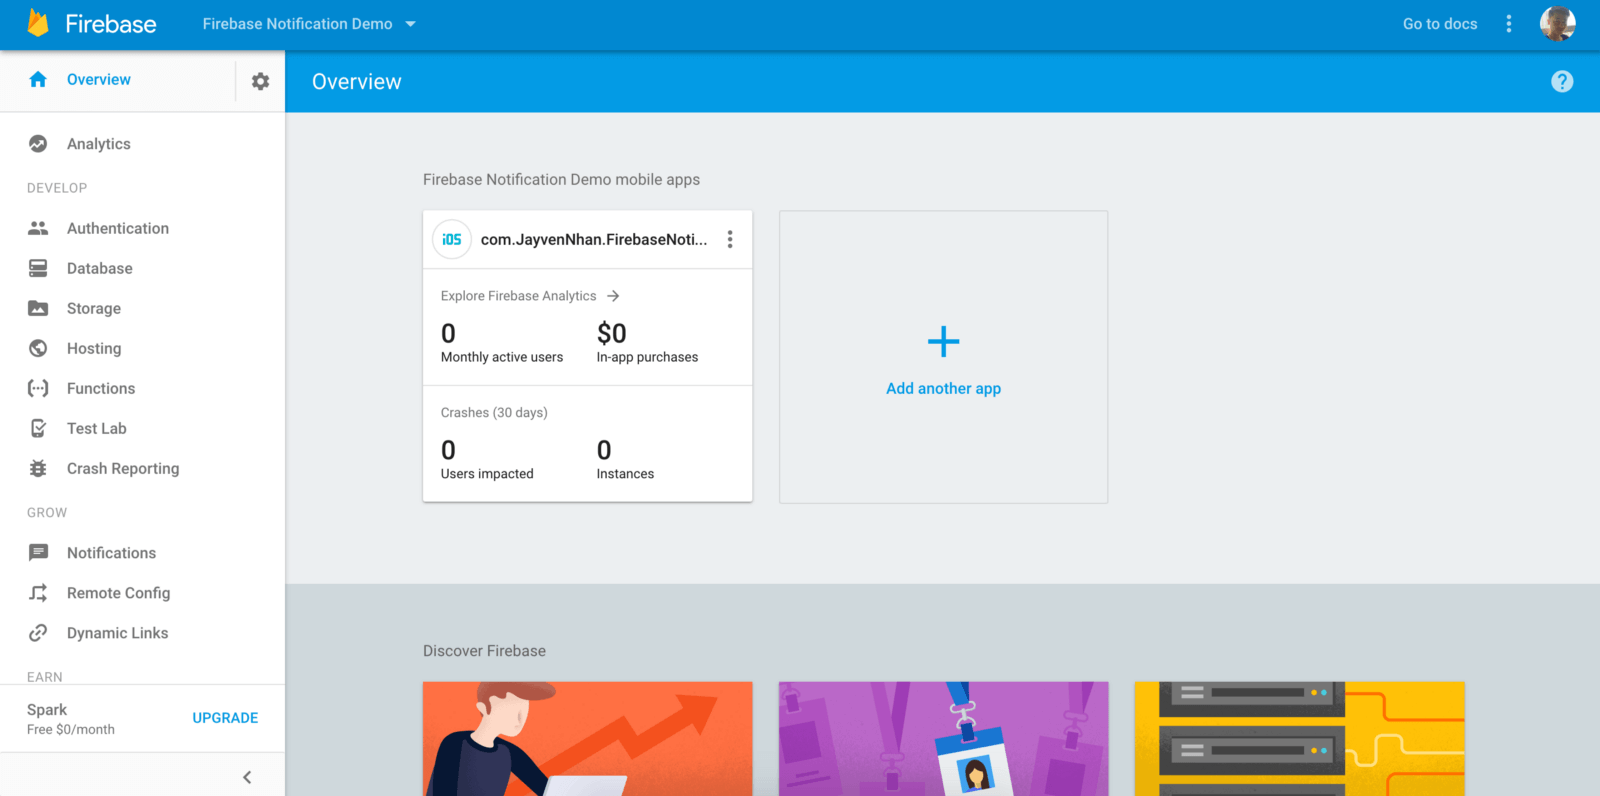
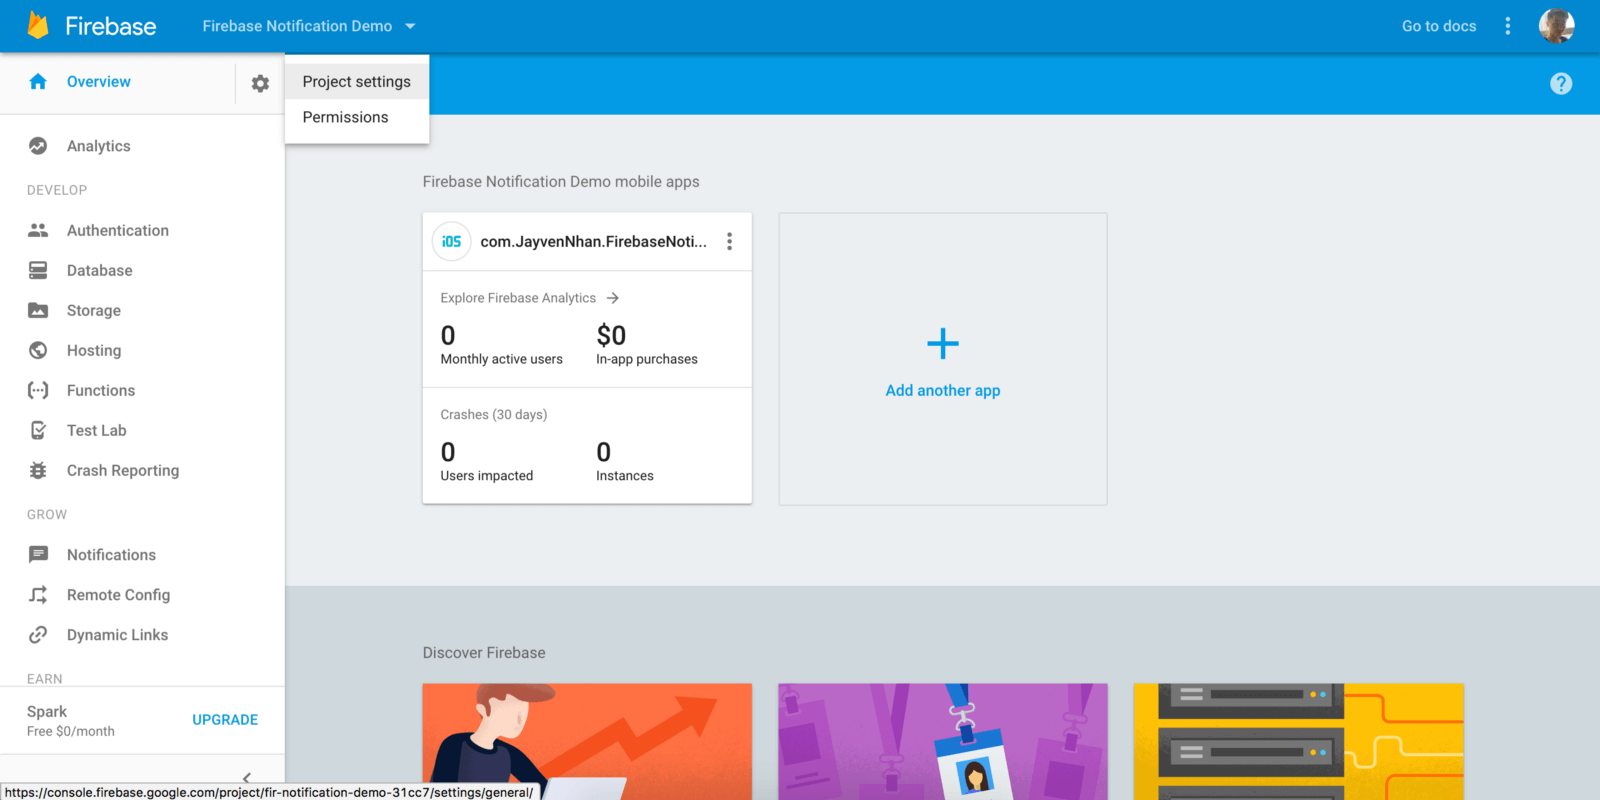
Look for the setting icon at the top right. Click the settings icon > Project settings.

Select the Cloud Messaging tab.

Scroll down, and click the “Upload Certificate” button.

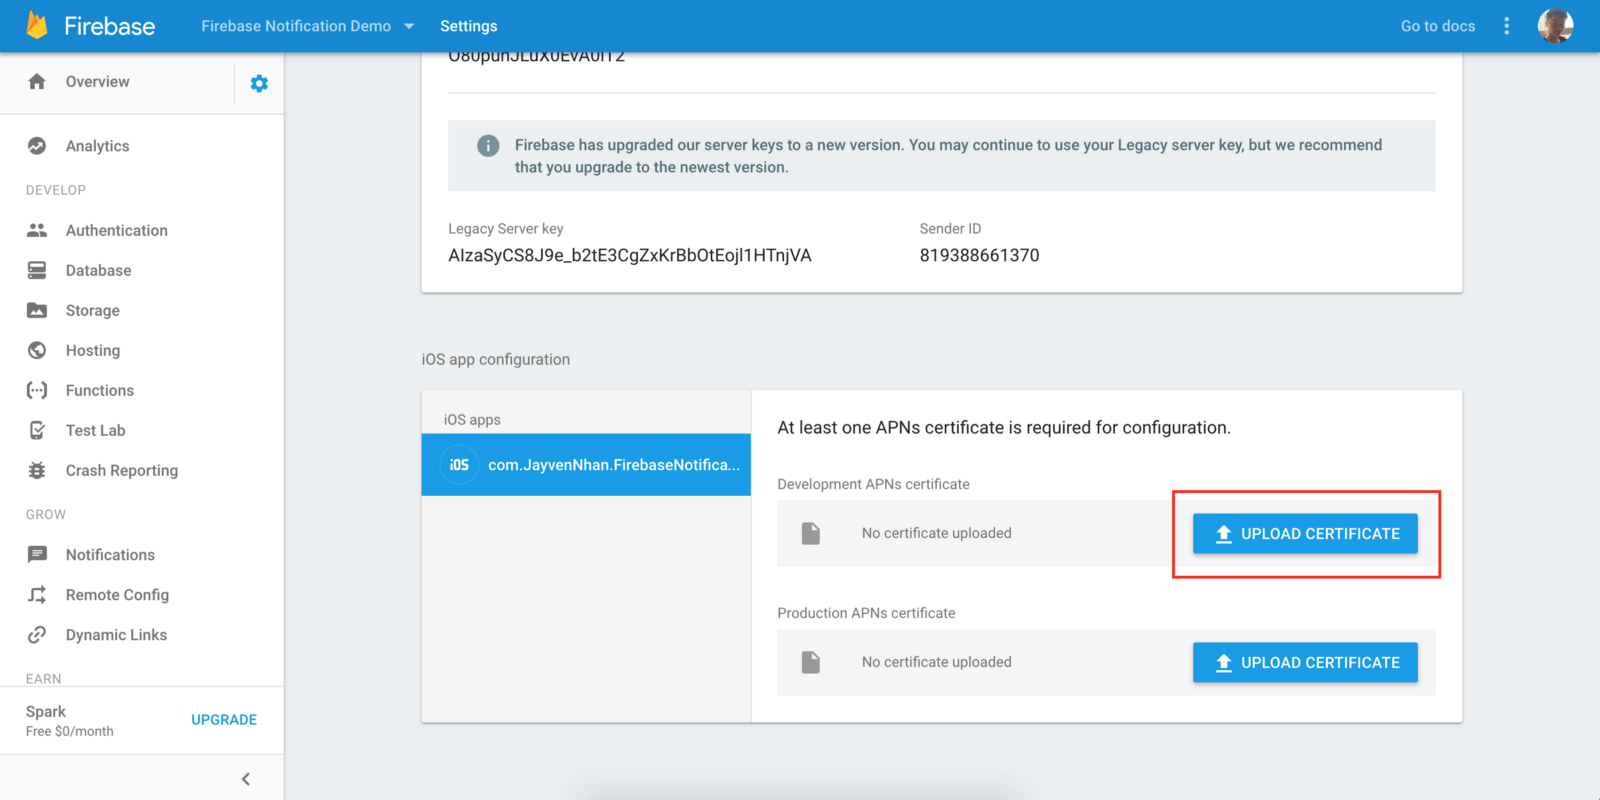
Then a pop should appear to ask you for your Development APNS certificate.

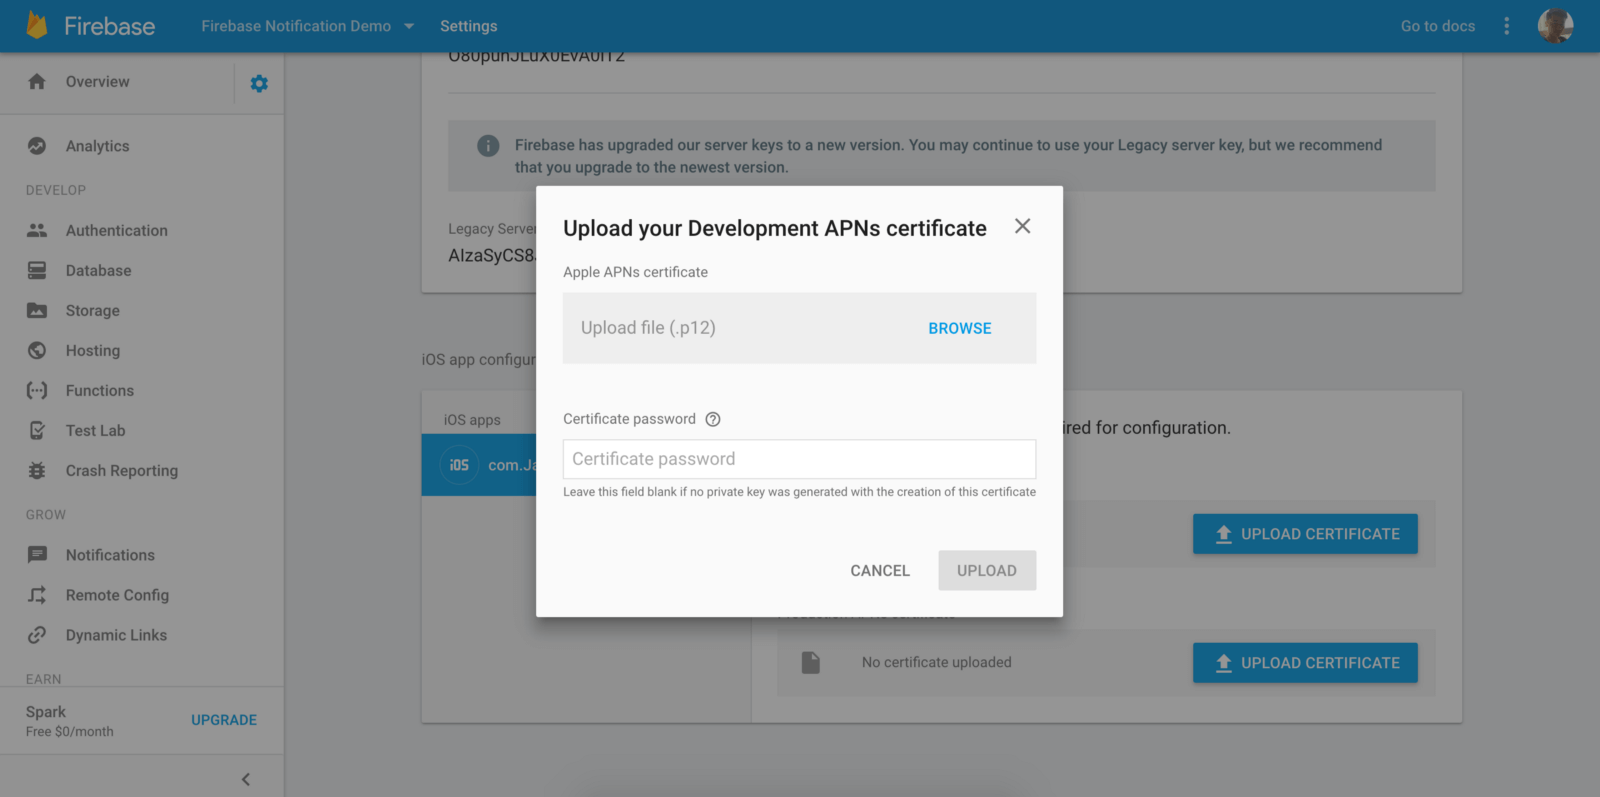
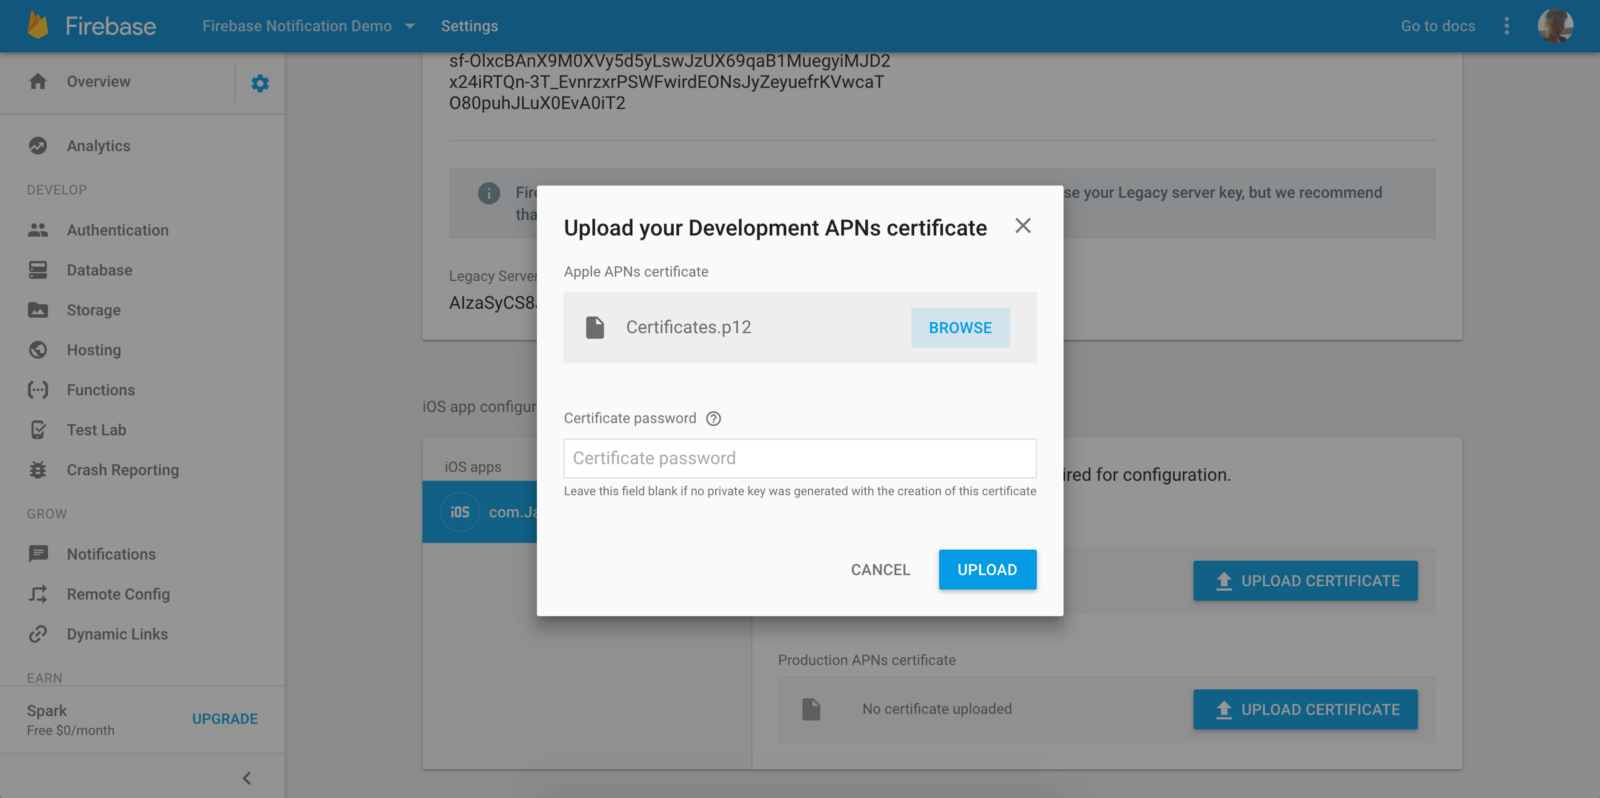
Click browse and choose your APNs certificate (i.e. .p12
file) that you prepared in the earlier section. If you configured the file with a password, enter certificate password, followed by clicking the Upload button.

Now you should see a Development APNs certificate file in the Cloud Messaging setting.

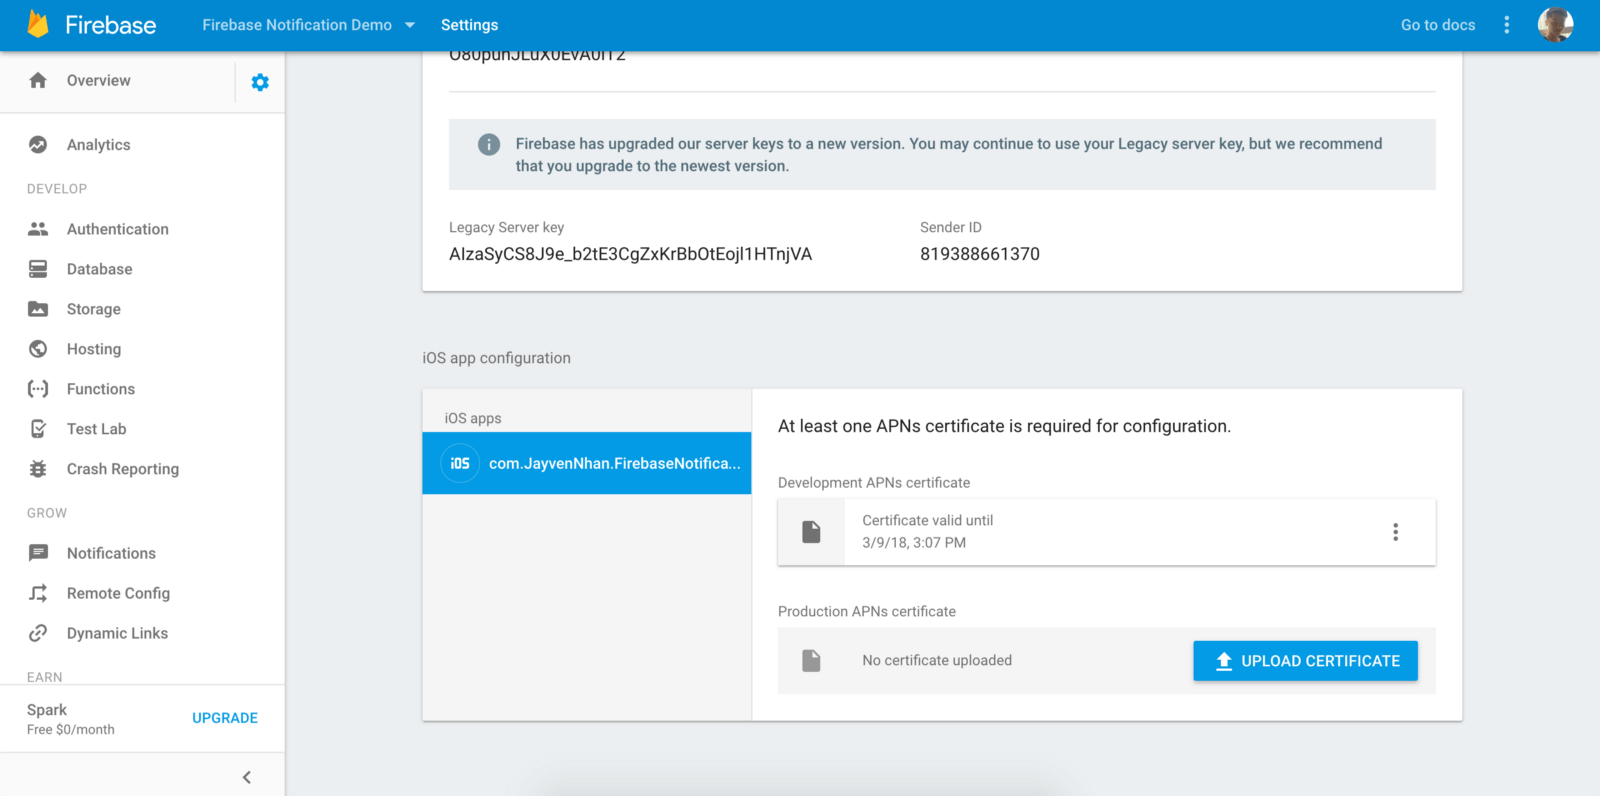
For this demo, we are going to use the Development APNs certificate. If you do decide to put your app onto the App Store, make sure that you have a Production APNs certificate file for Firebase as well.
Great! We finally finish all the configurations. It’s time to head back to Xcode to create the demo.
Building the Firebase Notification Demo App
Now fire up Xcode and create a new project using the Single View Application template. Name your Xcode project whatever you want.

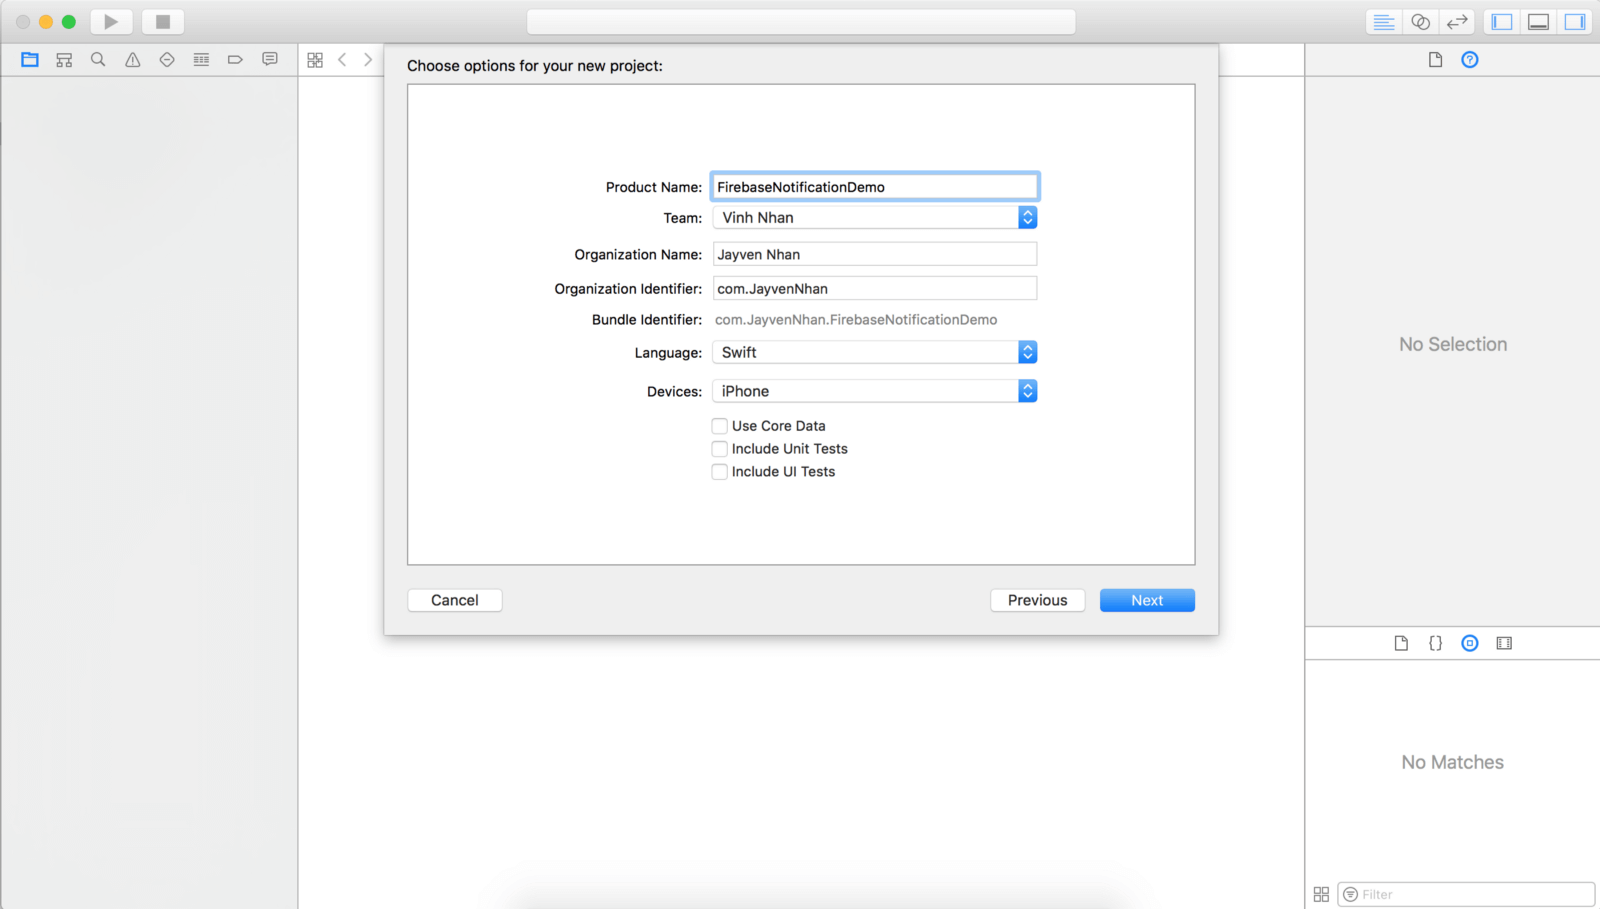
Please note that your bundle ID should be identical to the one you set in your Apple Developer dashboard. If you already forgot the ID, you can go back to App IDs under Identifiers and see what it is. In case you use a wrong ID, you will not be able to receive any push notifications.
Installing the Firebase SDK Using CocoaPods
Next, it is time for us to integrate the Firebase SDK into our Xcode project. The simplest way to do that is by using CocoaPods. First, close the Xcode project and then openTerminal. Change to the directory of your project and run the following command to initialize your Podfile:
1 |
pod init |
Open the Podfile, add the following pods to your Podfile:
1 2 |
pod 'Firebase/Core' pod 'Firebase/Messaging' |
Save it. Your podfile should look something like this:
1 2 3 4 5 6 7 8 9 10 |
# Uncomment the next line to define a global platform for your project # platform :ios, '9.0' target 'FirebaseNotificationDemo' do # Comment the next line if you're not using Swift and don't want to use dynamic frameworks use_frameworks! # Pods for FirebaseNotificationDemo pod 'Firebase/Core' pod 'Firebase/Messaging' end |
Go back to your terminal and run the following command to install the pods:
1 |
pod install |
CocoaPods will then download the SDK for you and create a .xcworkspace
file for you. Make sure you open that file in Xcode.
Adding GoogleService-Info.plist
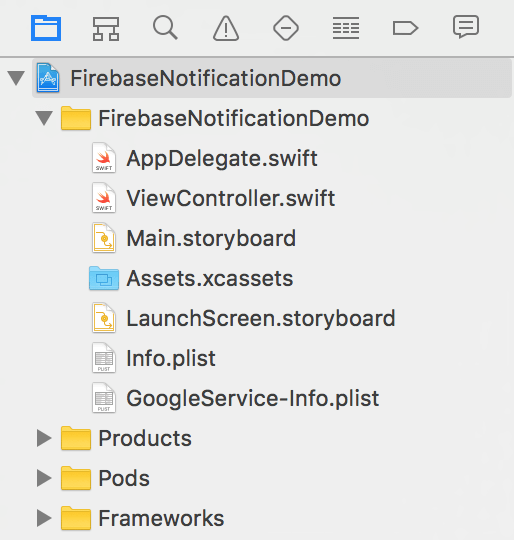
With the SDK installed, it’s time to add the GoogleService-Info.plist
file that you have downloaded before. Drag that file from Finder to your project folder.

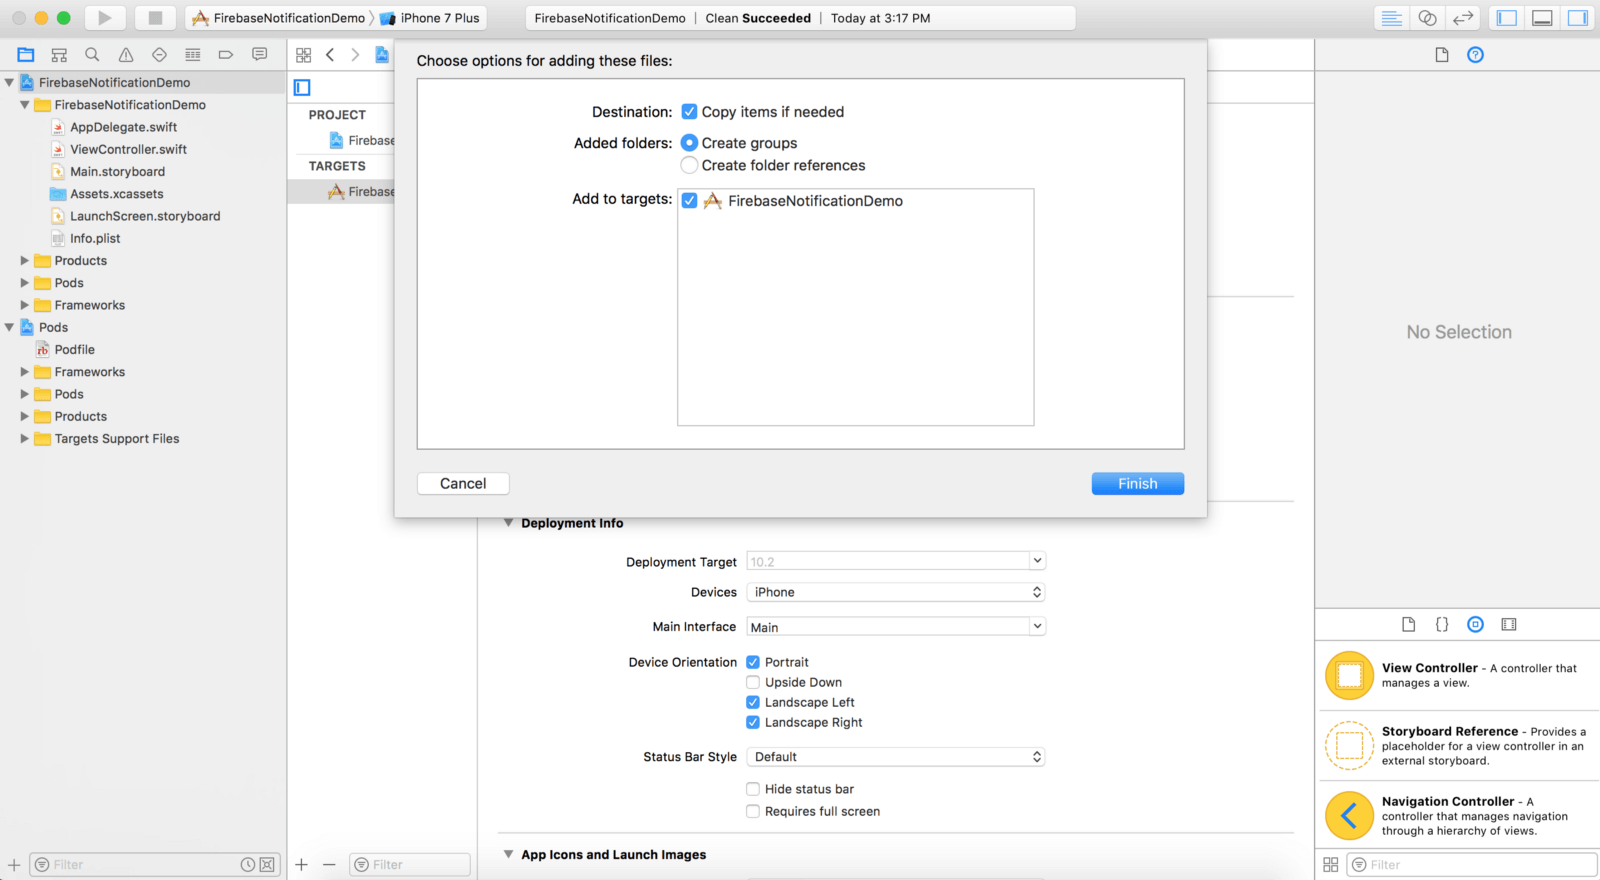
Once it is done, you should see the GoogleService-Info.plist
in your project folder.

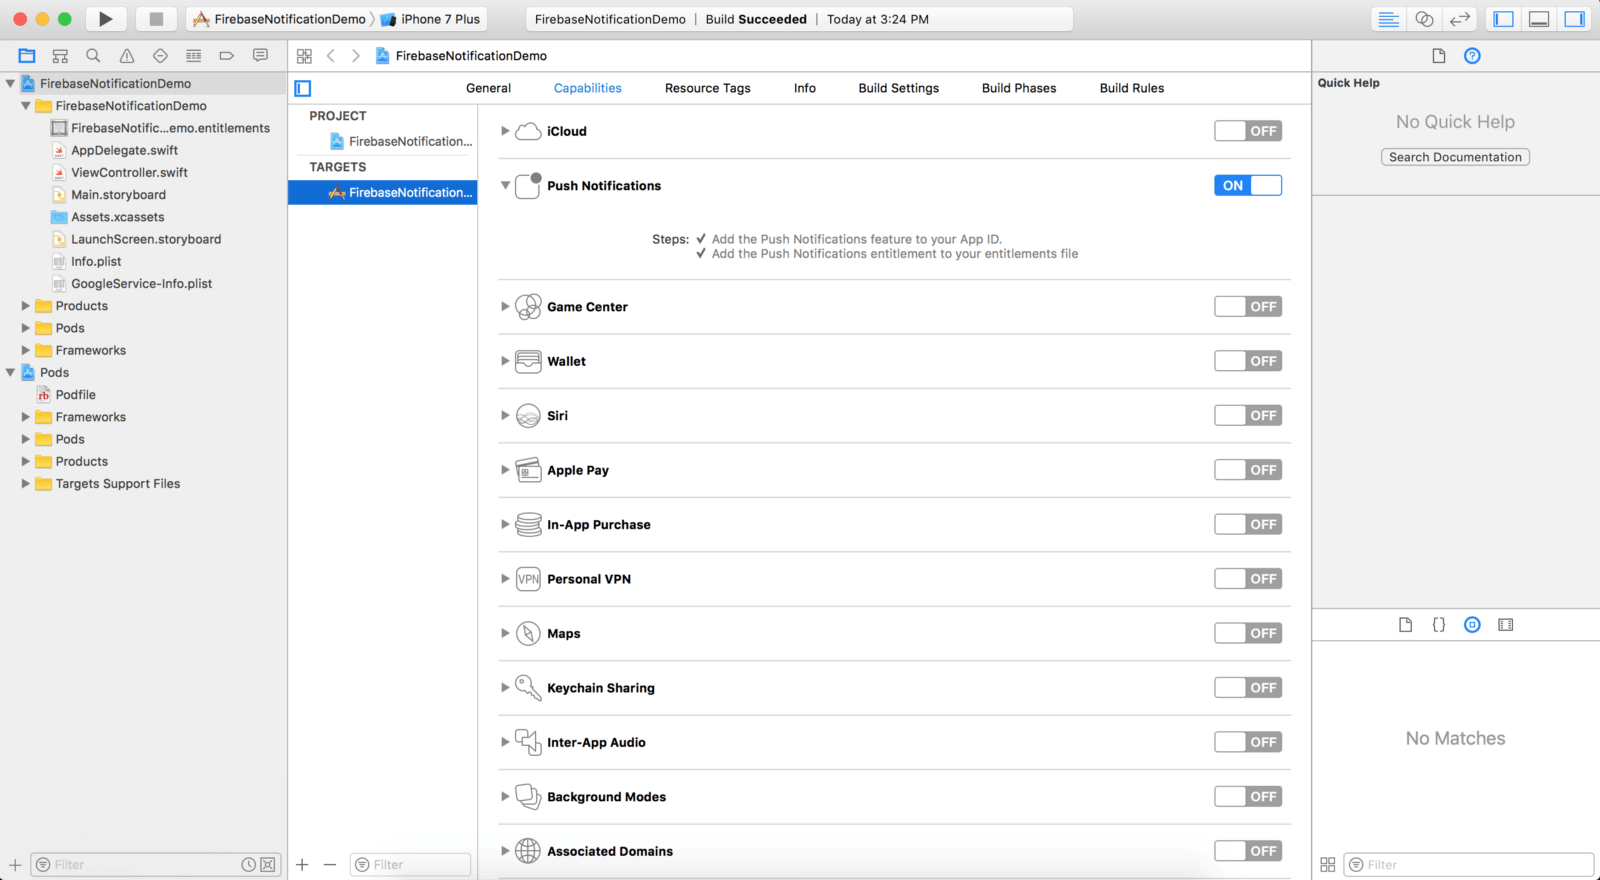
Enabling Push Notifications
Cool! The next step is to enable the Push Notifications capability of the demo project. Select the project in the project navigation, and then choose Target > Capabilities. Flip the switch of Push Notifications to ON
to enable it.

Initializing Push Notifications
It’s time to write some code and test push notifications. Head over to AppDelegate.swift
and import the following modules:
1 2 3 4 |
import UserNotifications import Firebase import FirebaseInstanceID import FirebaseMessaging |
Adopt the following protocols in your App Delegate class:
1 |
UNUserNotificationCenterDelegate, FIRMessagingDelegate |
Next, implement the applicationReceivedRemoteMessage
required method of the FIRMessagingDelegate
protocol like this:
1 2 3 4 |
// The callback to handle data message received via FCM for devices running iOS 10 or above. func applicationReceivedRemoteMessage(_ remoteMessage: FIRMessagingRemoteMessage) { print(remoteMessage.appData) } |
Now inside of your application(_:didFinishLaunchingWithOptions:)
method, add the following code:
1 2 3 4 5 6 7 8 9 10 11 12 13 14 15 16 17 18 |
if #available(iOS 10.0, *) { // For iOS 10 display notification (sent via APNS) UNUserNotificationCenter.current().delegate = self let authOptions: UNAuthorizationOptions = [.alert, .badge, .sound] UNUserNotificationCenter.current().requestAuthorization( options: authOptions, completionHandler: {_, _ in }) // For iOS 10 data message (sent via FCM FIRMessaging.messaging().remoteMessageDelegate = self } else { let settings: UIUserNotificationSettings = UIUserNotificationSettings(types: [.alert, .badge, .sound], categories: nil) application.registerUserNotificationSettings(settings) } application.registerForRemoteNotifications() FIRApp.configure() |
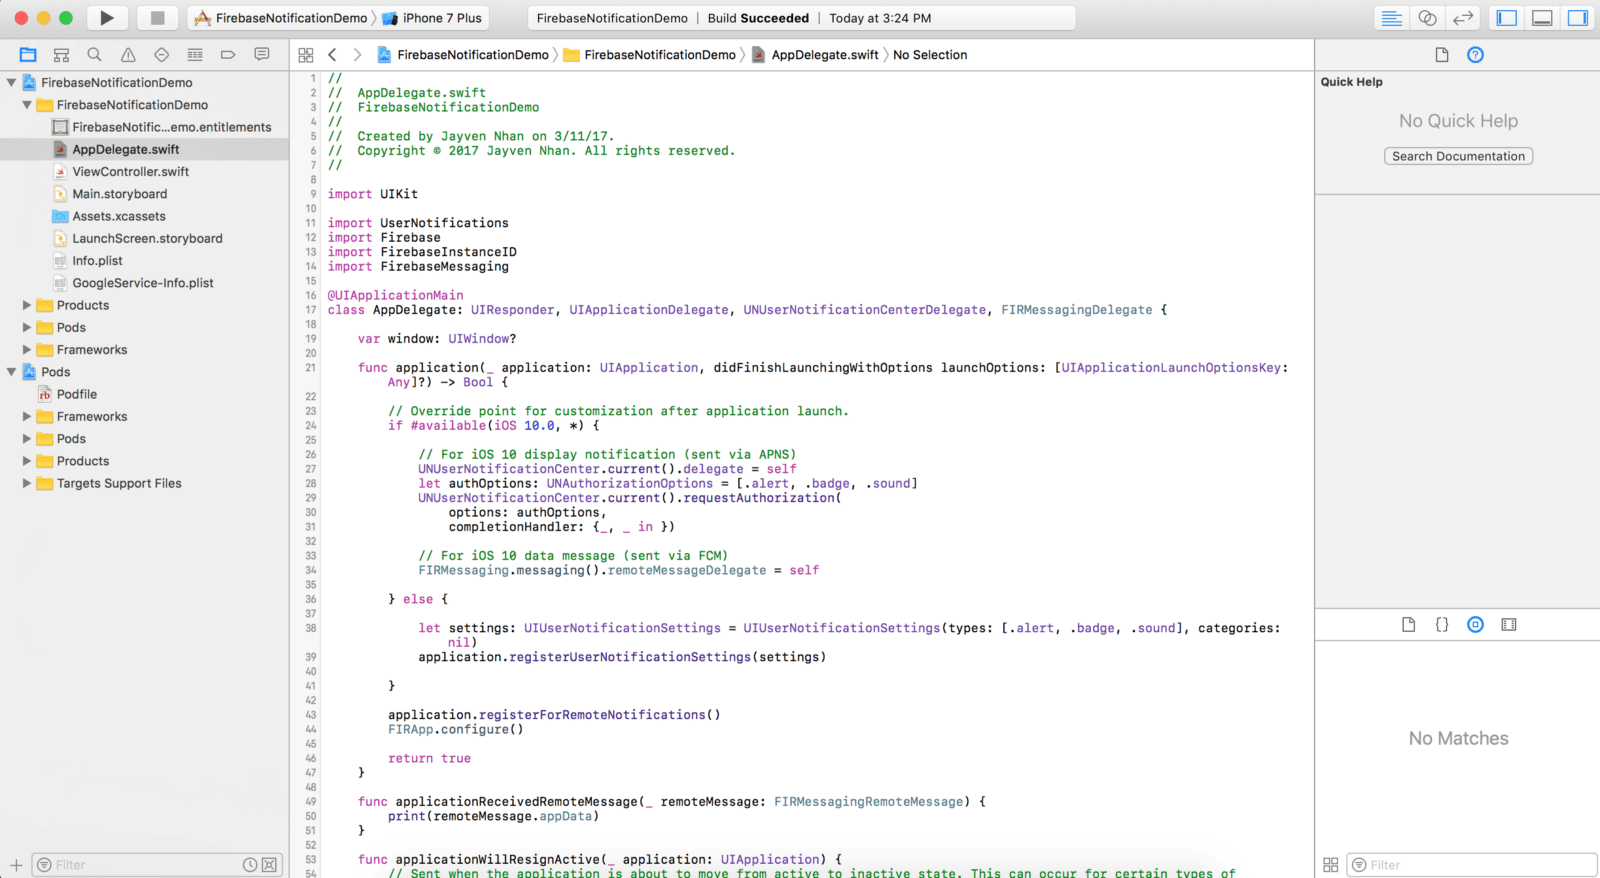
This sets up push notification settings based on your iOS version. The last line FIRApp.configure()
is to initialize and configure Firebase. The AppDelegate
class should look something like this:

Once you have your App Delegate set up, you can run your Xcode project on your device. Make sure you tap Allow when your app asks you for notifications permission.

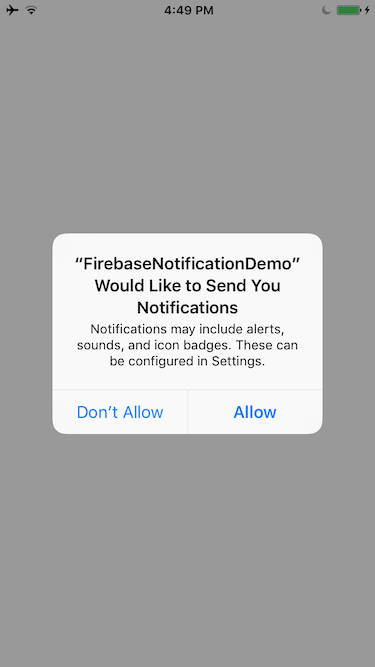
Great! You are good to go, and let’s try to send some notifications!
Testing Firebase Notifications
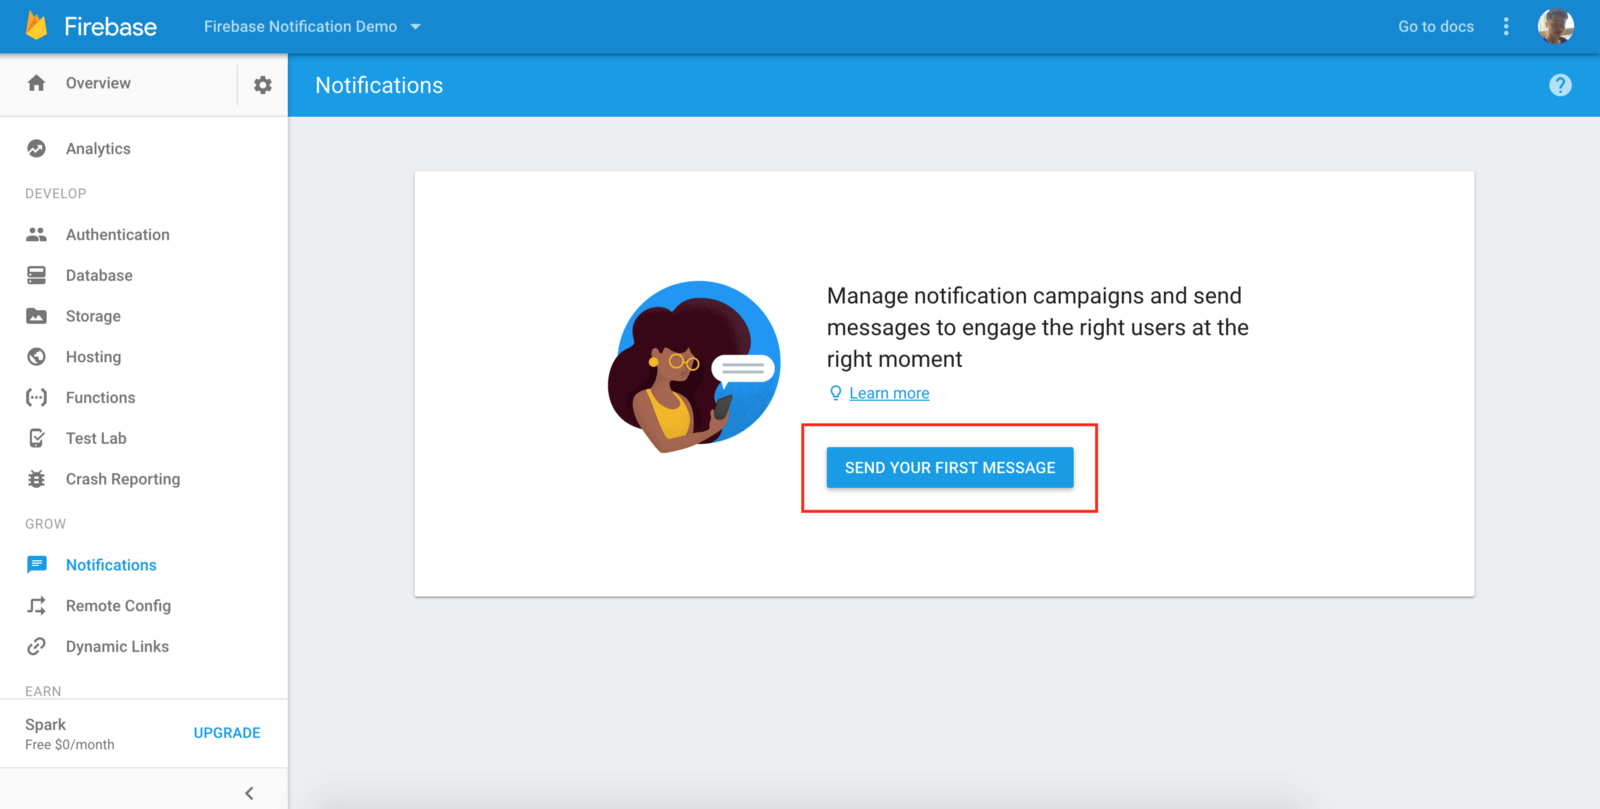
Alright, it’s time to do some tests and try to send some notifications. Go back to the Firebase Console, and then select your Firebase project. Look to the left side bar and you should see the Notifications option. Click the button. Once you see the Notification page, click the “SEND YOUR FIRST MESSAGE” button.

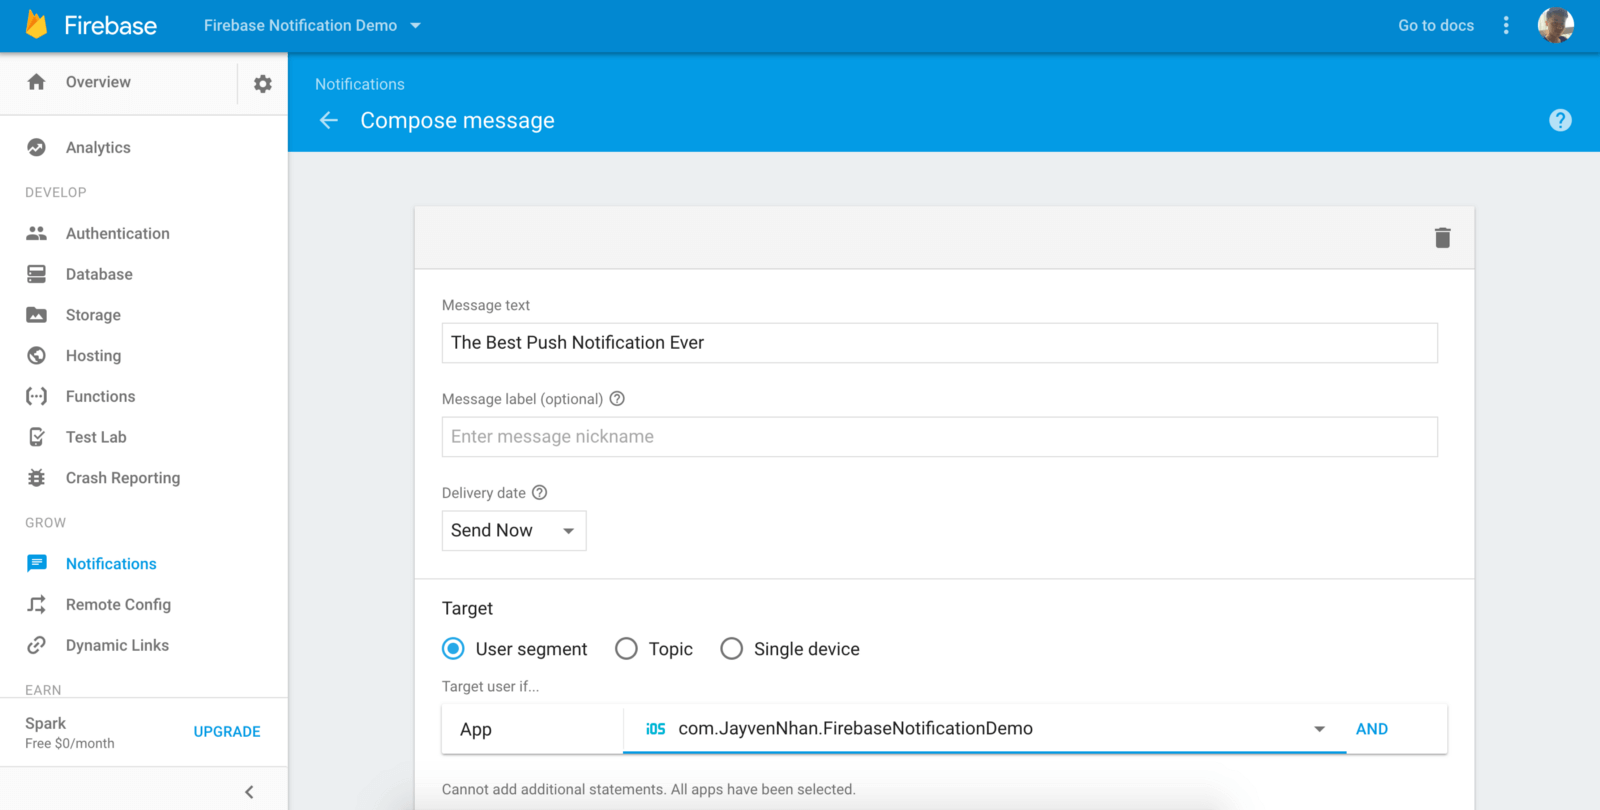
After so much work, it is about time that we send “the best push notification ever” from Firebase. Let’s go ahead and do that.
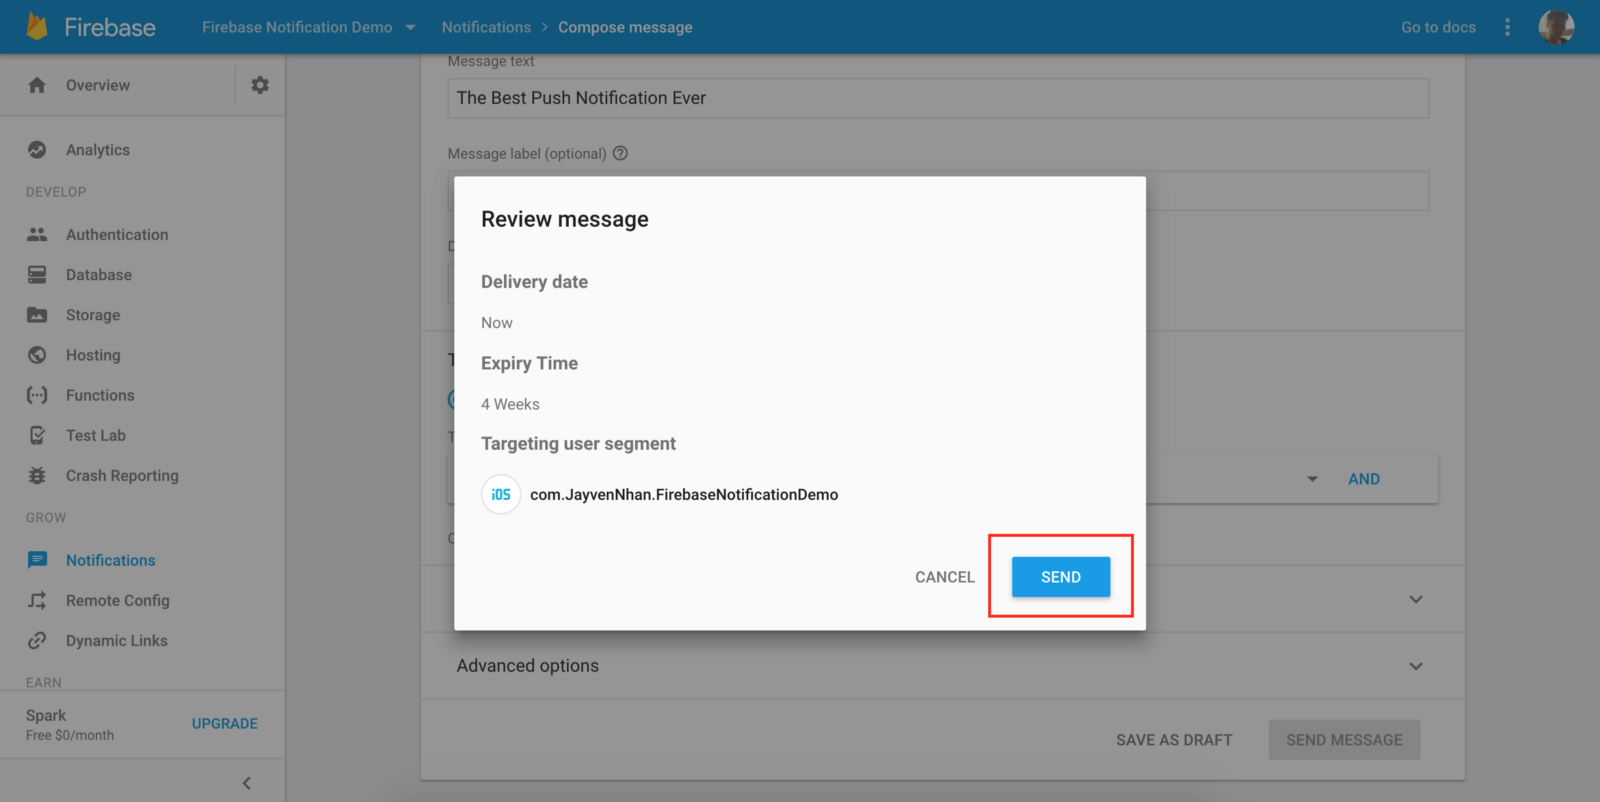
Fill in the “Message text” field with a message you would like your users to see. Then select your app under the Target section.

Scroll down and press the “SEND MESSAGE” button.

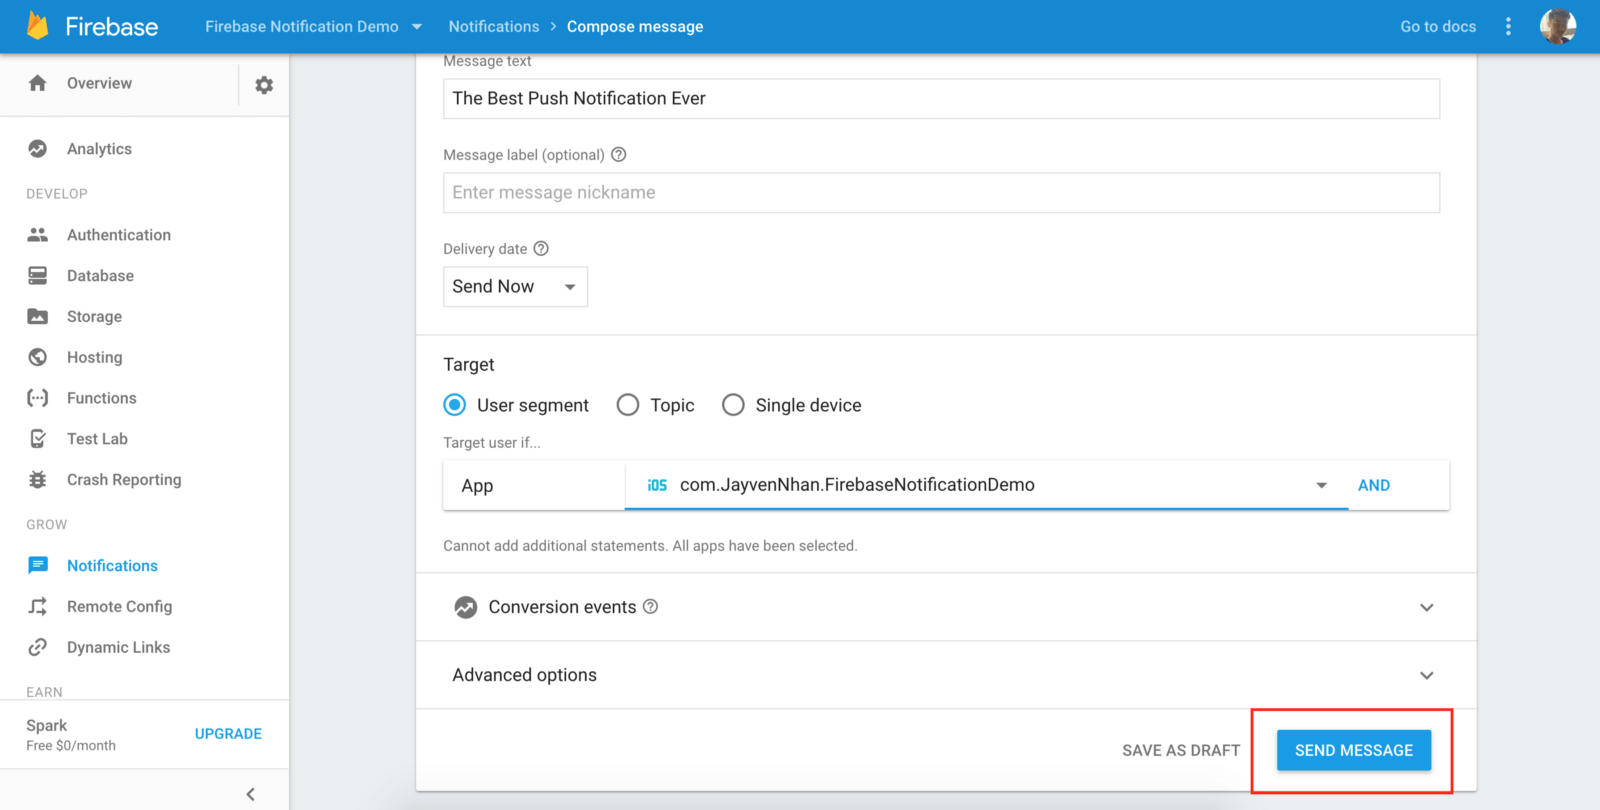
A pop up will ask you to review your notification message. Press the SEND button to send out your notification.

If you lock your device, you should be able to see the notification you pushed on your lock screen. You can then swipe from left to right on the notification to open the app. If you are on your home screen, you will a notification message drop down from the top of your screen. You can tap on the notification to open the app.
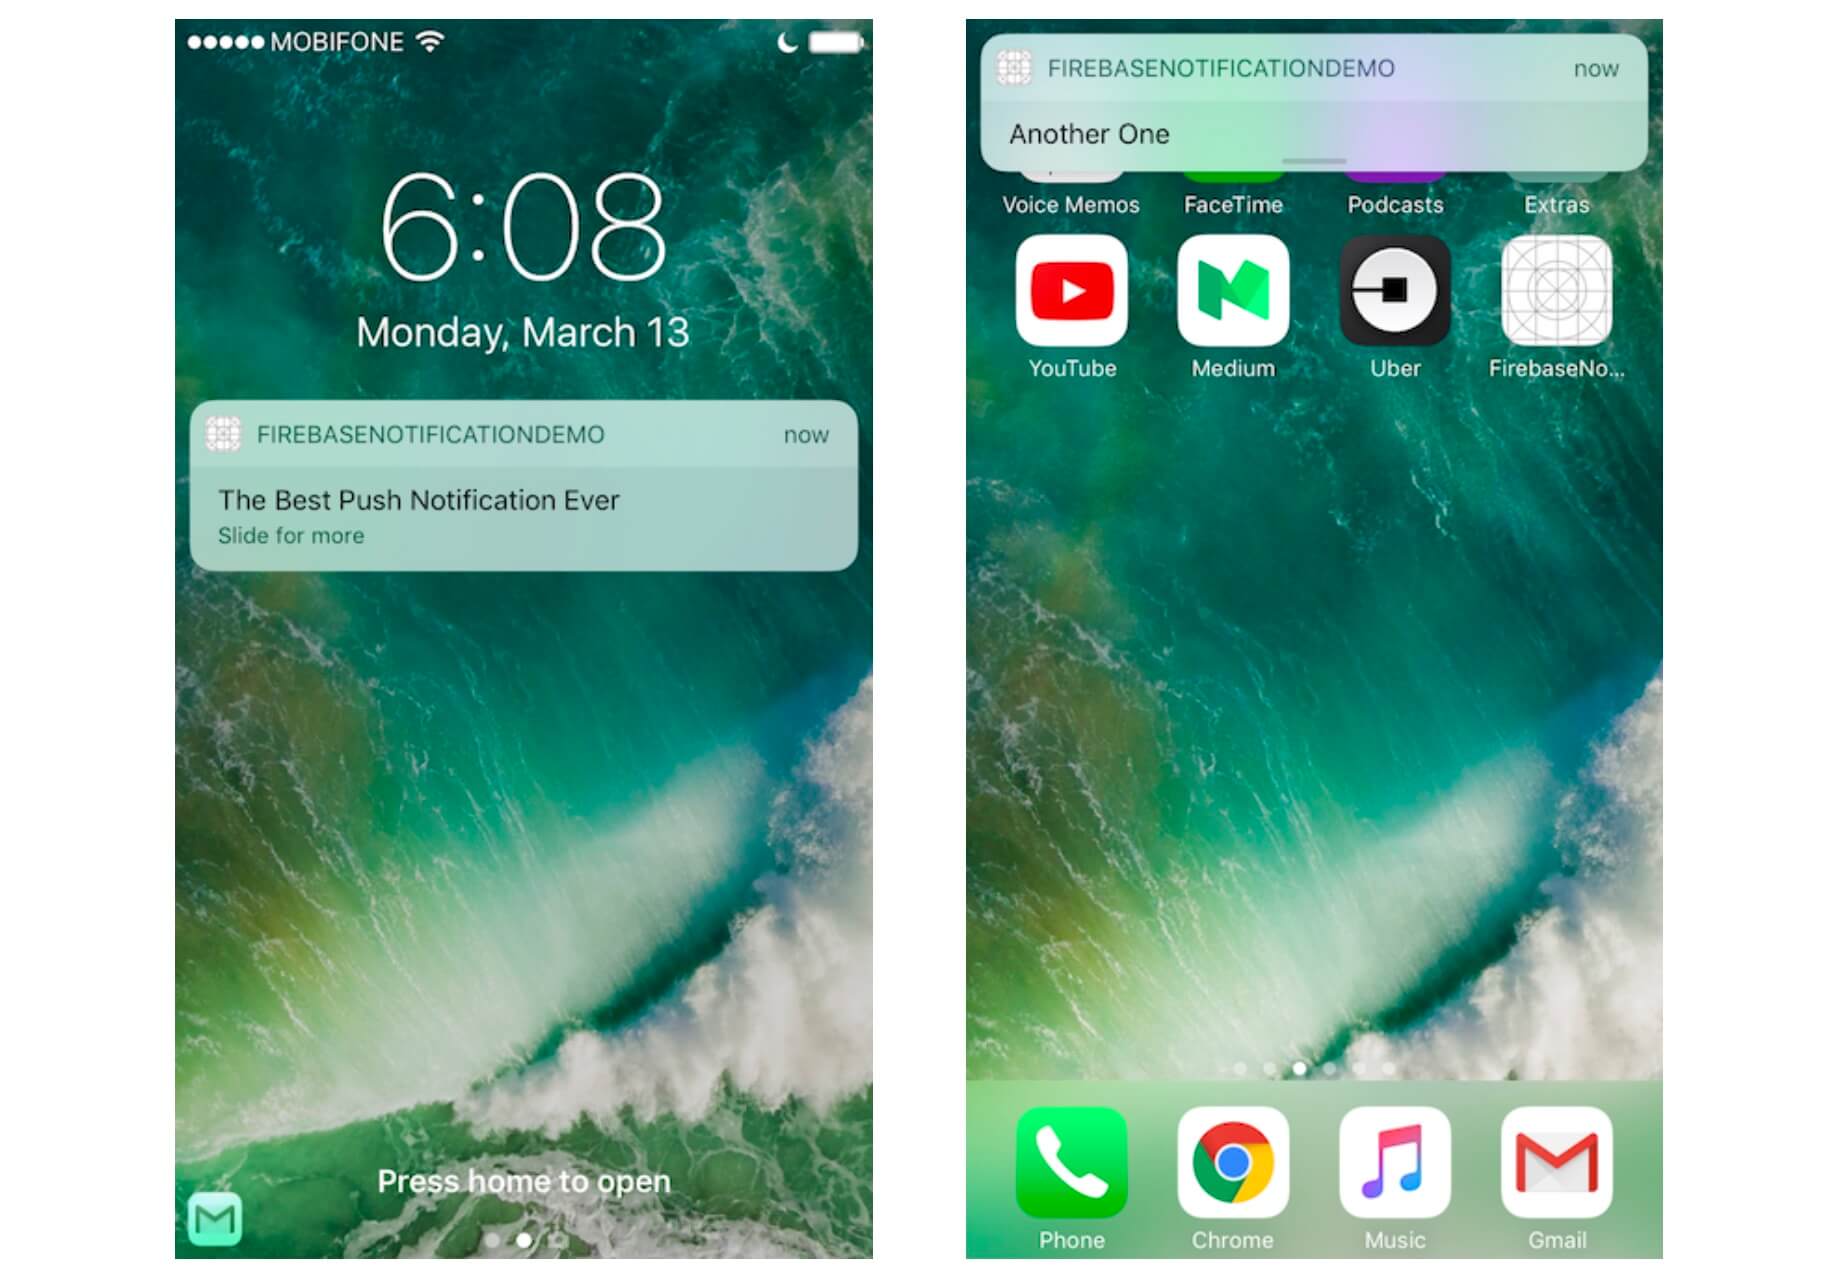
That’s it!
Wrap Up
We have implemented Firebase Notifications into our Xcode project. We took it one step at a time and made to the end. Congratulations for making it this far!
I hope you have enjoyed and learned something valuable from my article. If you have, please let me know by sharing this article with your friends.
Comments
Emre
AuthorHello, I know this already my curiosity is how to send notifications from firebase without dashboard. Maybe with Functions of the Firebase but I don’t know how to use it.
Simon Ng
AuthorEmre, you will need to work with the server side API. For details, you can check this out:
http://stackoverflow.com/questions/37371990/how-can-i-send-a-firebase-cloud-messaging-notification-without-use-the-firebase
Emre
AuthorYou are awesome Simon! Thanks
David
AuthorShould add in AppDelegate for working:
func application(_ application: UIApplication, didRegisterForRemoteNotificationsWithDeviceToken deviceToken: Data) {
FIRInstanceID.instanceID().setAPNSToken(deviceToken, type: FIRInstanceIDAPNSTokenType.sandbox)
FIRInstanceID.instanceID().setAPNSToken(deviceToken, type: FIRInstanceIDAPNSTokenType.prod)
}
Muvi Developer
AuthorI have the same problem
just follow the steps and install on my iphone,send message through firebase
But I still can’t receive any notification on my mobile phone
PeiSheng Lu
AuthorI just follow the steps and install on my iphone,send message through firebase
But I still can’t receive any notification on my mobile phone
Simon Ng
AuthorIs the bundle ID the same as the one you configured in Firebase?
PeiSheng Lu
Authoryes
I’ve checked the bundle ID
and the code as same as Jayven N’s guide
vira
AuthorDid you accept the notification settings when it popped up? Little tricky to debug, feel free to post in Github, will have a look.
Fadi abu zant
AuthorSame here did not receive any notification
sudha
Authorset FirebaseAppDelegateProxyEnabled = YES in info.plist
It worked for me.
Allen Ross
AuthorPerfect timing for my app! I really like how detailed and clear this tutorial is. I got this to work exactly the way I want. This tutorial made my life so much easier. I hope AppCoda will continue to publish more awesome tutorials.
Aleksey Kharitonov
AuthorHi there!
I did everything like in tutorial and read all comments, but after sending app to internal testing (via TestFlight) only my device receiving push-notification. other tester didn’t got it. I wonder what I did wrong?
Erick
Authori got an error that says: could not build Objective-C module ‘Firebase’..
Do i need to do bridging for this?
Egzon Pllana
AuthorThis worked perfect for me. Followed many other tutorials but they didnt work. Keep it up mate 🙂 Thank you!
Tim H
AuthorThanks for the tutorial – I followed all the steps to add notifications to my app, and when I sent a test message in Firebase, it didn’t show up. Bundle ID is the same everywhere (Firebase and Xcode). I never got the notification accept popup, but I think that may be because I previously tried to put in push notifications a different way (OneSignal) and accepted the popup there. But I abandoned that approach and did it this way too.
Abdul
AuthorGuys thanks for the great job.
you just missed the step of adding Provisioning Profile.
the steps from Firebase website :
To test your app while under development, you need a Provisioning Profile for development to authorize your devices to run an app that is not yet published on the App Store.
Navigate to the Apple Developer Member Center and sign in.
Navigate to Certificates, Identifiers and Profiles.
In the drop down menu on the top left corner, select iOS, tvOS, watchOS if it’s not already selected, then navigate to Provisioning Profiles > All.
Click the + button to create a new Provisioning Profile.
Select iOS App Development as provisioning profile type, then click Continue.
In the drop down menu, select the App ID you want to use, then click Continue.
Select the iOS Development certificate of the App ID you have chosen in the previous step, then click Continue.
Select the iOS devices that you want to include in the Provisioning Profile, then click Continue. Make sure to select all the devices you want to use for your testing.
Input a name for this provisioning profile (e.g. Firebase Sample App Development Profile), then click Generate.
Click Download to save the Provisioning Profile to your Mac.
Double-click the Provisioning Profile file to install it.
thanks.
Giridharan J
AuthorThanks Abdul
ptolomeo
AuthorThank you for the magnificent tutorial.
I followed all the steps, but at the end (before building the app) I have these errors in XCode (AppDelegate.swift):
– FIRMessagingDelegate has been renamed to MessagingDelegate
– FIRMessaging has been renamed to Messaging
– FIRApp has been renamed to FirebaseApp
– FIRMessagingRemoteMessage has been renamed to MessagingRemoteMessage
If I replace the suggested names, I then get an error “Type AppDelegate does not conform to protocol MessagingDelegate”
What can I do to move past these errors? Thank you in advance.
ptolomeo
AuthorHello, I figured out how to solve these problems.
I renamed all the sugestions made by XCode:
– FIRMessagingDelegate has been renamed to MessagingDelegate
– FIRMessaging has been renamed to Messaging
– FIRApp has been renamed to FirebaseApp
– FIRMessagingRemoteMessage has been renamed to MessagingRemoteMessage
I then included the following function definitions inside the AppDelegate class:
func messaging(_ messaging: Messaging, didRefreshRegistrationToken fcmToken: String) {
print(“Firebase registration token: (fcmToken)”)
}
// [END refresh_token]
// [START ios_10_data_message]
// Receive data messages on iOS 10+ directly from FCM (bypassing APNs) when the app is in the foreground.
// To enable direct data messages, you can set Messaging.messaging().shouldEstablishDirectChannel to true.
func messaging(_ messaging: Messaging, didReceive remoteMessage: MessagingRemoteMessage) {
print(“Received data message: (remoteMessage.appData)”)
}
And thus, I have it working on my iPad.
Thank you all!!
Geeta Khati
AuthorHey, i encountered the same problem and i renamed all suggestions and also added the code as mentioned by you… But still no luck…
I’m not able to receive push from the server as “didreceiveRemoteNotification ” is not being called….!
Any help or suggestion would be appreciated..
Thanks !
disqus_ShFBOKGP4O
Authorset up the app delegate like this:
@UIApplicationMain
class AppDelegate: UIResponder, UIApplicationDelegate, MessagingDelegate, UNUserNotificationCenterDelegate{
var window: UIWindow?
func application(_ application: UIApplication, didFinishLaunchingWithOptions launchOptions: [UIApplicationLaunchOptionsKey: Any]?) -> Bool {
// Override point for customization after application launch.
if #available(iOS 10.0, *) {
UNUserNotificationCenter.current().requestAuthorization(options: [.alert, .sound, .badge]) {
(granted, error) in
}
UNUserNotificationCenter.current().delegate = self
Messaging.messaging().delegate = self
application.registerForRemoteNotifications()
} else {
let types: UIRemoteNotificationType = [.alert, .badge, .sound]
application.registerForRemoteNotifications(matching: types)
}
FirebaseApp.configure()
//No Longer Needed With addition of didRefreshRegistrationToken delegate method
//NotificationCenter.default.addObserver(self, selector: #selector(self.tokenRefreshNotification(notification:)), name: NSNotification.Name.InstanceIDTokenRefresh, object: nil)
return true
}
func applicationWillResignActive(_ application: UIApplication) {
// Sent when the application is about to move from active to inactive state. This can occur for certain types of temporary interruptions (such as an incoming phone call or SMS message) or when the user quits the application and it begins the transition to the background state.
// Use this method to pause ongoing tasks, disable timers, and invalidate graphics rendering callbacks. Games should use this method to pause the game.
}
func applicationDidEnterBackground(_ application: UIApplication) {
// Use this method to release shared resources, save user data, invalidate timers, and store enough application state information to restore your application to its current state in case it is terminated later.
// If your application supports background execution, this method is called instead of applicationWillTerminate: when the user quits.
Messaging.messaging().shouldEstablishDirectChannel = false
}
func applicationWillEnterForeground(_ application: UIApplication) {
// Called as part of the transition from the background to the active state; here you can undo many of the changes made on entering the background.
}
func applicationDidBecomeActive(_ application: UIApplication) {
// Restart any tasks that were paused (or not yet started) while the application was inactive. If the application was previously in the background, optionally refresh the user interface.
connectToFCM()
}
// Firebase Stuffs
func messaging(_ messaging: Messaging, didRefreshRegistrationToken fcmToken: String) {
let refreshedToken = InstanceID.instanceID().token()
print(“InstanceID token: (String(describing: refreshedToken))”)
connectToFCM()
}
func messaging(_ messaging: Messaging, didReceive remoteMessage: MessagingRemoteMessage) {
}
///Delegate function to show banner notification if application is in the foreground
func userNotificationCenter(_ center: UNUserNotificationCenter, willPresent notification: UNNotification, withCompletionHandler completionHandler: @escaping (UNNotificationPresentationOptions) -> Void) {
completionHandler(.alert)
}
func connectToFCM() {
Messaging.messaging().shouldEstablishDirectChannel = true;
}
}
Suhaib Nabiel
AuthorThanks for the article.
Could you update this article please ?
1- Google now allow us to upload .p8 certificates which is easier/shorter to create and they don’t expire
2- Some of the commands have been renamed
sireesha siddineni
AuthorReceiving notifications from Google Console but not from server . What might be the problem in it?
Lukas Bimba
AuthorAny tutorials or projects on adding a geofence notification message?
Emre
AuthorThis is the easy way, you guys must show people how to device to device with firebase. Thanks
john
AuthorI have tried this several times and keep getting the following error when trying to upload to Firebase: The certificate bundleId did not match that of your app
please help
Abhishek Kumar
AuthorIs the notification sent even when app is in killed state?
Hamza Imran
AuthorSir any tutorials in objective c for firebase push notification integration? @Jayven N
Nahuel Roldan
AuthorGreat post, it was really helpful! !
Here’s a gist with the sample code updated for Swift 4:
https://gist.github.com/nahuelDeveloper/7f5e813e356370282adb6f09724e58ac#file-swift
In case anyone has trouble with push notifications on iOS 11, this link may be useful:
https://stackoverflow.com/questions/46345500/firebase-notifications-not-working-in-ios-11
Tim Mowod
AuthorThank you for the tutorial!! Very detailed!
I’m just wondering what I should do next. I’d like to be able to send a notification with a UIButton press. Is there a way I can tie these together and notify programmatically? I’d like to be able to notify everyone with app installed through a UIButton. Thanks in advance.
Andy B
AuthorAny update for this ?
Let me know pls
Tim M
AuthorHey Andy, I’m still working and researching. I’m very new so take my advice with a grain of salt. The only thing I can think of in my circumstance is adding a bool value when open button is pressed (open = true, closed = false), requesting a fetch to see if said value is true. If variable is true && if x = 0, make x = 2. If x = 2, send notification and subtract 1 from x if notification is a success. Fetch in theory won’t send a notification if x = 1. Then, if value is false, make x = 0. I don’t know if this makes sense to you, I haven’t tested it just yet. Oh, the open / closed value is through Firebase and x would be through Core Data. Let me know if this helps, I could use the help too.
Akshay Cm
Authoryou would need users to subscribe to a topic in firebase cloud messaging and use a rest api and post to the api to send a notification to all people with the app subscribed to the topic.
Rolf Cosmo Anthony
AuthorThis works except when my application is open and in the foreground. Would I need to create an alert to replace the notification, and if so, how?
Code Bender
AuthorThanks for the wonderful guide, kindly update the article to include push notification handling, i.e. once the user taps on the notification, it opens a specific screen in the app. thanks
Julien Attard
AuthorWow, THANK YOU VERY MUCH 🙂 !
ynstek
AuthorFirst of all, thank you for the article.
I successfully made the notification with postman:
{
“to”: “/topics/news”,
“notification” : {
“title” : “test Title”,
“body” : “test Body”
}
}
but I want to send the data down. In this way, the didReceiveRemoteNotification function does not fall.
{
“to”: “/topics/news”,
“data” : {
“message” : “test”,
“url” : “http://yunustek.com”
}
}
bhushan deshmukh
Authorhow to also send image?
comm1x
AuthorThank you so much! This tutorial is more helpful than official FCM manual.
sathya baman
AuthorNice Article. Did work like a Charm.. tnx..
Mohan Ram
Authorif possible update the tutorial for swift 4. Thanks for this work. It helped me to implement the firebase with ease.
Kurniawan26
AuthorHey..great tutorial..
But my app only receive notification when it’s running on background..
any idea ?
here’s my payload
{
“to”:”device_token”,
“notification”: {
“body”: “Hey there…”,
“sound”: “default”
},
“data”: {
“show_in_foreground”: “true”,
“priority”: “high”
}
}
Manjunath C.K Kadani
AuthorThanx It Worked For Me
java person
Authorthis does not work, it does asking for permission though which is far closer to finish than other tutorial i found including the tutorial from google itself.