

During an application development process, a quite significant part is the way developers manage to keep track of the changes been made over time. It really consists of a necessary need to be able to store and handle copies of working code versions in various stable stages, and revert back to them when bugs or problems arise. Even more, when a number of programmers work at the same project, keeping track of all changes is a one-way path. Fortunately, developers don’t have to discover their own way to do all that, as there are special software solutions, called Version Control Systems.
A version control system, or in other words a revision control system, is actually a (software) mechanism that is capable of monitoring changes performed to code files over time and storing them for future reference. Besides that, it can also save extra essential data, such as the developer who made the changes, when did they happen, what was actually modified, and other kind of historical and not only data. Moreover, such a system provides the ability to compare various versions of the code, revert to a previous version of either specific files or a whole project if needed, and eventually implement a bug-free product by tracking down any malicious code.
Using a version control system, developers can work on different paths of a project, commonly named branches, and when their piece of project is ready, everything is put together so the final release of the application can be built. This process is called merging, and it consists of a special characteristic of version control systems. Actually, that fashion of work is mandatory in teams of developers and software companies, where each one if responsible for a project’s part, and at the end everything must be gathered up and put in one place.
For single developers it is not required to use a version control system, however is highly recommended, as with it’s much more easier to track down bugs or going back to stable and working versions of code, once a dead end appears or for some reason everything is messed up. The truth is that a great number of lone-rider programmers, especially the new ones, do not use such a system at all, and is common to manually keep copies of their projects when they are about to add new features or generally modify them. That’s a really bad habit, as a source control system does all that much better and efficiently, providing at the same time all the extra capabilities previously described.
One of the most well-known (if not the most famous) version control systems, is the git, and it was originally developed by the creator of Linux, Linus Torvalds. Git organizes everything in virtual directories, named repositories, and any version tracking actually applies to them. It can be used either as a command line tool, or through desktop applications designed exactly for it. If git sounds new to you, then I would suggest to read a few more about it on the web, as discussing about it any further would be out of the scope of the tutorial.
Xcode, since version 5, incorporates an enriched capability for working with git, and there’s implemented an entire menu with various options and submenus in it for managing source control. As you’ll see later on, working with git and version control is pretty easy and fast, and after you’ll have the tutorial finished there will be no excuse for not using it.
Concluding this introduction, as you have already understood our mission is to learn how to work with git and version control through Xcode, and all this will be achieved by getting to know each related feature that Xcode provides. If you feel unfamiliar with all that stuff, or if you need to acquire some more knowledge before we begin, then please be my guest and search around the web for more information. I have to say in advance that during the tutorial I presume that you possess the minimum required knowledge about version control systems and what git is about, as we are going to take them for granted and focus mostly on how Xcode manages all that.
GIT Demo Overview
On the contrary with other tutorials’ demo applications, in this one we are not going to implement an app that demonstrates a specific feature of the iOS SDK, nor we will have at the end a developed sample product. What we will actually do, is to create a demo project just to add a few lines of code to various points, and we’ll use it as a tool to test all the source control management options Xcode provides. In other words, we will focus on IDE, and not on iOS.
In addition to the above, this time there is not an app to download. Instead, I invite you to come along and implement step by step the demo project, and add any code where is required manually (don’t worry, it’s not that much). It’s necessary to follow that way, as we are going to perform various repeated version control related actions and we must see the results in real time. That wouldn’t be possible if I would just provide an application with all actions already been made, as then the practice on your behalf would be equal to zero.
So, let’s get started, and let’s take a detailed look to the version control essentials using Xcode.
Creating a Git repository
Every time a new project is getting created in Xcode, the capability to add a local git repository is always given as an option to the developer. In a project creation, a three-step guided process is involved, and at the third and last step of it Xcode provides a check box with the appropriate message, which if selected the git repository is added to the project’s directory. It’s easy this option to be overlooked or to be considered as another unneeded Xcode feature, and usually that’s what happens, especially in cases of developers who have never worked with version control and git before, or they are new to programming.
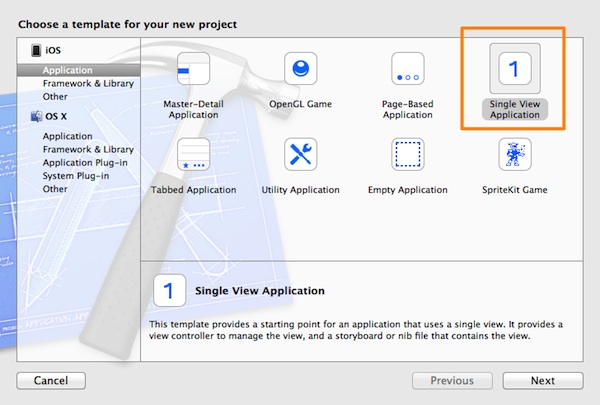
To see everything in details, launch Xcode and create a new project. Firstly, as the application’s template select the Single View Application, in the Application category under the iOS section.
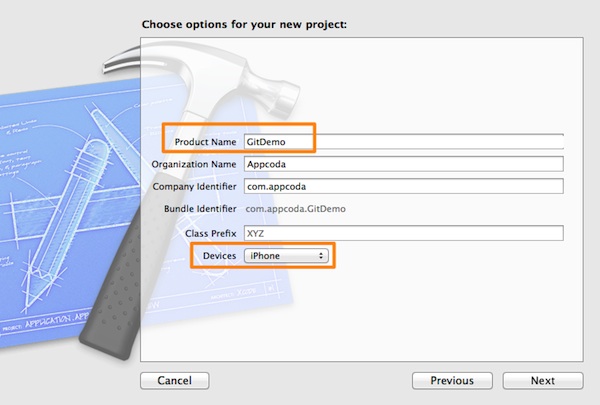
Click on the Next button to proceed to the second step. In the Product Name field, set the GitDemo value as the project’s name, and also make sure that in the Devices drop down menu the iPhone value is selected. No need for an iPad or universal app here.
Click once again on the Next button, and let the guide take you to the third and last step. In here, at first select a directory to save the project. Then, look at the bottom of the window, and notice a check box lying over there, with the text Create git repository on (My Mac ):
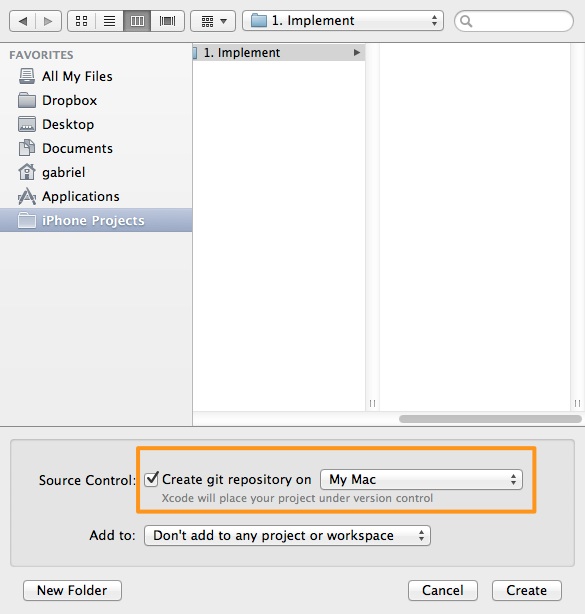
By default, this option is always selected and a git repo is created with every project. In case you don’t want to use git and version control in your project, you just have to deselect it, but I wouldn’t recommend this. Anyway, in this tutorial we want it enabled, there for make sure that you select the check box. Finally, click on the Create button.
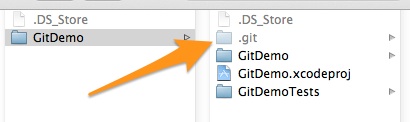
Let the project to be created, and then open a Finder window and navigate to the directory that you stored our project. In there, look for the .git sub-directory, which is the one Xcode automatically created for storing the git repository related data.
If you are unable to see the .git directory, then you must make the hidden files on your computer visible. To do that, open a Terminal window, and add the next commands:
For OS X Mavericks 10.9:
defaults write com.apple.finder AppleShowAllFiles TRUE
For previous OS X versions:
defaults write com.apple.Finder AppleShowAllFiles TRUE
Then, just reload the Finder app, so add one more command:
killall Finder
So, as you see, here is the place where your local git repository actually gets saved for this app. Accordingly, a .git sub-directory is always created along with any new application you create, as long as you leave the respective option enabled.
It’s obvious that adding a git repository to a project is totally effortless using Xcode. However, what happens if you don’t include a git repository during a project setup, or if you want to add one at a later time? Well, the good news is that you can add a repository for your project at any time, but without using Xcode, and even that’s a rare case to happen, I’m going to show you how.
Note that if you wish, you may skip the rest and proceed to the next part of tutorial. However I would recommend to keep on reading, as the information provided right next is quite useful.
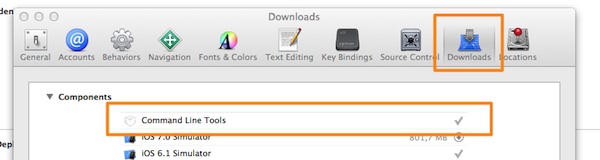
Before demonstrating anything, you must download the Command Line Tools through Xcode, as we are going to work in Terminal and we need some extra tools available. If you have already downloaded this package, then keep forward. If not, then to install the command line tools, go to the Xcode > Preferences… menu on Xcode, and then select the Downloads tab. In the upper side of the window, under the Components section, click on the button with a down arrow existing at the right side of the Command Line Tools option. Once the download is over, a checkmark will appear instead of the download button:
Now, create one more Xcode project for the sake of this example, and delete it when we are through. Make sure to deselect the Create git repository option. We don’t want Xcode to prepare a repository for us in this case. Name the project NoGitExample and beyond that, save it in your Desktop, so you can follow along with the commands I will show.
Once everything is ready, open a Terminal window (if you have already opened any, make sure to close it first, so any changes made by installing the command line tools to be applied). For starters, navigate your self to the new project’s directory:
cd /Users/YOUR-USERNAME/Desktop/NoGitExample
Don’t forget to set your Mac username in the above command. Next:
git init
This will initialize an empty repository, and if you either go to Finder or use the ls terminal command, you’ll see that the .git sub-directory has been created. That’s great. Keep going:
git add .
With this one, all contents of the current directory (the dot [.] symbol) will be added to the repository. Finally, commit all (make the changes permanent):
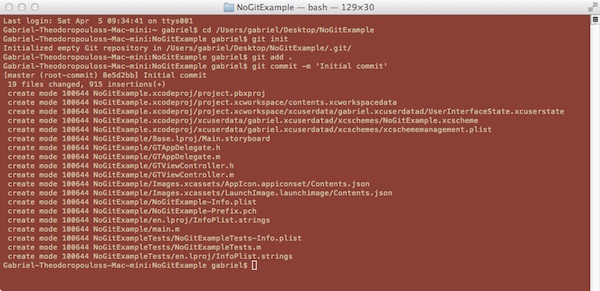
git commit -m 'Initial commit'
A list of all files committed to the local git repository will appear to the terminal window. The next figure illustrates the terminal of mine:
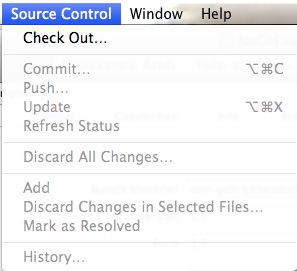
The git repository is ready, but if you go back to Xcode and open the Source Control menu, you’ll find out that everything is still disabled.
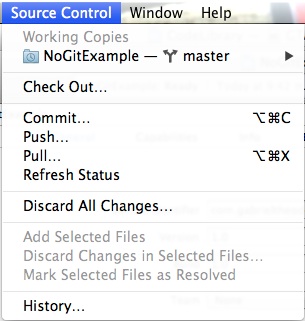
That’s because Xcode doesn’t get notified automatically about our manual git repository addition. So, close Xcode using the menu Xcode > Quit Xcode and re-open it. Now, in the NoGitExample project if you open the Source Control menu once again, you’ll see that all options have been enabled, just like if we would have added the git repository along with the project creation.
At this point feel free to close the NoGitExample project and delete it from your Desktop as well.
Now you know how to add a git repository for every project of yours, and even if you intentionally or accidentally you don’t add one during a project setup, you can do it manually at any given time.
Committing Changes
When talking about committing changes to a repository, we actually mean to store a new version of our project containing all changes that have been made to it, such as modified or newly added files. Generally, a commit should happen when a remarkable amount of work is done, and the project exists in a stable state. There’s not any general rule about how often a commit should be done, but I would suggest you that: If you think that the work you’ve done since the last time you committed any changes to the repository will cost a lot in time and effort if you ruin it by accident along the way, then it’s definitely time for a new commit.
Xcode by default makes an initial commit once a new project gets created. The purpose of it is to keep a version of the project at its initial state. That happens behind the scenes, without disturbing you or asking for any kind of confirmation from you. If you don’t add a git repository when creating a new project, but you do so later manually as shown in the previous part, the initial commit is preformed with the command: git commit -m ‘Initial commit’ that we previously used.
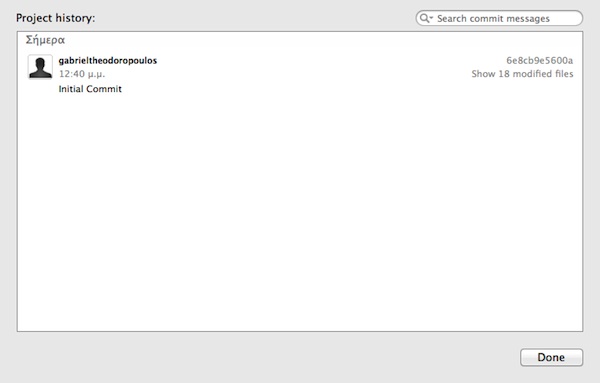
Actually, you can see information regarding the initial commit if you go to the Source Control > History… menu. In there is recorded every commit you perform to the project.
Let’s see a little bit action now, and let’s do some modifications to the project. Go to the ViewController.m file, and in the private class section add the next property declaration:
@interface ViewController ()

@property (nonatomic) int sum;

@end
Next, modify the viewDidLoad method as shown right next:
- (void)didReceiveMemoryWarning
{
    [super didReceiveMemoryWarning];
    // Dispose of any resources that can be recreated.

    int a = 5;
    int b = 10;

    self.sum = a + b;

    NSLog("The result is: %d", self.sum);
}
If you take a look at the Project Navigator pane, you’ll notice that next to the ViewController.m file, the M letter has been added, just like it’s shown the next figure:

This means that the file has been modified, and there are changes in comparison to the last committed version of it. Generally, every time you modify a file the M letter indicates that there are new changes, not committed yet.
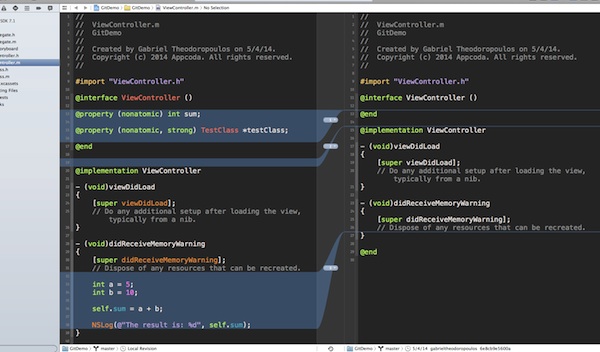
Let’s see now how to commit. It’s very simple, and it only takes to open the Source Control > Commit… menu. The following window appears:
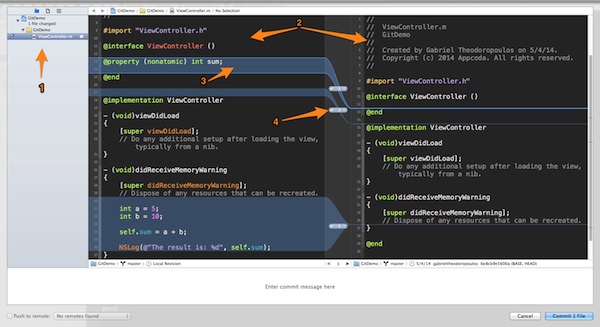
Let’s see what it tells us, step by step. At the left pane (indicated with the number #1 in the figure), they are listed all the files that have been modified. In our case, only the ViewController.m has been changed, therefore it’s the only one displayed here. If you pay a close attention, you’ll see that there is a check box at the left side of the file, which is checked by default. If you uncheck it, the changes to file won’t be committed, but now that’s not something we desire, so let it be checked.
In the middle area of the window (indicated as #2), there are two preview panes. At the left one, there is the current version of the file (not yet committed), and at the right one there’s the last committed version of the same file. In this screenshot, as the only commit that has been done was the initial one, it’s depicted the original state of the ViewController.m file.
The blue areas at the left pane, ending as lines at the right (indicated as #3), are the actual changes that were made to the file. That kind of representation makes immediately clear all modifications, and to the point (line numbers) they were made. If you notice, at the center of the window, between the two preview panes, there are some small rounded labels, with a number on them (indicated as #4). These labels count the total changes one by one, and that’s the meaning of the numbers on them. At the left of them, there is a checkmark symbol. When that checkmark appears, then the respective change will be normally committed to the repository. However, you can skip to commit one or more specific changes of a file, or even discard them, if you click at the small down arrow at the right side of the number. A small menu with two options is displayed:
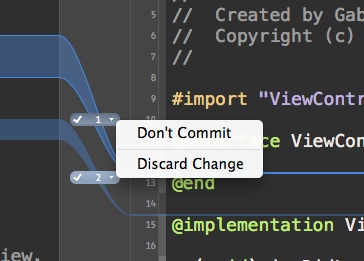
If you select the Don’t Commit option, the checkmark symbol is replaced by a stop symbol, and the respective change won’t get committed to the repository.
![]()
If you select the Discard Change option on the menu, a confirmation window will appear notifying that the selected change will be reverted, and there’s no way to undo that.
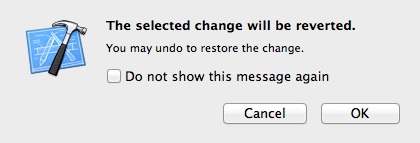
If you click on the OK button, the modifications made to the selected area will vanish, like they were never happened.
If you pay close attention to the commit window image above, you’ll see that all modifications are considered as changes by Xcode, even a blank line. Actually, blank lines are Enter characters not visible on-screen, so it’s totally reasonable to be added to the collection of changes.
Anyway, for the sake of the example, make sure you don’t discard any change, and you allow everything to be committed, so you must be watching the checkmark symbol on each change label.
Under the two panes there is a white area, writing Enter commit message here at the middle of it. This area is provided to add a short description about all the changes made in this version. Click on it and add the contents shown to the next image:
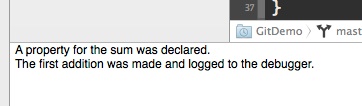
Writing commit messages (that make sense) is useful, especially if you begin committing a lot. So, think of it as a necessary action.
Now that we have made a tour to the essentials of this window, it’s time to do our first commit. At the bottom-right corner of the window, there’s a button saying: Commit 1 file.
![]()
In this button the total number of files to be committed always appear. Click it and congratulations! Your first commit is real, and now belongs to history, both metaphorically and literally. What do I mean? Just open the Source Control > History… menu, and you’ll see it listed there.

As you see, the message we wrote is appeared there, as well as the number of the modified files. In the initial commit made by Xcode, all files were committed, but now just the one we modified.
Besides that, if you close the history window and look at the Project Navigator pane, the M indication next to the ViewController.m file has gone too!
Now, let’s get prepared for one more commit. This time, we are going to add some new files to our project, and the best way to do that is by creating a new class. So, press the Command-N keys combination to your keyboard, and add an Objective-C class. Make it a Subclass Of the NSObject class, and name it TestClass. Finally, add it to the project.
Once you’ve finished doing all the above, notice in the Project Navigator pane that a new indication with the letter A is appeared next to the two class files. This means the these files have been added to the project, and of course, that they haven’t been committed yet.
Open the ViewController.h file, and just import our class:
#import "TestClass.h"
Next, open the ViewController.m file, and declare a private property as follows:
@interface ViewController ()

@property (nonatomic) int sum;

@property (nonatomic, strong) TestClass *testClass;

@end
Look again on the Project Navigator, and notice that there are four files this time not committed. The two class files we added a while ago, and the two modified existing files. Let’s commit those changes as well, therefore open the Source Control > Commit… menu.

This time, there are five files in total selected to be committed. The fifth (presented first in the row) is the project settings file, automatically modified by Xcode when the new class was added to the project. If you click on the TestClass.h or TestClass.m file, the pane on the left will appear without a content, as shown here:
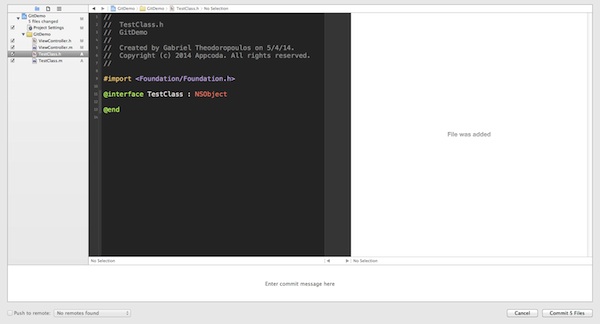
That happens because there isn’t a previous commit regarding both of these files, so there’s no prior version to compare with. So, seeing the right pane simply writing File was added is absolutely normal.
Go to the message area and add the next commit message: TestClass class was added to the project.. After that, click on the Commit 5 files button and let Xcode commit the changes to the git repository.
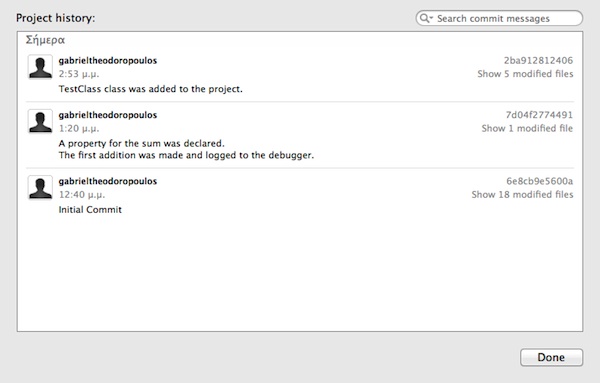
The second manual commit was successfully made. You can check this if you open the commit history from the Source Control > History… menu:
Comparing Versions
After you have committed various versions of your project, is quite easy to compare them and track down code modifications. Comparing versions is especially important when newly added code doesn’t work as it was expected and you need to find any changes been made since the last stable version.
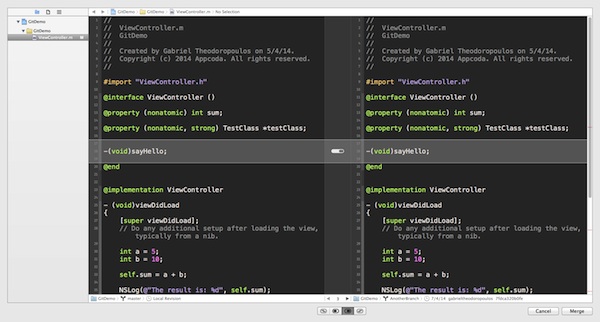
To compare two different versions of a file, either use the View > Version Editor > Show Version Editor, or click on the Version Editor button existing on the toolbar, as shown below:

Once you do any of the above, the editor splits up to two parts. Initially, both the left and right editor panes show the current version of the selected file. To switch any of the two panes to a previously committed version, go to the toolbar below the pane and click on the last button, the one with the clock image:
Immediately, any changes matching to the selection been made are shown on the screen. Usually, the left pane is used for the current version of the file, while the right one is used to access a previous revision. The known blue areas indicating the modified code are displayed, and that makes tracking down code additions really easy. So, go ahead and select any previous commit, and watch the differences appeared between the two panes.
As you may notice, between the two editor panes there are the rounded labels we first saw in the commit window. Clicking on the down arrow existing on any of them, the option to discard the respective changes is appeared. If you click on it, Xcode will ask for your confirmation and if you agree, the selected code will be discarded forever, without any chance to get it back. So, be careful not to discard any piece of code, even accidentally.
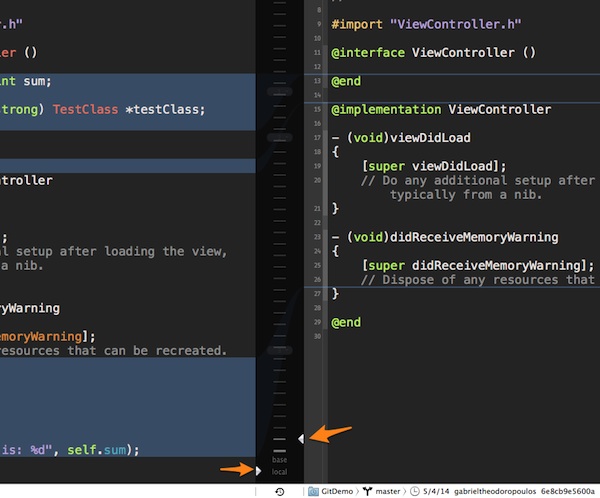
Besides the way presented above, there’s one more that you can use for going back to previous revisions. If you look closely at the toolbar below the two panes, in the middle of it there is a button with a clock and an arrow.
![]()
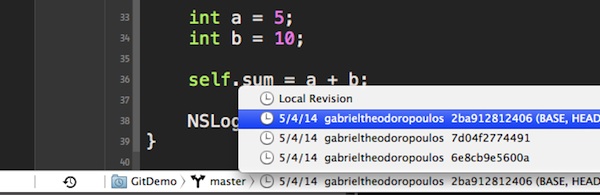
If you click it, the column between the two panes gets changed and the labels are replaced by a series of timestamps in which all the previous commits were made. Note that not all of them represent an actual commit, the actual number of those rounded rectangle shapes matching to previous versions, depends on the amount of the commits. For example, in our application only the two shapes on the bottom match to actual commits.
At the bottom of that column, there are two arrows. The left one belonging to the left pane points to the right, and the right one belonging to the right pane points to the left. Move any of those arrows to any previous revision, and instantly you’ll see it appearing to the respective pane. If you want to compare the current version with any previous one, let one arrow pointing to the local row, and move the second one. The order of the timestamps, beginning from bottom to top, is from the most recent to the oldest one. That means that in the row titled base, you have the last commit we previously did, and if you move towards top, you’ll meet the oldest commits. The next screenshot summarizes everything I described lastly:
Now you know how to compare versions and track changes over time, so feel free to play around with that feature before we go any further.
Who’s Got the Blame
Further than comparing file versions, Xcode allows to track down the person who did a commit, as well as the one who modified parts of code. This is a feature quite useful in cases of projects in which work more than one people. To use it, simply open the View > Version Editor > Show Blame View menu, or keep the mouse button down over the Version Editor button on the toolbar, and then select the Blame option. A window similar to the next one will appear to you:

As you see, the code of the selected file is separated in segments by horizontal lines that match to specific commits. The author of each code segment, along with the commit message and some other info is shown to the right side of the window, inside a special pane.
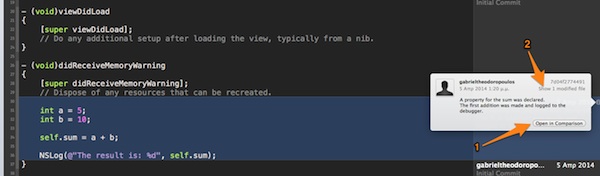
If you haven’t done so yet, open the blame view and pay some attention to the way Xcode presents the code parts separated by commit and author. It’s super fast and easy to locate for a specific bunch of code when it was committed, by whom and get some additional info if you want. That additional info can be accessed if you hover your mouse pointer over the blame pane. You’ll see that when the pointer is over a commit segment, an small button with an i image appears at the very right of it. If you click it, the code of the segment is selected, and a popup window appears with all the commit info. Through this window, you can also access the comparison window (indication #1) and the files modified in the specific commit (indication #2).
Besides the comparison view we saw in the previous section and the blame view we just discussed about, there is also the Log view, which can be accessed through the View > Version Editor > Show Log View, or if you keep the mouse button down on the Version Editor button on the toolbar, and then select the Log option. I won’t get into any details about it, I just leave it for you. After all, it’s not hard to understand what this log is about, and how it can be used.
Branches
Imagine that you have a working version of a project ready for release, or already released, and now you want to start building a new feature, but you don’t want to destroy by accident the currently stable and working application. What can you do in this case so as to avoid a possible disaster and ensure that your project won’t be wrongly modified? The answer is simple: Use branches.
To clearly understand what a branch is, think of your project as a tree, where the stem is always the main, stable and working version of it. Any new features or additions made to the app, must be part of the stem in order to go to production stage. A branch in version control systems, is just like the branch of the tree, which starts from the stem, and follows a different direction. In git (and Xcode eventually), you can create branches to set new paths for your code (such as implementing new features), without the risk to break the working version during development.
Actually, a branch is always created by default in git, named master. The initial commit performed by Xcode, takes place in this branch. Usually, solo developers work only in master branch, even though that this would be a bad practice. No matter if you are working alone or in a team, I think is quite important to use branches when you want to do vital changes or additions to your app, as this tactic may keep you out of troubles. Of course, in team projects, is almost mandatory to implement your own part of the project to a separate branch.
It’s important to have in mind two facts:
- The final product that is about to be delivered either to App Store or to a client, is always the version of the project existing on the master branch.
- Any code or features implemented to secondary branches must be eventually merged to the master branch, in order to be included to the official release of the application (about this later).
When you start working on a new branch, you actually begin from the point you are currently to, even if you have any uncommitted changes. From there on, any code modifications will only be available to the new branch.
Let’s go to Xcode now. To create a new branch, go to the Source Control > GitDemo – master > New Branch… menu, and you’ll see the next window appearing to you:
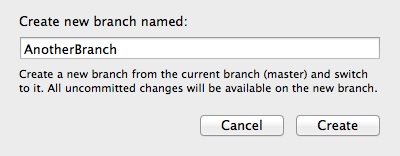
Add a name for the branch. I named it (as you see in the image above) AnotherBranch, but it doesn’t have any point here how you’ll name it. Then click on the OK button, and wait for a moment until the new branch gets created and the current code to be copied to it.
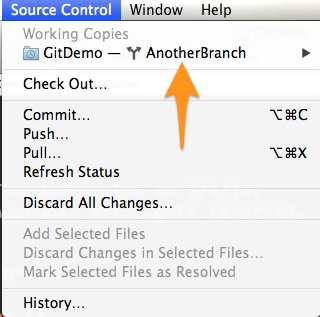
You can very easily to find out what your active branch is. Simply open the Source Control menu, and next to the project’s name option you’ll see the current branch.
Now, let’s make a commit to the new branch. Before doing so, let’s add some new code, so go to the private class section and add the next method declaration:
@interface ViewController ()

...

-(void)sayHello;

@end
Then, implement it:
-(void)sayHello{
    NSLog("Hello");
}
Finally, call it in the viewDidLoad method:
- (void)didReceiveMemoryWarning
{
    ...

    [self sayHello];
}
Now, go to the Source Control > Commit… menu, and the version comparison window will appear. You’ll see that only one modified file existing here to commit, is the ViewController.m file, and the new additions are highlighted as always.
Go and add the next commit message: First commit to new branch… and then click on the Commit 1 File button. The changes take place to the AnotherBranch branch.
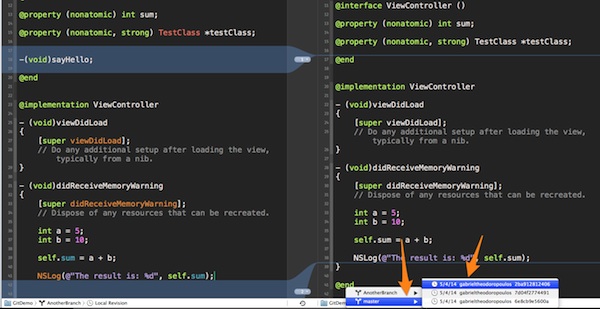
Open the Version Editor now (menu View > Version Editor > Show Version Editor), and go to the toolbar under the right editor pane. You’ll see that the selected branch is the AnotherBranch. Click on it, and you’ll see both this one and the master branches appearing. From the master branch, select any revision you want, and Xcode will highlight the changes between the current version of the AnotherBranch branch, and the selected revision on the master branch. Using that way, as well as everything else we talked about in the Comparing Versions section of the tutorial, you can easily track down code changes made among all branches of your project.
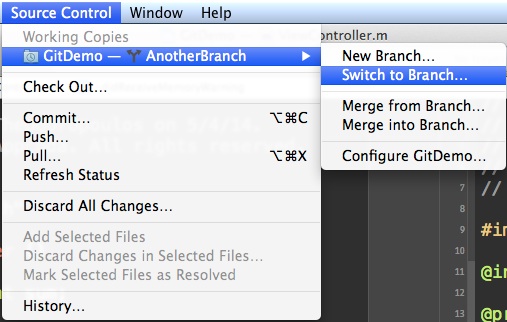
Lastly, to switch to another branch, or to the master branch, go to the Source Control > GitDemo – AnotherBranch > Switch to Branch… menu:
From the window that appears, select the branch you want to switch to, in our case the master branch:
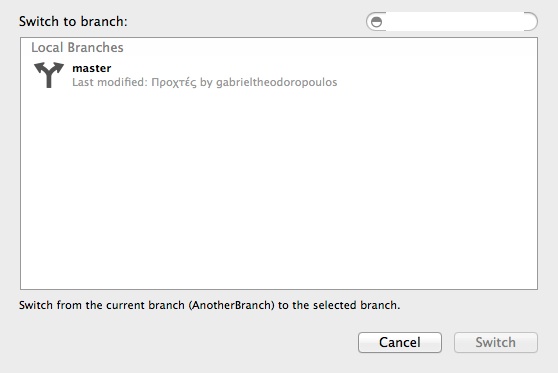
Select it and click on the Switch button. The master will become the active branch again, and you’ll notice that any changes made to the AnotherBranch branch do not appear here. That’s great, as we managed to evolve our project, without modifying the stable version.
Merging Branches
Working on branches other than the master, is always good while being in the implementation state. However, any code additions or modifications must be put together into the master branch if they are meant to exist to a next app release, so in this part we’ll see how this can be done. As you conclude by the title of the section, the functionality we’ll talk about here is called merging, and Xcode provides a fast way to merge the revisions of two branches into one.
Let’s make a small experiment to see how merging works. First of all, make sure you are currently working on the master branch. If not, then go to the Source Control > GitDemo – AnotherBranch > Switch To Branch… menu, and from the displayed window select the master branch.
Next, create a new branch using the Source Control > GitDemo – master > New Branch… menu, and name it LastBranch.
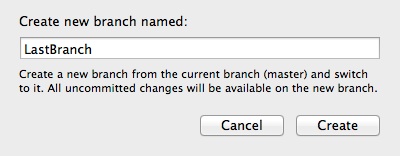
Give Xcode some seconds to prepare it. Now, go to the ViewController.m file to create one more dummy private method, and begin by declaring it:
@interface ViewController ()

...


-(void)sayByeBye;

@end
Then implement it:
-(void)sayByeBye{
    NSLog("Bye - Bye");
}
And finally, call it in the viewDidLoad method:
- (void)viewDidLoad
{
    ...

    [self sayByeBye];
}
Before merging, the changes made to this branch must be committed first to the local repository. Therefore, go to the Source Control > Commit… to perform the commit.
Let’s get to the point now. To merge two different branches into one, you have two options:
- Merge From Branch: Any changes existing to the branch you’ll choose, they will be merged to the currently working branch.
- Merge Into Branch: Any changes existing in the currently working branch will be merged to the branch you’ll choose.
Both of these options can be found under the Source Control > GitDemo menu. Note that when your active branch is the master, the second option is not available.
Let’s suppose now that one developer has worked on the AnotherBranch branch we previously created and implemented on it the sayHello method, and another one has worked on the LastBranch and implemented the sayByeBye method, and it’s your duty to include these two new additions to the next stable release of the app. What will you do? Simply, while having the master branch active, you’ll merge from the two other branches as follows:
At first, make sure your working branch is the master, and if not switch to it.
Next, open the Source Control > GitDemo – master > Merge From Branch…, and from the window that opens select the AnotherBranch branch and click on the Merge button.

A revision comparison window will appear, where you’ll have the chance to review all code changes that will be made after merging. If you want, take a quick look, and when you’re ready, click on the Merge button once again.
When Xcode asks you about taking snapshots of the project, click on the Enable button to proceed. Give it some moments and voila! In the master branch the additions been made to the AnotherBranch branch have now been merged.
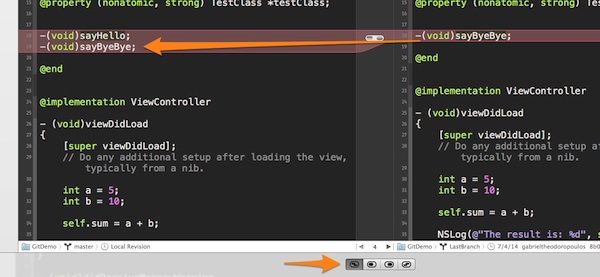
Follow the same way to merge from the LastBranch branch. You’ll notice that Xcode won’t let you merge again if you don’t commit the current version of the modified file. So, there’s only one way, to commit. Do it and then try to merge from the LastBranch once again. In the version comparison window you may see a red area indicating the changes after merging, instead of the usual blue one. That means that code existing in the branch you merge from will replace the code at the same lines on the currently working branch, the master, as shown below:

You can easily avoid this and keep both of the existing and new code, if you use the buttons lying in the toolbar below the editor panes. Having selected the area by clicking on the rounded shape pointed above with an arrow, use all buttons to see their effects. In the screenshot that follows, I have selected the first one, meaning that the existing code on the master branch will be placed first and prior to the code from the other branch in terms of line ordering:
Go through all changes, and make sure that no code will be excluded by any branch. Once you have finished and you are sure that all code is there, click on the Merge button.
Congratulations! You have managed to successfully merge code from multiple branches into one, and now you know how to deal with Xcode in similar cases.
Discarding Changes
The option to discard unwanted code modifications made to a project is a seriously helpful one, as with just one click you can undo all the work you have done since the last commit. It’s useful when the implementation is not going towards the desired direction and you want to fresh start from the last stable and working version. Notice though that discarding changes is an undoable operation, therefore if you accidentally do it you won’t have any chance to get your work back. So, be cautious.
Previously, while we were discussing about comparing versions, we saw for first time how to discard specific code segments by using the small menu icon of each marked area between the editor panes. Here, we’ll see how to perform a discard on whole project, and instantly go the last commit point.
For the testing purposes of this part, open the ViewController.h file and add a public method declaration:
@interface ViewController : UIViewController

-(void)aVeryCoolMethod;

@end
Now, let’s modify a bit the ViewController.m file by adding a small implementation segment for this method:
-(void)aVeryCoolMethod{
    NSLog("I'm feeling that you'll discard me... Really?");
}
If you notice on the Project Navigator, the M indication has been added next to both of the files we just touched. That’s good, as we want to see if by discarding the changes, all of the modified files will be affected and get reverted to their previous state.
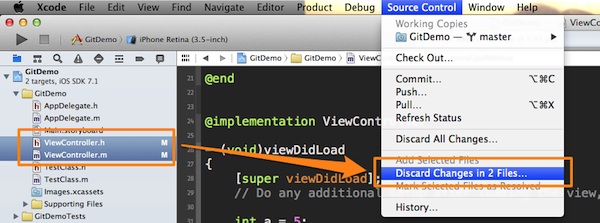
Let me mention an important detail here: You can either discard changes made to all files, or just to specific ones. That’s up to you, and if you want to discard selectively, then make sure firstly to select the files of which you want the changes to be discarded. To make the latter clear enough, if you select only the ViewController.m file and then open the Source Control menu, you’ll find an option titled Discard Changes in ViewController.m. Similarly, if you select only the ViewController.h file and open the same menu, you’ll see the Discard Changes in ViewController.h option this time. However, if you want to discard changes in both files (and suppose that there could be more than those two modified), just select them in the Project Navigator and open once again the Source Control menu. The respective command turns into Discard Changes in 2 Files…, as shown below:
In this example we are not going to use that option, but the Discard All Changes instead. By clicking it, a confirmation alert will appear on screen, and this is the one and only Xcode’s effort to prevent you from doing it accidentally.
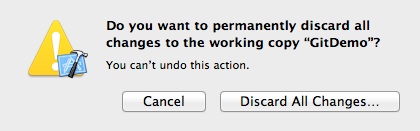
Click on the Discard All Changes… button of the alert and the public method belongs to the past now. As you see, discarding all changes is just a couple of clicks away from your current state, so I advise you once again to be extremely careful when you’re about to discard, as well as when you generally use the Source Control menu.
Summary
Through this tutorial, I made an effort to present in a thorough and detailed way how to manage version and source control using Xcode. Behind the scenes, the real work is done by git, one of the most popular and most-used version control system. You may have noticed that no reference to GitHub or to any of the related Xcode features was made, but that was done on purpose, as my target was to focus entirely on git management through Xcode, and besides that, GitHub can be used if only you know how to deal with version control. Further than all these and as I already mentioned at the beginning of this tutorial, if you are a member of a team, then working with a version control system is mandatory. If you are working alone though, then you are strongly encouraged and prompted to start using version control with Xcode if you don’t do so. That’s a way to guarantee that you won’t ruin any already made with pain and cost work, and besides that, it will become easier to expand your applications when adding new features. Closing, I wish the examples presented here to be proved helpful, and by using the Xcode’s version control to eventually manage to save some working hours.
As always, feel free to share your thought by leaving comment below.


