

One of the several services and APIs that developers can use from Google is the Cloud Translation API, which offers the ability to perform machine learning (ML) based translations of any string into any supported language. The list of supported languages is long and it’s getting longer over time. Google provides pre-trained models for translation, but custom models can be trained as well. And as we will find out soon in this tutorial, translation is fast, accurate, and of high-quality.
In this post we are going to learn how to use the Google Translation API so we can support and provide realtime translation in our apps. To make it clear, we won’t train any model, it’s totally out of our scope. What we’ll discuss about will focus on three different kind of services that Google provides with Translation API:
- Text translation: Translating some text from a source language to a target language.
- Language detection: Useful feature when source language is unknown or it must be detected automatically.
- Supported languages: A list of all languages supported for translation.
Google offers client libraries for integration into projects, but not for iOS. However, that’s not going to be much of a problem for us here as we will be based on the REST APIs it also offers, so we will be doing web requests in order to achieve any of the above. Of course, that means that you have a basic understanding about RESTful services, web requests, what a request or a response is, HTTP methods, and other related concepts. Don’t worry, you don’t have to be a master on these so you can understand what we will do in this post. In order to perform web requests we will write a small method that will do all the “magic” a bit later, so any dark points will be cleared out.
The downside and probably frustrating point regarding the Cloud Translation API is that there is no option for free API usage even for a limited number of requests, so charges apply and developers have to pay even to try it out. That’s undoubtedly a fact that generates some sort of reluctance and hesitation to anyone who wants to get to know this API. However the cost of the service is not that high, it’s at $20 per one million characters, which sounds fair. See more details here.
Through the next parts of this tutorial we’ll mainly focus on building an iOS app that will clearly demonstrate how to integrate translation services by using Google Cloud Translation APIs into an iOS project. However we’ll begin with Google Cloud Platform where it is mandatory to make some preliminary work and eventually generate an API key that will “unlock” the translation services to us. Somewhere in the process you will be called to provide billing information if you do not have a billing account already configured in Google.
Always remember that Google documentation is quite informative and helpful, so do not hesitate to pay a visit there to read more if you feel like it. Now, let’s have a quick look at the demo application that we will be working on today.
About The Demo App
We’ll get to know Google Cloud Translation APIs through a simple, yet essential iOS application. We won’t start from scratch as there is a starter project for you to download. This project has all vital stuff already implemented except for any logic related to using the translation APIs.
To give you an overview, the Translate project is a navigation based app parted by three view controllers:
EditorViewController: It contains a text view where the source text can be typed in, and two bar buttons in the navigation bar. The first one is to trigger source text language detection, and the second to initiate text translation.LanguagesViewController: It contains a table view where all supported languages for translation are being listed after they are fetched from Google.TranslationViewController: It contains a text view where the translation of the source text is being displayed.
The flow of the app is simple:
- Users type in some text.
- They tap on the Translate button.
- The list of supported languages for translation is fetched and presented in the table view of the
LanguagesViewController. - Users select a target language to translate the original text to and they are navigated to
TranslationViewControllerwhere the translated text will appear after the translation has successfully finished.
Additionally, users will be able to perform an automatic language detection of the source text using the Detect Language bar button in the EditorViewController.
The following animated graphic illustrates the app functionality:
In the starter project you will find a custom library of mine called GTAlertCollection (which you can also find on Github). Its purpose is to present various kinds of alert controllers by simply calling the proper method and passing a few arguments, and that’s going to save us significant implementation time in the following parts.
Please download the starter project and navigate yourself around. Open the Main.storyboard file and see the scenes order and flow, and go through the classes and see what is already implemented. When you feel ready, continue to the next parts where I guarantee that we will meet really interesting stuff!
Creating A Project In Google Cloud Platform Console
Before we are able to use any Translation APIs from Google, we must go through the process of creating a new project in the Google Cloud Platform Console, and ultimately to generate an API key that will let our app access the translation API and make requests to it, as well as to let Google keep track of the API usage. In this part I’ll take you through all necessary steps from creating a new project and enabling Translation API, up to generating the desired API key.
Note: I won’t go into details on how to set up a billing account. If you already have one then you’re all set, if not, you will be asked to create one when you will enable Translation API in the following steps. In that case, follow the on-screen instructions, give your credit card information and then proceed to the rest of the process.
So, to start, get connected to your Google account and then visit this page where Google Cloud Platform projects can be managed. If you have previous projects already created then you will find them here.
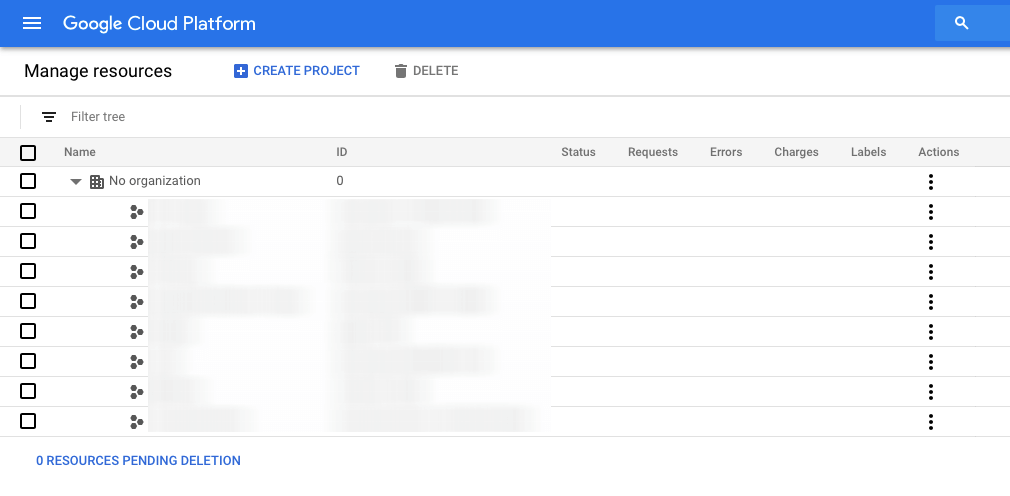
Click to the Create Project button to the top side, and you’ll be navigated to a new page where you will provide a name for the project we are creating for our app. As you can see next, I named it Translation Project, but feel free to give any name you like. Once you are ready, click to the Create button.
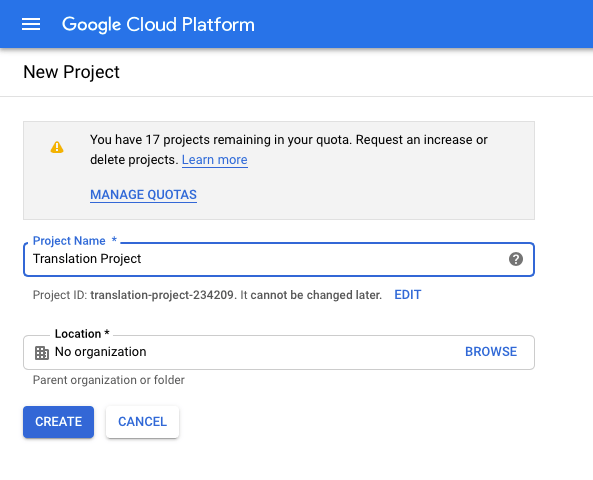
Wait for a few seconds while the new project is being created, and soon enough you’ll see it in the list of projects (if not, refresh the page after you see the notification that the project is ready).
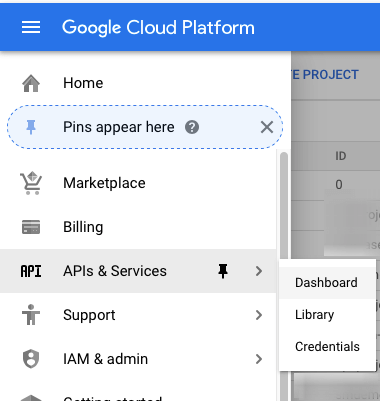
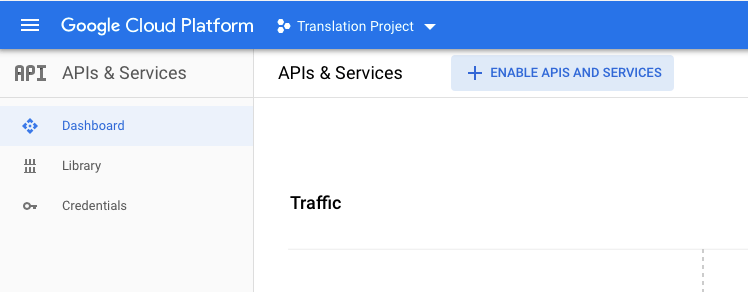
Next, click to the Navigation menu (the sandwich menu on the blue bar), and select the option APIs & Services > Dashboard. Even though we have created a brand new project, no API has been connected to it yet, and that’s what we are after here.
In the new screen make sure that the new project name (Translation Project or whatever you named it) is shown to the blue bar. If not, click on the down arrow and select it in the window that will appear. When you see it selected, click to the ENABLE APIS AND SERVICES button.
The above action will take you to the API Library page:
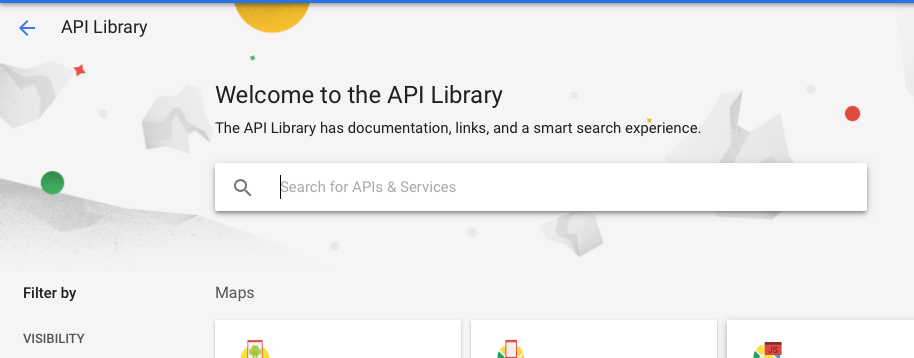
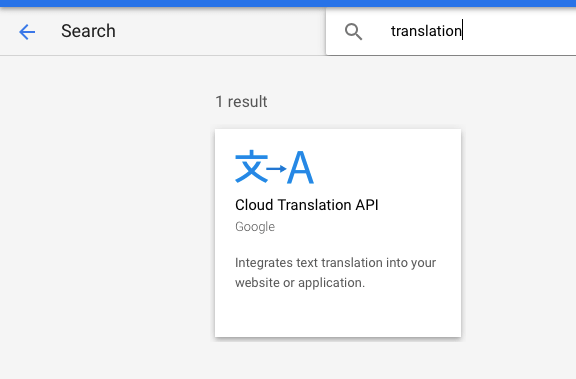
In the search field type the word translation, and the Cloud Translation API will remain the only item on the page. Click on it.
The following page provides some details about the API, as well as pricing information. As said already, the cost of using translation API is $20 per 1 million characters at the time of writing this post. Read whatever you find useful on that page, and then click on the blue Create button.
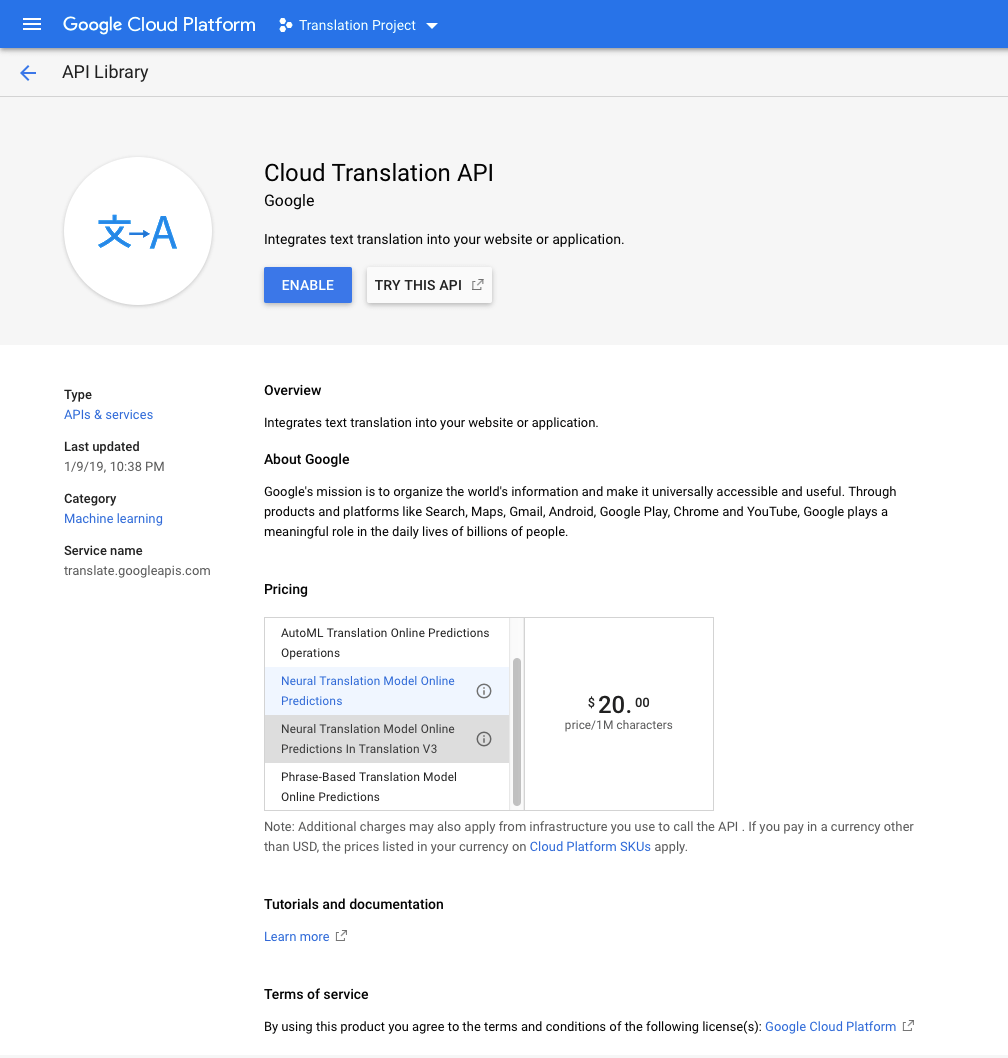
If you have not a billing account already active, then most probably this is the time that you will be asked to created one. Google won’t let you proceed and enable the Cloud Translation API without having a billing account.
After enabling the API, you’ll land to a new page containing details and its overview. At the top you’ll find a message saying that this API needs credentials, so let’s create them. Open the Navigation menu (sandwich menu) again, and go to APIs & Services > Credentials option. Somewhere in the middle of the page you will find a box titled APIs Credentials, and a blue button titled Create credentials. By clicking on it, you should see a list of options similar to the next image:
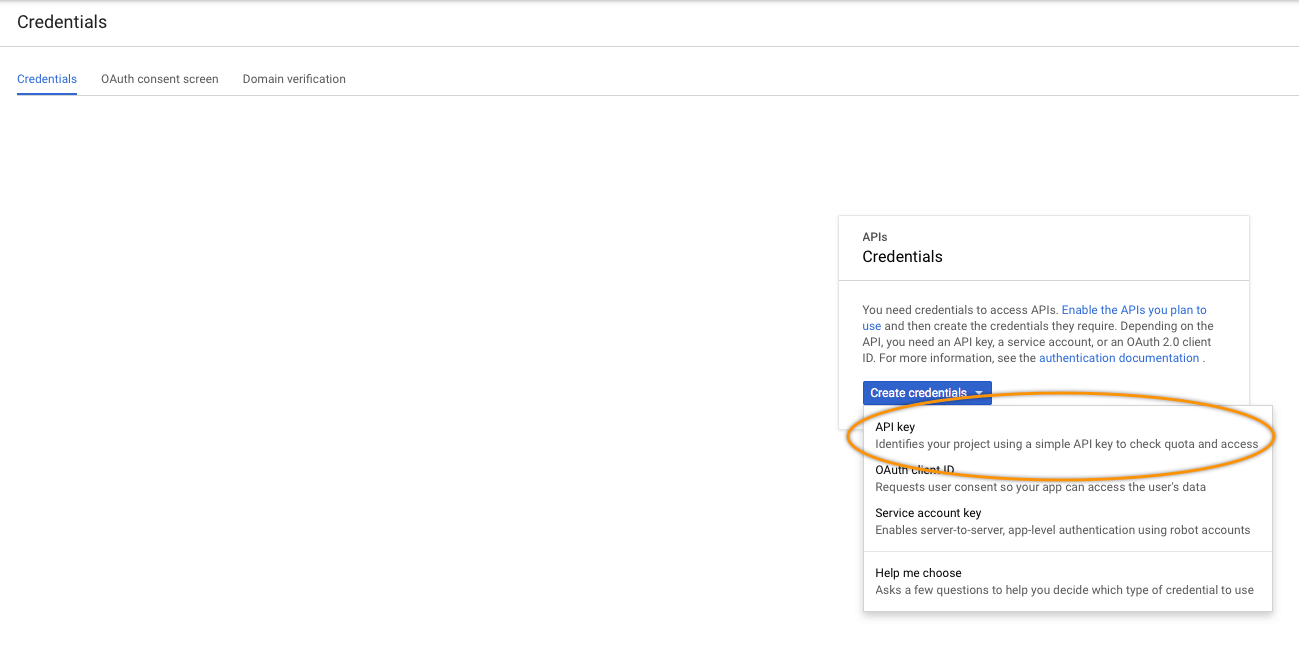
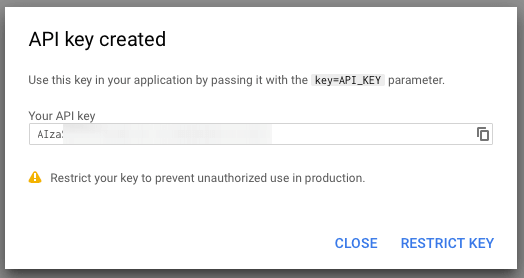
Click on the first option titled API key. A small window will pop up containing the new key created for you. This is what we want, but before we finish click on the Restrict Key button to the bottom of the small window:
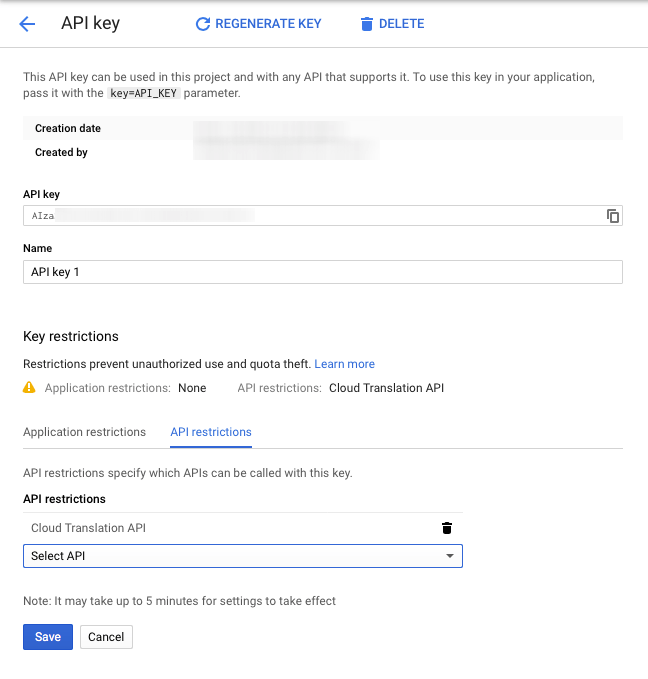
You will be taken to the key details where you can restrict the key usage with two different types of restrictions:
- Application restrictions
- API restrictions
In Application restrictions you can allow specific kind of apps to be able to make requests using the given key. You could select, for example, the iOS apps option since we are going to use the key through an iOS app only.
In API restrictions you limit the key usage to specific enabled APIs in the project. If, for example, we would have more APIs enabled in the project, we could click on the Select API dropdown and select the Cloud Translation API option to allow the specific key to be used with that API only.
If you make any changes, do not forget to click to the Save button.
Here is what you should see in the Credentials page after you finish with the key creation:

Don’t close that page yet, we’ll need to copy the API key soon. However, the work on Google Cloud Platform is now finished.
Starting To Code: The TranslationAPI enum
Time to do some coding, and we’ll start by creating a useful enum where we’ll define the Cloud Translation API use cases:
- Detect language
- Get supported languages
- Translate
In the starter project open the TranslationAPI.swift file and add the following:
enum TranslationAPI {
    case detectLanguage
    case translate
    case supportedLanguages
}
We will be using the TranslationAPI enum to specify the API we want to make requests to as you will see later on. But listing the APIs only is not enough; we could add a couple of functions as well and make our life easier in the following steps. What would these functions be?
The first one can be a function that returns the request URL of each API. We have three different APIs, so three different URLs:
enum TranslationAPI {
    // ...

    func getURL() -> String {
        var urlString = ""

        switch self {
        case .detectLanguage:
            urlString = "https://translation.googleapis.com/language/translate/v2/detect"

        case .translate:
            urlString = "https://translation.googleapis.com/language/translate/v2"

        case .supportedLanguages:
            urlString = "https://translation.googleapis.com/language/translate/v2/languages"
        }

        return urlString
    }
}
The other function will regard the HTTP request method each API requires. For getting the supported languages by the Cloud Translation API we’ll make a GET request, and a POST request for the other two.
enum TranslationAPI {
    // ...

    func getHTTPMethod() -> String {
        if self == .supportedLanguages {
            return "GET"
        } else {
            return "POST"
        }
    }
}
The few code we added here will be proved useful next.
The Translation Manager for Google Translation API
In this part we are going to start implementing a class that we will name TranslationManager, but we will finish it in the last part of the tutorial. In this class we’ll implement all that code we need to make web requests to Google Cloud Translation APIs, and to fetch and parse the results before we hand them back to the view controller which asked for them. So, let’s get going by doing some sort of preparation that will make it easy for us to make request to translation APIs pretty soon.
Open the TranslationManager.swift file and add the following starter stuff:
class TranslationManager: NSObject {

    static let shared = TranslationManager()

    private let apiKey = "YOUR-API-KEY"


    override init() {
        super.init()
    }
}
The shared property will let us use TranslationManager as a singleton class, or in simple words, we’ll be using the shared instance throughout the project instead of initializing new TranslationManager instances wherever and whenever we need to use it.
Next, we assign the API key we created in Google Cloud Platform previously to the apiKey property. Replace the “YOUR-API-KEY” with the real API key from Google, and we’ll use it soon enough.
We will keep adding new properties to the class as we’ll be moving forward. At the time being the above is all we need, so let’s implement a really important method; the one that will perform the actual web requests and will fetch the results. We’ll start by defining it:
private func makeRequest(usingTranslationAPI api: TranslationAPI, urlParams: [String: String], completion: @escaping (_ results: [String: Any]?) -> Void) {

}
The first parameter is a TranslationAPI value that will help determine the request URL and HTTP method to use. You will start seeing the value of the TranslationAPI enum as it’s going to save us from unnecessary extra coding. The second parameter is a dictionary that will contain the URL parameter values for each request we’ll be making.
Note: API key will always be one of the URL parameter values.
The completion handler will pass the fetched results to the method that calls this one, or it will simply return a nil value if no results have been fetched.
Let’s make that method work now. First of all, we must append the parameter values (urlParams dictionary) to the request URL. For that, we’ll initialize a URLComponents object.
if var components = URLComponents(string: api.getURL()) {

}
The initilization of the URLComponents object is done using the request URL string taken from the getURL() function of the api parameter value. Note that this initilization might return a nil value, so unwrapping it is necessary. Also, notice that instead of an if let statement, I used an if var. That’s because the components object is going to be changed right next and it cannot be a constant.
URLComponents contains an array called queryItems which by default is nil. This array expects URLQueryItem items. We will initialize it, and we’ll add all URL parameters as URLQueryItem objects one by one.
if var components = URLComponents(string: api.getURL()) {
    components.queryItems = [URLQueryItem]()

    for (key, value) in urlParams {
        components.queryItems?.append(URLQueryItem(name: key, value: value))
    }
}
Next step is to create a URLRequest object using the built URL from the components object, and pass the appropriate HTTP method to it:
if var components = URLComponents(string: api.getURL()) {
    // ...

    if let url = components.url {
        var request = URLRequest(url: url)
        request.httpMethod = api.getHTTPMethod()
    }
}
We get the HTTP method instantly simply by calling the getHTTPMethod() function.
Now, we’ll create a URLSession object along with a data task that will perform the URL request:
if var components = URLComponents(string: api.getURL()) {
    // ...

    if let url = components.url {
        // ...

        let session = URLSession(configuration: .default)
        let task = session.dataTask(with: request) { (results, response, error) in

        }

        task.resume()
    }

}
The above data task returns three values on finish:
resultswhich is the data returned by the server (it can be nil if nothing has been fetched).responsewhich is aURLResponseobject.errorthat describes any error that have might occurred.
We’ll start inside the completion handler of the data task by checking the value of the error parameter. If error is different than nil then something bad has happened, and in that case we can only return nil in the completion handler of our function.
Otherwise, we check the HTTP status value of the response (after we convert it to a HTTPURLResponse object), and if it’s 200 or 201 (success on GET and POST requests respectively) we convert the fetched data into a dictionary and we pass it to the caller through the completion handler. Remember that server returns JSON data, so we’ll use JSONSerialization class to convert to dictionary.
The following code includes all these discussed above:
let task = session.dataTask(with: request) { (results, response, error) in
    if let error = error {
        print(error)
        completion(nil)
    } else {
        if let response = response as? HTTPURLResponse, let results = results {
            if response.statusCode == 200 || response.statusCode == 201 {
                do {
                    if let resultsDict = try JSONSerialization.jsonObject(with: results, options: JSONSerialization.ReadingOptions.mutableLeaves) as? [String: Any] {
                        completion(resultsDict)
                    }
                } catch {
                    print(error.localizedDescription)
                }
            }
        } else {
            completion(nil)
        }
    }
}
The method that will perform the actual web requests is now ready, and we’ll make use of it starting from the next part. Before we close this one, here it is in one piece:
private func makeRequest(usingTranslationAPI api: TranslationAPI, urlParams: [String: String], completion: @escaping (_ results: [String: Any]?) -> Void) {
    if var components = URLComponents(string: api.getURL()) {
        components.queryItems = [URLQueryItem]()

        for (key, value) in urlParams {
            components.queryItems?.append(URLQueryItem(name: key, value: value))
        }

        if let url = components.url {
            var request = URLRequest(url: url)
            request.httpMethod = api.getHTTPMethod()

            let session = URLSession(configuration: .default)
            let task = session.dataTask(with: request) { (results, response, error) in
                if let error = error {
                    print(error)
                    completion(nil)
                } else {
                    if let response = response as? HTTPURLResponse, let results = results {
                        if response.statusCode == 200 || response.statusCode == 201 {
                            do {
                                if let resultsDict = try JSONSerialization.jsonObject(with: results, options: JSONSerialization.ReadingOptions.mutableLeaves) as? [String: Any] {
                                    print(resultsDict)
                                    completion(resultsDict)
                                }
                            } catch {
                                print(error.localizedDescription)
                            }
                        }
                    } else {
                        completion(nil)
                    }
                }
            }

            task.resume()
        }

    }
}
Detecting Source Language
The first Google Cloud Translation API that we are going to use, is the language detection API. To use it, all it takes is to post some text and we’ll get back a response that contains the detected language. One thing that I find to be a neat feature is the fact that several texts can be sent over for detection with a single request.
Note: We won’t send multiple texts for language detection here, but keep the above in mind in case you need it in your own projects. Feel free to alter the implementation to the method we’ll build next and support multiple text inputs.
For reference, documentation about language detection can be found here, and I push you towards reading it.
So, back to our work, and still in the TranslationManager.swift file and in the TranslationManager class, let’s declare the following new property:
var sourceLanguageCode: String?
The detected language will be kept to that property, and you’ll understand later (on translation part) why we do that.
Now, let’s start implementing a new method dedicated to the language detection. That method will accept two parameters: The text that will be used as the source to language detection, and a completion handler with the detected language if the request is successful.
func detectLanguage(forText text: String, completion: @escaping (_ language: String?) -> Void) {

}
According to the API documentation, we have to include two parameters in the URL that we’ll make the request to:
- The source text,
- The API key.
We have both values, so we’ll create a new dictionary with them:
func detectLanguage(forText text: String, completion: @escaping (_ language: String?) -> Void) {

    let urlParams = ["key": apiKey, "q": text]

}
For first time now we’ll use the makeRequest(usingTranslationAPI:urlParams:completion:) method which we implemented in the previous part. We will call it passing the urlParams dictionary we just specified, and the first thing we’ll do in its completion handler is to make sure that there’s data returned.
func detectLanguage(forText text: String, completion: @escaping (_ language: String?) -> Void) {
    let urlParams = ["key": apiKey, "q": text]

    makeRequest(usingTranslationAPI: .detectLanguage, urlParams: urlParams) { (results) in
        guard let results = results else { completion(nil); return }

    }
}
Notice that the detectLanguage value is given as the first argument (since it’s expecting for a TranslationAPI value). Also, if results is nil, then nil is returned to the completion handler as well.
Let’s focus a bit now on the expected results. Let’s suppose we make language detection for the string: Hello there!!!.
In normal conditions the returned data is similar to this:
["data": {
    detections =     (
                (
                        {
                confidence = 1;
                isReliable = 0;
                language = en;
            }
        )
    );
}]
data is a dictionary, and detections is a two-dimensional array where each item of the inner array is a dictionary too. The language key is the one containing the detected language as an ISO 639-1 code (ie, “en”, “el”, “fr”), and not as a human readable text. According to documentation, confidence and isReliable are deprecated and they should not be used for making any decisions regarding the detected language.
Note: A piece of advice in case you want to get the human readable text for the returned language: Fetch the list of supported languages (see next part) and then search for the language name based on the language code.
With the above results in mind, let’s continue to data parsing. As you will see in the following implementation, once we make sure that data and detections keys exist in the result, we iterate through detections and we keep the found language code (or codes if you change the implementation and send multiple texts to be detected). Then, and once we make sure that at least one language code has been found, we assign it to the sourceLanguageCode property and pass it to the completion handler. In any other case, we just pass nil to the completion handler.
if let data = results["data"] as? [String: Any], let detections = data["detections"] as? [[[String: Any]]] {
    var detectedLanguages = [String]()

    for detection in detections {
        for currentDetection in detection {
            if let language = currentDetection["language"] as? String {
                detectedLanguages.append(language)
            }
        }
    }

    if detectedLanguages.count > 0 {
        self.sourceLanguageCode = detectedLanguages[0]
        completion(detectedLanguages[0])
    } else {
        completion(nil)
    }

} else {
    completion(nil)
}
Here’s the detectLanguage(forText:completion:) method all together:
func detectLanguage(forText text: String, completion: @escaping (_ language: String?) -> Void) {
    let urlParams = ["key": apiKey, "q": text]

    makeRequest(usingTranslationAPI: .detectLanguage, urlParams: urlParams) { (results) in
        guard let results = results else { completion(nil); return }

        if let data = results["data"] as? [String: Any], let detections = data["detections"] as? [[[String: Any]]] {
            var detectedLanguages = [String]()

            for detection in detections {
                for currentDetection in detection {
                    if let language = currentDetection["language"] as? String {
                        detectedLanguages.append(language)
                    }
                }
            }

            if detectedLanguages.count > 0 {
                self.sourceLanguageCode = detectedLanguages[0]
                completion(detectedLanguages[0])
            } else {
                completion(nil)
            }

        } else {
            completion(nil)
        }
    }
}
Let’s change our working file now, and let’s open the EditorViewController.swift file. There is a bar button in the navigation bar of the EditorViewController titled Detect Language, and its purpose is to perform language detection to any text that has been typed in the text view. This button is already connected to the detectLanguage(_:) IBAction method, but there’s no implementation currently in it.
As I mentioned in the demo app description part of this post, we are going to use a library of mine called GTAlertCollection to show alert controllers. We’ll do that to save implementation time as it can help us present various types of alerts as easy as just making simple method calls. In the detectLanguage(_:) method now we’ll display a sort of “Please wait…” message in a buttonless alert along with an activity indicator.
Then we’ll call the detectLanguage(forText:completion:) method we implemented right above, and once we get the detected language back we’ll present it to a new alert. In case an error occurs and no language is returned, we’ll display the respective message.
@IBAction func detectLanguage(_ sender: Any) {
    if textView.text != "" {
        // Present a "Please wait..." buttonless alert with an activity indicator.
        alertCollection.presentActivityAlert(withTitle: "Detect Language", message: "Please wait while text language is being detected...", activityIndicatorColor: UIColor.blue, showLargeIndicator: false) { (presented) in
            if presented {


            }
        }

    }
}
Notice that we don’t proceed if there’s no text entered in the text view.
The presentActivityAlert method of the GTAlertCollection class displays a buttonless alert with an activity indicator in it. activityIndicatorColor and showLargeIndicator parameter values can be optionally provided (we’ll see a shorter version of this method later), but I included them here for showing that the activity color and size can be altered. The presented parameter value of the completion handler indicates when the alert controller has been presented to the view controller.
Note: The alertCollection property has been initialized in the viewDidLoad() method already. The view controller object (self) is given as an argument upon initialization.
Our next step is to call the detectLanguage(forText:completion:) method we implemented right above. In the completion handler we’ll dismiss the buttonless alert, and we’ll display a new alert that will contain either the detected language code, or an error message if no language is returned.
TranslationManager.shared.detectLanguage(forText: self.textView.text) { (language) in
    // Dismiss the buttonless alert.
    self.alertCollection.dismissAlert(completion: nil)

    if let language = language {
        // Present an alert with the detected language.
        self.alertCollection.presentSingleButtonAlert(withTitle: "Detect Language", message: "The following language was detected:\n\n\(language)", buttonTitle: "OK", actionHandler: {

        })

    } else {
        // Present an alert saying that an error occurred.
        self.alertCollection.presentSingleButtonAlert(withTitle: "Detect Language", message: "Oops! It seems that something went wrong and language cannot be detected.", buttonTitle: "OK", actionHandler: {

        })
    }
}
There is nothing particularly difficult in the above code, and the detectLanguage(_:) IBAction method is now complete. Here it is as one piece:
@IBAction func detectLanguage(_ sender: Any) {
    if textView.text != "" {
        // Present a "Please wait..." buttonless alert with an activity indicator.
        alertCollection.presentActivityAlert(withTitle: "Detect Language", message: "Please wait while text language is being detected...", activityIndicatorColor: UIColor.blue, showLargeIndicator: false) { (presented) in
            if presented {
                TranslationManager.shared.detectLanguage(forText: self.textView.text) { (language) in

                    // Dismiss the buttonless alert.
                    self.alertCollection.dismissAlert(completion: nil)

                    if let language = language {
                        // Present an alert with the detected language.
                        self.alertCollection.presentSingleButtonAlert(withTitle: "Detect Language", message: "The following language was detected:\n\n\(language)", buttonTitle: "OK", actionHandler: {

                        })

                    } else {
                        // Present an alert saying that an error occurred.
                        self.alertCollection.presentSingleButtonAlert(withTitle: "Detect Language", message: "Oops! It seems that something went wrong and language cannot be detected.", buttonTitle: "OK", actionHandler: {

                        })
                    }
                }
            }
        }

    }
}
The app can be tested now for first time. Once you run it and type some text in the text view, tap on the Detect Language button. Google Cloud Translation API will detect the language of the entered text, and you’ll be presented with the language code in just a few moments.
Getting Supported Languages
In the previous part we created the detectLanguage(forText:completion:) method in the TranslationManager class in order to detect the language of the entered text in the text view. In both this and the next part we’ll follow the same pattern, and we will create additional methods to get the list of the supported languages for translation, and to make the actual translation.
As I have said already, after some text has been typed in the text view and the Translate bar button is tapped in the app, a list of the supported languages for translation should be displayed. That list is not hardcoded into the app though; we’ll be fetching it using the Google Cloud Translation API described here. The list of languages will be fetched once per app launch, so if you kill the app (not just send it on the background) the list will be fetched again on the next run.
Note: I leave it to you to implement a persistent storage of the fetched supported languages.
Opening the TranslationManager.swift file again, we’ll start by defining the following struct:
struct TranslationLanguage {
    var code: String?
    var name: String?
}
That struct represents a supported language programmatically. It’s easy assume that each returned supported language will contain a code (such as “en”) and the human readable textual representation. However it’s not always guaranteed that the language name (name property) will be always there. Why? You’ll find out soon.
Let’s go in the TranslationManager class now and let’s declare the following array as a class property:
var supportedLanguages = [TranslationLanguage]()
We’ll be storing the fetched supported languages data in it.
Now, let’s start implementing a new method that will initiate the request for getting the supported languages and parsing the results:
func fetchSupportedLanguages(completion: @escaping (_ success: Bool) -> Void) {

}
The completion handler of this brand new method returns just a flag which indicates whether fetching the languages list was successful or not. The actual data will be kept in the supportedLanguages array.
Let’s talk a bit now about the URL parameter values. The supported languages API can accept from one up to three URL parameters:
- The API key – this is mandatory.
- The target language for the results.
- The translation model of the supported languages.
Target language specifies the language that will be used in order to represent the human readable text representation of each returned language. For example, if “en” language is specified as target language in the request (as a URL parameter value), results will look like this:
["data": {
    languages =     (
        {
            language = af;
            name = Afrikaans;
        },
        {
            language = sq;
            name = Albanian;
        },
        {
            language = am;
            name = Amharic;
        },
        {
            language = ar;
            name = Arabic;
        },
        ...
        ...
        ...
    );
}]
However, if the target language is omitted, then the results would look like the following:
["data": {
    languages =     (
        {
            language = af;
        },
        {
            language = sq;
        },
        {
            language = am;
        },
        {
            language = ar;
        },
        ...
        ...
        ...
    );
}]
The difference is obvious; language name does not exist in the results! In our demo app here we will specify a target language, but in your own projects you can omit it if you think you don’t need this data to be returned by the server.
Regarding the translation model now, there are two values that can be used:
- base: Use this value to get Phrase-Based Machine Translation (PBMT) supported languages.
- nmt: Use this to get Neural Machine Translation (NMT) supported languages.
Two important details to remember: First, if you omit this parameter from the request URL, all supported languages will be returned. Second, NMT supported languages can only be translated to or from English.
It’s up to you to decide if and which model you’ll specify. In our demo app here, we’ll just omit that URL query parameter and we’ll let all supported languages to be returned.
After having said all the above, let’s proceed with the implementation of our method. We will create a dictionary that will contain the URL parameter values:
- The API key
- The target language. Here we’ll use the locale settings of the device. If
languageCodenext is nil, we set “en” (English) as the default target language.
func fetchSupportedLanguages(completion: @escaping (_ success: Bool) -> Void) {
    var urlParams = [String: String]()
    urlParams["key"] = apiKey
    urlParams["target"] = Locale.current.languageCode ?? "en"
}
Next, let’s make the request:
makeRequest(usingTranslationAPI: .supportedLanguages, urlParams: urlParams) { (results) in
    guard let results = results else { completion(false); return }

}
Time to parse the results. Based on the previous examples, the returned data contains a dictionary named “data”, which in turn contains the “languages” array, where each item is another dictionary with each language’s data.
With that in mind, we can proceed in parsing the results:
makeRequest(usingTranslationAPI: .supportedLanguages, urlParams: urlParams) { (results) in
    guard let results = results else { completion(false); return }

    if let data = results["data"] as? [String: Any], let languages = data["languages"] as? [[String: Any]] {

        for lang in languages {
            var languageCode: String?
            var languageName: String?

            if let code = lang["language"] as? String {
                languageCode = code
            }
            if let name = lang["name"] as? String {
                languageName = name
            }

            self.supportedLanguages.append(TranslationLanguage(code: languageCode, name: languageName))
        }

        completion(true)

    } else {
        completion(false)
    }

}
With the parsed code and name values of each language we create a TranslationLanguage object, which we append to the supportedLanguages collection.
With the above method implemented, our next step is to check whether supported languages should be fetched or not when the LanguagesViewController is presented. This view controller is pushed to the navigation controller when the Translate button is tapped.
Open the LanguagesViewController.swift file, and in the LanguagesViewController class implement the following method:
func checkForLanguagesExistence() {
    // Check if supported languages have been fetched by looking at the
    // number of items in the supported languages collection of the
    // TranslationManager shared instance.
    // If it's zero, no languages have been fetched, so ask user
    // if they want to fetch them now.
    if TranslationManager.shared.supportedLanguages.count == 0 {
        alertCollection.presentAlert(withTitle: "Supported Languages", message: "It seems that supported languages for translation have not been fetched yet. Would you like to get them now?", buttonTitles: ["Yes, fetch supported languages", "Not now"], cancelButtonIndex: 1, destructiveButtonIndices: nil) { (actionIndex) in

            // Check if user wants to fetch supported languages.
            if actionIndex == 0 {
                self.fetchSupportedLanguages()
            }
        }
    }
}
First of all, we check the number of existing languages in the supportedLanguages array in the TranslationManager shared instance. If no languages exist, then we present an alert controller asking the user whether they want to fetch the supported languages now or not. In case of a positive answer, then we call the fetchSupportedLanguages() method that we’ll implement right next. Before we do that, call the above method in the viewDidAppear(animated:) method:
override func viewDidAppear(_ animated: Bool) {
    super.viewDidAppear(animated)

    checkForLanguagesExistence()
}
Let’s implement the fetchSupportedLanguages() method now. As we are going to make a web request using the fetchSupportedLanguages(completion:) method of the TranslationManager class and users will have to wait, we’ll display a buttonless alert once again to indicate that fetching is in progress. Once data has been returned from the server, we will reload the table view and we will display the fetched languages.
Since the implementation is fairly easy, here it is in one piece:
func fetchSupportedLanguages() {
    // Show a "Please wait..." alert.
    alertCollection.presentActivityAlert(withTitle: "Supported Languages", message: "Please wait while translation supported languages are being fetched...") { (presented) in

        if presented {
            TranslationManager.shared.fetchSupportedLanguages(completion: { (success) in
                // Dismiss the alert.
                self.alertCollection.dismissAlert(completion: nil)

                // Check if supported languages were fetched successfully or not.
                if success {
                    // Display languages in the tableview.
                    DispatchQueue.main.async { [unowned self] in
                        self.tableView.reloadData()
                    }
                } else {
                    // Show an alert saying that something went wrong.
                    self.alertCollection.presentSingleButtonAlert(withTitle: "Supported Languages", message: "Oops! It seems that something went wrong and supported languages cannot be fetched.", buttonTitle: "OK", actionHandler: {

                    })
                }

            })
        }

    }
}
Before we are able to see the supported languages listed on the table view, we must make a couple of small changes to the existing code in the starter project, and more specifically to two datasource methods of the table view. First, go to the tableView(_:numberOfRowsInSection:) method and update it according to the following snippet:
func tableView(_ tableView: UITableView, numberOfRowsInSection section: Int) -> Int {
    return TranslationManager.shared.supportedLanguages.count
}
The above will return as many rows for the table view as the fetched supported languages are.
In the tableView(_:cellForRowAt:) datasource method we’ll populate each language’s name and code to the cell’s labels:
func tableView(_ tableView: UITableView, cellForRowAt indexPath: IndexPath) -> UITableViewCell {
    guard let cell = tableView.dequeueReusableCell(withIdentifier: "idLanguageCell", for: indexPath) as? LanguageCell else { return UITableViewCell() }

    let language = TranslationManager.shared.supportedLanguages[indexPath.row]

    cell.languageLabel.text = language.name ?? ""
    cell.codeLabel.text = language.code ?? ""

    return cell
}
With the last two tweaks above the supportedLanguages array of the the TranslationManager shared instance is becoming the datasource of the table view.
Run the app again and tap on the Translate button after you type something in the text view. You’ll be asked if you want to get the supported languages, and if you agree to that, you’ll have them listed right in front of your eyes.
Translating Text
Our app can now fetch the supported languages for translation, so our next step is to allow translation once a language is selected in the LanguagesViewController. Actually, the translation won’t be initiated there but in the TranslationViewController, where the translated text will be displayed in a text view. Since our application is navigation based, it’s going to be easy to translate the original text to various languages by going back and forth between the LanguagesViewController and TranslationViewController.
Note: Documentation on translate API that we’ll use in this part can be found here.
Similarly to what we did in the previous two parts, we’ll implement a new method in TranslationManager class that will trigger the request to translation API and will parse the results. But before doing so, we need to add two new properties that will hold data necessary for the translation.
Open TranslationManager.swift file and declare the next two:
var textToTranslate: String?

var targetLanguageCode: String?
textToTranslate will keep the original text that should be translated, while targetLanguageCode will keep the code of the selected language in LanguagesViewController.
Straight to the implementation of our last method in TranslationManager class:
func translate(completion: @escaping (_ translations: String?) -> Void) {
    guard let textToTranslate = textToTranslate, let targetLanguage = targetLanguageCode else { completion(nil); return }

}
Through the completion handler of that method we’ll return either the translated text, or nil if for some reason no translation was returned or parsed. Besides that, it’s necessary to ensure that textToTranslate and targetLanguageCode have values and they are not nil, as we need both of them for translating the source text.
Next step is to prepare the URL parameters that we’ll pass along with the request. Let’s see what we have to provide here:
- The API key.
- The text to translate. Parameter name is called
q, and it can be provided multiple times to perform multiple translations at the same request. We won’t use that feature here, we’ll pass a single text. - The target language to translate to.
- The format of the returned text, which is either text for simple text and html for HTML formatted results.
- Optionally, we can provide the source language code; if we don’t, source language will be detected right before translation.
- Also optionally, the translation model (“base” or “nmt”, see previous part for details). By omitting this parameter value, Neural Machine Translation will be made. If translation is not from or to English, the Phrase-Based Machine Translation will be used instead automatically. In this demo app we will omit this parameter, as the default behaviour sounds suitable for our app needs.
Let’s create the dictionary that will contain the URL parameters:
func translate(completion: @escaping (_ translations: String?) -> Void) {
    guard let textToTranslate = textToTranslate, let targetLanguage = targetLanguageCode else { completion(nil); return }

    var urlParams = [String: String]()
    urlParams["key"] = apiKey
    urlParams["q"] = textToTranslate
    urlParams["target"] = targetLanguage
    urlParams["format"] = "text"

    if let sourceLanguage = sourceLanguageCode {
        urlParams["source"] = sourceLanguage
    }

}
To refresh our memory, sourceLanguageCode property was getting its value in the language detection part when the language of a text was being detected successfully. Practically speaking, if a language detection operation takes place prior to translation, then we can pass the source URL parameter value along with the request. In the opposite case, we don’t pass it at all and we let language detection happen on the fly while translating.
Making the request to translate is our next step:
func translate(completion: @escaping (_ translations: String?) -> Void) {
    // ...

    makeRequest(usingTranslationAPI: .translate, urlParams: urlParams) { (results) in
        guard let results = results else { completion(nil); return }

    }
}
Once we make sure that results have a value (no nil value came back from the makeRequest(usingTranslationAPI:urlParams:completion:) method), we can parse the data and extract the translation.
Note: Remember that the q URL parameter can be passed multiple times in a single request for making simultaneous translations. If you do so, then multiple translations will be returned by the server as well. Here we do not do that, we pass one piece of text for translation only, and we’ll get one translation in return.
Right next you can see a sample JSON answer coming back from the server when translating the “Good morning!” phrase from English to French:
["data": {
    translations =     (
                {
            detectedSourceLanguage = en;
            translatedText = "Bonjour!";
        }
    );
}]
With that JSON as our guide we can parse:
if let data = results["data"] as? [String: Any], let translations = data["translations"] as? [[String: Any]] {
    var allTranslations = [String]()
    for translation in translations {
        if let translatedText = translation["translatedText"] as? String {
            allTranslations.append(translatedText)
        }
    }

    if allTranslations.count > 0 {
        completion(allTranslations[0])
    } else {
        completion(nil)
    }


} else {
    completion(nil)
}
In the above code we gather all returned translations to allTranslations array (it doesn’t matter we expect for one translation only, that implementation helps in case of multiple returned translations). Then we return the first translation found through the completion handler.
The translate(completion:) method is now ready, but we can’t use it yet. There are still a few pieces missing from our puzzle.
First of all, open the EditorViewController.swift file and go to the translate(_:) IBAction method. Update it as shown next, so the typed text to be assigned to the textToTranslate property of the TranslationManager shared instance:
@IBAction func translate(_ sender: Any) {
    if textView.text != "" {

        TranslationManager.shared.textToTranslate = textView.text

        performSegue(withIdentifier: "LanguagesViewControllerSegue", sender: self)
    }
}
By adding the line:
TranslationManager.shared.textToTranslate = textView.text
we ensure that there’s source text to translate.
Next, open the LanguagesViewController.swift file and go to the tableView(_:didSelectRowAt:) table view delegate method which at the time being it is empty. Add the following code:
func tableView(_ tableView: UITableView, didSelectRowAt indexPath: IndexPath) {
    tableView.cellForRow(at: indexPath)?.setSelected(false, animated: true)
    TranslationManager.shared.targetLanguageCode = TranslationManager.shared.supportedLanguages[indexPath.row].code
    performSegue(withIdentifier: "TranslationViewControllerSegue", sender: self)
}
Three different things take place in the three lines we added:
- We remove the selection from the tapped cell on the table view.
- We keep the language code of the tapped language to the
targetLanguageCodeproperty of theTranslationManagershared instance. - We perform the
TranslationViewControllerSeguesegue that will push theTranslationViewControllerto navigation stack and present it.
Let’s recap. So far in this part we added a couple new properties to the TranslationManager class, we implemented a new method responsible for the translation and we made the necessary additions to EditorViewController and LanguagesViewController classes so we gather all necessary data required to translate the source text. What we are still missing is to go to TranslationViewController and initiate the translation process, which will happen when the view controller’s view has appeared.
Open the TranslationViewController.swift file and add the following new method implementation. In it we display a buttonless alert controller with a wait message, and we call the translate(completion:) method of the TranslationManager class to translate the original text. On success, we display the translated text to the text view of the TranslationViewController, otherwise we just show an alert saying that something went wrong.
Here it is:
func initiateTranslation() {
    // Present a "Please wait..." alert.
    alertCollection.presentActivityAlert(withTitle: "Translation", message: "Your text is being translated...") { (presented) in
        if presented {

            TranslationManager.shared.translate(completion: { (translation) in

                // Dismiss the buttonless alert.
                self.alertCollection.dismissAlert(completion: nil)

                if let translation = translation {

                    DispatchQueue.main.async { [unowned self] in
                        self.textView.text = translation
                    }

                } else {
                    self.alertCollection.presentSingleButtonAlert(withTitle: "Translation", message: "Oops! It seems that something went wrong and translation cannot be done.", buttonTitle: "OK", actionHandler: {

                    })
                }

            })

        }
    }
}
Do not forget to call the above method. Implement the viewDidAppear(_:) to do so:
override func viewDidAppear(_ animated: Bool) {
    super.viewDidAppear(animated)

    initiateTranslation()
}
That’s it! The app is now complete, so go ahead and give it a try!
Summary
Being able to take advantage of the technology evolution and integrate provided services such as realtime translation into your apps sounds more and more vital nowadays. With that in mind I want to believe that the small demo application we implemented in this post will act as a guide when you decide to include Google Cloud Translation APIs in your projects. Actually, several parts of the demo application can be taken and used as-is. A few minor adjustments might be needed to cover cases that we left aside, such as language detection or translation of multiple texts simultaneously, but we’ve covered all the essential stuff you need to know about.
On a bit of a different context, I understand that having to pay for the Translation API just to practice on translation services integration leaves a sort of bad taste, but looking at the big picture the cost might be low comparing to what that knowledge could pay us back. Finally, do not forget to visit Google documentation about the APIs we discussed here today using the links provided already in previous parts. With the hope that you enjoyed this post, I farewell you!
For reference, you can download the full project on GitHub.


