Hello World! Build Your First iPhone App
Update: This tutorial only works for Xcode 4.6 or lower. If you’ve upgraded to Xcode 5, please check out the updated Hello World tutorial. We also published a new screencast to walk you through the process and updated the tutorial for Xcode 6..
I hope you have configured your development environment properly with Xcode installed. If you haven’t done so, check out our previous article about what you need to begin iOS programming. We’ll use Xcode 4.3.2 to work on the tutorial. However, you can also Xcode 4.2 to build the app in case you can’t upgrade to the latest version of Xcode.
You may have heard of “Hello World” program if you have read any programming book before. It has become the traditional program for first-time learner to create. It’s a very simple program that usually outputs “Hello, World” on the display of a device. In this tutorial, let’s follow the programming tradition and create a “Hello World” app using Xcode. Despite its simplicity, the “Hello World” program serves a few purposes:
- It gives you a better idea about the syntax and structure of Objective C, the programming language of iOS.
- It also gives you a basic introduction of the Xcode environment. You’ll learn how to create a Xcode project and create user interface with the built-in interface builder.
- You’ll learn how to compile a program, build the app and test it using the Simulator.
- Lastly, it makes you think programming is not difficult. I don’t want to scare you away. 🙂
Take a Look at Your First App
Before we go into the coding part, let’s first take a look at our version of the “Hello World” app. The final deliverable will look like this:

Your First iPhone App – Hello World
It’s very simple and shows only a “Hello World” button. When tapped, the app prompts you a message. That’s it. Nothing complex but it helps you kick off your iOS programming journey.
Start Coding!
First, launch Xcode. If you’ve installed Xcode via Mac App Store, you should be able to locate Xcode in the LaunchPad. Just click on the Xcode icon to start it up.
Once launched, Xcode displays a welcome dialog. From here, choose “Create a new Xcode project” to start a new project:

Xcode – Welcome Dialog
Xcode shows you various project template for selection. For your first app, choose “Single View Application” and click “Next”.

Xcode Project Template Selection
This brings you to another screen to fill in all the necessary options for your project.

Project Options for Hello World App
You can simply fill in the options as follows:
- Product Name: HelloWorld – This is the name of your app.
- Company Identifier: com.appcoda – It’s actually the domain name written the other way round. If you have a domain, you can use your own domain name. Otherwise, you may use mine or just fill in “edu.self”.
- Class Prefix: HelloWorld – Xcode uses the class prefix to name the class automatically. In future, you may choose your own prefix or even leave it blank. But for this tutorial, let’s keep it simple and use “HelloWorld”.
- Device Family: iPhone – Just use “iPhone” for this project.
- Use Storyboards: [unchecked] – Do not select this option. You do not need Storyboards for this simple project.
- Use Automatic Reference Counting: [checked] – By default, this should be enabled. Just leave it as it is.
- Include Unit Tests: [unchecked] – Leave this box unchecked. For now, you do not need the unit test class.
Click “Next” to continue. Xcode then asks you where you saves the “Hello World” project. Pick any folder (e.g. Desktop) on your Mac. You may notice there is an option for Source Control. Just deselect it. We’ll discuss about this option in the later tutorials. Click “Create” to continue.

Pick a Folder to Save Your Project
As you confirm, Xcode automatically creates the “Hello World” project based on all the options you provided. The screen will look like this:

Main Xcode Window for Hello World Project
Familiarize with Xcode Workspace
Before we move on to code your app, let’s take a few minutes to have a quick look at the Xcode workspace environment. On the left pane, it’s the project navigator. You can find all your files under this area.

Project Navigator in Workspace
The center part of the workspace is the editor area. You do all the editing stuffs (such as edit project setting, class file, user interface, etc) in this area depending on the type of file selected.

Editor and Utility Area in Xcode
The rightmost pane is the utility area. This area displays the properties of the file and allows you to access Quick Help. If Xcode doesn’t show this area, you can select the rightmost view button in the toolbar to enable it.
Lastly, it’s the toolbar. It provides various functions for you to run your app, switch editor and the view of the workspace.

Toolbar in Workspace
Run Your App for the First Time
Even you haven’t written any code, you can run your app to try out the Simulator. This gives an idea how you build and test your app in Xcode. Simply hit the “Run” button in the toolbar.

Run Button in Xcode
Xcode automatically builds the app and runs it in the Simulator. This is how the Simulator looks like:

The Simulator
A gray screen with nothing inside?! That’s normal. As your app is incomplete, the Simulator just shows a blank screen. To terminate the app, simply hit the “Stop” button in the toolbar.

Terminate the Running App
Back to Code
Okay, let’s move on and start to add the Hello World button to our app. Go back to the Project Navigator and select “HelloWorldViewController.xib”.

Select HelloWorld XIB File
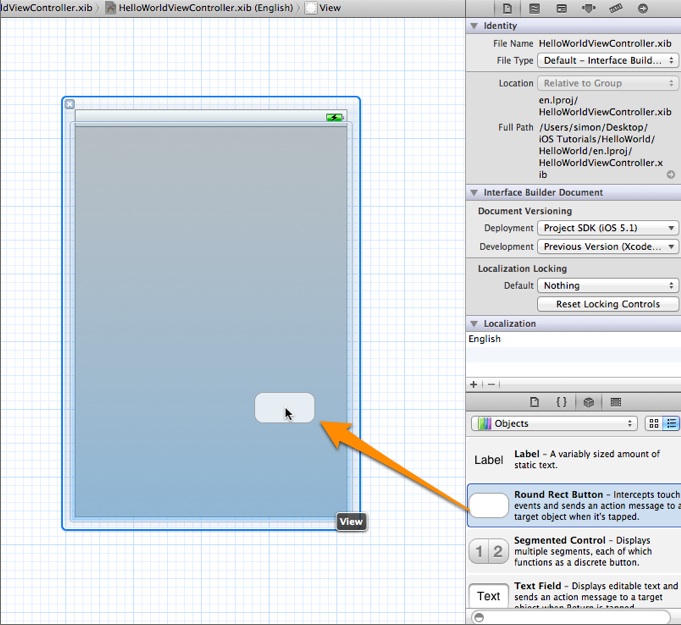
As you select the file, the editor changes to an Interface Builder and displays an empty view of your app like below:

Interface Builder in Xcode
In the lower part of the utility area, it shows the Object library. From here, you can choose any of the UI Controls, drag-and-drop it into the view. For the Hello World app, let’s pick the “Round Rect Button” and drag it into the view. Try to place the button at the center of the view.
To edit the label of the button, double-click it and name it “Hello World”.

Try to run the app again and you should have an app like this:
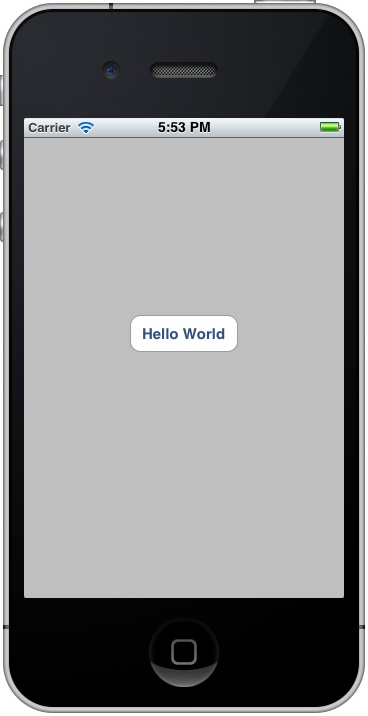
Now Hello World with a Button
For now, if you tap the button, it does nothing. We’ll need to add the code for displaying the “Hello, World” message.
Coding the Hello World Button
In the Project Navigator, select the “HelloWorldViewController.h”. The editor area now displays the source code of the selected file. Add the following line of code before the “@end” line:
1 |
-(IBAction)showMessage; |
Your code should look like this after editing:

Next, select the “HelloWordViewController.m” and insert the following code before the “@end” line:
1 2 3 4 5 6 7 8 |
- (IBAction)showMessage { UIAlertView *helloWorldAlert = [[UIAlertView alloc] initWithTitle:@"My First App" message:@"Hello, World!" delegate:nil cancelButtonTitle:@"OK" otherButtonTitles:nil]; // Display the Hello World Message [helloWorldAlert show]; } |
After editing, your code should look like below:

Source Code of HelloWorldViewController After Editing
Forget about the meaning of the above Objective-C code. I’ll explain to you in the next post. For now, just think of “showMessage” as an action and this action instructs iOS to display a “Hello World” message on screen.
Connecting Hello World Button with the Action
But here is the question:
How can the “Hello World” button know which action to invoke when someone taps on it?
Next up, you’ll need to establish a connection between the “Hello World” button and the “showMessage” action you’ve just added. Select the “HelloWorldViewController.xib” file to go back to the Interface Builder. Press and hold the Control key on your keyboard, click the “Hello World” button and drag to the “File’s Owner”. Your screen should look like this:

Release both buttons and a pop-up shows the “showMessage” action. Select it to make a connection between the button and “showMessage” action.

Send Event Pop-up from File's Owner
Test Your App
That’s it! You’re now ready to test your first app. Just hit the “Run” button. If everything is correct, your app should run properly in the Simulator.
Congratulation! You’ve built your first iPhone app. It’s a simple app however, I believe you already have a better idea about Xcode and how an app is developed.
In the next post, I’ll further explain the Objective-C code we’ve done here and how the HelloWorld app actually works. Stay tuned.
As always, if you come across any problem while creating your app, head over to our AppCoda Community forum and post your question.
Update: You can download the Xcode project here.
Comments
SimonZA
AuthorGreat start!
First tutorial was fun! I hope next time we learn a little more about the difference between the ‘.m’ and ‘.h’ files, etc.
But great work Simon! Look forward to the next one.:)
Simon Ng
AuthorThanks for your comment! In the upcoming post, I’ll definitely explain the difference between the .m and .h files.
Simon Ng
AuthorThe 2nd tutorial about iOS programming basic is now available. In the tutorial, you’ll find my explanation about the difference between the .m and .h files. Check it out and let me know if it gives you a better idea.
Randall
AuthorThat was very cool, and shall I say quite a “painless” introduction.
I’m looking forward to the next lesson!
Randall
Daniel
AuthorAwesome! Tks! Looking forward for the next!
Paulo
AuthorGreat!!!
Never knew this could be so simple!
Vijay
AuthorCrisp and made simple…Thanks Simon! Eagerly waiting for the next tutorial..
William
AuthorThis was a great tutorial, thank you Simon! I’m really looking forward to the next one.
Tom
AuthorGreat start, looking forward to the upcoming tutorials! Especially learning the difference between all the different files!
Thanks!
DarkxFuneral
AuthorGreat start. thanks.!
Vince
AuthorA concise one suitable for all.
Eager to know more about the concept of File’s Owner, Responder etc in the next tutorials.
Simon Ng
AuthorThanks for your comment! I’ll cover more about responder and file’s owner in later tutorial. At the mean time, you can refer to this tutorial that the event flow and how the Hello World app actually works.
D
AuthorBest tutorial I’ve found. One caveat seems to be if you run xcode as root on MacOSX 10.7.3, the simulator doesn’t work right (took awhile to figure that out).
Simon Ng
AuthorGreat to hear your feedback!
Parvesh
AuthorHi, thanks for the tutorial. Looking to get started with ios programming.
I did some basic programming on python at school, and i have some java programming knowledge. Can you tell me if its enough or do i need to know C ?
Simon Ng
AuthorAs you already have some programming experience (and I believe you also know about OOP), it’s not too difficult to pick up iOS programming. Yes, you need to learn C. For iOS programming, you’ll use Objective-C to create your app.
Don’t just read book about Objective-C. My suggestion is to take action, get your hands dirty and try to build some simple apps. It’ll be more fun.
davidchen
AuthorGreat ….thanks for the tutorial.
Simon Ng
AuthorThank, David!
surabhi
AuthorVery nice tutorial. Thank you!!!
eric
Authornice post….
One of the very nice website from where you can get iOS material and source code “http://www.techipost.com/”.
champcar2000
AuthorThanks for your tutorials!
In the source code, it automatically has ‘Created by’ followed by my name, and ‘Copyright’ by ‘__MyCompanyName__’.
Where does Xcode get the values for these, so that I can change them? Thanks in advance.
Simon Ng
AuthorYou simply edit your contact in address book to change the company name. Alternatively, select the project in Xcode, select “File Inspector” in Utility pane. Change the organization name under Project Document section.
Tommy Crush
AuthorGreat tutorial! Thanks!
Vladimir
AuthorGreat tutorial!!! Thank you! 🙂
Erin
AuthorGreat tutorial thank you
l073x
Authortanks for tut great job …good luck
Meganewbie
AuthorDid this tutorial stop working on xcode 4.5? =/
Meganewbie
AuthorNevermind… my mistake =P
Vinoth sivanandam
Authorhow to works all functions in ios like application did finish launch in with options and what work done by delegates, responder and uiviewcontroller
James Cozzi
AuthorI keep getting errors for [helloWorldAlert show]; any ideas?
daniel Jackson
AuthorSuper piece of information about app development. surely its useful for the mobile app beginners. Surely they will use in their 1st app development processes. If you in need of any development of any platform visit http://innoppl.com/mobile-application-development
Htun Lin Aung
AuthorI want to show data from SQL server 2008 database on app. It can be done or not? If it can, pls show me how to do it.
holmes
AuthorHello,when I try the first code,I had a misstake in my progamming like the pic show,please give me a hand.thank you.
Simon Ng
AuthorI’ve just uploaded the Xcode project for your reference. You can download it and compare it with yours.
George
AuthorIs this code in your .h, or .m file?
Cyrus
AuthorMaybe “Message” should be replaced by “message”
weblancer23
AuthorI followed all the steps shown but it is still not working. Is there anything that I need to configure first before running the program that is not shown here. Thanks!
Simon Ng
AuthorWhat’s the error?
Justin Thomson
AuthorIt’s one of well written source! The whole concept is truly solid about how to make our first iPhone app. The massive look of this post is authentically knowledgeable and promising for the beginners. It’s completely amazing and worthy experienced info for the newcomers in the field of iPhone app development. I am also one of iphone app developer and I bookmarked this site to getting better help.
Jeremy
AuthorHello! Cool tutorial! Should the same code do the same thing on the iPad simulator?
bucksnort2
AuthorI have a newer version of Xcode and I cannot figure out how to connect the button to the code to display the message.
also, in my code, it says that the
– (IBAction)showMessage
is missing a semicolon at the end, even though I have the stuff in the brackets copied down verbatim.
I have no Idea what is wrong, please help
Untitled
AuthorGreat tutorial to get your feet wet with Xcode. Thanks!
Prabodha Dissanayake
Authornice post bro this help me to step in to iOS world
Jason
AuthorAny chance you’ll be updating this tutorial for Xcode 5? Seems like there are some pretty significant changes between Xcode 4 and 5. I sure would love to see your Xcode 5 steps so I can follow along.
Internet Surface
AuthorI’ve started this tutorial series and they’re great! Thank you for publishing this fantastic courses.
Sanjeev Anand
Authorthanks you very much…. this explanation make me easy to learn …..
yeah dude
AuthorNice work. Does the UIAlertView have to be so complicated with titles and such??? Was it not possible to just make it simple and display the text only?? forget including anything about titles and delegate?? and such whatever???
BichaDoDemonio
AuthorHi, i have the same problem that holmes, it shows that error message, what can i do?? All the youtube videos show about labels, but i like it more like this, the message box!!
Gul
AuthorHello, I saw the same problem, and compared, the code is exactly the same but mine doesn’t do anything when I click the button. I do not see any errors in the code..
when I downloaded your code, it works… I am not sure what may be the problem because my code matches yours…
Lilzee
AuthorHow come I don’t have “helloworldviewcontroller.xib” ? On the left of the window?
Simon Ng
AuthorXCode 5 doesn’t use Interface Builder by default. You can check out the new Hello World tutorial here:
http://104.131.120.244/hello-world-app-using-xcode-5-xib/
Mister_Vicious
AuthorAs some others have noted, Xcode 5 appears to be much different. We don’t have the three checkbox options (use storyboards, use automatic reference counting, include unit tests). I’ve done some scouring of the web and it seems that storyboards are on by default in Xcode 5. Because of this we don’t see the “helloworldviewcontroller.xib” file. So we’re pretty much stuck in the beginning of the tutorial. Is there a workaround to this? Everything I’ve searched so far includes some pretty complex and over my head things that I’m not even sure pertain to the issue.
Simon Ng
AuthorXcode 5 doesn’t use Interface Builder by default. We’ve updated the tutorial and make it fit for Xcode 5. You can check out here:
http://104.131.120.244/hello-world-app-using-xcode-5-xib/
Mister_Vicious
AuthorThank you SO much! I really appreciate the time you guys put in here, great site!
josephcruise101
Authorreally good explanation… i want to add one tip.. if you are not good at coding.. android app development will be really tough for you.. For non technical persons they can use app creator for building an iphone app..
alina thomas
AuthorDeveloping iPhone applications is something that almost everyone wants to be able to do nowadays. Something that is typically the first app that you create when learning a new development terminology. I assume you’ve hit on the
most essential aspect which is really helpful to the beginner and the expert’s developers.I wish I would have discovered this previously would have save my time while exploring all this things.
iphone app development Melbourne
jenny
AuthorSimon can u send me the link to download xcode… i m unable to download it from apple official website
orit
Authorwe work on Xcode 6.0, and things are different and we can’t run the project properly. Any one can help us?
Simon Ng
AuthorHave you checked out the updated tutorial?
http://104.131.120.244/build-hello-world-app-swift/
Dana Cunningham
AuthorCheck out how Lehigh University students created a web app for the 150th Rivalry game! Everything is their orignial ideas, code, illustrations, and graphics. http://bit.ly/1tzelyy
Anon
AuthorHey, the login for AppCoda Screencasts is below:
URL: http://104.131.120.244/screencasts
Login: swiftbook
Password: LearnSwift2014)()(
Trần Ngọc Khánh
AuthorThis is my hello world app, its is amazing to learn code ios. 🙂
Robert Slackware
Authorwouldn’t “Got Liver” be more appropriate?
Baymediasoft
AuthorI enjoyed your article richly expanded but still wrapped as one topic. I would like to follow more of your future articles. I really enjoyed this one.
Kathy Johnson
AuthorWhat an amazingly written post… The in-depth research about Build Your First iPhone App is really impressive and worth reading!
Keep up the awesome work of sharing information so comprehensively.
http://www.baymediasoft.com
Sonal Mehta
AuthorHi Simon Thanks for sharing such great introduction about ios app development guideline.