
Since the introduction of iBeacons with iOS 7 by Apple, a lot of things have been said and written about. iBeacon technology consist of a revolutionary way to keep track of the position of a device indoors and use location services, similarly to the GPS outdoors, and it’s based on the signal transmitted through Bluetooth (Bluetooth Low Energy specifically, or BLE) by beacon devices. iOS devices can do that also, as long as they run a proper application.
However, the most important thing is that iOS SDK allows to develop applications capable of monitoring for iBeacons, and then perform various actions, depending always on specific requirements. The use of iBeacons can be applied in a wide range of cases, especially for marketing purposes. For example, using iBeacons in retail stores targeted advertisements can be displayed on the customers’ devices once the device enters a beacon’s region, or keep track of the traffic in such stores. Actually, the example that I just described is already being used, and it can be evolved even further.
![]()
From the developer’s point of view, an iBeacon area can be monitored and handled almost like a location, therefore the meaning of regions exist in this case too. The only difference is that such a region is actually called beacon region. If you’ve ever worked in the past with location services, then you already know that the Core Location framework provides API to work with regions. With this, an app can be aware of whether and when a device enters or leaves a beacon region, how to identify and manage any found beacons and a lot more. Additionally, it’s possible for an app to track changes in the bluetooth state, so it can automatically stop monitoring for beacons and save resources when the bluetooth for some reason doesn’t operate.
Every iBeacon has an identity which is parted by three values:
- ProximityUUID: This is a 128-bit value, known as Universally Unique Identifier or UUID (for simplicity in this text I’ll stick to the UUID term). We’ll discuss some details about this later, among them how a UUID is created. For now, it’s necessary just to say that this value is the one that distinguishes an iBeacon from another.
- Major: Each iBeacon has two values used to distinguish it from others having the same UUID. The first one of them, also known as the most significant value, is this one, and almost always it specifies a sub-region inside a region of beacons that have the same UUID. For example, think of the scenario where somebody would like to use iBeacons in his house and have one in the living room, one in the kitchen, and one in the bedroom. In that case, all iBeacons should have the same UUID so they belong to the same region (let’s say house region), and different major values so each sub-region of the house to be properly represented by each iBeacon. In rare cases and under certain, app-specific conditions only, the major value could mean something other than a sub-region.
- Minor: This is the second value I mentioned above, and it’s also called least significant value. It’s used to divide a sub-region specified by the major value even further, and always in accordance to the requirements of the app that gets developed. In the hypothetical scenario I presented right before, the minor value can specify the sub-area of a room, for example a region next to a window or to the closet.
Besides the above, an iBeacon, or more accurately a beacon object (described by the CLBeacon class), has also the properties presented right next. Those are really handy when it’s necessary to deal with the distance of a found beacon from the device:
- Proximity: This property describes the distance between the device and a found iBeacon. Actually, it’s a structure (struct), and it uses the far, near, and immediate values to describe the distance.
- Accuracy: When two or more beacons exist in the same distance from the device, or in other words they have the same proximity value, then the accuracy will determine the closest one. Its value represents the distance in meters.
- RSSI (or Received Signal Strength): As its name suggests, it is the strength of the bluetooth signal. It’s measured in decibels, and this is a read-write property. However, setting the rssi value is not as simple as assigning a new value to it. You’ll see later how this is achieved. For example, the rssi can be used to increase the signal strength of a beacon and reduce the strength of another one, in case extra calibration is needed or specific beacons should be easier to be found than others.
From the last three properties we’ll use just the proximity in this tutorial. However, it’s not hard to use the other two as well.
As a last word, all the information I just gave you consist of a standard knowledge that you should possess before you proceed in the next parts of the tutorial. If you feel so, please go ahead and search for more info in the Apple’s official documentation.
With all the above have been told, let’s “enter to the beacons’ regions” straight away. There are really interesting things awaiting for us!
An Overview of the Demo Applications
Let me start by saying that the title of this part has not a typographic error, and you are reading it correctly. In this tutorial we are not going to implement just one application, but two! Yes, two. As you will discover by the end of this tutorial, even though they’ll not be complicated enough, they are going to be just as good as needed so you get the grasp and learn how to work with iBeacons.
For both applications I provide you a starter project, which you can download here. In those projects a minimum implementation has already been done. Both the apps are universal, so you can run them in any device you have or desire (iPhone or iPad). Obviously, you need to download and open them in Xcode if you’re about to follow step by step.
Let me go now to some details regarding each app. The first one is named BeaconPop, and is going to be acting as an iBeacon; it will broadcast a signal using bluetooth so it is detectable and discoverable by other devices. Right next you can see a how the BeaconPop app looks like:
![]()
As you witness, besides the various informative labels being here and there, there are three important subviews: Two textfields for setting the major and minor values of the devices, and a button that will be used to start and stop the beacon advertisement functionality. The UUID value will be set in code, as it’s a value that is not supposed to be changed once it has been set.
Besides those three subviews, there’s one interesting label shown in the above image, the one at the bottom of the screen. In it, the bluetooth state is going to be displayed as long as the app runs. As you’ll see in more details later on, knowing the state of the bluetooth at any time is crucial for the behavior of the app. Not only new actions should be taken when the bluetooth state changes, but also valuable resources can be wasted if the bluetooth is, for example, off and the device keeps broadcasting. Anyway, we’ll see that in just a while.
There are two things that you should note regarding this app (they are irrelevant to each other): First, don’t expect the app to be working when being in the background. An iOS device can act as an iBeacon only when it runs in the foreground. Don’t forget about this fact. Second, you can dismiss the keyboard that’s being displayed when editing the textfields simply by swiping towards bottom. This behavior is already implemented in the starter project.
Now, let me say a few words about the second app. This is called BeaconSpot and it will do the exact opposite thing than the first one: It will monitor for beacons. Here’s a screenshot of it:
![]()
This app actually will do nothing more than simply providing us with the details (major, minor, distance) of an iBeacon that has been discovered, once it has entered in such a region. As you can see in the image, there’s one button only and it will be used to start and stop the monitoring process.
Now, let me give you a couple of facts regarding both apps:
- During the implementation process we are going to use the Core Location framework. In the BeaconPop app this usage will be limited, but in the BeaconSpot clearly is going to be more extended.
- Both applications are going to use the same UUID value.
- Make sure to turn the bluetooth on in all devices that you’re going to run the apps. For the broadcasting app, feel free to “play” around with the bluetooth, so you can see how it reacts in the bluetooth state changes.
- Upon the first run of each app, you’ll be asked for permissions by both apps. Apparently, you should allow them to use location services. Remember that you can change these kind of settings at any time in the Settings app.
Finally, as I mentioned earlier about the BeaconPop app, the BeaconSpot must be running too in the foreground to operate. As I always say, just before we begin make sure to go through both the starter projects, and view the existing code and the storyboard in the Interface Builder. It’s important you feel familiar with both projects during implementation.
Generating a UUID String
So, let’s dive right in the work we have to do today, but before we write any code at all, it’s necessary to perform a prerequisite step. That is to create a UUID string that we’ll use later on in both of our projects. The UUID word is an abbreviation of the Universally Unique Identifiers term, and you can find more about it here. In short, a UUID is a 128-bit value that is used to uniquely identify an item, and it and looks like this:
AD5C5B73-5D1B-4458-AAA7-E31BE2077007
Regarding iOS, Apple provides the NSUUID class for handling UUID values. It’s a really simple class, and you can see its details here. We’re going to create instances of this class in both of our projects, but we won’t do anything special with them. We’ll just use where they’re needed during implementation.
Having done this small intro about the UUID values, let’s move forward to create one, and for this purpose we’ll use the Terminal Mac app. So, either open the Launchpad > Other > Terminal, or simply type “Terminal” in the Spotlight, so the terminal window appears. Once you have it right in front of you, type only the following command and hit Return:
uuidgen
Instantly, a new UUID value will be created and displayed in the Terminal window, right as shown below:
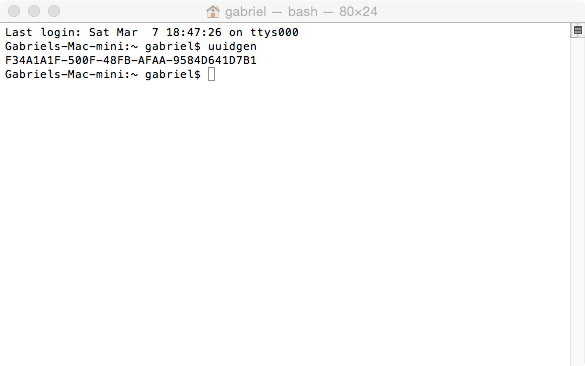
If you don’t want to create your own UUID value right now, you can just use the one I generated in the previous image. Here it is as text, so you can copy-paste it later:
F34A1A1F-500F-48FB-AFAA-9584D641D7B1
If you create your own UUID value, then for the time being don’t close the Terminal app. You’ll need to copy the UUID in the next part. In any case however, you can generate a new one whenever you need it.
Broadcasting with BeaconPop
Now that we’ve generated the UUID value, we can proceed to the implementation of the two apps. We’re going to start by the broadcasting application for two reasons: First, it’s easier to be implemented. Second, it is more reasonable to build it first, as it would be really nice to have it already working as an iBeacon we’ll finish with the implementation of the second application.
So, we’ll make our hands dirty starting by the BeaconPop app. If you haven’t still downloaded the starter project, now it’s the best time to do it so you can come along. Before we write the first line of code, it’s necessary to explain a few things about how an iOS device works as a beacon. Among the data that a beacon transmits is the UUID, the major and minor values, and the RSSI value that expresses the strength of the signal. In order for a receiver application to “read” these values and then perform any needed actions based on them, it must be possible to acknowledge that there is actually an iBeacon somewhere around. And this can be done only by the broadcasting app, as it is its job to make known to other application that works as an iBeacon. So, the question that arises now, is how is this achieved?
Well, that’s easy indeed, as all it has to do the broadcasting application is to initialize and advertise a special Core Location region, named Beacon Region. Programmatically, such a region is represented by the CLBeaconRegion class, and an instance of it is created using the detailed values (UUID, major and minor values, etc) that the iBeacon must promote. As you we will seen pretty soon, creating a beacon region in code is amazingly easy, and if you have ever worked with Core Location services and classes, this one will seem much simpler.
What I just said is the first fact that you should be aware of before we do some coding. The other thing that you should also know, is that we have to check and react to any Bluetooth state changes. As you already know, in order for a device to work as a beacon (iOS device, or a real beacon device), it must transmit data using bluetooth signal. In iOS, there’s not guarantee that the BT will be always working, as the user can disable it at any given time. Besides that, BT might not be supported to all devices, or more generally, the BT might enter to a state other than the expected one (powered on state) without the user being aware of that. Of course, the broadcasting app’s behavior should be changed in accordance to the bluetooth state, and it’s our duty to do that. So, as you understand, further than creating a beacon region and broadcasting data, we also have to keep track of such BT state changes, and of course, perform the appropriate actions.
Having said all the above, it’s time to pass from theory into action. To keep things simple, we’ll see all the aforementioned stuff in separate steps.
Enabling and Disabling Broadcasting
First of all, make sure that you open the BeaconPop application in Xcode. For starters, open the ViewController.swift file and declare the following variables at the top of the class, right under the IBOutlet properties:
let uuid = NSUUID(UUIDString: "F34A1A1F-500F-48FB-AFAA-9584D641D7B1")

var beaconRegion: CLBeaconRegion!

var bluetoothPeripheralManager: CBPeripheralManager!

var isBroadcasting = false

var dataDictionary = NSDictionary()
The uuid constant is an object of the NSUUID class. I talked about it in the last part. As you see, we initialize it at the same time we declare it. The generated UUID value is passed as an argument to the init method, and by writing that line only, we’re finished with it.
Next, we declare a CLBeaconRegion property. This property is the beacon region I said about earlier, and as you understand, it’s really important to this project.
Equally important is the next property named bluetoothPeripheralManager, which is an object of the CBPeripheralManager class. Through this object, we’ll be able later to monitor the bluetooth state changes and act appropriately. I provide no more details right now, as we’ll see how it’s used in just a while.
The last two variables are going to play a purely assistive role. As you assume, the isBroadcasting flag will indicate whether the device is broadcasting or not, and as initially this is not happening, its value is set to false. The dataDictionary is a NSDictionary object that we will need when the broadcasting will be starting.
At this point, let me underline two facts: First of all, it’s important for you to notice that the following two frameworks have been imported to the beginning of the file:
import CoreLocation
import CoreBluetooth
Without them, it won’t be possible for the device to operate as an iBeacon. The CoreLocation framework is needed to define the beacon region and work with it, while the CoreBluetooth framework is necessary for accessing the bluetooth component of the device.
The second thing that I want to highlight, is that for the time being we won’t initialize the bluetoothPeripheralManager object, but we’ll use it in our code normally, as if it were initialized. We’ll focus on that property in the next part of this section.
Our next step is to enable broadcasting. We want this to happen when the Start button is tapped on the app’s interface, therefore we are going to work in the switchBroadcastingState(_:) IBAction method. We’ll enable broadcasting under two certain conditions: The isBroadcasting flag must be false, meaning that currently no broadcasting is taking place, and of course, we must make sure that the bluetooth is powered on (enabled). Here’s what I just said translated into code:
@IBAction func switchBroadcastingState(sender: AnyObject) {
    if !isBroadcasting {
        if bluetoothPeripheralManager.state == CBPeripheralManagerState.PoweredOn {

        }
    }
}
Now, if both of the above conditions are true, we have to do the following:
- To initialize the beacon region.
- To start advertising the region.
- To update the interface as necessary, by changing the button’s title, by indicating that the device is broadcasting, and by disabling both the textfields, so the user is unable to change the major and minor values during broadcasting.
- To indicate in code that the device is broadcasting.
Let’s see the first step in code:
@IBAction func switchBroadcastingState(sender: AnyObject) {
    if !isBroadcasting {
        if bluetoothPeripheralManager.state == CBPeripheralManagerState.PoweredOn {
            let major: CLBeaconMajorValue = UInt16(txtMajor.text.toInt()!)
            let minor: CLBeaconMinorValue = UInt16(txtMinor.text.toInt()!)
            beaconRegion = CLBeaconRegion(proximityUUID: uuid, major: major, minor: minor, identifier: "com.appcoda.beacondemo")
        }
    }
}
At first, we convert the major and minor values that have been already set in the textfields to numbers. The CLBeaconMajorValue and CLBeaconMinorValue types are nothing else than UInt16 numbers (16-bit unsigned int), and you can find this out from the conversion that takes place in the first two lines. Once we acquire them, we proceed to the initialization of the beacon region. If you start typing the above initializer, you’ll see that the class provides more than one initializers, however the above is the proper one that must be used. As you witness, actually four values must be provided as arguments:
- The UUID value we generated in the previous part. Here’s where it’s needed in this app.
- The major value.
- The minor value.
- A unique string identifier that is set for the specific beacon region. The same value we’re about to use in the receiver app too.
Next, we must advertise the above region, so when a receiver app is nearby to be able to identify the beacon. This is achieved with the next two lines:
@IBAction func switchBroadcastingState(sender: AnyObject) {
    if !isBroadcasting {
        if bluetoothPeripheralManager.state == CBPeripheralManagerState.PoweredOn {
            ...

            dataDictionary = beaconRegion.peripheralDataWithMeasuredPower(nil)
            bluetoothPeripheralManager.startAdvertising(dataDictionary)
        }
    }
}
Some explanation now. When using a device as an iBeacon, it’s possible to transmit some extra data besides the values we specified in the beacon region initializer, and this is achieved by using a dictionary object. In this example we don’t do something like that, but no matter what, this dictionary must be initialized using the RSSI value of the device (the signal strength). This value can be set using the peripheralDataWithMeasuredPower(:) method, and you can either set a specific value as an argument (remember that value represents the decibels), or leave it nil so the app uses the default RSSI value of the device. Regarding the advertising now, it is initiated by using the startAdvertising(:) method of the bluetoothPeripheralManager object, and it takes just one argument: The dictionary with the data to transmit. That’s the reason we first create the data dictionary, and then we start advertising.
Now, let’s update our interface as needed:
@IBAction func switchBroadcastingState(sender: AnyObject) {
    if !isBroadcasting {
        if bluetoothPeripheralManager.state == CBPeripheralManagerState.PoweredOn {
            ...

            btnAction.setTitle("Stop", forState: UIControlState.Normal)
            lblStatus.text = "Broadcasting..."

            txtMajor.enabled = false
            txtMinor.enabled = false
        }
    }
}
Lastly, let’s indicate that the device is broadcasting:
@IBAction func switchBroadcastingState(sender: AnyObject) {
    if !isBroadcasting {
        if bluetoothPeripheralManager.state == CBPeripheralManagerState.PoweredOn {
            ...

            isBroadcasting = true
        }
    }
}
That’s it. Now, when tapping on the Start button the app is capable to be working as an iBeacon. However, we’re not over yet, as we must take the exact opposite path and stop the broadcasting by tapping once again in the button, this time titled “Stop”. In the first ifstatement above we will add an else case, and in there we will perform the next tasks:
- We’ll stop the beacon advertising.
- We’ll update the interface.
- We’ll indicate that the device is no longer broadcasting.
Here are all the above in one snippet:
@IBAction func switchBroadcastingState(sender: AnyObject) {
    if !isBroadcasting {

    }
    else {
        bluetoothPeripheralManager.stopAdvertising()

        btnAction.setTitle("Start", forState: UIControlState.Normal)
        lblStatus.text = "Stopped"

        txtMajor.enabled = true
        txtMinor.enabled = true

        isBroadcasting = false
    }
}
The first part in creating the broadcasting app is now ready, so let’s go to the next one.
Tracking Bluetooth State Changes
In the above IBAction method we used the bluetoothPeripheralManager property to get the state of the bluetooth, but if you remember up to that point we hadn’t initialize it. We said that this will take place at a later time, and this time is right now. Begin by going to the viewDidLoad method. There you’ll find some code already existing, but regardless that, all you have to do is to add the next line:
override func viewDidLoad() {
    ...

    bluetoothPeripheralManager = CBPeripheralManager(delegate: self, queue: nil, options: nil)
}
The important in the above initialization is to set our class as the delegate of the bluetoothPeripheralManager object. But, as you understand that by doing that, it’s necessary to adopt the CBPeripheralManagerDelegate protocol:
class ViewController: UIViewController, CBPeripheralManagerDelegate
Okay, now there is one delegate method that we have to implement. This method provides us with all the possible BT states, and it’s our work to handle each one separately. Obviously, the reaction of the app upon a BT state change is not common for all applications; everything depends on the app nature, requirements, and so on.
Let me become now more specific and say that among all the states that we are about to see, we are actually interested in just two of them in this sample application: The powered on and off states of the BT. We already used the first case in the previous implementation, where we allowed the app to broadcast if only the BT is powered on. If at some point the state goes to off, we must make sure that the app won’t keep trying to broadcast, so we must disable that functionality once the state gets changed. For the rest BT states you’ll see next, we are not going to do anything particular; instead, we’ll just prepare a custom message describing each state, and then we’ll display it in the lblBTStatus label.
So, with all the above said, here’s the second important part of our application:
func peripheralManagerDidUpdateState(peripheral: CBPeripheralManager!) {
    var statusMessage = ""

    switch peripheral.state {
    case CBPeripheralManagerState.PoweredOn:
        statusMessage = "Bluetooth Status: Turned On"

    case CBPeripheralManagerState.PoweredOff:
        if isBroadcasting {
            switchBroadcastingState(self)
        }
        statusMessage = "Bluetooth Status: Turned Off"

    case CBPeripheralManagerState.Resetting:
        statusMessage = "Bluetooth Status: Resetting"

    case CBPeripheralManagerState.Unauthorized:
        statusMessage = "Bluetooth Status: Not Authorized"

    case CBPeripheralManagerState.Unsupported:
        statusMessage = "Bluetooth Status: Not Supported"

    default:
        statusMessage = "Bluetooth Status: Unknown"
    }

    lblBTStatus.text = statusMessage
}
Notice that in case the BT is turned off, we check if the device is currently broadcasting or not. If it is, then we call the IBAction method so all the proper tasks to be performed and the broadcasting to be stopped. Once again, depending on the requirements of the app you’re developing, you might need to handle each state in a different manner; now you’ve been shown the way, so it’s up to you to apply any missing logic.
Final Touches
So, our broadcasting app is now almost ready, and it works, but it’s not perfect. There are some final touches missing yet, which if attached to it, they’ll make it even better, and even though it’s a demo app, I consider the extra behavior that we’ll add here quite important.
If you recall, during the beacon region initialization, we used the textfields’ values as the major and minor values for the beacon. Now, what is it going to happen if any of these two values is missing? And how should the app act in such a case? Well, there are various possible solutions to that, and the proper one definitely depends on the nature of the app. Here we can easily workaround this problem if we simply do not allow the app to start broadcasting if any of those two values is missing. Maybe we could even display a message to the user saying that both values are required (but we won’t do it).
In addition to the above, it would be a nice idea to prevent the broadcasting when the keyboard is visible, and the user is still editing either the major or the minor value.
So, with the those two thoughts in mind, you’re given once again the IBAction method containing the new additions at the beginning of it:
@IBAction func switchBroadcastingState(sender: AnyObject) {
    if txtMajor.text == "" || txtMinor.text == "" {
        return
    }

    if txtMajor.isFirstResponder() || txtMinor.isFirstResponder() {
        return
    }

    if !isBroadcasting {
        if bluetoothPeripheralManager.state == CBPeripheralManagerState.PoweredOn {
            let major: CLBeaconMajorValue = UInt16(txtMajor.text.toInt()!)
            let minor: CLBeaconMinorValue = UInt16(txtMinor.text.toInt()!)
            beaconRegion = CLBeaconRegion(proximityUUID: uuid, major: major, minor: minor, identifier: "com.appcoda.beacondemo")

            dataDictionary = beaconRegion.peripheralDataWithMeasuredPower(-58)

            bluetoothPeripheralManager.startAdvertising(dataDictionary)

            btnAction.setTitle("Stop", forState: UIControlState.Normal)
            lblStatus.text = "Broadcasting..."

            txtMajor.enabled = false
            txtMinor.enabled = false

            isBroadcasting = true
        }
    }
    else {
        bluetoothPeripheralManager.stopAdvertising()

        btnAction.setTitle("Start", forState: UIControlState.Normal)
        lblStatus.text = "Stopped"

        txtMajor.enabled = true
        txtMinor.enabled = true

        isBroadcasting = false
    }
}
At this point the BeaconPop app is ready, and fully functional. You can run it if you desire, but without its counterpart which is the next app, you won’t be able to see any results. So, take a breath here, and when you’re ready, let’s keep going!
Finding Beacons With BeaconSpot
In the second app that we have to implement in this tutorial, we’ll do the exact opposite thing than before; we will track all the nearby devices that advertise themselves as iBeacons. Now that we have finished working in the BeaconPop project feel free to close it, and then make sure to open the BeaconSpot starter project in Xcode. Our work here is quite specific. What we’ll do is to monitor for beacon regions using location services and the Core Location API, and once such a region is found, we’ll range all beacons in it. If there are more than one beacons in region, then we’ll fetch the closest one, and then we’ll display its details on the screen.
Likewise the previous app, we are going to use a button to start and stop the region monitoring, and eventually all the rest functionalities. Note however that this is not a rule, it’s just how I chose to develop this specific app. It’s quite possible that this approach won’t fit in your needs, and you might want to start monitoring for regions once the app gets launched. As I always love to say, I show you the way, but you’re the one that you’ll customize everything according to the requirements of your under development app. Contrary to the BeaconPop app, here we’ll work more with the CoreLocation framework. Specifically, further than using a beacon region object, we’ll also use a location manager, and several delegate methods that are provided by the CLLocationManagerDelegate protocol. There’s no need to go into more details now, as everything will become clear as we move along.
Before we start coding, let me explain shortly the “plan” that we’re going to follow. As I already mentioned, we are going to use the button to start monitoring for beacon regions. Once the app detects such a region, and when it actually detects that is inside such a region, it will start ranging the nearby beacons. All the found beacons within range are provided to us in an array through a really useful delegate method. In that array, the closest beacon is positioned in the first index, while the farthest one to the last one. Practically, that means that by simply “extracting” the first beacon from the array, we have in our hands the closest beacon. How are we going to use it? Well, I leave this for later. We’ll discuss about it when we’ll get there. Lastly, when the app exits from a beacon region, it will stop the ranging process (it will start again when it enters a region). It would be a total waste of resources to keep ranging while the device isn’t inside the range of a beacon. By tapping once again the button, the app will instantly stop monitoring and ranging, no matter whether is inside a beacon region or not.
That’s all you need know before we start programming. Let me note that in this app I’m not going to bother about the bluetooth state of the device, whether it’s working or not, or generally to track its state changes. I intentionally skipped it, as this demo application should end at some point. Additionally, you’ve already been given with the necessary code on how to do so, therefore you know how to be programmatically informed about bluetooth state changes if you need to.
Let’s get started. As we did in the previous app, we’ll begin here too by declaring all the variables that we’ll need throughout the implementation. Make sure that you’ve opened the ViewController.swift file, and you’re in the beginning of the class. Here they are:
var beaconRegion: CLBeaconRegion!

var locationManager: CLLocationManager!

var isSearchingForBeacons = false

var lastFoundBeacon: CLBeacon! = CLBeacon()

var lastProximity: CLProximity! = CLProximity.Unknown
The beaconRegion property will be used to specify the kind of region that the app should monitor for, and as you’ll see next, we’ll provide it with the UUID value we generated earlier. This object will be used later in conjunction with the locationManager object, right when the app should start monitoring for regions. The isSearchingForBeacons flag will let us know whether the app is searching or not (monitoring or not) for beacons, and depending on its value we’ll perform the proper actions. Finally, in the lastFoundBeacon and lastProximity properties we’ll store (as their names suggest) the closest beacon that was last found, and its most recent proximity value respectively. Both of these properties will assist us to avoid unnecessary UI updates when the beacon or its proximity haven’t changed since the last ranging.
Now, it’s time to do some initialization, so go to the viewDidLoad method and add the following content:
override func viewDidLoad() {
    ...

    locationManager = CLLocationManager()
    locationManager.delegate = self

    let uuid = NSUUID(UUIDString: "F34A1A1F-500F-48FB-AFAA-9584D641D7B1")
    beaconRegion = CLBeaconRegion(proximityUUID: uuid, identifier: "com.appcoda.beacondemo")

    beaconRegion.notifyOnEntry = true
    beaconRegion.notifyOnExit = true
}
At first, we initialize the location manager property, and we set our class as its delegate. That’s necessary, as we’re going to use several of the delegate methods it provides.
Then, we initialize the beacon region using the UUID and the identifier values only. Note that this is a different initializer than the one we used in the broadcasting app. There, we had to provide it with the major and minor values as well. Here, this is not needed. Also, keep in mind that both the broadcasting app and this one should use the same UUID value. If you change it to any of the apps, then there’s no case the iBeacon to be spotted by this app, even if the devices are “sitting” next to each other.
Lastly, by using the notifyOnEntry and notifyOnExit properties of the beacon region object, we make sure that the app will become aware when it enters or leaves a beacon region area. This is useful, as it will determine whether the beacon ranging should be started or should be stopped.
At this point, Xcode is displaying an error. That’s because the CLLocationManagerDelegate protocol is not adopted yet by our class, so let’s fix it:
class ViewController: UIViewController, CLLocationManagerDelegate
Now, let’s handle the case where the user taps on the “Start Spotting” button, and the region monitoring should begin. As you may already now, when using Core Location services it’s necessary to request for users’ permission for monitoring for region changes and getting location updates, and that’s something that we are about to do here too. In iOS 8, a new, important step was added to that step, which if omitted the app is not going to work. That is to include a new item in the .plist file regarding the description that will be displayed to the user regarding the permissions to track location changes. More specifically, in the .plist file of the app create a new item with the following key:
NSLocationAlwaysUsageDescription
The value matching to that key is a string, and it’s a complementary description to the default one that the system will display to the user. In that case, just any description you want, or use this: “Need permission to spot iBeacons.”
Generally speaking now, the above key is used in cases where the app needs to use location services all the time, even when it runs on the background. In case you want your app to use location services only when it’s in the foreground, then use the NSLocationWhenInUseUsageDescription key instead. However, it’s not just those two keys in the .plist file that define the location services usage type. It’s also important to specify that in code, exactly as we’ll do right next.

Back in the switchSpotting(_:) IBAction method now, here’s what we’re going to perform so the app starts to monitor for beacons:
- Request for authorization, as described above.
- Start monitoring for beacon regions.
- Start updating the location of the device.
- Update the interface.
In code:
@IBAction func switchSpotting(sender: AnyObject) {
    if !isSearchingForBeacons {
        locationManager.requestAlwaysAuthorization()
        locationManager.startMonitoringForRegion(beaconRegion)
        locationManager.startUpdatingLocation()

        btnSwitchSpotting.setTitle("Stop Spotting", forState: UIControlState.Normal)
        lblBeaconReport.text = "Spotting beacons..."
    }

    isSearchingForBeacons = !isSearchingForBeacons
}
Note that initially we check if the device is searching for beacons or not. Also, don’t overlook the last line in the above method. With it, we change the flag’s value, so the next time that the user will tap on the button the monitoring will stop (we’ll do that later).
The requestAlwaysAuthorization() method of the location manager in combination with the key we added in the .plist file, is going to make sure that the user will be asked for the proper permissions before the app starts using any location services. If either this command or the .plist entry is missing, the app won’t work.
Once we make the app start monitoring for beacon regions (regions that we specified in the initialization of the beaconRegion object) it’s necessary right next to use a couple of delegate methods and ask the system to check if the device is already in a region of interest or not. Note that if we don’t perform the following tasks, the app won’t really know if the device is inside a beacon region or not when it starts running, even if it really is. Even more, it won’t be aware of that until it exits the region and re-enters again.
So, at first we need to request the state of the region as shown next:
func locationManager(manager: CLLocationManager!, didStartMonitoringForRegion region: CLRegion!) {
    locationManager.requestStateForRegion(region)
}
This delegate method is called immediately right after the device has started monitoring for regions. The answer to the above request is given to the delegate method that is shown below:
func locationManager(manager: CLLocationManager!, didDetermineState state: CLRegionState, forRegion region: CLRegion!) {
    if state == CLRegionState.Inside {
        locationManager.startRangingBeaconsInRegion(beaconRegion)
    }
    else {
        locationManager.stopRangingBeaconsInRegion(beaconRegion)
    }
}
The above delegate method contains the state parameter, which is actually a CLRegionState struct and it “tells” us whether the device is inside the desired region or not. In our case, if it is then we must start ranging the nearby beacons, and that’s what exactly we do. Note that the above method doesn’t get called only when we request for the region state; it’s called every time the device enters or leaves a region, therefore is necessary to have an else case. In it, we only have to stop ranging beacons.
For your information, here’s the declaration of the CLRegionState struct:
enum CLRegionState : Int {
    case Unknown
    case Inside
    case Outside
}
As I said right before, the last delegate method is also called when the device crosses the boundary of a region, either it enters on it or exits. In any of those cases, what we only have to do is to update our interface, as the beacon ranging has already been handled. Here are the two respective delegate methods that are used to do that exactly:
func locationManager(manager: CLLocationManager!, didEnterRegion region: CLRegion!) {
    lblBeaconReport.text = "Beacon in range"
    lblBeaconDetails.hidden = false
}


func locationManager(manager: CLLocationManager!, didExitRegion region: CLRegion!) {
    lblBeaconReport.text = "No beacons in range"
    lblBeaconDetails.hidden = true
}
Now, let’s focus on the beacon ranging. When this process is taking place the following delegate method is being called:
func locationManager(manager: CLLocationManager!, didRangeBeacons beacons: [AnyObject]!, inRegion region: CLBeaconRegion!) { }
The beacons array contains the all the beacons found, and as I said to the beginning of this part, the object in the first position of the array represents the closest beacon. Our goal here is to get the details of it (major and minor values, distance), and display them to the user. But, as this method is called almost every second, it’s totally unnecessary to keep updating the interface while the closest beacon remains the same. So, what we’ll do to avoid this is simple: We’ll store the closest beacon to the lastFoundBeacon property, and its distance from the device (or in other words the proximity) to the lastProximity property. Then, we’ll compare both the last found beacon and the proximity to the new ones, and if any of them has changed we’ll update the interface. Otherwise, we won’t.
As you’ll see in the next code snippet, the details of the found beacon are presented as a formatted string to the lblBeaconDetails label. By default, this label is hidden and becomes visible only when there’s actual beacon data to display. However, if no beacons are found or any other problems exists (for example, a nil value), the label becomes hidden again. In the code that follows, notice all the checks that take place until we actually display the beacon data to the user:
func locationManager(manager: CLLocationManager!, didRangeBeacons beacons: [AnyObject]!, inRegion region: CLBeaconRegion!) {
    var shouldHideBeaconDetails = true

    if let foundBeacons = beacons {
        if foundBeacons.count > 0 {
            if let closestBeacon = foundBeacons[0] as? CLBeacon {
                if closestBeacon != lastFoundBeacon || lastProximity != closestBeacon.proximity  {
                    lastFoundBeacon = closestBeacon
                    lastProximity = closestBeacon.proximity

                    var proximityMessage: String!
                    switch lastFoundBeacon.proximity {
                    case CLProximity.Immediate:
                        proximityMessage = "Very close"

                    case CLProximity.Near:
                        proximityMessage = "Near"

                    case CLProximity.Far:
                        proximityMessage = "Far"

                    default:
                        proximityMessage = "Where's the beacon?"
                    }

                    shouldHideBeaconDetails = false

                    lblBeaconDetails.text = "Beacon Details:\nMajor = " + String(closestBeacon.major.intValue) + "\nMinor = " + String(closestBeacon.minor.intValue) + "\nDistance: " + proximityMessage
                }
            }
        }
    }

    lblBeaconDetails.hidden = shouldHideBeaconDetails
}
Besides all those I mentioned before, also note how the proximity of the beacon is handled. In the above implementation you can see all the possible values of the CLProximity struct. Depending on the proximity value, we specify the message that will be displayed. Of course, the above approach is just for demo reasons, and in a real app you should probably take some actions based on each proximity value.
The above method is the last important thing regarding the beacon monitoring we have to do in this application. Additionally, we should never forget that is possible errors to occur, so let’s implement a few delegate methods where we’ll just output the error message. You’ll understand what each method is for by its name:
func locationManager(manager: CLLocationManager!, didFailWithError error: NSError!) {
    println(error)
}


func locationManager(manager: CLLocationManager!, monitoringDidFailForRegion region: CLRegion!, withError error: NSError!) {
    println(error)
}


func locationManager(manager: CLLocationManager!, rangingBeaconsDidFailForRegion region: CLBeaconRegion!, withError error: NSError!) {
    println(error)
}
Now, let’s make the app capable of stopping spotting beacons when the button gets tapped once again. Back in the one and only IBAction method, we’ll add an else case as shown next:
@IBAction func switchSpotting(sender: AnyObject) {
    if !isSearchingForBeacons {
        ...
    }
    else {
        locationManager.stopMonitoringForRegion(beaconRegion)
        locationManager.stopRangingBeaconsInRegion(beaconRegion)
        locationManager.stopUpdatingLocation()

        btnSwitchSpotting.setTitle("Start Spotting", forState: UIControlState.Normal)
        lblBeaconReport.text = "Not running"
        lblBeaconDetails.hidden = true
    }

    isSearchingForBeacons = !isSearchingForBeacons
}
As you can see, we stop everything, even the beacon ranging in case is being performed. Also, we update the interface accordingly.
With the above addition, the BeaconSpot app is ready too!
Running the Apps
Now that both of the demo applications of the tutorial have been implemented, you can go ahead and test them. It’s important to keep in mind that you should run them in real devices, no matter if they’re iPhones or iPads. The ideal case for testing is to use at least three devices that run iOS 8 (8.1 or above specifically), where the two of them would act as iBeacons, and the third one would search for them. However, make sure that the broadcasting devices won’t have the same major and minor values, as it will be impossible for the BeaconSpot app to identify them as two different beacons.
If you don’t have three iOS devices, there are a couple of two other options you can use so you test the apps (or at least the BeaconSpot):
- Use real beacons. There are various companies out there making and selling beacon devices that use Bluetooth Low Energy technology (BLE), and if you’re interested in them in real, you should buy some. Maybe it isn’t worth doing so just for testing the demo app, but if you think that you could use them in the future too, then go ahead and grab some. Usually more than one beacons are sold together in a package. Before using a real beacon some extra work is required so you “program” them properly and assign the desired UUID, major, minor, etc, values, but the way you should do that totally depends on the manufacturer’s guides of the beacons you’ll get. As you guess, I’m not going to propose any manufacturer at all, there are a few out there, so the final decision it’s yours.
- Allow your Mac to act as a beacon device. To do that, two conditions must be met: First of all, you must make sure that your computer’s bluetooth is version 4.0, otherwise it’s not going to work. If you have an older version than that, you could optionally buy a proper bluetooth USB dongle (BLE 4.0) that’s really cheap, and upgrade that way the bluetooth of your Mac.The second condition is to find in the Internet (and probably in the GitHub) a Mac application that will let you specify all the broadcasting details and then transmit through the bluetooth. I don’t think that you’ll find any application to do that on the Mac App Store, so you might need to search a bit. Even though it is said that in Yosemite it’s not doable something like that, trust me, it is, as I’ve already tested it. Right next you can see a screenshot of such a Mac app running in my computer:
![]()
Anyway, I’m pretty sure that you’ll figure out a way to test the apps. To keep things interesting, make sure that the devices acting as beacons are in some distance, so you have the opportunity to enter and exit to their regions. During testing, note how the proximity gets changed as you move closer to or farther from a beacon.
Here is a screenshot demonstrating both the BeaconPop and BeaconSpot apps running:
![]()
Summary
From my experience I would say that working with beacons in real application is a bit more complicated than what I’ve showed you here, because the code must be adapted and fit to the under-development application logic, but everything is manageable and according to what you’ve already learnt. Probably you will rarely or never need to build an iBeacon app, except for demonstrative or testing purposes, but it’s almost certain that you’ll have to create a beacon receiver at some point (if, of course, you’ll be dealing with beacons). What you’ve seen here can help you create the backbone of a beacon-related app; all you have to do next is to customize it by applying the required logic. Needless to say that you’ll have to dig up more on all the aspects talked about today if you’re going to work with beacons, but don’t worry; nothing is eventually so hard to do. In any case, I think that dealing with iBeacons is a really funny and interesting work, and definitely you will agree that beacons can unveil a whole new world of possibilities. With that, I leave you to keep experimenting and remember that now you’ve been shown the way, go ahead and develop some really interesting and useful iBeacon apps. There are hundreds of different kind of uses, so go and take advantage of them!
For your reference, you can download the complete project here.


