

Editor’s note: This is part 1 of the Multipeer Connectivity series.
The Multipeer Connectivity Framework is one of the many new frameworks iOS 7 introduces, and it broadens the range of the applications that can be built for the new operating system. Its aim is to enable developers to create applications that will allow devices being in close distance to get connected, simply using Wi-Fi networks or Bluetooth. Great tools are offered for establishing communication between nearby devices, and for exchanging data and other resources without much effort to be required.
Continuing this introduction, it’s necessary to discuss a few more details about the Multipeer Connectivity framework and become more familiarized with it before we see any example of it. First of all, it’s really important to underline that this framework works on nearby devices only, meaning devices that use the same network infrastructure (such as Wi-Fi or Bluetooth), so don’t expect it to work for devices existing in long distance. With Multipeer Connectivity, one device is able to get connected to many other devices and communicate at the same time with all of them. A single device is called a peer. What actually takes place when a connection between two peers is established, is that a Multipeer Connectivity Session gets created, and this session is responsible for managing the whole communication and data exchanging between peers. For multiple devices, multiple sessions can be set up.
Prior to any session establishment, devices (peers) need to discover one each other. Discovery is the first phase that takes place when Multipeer Connectivity is used in applications. How discovery is being made? Let’s suppose we have only two devices we want to get connected. One device at least must work as a browser, in order to search for other existing devices, and the second device must be discoverable by telling that it’s out there and wants to connect to someone, or in other words the second device must advertise itself. Normally, both devices should advertise themselves, but at least one should browse for other peers in order to establish a connection.
Regarding the browsing functionality especially, Apple provides two ways to use it. The first and easy one, is a browsing UI built-in directly into the framework, which when is called a modal view is displayed listing all available and connected devices to the one that works as a browser. The second way offers greater flexibility to developers, as it’s a totally programmatic way, so one can implement customized browsing according to the needs of the application. Later on we will use the first way only, as this is an introductory tutorial about this framework.
Once the discovery of other peers has been done, the peer that locates the advertiser sends a message asking to establish a connection. If the second one (the advertiser) accepts that, then a session is created and both peers are ready to exchange data.
Talking about data, there are three kinds of data that can be sent and received using the Multipeer Connectivity framework. These are:
- Messages (including text, images, and everything else that can be converted to a NSData object)
- Streaming
- Resources
Going into some more details about messages, there are two modes that can be used for data transmission: The reliable and the unreliable mode. Using the reliable mode to send data, the framework makes sure that everything will arrive to the receiver, and in the order been sent. The cost of this reliable data sending though, is that is required more time for the transmission to be completed. On the other hand, when using the unreliable mode, data is send in no-time, really fast, but there is no guarantee that everything will arrive to the other peer, and of course, data is not sent in order. Which way is the most preferable clearly depends on the requirements of each application, so it’s up to every developer to decide what mode will use.
Generally, the Multipeer Connectivity framework offers classes and libraries for high-level development, so no C or other kind of low-level programming is required. Under the hood, many features are built-in ready to be used, taking away any hassle caused by implementing or addressing any network-related issues. In this tutorial we won’t consume any more time in theoretical presentation of the framework, therefore you are strongly advised to visit Apple’s documentation and do some study, and of course, watch the WWDC 2013 Session 708 video. Note that for testing the Multipeer Connectivity framework you need to have at least two devices, or use one device and the iPhone Simulator.
To see how easily the Multipeer Connectivity feature can be put in action and how it lets devices communicate, just keep reading!
Demo App Overview
In this tutorial we will create a sample application for demonstrating the most important aspects of the Multipeer Connectivity framework. I mentioned previously that there are three kinds of data that can be exchanged using it: Messages, streaming and resources. In the demo application that we are going to implement, we will see how to send messages, meaning NSData objects from device to device, and how to share resources, such as files. However, before we start building, we need to take a quick look on what exactly the demo app is about.
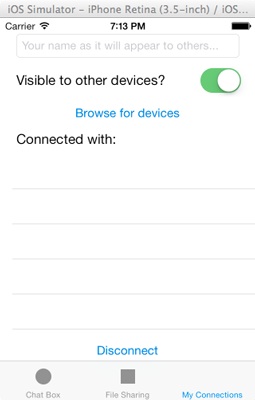
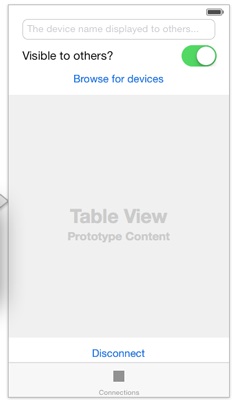
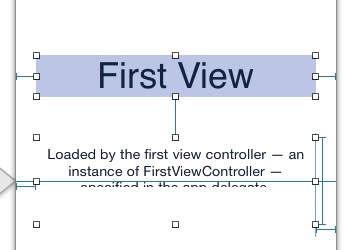
We are going to create a tabbed application, with three tabs in total. Starting on purpose from the last one, titled My Connections, we will create a view controller to manage the peer (device) naming, the advertising and all the connections (the sessions actually) of the device. Specifically, using a text field, we’ll be able to set a custom name for the device that will appear to other peers. A button will display the default browser UI when it’s tapped, while a switch control will toggle the advertising functionality of the device. In a table view they will be listed all of our connections. Under the table view there will be one more button, which will be used to disconnect the device from the session. The next figure presents a synopsis of the view controller:
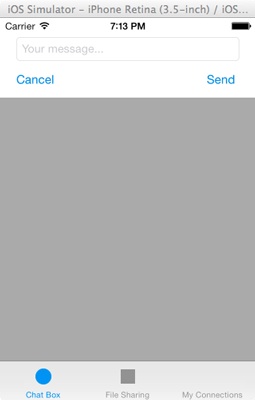
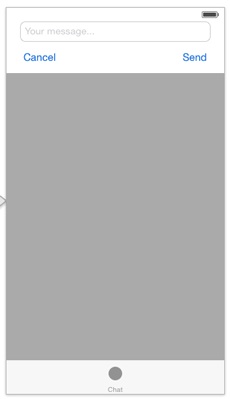
Behind the first tab is going to be another view controller. This one will be titled Chat Box and it will be used for sending text messages among devices using the Multipeer Connectivity. It will consist of a text field where the message will be written, a text view where the whole chat will appear, and a couple of buttons, one for sending the message and one for cancelling it. Here is a screenshot of it:
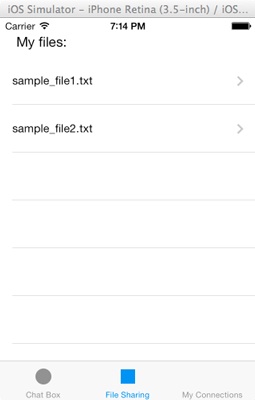
Lastly, one more view controller is going to lie behind the second tab, titled File Sharing. Here a table view will contain a list of some (sample) files. When a row is selected, then an action sheet will be displayed with all the peer names as its options. By selecting a peer, the selected file will be sent directly to it. To make it more attractive and more interactive, the file name, the sender and a progress view showing the progress of the file being received will be shown to the last row of the table view when a device receives a file. When it sends one, then right next to the file name a percentage showing the progress of the sending will appear. Here is the view controller behind the second tab in its initial state:
I presented all the view controllers of the demo application starting from the third tab in purpose, as the view controller behind it is the most important for us in this tutorial. Through it, we will see how the discovery and session establishment phases are handled and managed.
Before we reach the end of this brief app presentation, there is something more quite important I necessarily need to say. In order for the Multipeer Connectivity options to be app-wide and in order to avoid repeating building the same functionality three times (for each view controller separately), we will create a class for managing all the framework-related objects and tasks. In the application delegate (AppDelegate) class then we will initialize an object of this class. Also, through the application delegate we will access this object across the application. After all, it’s a terrible programming practice to develop something multiple times, instead of build it just once and use it as a tool.
So, after having walked through the application we are going to develop, it’s time to start working on it. You may download the two sample files at the end of this tutorial if you want to build step by step. Alternatively, get the full demo application provided for your own convenience, but stay put for all code details.
Demo App Creation
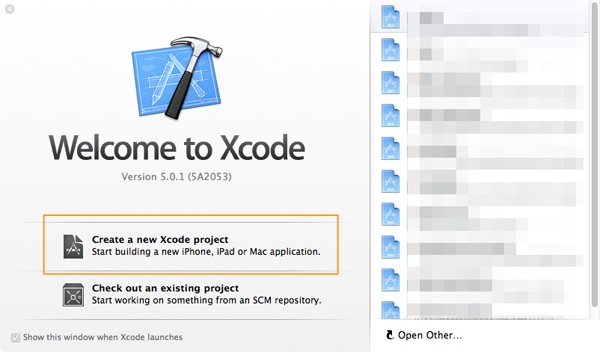
Launch Xcode and create a new project by clicking on the respective button at the left side of the Welcome screen:
At the first step of the guide, select the Tabbed Application option in the Application category, under the iOS section.

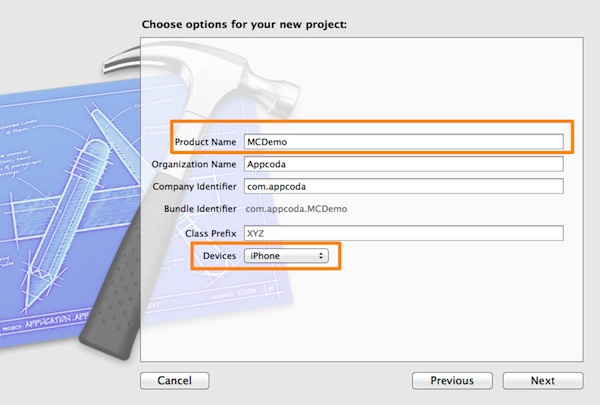
Click on the Next button to move to the next step of the guide. I named the app MCDemo in the Product Name field, but feel free to name it otherwise if you’d like. Besides that, make sure that in the Devices drop down menu, the iPhone option is selected. Leave everything else as it is and proceed by clicking on the Next button.
Finally, select a destination for your project and click on the Create button to end this guide. The project is now ready.
Adding New Tab
As I have already said, the application will consist of three tabs in total, but by default there are only two. So, our first task is to create a new tab and to connect it with a new class we will add to the project. Also, further than that we will set all tab titles and icons.
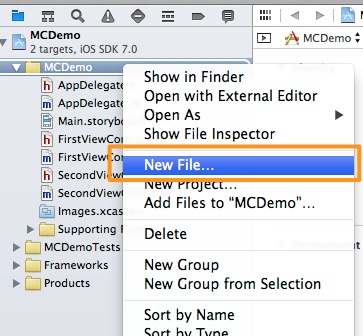
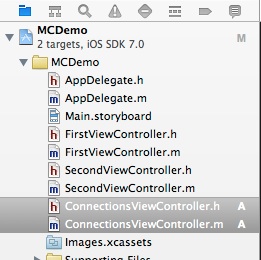
Begin by adding a new UIViewController class to the project for the third tab that we will add in a while. On the Project Navigation, Ctrl-click or right-click on the MCDemo group and from the popup menu select the New File… option, as shown in the next figure:
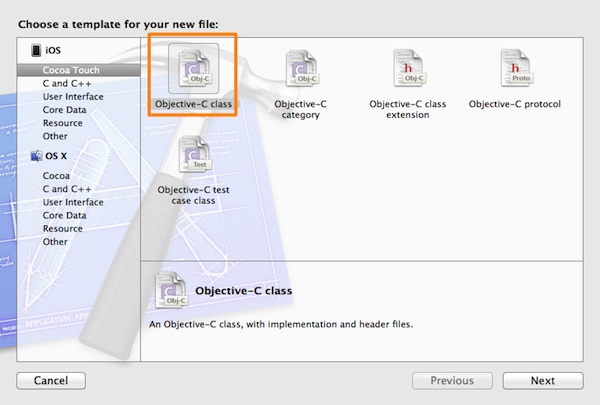
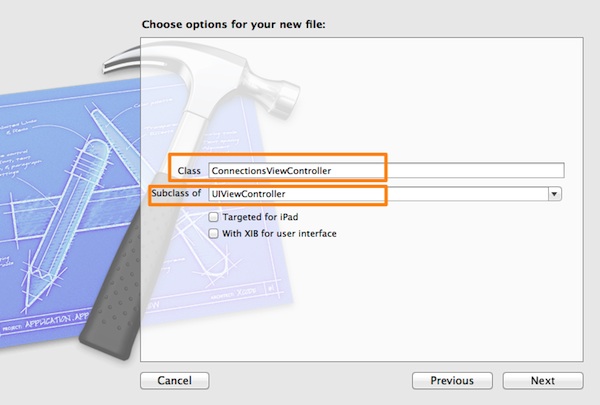
Under the iOS section, make sure that the Cocoa Touch category is selected. Then, select the Objective-C class icon and click on the Next button to proceed.
In the Class field, set the ConnectionsViewController value. Also, make sure that the UIViewController value is filled in the Subclass of field. Do not check any of the other two options. Click on the Next to move to the next step.
At the last step click on the Create button and you are ready. You should now see the ConnectionsViewController.h and ConnectionsViewController.m files on the Project Navigator.
Click now on the Main.storyboard file to let it open on the Interface Builder. As a first step, add a new view controller, by dragging it from the Object Library and dropping it to the canvas, right below the second view controller scene.
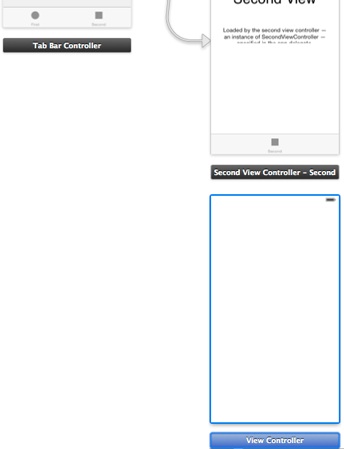
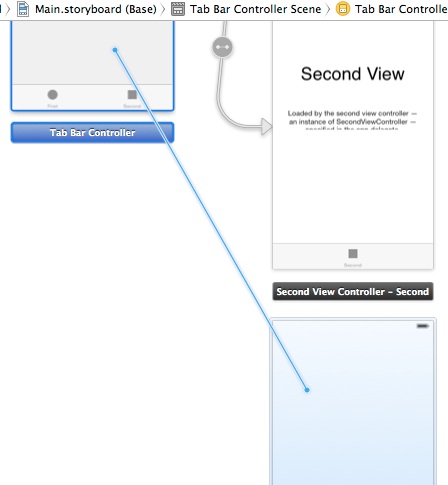
Next, keep the Ctrl key on the keyboard down, click on the Tab Bar Controller scene, and without leaving the mouse button drag the mouse on the new scene we just added to the interface. Release both the Ctrl key and the mouse button. A black, popup window will appear, where under the Relationship Segue section you must click on the view controllers option, so as the new view controller to be added as a tab to the tab bar controller.
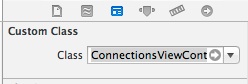
The tab bar controller now contains three tabs, and our new scene has been connected to it. We need now to set the ConnectionsViewController class we added earlier as the class for the new view controller. To do so, click on the new view controller scene, and in the Utilities Pane, open the Identity Inspector and in the Custom Class section start writing Connect… in the Class field. Xcode will automatically complete it for you.
Finally, we just have to set the correct titles to the tabs. To set a tab’s title, you must first select the tab on the scene (and not on the tab bar controller) you want to modify. Then, go once again on the Utilities pane, open the Attributes Inspector and under the Bar Title section set the title in the Title field.
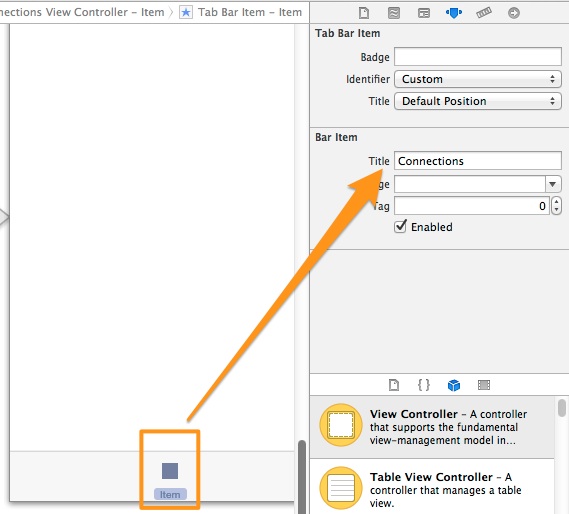
Set the following titles:
- First View Controller: Chat Box
- Second View Controller: File Sharing
- Connections View Controller: My Connections
Note that any visual configuration on Interface Builder made in this tutorial is targeted for 4″ screen devices, such as iPhone 5 or 5S. If you want to make the application run on older devices with a 3.5″ screen size, just play around by applying the suggested constraints by Xcode and you’ll easily manage to have it running in these devices as well.
Connections View Controller: Setup the Interface
Now that the third tab, along with its respective view controller have been added, it’s time to start building our application beginning from the view controller of the last tab, the Connections View Controller. Our first mission is to setup its interface, as well as to declare and connect any required IBOutlet properties and IBAction methods. So, while being in the Interface Builder, drag and drop the controls presented right next from the Objects Library into the Connections View Controller scene. Note that for each control are provided all the properties you should modify:
- UITextField
- Frame: X=20, Y=20, Width=280, Height=30
- Placeholder: The device name displayed to others…
- UILabel
- Frame: X=20, Y=63, Width=180, Y=21
- Text: Visible to others?
- UISwitch
- Frame: X=251, Y=58, Width=51, Y=31
- State: ON
- UIButton
- Frame: X=94, Y=92, Width=132, Y=30
- Title: Browse for devices
- UITableView
- Frame: X=0, Y=130, Width=320, Y=352
- UIButton
- Frame: X=121, Y=490, Width=78, Y=30
- Text: Disconnect
- Enabled: False (Unchecked)
After adding all the above, here is how your scene should look like:
Let’s declare now some IBOutlet properties and some IBAction methods. Open the ConnectionsViewController.h file, and add the next properties in the interface body:
@property (weak, nonatomic) IBOutlet UITextField *txtName;
@property (weak, nonatomic) IBOutlet UISwitch *swVisible;
@property (weak, nonatomic) IBOutlet UITableView *tblConnectedDevices;
@property (weak, nonatomic) IBOutlet UIButton *btnDisconnect;
Also, add these IBAction methods:
- (IBAction)browseForDevices:(id)sender;
- (IBAction)toggleVisibility:(id)sender;
- (IBAction)disconnect:(id)sender;
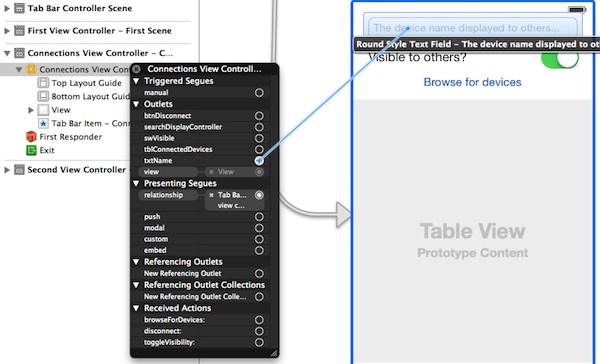
Fine. Now head back to the Main.storyboard to connect them to the appropriate controls. To do that, make sure that the Document Outline Pane is shown. Next, Ctrl-click or right-click on the Connections View Controller – Connections object, and a black, popup window will appear. Next to each property (and each IBAction method) there is a circle. Click on this circle next to an IBOutlet property, and without releasing the mouse button, drag and drop to the respective control on the scene. The following figure illustrates exactly that:
The connections should be done as follows:
- The txtName property goes to the UITextField object.
- The swVisible property goes to the UISwitch object.
- The tblConnectedDevices property goes to the UITableView object.
- The btnDisconnect property goes to the second UIButton (titled Disconnect) object.
For the rest objects on the scene we don’t need to use IBOutlet properties.
Using the same method as above, connect the declared IBAction methods to the appropriate controls. Here is how you should match the methods with the controls:
- The browseForDevices: method should connect to the first UIButton (titled Browse for devices) object.
- The toggleVisibility: method should connect to the UISwitch object.
- The disconnect: method should connect to the second UIButton object.
The interface for the Connections View Controller is now ready. We will discuss about the functionality and the purpose of each control we just added later. For the time being, we have to focus for first time on the Multipeer Connectivity framework details.
A Multipeer Connectivity Framework-Related Class
Right now we are going to do a big turn, as we will leave behind us the Interface Builder and any visual setup, and we will focus totally on code. In this section our goal is to create a new class, in which we will implement all framework-related logic, we will use any required framework classes and we will perform any necessary tasks. Note that it’s not required by the framework to do so, however this is the most convenient way for this sample application to perform app-wide tasks without having to re-write the same code more than once.
Before doing all these, the new class must be created, so Ctrl-click or Right-click on the MCDemo group in the Project Navigator, and from the popup menu select the New File… option, or simply press Command-N on your keyboard.
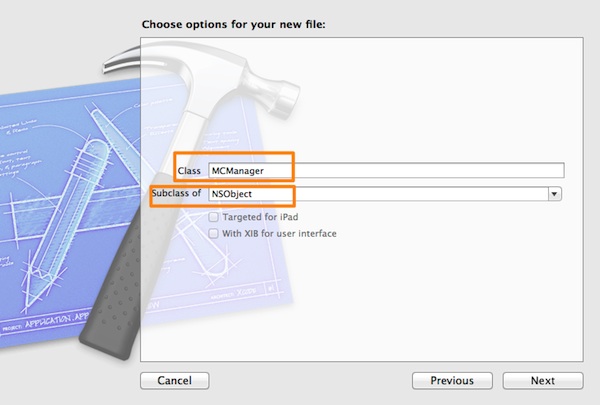
In the guide that appears, select the Objective-C class option as the template for the new file. Click Next to proceed. Next, at the Subclass of field, set the NSObject value. Right above, in the Class field, you must write the name of the new class. I named it MCManager, and it would be a good idea you name it the same, just to follow properly this tutorial.
Finally, click on the Next, and then click on the Create button to add the new class into the project. The MCManager.h and MCManager.m files should now be listed on the Project Navigator.
Let’s write some code now. Open the MCManager.h to declare some required objects. Before doing that however, we must import the Multipeer Connectivity library to our project, therefore head at the top of the file and add the next one:
#import
As you see, I didn’t add the framework manually to the project, but I directly used it. The compiler will do that for us, thanks to a new feature that incorporates, named Auto Linking.
Now, modify the interface header line to adopt the MCSesssionDelegate protocol as follows:
@interface MCManager : NSObject
After doing so, declare the next objects:
@property (nonatomic, strong) MCPeerID *peerID;
@property (nonatomic, strong) MCSession *session;
@property (nonatomic, strong) MCBrowserViewController *browser;
@property (nonatomic, strong) MCAdvertiserAssistant *advertiser;
The peerID object represents the device and it contains various properties needed for the discovery and session establishment phases. The session object is the most important one, as it represents the session that the current peer (the device that this app will run) will create. Any data exchanging and any communication details are controlled by this object. The browser object is actually representing the default UI provided by Apple for browsing for other peers, and we will use it for this purpose. For more advanced handling of the browsing feature of the framework, Apple provides a programmatic alternative way, but for now it’s out of the scope of this tutorial. Finally, there is the advertiser object, which is used from the current peer to advertise itself and make its discovery feasible.
Notice that the classes of all these objects belong to the Multipeer Connectivity framework. You’ll see how we will use them, but for now let’s declare some public methods that we’ll need later as well:
-(void)setupPeerAndSessionWithDisplayName:(NSString *)displayName;
-(void)setupMCBrowser;
-(void)advertiseSelf:(BOOL)shouldAdvertise;
Now head to the MCManager.m file, and for starters add the next init method for initialising our class:
-(id)init{
    self = [super init];

    if (self) {
        _peerID = nil;
        _session = nil;
        _browser = nil;
        _advertiser = nil;
    }

    return self;
}
At this point, Xcode should normally be complaining and displaying some warnings. Those are because we haven’t implemented the public methods yet, and also because we didn’t add any delegate methods of the MCSessionDelegate protocol. Let’s silence all of them, first by adding all necessary delegate methods:
-(void)session:(MCSession *)session peer:(MCPeerID *)peerID didChangeState:(MCSessionState)state{

}


-(void)session:(MCSession *)session didReceiveData:(NSData *)data fromPeer:(MCPeerID *)peerID{

}


-(void)session:(MCSession *)session didStartReceivingResourceWithName:(NSString *)resourceName fromPeer:(MCPeerID *)peerID withProgress:(NSProgress *)progress{

}


-(void)session:(MCSession *)session didFinishReceivingResourceWithName:(NSString *)resourceName fromPeer:(MCPeerID *)peerID atURL:(NSURL *)localURL withError:(NSError *)error{

}


-(void)session:(MCSession *)session didReceiveStream:(NSInputStream *)stream withName:(NSString *)streamName fromPeer:(MCPeerID *)peerID{

}
Even though it’s obvious by the delegate method names what they are all about, let me make a quick reference on them. The first method is called when a peer changes its state, meaning when it’s connected or disconnected. There are three states: MCSessionStateConnected, MCSessionStateConnecting and MCSessionStateNotConnected. The last state is valid even when a peer gets disconnected from our session. Generally this delegate method is called when the peer state is modified. The second delegate method is called when new data arrives from a peer. Remember that three kinds of data can be exchanged; messages, streaming and resources. This one is the delegate for messages. The next couple of methods are called when a resource is received, and finally the last one is invoked for incoming streams. In this tutorial we’ll use all of them, except for the last one.
Let’s go to the public method implementation now. Begin with the next code fragment, and we’ll talk about it in a while.
-(void)setupPeerAndSessionWithDisplayName:(NSString *)displayName{
    _peerID = [[MCPeerID alloc] initWithDisplayName:displayName];

    _session = [[MCSession alloc] initWithPeer:_peerID];
    _session.delegate = self;
}
First of all, the peerID object is initialised, as everything is based on it. The displayName string value that is provided to the init method (and as parameter to the method) concerns the name of the device as it will appear to other peers. This can be the device’s name (such as ‘John’s iPhone’), or a custom name. If you recall, we added a text field in our interface for this purpose, and we’ll see more about it later.
Next, we initialise the session object, the most important one as everything depends on it. We provide it with the peerID for initialisation and we make our class its delegate in the last line.
Let’s continue:
-(void)setupMCBrowser{
    _browser = [[MCBrowserViewController alloc] initWithServiceType:@"chat-files" session:_session];
}
This method contains just one, but an important line. It is the initialisation of the default, pre-made by Apple view controller that displays a browser for searching other peers. It accepts two parameters upon initialisation: The serviceType defines the type of service that the browser should look for, and it’s a small text that describes it. This text should be the same for both the browser and the advertiser in order for the first one to be able to discover the second. There are two rules about its name:
- Must be 1–15 characters long.
- Can contain only ASCII lowercase letters, numbers, and hyphens.
The second parameter is the session object initialised on the previous method.
One more public method to go:
-(void)advertiseSelf:(BOOL)shouldAdvertise{
    if (shouldAdvertise) {
        _advertiser = [[MCAdvertiserAssistant alloc] initWithServiceType:@"chat-files"
                                                           discoveryInfo:nil
                                                                 session:_session];
        [_advertiser start];
    }
    else{
        [_advertiser stop];
        _advertiser = nil;
    }
}
We are going to use this public method for toggling the advertising feature of the device. As you notice, the parameter defines whether the device should advertise itself or not, depending on the settings of our app. Remember that we added a UISwitch object for making our peer visible/invisible to others.
When we want the advertiser on, we initialise it and we start it. Note the serviceType text that matches to the browser’s one. When we want to turn off the advertiser, we simply stop it and we make our object nil.
So, for now our class is ready to be used as a tool. We’ll visit it many times along the way, as we’ll add code to the delegate methods of the session. Maybe not everything makes sense to you, but don’t worry, all will become clear upon usage.
One last thing we have left to do, and that is to go to the AppDelegate.h file and declare an object of our class:
@property (nonatomic, strong) MCManager *mcManager;
Don’t forget however to import the class:
#import "MCManager.h"
After that, open the AppDelegate.m file and inside the application:didFinishLaunchingWithOptions: delegate method add the next initialising line:
- (BOOL)application:(UIApplication *)application didFinishLaunchingWithOptions:(NSDictionary *)launchOptions
{
    // Override point for customization after application launch.

    _mcManager = [[MCManager alloc] init];

    return YES;
}
We are now in position to use our class through the object of the application delegate. Let’s go ahead to put Mutlipeer Connectivity in action!
The Discovery Phase
The browser view controller is going to be displayed through the ConnectionsViewController class we previously created, therefore we need to make it conform to the MCBrowserViewControllerDelegate protocol in order to be able to handle the browser. Go to the ConnectionsViewController.h file and import the Multipeer Connectivity framework, just like you did in the MCManager class:
#import
Next, modify the interface header as follows:
@interface ConnectionsViewController : UIViewController
I have already mentioned a couple of times that we will use our custom class (the MCManager class) through the application delegate. That means that we need access to it, so go to the ConnectionsViewController.m file, right into the private section of the interface. In there declare the next object:
@property (nonatomic, strong) AppDelegate *appDelegate;
Don’t worry if Xcode shows an error. You just have to make the following import:
#import "AppDelegate.h"
Now we can access the mcManager object of the application delegate. How? To see that go straight ahead to the viewDidLoad method. In there we will add three lines:
- (void)viewDidLoad
{
    [super viewDidLoad];

    _appDelegate = (AppDelegate *)[[UIApplication sharedApplication] delegate];
    [[_appDelegate mcManager] setupPeerAndSessionWithDisplayName:[UIDevice currentDevice].name];
    [[_appDelegate mcManager] advertiseSelf:_swVisible.isOn];
}
In the first line we instantiate the appDelegate object using the sharedApplication class method. After doing so, we are able to call any required public methods of the mcManager object, and that’s exactly we are doing right next. The setupPeerAndSessionWithDisplayName: method is being called, and as we are in the initialisation of our class, as the display name of our device we specify its actual name. During execution, if no custom name is set to the text field, then this name will appear to the other peers. Finally, we call the advertiseSelf: method with the current state of our switch, to either enable or keep nil the advertiser object.
Let’s implement the browser view controller appearance now, by adding the necessary code to the browseForDevices: IBAction method. Add the next code fragment in your ConnectionsViewController.m file:
- (IBAction)browseForDevices:(id)sender {
    [[_appDelegate mcManager] setupMCBrowser];
    [[[_appDelegate mcManager] browser] setDelegate:self];
    [self presentViewController:[[_appDelegate mcManager] browser] animated:YES completion:nil];
}
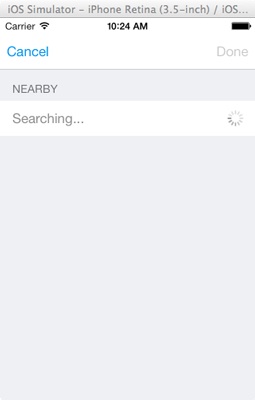
Using the first line, we call the setupMCBrowser public method of the MCManager class. Next, we set self (this class) as its delegate and finally we modally present it. After having this method implemented, the button with title Browse for devices is going to perfectly work, and if you compile and run the application and tap on that button, here is what you should expect to see:
Great! We just took our first taste from the Multipeer Connectivity framework. However, if you try to use the Done or Cancel button of the view controller, you’ll find out that they are not working. To enable them, we must implement two delegate methods of the MCBrowserViewControllerDelegate. So, turn back to Xcode and add these two methods:
-(void)browserViewControllerDidFinish:(MCBrowserViewController *)browserViewController{
    [_appDelegate.mcManager.browser dismissViewControllerAnimated:YES completion:nil];
}


-(void)browserViewControllerWasCancelled:(MCBrowserViewController *)browserViewController{
    [_appDelegate.mcManager.browser dismissViewControllerAnimated:YES completion:nil];
}
When tapping on the Done button of the view controller, we simply want to dismiss it, and similarly want the browser to act when the Cancel button is tapped. Therefore, both of these methods contain the same code, just for dismissing the browser view controller. The first method is the delegate for the Done button, and the second one is the delegate for the Cancel button.
Before going any further, just note how we access the browser object using this:
_appDelegate.mcManager.browser
Now, both buttons of the browser view controller are perfectly working. However, the Done button is disabled and you cannot test it yet, unless another device is discovered and gets connected to the current one. Before we see that though, let’s implement two more functionalities: How to set a custom name for the device and how to enable/disable the advertiser.
Peer Display Name And The Advertiser State
Let’s start from the text field. Go to the ConnectionsViewController.h file and adopt the UITextFieldDelegate protocol, as shown in the next line:
@interface ConnectionsViewController : UIViewController
Now, in the viewDidLoad method inside the ConnectionsViewController.m file, add the next one:
- (void)viewDidLoad
{
    ...

    [_txtName setDelegate:self];
}
We will implement the textFieldShouldReturn: delegate method of the text field, because we want the keyboard to be disappeared when the Return button is tapped and the peerID object of the MCManager class to get the name we set to the text field. However, in the viewDidLoad method we have already initialised both the peerID and the session objects, so first we need to set them to nil and then reinitialise them using the specified name by calling the setupPeerAndSessionWithDisplayName: method. Here is the implementation:
-(BOOL)textFieldShouldReturn:(UITextField *)textField{
    [_txtName resignFirstResponder];

    _appDelegate.mcManager.peerID = nil;
    _appDelegate.mcManager.session = nil;
    _appDelegate.mcManager.browser = nil;

    if ([_swVisible isOn]) {
        [_appDelegate.mcManager.advertiser stop];
    }
    _appDelegate.mcManager.advertiser = nil;


    [_appDelegate.mcManager setupPeerAndSessionWithDisplayName:_txtName.text];
    [_appDelegate.mcManager setupMCBrowser];
    [_appDelegate.mcManager advertiseSelf:_swVisible.isOn];

    return YES;
}
Note that we check if the advertiser is on, and if that’s the case we first stop it and then we set the respective object to nil.
There is an important fact that I should point out here. Once our device is connected to another peer, we shouldn’t change its display name, as a session would have been already established and any data exchange might be in progress. Therefore, in order to protect us from changing name while the device is connected, we will keep the text field disabled. Only when there is no connection to other peers the text field will be enabled, and we are going to associate this functionality with the Disconnect button later on. More specifically, once a connection gets established, the text field will become disabled, and when the Disconnect button is used to stop a connection, it will become enabled again. So, for now, just keep this in mind and let’s move forward.
Let’s make the switch control now to enable and disable the advertiser. Implement the following IBAction method:
- (IBAction)toggleVisibility:(id)sender {
    [_appDelegate.mcManager advertiseSelf:_swVisible.isOn];
}
Pretty simple implementation, right? We just call the advertiseSelf method to set the advertiser’s state according to the switch’s state.
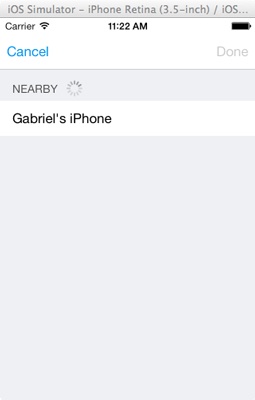
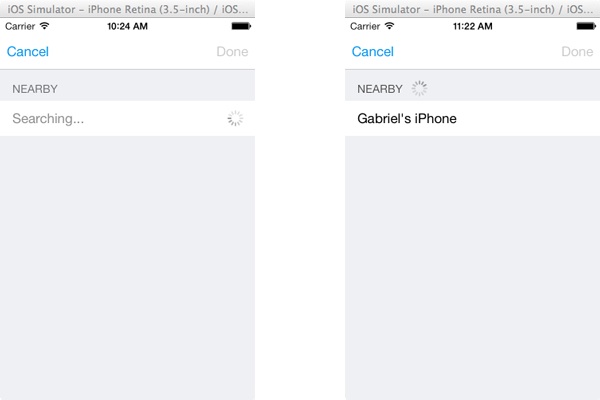
If you test the application now (in two devices or in one device and in the Simulator), you can play around with the peer discovery and the two more functionalities we added here. Here are some screenshots:
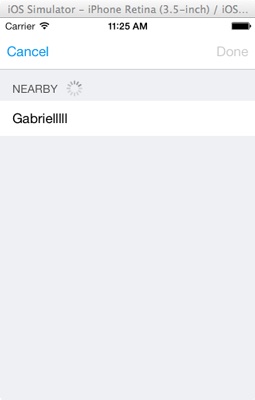
When a nearby device is found:
Using the switch to turn on/off the advertising feature of the second device:
Changing the display name of the device:
Note that the display name of the device, as well as the advertiser’s state can be changed, as we still haven’t made any connections. In the next part we are going to do exactly that. We will also see how we can get notified about the connected peers, how to show the other peer’s display name on the table view and how to make the Disconnect button work.
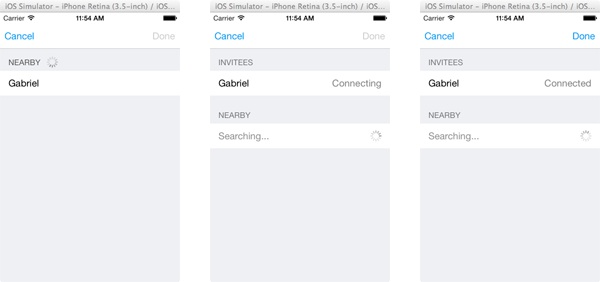
Making a Connection
Making a connection is really simple. In the browser view controller, you just have to tap on a nearby device’s name and wait until it gets connected. The view controller displays the status of the connections, changing from the Not Connected to Connecting and finally to the Connected state. Once this happens, the Done button becomes enabled.
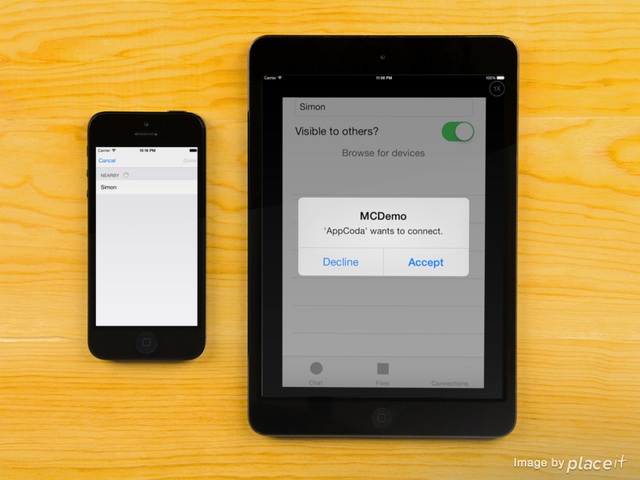
On the other device an alert view similar to the next one appears, prompting the user to accept or decline the connection:
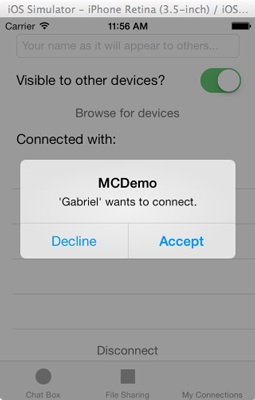
Once the user taps on the Accept button, the connection gets established. The important now is how we can handle it, and first of all, how we can be notified about the other peer connection state all the time. Thankfully, the Multipeer Connectivity framework gives us some MCSession delegate methods, which we implemented previously in the MCManager class, without having written any code though.
So, open the MCManager.m file and locate the session:peer:didChangeState: method. This one is called when a new connection takes place, and is our job to handle the info that provides. What we are going to do in our case is quite simple: As this is a class other than the one that we use to manage our connections (the ConnectionsViewController class), we will post a notification to let the latter know about the peer state changing, and along with the notification we will post all the provided info. Let’s see the implementation:
-(void)session:(MCSession *)session peer:(MCPeerID *)peerID didChangeState:(MCSessionState)state{
    NSDictionary *dict = @{@"peerID": peerID,
                           @"state" : [NSNumber numberWithInt:state]
                           };

    [[NSNotificationCenter defaultCenter] postNotificationName:@"MCDidChangeStateNotification"
                                                        object:nil
                                                      userInfo:dict];
}
At first, we create a NSDictionary object and we set the peerID and state parameter values as its contents. Next, we post a notification with the MCDidChangeStateNotification name and the dict object as its user info dictionary. By doing all these, we make sure that every time a peer’s state gets changed, our class will know it.
However, for the time being, only the half job has been done. We need to make the ConnectionsViewController class to observe for this notification and act appropriately when one arrives. So, open the ConnectionsViewController.m file, and head to the viewDidLoad method. Add the next content to it:
- (void)viewDidLoad
{
    ...

    [[NSNotificationCenter defaultCenter] addObserver:self
                                             selector:@selector(peerDidChangeStateWithNotification:)
                                                 name:@"MCDidChangeStateNotification"
                                               object:nil];
}
With this command, we let our class observe for the specific notification. When such a notification arrives, a method should be called and any actions that need to be taken, should be written in that method. In our case, this is the peerDidChangeStateWithNotification:, and it’s a custom private method that we will declare right now. Go to the private section of the interface, and add the next declaration:
@interface ConnectionsViewController ()
...

-(void)peerDidChangeStateWithNotification:(NSNotification *)notification;

@end
Next, we must implement it, but let’s discuss about it for a moment. What do we want to do when a new connection is being made? Simply to add the connected peer’s display name to the table view, to enable the Disconnect button and to disable the text field (I explained earlier why). On the other hand, when a peer is disconnected, we simply have to remove its name from the table view, and if no other peers exist, to disable the Disconnect button and enable the text field.
In order to do all that, we need an array that will be used as the datasource for our table view. Therefore, let’s declare and initialise this array, and then we will be able to implement the private method.
Go once again at the private section of the interface and add the next declaration:
@interface ConnectionsViewController ()
...

@property (nonatomic, strong) NSMutableArray *arrConnectedDevices;

@end
Then, in the viewDidLoad method initialise it:
- (void)viewDidLoad
{
    ...

    _arrConnectedDevices = [[NSMutableArray alloc] init];
}
Also, in order our table view to respond to everything we want, we must set our class as its delegate and its datasource. So, while being in the viewDidLoad method, add the next two lines:
- (void)viewDidLoad
{
    ...

    [_tblConnectedDevices setDelegate:self];
    [_tblConnectedDevices setDataSource:self];
}
Xcode will issue now some new warnings for these two commands. That’s because we haven’t adopted two required protocols, the UITableViewDelegate and the UITableViewDatasource. To fix this, go to the ConnectionsViewController.h file, and modify the interface header line, just as follows:
@interface ConnectionsViewController : UIViewController
Now we are totally ready to implement our private method that will be called when a notification arrives. Open once again the ConnectionsViewController.m file, and start with these lines:
-(void)peerDidChangeStateWithNotification:(NSNotification *)notification{
    MCPeerID *peerID = [[notification userInfo] objectForKey:@"peerID"];
    NSString *peerDisplayName = peerID.displayName;
    MCSessionState state = [[[notification userInfo] objectForKey:@"state"] intValue];
}
What we do here is not hard to be understood. We just get the two objects from the user info dictionary (peerID and state), and we keep the display name of the connected peer to a NSString object. Let’s keep going:
-(void)peerDidChangeStateWithNotification:(NSNotification *)notification{
    ...

    if (state != MCSessionStateConnecting) {
        if (state == MCSessionStateConnected) {
            [_arrConnectedDevices addObject:peerDisplayName];
        }
        else if (state == MCSessionStateNotConnected){
            if ([_arrConnectedDevices count] > 0) {
                int indexOfPeer = [_arrConnectedDevices indexOfObject:peerDisplayName];
                [_arrConnectedDevices removeObjectAtIndex:indexOfPeer];
            }
        }
     }
}
First of all, we perform any action only when the current state is other than the MCSessionStateConnecting. So, if currently the state matches to the MCSessionStateConnected, then we add the peer display name to the arrConnectedDevices array. Otherwise, if the state is equal to the MCSessionStateNotConnected one, then we find the index of the current peer in the array and simply remove it. This code snippet is the heart of our method. However, we are not finished yet. Add what is missing:
-(void)peerDidChangeStateWithNotification:(NSNotification *)notification{
    ...

    if (state != MCSessionStateConnecting) {
        ...

        [_tblConnectedDevices reloadData];

        BOOL peersExist = ([[_appDelegate.mcManager.session connectedPeers] count] == 0);
        [_btnDisconnect setEnabled:!peersExist];
        [_txtName setEnabled:peersExist];
    }
}
At first, we reload the data on the table view. After that, we check if there are any peers left connected, and we assign the result of this comparison to a BOOL value. Note that the connectedPeers method of the session object returns an array with all the connected peers to the session. Anyway, depending on the bool value, we set the text field and the disconnect button enable state.
The method is ready, but if you run the application you’ll see no results at all. Why not? Because we still haven’t implemented the minimum required table view delegate and datasource methods. Let’s do it now. Right next, you are given all these methods at once:
-(NSInteger)numberOfSectionsInTableView:(UITableView *)tableView{
    return 1;
}


-(NSInteger)tableView:(UITableView *)tableView numberOfRowsInSection:(NSInteger)section{
    return [_arrConnectedDevices count];
}


-(UITableViewCell *)tableView:(UITableView *)tableView cellForRowAtIndexPath:(NSIndexPath *)indexPath{
    UITableViewCell *cell = [tableView dequeueReusableCellWithIdentifier:@"CellIdentifier"];

    if (cell == nil) {
        cell = [[UITableViewCell alloc] initWithStyle:UITableViewCellStyleDefault reuseIdentifier:@"CellIdentifier"];
    }

    cell.textLabel.text = [_arrConnectedDevices objectAtIndex:indexPath.row];

    return cell;
}


-(CGFloat)tableView:(UITableView *)tableView heightForRowAtIndexPath:(NSIndexPath *)indexPath{
    return 60.0;
}
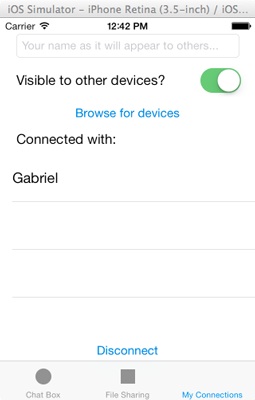
There is nothing hard here that needs to be explained. We just display the contents of the table view. If you test the app now and make a connection, you should see something similar to this:
Finally, there is just one more thing to be done and our view controller will be fully functional. That is to make the disconnect button work. Simply, implement the disconnect: method:
- (IBAction)disconnect:(id)sender {
    [_appDelegate.mcManager.session disconnect];

    _txtName.enabled = YES;

    [_arrConnectedDevices removeAllObjects];
    [_tblConnectedDevices reloadData];
}
As you see, the session object has the disconnect method, that enables it to break the connection. After that, the rest is easy to be understood.
Go and test once again the application. After you have a connection established, tap on the Disconnect button and you’ll see that in both devices the other peer’s display name goes away, while the text field becomes enabled again.
At this point, the Connections View Controller is ready! Up to now, we have seen many things regarding the framework, but let’s go ahead for even more interesting stuff!
Setup The Chat Interface
Once a connection is established, we can exchange any allowed data we want. In this part we will work with setting up the First View Controller interface, and later we will implement the chatting feature of the application. So, let’s get started!
Click on the Main.storyboard file to bring the Interface Builder up. Go to the First View Controller scene and delete its default contents.
Then, drag and drop the following controls from the Objects Library and set some of their properties as given below:
- UITextField
- Frame: X=20, Y=20, Width=280, Height=30
- Placeholder: Your message…
- UIButton
- Frame: X=254, Y=58, Width=46, Height=30
- Title: Send
- UIButton
- Frame: X=25, Y=58, Width=48, Height=30
- Title: Cancel
- UITextView
- Frame: X=0, Y=96, Width=320, Height=422
- Text: None
- Background Color: Light Gray
Your scene should now look like this:
Let’s declare a couple of IBOutlet properties now. Open the FirstViewController.h file and add these two inside the interface body:
@interface FirstViewController : UIViewController
@property (weak, nonatomic) IBOutlet UITextField *txtMessage;
@property (weak, nonatomic) IBOutlet UITextView *tvChat;
@end
Also, we want an IBAction method for each button, so add these as well:
@interface FirstViewController : UIViewController
...

- (IBAction)sendMessage:(id)sender;
- (IBAction)cancelMessage:(id)sender;

@end
Before we go back to Interface Builder and while being in this file, adopt the UITextField protocol, as we will need later to implement a delegate method of it.
@interface FirstViewController : UIViewController
Following the same steps for connecting the IBOutlet properties and the IBAction methods as we did while we were setting the Connections View Controller up, go and connect the txtMessage property to the text field and the tvChat property to the text view. Next, connect the sendMessage: IBAction method to the Send button and the cancelMessage: to the Cancel button. Once you’ve done these steps, nothing else remains to be done here.
Let’s Chat
The title of this section speaks on its own for our goal here. We will do any required implementation, so our connected devices using the Multipeer Connectivity framework to be able to chat using text messages.
Let’s begin by doing something common for all three view controllers: To declare and instantiate an AppDelegate object. Go to the FirstViewController.m file, and import the AppDelegate.h file:
#import "AppDelegate.h"
Then, inside the private section of the interface, make this declaration:
@interface FirstViewController ()
@property (nonatomic, strong) AppDelegate *appDelegate;
@end
Finally, go to the viewDidLoad method and instantiate the object:
- (void)viewDidLoad
{
    [super viewDidLoad];

   _appDelegate = (AppDelegate *)[[UIApplication sharedApplication] delegate];
}
Now we are able to access the mcManager object of the application delegate. We are continuing by implementing the textFieldShouldReturn: text field delegate method. We need it because we want the Return button of the keyboard to behave just like the Send UIButton, and that is to send the message to other peers. However, before we see this method, and while we are still in the viewDidLoad method, let’s make our class the delegate of the text field:
- (void)viewDidLoad
{
    ...

    _txtMessage.delegate = self;
}
Now we can implement the textFieldShouldReturn: method:
-(BOOL)textFieldShouldReturn:(UITextField *)textField{
    [self sendMyMessage];
    return YES;
}
The sendMyMessage method we call here is a custom, private method that we will implement in a while and that it will do the sending job. Now, it’s a good chance to implement the two IBAction methods we previously declared:
- (IBAction)sendMessage:(id)sender {
    [self sendMyMessage];
}

- (IBAction)cancelMessage:(id)sender {
    [_txtMessage resignFirstResponder];
}
They couldn’t be any simpler. The first one also calls the sendMyMessage method, and the second one just makes the keyboard go away, without sending any message at all.
Now we can dive in to the core of the desired functionality. We will implement the private method, and we will meet a new method of the framework that allows us to send messages.
Go to the private section of the interface to declare the method:
@interface FirstViewController ()
...

-(void)sendMyMessage;

@end
Now we may proceed to its implementation, so let’s see it first and we’ll discuss later.
-(void)sendMyMessage{
    NSData *dataToSend = [_txtMessage.text dataUsingEncoding:NSUTF8StringEncoding];
    NSArray *allPeers = _appDelegate.mcManager.session.connectedPeers;
    NSError *error;

    [_appDelegate.mcManager.session sendData:dataToSend
                                     toPeers:allPeers
                                    withMode:MCSessionSendDataReliable
                                       error:&error];

    if (error) {
        NSLog(@"%@", [error localizedDescription]);
    }

    [_tvChat setText:[_tvChat.text stringByAppendingString:[NSString stringWithFormat:@"I wrote:\n%@\n\n", _txtMessage.text]]];
    [_txtMessage setText:@""];
    [_txtMessage resignFirstResponder];
}
The session object has the sendData:toPeers:withMode:error: method, which is the one that actually sends a message. The data should be a NSData object and that’s exactly is taking place in the first line by using the dataUsingEncoding: method.
The second parameter of the method must be a NSArray with all peers that should receive the message. For the sake of the tutorial, we’ll send the message to all connected peers. In a real application you can let users select the recipients of the message.
The third parameter is quite important, as this is the place where we define the mode that our data will be sent. At the beginning of this tutorial, I said that there are two modes, the reliable and the unreliable. This is supposed to be a chat application, so we don’t want to lose any package. Therefore, when calling the method we specify the MCSessionSendDataReliable value.
The last parameter is the all-time classic error object, which we use to check if any error occurred after we have this method called. Indeed, if any error occurs, we just log its description, as there is no reason to handle it in any other way in our demo app.
Finally, we perform three more tasks. First of all, we display the message to the text view, and to make clear that it’s us who wrote it, we prepend the I wrote: text. Next, we clear the text field from the current content, and finally we make the keyboard go away.
Further than the new method of the session object we just met, there is nothing difficult or weird. Let’s focus now on what happens when a message is received by a peer. Once that happens, the session:didReceiveData:fromPeer: delegate method is called, and it’s our responsibility to handle the received message according to our needs. We have implemented this method in the MCManager class, but with no content at all. Now it’s the appropriate time to pay it a visit and manage the received data.
Go to the MCManager.m file, and find the session:didReceiveData:fromPeer: method. Our approach here is going to be the same to the session:peer:didChangeState: method, and that means that we will post a notification that our class (FirstViewController) will catch and act appropriately.
Here is its implementation:
-(void)session:(MCSession *)session didReceiveData:(NSData *)data fromPeer:(MCPeerID *)peerID{
    NSDictionary *dict = @{@"data": data,
                           @"peerID": peerID
                           };

    [[NSNotificationCenter defaultCenter] postNotificationName:@"MCDidReceiveDataNotification"
                                                        object:nil
                                                      userInfo:dict];
}
As you see, we create a NSDictionary object with the provided data and peer as its contents. Next, we post a notification with the given name and send the dictionary along with it. After having added this simple code, we have nothing more to do, so let’s go back to the FirstViewController.m file.
Our next task is to make our class observe for this notification, and we’ll do that in the viewDidLoad method. Add the next code fragment:
- (void)viewDidLoad
{
    ...

    [[NSNotificationCenter defaultCenter] addObserver:self
                                             selector:@selector(didReceiveDataWithNotification:)
                                                 name:@"MCDidReceiveDataNotification"
                                               object:nil];
}
The didReceiveDataWithNotification: method in the selector is the private method that is called every time such a notification arrives. We are going to implement it in a while, but first let’s declare it. Go to the private section of the interface and add this declaration:
@interface FirstViewController ()
...

-(void)didReceiveDataWithNotification:(NSNotification *)notification;

@end
What we want this method to do is fairly simple. The user info dictionary of the notification contains the peer that sent the message and the message itself as a NSData object. From the peer object we’ll get its display name, and we will convert the data into a NSString object. Once that has been done, then we will add to the text view the peer display name along with its message.
Here is the implementation:
-(void)didReceiveDataWithNotification:(NSNotification *)notification{
    MCPeerID *peerID = [[notification userInfo] objectForKey:@"peerID"];
    NSString *peerDisplayName = peerID.displayName;

    NSData *receivedData = [[notification userInfo] objectForKey:@"data"];
    NSString *receivedText = [[NSString alloc] initWithData:receivedData encoding:NSUTF8StringEncoding];

    [_tvChat performSelectorOnMainThread:@selector(setText:) withObject:[_tvChat.text stringByAppendingString:[NSString stringWithFormat:@"%@ wrote:\n%@\n\n", peerDisplayName, receivedText]] waitUntilDone:NO];
}
Note that we set the text to the text view by calling the performSelectorOnMainThread:withObject:waitUntilDone: method. This is done because the data is received in a secondary thread, and any visual update should always take place on the main thread of the application.
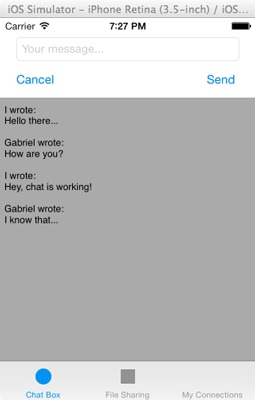
Our chatting feature is ready! If you want to test it, first establish a connection and then start sending text messages from peer to peer.
Summary
The Multipeer Connectivity framework is a brand-new feature on iOS 7. In this tutorial we gave you a brief introduction of the framework and demonstrated how you can use it to build a simple chat app. There is still a lot to explore. In part 2 of the tutorial series, we’ll continue to work on the project and see how to share file with nearby devices. Stay tuned.
For your reference, you can download the complete Xcode project from here. As always, feel free to share your thoughts and comments below.
Update: Part 2 is now available.


