

One of the not so well-known frameworks existing on iOS (and Mac OS), is the Event Kit framework. This framework has one purpose only, to let us access the calendars, the events and the reminders of a device, and work with them. If you have ever been wondered about how you can create custom events through your app, or how to set reminders without using the Reminders app, then the Event Kit is the answer you’re looking for. Through this tutorial, you will have the chance to meet it, as you’ll get to know the most important aspects of it.
Before we start working with it, I think it would be useful to mention a few facts about the Event Kit framework. What actually the framework does, is to provide access to the Calendar and Reminders apps, and make your own app capable of retrieving information, or adding new. Behind of both of these apps, there is the same database, named Calendar Database. What you can do with the framework is to create, edit and delete both events and reminders. Events are displayed in the Calendar app, while reminders are (obviously) displayed in the Reminders app. Further than that, you are given the ability to create or delete calendars, and furthermore, to perform more advanced tasks, such as settings alarms for an upcoming event or reminder, or making them recurring.
When using the Event Kit framework, you should always have in mind that the user must grant access to either Calendar or Reminders apps. Upon the first launch of an app that uses the framework, an alert view asking for the user consent must appear, and it’s up to users to decide whether your app will be able to work with any of the above resources. After all, asking for user permissions is something that always happen in cases of frameworks that deal with other apps or resources of the iOS. Therefore, you should check if user has granted access, and then make the related to Event Kit features available.
As always, I recommend you to go through the Apple documentation as well for getting a greater level of understanding on the topic. Having said all that, let’s move on to make our introduction to the sample app of this tutorial.
Demo App Overview
Unlike to the most of the tutorials, in this one we are not going to create an app from the scratch. On the contrary, you should get a starter app from here in which I’ve already made an initial preparation. All the necessary view controllers, connections, and the basic structure have been created and configured. What we have to do, is to apply all the logic lying behind the app.
Before I present you all the aspects of the starter app, let me say a few words about what we’ll do in this tutorial. My goal is to make you familiar with the most important Event Kit classes, and the most important tasks of them. There are three major entities that one can work with: Calendar, events and reminders. There are great similarities on event and reminder handling, therefore we’ll focus only on events. We’ll see how to create, load, delete and display events, but not just that. We’ll also see how to add alarms to an event, and how to make a repeated, or in other words a recurring event. Further than that, we’ll focus on calendars too. We’ll learn how to create a new calendar, how to load and display existing calendars, and how to delete them. Everything will be presented in great details, performing one step at the time.
A couple of words about the starter app now. First of all, I must say that the sample app is a navigation based one. For managing all the aspects of the Event Kit framework, we’ll create a new class in which we’ll keep adding extra functionalities as we’ll move forward to the implementation. Regarding the view controllers, here’s in short which they are:
- ViewController: This is the default view controller created automatically with the project. In this one, we’ll display all the events of a selected calendar.
- CalendarsViewController: In this one, we’ll display all the local calendars existing on the device or the Simulator. Also, besides than simply showing calendars, we’ll be able to add new or delete existing ones.
- EditEventViewController: This is a quite important one, as we’ll do much of our work here. This is the place where we’ll edit a new event, we’ll set alarms and make our events recurring.
- DatePickerViewController: It’s clearly an auxiliary view controller. We won’t do anything on that, but we’ll use it to pick dates when it’s needed.
Lastly, you’ll find out that you’ll be able to test the app almost at every step of the development. You can do so either on Simulator, or on a real device.
Let’s see some action now, as we have a lot of work to do.
The EventManager Class
Let’s get started by creating a new class which we’ll use to manage the various Event Kit related tasks. We will name this class EventManager, and through it we’ll perform all the saving, loading, deleting and more operations.
On Xcode, go to the File > New > File… menu, and wait for the guide to appear. Then, select the Objective-C class option as the template for the new file, in the Cocoa-Touch category under the iOS section.
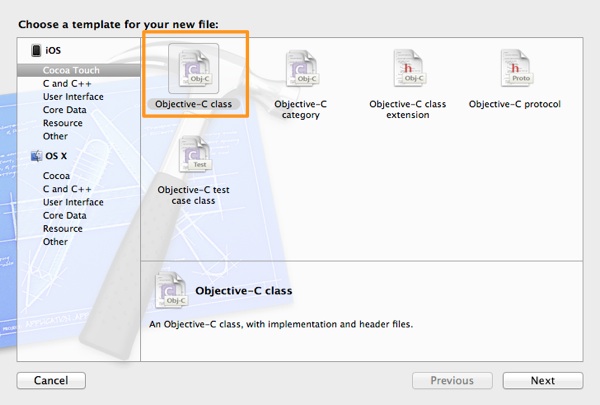
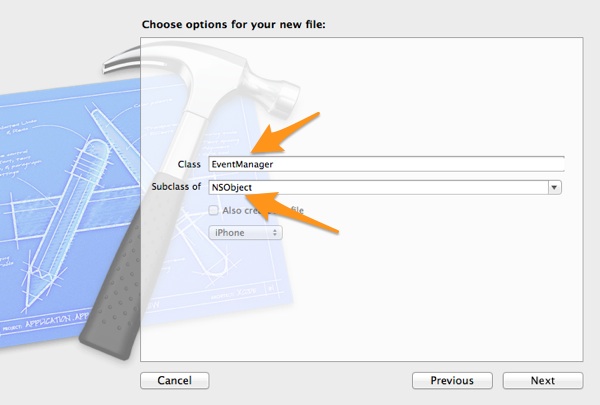
Click on the Next button, and at the second step make sure that in the Subclass of field the NSObject value is set. If not, then start typing it and Xcode will suggest it. In the Class field set the name of our class, which is EventManager as we already said.
Click on the Next button once again, and finally click on the Create to get finished.
After the pair of the new files appear on the Project Navigator, click on the EventManager.h file to edit it. During the implementation of the project, we are going to declare various properties and methods in here. However, the most important property and the one that we’ll start with, is an object of the EKEventStore class. This class is responsible in the Event Kit for handling almost everything: events, reminders, alarms, etc. As you’ll find out later, most of the important tasks will be performed using that property. Having said that, here’s the declaration:
@interface EventManager : NSObject

@property (nonatomic, strong) EKEventStore *eventStore;

@end
When using frameworks that deal with iOS features or built-in apps, such as the Calendar, the Reminders, or the Photos app, it’s necessary to get user permissions for accessing and modifying the resources you want. That happens with the Event Kit framework too. When our app will be launched for first time, a message asking for permissions will be shown to the user, and our app will be able to access the necessary resources (such as calendars) if only the user allows so. If there’s no user consent, then a wall will exist between the app and the wanted resources, and nothing will work. In our app, such a message should appear when the ViewController view controller gets loaded, where the events of a calendar will be listed. To let us know whether the user has granted access or not, we will use a boolean value. That value will be saved to the user defaults (NSUserDefaults) dictionary, and it will be retrieved upon subsequent launches of the app. So, let’s declare it:
@interface EventManager : NSObject
...
@property (nonatomic) BOOL eventsAccessGranted;

@end
Now, open the EventManager.m file to implement the init method of the class. At the moment, we’ll do just two things:
- We will initialize the eventStore object.
- We will check if a key for the eventsAccessGranted exists in the user defaults dictionary, and if so, we’ll load its value.
- (instancetype)init
{
self = [super init];
if (self) {
self.eventStore = [[EKEventStore alloc] init];NSUserDefaults *userDefaults = [NSUserDefaults standardUserDefaults]; // Check if the access granted value for the events exists in the user defaults dictionary. if ([userDefaults valueForKey:@"eventkit_events_access_granted"] != nil) { // The value exists, so assign it to the property. self.eventsAccessGranted = [[userDefaults valueForKey:@"eventkit_events_access_granted"] intValue]; } else{ // Set the default value. self.eventsAccessGranted = NO; }}
return self;
}
- (instancetype)init
As you see in the code snippet above, I used the * eventkit_events_access_granted* key name, but that’s something you can change if you don’t like it. Later, we’ll add a few more stuff in the init method.
Now let’s go to see how the EventManager class can be used. It’s quite important to always have in mind that the initialization of the eventStore object is a time-consuming process. Therefore, Apple strictly recommends to use one instance of that class for performing app-wide tasks, and not to initialize a new object every time that a feature of the Event Kit framework should be used. Following that rule, we are going to declare and initialize such an object in the AppDelegate class, and we are going to use it in all the view controllers of our app.
Open the AppDelegate.h file, and at the very top of it add the next line:
#import "EventManager.h"
Then, declare a new property, named eventManager:
@interface AppDelegate : UIResponder

@property (strong, nonatomic) UIWindow *window;

@property (nonatomic, strong) EventManager *eventManager;

@end
Click on the AppDelegate.m file on the Project Navigator now, and go to the applicationDidBecomeActive: delegate method. In this one we’ll initialize the eventManager object:
- (void)applicationDidBecomeActive:(UIApplication *)application
{
    // Restart any tasks that were paused (or not yet started) while the application was inactive. If the application was previously in the background, optionally refresh the user interface.

    self.eventManager = [[EventManager alloc] init];

}
At this point, the first implementation of the EventManager class is over, but we’ll keep adding new code along our way. Also, by declaring the eventManager property in the AppDelegate class, we’ll be able to access it from anywhere in the app and manage all the Event Kit related tasks.
Asking for User Consent
In the previous section we declared a boolean value that we will use for knowing at any given time whether the user has allowed access to the events of the device. Now, before we go any further, let’s see how we can ask for user consent, and how the user response will be stored to the user defaults dictionary. Up to this point, we’ve added code to retrieve the value of that boolean property, however we haven’t done anything for storing it, so we’ll do that here as well.
Begin by opening the ViewController.m file, and by going to the top of the file. We’ll ask user to grant access to the events, using a private method. In this private method we’ll add the necessary code, and we’ll call it from the viewDidLoad method after a small period of time. The delay is necessary, because the event store object requires some time until it gets initialized. At the private class section, add the following declaration:
@interface ViewController ()

...

-(void)requestAccessToEvents;

@end
Next, implement it as shown right next:
-(void)requestAccessToEvents{
    [self.appDelegate.eventManager.eventStore requestAccessToEntityType:EKEntityTypeEvent completion:^(BOOL granted, NSError *error) {
        if (error == nil) {
            // Store the returned granted value.
            self.appDelegate.eventManager.eventsAccessGranted = granted;
        }
        else{
            // In case of error, just log its description to the debugger.
            NSLog(@"%@", [error localizedDescription]);
        }
    }];
}
The requestAccessToEntityType:completion: method above, expects to be provided with the proper entity type that we’re asking access to. There are two values that can be set: Either EKEntityTypeEvent when asking for access to events, or EKEntityTypeReminders when asking for access to reminders. The completion handler is called after the user has made a choice, and the returned granted value is assigned to the respective boolean property of our class. In case that any error occurs, we simply display its description on the debugger.
Now that this method is ready, let’s call it in the viewDidLoad:
- (void)viewDidLoad
{
    ..

    // Request access to events.
    [self performSelector:@selector(requestAccessToEvents) withObject:nil afterDelay:0.4];

}
By implementing the above stuff we manage to show a default, pre-made alert view to the user the first time the view controller is loaded, but we’re unable to store the response yet. As you may have noticed, we didn’t call any methods at all for storing the eventsAccessGranted property to the user defaults dictionary, we just assigned the user response to it. So, how are we going to succeed it?
The solution is simple, as we just have to override the setter method of the boolean property. In there, we’ll set the property’s value, and we’ll save it to the user dictionary too. Following that way, we don’t have to write any extra method just for saving the boolean value.
Go to the EventManager.m file, and add the next method implementation for the eventAccessGranted property:
-(void)setEventsAccessGranted:(BOOL)eventsAccessGranted{
    _eventsAccessGranted = eventsAccessGranted;

    [[NSUserDefaults standardUserDefaults] setValue:[NSNumber numberWithBool:eventsAccessGranted] forKey:@"eventkit_events_access_granted"];
}
Notice that we use the _eventsAccessGranted member variable that automatically gets synthesized, instead of the self.eventsAccessGranted property, as that’s the proper way to set its value.
Now, the app is able to store the boolean values to the user info dictionary every time a new value is assigned to them.
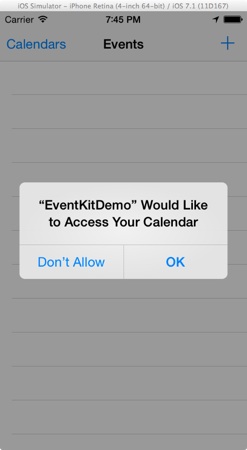
The next figure illustrates the alert view asking for user consent when the app runs for the first time.
Listing Calendars
In order to work with calendars, it’s necessary to load the CalendarsViewController view controller and push it to the navigation stack. In the starter app all the necessary connections between the view controllers have been already made, and we only need to add one command for letting it appear. However, we should always check whether the user has allowed access to the events, and if not we shouldn’t load the calendars view controller when the Calendars bar button item gets tapped.
To do that, open the ViewController.m file, and find the showCalendars: IBAction method definition. In it, add the following code:
- (IBAction)showCalendars:(id)sender {
    if (self.appDelegate.eventManager.eventsAccessGranted) {
        [self performSegueWithIdentifier:@"idSegueCalendars" sender:self];
    }
}
That’s great, as the calendars view controller will appear now if only the user has granted access to the events of the device.
Let’s focus now on how to display all existing event calendars. Before we proceed, I must make clear that there are various types of calendars (such as local, on iCloud, etc). For the sake of the simplicity however, we’ll work only with local calendars, meaning with calendars that are stored on the device.
In order to list existing (local) calendars, it’s required to have data to show. Therefore, we’ll begin here by implementing a custom method on the EventManager class, and in there we’ll get all the local calendars from the event store object. Initially, go to the EventManager.h file, and declare the next method:
@interface EventManager : NSObject

...

-(NSArray *)getLocalEventCalendars;

@end
That’s the first one of a series of methods that we’re about to implement in this tutorial. Now, open the EventManager.m file, and define it:
-(NSArray *)getLocalEventCalendars{
NSArray *allCalendars = [self.eventStore calendarsForEntityType:EKEntityTypeEvent];
NSMutableArray *localCalendars = [[NSMutableArray alloc] init];
for (int i=0; i
Let's discuss it a bit. At first, you notice that we get an array with all calendars of any type using the calendarsForEntityType: method of the event store object and by specifying the EKEntityTypeEvent as the kind of the calendars we want to get. Note that this array contains calendars of all types, so we must get only the local ones. For that reason, we initialize a mutable array, and using a loop we check the type of each returned calendar. Every local calendar found in the first array is stored to the mutable one, which is returned at the end. Inside the loop, each calendar (the current calendar) is stored to a EKCalendar object temporarily. As you understand, the EKCalendar class represents a calendar in the Event Kit framework.
Our work here is over for now, so let's head directly to the CalendarsViewController.m file. The first thing we have to do here, is to declare a private array in which they are going to be stored all the calendars retrieved in the above method. So, go to the private section of the class and declare one. Along with it, declare a private method as well, which we'll use for loading the calendars:
@interface CalendarsViewController ()
...
@property (nonatomic, strong) NSArray *arrCalendars;
-(void)loadEventCalendars;
@end
Let's implement the loadEventCalendars method:
-(void)loadEventCalendars{
// Load all local event calendars.
self.arrCalendars = [self.appDelegate.eventManager getLocalEventCalendars];
// Reload the table view.
[self.tblCalendars reloadData];
}
What we did in the above snippet is really simple. We just made a call to the new method of the EventManager class, we assigned all found calendars to the arrCalendars array, and we reloaded the table view. The last command is necessary if you want to show the loaded data to the table view.
The above method should be called, and that's something that we'll do in the viewDidLoad method:
- (void)viewDidLoad
{
...
// Load all local event calendars.
[self loadEventCalendars];
}
Now, let's work a bit with the table view methods. At first, let's specify how many rows should be returned, therefore change the next method as shown:
-(NSInteger)tableView:(UITableView *)tableView numberOfRowsInSection:(NSInteger)section{
return self.arrCalendars.count;
}
Note that later we'll modify it again, but for now we're fine. What we must do next, is to display the title of each loaded local calendar. Go to the tableView:cellForRowAtIndexPath: method, and replace the return nil; command with the following few lines:
-(UITableViewCell *)tableView:(UITableView *)tableView cellForRowAtIndexPath:(NSIndexPath *)indexPath{
UITableViewCell *cell = [tableView dequeueReusableCellWithIdentifier:@"idCellCalendar"];
EKCalendar *currentCalendar = [self.arrCalendars objectAtIndex:indexPath.row];
cell.textLabel.text = currentCalendar.title;
return cell;
}
Each calendar of the arrCalendars array is firstly assigned to an EKCalendar object, and then its title is set to the textLabel of the cell. If you run the app now, any existing calendars in the device will be listed in our app.

The purpose of this view controller, besides than demonstrating how to create and list calendars, is to let us select one for adding events, so before we finish our work in this section we must indicate the selected calendar on the table view, and store it as well. Actually, each calendar has a unique identifier string, so instead of storing a calendar object when users selects one, we'll just save its identifier. That's simpler to do, and by using the identifier we can retrieve the respective calendar from the event store object.
The selected calendar identifier will be assigned to a new property that we'll add to the EventManager class, therefore go to the EventManager.h file and declare the next one:
@interface EventManager : NSObject
...
@property (nonatomic, strong) NSString *selectedCalendarIdentifier;
@end
Before we go back to the CalendarsViewController class, we must perform two tasks: The first one is to override the setter method of this property, so the identifier gets saved to the user defaults dictionary upon value assignment, and the second is to load it in the init method. Let's see them:
-(void)setSelectedCalendarIdentifier:(NSString *)selectedCalendarIdentifier{
_selectedCalendarIdentifier = selectedCalendarIdentifier;
[[NSUserDefaults standardUserDefaults] setObject:selectedCalendarIdentifier forKey:@"eventkit_selected_calendar"];
}
There is nothing especially hard here, so let's go to the init method to load that value, if exists.
- (instancetype)init
{
self = [super init];
if (self) {
...
// Load the selected calendar identifier.
if ([userDefaults objectForKey:@"eventkit_selected_calendar"] != nil) {
self.selectedCalendarIdentifier = [userDefaults objectForKey:@"eventkit_selected_calendar"];
}
else{
self.selectedCalendarIdentifier = @"";
}
}
return self;
}
If the eventkit_selected_calendar key exists in the user defaults dictionary then we load the identifier of the selected calendar, otherwise we set the empty string as the value of the selectedCalendarIdentifier property.
Back to the CalendarsViewController now, and in the tableView:cellForRowAtIndexPath: table view method. Continuing its implementation, initially we'll set the accessory type of the cell to None, meaning no accessory type will exist. Then, we'll check if the selectedCalendarIdentifier property has a value other than the empty string, and if so, we'll set the checkmark accessory type to the cell that the respective calendar's identifier matches to that property's value. However, if the empty string has been set as the value of the selectedCalendarIdentifier property, then we'll select by default the first calendar listed on the table view. Here it is:
-(UITableViewCell *)tableView:(UITableView *)tableView cellForRowAtIndexPath:(NSIndexPath *)indexPath{
...
cell.accessoryType = UITableViewCellAccessoryNone;
if (self.appDelegate.eventManager.selectedCalendarIdentifier.length > 0) {
if ([currentCalendar.calendarIdentifier isEqualToString:self.appDelegate.eventManager.selectedCalendarIdentifier]) {
cell.accessoryType = UITableViewCellAccessoryCheckmark;
}
}
else{
if (indexPath.row == 0) {
cell.accessoryType = UITableViewCellAccessoryCheckmark;
}
}
return cell;
}
If you run the app now, you'll see that the first calendar displayed on the table view is selected by default. If you try to tap on any other calendar (if any exists), you'll see that the selection doesn't change. Let's fix that.
Add the tableView:didSelectRowAtIndexPath: table view method, along with the next three lines:
-(void)tableView:(UITableView *)tableView didSelectRowAtIndexPath:(NSIndexPath *)indexPath{
// Deselect the tapped row.
[[tableView cellForRowAtIndexPath:indexPath] setSelected:NO];
// Keep the identifier value of the selected calendar.
self.appDelegate.eventManager.selectedCalendarIdentifier = [[self.arrCalendars objectAtIndex:indexPath.row] calendarIdentifier];
// Reload the table view.
[self.tblCalendars reloadData];
}
With the first one, the tapped row is deselected. The second one is the most important, as we actually store the identifier of the selected calendar. Finally, we reload the table view so the checkmark accessory type to be displayed next to the selected calendar's title.
Feel free to try the app again. This time you'll see that your selection gets changed (as long as you have more than one calendar).
Creating a Calendar
If you go to the Main.storyboard file and in the Calendars View Controller scene, you will notice that there's a prototype cell there which contains a textfield. So far we haven't used it, but we're going to do so here. Actually, we will use the textfield for typing a title for a new calendar, which in turn will be stored to the collection of the local calendars.
Besides that, if you run the app and load the CalendarsViewController view controller, you'll see that at the right side of the navigation bar there is an Edit bar button item. When it's tapped, we want to set the table view in editing mode, and display the cell with the textfield as well. Because of the editing mode of the table view, at the left side of each cell is going to appear the red minus button, which if tapped it will reveal the Delete button of the respective cell. Also, in the first row a green plus button will appear instead of the red one, as in this row the textfield will appear. Let's see everything step by step.
Initially, go to the editCalendars IBAction method definition, and add the next couple of lines:
- (IBAction)editCalendars:(id)sender {
// Set the table in editing mode.
[self.tblCalendars setEditing:!self.tblCalendars.isEditing animated:YES];
// Reload the table view.
[self.tblCalendars reloadData];
}
As I said, we want the cell with the textfield to be the first one displayed on the table view when editing. That means that we have to modify the tableView:cellForRowAtIndexPath: method so as to check whether the table view is in editing mode or not, and finally to properly act. Right below you are given the implementation of that method as it should be after doing all the necessary changes:
-(UITableViewCell *)tableView:(UITableView *)tableView cellForRowAtIndexPath:(NSIndexPath *)indexPath{
UITableViewCell *cell = [tableView dequeueReusableCellWithIdentifier:@"idCellCalendar"];
if (self.tblCalendars.isEditing) {
if (indexPath.row == 0) {
cell = [tableView dequeueReusableCellWithIdentifier:@"idCellEdit"];
UITextField *textfield = (UITextField *)[cell viewWithTag:10];
textfield.delegate = self;
}
}
if (!self.tblCalendars.isEditing || (self.tblCalendars.isEditing && indexPath.row != 0)) {
NSInteger row = self.tblCalendars.isEditing ? indexPath.row - 1 : indexPath.row;
EKCalendar *currentCalendar = [self.arrCalendars objectAtIndex:row];
cell.textLabel.text = currentCalendar.title;
if (!self.tblCalendars.isEditing) {
cell.accessoryType = UITableViewCellAccessoryNone;
if (self.appDelegate.eventManager.selectedCalendarIdentifier.length > 0) {
if ([currentCalendar.calendarIdentifier isEqualToString:self.appDelegate.eventManager.selectedCalendarIdentifier]) {
cell.accessoryType = UITableViewCellAccessoryCheckmark;
}
}
else{
if (indexPath.row == 0) {
cell.accessoryType = UITableViewCellAccessoryCheckmark;
}
}
}
}
return cell;
}
Notice the following:
- If editing, then we access the textfield using its tag value, which I set to 10. Also, we make our class the delegate of the textfield (keep in mind that I already have adopted the UITextFieldDelegate protocol, otherwise the respective line would issue a warning).
- The row index of the selected cell is not constant, as when being in editing mode the first row contains the cell with the textfield. Therefore, we dynamically calculate the row index with this line: NSInteger row = self.tblCalendars.isEditing ? indexPath.row - 1 : indexPath.row;.
Further than modifying the above method, we must implement the tableView:editingStyleForRowAtIndexPath: too. With this one, the appropriate buttons will be placed at the left side of each cell, as I described earlier.
-(UITableViewCellEditingStyle)tableView:(UITableView *)tableView editingStyleForRowAtIndexPath:(NSIndexPath *)indexPath{
if (indexPath.row == 0) {
return UITableViewCellEditingStyleInsert;
}
else{
return UITableViewCellEditingStyleDelete;
}
}
Finally, we shouldn't forget that one more row should be displayed when being in editing mode. Therefore, modify the next method as shown exactly:
-(NSInteger)tableView:(UITableView *)tableView numberOfRowsInSection:(NSInteger)section{
if (!self.tblCalendars.isEditing) {
return self.arrCalendars.count;
}
else{
return self.arrCalendars.count + 1;
}
}
If you want, go and give the app a try. You'll notice that when tapping on the Edit button of the navigation bar, the table view enters in editing mode. However, when tapping on the Done button of the keyboard (if you type), or in the green (insert) button, nothing works yet.
What we want from both the Done button of the keyboard and the green button is to create a new calendar using the title typed in the textfield. Instead of writing the same thing twice, we'll create a private method to do that. Go to the private class section and declare the next method:
@interface CalendarsViewController ()
...
-(void)createCalendar;
@end
Let's see its implementation step by step now. The first thing we should do is to hide the keyboard. To do that, we need to access the textfield, but it is a subview of a cell and there isn't an IBOutlet property connected to it, so how do we handle it? Here's is the answer:
UITextField *textfield = (UITextField *)[[self.tblCalendars cellForRowAtIndexPath:[NSIndexPath indexPathForRow:0 inSection:0]] viewWithTag:10];
[textfield resignFirstResponder];
Next, we must make sure that the user has actually typed a title, otherwise we shouldn't proceed:
// In case that no text was typed in the textfield then do nothing.
if (textfield.text.length == 0) {
return;
}
When creating a new calendar, two values must be set: The title and the source of the calendar. The source is actually the type of the calendar, and in our case it's the Local source. Before we see how we specify the source of the calendar, let's create a new calendar object and let's set its title:
// Create a new calendar.
EKCalendar *calendar = [EKCalendar calendarForEntityType:EKEntityTypeEvent
eventStore:self.appDelegate.eventManager.eventStore];
// Set the calendar title.
calendar.title = textfield.text;
In the first line you can see that we specify the Event as the entity type of the calendar, and we provide our event store object as the second parameter.
The source of the calendar cannot be assigned directly. Instead, we must go through all the available sources of the event store object using a loop, and when the Local source is found it should be assigned to our calendar. Here it is:
// Find the proper source type value.
for (int i=0; i
With the above lines a new calendar is being created indeed, but it's not permanently stored. Here's how we can save it:
NSError *error;
[self.appDelegate.eventManager.eventStore saveCalendar:calendar commit:YES error:&error];
// If no error occurs then turn the editing mode off, store the new calendar identifier and reload the calendars.
if (error == nil) {
// Turn off the edit mode.
[self.tblCalendars setEditing:NO animated:YES];
// Store the calendar identifier.
[self.appDelegate.eventManager saveCustomCalendarIdentifier:calendar.calendarIdentifier];
// Reload all calendars.
[self loadEventCalendars];
}
else{
// Display the error description to the debugger.
NSLog(@"%@", [error localizedDescription]);
}
In case that no error occurs, then we turn off the editing mode of the table view, we save the identifier of the newly created calendar and finally we reload all calendars so they properly be displayed to the table view. But wait a minute, what's that saveCustomCalendarIdentifier: method?
As you have probably guessed, that's one more method we'll implement in the EventManager class, but before doing so, it's important to tell you what is for. So, it is used to store the identifier strings of the calendars we create in our demo app to the user defaults dictionary. That's not necessary in a real app to happen, but in our case I want to let us know what calendars were created by our app and what not. Later, when we'll have the calendar deletion feature implemented, nobody would like to delete a calendar other than those created by our app, even by mistake. In other words, we store the newly created calendar identifiers for safety reasons.
Before we proceed, let me give you the createCalendar method in one piece:
-(void)createCalendar{
// Hide the keyboard. To do so, it's necessary to access the textfield of the first cell.
UITextField *textfield = (UITextField *)[[self.tblCalendars cellForRowAtIndexPath:[NSIndexPath indexPathForRow:0 inSection:0]] viewWithTag:10];
[textfield resignFirstResponder];
// In case that no text was typed in the textfield then do nothing.
if (textfield.text.length == 0) {
return;
}
// Create a new calendar.
EKCalendar *calendar = [EKCalendar calendarForEntityType:EKEntityTypeEvent
eventStore:self.appDelegate.eventManager.eventStore];
// Set the calendar title.
calendar.title = textfield.text;
// Set the calendar source.
calendar.source = EKSourceTypeLocal;
// Save and commit the calendar.
NSError *error;
[self.appDelegate.eventManager.eventStore saveCalendar:calendar commit:YES error:&error];
// If no error occurs then turn the editing mode off, store the new calendar identifier and reload the calendars.
if (error == nil) {
// Turn off the edit mode.
[self.tblCalendars setEditing:NO animated:YES];
// Store the calendar identifier.
[self.appDelegate.eventManager saveCustomCalendarIdentifier:calendar.calendarIdentifier];
// Reload all calendars.
[self loadEventCalendars];
}
else{
// Display the error description to the debugger.
NSLog(@"%@", [error localizedDescription]);
}
}
Let's focus now on the saveCustomCalendarIdentifier: method. At first, go to the EventManager.h file to declare it:
@interface EventManager : NSObject
...
-(void)saveCustomCalendarIdentifier:(NSString *)identifier;
@end
Before we implement it, let's give it some thought. As I said, its purpose is to store the identifiers of the newly created calendars, but how can we handle a bunch of them, not only when saving, but when loading them or later when deleting calendars? The best solution that we have at our disposal it to use an array, in which we'll add all identifiers, and then we'll store that array to the user defaults dictionary.
That array doesn't have to be a public one, so go to the EventManager.m file and declare it privately:
@interface EventManager()
@property (nonatomic, strong) NSMutableArray *arrCustomCalendarIdentifiers;
@end
As you see it's a mutable array, because we want to be able to add and (later) remove objects.
Now, we can implement the method:
-(void)saveCustomCalendarIdentifier:(NSString *)identifier{
[self.arrCustomCalendarIdentifiers addObject:identifier];
[[NSUserDefaults standardUserDefaults] setObject:self.arrCustomCalendarIdentifiers forKey:@"eventkit_cal_identifiers"];
}
At first we add the new identifier string to the array, and then we save the array to the user defaults dictionary.
Let's go back to the CalendarsViewController.m file, and let's call the createCalendar method. The first place that should be called from is the textFieldShouldReturn: textfield delegate method:
-(BOOL)textFieldShouldReturn:(UITextField *)textField{
[self createCalendar];
return YES;
}
The second place that we should call it from is when tapping on the green insert button, but we must implement another table view method to do that:
-(void)tableView:(UITableView *)tableView commitEditingStyle:(UITableViewCellEditingStyle)editingStyle forRowAtIndexPath:(NSIndexPath *)indexPath{
if (editingStyle == UITableViewCellEditingStyleInsert) {
[self createCalendar];
}
else{
}
}
So simple... In the else we'll add some code later, but for the time being we're perfect.
Give the app a shot again, and try to create a new calendar. If you followed everything step by step, then you can create a new calendar and also see it in the Calendars app of the device/Simulator.


Deleting a Calendar
To delete a calendar, the red Delete button of the respective cell must become visible, and that can be done in two ways: Either by tapping on the red minus button when being in editing mode, or by swiping on the respective cell towards left. When the Delete button gets tapped, it's our duty to check if the calendar that's about to be deleted is a custom one created by our app, or it's a calendar created by the Calendar or any other app. In the second case, we shouldn't allow users to delete it, therefore we'll show a relevant message. However, in cases that a calendar can be removed indeed, then we'll first ask for confirmation and then we'll proceed to the actual deletion.
We'll see everything in details, and the place we'll start from is the one we left off at the previous section. In the tableView:commitEditingStyle:forRowAtIndexPath: we have an empty else case, and the code we'll add there is executed when the user taps on the Delete button. Let's see the method fully implemented this time before we proceed:
-(void)tableView:(UITableView *)tableView commitEditingStyle:(UITableViewCellEditingStyle)editingStyle forRowAtIndexPath:(NSIndexPath *)indexPath{
if (editingStyle == UITableViewCellEditingStyleInsert) {
[self createCalendar];
}
else{
// Keep the row index of the calendar that's about to be deleted.
self.indexOfCalendarToDelete = indexPath.row - 1;
// Show the confirmation alert view.
[self confirmCalendarDeletion];
}
}
In the else clause, we added just two lines. In the first one, we store to a property (that doesn't exist yet) the row index of the cell that contains the calendar that's about to be deleted. Note that when editing, the first row contains the cell with the textfield, and the calendar listing starts from the index 1. However, the first calendar index in the arrCalendars array is 0, and in order to have a match we decrease the row index by one.
In the second line we call a custom method, which doesn't exist yet too. In this one, we'll display the proper message using an alert view. At the moment, Xcode is showing a couple of errors, and that's because we refer to objects that do not exist, so let's declare them. Go to the private class section, and add the next lines:
@interface CalendarsViewController ()
...
@property (nonatomic) NSUInteger indexOfCalendarToDelete;
-(void)confirmCalendarDeletion;
@end
Let's see the implementation of the confirmCalendarDeletion method now:
-(void)confirmCalendarDeletion{
// Check if the selected calendar is a custom one and can be actually deleted.
NSString *identifier = [[self.arrCalendars objectAtIndex:self.indexOfCalendarToDelete] calendarIdentifier];
if (![self.appDelegate.eventManager checkIfCalendarIsCustomWithIdentifier:identifier]) {
// The selected calendar was not created by our app, so we shouldn't delete it.
// Show a message to the user.
[[[UIAlertView alloc] initWithTitle:@"EventKitDemo"
message:@"You are not allowed to delete this calendar."
delegate:nil
cancelButtonTitle:nil
otherButtonTitles:@"Okay", nil] show];
}
else{
// The calendar can be deleted, but first ask for confirmation.
// Ask for delete confirmation.
UIAlertView *alert = [[UIAlertView alloc] initWithTitle:@"EventKitDemo"
message:@"Are you sure you want to delete the selected calendar?"
delegate:self
cancelButtonTitle:@"Cancel"
otherButtonTitles:@"Yes, delete", nil];
[alert show];
}
}
The logic here is simple: At first we get the identifier string of the calendar that's about to be deleted. In the respective line, you can see how we use the indexOfCalendarToDelete property. In order to find out whether the calendar is a custom one (created by our app) or not, we use another method of the EventManager class that we'll implement in a while. If the identifier doesn't match to any of the saved ones (remember that we previously saved the identifier of every new calendar), then we display a message to the user telling that deleting the selected calendar is not allowed. Otherwise, we ask for confirmation. Notice that we set our class as the delegate of the alert view. I have already adopted the UIAlertViewDelegate protocol in the starter app, so Xcode doesn't show a warning.
Let's implement the checkIfCalendarIsCustomWithIdentifier: method now. Initially, go to the EventManager.h class to declare it:
@interface EventManager : NSObject
...
-(BOOL)checkIfCalendarIsCustomWithIdentifier:(NSString *)identifier;
@end
Next, its implementation:
-(BOOL)checkIfCalendarIsCustomWithIdentifier:(NSString *)identifier{
BOOL isCustomCalendar = NO;
for (int i=0; i
If the calendar is found in the arrCustomCalendarIdentifiers array, then the YES value is returned, otherwise the returned value is NO. Before we go back to the CalendarsViewController class, we must take care of one more thing: That is to load the identifiers array from the user defaults dictionary when an EventManager object is initialized. Go to the init method and add the next lines:
- (instancetype)init
{
self = [super init];
if (self) {
...
// Load the custom calendar identifiers (if exist).
if ([userDefaults objectForKey:@"eventkit_cal_identifiers"] != nil) {
self.arrCustomCalendarIdentifiers = [userDefaults objectForKey:@"eventkit_cal_identifiers"];
}
else{
self.arrCustomCalendarIdentifiers = [[NSMutableArray alloc] init];
}
}
return self;
}
In case that no identifiers array is found in the user defaults dictionary, then we simply initialize the array.
Back to the CalendarsViewController now, let's handle the user's response to the deletion confirmation. In the following code, we first check if the user agrees to delete the calendar. Then, we get the proper calendar from the arrCalendars array, and we remove it using the event store object of the EventManager class. Next, if no problem arises, we check if the deleted calendar was the selected one in the table view (the one with the checkmark). If that's the case, then we set the empty string value to the selectedCalendarIdentifier property of the eventManager object, and finally we remove the deleted calendar's identifier from the identifiers collection array. Note that the last action is taken using one more custom method that we'll create in a while in the EventManager class. Here's the implementation:
-(void)alertView:(UIAlertView *)alertView clickedButtonAtIndex:(NSInteger)buttonIndex{
// Delete the selected calendar if user selected so.
if (buttonIndex == 1) {
NSString *identifier = [[self.arrCalendars objectAtIndex:self.indexOfCalendarToDelete] calendarIdentifier];
EKCalendar *calendarToDelete = [self.arrCalendars objectAtIndex:self.indexOfCalendarToDelete];
NSError *error;
if ([self.appDelegate.eventManager.eventStore removeCalendar:calendarToDelete commit:YES error:&error]) {
// Check if the calendar that's about to be deleted is the selected one.
if ([self.appDelegate.eventManager.selectedCalendarIdentifier isEqualToString:identifier]) {
// In this case, set the empty string as the selectedCalendarIdentifier property's value.
self.appDelegate.eventManager.selectedCalendarIdentifier = @"";
}
// Remove the current identifier from the collection of the custom calendar identifiers.
[self.appDelegate.eventManager removeCalendarIdentifier:identifier];
// Load the calendars once again.
[self loadEventCalendars];
}
else{
// Simply log the error description.
NSLog(@"%@", [error localizedDescription]);
}
}
}
The actual job is being done using the removeCalendar:commit:error: method of the event store object.
Now, back to the EventManager.h class, let's declare the next one:
@interface EventManager : NSObject
...
-(void)removeCalendarIdentifier:(NSString *)identifier;
@end
The implementation is simple:
-(void)removeCalendarIdentifier:(NSString *)identifier{
[self.arrCustomCalendarIdentifiers removeObject:identifier];
[[NSUserDefaults standardUserDefaults] setObject:self.arrCustomCalendarIdentifiers forKey:@"eventkit_cal_identifiers"];
}
If you run the app now, you'll be able to delete your calendars.

Creating a Simple Event
In order to create an event, here is what we need to provide Event Kit with:
- A title
- A start date
- An end date
- A calendar
Up to now, we have seen how to deal with calendars and how to select one, so we just have to do the necessary implementation for adding a title and the couple of dates to an event. Almost of our work here is going to take place in the EditEventViewController class, but not only. As we previously did, we're going to enrich the EventManager class even more by adding new necessary methods and properties that will help us in our mission.
The EditEventViewController view controller is supposed to be pushed to the navigation stack when tapping on the add button (Plus) of the navigation bar. However, we should make it work only when the user has granted us access to the events stored in the device. Going into action, open the ViewController.m file, and locate the createEvent: IBAction method. Add the next simple code segment in order to make the EditEventViewController view controller able to be shown:
- (IBAction)createEvent:(id)sender {
if (self.appDelegate.eventManager.eventsAccessGranted) {
[self performSegueWithIdentifier:@"idSegueEvent" sender:self];
}
}
The style of the table view existing in the EditEventViewController view controller is grouped, and the table view will contain initially sections (later we'll add a third section too). In the first section we are going to have the necessary cells for managing the basic data an event needs, while in the second section we are going to add some alarms. However, in this part we're going to focus on the first section only, we won't deal with alarms yet.
Open the EditEventViewController.m file and go to the private class section. The first thing we're about to do here, is to declare and initialize a few properties that we'll use for storing the event data (title, dates). Add the next lines:
@interface EditEventViewController ()
...
@property (nonatomic, strong) NSString *eventTitle;
@property (nonatomic, strong) NSDate *eventStartDate;
@property (nonatomic, strong) NSDate *eventEndDate;
@end
Now, go to the viewDidLoad method and do the following initializations:
- (void)viewDidLoad
{
[super viewDidLoad];
...
// Set initial values.
self.eventStartDate = nil;
self.eventEndDate = nil;
}
Let's focus now a bit on the tableView:cellForRowAtIndexPath: table view method. As you see in the starter app, I have already added the following piece of code...
-(UITableViewCell *)tableView:(UITableView *)tableView cellForRowAtIndexPath:(NSIndexPath *)indexPath{
UITableViewCell *cell = nil;
if (indexPath.section == 0) {
// If the cell is nil, then dequeue it. Make sure to dequeue the proper cell based on the row.
if (cell == nil) {
if (indexPath.row == 0) {
cell = [tableView dequeueReusableCellWithIdentifier:@"idCellTitle"];
}
else{
cell = [tableView dequeueReusableCellWithIdentifier:@"idCellGeneral"];
}
}
}
else{
if (cell == nil) {
cell = [tableView dequeueReusableCellWithIdentifier:@"idCellGeneral"];
}
}
return cell;
}
... which simply dequeues the proper cell in the first section and then it returns it. No logic still applied here, and that's something we'll do right now. As you see, for the first row is dequeued the cell that contains the textfield, while for the other two rows is dequeued the cell with the label. What we want to do here is quite straightforward: For the first row, we'll get the textfield and we'll set the value of the eventTitle property. For the other two cells, we'll either display the event's start and end dates, or we'll show a message that prompts the user to pick a date. Note that the each date object should be converted into a string object for being able to be assigned to the cell's label. Right below you're given the same table view method, where it has been added everything I just described:
-(UITableViewCell *)tableView:(UITableView *)tableView cellForRowAtIndexPath:(NSIndexPath *)indexPath{
UITableViewCell *cell = nil;
if (indexPath.section == 0) {
// If the cell is nil, then dequeue it. Make sure to dequeue the proper cell based on the row.
if (cell == nil) {
if (indexPath.row == 0) {
cell = [tableView dequeueReusableCellWithIdentifier:@"idCellTitle"];
}
else{
cell = [tableView dequeueReusableCellWithIdentifier:@"idCellGeneral"];
}
}
switch (indexPath.row) {
case 0:
// The title of the event.
{
UITextField *titleTextfield = (UITextField *)[cell.contentView viewWithTag:10];
titleTextfield.delegate = self;
titleTextfield.text = self.eventTitle;
}
break;
case 1:
// The event start date.
if (self.eventStartDate == nil) {
cell.textLabel.text = @"Select a start date...";
}
else{
cell.textLabel.text = [self.appDelegate.eventManager getStringFromDate:self.eventStartDate];
}
break;
case 2:
// The event end date.
if (self.eventEndDate == nil) {
cell.textLabel.text = @"Select an end date...";
}
else{
cell.textLabel.text = [self.appDelegate.eventManager getStringFromDate:self.eventEndDate];
}
break;
default:
break;
}
}
else{
if (cell == nil) {
cell = [tableView dequeueReusableCellWithIdentifier:@"idCellGeneral"];
}
}
return cell;
}
The new addition here is the getStringFromDate: method, which we must implement in the EventManager class. For starters, go to the EventManager.h file and declare it:
@interface EventManager : NSObject
...
-(NSString *)getStringFromDate:(NSDate *)date;
@end
Next, open the EventManager.m file and define it as follows:
-(NSString *)getStringFromDate:(NSDate *)date{
NSDateFormatter *dateFormatter = [[NSDateFormatter alloc] init];
dateFormatter.locale = [NSLocale currentLocale];
[dateFormatter setDateFormat:@"d MMM yyyy, HH:mm"];
NSString *stringFromDate = [dateFormatter stringFromDate:date];
return stringFromDate;
}
The dateFormatter object is the one here that performs the actual job. Using it, we set the format of the string, and then we convert the given date using that format into a string, which is finally returned. Simple but efficient.
Back to the EditEventViewController.m file again, we want to let our users to be able to pick a start and end date for the event, so we must make the table view respond when tapping on any of the date rows. If you've taken a look in the interface of the app, then you saw that there's a view controller named DatePickerViewController with a date picker in it. I created for general use and just for picking a date, and in the Interface Builder the necessary connections have already been made. What we want to do now is to display that view controller, and to do so we need to add the next table view method:
-(void)tableView:(UITableView *)tableView didSelectRowAtIndexPath:(NSIndexPath *)indexPath{
if (indexPath.section == 0 && (indexPath.row == 1 || indexPath.row == 2)) {
[self performSegueWithIdentifier:@"idSegueDatepicker" sender:self];
}
}
The DatePickerViewController class has a delegate method, which is called every time a date is selected, and it is already defined in our file. In there, we must store the picked date to the appropriate date property. In order to find out what date property we should use for assigning the selected date to (eventStartDate or eventEndDate), we'll check which cell is currently selected. Then, we'll properly assign the date. Here it is:
-(void)dateWasSelected:(NSDate *)selectedDate{
// Based on the selected cell, specify what the selected date is purposed for.
NSIndexPath *indexPath = [self.tblEvent indexPathForSelectedRow];
if (indexPath.section == 0) {
// In this case, it's either the event start or end date.
if (indexPath.row == 1) {
// The event start date.
self.eventStartDate = selectedDate;
}
else{
// The event end date.
self.eventEndDate = selectedDate;
}
}
// Reload the table view.
[self.tblEvent reloadData];
}
With the couple previous steps, we've managed to make our users able to select both the start and the end date of the event, and then display them to the table view. What we haven't still done is to store the typed title, so let's do it now in the textFieldShouldReturn: textfield delegate method:
-(BOOL)textFieldShouldReturn:(UITextField *)textField{
self.eventTitle = textField.text;
[textField resignFirstResponder];
return YES;
}
At this point, our view controller can successfully display and accept new event data, so we have only left to create and save the new event. That task will take place in the saveEvent: IBAction method. Notice that before saving the event, it's necessary to check if all the required values have been given by the user. If the title or any of the dates is missing, then we just return from the method without saving at all.
Let's see the method:
- (IBAction)saveEvent:(id)sender {
// Check if a title was typed in for the event.
if (self.eventTitle.length == 0) {
// In this case, just do nothing.
return;
}
// Check if a start and an end date was selected for the event.
if (self.eventStartDate == nil || self.eventEndDate == nil) {
// In this case, do nothing too.
return;
}
// Create a new event object.
EKEvent *event = [EKEvent eventWithEventStore:self.appDelegate.eventManager.eventStore];
// Set the event title.
event.title = self.eventTitle;
// Set its calendar.
event.calendar = [self.appDelegate.eventManager.eventStore calendarWithIdentifier:self.appDelegate.eventManager.selectedCalendarIdentifier];
// Set the start and end dates to the event.
event.startDate = self.eventStartDate;
event.endDate = self.eventEndDate;
// Save and commit the event.
NSError *error;
if ([self.appDelegate.eventManager.eventStore saveEvent:event span:EKSpanFutureEvents commit:YES error:&error]) {
// Call the delegate method to notify the caller class (the ViewController class) that the event was saved.
[self.delegate eventWasSuccessfullySaved];
// Pop the current view controller from the navigation stack.
[self.navigationController popViewControllerAnimated:YES];
}
else{
// An error occurred, so log the error description.
NSLog(@"%@", [error localizedDescription]);
}
}
In order to create a new event, we use the EKEvent class of the Event Kit framework. After we have provided it with the proper values, we save and commit it at the same time, using once again the event store object of the EventManager class. As you notice, if the saving is successful, we call the delegate method eventWasSuccessfullySaved to notify the caller class that our job here is ready. The caller in our case is the ViewController class, and we'll implement the delegate method there in a while. For now, we just call it in advance.
Test the app now if you want and try to create a new event. Even though nothing will appear after creating an event in our app yet, you can see if a new event has been actually created by opening the Calendar app of the device or the Simulator. If you find it there, then congratulations, you just managed to create your first event!


Displaying Events
The job we have to do here is quite simple and straightforward. In order to display the events for the selected calendar we must perform actually two tasks: To load and show them in the table view existing in the ViewController class. We're going to create a new method in the EventManager class to load them, but before we do so, let's make some initial steps in the ViewController.m file.
First of all, it's necessary to declare an array property. In this array we'll keep all the events after we have them loaded, and from this array the table view will retrieve its data. Furthermore, we'll create a simple private method, which will be used to load the events and to refresh the table view.
Let's get started by going to the private class section. In there, write the next couple of lines:
@interface ViewController ()
...
@property (nonatomic, strong) NSArray *arrEvents;
-(void)loadEvents;
@end
Now, let's go to the EventManager class, in order to create a new public method that we'll use to load the events for the selected calendar. Open the EventManager.h file, and declare the next method:
@interface EventManager : NSObject
...
-(NSArray *)getEventsOfSelectedCalendar;
@end
As you notice, we are going to return an array from the method, so we assign the results to the private array property we previously declared in the ViewController class.
Before we go into definition, let me mention something first. To retrieve the events for a calendar, it's required to use predicates (NSPredicate object). In the predicate we'll create, we must specify the time period we want to get events for. For demo reasons only, we'll specify a two-year time period, meaning a year before and a year after the current date. In your applications, apply your own logic depending on the requirements of your apps, and specify the proper predicates. Besides that, keep in mind that the returned events are not sorted in chronological order. Therefore, in the method we'll implement right next, you'll see that we apply some sorting so we get all events in order. As a last note, the Event Kit framework method we'll use to get the events for the specified time period also accepts an array of calendars. In our app, we work with just one calendar at the time, so we'll add only the currently selected calendar to that array. Let's see the method now:
-(NSArray *)getEventsOfSelectedCalendar{
// Specify the calendar that will be used to get the events from.
EKCalendar *calendar = nil;
if (self.selectedCalendarIdentifier != nil && self.selectedCalendarIdentifier.length > 0) {
calendar = [self.eventStore calendarWithIdentifier:self.selectedCalendarIdentifier];
}
// If no selected calendar identifier exists and the calendar variable has the nil value, then all calendars will be used for retrieving events.
NSArray *calendarsArray = nil;
if (calendar != nil) {
calendarsArray = @[calendar];
}
// Create a predicate value with start date a year before and end date a year after the current date.
int yearSeconds = 365 * (60 * 60 * 24);
NSPredicate *predicate = [self.eventStore predicateForEventsWithStartDate:[NSDate dateWithTimeIntervalSinceNow:-yearSeconds] endDate:[NSDate dateWithTimeIntervalSinceNow:yearSeconds] calendars:calendarsArray];
// Get an array with all events.
NSArray *eventsArray = [self.eventStore eventsMatchingPredicate:predicate];
// Sort the array based on the start date.
eventsArray = [eventsArray sortedArrayUsingSelector:@selector(compareStartDateWithEvent:)];
// Return that array.
return eventsArray;
}
Let's head back to the ViewController.m file, and let's implement the loadEvents method:
-(void)loadEvents{
if (self.appDelegate.eventManager.eventsAccessGranted) {
self.arrEvents = [self.appDelegate.eventManager getEventsOfSelectedCalendar];
[self.tblEvents reloadData];
}
}
Note that we firstly check if the user has granted access to the events. The usage of the getEventsOfSelectedCalendar method is quite simple. At the end, we reload the table view data.
After we have this method defined, we must call it too. That should happen in two places: The first one is the viewDidLoad method, and the second one is the delegate method of the EditEventViewControllerDelegate protocol. Let's see that:
- (void)viewDidLoad
{
...
// Load the events with a small delay, so the store event gets ready.
[self performSelector:@selector(loadEvents) withObject:nil afterDelay:0.5];
}
Note that we don't call the loadEvents method at once, but after a half of a second. This is done on purpose, because if you remember the event store object requires some time in order to get initialized. Next, the call in the delegate method:
-(void)eventWasSuccessfullySaved{
// Reload all events.
[self loadEvents];
}
Up to here everything is fine, but don't forget that we must display the data of the loaded events as well. Let's begin by going to the tableView:numberOfRowsInSection table view method. In there, replace the return 0; command with the next one:
-(NSInteger)tableView:(UITableView *)tableView numberOfRowsInSection:(NSInteger)section{
return self.arrEvents.count;
}
We need as many rows as the number of the events. Next, let's see the tableView:cellForRowAtIndexPath: table view method. What we'll do here is easy, so here it is:
-(UITableViewCell *)tableView:(UITableView *)tableView cellForRowAtIndexPath:(NSIndexPath *)indexPath{
UITableViewCell *cell = [tableView dequeueReusableCellWithIdentifier:@"idCellEvent"];
// Get each single event.
EKEvent *event = [self.arrEvents objectAtIndex:indexPath.row];
// Set its title to the cell's text label.
cell.textLabel.text = event.title;
// Get the event start date as a string value.
NSString *startDateString = [self.appDelegate.eventManager getStringFromDate:event.startDate];
// Get the event end date as a string value.
NSString *endDateString = [self.appDelegate.eventManager getStringFromDate:event.endDate];
// Add the start and end date strings to the detail text label.
cell.detailTextLabel.text = [NSString stringWithFormat:@"%@ - %@", startDateString, endDateString];
return cell;
}
You see that we assign each object of the arrEvents array to an EKEvent object, and then we access the values we want. The prototype cell of this table view contains both a main label and a subtitle label. In the first one, we set the title of the event. In the second, we assign the start and end dates of the event, after having them converted to string objects, and after having concatenated them into one string value.
Go and try the app once again. This time, all the events from any calendar you select are displayed, and even more, when creating a new event is shown to the list directly.

Editing Events
We'll make this tutorial even better if we manage to edit an event. What we'll really do is to delete and re-create a selected event, after having edited its details of course. The EditEventViewController class already contains the mechanism needed to modify and save an event, so we'll only perform some adjustments to make it fit to our demanding.
The key to the event editing idea is to store somewhere a unique identifier string that each event has (it's produced when an event is saved for first time), and using that identifier to load the event details in the EditEventViewController view controller. To store temporarily the identifier of the event that we're about to edit, we'll create a new public property to the EventManager class, so we can access it directly later on from the EditEventViewController class.
Open the EventManager.h file, and declare the next string property:
@interface EventManager : NSObject
...
@property (nonatomic, strong) NSString *selectedEventIdentifier;
@end
Then, go back to the ViewController.m file, and add the next table view delegate method:
-(void)tableView:(UITableView *)tableView accessoryButtonTappedForRowWithIndexPath:(NSIndexPath *)indexPath{
// Keep the identifier of the event that's about to be edited.
self.appDelegate.eventManager.selectedEventIdentifier = [[self.arrEvents objectAtIndex:indexPath.row] eventIdentifier];
// Perform the segue.
[self performSegueWithIdentifier:@"idSegueEvent" sender:self];
}
With that method, the identifier of the selected event will be stored to the property we just created, and the EditEventViewController view controller will appear every time that the respected accessory button gets tapped . Note that the idSegueEvent has already been set in the Interface Builder, so the above code will work at once.
Now, let's go to the EditEventViewController.m file. For starters, declare an EKEvent object that we'll use for loading the event with the specified identifier:
@property (nonatomic, strong) AppDelegate *appDelegate;
...
@property (nonatomic, strong) EKEvent *editedEvent;
@end
The next thing we have to do here, is to check in the viewDidLoad method whether the selectedEventIdentifier property contains a value. If yes, then the proper event should be loaded, and its details should be set to the subviews of the view controller. If that property doesn't contain a value (it's nil or it contains the empty string value), then it's not the case of an edited event. Let's see that in action. In the viewDidLoad method add the next code segment:
- (void)viewDidLoad
{
[super viewDidLoad];
...
// Check the value of the selectedEventIdentifier property, of the eventManager object.
// If its length is 0, then a new event is going to be added.
// If its length is other than 0, then an existing event is going to be edited. In that case, load the event.
if (self.appDelegate.eventManager.selectedEventIdentifier.length > 0) {
self.editedEvent = [self.appDelegate.eventManager.eventStore eventWithIdentifier:self.appDelegate.eventManager.selectedEventIdentifier];
self.eventTitle = self.editedEvent.title;
self.eventStartDate = self.editedEvent.startDate;
self.eventEndDate = self.editedEvent.endDate;
}
}
That's it. In the tableView:cellForRowAtIndexPath: method no changes are required to be made, as we have already set the value of each property shown above to the proper subview. The next modification we should make though, is in the saveEvent: method. In this one, we must check if we are editing an existing event or not, and if so, to delete the existing event as we're going to save it again. Note that by deleting an event and by re-creating it, its identifier gets changed, but actually we don't care about that.
Go to the saveEvent: and navigate yourself right above the next line:
EKEvent *event = [EKEvent eventWithEventStore:self.appDelegate.eventManager.eventStore];
Then, add the next condition:
if (self.appDelegate.eventManager.selectedEventIdentifier.length > 0) {
[self.appDelegate.eventManager deleteEventWithIdentifier:self.appDelegate.eventManager.selectedEventIdentifier];
self.appDelegate.eventManager.selectedEventIdentifier = @"";
}
As you correctly guess, the deleteEventWithIdentifier: is another public custom method of the EventManager class. Before we work with it, I should just say that these lines are enough for succeeding our goal. The existing event will be deleted, and the rest of the code in this method will create it again. Notice that we set the empty string value again to the selectedEventIdentifier property, so we won't have any problems if we try to add a new event later.
Now, open the EventManager.h file and declare the new method:
@interface EventManager : NSObject
...
-(void)deleteEventWithIdentifier:(NSString *)identifier;
@end
To delete the event, we'll make use of the event store object again. Here's the implementation, which is straightforward enough:
-(void)deleteEventWithIdentifier:(NSString *)identifier{
// Get the event that's about to be deleted.
EKEvent *event = [self.eventStore eventWithIdentifier:identifier];
// Delete it.
NSError *error;
if (![self.eventStore removeEvent:event span:EKSpanFutureEvents error:&error]) {
// Display the error description.
NSLog(@"%@", [error localizedDescription]);
}
}
We are ready. Test the app once again, and edit an existing event. You'll see that when you save it, your changes will be reflected in the ViewController view controller.
Deleting an Event
The way we structured the app so far, and the last custom method we created in the EventManager class, allow us to delete an event pretty easily. The only thing we should do, is to implement a new table view delegate method, and use in there the deleteEventWithIdentifier: method we previously defined. Let's see it:
-(void)tableView:(UITableView *)tableView commitEditingStyle:(UITableViewCellEditingStyle)editingStyle forRowAtIndexPath:(NSIndexPath *)indexPath{
if (editingStyle == UITableViewCellEditingStyleDelete) {
// Delete the selected event.
[self.appDelegate.eventManager deleteEventWithIdentifier:[[self.arrEvents objectAtIndex:indexPath.row] eventIdentifier]];
// Reload all events and the table view.
[self loadEvents];
}
}
With this one, every time you swipe your finger on a cell towards left the red Delete button will appear. When tapping it, the respective event will be deleted, and the remaining events will be loaded again so the table view contents remain up to date.
With that fast addition you can try the app out again, and delete existing events.

Setting Alarms
Setting alarms for one or more events is useful in cases you want the system to notify you about them before their start date. If you remember, when we implemented the logic of the EditEventViewController we said that the table view is going to have two sections. The first one is for the event details, while the second will be used for setting one or more alarms per event. Here, we're going to focus on that second section, and we'll perform all the necessary tasks required for using alarms. Keep in mind that when talking about alarms, we actually talk about the date that an alarm should occur. That date should be prior the start date of an event. Alarms act like local notifications, but it's not recommended to use them in place of such notifications for other general purposes.
For starters, open the EditEventViewController.m file, and in the private section of the class declare the following array:
@interface EditEventViewController ()
...
@property (nonatomic, strong) NSMutableArray *arrAlarms;
@end
In this one we'll store the alarms we'll create later. Actually, in this array we'll keep the date of each alarm (date objects). Now, in the viewDidLoad method initialize it:
- (void)viewDidLoad
{
...
self.arrAlarms = [[NSMutableArray alloc] init];
}
Then, go to the tableView:numberOfRowsInSection: method and modify the body of the else case as shown below:
-(NSInteger)tableView:(UITableView *)tableView numberOfRowsInSection:(NSInteger)section{
if (section == 0) {
return 3;
}
else{
return self.arrAlarms.count + 1;
}
}
The first row of the second section in the table view will have a permanent cell displaying a prompting message for adding a new alarm. All the alarms created will be listed below that cell, starting from the index 1. That's also the reason we return the total number of alarms plus one in the above method. Further than that, when tapping on the first row to add a new alarm, the DatePickerViewController view controller will appear to pick a date for the alarm.
Having all that in mind, let's move to the tableView:cellForRowAtIndexPath: method, and let's add some code to the else case. As you'll see, we check what the current row is, and if it's the first one then we display the prompt message. Otherwise, we get the date matching to an alarm, we convert it to a string object, and we show it. Right next, it's given the whole method again, fully implemented this time:
-(UITableViewCell *)tableView:(UITableView *)tableView cellForRowAtIndexPath:(NSIndexPath *)indexPath{
UITableViewCell *cell = nil;
if (indexPath.section == 0) {
// If the cell is nil, then dequeue it. Make sure to dequeue the proper cell based on the row.
if (cell == nil) {
if (indexPath.row == 0) {
cell = [tableView dequeueReusableCellWithIdentifier:@"idCellTitle"];
}
else{
cell = [tableView dequeueReusableCellWithIdentifier:@"idCellGeneral"];
}
}
switch (indexPath.row) {
case 0:
// The title of the event.
{
UITextField *titleTextfield = (UITextField *)[cell.contentView viewWithTag:10];
titleTextfield.delegate = self;
titleTextfield.text = self.eventTitle;
}
break;
case 1:
// The event start date.
if (self.eventStartDate == nil) {
cell.textLabel.text = @"Select a start date...";
}
else{
cell.textLabel.text = [self.appDelegate.eventManager getStringFromDate:self.eventStartDate];
}
break;
case 2:
// The event end date.
if (self.eventEndDate == nil) {
cell.textLabel.text = @"Select an end date...";
}
else{
cell.textLabel.text = [self.appDelegate.eventManager getStringFromDate:self.eventEndDate];
}
break;
default:
break;
}
}
else{
if (cell == nil) {
cell = [tableView dequeueReusableCellWithIdentifier:@"idCellGeneral"];
}
if (indexPath.row == 0) {
cell.textLabel.text = @"+ Add a new alarm...";
}
else{
cell.textLabel.text = [self.appDelegate.eventManager getStringFromDate:[self.arrAlarms objectAtIndex:indexPath.row - 1]];
// No selection for the alarm cells.
cell.selectionStyle = UITableViewCellSelectionStyleNone;
// No accessory style.
cell.accessoryType = UITableViewCellAccessoryNone;
}
}
return cell;
}
As I said earlier, we want to load and show the DatePickerViewController view controller when tapping on the first row, therefore we must modify the following method as shown:
-(void)tableView:(UITableView *)tableView didSelectRowAtIndexPath:(NSIndexPath *)indexPath{
if ((indexPath.section == 0 && (indexPath.row == 1 || indexPath.row == 2)) ||
(indexPath.section == 1 && indexPath.row == 0)) {
[self performSegueWithIdentifier:@"idSegueDatepicker" sender:self];
}
}
By doing so, the date picker view controller will be presented in three cases: When tapping on the start and end dates of the event, and when adding a new alarm. However, that's not enough for picking a date for the alarm. It's necessary to modify the dateWasSelected: delegate method, so we add the selected date to the arrAlarms array. Right next, it's given the whole method again. The interesting part is the outer else case:
-(void)dateWasSelected:(NSDate *)selectedDate{
// Based on the selected cell, specify what the selected date is purposed for.
NSIndexPath *indexPath = [self.tblEvent indexPathForSelectedRow];
if (indexPath.section == 0) {
// In this case, it's either the event start or end date.
if (indexPath.row == 1) {
// The event start date.
self.eventStartDate = selectedDate;
}
else{
// The event end date.
self.eventEndDate = selectedDate;
}
}
else{
// In this case, the selected date regards a new alarm.
[self.arrAlarms addObject:selectedDate];
}
// Reload the table view.
[self.tblEvent reloadData];
}
The next step is to edit the saveEvent: IBAction method, so any alarms set to be saved along with the event. Adding an alarm to an event is quite easy, as the EKEvent class provides a method named addAlarm: specifically for this reason. Because it's possible to set more than one alarms, we'll use a loop to go through all of the arrAlarms array's objects, we'll create an alarm object for each date (EKAlarm object) and finally we'll add it to the event.
In the saveEvent: method, go right above that point (right before we save the event):
NSError *error;
if ([self.appDelegate.eventManager.eventStore saveEvent:event span:EKSpanThisEvent commit:YES error:&error])
There, add that snippet:
// Add any alarms the user has set.
for (int i=0; i
With this small addition, our events can now have alarms. Before we finish our work here though, it would be nice if we could remove an already set alarm, wouldn't be? Actually, the easiest way would be to swipe towards left on an alarm cell and make the familiar red Delete button appear. Well, that's more than easy, as long as we implement the following method:
-(void)tableView:(UITableView *)tableView commitEditingStyle:(UITableViewCellEditingStyle)editingStyle forRowAtIndexPath:(NSIndexPath *)indexPath{
if (indexPath.section == 1 && indexPath.row > 0) {
if (editingStyle == UITableViewCellEditingStyleDelete) {
// Remove the respective date from the arrAlarms array.
[self.arrAlarms removeObjectAtIndex:indexPath.row - 1];
// Reload the table view.
[self.tblEvent reloadData];
}
}
}
There's one more detail that we shouldn't overlook here, and it regards the alarms of an event that is being edited. We must display the alarms for an edited event when it's loaded, but we haven't done something like that so far. What we should do, is to to get all alarms from the edited event in the viewDidLoad method, and add them to the arrAlarms array. Let's see that:
- (void)viewDidLoad
{
...
// Check the value of the selectedEventIdentifier property, of the eventManager object.
// If its length is 0, then a new event is going to be added.
// If its length is other than 0, then an existing event is going to be edited. In that case, load the event.
if (self.appDelegate.eventManager.selectedEventIdentifier.length > 0) {
self.editedEvent = [self.appDelegate.eventManager.eventStore eventWithIdentifier:self.appDelegate.eventManager.selectedEventIdentifier];
...
// If there are alarms, then keep the absolute date of each one.
if (self.editedEvent.hasAlarms) {
NSArray *alarms = self.editedEvent.alarms;
for (int i=0; i
A great new feature was just added to our app, so feel free to give it one more try. If you think that's not working correctly on Simulator, then test it on a device. Set an alarm for an event a bit before its start date, and wait until iOS notifies you.

Repeating an Event
A repeating, or in other words, a recurring event, is an event that can be re-scheduled automatically with a predefined frequency. In order to make an event able to be repeated, we must create a recurrence rule, and we necessarily need to set two values: The recurrence frequency and the * recurrence interval*. The frequency can have any of the following values:
- Daily
- Weekly
- Monthly
- Yearly
The interval is an integer number, indicating how often an event will be repeated using the specified frequency. For example, if the recurrence frequency is weekly and the interval is 2, then the event will be repeated every two weeks. Besides these two values, the recurrence end can be also set. In this sample, we're going to use the event's end date as the recurrence end date too. After having specified the above two values to a recurrence rule, we set it to an event object.
Our goal in this part is to extend a bit more the EditEventViewController class and to make it capable of making an event recurring. In order to keep things simple, we'll use an array with some predefined recurring values, which will be displayed to the table view and they will be available for selecting any of them. For the sake of the demo app, we'll set these predefined values:
- No repeat
- Repeat every day
- Repeat every 3 days
- Repeat every week
- Repeat every 2 weeks
- Repeat every month
- Repeat every 6 months
- Repeat every year
Let's start working now to see everything in action. Make sure you've opened the EditEventViewController.m file, and then go to the private section of the class to declare the next two properties:
@interface EditEventViewController ()
...
@property (nonatomic, strong) NSArray *arrRepeatOptions;
@property (nonatomic) NSUInteger indexOfSelectedRepeatOption;
@end
The first one is the array that will contain the predefined repeat values. The second property will indicate the index of the selected repeat value in the table view and in the array.
Next, we must initialize the array with the above values, as well as the integer property. In the viewDidLoad method add the following:
- (void)viewDidLoad
{
...
// Initialize the repeat options array.
self.arrRepeatOptions = @[@"Never", @"Every day", @"Every 3 days", @"Every week", @"Every 2 weeks", @"Every month", @"Every six months", @"Every year"];
self.indexOfSelectedRepeatOption = 0;
}
Now that we have the repeating options ready, it's necessary to modify the table view so we display them. Begin by setting the total number of sections:
-(NSInteger)numberOfSectionsInTableView:(UITableView *)tableView{
return 3;
}
Then, return the proper number of rows for each section:
-(NSInteger)tableView:(UITableView *)tableView numberOfRowsInSection:(NSInteger)section{
if (section == 0) {
return 3;
}
else if (section == 1) {
return self.arrAlarms.count + 1;
}
else{
return self.arrRepeatOptions.count;
}
}
As you see, a new case was added here. Next, let's set the section title:
-(NSString *)tableView:(UITableView *)tableView titleForHeaderInSection:(NSInteger)section{
if (section == 0) {
return @"General Settings";
}
else if (section == 1) {
return @"Alarms";
}
else{
return @"Repeat Frequency";
}
}
The most important part now, is to display the repeat values. In the tableView:cellForRowAtIndexPath: table view method, we need to add one more case with the following body:
if (cell == nil) {
cell = [tableView dequeueReusableCellWithIdentifier:@"idCellGeneral"];
}
// The section with the repeat options.
cell.textLabel.text = [self.arrRepeatOptions objectAtIndex:indexPath.row];
if (indexPath.row == self.indexOfSelectedRepeatOption) {
cell.accessoryType = UITableViewCellAccessoryCheckmark;
}
else{
cell.accessoryType = UITableViewCellAccessoryNone;
}
Notice that we check whether the current row is the selected one. If that's the case, then we use the checkmark accessory type to indicate that. Here's the whole method implementation once again. Our addition is in the last case:
-(UITableViewCell *)tableView:(UITableView *)tableView cellForRowAtIndexPath:(NSIndexPath *)indexPath{
UITableViewCell *cell = nil;
if (indexPath.section == 0) {
// If the cell is nil, then dequeue it. Make sure to dequeue the proper cell based on the row.
if (cell == nil) {
if (indexPath.row == 0) {
cell = [tableView dequeueReusableCellWithIdentifier:@"idCellTitle"];
}
else{
cell = [tableView dequeueReusableCellWithIdentifier:@"idCellGeneral"];
}
}
switch (indexPath.row) {
case 0:
// The title of the event.
{
UITextField *titleTextfield = (UITextField *)[cell.contentView viewWithTag:10];
titleTextfield.delegate = self;
titleTextfield.text = self.eventTitle;
}
break;
case 1:
// The event start date.
if (self.eventStartDate == nil) {
cell.textLabel.text = @"Select a start date...";
}
else{
cell.textLabel.text = [self.appDelegate.eventManager getStringFromDate:self.eventStartDate];
}
break;
case 2:
// The event end date.
if (self.eventEndDate == nil) {
cell.textLabel.text = @"Select an end date...";
}
else{
cell.textLabel.text = [self.appDelegate.eventManager getStringFromDate:self.eventEndDate];
}
break;
default:
break;
}
}
else if (indexPath.section == 1){
if (cell == nil) {
cell = [tableView dequeueReusableCellWithIdentifier:@"idCellGeneral"];
}
if (indexPath.row == 0) {
cell.textLabel.text = @"+ Add a new alarm...";
}
else{
cell.textLabel.text = [self.appDelegate.eventManager getStringFromDate:[self.arrAlarms objectAtIndex:indexPath.row - 1]];
// No selection for the alarm cells.
cell.selectionStyle = UITableViewCellSelectionStyleNone;
// No accessory style.
cell.accessoryType = UITableViewCellAccessoryNone;
}
}
else{
if (cell == nil) {
cell = [tableView dequeueReusableCellWithIdentifier:@"idCellGeneral"];
}
// The section with the repeat options.
cell.textLabel.text = [self.arrRepeatOptions objectAtIndex:indexPath.row];
if (indexPath.row == self.indexOfSelectedRepeatOption) {
cell.accessoryType = UITableViewCellAccessoryCheckmark;
}
else{
cell.accessoryType = UITableViewCellAccessoryNone;
}
}
return cell;
}
If you run it, you'll see the repeat options listed successfully on the table view. However, nothing happens yet if you tap on any of them, and the first option always remains the selected one. Let's fix that in the tableView:didSelectRowAtIndexPath: table view method, where we'll just add a new if clause:
-(void)tableView:(UITableView *)tableView didSelectRowAtIndexPath:(NSIndexPath *)indexPath{
...
if (indexPath.section == 2) {
self.indexOfSelectedRepeatOption = indexPath.row;
[self.tblEvent reloadData];
}
}
Now, every time you tap on a repeat option the selection will get changed too. Up to now, we've managed to set and show the predefined repeat options, and to properly select any of them. The most important thing however is to create a recurring rule based on the user selection, and then set it to the event upon saving. Before we create the rule though, we must specify the recurrence frequency and interval values. To do so, head to the saveEvent: IBAction method and and add the next code snippet right before the point where we save the event and after the alarms segment:
// Specify the recurrence frequency and interval values based on the respective selected option.
EKRecurrenceFrequency frequency;
NSInteger interval;
switch (self.indexOfSelectedRepeatOption) {
case 1:
frequency = EKRecurrenceFrequencyDaily;
interval = 1;
break;
case 2:
frequency = EKRecurrenceFrequencyDaily;
interval = 3;
case 3:
frequency = EKRecurrenceFrequencyWeekly;
interval = 1;
case 4:
frequency = EKRecurrenceFrequencyWeekly;
interval = 2;
case 5:
frequency = EKRecurrenceFrequencyMonthly;
interval = 1;
case 6:
frequency = EKRecurrenceFrequencyMonthly;
interval = 6;
case 7:
frequency = EKRecurrenceFrequencyYearly;
interval = 1;
default:
interval = 0;
frequency = EKRecurrenceFrequencyDaily;
break;
}
Having at our disposal the frequency and interval values, we're able to create a new recurrence rule:
// Create a rule and assign it to the reminder object if the interval is greater than 0.
if (interval > 0) {
EKRecurrenceEnd *recurrenceEnd = [EKRecurrenceEnd recurrenceEndWithEndDate:event.endDate];
EKRecurrenceRule *rule = [[EKRecurrenceRule alloc] initRecurrenceWithFrequency:frequency interval:interval end:recurrenceEnd];
event.recurrenceRules = @[rule];
}
else{
event.recurrenceRules = nil;
}
In the above two lines, not only we created the rule, but we added it to the event as well. Note that the event expects an array of rules, but in our case we have just one.
Now the app is capable of setting a recurring event. Before we test it, let's look at a last, but important detail: What will happen when we'll edit an existing event? What is going to be the selected repeat option index? By default, the preselected repeat option is the first one, but that would be wrong in cases that another repeat option had been selected. So, we need to fix that now, and to do so we'll implement a private method. At first declare it:
@interface EditEventViewController ()
...
-(void)determineIndexOfRepeatOption;
@end
In its implementation, we'll retrieve the recurrence rule from the edited event, and based on the frequency and interval values we'll specify the index of the selected option. Let's see it:
-(void)determineIndexOfRepeatOption{
if (self.editedEvent.recurrenceRules != nil && self.editedEvent.recurrenceRules.count > 0) {
// Get the frequency and interval values from the recurrence rule of the edited event.
EKRecurrenceRule *rule = [self.editedEvent.recurrenceRules objectAtIndex:0];
EKRecurrenceFrequency frequency = rule.frequency;
NSInteger interval = rule.interval;
if (interval == 1){
if (frequency == EKRecurrenceFrequencyDaily) {
self.indexOfSelectedRepeatOption = 1;
}
else if (frequency == EKRecurrenceFrequencyWeekly){
self.indexOfSelectedRepeatOption = 3;
}
else if (frequency == EKRecurrenceFrequencyMonthly){
self.indexOfSelectedRepeatOption = 5;
}
else{
self.indexOfSelectedRepeatOption = 7;
}
}
else{
if (frequency == EKRecurrenceFrequencyDaily) {
self.indexOfSelectedRepeatOption = 2;
}
else if (frequency == EKRecurrenceFrequencyWeekly){
self.indexOfSelectedRepeatOption = 4;
}
else{
self.indexOfSelectedRepeatOption = 6;
}
}
}
}
Lastly, we just have to call it. This should happen in the viewDidLoad method, inside the if condition where we check if the event is edited:
- (void)viewDidLoad
{
...
// Check the value of the selectedEventIdentifier property, of the eventManager object.
// If its length is 0, then a new event is going to be added.
// If its length is other than 0, then an existing event is going to be edited. In that case, load the event.
if (self.appDelegate.eventManager.selectedEventIdentifier.length > 0) {
self.editedEvent = [self.appDelegate.eventManager.eventStore eventWithIdentifier:self.appDelegate.eventManager.selectedEventIdentifier];
...
// Determine the index of the repeat option based on the recurrence rule of the edited event.
[self determineIndexOfRepeatOption];
...
}
}
That's it. Our app can now set recurring events, so go and give it a try. Create a new event, set its details and finally pick a repeating option. Tap on Save and return to the ViewController view controller to see that... we have a problem! The table view displays multiple occurrences of the new event instead of just once, as follows:

Well, that would definitely should not happen, but on the other hand it's quite reasonable, because if you remember we use predicates with specific time frame to retrieve the events. The framework returns all the events for the period we specified, regardless if it's the same, recurring event. To fix this, we have to pay a visit to the getEventsOfSelectedCalendar custom method of the EventManager class, and add a small code segment, where we'll copy all the retrieved events to another array before we return them. This time, we'll keep just one occurrence of each event, and we'll have no problem. Here's the method fixed (the modifications start after we have retrieved the events):
-(NSArray *)getEventsOfSelectedCalendar{
// Specify the calendar that will be used to get the events from.
EKCalendar *calendar = nil;
if (self.selectedCalendarIdentifier != nil && self.selectedCalendarIdentifier.length > 0) {
calendar = [self.eventStore calendarWithIdentifier:self.selectedCalendarIdentifier];
}
// If no selected calendar identifier exists and the calendar variable has the nil value, then all calendars will be used for retrieving events.
NSArray *calendarsArray = nil;
if (calendar != nil) {
calendarsArray = @[calendar];
}
// Create a predicate value with start date a year before and end date a year after the current date.
int yearSeconds = 365 * (60 * 60 * 24);
NSPredicate *predicate = [self.eventStore predicateForEventsWithStartDate:[NSDate dateWithTimeIntervalSinceNow:-yearSeconds] endDate:[NSDate dateWithTimeIntervalSinceNow:yearSeconds] calendars:calendarsArray];
// Get an array with all events.
NSArray *eventsArray = [self.eventStore eventsMatchingPredicate:predicate];
// Copy all objects one by one to a new mutable array, and make sure that the same event is not added twice.
NSMutableArray *uniqueEventsArray = [[NSMutableArray alloc] init];
for (int i=0; i 0) {
for (int j=0; j
If you run the app again, you'll see that the same event doesn't appear more than once now.

Summary
This tutorial was an effort to help you meet the world of calendars and events. As you may conclude, working with Event Kit is a quite straightforward process, as nothing especially difficult is required to be done. Working with all the stuff we met here is something that maybe will be needed sooner or later in your programming life, and knowing how to deal with it will surely save you a significant amount of time. Besides that, the class we created and used for managing the framework can be extended and evolved, and ultimately become a useful tool that you can add in your programming toolbox. Closing, I'd like to believe that this tutorial will become handy to all of you, and as always, let me know your thoughts.
For your reference, you can download the complete Xcode project from here.


