

Editor’s note: This is part 3 of our simple Maze game series. Previously, we showed you how to make use of accelerometer to move the pacman. In the final part, we’ll finish the game by implementing collision detection. If you haven’t read the first two parts of the tutorials, go back and check out part 1 and part 2 of the tutorials first.
In the second part of this tutorial series we have learnt how to move the pacman figure around the screen. The app, however, is still only half-baked. The pacman can move off the screen and pass through all the obstacles. In this final part, we will turn it into a complete game by handling all kinds of collisions including:
- Collision with screen boundaries – the pacman shouldn’t move off the screen and we expect it to bounce back
- Collision with pac-dot – player wins the game when pacman bypasses all obstacles and eat the pac-dot
- Collision with ghosts – player loses the game when pacman hits the ghost
- Collision with walls – the pacman can hit the wall but we expect the pacman to bounce back instead of passing through it
Collision detection is one the most difficult tasks in the development of video games, especially for 3D games. In this tutorial, we are going to study a few cases of collisions and how we can solve them. The proposed solutions are very simple. while advanced games should use other collision techniques.
Let’s get started.
Handling Collision with Screen Boundaries
It is very easy to detect if the pacman has collided with the boundaries of the iPhone screen. We only need to check if the frame of pacman is inside the screen. Add the following code in the APPViewController.m:
And copy the source code of the new method:
- (void)collisionWithBoundaries {

    if (self.currentPoint.x < 0) {
        _currentPoint.x = 0;
        self.pacmanXVelocity = -(self.pacmanXVelocity / 2.0);
    }

    if (self.currentPoint.y < 0) {
        _currentPoint.y = 0;
        self.pacmanYVelocity = -(self.pacmanYVelocity / 2.0);
    }

    if (self.currentPoint.x > self.view.bounds.size.width - self.pacman.image.size.width) {
        _currentPoint.x = self.view.bounds.size.width - self.pacman.image.size.width;
        self.pacmanXVelocity = -(self.pacmanXVelocity / 2.0);
    }

    if (self.currentPoint.y > self.view.bounds.size.height - self.pacman.image.size.height) {
        _currentPoint.y = self.view.bounds.size.height - self.pacman.image.size.height;
        self.pacmanYVelocity = -(self.pacmanYVelocity / 2.0);
    }

}
We’ll invoke this method at the beginning of the movePacman method:
[self collisionWithBoundaries];
When a collision is detected, we reverse the direction of the velocity vector, just like a ray reflected in a mirror. In real world, a bouncing ball slows down each time it bounces back from the ground. So here, we decrease the velocity to half. You can modify this parameter to give more (or less) elasticity to the collisions.
Compile and run the game. You’ll immediately notice the difference. The pacman is not allowed to move off the screen and bounces back nicely when it hits the screen boundaries. The overall effect is highly realistic. Some people might be surprised that we can achieve this effect without learning advanced physics. Thanks to the accelerometer and the iOS SDK. It simplifies the whole implementation.
Handling Collision with Pac-Dot
The next problem is how to detect the collision with the pac-dot (i.e. the big yellow dot) or the exit. Again, it is not difficult to handle. It’s even simpler than the collision detection of screen boundaries as we do not need to calculate how the pacman would bounce back.
Add the following source code in APPViewController.m:
- (void)collisionWithExit {

    if (CGRectIntersectsRect(self.pacman.frame, self.exit.frame)) {

        [self.motionManager stopAccelerometerUpdates];

        UIAlertView *alert = [[UIAlertView alloc] initWithTitle:@"Congratulations"
                                                  message:@"You've won the game!"
                                                  delegate:self
                                                  cancelButtonTitle:@"OK"
                                                  otherButtonTitles:nil];
        [alert show];

    }

}
Add the following line of code in movePacman method, right before the collisionWithBoundaries method call:
[self collisionWithExit];
Core Graphics provides the function CGRectIntersectsRect to help us detect whether one view’s frames overlaps another specified view’s frame. In the method, we use the function to check if the frame of the pacman and the frame of the exit intersects. If the frames are overlapped, that means the player has won the game. To keep thing simple, we simply display an alert message. Of course, for a real game, you should do something else, like progress to the next level.
Please be reminded to stop the accelerometer updates as we’ve done it in line #5. If we don’t do that, we’ll keep getting the alert view.
Handling Collision with Ghosts
The first two kinds of collision detection is pretty straightforward. It’s a little bit more complex to detect the collision with the ghost sprite as they keep moving back and forth. We will tweak the CGRectIntersectRect technique as used in the last section to handle the collision.
In movePacman method, add the following line of code right before the collisionWithBoundaries method call:
[self collisionWithGhosts];
Next, add the following code in the APPViewController.m:
- (void)collisionWithGhosts {

    CALayer *ghostLayer1 = [self.ghost1.layer presentationLayer];
    CALayer *ghostLayer2 = [self.ghost2.layer presentationLayer];
    CALayer *ghostLayer3 = [self.ghost3.layer presentationLayer];

    if (CGRectIntersectsRect(self.pacman.frame, ghostLayer1.frame)
        || CGRectIntersectsRect(self.pacman.frame, ghostLayer2.frame)
        || CGRectIntersectsRect(self.pacman.frame, ghostLayer3.frame) ) {

        self.currentPoint  = CGPointMake(0, 144);

        UIAlertView *alert = [[UIAlertView alloc] initWithTitle:@"Oops!"
                                                  message:@"Mission Failed!"
                                                  delegate:self
                                                  cancelButtonTitle:@"OK"
                                                  otherButtonTitles:nil];
        [alert show];

    }

}
As mentioned earlier, the CGRectIntersectsRect function is used to determine whether the frames of two views are overlapped. Unlike the pac dot, the frame of the animated ghost spans along all the animations of the moving object. Yet what we have to do is to get the current presentationLayer of the ghost that represents the state of the layer as it currently appears on screen. In other words, we get the current position of the ghost and use that frame to check if it overlaps with the pacman’s frame.
Again, to keep our game simple, we simply show a failure alert when player hits the ghost and we’ll restart the game.

Display an alert message when pacman hits any of the ghosts
Handling Collision with Game Walls
The collision with the walls is the most complex case to study in this tutorial. Similarly, we’ll use the CGRectIntersectRect function to detect if the pacman’s frame and the wall’s frame overlaps. However, the challenges are how we can determine the side of the squared wall the pacman hits and how we can handle the rebound.
First, add the following line of code to movePacman method. Place it before the collisionWithBoundaries method:
[self collisionWithWalls];
Next, add the following code in APPViewController.m:
- (void)collsionWithWalls {
CGRect frame = self.pacman.frame;
frame.origin.x = self.currentPoint.x;
frame.origin.y = self.currentPoint.y;
for (UIImageView *image in self.wall) {
if (CGRectIntersectsRect(frame, image.frame)) {
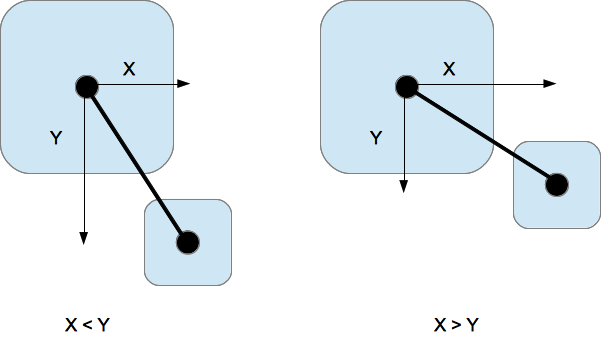
// Compute collision angle
CGPoint pacmanCenter = CGPointMake(frame.origin.x + (frame.size.width / 2),
frame.origin.y + (frame.size.height / 2));
CGPoint imageCenter = CGPointMake(image.frame.origin.x + (image.frame.size.width / 2),
image.frame.origin.y + (image.frame.size.height / 2));
CGFloat angleX = pacmanCenter.x - imageCenter.x;
CGFloat angleY = pacmanCenter.y - imageCenter.y;
if (abs(angleX) > abs(angleY)) {
_currentPoint.x = self.previousPoint.x;
self.pacmanXVelocity = -(self.pacmanXVelocity / 2.0);
} else {
_currentPoint.y = self.previousPoint.y;
self.pacmanYVelocity = -(self.pacmanYVelocity / 2.0);
}
}
}
}
The first thing we have to do is to compute the final destination point for the pacman. When the pacman hits the wall, we’ll not move the pacman to its final position. Otherwise, the pacman could pass through the walls.
The next step is to check if the frames collide, and if so, we compute on which side of the wall (X or Y) the collision has happened. In order to do that we calculate the angle of the collision, by comparing the center points of both objects. If the angle X component is greater than the Y component, we have to reverse the X velocity, otherwise, we reverse the Y velocity:
Of course, this method only works if we are dealing with squared objects. For rectangular objects we could use a similar approach. However, you’ll need a much better collision detection algorithm for other shapes.
Compile and Run the App
We have already finished our game. Compile the app and test it on a physical device (not in the simulator). Try to hit the wall, ghost and eat the pac dot. Have fun!

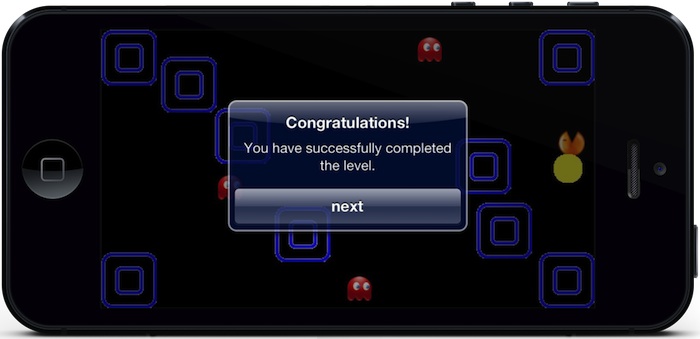
Pacman eats the dot!
What’s Next
Congratulation! You’ve developed your first iOS game. It’s a long journey, right? But I’m sure you’ve learnt quite a lot about game development stuffs. That said, it’s just a beginning and you can treat this as the starting point for your game development. The maze game is not perfect (yes, you may find some bugs as we try to keep it as simple as possible). Try to tweak this game and turn it into a more advanced game with different levels!
For your complete reference, you can download the full source of this game project here. As always, leave us comment and share your thought. We love to hear your feedback and further improve our tutorials.


