

While I’ve introduced you quite a number of new features announced in WWDC 2020. Let’s step back a bit and check out a useful framework introduced in WWDC 2019. At first glance, it does not look as significant or important as other frameworks, however it consists of a really useful tool when it is needed. That is the LinkPresentation framework, and it provides a handful of built-in functionalities that makes presenting rich links in apps a really simple and straightforward process.
LinkPresentation framework contains mechanisms that parse the website behind a link and fetch metadata necessary in order to display the link in a visually formatted, beautiful manner. In particular, it fetches the title, icon, images, and video metadata, when any of those is provided by the website through the Open Graph protocol.
Fetched metadata can be saved locally for future use, so it’s possible to avoid downloading the exact same data repeatedly. Making the local storage of metadata (caching) a reality is assisted by the custom type that represents metadata programmatically; the LPLinkMetadata class, which is serializable, so it’s easy to create Data objects out of it that can be written locally.
But the above are not the only features available. LinkPresentation also handles the appearance of a visually formatted link by providing a custom view configured based on fetched metadata, and that view also supports user interaction through single tap and long press gestures.
If there’s just one negative point we can spot in the LinkPresentation framework, then that is the fact that it’s built for UIKit (and AppKit on macOS), so integrating it in SwiftUI projects requires some additional work. But no need to worry, as in this post we’ll do exactly this; we’ll build a SwiftUI project where we’ll embed and use the LinkPresentation framework!
LinkPresentation framework works in both iOS and macOS, starting from iOS 13 and macOS 10.15. Besides than fetching metadata for remote links, it’s also possible to deal with links pointing to local files, however that’s not something we’ll discuss in this tutorial. We’ll see all the main features that were presented shortly right above, and on top of that we’ll see how LinkPresentation framework can be combined with the activity view controller in order to share links easily, taking advantage of already cached metadata.
So, keep on reading to find out some cool features of the LinkPresentation framework, but before that, let’s meet the demo application we’re going to build in the next parts of this tutorial!
The Demo Application
Our journey to LinkPresentation framework will take place using a SwiftUI based iOS application. Parts of it have already been built and you can download it here as a starter project. Our work in this tutorial will begin by keep building on that starter project, so once you get it open it in Xcode.
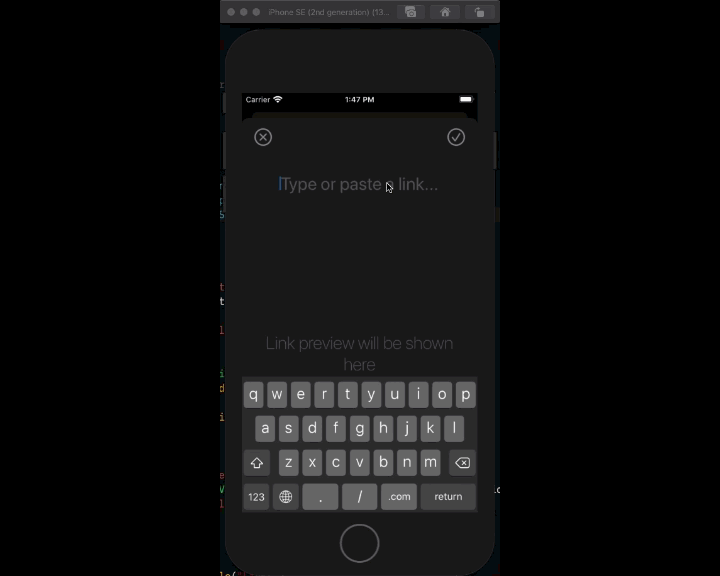
In the demo application we’ll go through all features of the LinkPresentation framework that one would need to incorporate in their own apps. The first thing we’ll meet is how to fetch remote link metadata using the LPMetadataProvider class, and this will happen after having typed or pasted a URL in the InputLinkView view of the starter project.
Next, we’ll see how to display a rich link after having fetched its metadata, and we’ll get to know the LPLinkView class; the one that’s responsible for presenting a link visually formatted. We’ll display our first link view in the InputLinkView as the result of the link metadata fetching. In this part we’ll have the opportunity to see how to bring a UIKit view to SwiftUI with the UIViewRepresentable protocol.
After that, we’ll add the capability to save downloaded link metadata as part of a collection of links, and then load them. We’ll talk about serialization, the NSSecureCoding protocol, and we’ll archive and unarchive using the NSKeyedArchiver and NSKeyedUnarchiver classes respectively.
By making our app capable of caching link metadata locally and loading back we’ll move on and we’ll display all stored links in a list. This will happen in the LinksListView view, and once again, we’ll make use of the link view.
Finally, we’ll disable the default interactions with the link view and we’ll implement our own activity view controller for sharing links in order to feed it with cached metadata; we’ll prevent it that way from fetching that metadata again, which is its default behaviour. We’ll meet a specific method of the UIActivityItemSource protocol that actually provides link metadata to activity view controller, and besides that some other intersting stuff, such as how to use a UIKit view controller in SwiftUI with the UIViewControllerRepresentable protocol.
In addition to all the above we’ll make use of two additional custom types: The Link class which will represent a link programmatically, and the LinksModel which already contains a collection of Link objects and it consists of the place where we’ll add all the implementation about fetching link metadata, saving and loading.
Navigate through the current implementation of the starter project, and when you’re done, prepare to fetch link data for first time!
Getting Started: Fetching Link Data
By making clear what we’re going to talk about in this post and what our course of actions is going to be, it’s time to start building on the project and see the various aspects of the LinkPresentation framework.
Our starting point cannot be other than fetching the metadata for a link that is provided in the InputLinkView view. We’ll be triggering the actual link data fetching when the Return key is tapped on the keyboard in order to be dismissed.
First, let’s focus on the mechanism responsible for getting the link metadata. Open the LinksModel.swift file where we’ll add the following class method in the LinksModel class:
class LinksModel {
    class func fetchMetadata(for link: String, completion: @escaping (Result<LPLinkMetadata, Error>) -> Void) {

    }
}
The first parameter value is the URL of the target link as a String value; the text given to the textfield in the InputLinkView.
Since fetching data from Internet is an asynchronous process, the second parameter is a completion handler, or in other words a callback function that will be called when the download is finished. The completion handler’s argument is a Result type that will contain either the actual fetched data, or an error object in case the operation fails.
Note: Read more about the Result type here.
In case of success, the data of the Result type above is going to be a LPLinkMetadata object. LPLinkMetadata class belongs to LinkPresentation framework, and it contains properties that describe a link:
- URL
- Title
- Icon
- Image
- Video
We’re going to use the returned LPLinkMetadata instance to show the rich link preview later, as well as to store fetched metadata locally.
Before we continue, add the following import statement right before the opening of the LinksModel class so we import the LinkPresentation framework and eliminate the error that is currently displayed in Xcode:
import LinkPresentationWe’ll begin implementing the above method by creating a URL object based on the provided URL string:
guard let url = URL(string: link) else { return }Now, we’re going to meet another class of the LinkPresentation framework called LPMetadataProvider. This is the one that will perform the actual fetching of the link’s metadata and it will return either a LPLinkMetadata object, or an error object if something turns out bad.
Using it is very simple. First we have to initialize an object of it:
let metadataProvider = LPMetadataProvider()Then, we need to call the method that will initiate the asynchronous fetching operation:
metadataProvider.startFetchingMetadata(for: url) { (metadata, error) in

}
The completion handler of the method we just called contains two parameters: The link’s metadata and an error object . We’ll check if any of them is nil or not, and we’ll pass the respective unwrapped value to the Result type that we’ll feed to the completion handler of our method.
metadataProvider.startFetchingMetadata(for: url) { (metadata, error) in
    if let error = error {
        completion(.failure(error))
        return
    }

    if let metadata = metadata {
        completion(.success(metadata))
    }
}
If error is not nil, then we pass the .failure case of the Result type as an argument to the completion handler with the error object as an associated value. Otherwise, we check if metadata is not nil and we pass the .success case of the Result type to the completion handler along with the unwrapped metadata object.
Here is the method we just implemented in one piece:
class func fetchMetadata(for link: String, completion: @escaping (Result<LPLinkMetadata, Error>) -> Void) {
    guard let url = URL(string: link) else { return }

    let metadataProvider = LPMetadataProvider()
    metadataProvider.startFetchingMetadata(for: url) { (metadata, error) in
        if let error = error {
            completion(.failure(error))
            return
        }

        if let metadata = metadata {
            completion(.success(metadata))
        }
    }
}
Let’s open now the InputLinkView.swift file, where we’ll make use of the above method. Go to the textfield’s implementation into the view’s body and spot the comment: // Fetch link metadata..
The place where you find that comment is the action handler that gets called when the Return key in the keyboard is tapped while editing the textfield’s text. Replace the comment with the following code:
LinksModel.fetchMetadata(for: self.link) { (result) in

}
We’re going to handle the above method’s result right next. What really matters at this point is that the first important step has been now done! With just a few bits of code the demo application is capable of fetching the metadata for any given link!
Handling Fetched Link Metadata
We will handle the results of the fetchMetadata(for:completion:) in a new method that we’ll implement here. But before that, go to the beginning of the InputLinkView structure and above the body implementation in order to add the following property which will hold the fetched metadata:
@State private var metadata: LPLinkMetadata?Additionally, import the LinkPresentation framework at the beginning of the file:
import LinkPresentationWith the metadata property handy now, let’s move on to the definition of a new method. Still inside the InputLinkView structure and right after the body implementation add the following:
private func handleLinkFetchResult(_ result: Result<LPLinkMetadata, Error>) {

}
This method will accept the Result value coming from the completion handler of the fetchMetadata(for:completion:) and will handle both the metadata, if exists, and the error.
In case where link’s metadata has been fetched successfully, then we’ll get it from the associated value of the success case of the Result type and we’ll assign it to the property we declared right before. In case of error, then we’ll simply print it on the console; that’s a fast solution good enough for this tutorial, however in real applications more appropriate actions should be taken, such as informing the user with an alert, or anything else suitable for the application.
All the above will take place in a switch statement, since it consists of the easiest way to extract associated values from a Result value. In addition to that, don’t forget that metadata fetching is an asynchronous process and that our actions here will affect the user interface (UI), therefore it is mandatory everything to be done on the main thread.
Here’s the full implementation of the handleLinkFetchResult(_:) method:
private func handleLinkFetchResult(_ result: Result<LPLinkMetadata, Error>) {
    DispatchQueue.main.async {
        switch result {
            case .success(let metadata): self.metadata = metadata
            case .failure(let error): print(error.localizedDescription)
        }
    }
}
A couple of more tweaks in the original code of the starter project are necessary and we’ll be good to go. First find the comment saying: // Clear previous metadata. in the view’s body implementation.
The closure that this comment is written into is the textfield’s handler that is being called when the textfield gets edited. For simplicity and in order to avoid small collateral complications that we don’t need in this tutorial, we’ll be scratching any metadata previously fetched whenever users edit the link’s URL. So, replace that comment with:
if self.metadata != nil {
    self.metadata = nil
}
After doing that, move a bit down in the existing code where you will find the if false condition right below a comment saying: // Link preview.
This condition has no meaning and it works as a temporary placeholder for the actual condition that we’ll specify right now. Replace if false with this:
if metadata != nil {
    ...
}
If link’s metadata exists and the metadata property we declared earlier is not nil, then we’ll display the link preview (coming next). Otherwise, a placeholder text is displayed instead. We’ll return at this specific point in a while and we’ll replace the EmptyView() with an actual view that displays the link preview.
Finally, update the fetchMetadata(for:completion:) method call and in the completion closure call the handleLinkFetchResult(_:) method:
LinksModel.fetchMetadata(for: self.link) { (result) in
    self.handleLinkFetchResult(result)
}
The Link View
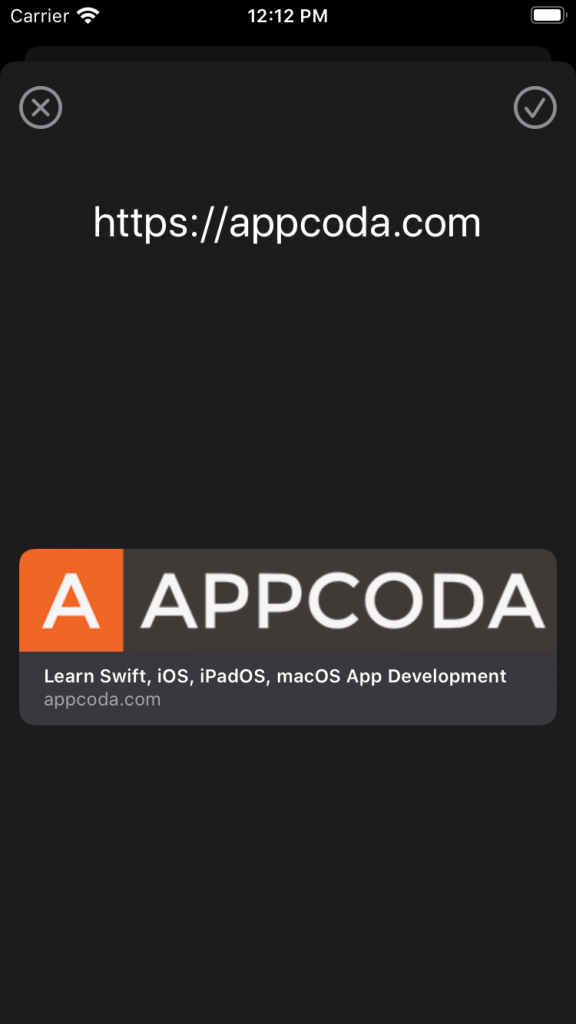
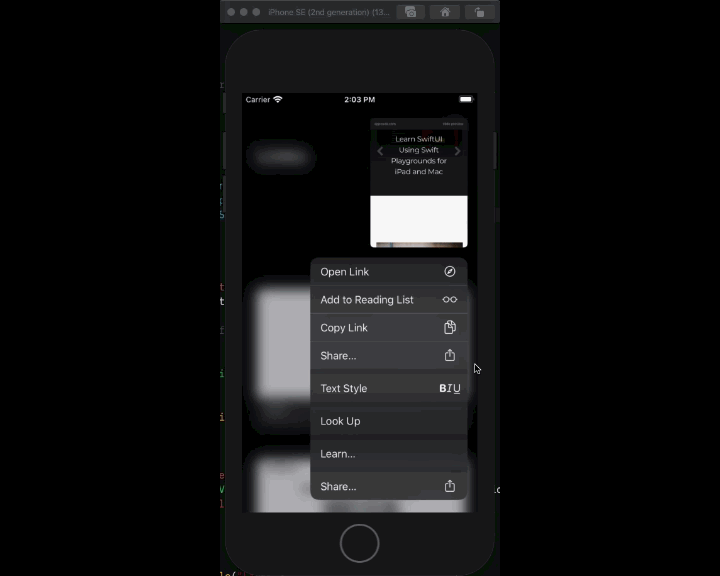
One of the greatest things in LinkPresentation framework is that it provides a view that displays the link preview formatted properly, as long as it’s fed with the link’s metadata as a LPLinkMetadata object. On top of that, that view allows interaction when single tapping and long pressing on it; when the first happens it opens the selected link in the browser. In the second case, it shows a list of options including copying the link’s URL, sharing, and more. However, that behaviour is not always desirable and you’ll find out the reason later in this post.
The responsible class for creating rich link representations is called LPLinkView. Even though it offers important functionality out of the box, it has a downside when working in SwiftUI; it is a UIView view subclass (a UIKit view) and not a SwiftUI view! So, in order to use it we must mix UIKit and SwiftUI.
Thankfully, it’s quite easy to wrap UIKit views in SwiftUI using the UIViewRepresentable protocol. The plan is to create a structure that conforms to UIViewRepresentable protocol, to implement a couple of required methods, and inside those methods to initialize and configure the UIView object.
To get started, open the LinkView.swift file, and right after the current import statement add the next two as well:
import UIKit
import LinkPresentation
Now, let’s create a new structure which will be used like any other SwiftUI view when we finish with it. We’ll call it LinkView:
struct LinkView: UIViewRepresentable {

}
UIViewRepresentable protocol has a required associated type called UIViewType and it indicates the type of view that the structure will present. Here is how we fulfil that requirement in our case:
typealias UIViewType = LPLinkViewAfter that, it’s necessary to define the next two methods:
func makeUIView(context: Context) -> LPLinkView {

}

func updateUIView(_ uiView: LPLinkView, context: Context) {

}
makeUIView(context:) must return an initialized view of the type specified in the UIViewType value. Here we are going to return a LPLinkView object.
The updateUIView(_:context:) method is not required to be mandatorily used, but it has to be defined. Use it when the view content must be updated when new information from SwiftUI exists, or the view cannot be fully configured in the makeUIView(context:) only.
A LPLinkView needs link metadata in order to display content. Therefore, add the next property in the LinkView structure; we’ll provide metadata upon initialization of LinkView instances:
var metadata: LPLinkMetadata?Time to add content to makeUIView(context:) method. First, we’ll make sure that the metadata property isn’t nil. Then, we’ll initialize a new LPLinkView view using the metadata, and we’ll return it from the method:
func makeUIView(context: Context) -> LPLinkView {
    guard let metadata = metadata else { return LPLinkView() }
    let linkView = LPLinkView(metadata: metadata)
    return linkView
}
That’s all we need! Here’s the entire implementation of the LinkView structure:
struct LinkView: UIViewRepresentable {

    typealias UIViewType = LPLinkView

    var metadata: LPLinkMetadata?

    func makeUIView(context: Context) -> LPLinkView {
        guard let metadata = metadata else { return LPLinkView() }
        let linkView = LPLinkView(metadata: metadata)
        return linkView
    }

    func updateUIView(_ uiView: LPLinkView, context: Context) {

    }
}
The above makes it possible to use an UIView object in SwiftUI like any other view, and you’re going to see that right next!
Previewing Rich Links
Back in the InputLinkView.swift file now where we’ll make the first use of the LinkView structure we just implemented. Find the following condition:
if metadata != nil {
    EmptyView()
}
We’re going to replace the EmptyView() with a LinkView instance. Here it is:
if metadata != nil {
    LinkView(metadata: metadata)
        .aspectRatio(contentMode: .fit)
} else {
    ...
}
Appending the aspectRatio modifier is done just for displaying properly the content of the link view, but it’s not a requirement; we could have omitted it.
With the above condition now fixed it’s possible to show a rich link preview when its metadata has been fetched, or a placeholder text when there’s no metadata or the textfield is being edited.
We can run the app for first time at this point and try out what we’ve managed so far! Click on the Plus button to add a link, type or paste any link in the textfield and tap on Return key (or hit Return on your keyboard if you’re using Simulator). Wait for a few moments and the rich link will show up!
The Custom Link Type
If a link’s metadata is not fetched for one-time use only, then the best practice that Apple recommends too is to save it locally (cache it) and load it when it’s about to be needed again. That way users will have a better experience since they won’t have to wait again and again until fetch is complete, and if they get connected through a cellular network they’ll avoid having unnecessary costs in their mobile data plans for fetching link metadata that they have already fetched in the past.
The good news for us is that metadata represented by a LPLinkMetadata instance is serializable, which in plain words means that we can archive and unarchive using the NSKeyedArchiver and NSKeyedUnarchiver classes respectively.
However, we won’t save the metadata alone straight to the disk in this post, and here is the reason:
Our next big goal is to display all stored links in a list, and in order to do that properly we need to have a type that conforms to Identifiable protocol and contains an id property.
LPLinkMetadata class does not satisfy that requirement, so we are going to use a custom type that will contain an id property along with the metadata, and it will adopt the Identifiable protocol so it can be used in SwiftUI lists.
That custom type has been defined already and it’s the Link class in the Link.swift file. Open it and add the following two properties:
var id: Int?
var metadata: LPLinkMetadata?
Since we’re making use of the LinkPresentation API, we need to import that framework in this file too:
import LinkPresentationAdditionally, adopt the Identifiable protocol to make it possible to list Link items later:
class Link: Identifiable { ... }Now, as I said already before, we won’t archive and save the metadata only. Instead, we’ll archive and save the entire instance of a Link object so it includes both the id and the metadata. But in order to do that it’s necessary to make Link class:
- A subclass of the
NSObjectclass. - Conform to the
NSSecureCodingprotocol (which in turn adoptsNSCoding). This will enable us to serialize and deserialize instances ofLink(and eventually save to disk) and take advantage of the fact thatLPLinkMetadatais serializable.
Note: We’ll make Link class conform to NSSecureCoding instead of NSCoding because metadata, a LPLinkMetadata object, is serializable with the NSSecureCoding protocol. Read more about NSCoding and NSSecureCoding, or make a search on the web for additional information about them.
So, we’ll continue by updating the class header line as shown:
class Link: NSObject, NSSecureCoding, Identifiable { ... }NSSecureCoding protocol brings along new requirements: We must include a required associated value to support secure coding, and to implement two methods; one for encoding stored properties and one to initialize instances of self from archived objects:
static var supportsSecureCoding = true

func encode(with coder: NSCoder) {

}

required init?(coder: NSCoder) {

}
Both of the above methods must be implemented by any custom type that needs to become capable of being serialized and deserialized.
Starting with the encode(with:) method, here’s how we’re encoding the two properties of the Link class so they become serializable:
func encode(with coder: NSCoder) {
    guard let id = id, let metadata = metadata else { return }
    coder.encode(NSNumber(integerLiteral: id), forKey: "id")
    coder.encode(metadata as NSObject, forKey: "metadata")
}
You might find peculiar that we’re encoding properties as Objective-C objects (NSNumber, NSObject) instead of encoding as Swift Int value and Any object respectively. Actually, that’s because of a requirement that results from the way decoding must be done when adopting NSSecureCoding protocol.
To be more precise, you will see next that in order to decode in the init(coder:) we’re making use of the decodeObject(of:forKey:) method as Apple recommends. The first argument must be a subclass of the NSObject class, and that creates the need to encode accordingly. Also, given what I just said and after you’ll see the implementation of the init(coder:) method right next you can understand why we made Link class a NSObject subclass. I leave it up to you to read more information about NSSecureCoding.
Going to the init(coder:) initializer now, here we have to decode previously encoded values and objects and assign them to the proper properties.
required init?(coder: NSCoder) {
    id = coder.decodeObject(of: NSNumber.self, forKey: "id")?.intValue
    metadata = coder.decodeObject(of: LPLinkMetadata.self, forKey: "metadata")
}
Before we move on to the next step, add the next default initializer to Link class that will allow us to create new objects:
override init() {
    super.init()
}
The implementation of the Link class is complete. You’ll see why the above are necessary in the following parts.
Saving Link Data
Switch to the LinksModel.swift file now where the actual saving of Link objects is going to take place. However, before we get to that, let’s start by creating a method in the LinksModel class that will create new Link objects using metadata that is provided as an argument:
func createLink(with metadata: LPLinkMetadata) {
    let link = Link()
    link.id = Int(Date.timeIntervalSinceReferenceDate)
    link.metadata = metadata
    links.append(link)
    saveLinks()
}
Here’s what is going on in the above method:
- First a new
Linkobject is being created. - As a quick solution for the value of
idproperty we’re getting the current timestamp and we keep only its integer part. We assign it to theidproperty as the identifier of thelinkobject. - We assign the
metadataparameter value to the respective property of thelinkobject. - We append the newly created object to the
linkscollection (already defined in theLinksModelclass). - Finally we call the
saveLinks()method that we’re going to implement as the next step in the whole process we’re doing here.
So, time to work on the actual saving of the link data to the disk. Using the NSKeyedArchiver class we’ll serialize the entire links array, but note that this is possible because its items are serializable (we took care of that in the previous part). Doing so isn’t difficult at all, and it’s recommended to be done in a do-catch statement since an exception might be thrown. Here it is:
fileprivate func saveLinks() {
    do {
        let data = try NSKeyedArchiver.archivedData(withRootObject: links, requiringSecureCoding: true)
        guard let docDirURL = FileManager.default.urls(for: .documentDirectory, in: .userDomainMask).first else { return }
        try data.write(to: docDirURL.appendingPathComponent("links"))
    } catch {
        print(error.localizedDescription)
    }
}
Note: To be able to find and see the created file in Finder just add the next line as the last one in the do statement above:
print(docDirURL.appendingPathComponent("links"))When the NSKeyedArchiver.archivedData(withRootObject: links, requiringSecureCoding: true) code is executed, the encode(with:) encoder method we met before gets called for every Link object in the links array so each one of them to be serialized. The resulting archived object is assigned to the data object as shown above. It’s important to stress here that the above wouldn’t work if we hadn’t made Link class serializable by conforming to NSSecureCoding protocol!
Note #2: Read more about NSKeyedArchiver and NSKeyedUnarchiver here and here respectively.
In case you wanted to serialize the metadata only and avoid all the hassle we went through in the Link class, then you should provide a LPLinkMetadata object as the first argument above instead of links, and probably to choose a specific name for the file that will contain the serialized metadata. Here’s an example method that does that:
func save(metadata: LPLinkMetadata) {
    do {
        let data = try NSKeyedArchiver.archivedData(withRootObject: metadata, requiringSecureCoding: true)
        guard let docDirURL = FileManager.default.urls(for: .documentDirectory, in: .userDomainMask).first else { return }
        try data.write(to: docDirURL.appendingPathComponent("SOME_BETTER_FILE_NAME"))
    } catch {
        print(error.localizedDescription)
    }
}
And by having said that, there’s one last action remaining to be done in order to save fetched link metadata to disk. We must call the createLink(with:) method from the InputLinkView structure.
Open the InputLinkView.swift file and find the comment saying:
// Save link metadata.
This closure gets called when the top-right button with the checkmark is tapped in the app. The goal is to save the link metadata and dismiss the modal view.
With that in mind, replace the above comment with the next simple call:
self.keepLink()And now let’s implement that keepLink() method which is fairly simple right after the body implementation and inside the InputLinkView structure:
private func keepLink() {
    guard let metadata = self.metadata else { return }

    // Create the Link object and save all links metadata to file.
    self.linksList.createLink(with: metadata)

    // Dismiss InputLinkView instance.
    self.presentationMode.wrappedValue.dismiss()
}
Run the app again now and after having fetched a link’s metadata tap on the top-right button. Link should be saved and the view to be dismissed.
Loading Link Data
Back to LinksModel.swift file and in the LinksModel class, where we’ll add a new method responsible for loading and deserializing previously serialized and stored Link objects. In this method we’ll follow the opposite path from the one we followed earlier; first we’ll load the file contents to a Data object (if the file exists), and then we’ll use the NSKeyedUnarchiver class to unarchive links data.
Here it is:
fileprivate func loadLinks() {
    guard let docDirURL = FileManager.default.urls(for: .documentDirectory, in: .userDomainMask).first else { return }
    let linksURL = docDirURL.appendingPathComponent("links")

    if FileManager.default.fileExists(atPath: linksURL.path) {
        do {
            let data = try Data(contentsOf: linksURL)
            guard let unarchived = try NSKeyedUnarchiver.unarchiveTopLevelObjectWithData(data) as? [Link] else { return }
            links = unarchived
        } catch {
            print(error.localizedDescription)
        }
    }
}
See that links property gets a value if only code execution mades it successfully up to that point. This means that the file must exist, a Data object to be properly initialized using the the file contents, and that data to be unarchived without problems.
We want links to be loaded when the app starts running so we can display them. For that reason, the above method must be called when LinksModel class is initialized. Add the following init() method that will be called upon LinksModel initialization:
init() {
    loadLinks()
}
We’re now in the position where we can update the UI and display a list of links.
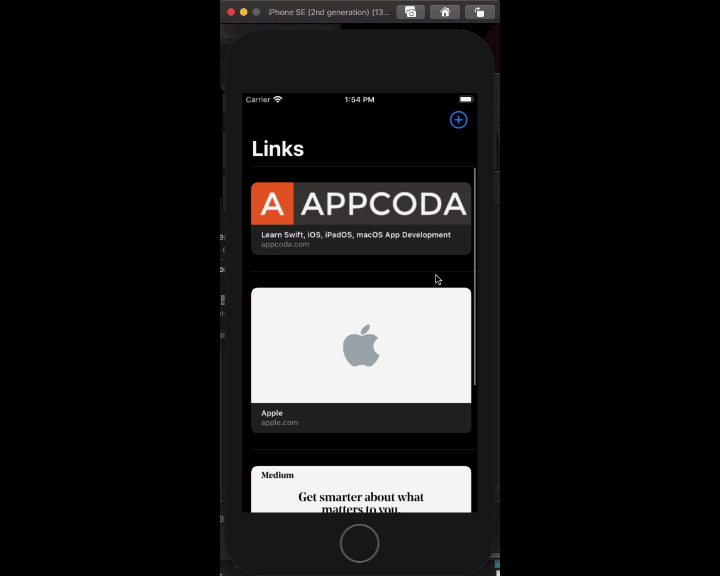
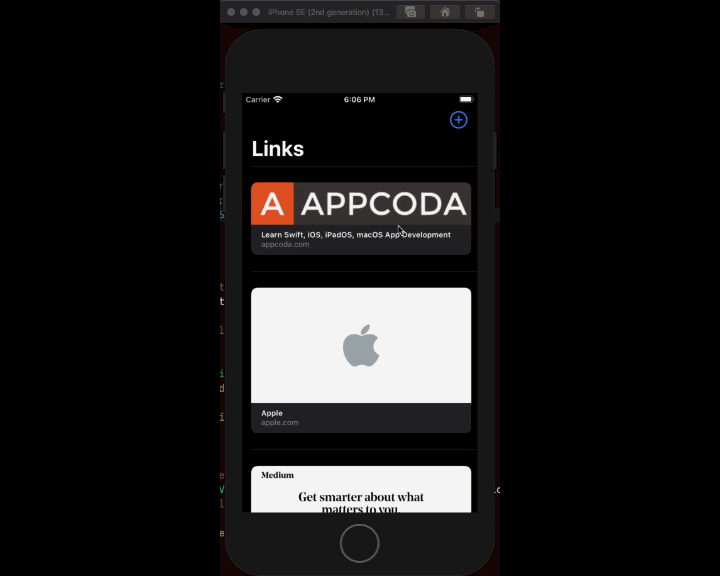
Listing Cached Links
Open the LinksListView.swift file now, where LinksListView is the place where we’ll list loaded links. At the beginning of the body implementation you’ll find a Text and an empty view inside a vertical stack. We’ll deal with the empty view later, but now we’ll replace the Text control with a List.
To do so, make sure you select and delete this:
Text("Links will appear here")Next, add the following List in place of Text:
List(linksList.links, rowContent: { link in

})
Listing Link objects the way shown above is the reason why we adopted the Identifiable protocol in the Link class and we added the id property. Inside the List closure now we’ll create a button, so each item to be tappable:
Button(action: {

}) {

}
    .padding(.vertical, 20)
The first closure in the Button is being called every time the button is tapped. Let’s leave it empty for now, and let’s focus on the second closure that regards what the button is going to display as a content.
That content is nothing else but a LinkView that will be using the metadata of each link object in the list:
LinkView(metadata: link.metadata)Putting everything together, here’s the list along with the button:
List(linksList.links, rowContent: { link in
    Button(action: {

    }) {
        LinkView(metadata: link.metadata)
    }
        .padding(.vertical, 20)
})
Run the app now to see rich links being listed. If you have saved already some links they’ll appear as soon as you launch the app. In any case, add a few more links in the InputLinkView and come back to see them being added to the links list.
Sharing Links With The Activity Controller
If you’ve played a bit with the rich link previews either in the InputLinkView or in the LinksListView then you’ve found out already that by single tapping on a link causes it to open in the browser. If you long press a link, then a preview of the target website along with various options for opening, copying, or sharing the link also appear.
Let’s focus on the sharing feature that shows up after performing a long tap to the link preview. An activity view controller appears with various sharing options available to the device, and we get a nice functionality for free, but there’s a disadvantage. The displayed link details are being fetched again and again from the target URL whenever the activity controller is being presented.
Obviously that’s not a desirable thing to happen, especially when we’ve already fetched and cached link metadata. So the question that arises here is: Can we use the metadata that we have already fetched in order to provide them to the activity view controller and to avoid fetching repeatedly the same data?
The answer is yes, and actually Apple recommends to do so! However we can’t do that in the activity view controller presented from the default link view. We must initialize and present our own activity view controller, and in that case it’s possible to feed it with any data we want to.
That sounds great, but the fact that we’re working in SwiftUI makes things a bit more complicated for us! Activity view controller is a UIKit view controller, so we must “port” it in SwiftUI. Don’t worry though! It’s a quite straightforward process pretty similar to the way we imported LPLinkView previously using the UIViewRepresentable protocol.
What we’re going to do here is a two-step process: First, we’ll create a UIKit view controller that will initialize a new activity view controller and it will adopt the UIActivityItemSource protocol. That will allow to implement specific methods through which we’ll provide link metadata to the activity controller.
Then, we’ll create a new custom structure which we’ll call ShareLinkView. It will conform to UIViewControllerRepresentable protocol; this will make it possible to “port” the UIKit view controller to SwiftUI and use it like any other native View object.
The ActivityController View Controller
With all the above said, let’s keep building on our app. Open the ShareLinkView.swift file, and start by importing the following two frameworks:
import UIKit
import LinkPresentation
Next, define the following class:
class ActivityController: UIViewController, UIActivityItemSource {

}
We create the ActivityController type, which is a view controller and adopts the UIActivityItemSource protocol. That protocol has a couple of required methods that need to be implemented, plus one more that we’ll add specifically for returning link metadata. Before we get there however, it’s necessary to make some other preparations.
So, at first declare the following properties in the ActivityController class:
var metadata: LPLinkMetadata?
var activityViewController: UIActivityViewController?
var completion: UIActivityViewController.CompletionWithItemsHandler?metadatais the link’s metadata that will be displayed on the activity controller as aLPLinkMetadataobject.activityViewControlleris the actual activity view controller that will be presented.completionis a completion handler that will be called by the activity view controller when it gets dismissed.
Next, override the viewDidAppear(_:) that will be called when our view controller has appeared. In it, we’ll initialize the activity controller:
override func viewDidAppear(_ animated: Bool) {
    super.viewDidAppear(animated)

    activityViewController = UIActivityViewController(activityItems: [self], applicationActivities: nil)
    activityViewController?.completionWithItemsHandler = completion
    present(activityViewController!, animated: true, completion: nil)
}
Two important things to notice here:
- An array of
selfitems is given as the activity items at the controller’s initialization. This is possible because of theUIActivityItemSourceprotocol and the methods we’ll implement next. - The
completionproperty is assigned to thecompletionWithItemsHandlerproperty of the activity view controller. When it’ll be dismissed, that completion handler will be called and let theShareLinkViewthat we’ll implement next know about that event.
Finally, time for the UIActivityItemSource methods. The two of them that are required are these:
func activityViewControllerPlaceholderItem(_ activityViewController: UIActivityViewController) -> Any {
    return ""
}

func activityViewController(_ activityViewController: UIActivityViewController, itemForActivityType activityType: UIActivity.ActivityType?) -> Any? {
    return metadata?.originalURL
}
In the first method we can return anything we want as placeholder item before an actual item becomes available. It doesn’t really matter here because the link metadata that we’ll provide will appear instantly, so simply returning an empty string value is enough.
The second method returns the actual data that the activity controller should act upon. Since we’re talking about links, this is the original URL of the link that will be used by any activity chosen in the activity controller.
Lastly, there’s one more method specific for the LinkPresentation framework; it feeds the activity controller with the link metadata object:
func activityViewControllerLinkMetadata(_ activityViewController: UIActivityViewController) -> LPLinkMetadata? {
    return metadata
}
The ActivityController class is ready, so let’s go straight ahead to use it.
The ShareLinkView
Previously in this post we created the LinkView structure, a custom type that was adopting the UIViewRepresentable protocol in order to make it possible to use a UIView object in SwiftUI.
In a quite similar fashion we’re going to create a new custom type to use in SwiftUI called ShareLinkView, but this time instead of adopting the UIViewRepresentable protocol, it will adopt the UIViewControllerRepresentable since it’s a view controller what we need to present.
Right after the closing of the ActivityController class add this:
struct ShareLinkView: UIViewControllerRepresentable {

}
Once again, it’s necessary to specify the view controller type that we’ll return to an associated value of the UIViewControllerRepresentable protocol, and implement two methods; one that will return the actual view controller and one that gets called in order to update the view controller when there are changes in SwiftUI environment.
typealias UIViewControllerType = ActivityController

func makeUIViewController(context: Context) -> ActivityController { }

func updateUIViewController(_ uiViewController: ActivityController, context: Context) { }
See that the above match to what we already met in the LinkView:
typealias UIViewType = LPLinkView

func makeUIView(context: Context) -> LPLinkView { }

func updateUIView(_ uiView: LPLinkView, context: Context) { }
Besides the above, we need to declare the following two properties in the ShareLinkView struct:
var metadata: LPLinkMetadata?
var completion: (() -> Void)
metadata is the metadata object that will be passed to the activity view controller. completion is another completion handler that will notify SwiftUI that the activity view controller has been dismissed.
In the makeUIViewController(context:) method we’ll create a new ActivityController instance and we’ll pass the metadata object:
func makeUIViewController(context: Context) -> ActivityController {
    let activityController = ActivityController()
    activityController.metadata = metadata
}
Then, we’ll deal with the completion handler of the activity controller; we’ll just call the completion property of the ShareLinkView structure to communicate to SwiftUI that the controller has been dismissed:
func makeUIViewController(context: Context) -> ActivityController {
    ...

    activityController.completion = { (activityType, completed, returnedItems, error) in
        self.completion()
    }
}
The completion’s arguments shown above are there just for demonstration; we’re not using them here. See Quick Help in Xcode for details what each parameter value is for.
Since the activityController instance we’re creating here is not loaded from any XIB or storyboard file, it’s necessary to call the loadView() method of the UIViewController class; this will trigger the user interface to be presented and the viewDidAppear(_:) we implemented earlier to be called in order to create the activity view controller:
func makeUIViewController(context: Context) -> ActivityController {
    ...

    activityController.loadView()
}
Finally, we must return the activityController instance:
func makeUIViewController(context: Context) -> ActivityController {
    ...

    return activityController
}
Regarding the updateUIViewController(_:context:) method, we’ll leave it empty; there’s nothing we really need to do with it.
Here’s the ShareLinkView structure complete:
struct ShareLinkView: UIViewControllerRepresentable {
    typealias UIViewControllerType = ActivityController

    var metadata: LPLinkMetadata?
    var completion: (() -> Void)

    func makeUIViewController(context: Context) -> ActivityController {
        let activityController = ActivityController()
        activityController.metadata = metadata
        activityController.completion = { (activityType, completed, returnedItems, error) in
            self.completion()
        }
        activityController.loadView()
        return activityController
    }

    func updateUIViewController(_ uiViewController: ActivityController, context: Context) {

    }
}
Using The ShareLinkView
Now that all the preparation has been done, we can go ahead and present the activity view controller passing the existing metadata of a link. Open the LinksListView.swift file, and declare the following property in the LinksListView structure that will keep the Link object matching to any selected link:
@State private var linkToShare: Link?Now, in the action handler closure of the button inside the list control, add the following:
Button(action: {
    // Add this...
    self.linkToShare = link
}) {
    ...
}
It’s finally time to show the ShareLinkView which will actually present the ActivityController which in turn will present the activity view controller.
We’ll be presenting a new instance of the ShareLinkView every time there’s a link to share, or in other words the linkToShare property is not nil. Inside the body implementation of the LinksListView, find the EmptyView() declaration right after the list and delete it. Add this instead:
if linkToShare != nil {
    ShareLinkView(metadata: linkToShare!.metadata, completion: {
        self.linkToShare = nil
    })
        .frame(width: 0, height: 0)
}
By tapping on any item in the list the state of the linkToShare is changed and SwiftUI updates the UI because of that. While initializing a new instance of the ShareLinkView we pass the metadata of the selected Link object, and in the completion handler’s closure we make linkToShare nil again; this will force SwiftUI to hide the ShareLinkView view.
Also notice that we specify a zero frame using the frame modifier. This is done in order to avoid displaying the empty view of our custom ActivityController view controller; we just need the activity view controller to appear. Feel free to comment it out and see the effect of that modifier.
Run the app now and tap on any item in the list, but not on a link view itself. You’ll see that the activity view controller is presented properly and there is no waiting time until link metadata to be displayed on it.
If you tap or long press on the link view, you’ll see that the previous default behaviour is still there. There will be times where that behaviour will be meaningful and useful, and times where we won’t actually need it. This is one of them; we want to present the activity view controller when tapping on a list item and avoid the confusion when tapping on a link view.
So, let’s disable it, and in order to do that add the following modifier right after the initialization of the LinkView object:
LinkView(metadata: link.metadata)
    .disabled(true)
Note that it’s relatively easy to implement the rest of the missing functionalities in case you need to disable link view’s interaction in your apps, such as copying or opening the URL of the link.
Conclusion
In my opinion, LinkPresentation framework is something that was missing for years from the iOS and macOS SDK. It makes it super easy and fast to present rich links inside apps and actually in a way that’s quite familiar to users.
If you’re working with UIKit (or AppKit on macOS), it might be a bit more straightforward to deal with what LinkPresentation framework provides. However, as you’ve seen in this tutorial, it’s not difficult at all to use it with SwiftUI as well, and on top of that we implemented solutions that bring UIKit parts to SwiftUI environment. Just see how we implemented the LinkView and ShareLinkView structures.
In overall, working with LinkPresentation framework does not hide any hard task, and on the contrary, it’s a pleasure implementing around it. I hope you found this post useful. Thanks for reading!
For the full demo project, please download it on GitHub.


